Table of Contents
![]() About the Author
About the Author
![]() Related Posts
Related Posts
Zipping files is essential for Mac users and has several advantages. One major value it provides is the reduced file size, which permits more efficient storage and faster data transfer. Zipping is especially useful when transferring many files or folders since it simplifies the process and reduces overall file size for more efficient transmission.
Furthermore, compressed files save disk space, making them an essential tool for organizing and managing data on your Mac. As we go through this article, we will look at numerous techniques of how to zip files on Mac, from the basics to more complex Terminal commands, to ensure you thoroughly grasp file compression on your Mac.
How to Zip a File on Mac
Before we get started on mastering the art of zipping files on your Mac, let's go over the fundamentals. Zipping a single file on your Mac not only improves storage efficiency but also facilitates file sharing. In this section, we'll walk you through the simple stages, illustrated by detailed images, so you can simply follow along. To zip a single file on Mac, follow these steps:
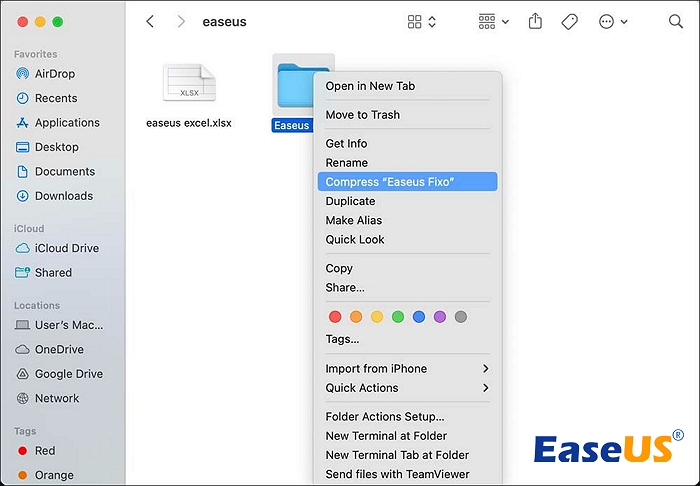
Step 1. Begin by opening "Finder" and identifying the file you want to zip. You may compress any document, picture, or folder for storage or sharing.
Step 2. Right-click (or Control-click) on the specified file. This menu includes several settings for the chosen file.
Step 3. To start the zipping process, click "Compress [File Name]."
Step 4. Your Mac will generate a compressed (.zip) version of the file. The time needed to compress a file is determined by its size.
Step 5. When the procedure is finished, you'll find the freshly produced zip file in the same folder as the original.
Feel free to share this effective strategy on social media to assist your colleagues in simplifying their Mac file management!
How to Zip Files and Folders on Mac
Zipping many files and folders on your Mac is simple and may greatly improve organization and sharing efficiency. In this part, we'll walk you through how to zip files and folders on Mac:
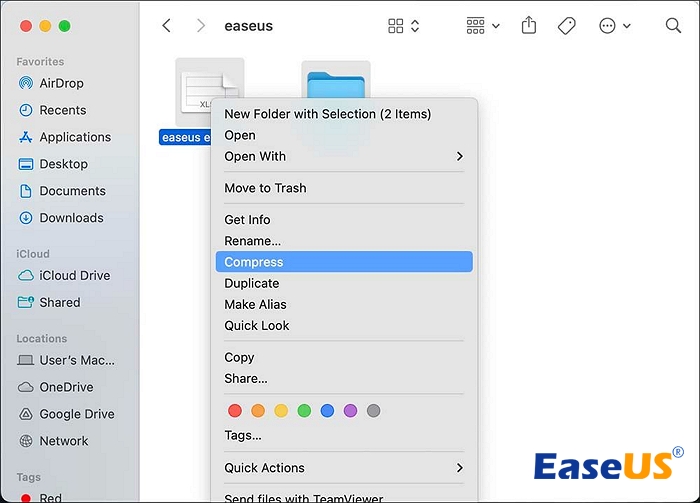
Step 1. Open the folder with the files or folders you want to compress.
Step 2. Choose files to include in the compressed file. Shift-click to choose a range of files, or Command-click to select objects not nearby.
Step 3. Click the "Compress" option in the contextual menu and click on it. This operation starts the compression process for the specified files and directories.
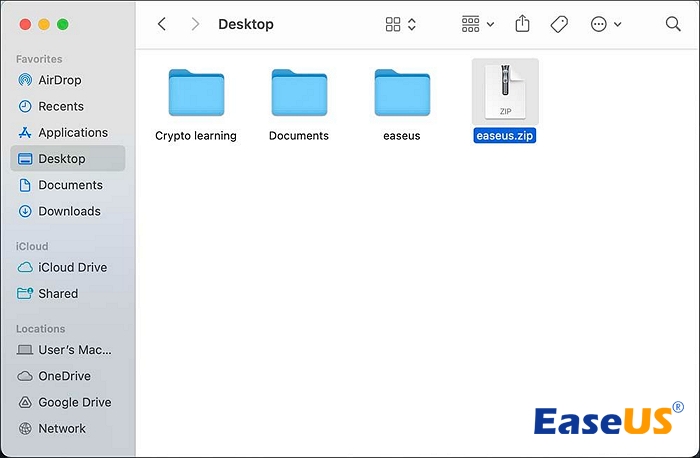
Step 4. When the compression is finished, you'll find the freshly produced zip file called "Archive.zip" in the same folder as the original stuff. This zip file includes all of the specified items in compressed format.
If you are unable to expand Zip files on Mac, move to the last part to repair Zip files on Mac with EaseUS Fixo Document Repair.
How to Zip Files on macOS with Terminal
Unlocking the potential of Terminal on macOS enables a more hands-on approach to file compression. Before getting into Terminal, it's important to understand that file compression and extraction are handled by two separate commands. The program 'zip' compresses data into an archive, while 'unzip' extracts the contents of an archive.
Let's find out how to zip files on MacOS via Terminal:
Step 1. Open "Terminal" on your Mac and utilize cd commands to find the folder or file that you wish to convert into a Zip.
Step 2. To compress files or folders on macOS using Terminal, use the commands below:
- 1. To zip a file, use the command zip archive.zip file.
- 2. To zip a folder, use the command zip -r archive.zip folder/.
These instructions allow users to compress and arrange files effectively right from the Terminal interface.
How to Unzip a File on Mac
Unzipping files on a Mac is a simple operation, whether you obtained a Zip file from the internet or compressed them yourself. Here's a step-by-step instruction:
Step 1. Open the Finder app and go to the zip file you wish to unpack.
Step 2. Double-click the Zip file to unzip and open the Zip files on Mac in the same place.
Step 3. If it were a single file, it would be restored to its former condition, with the name preserved. If a folder or Zip file has several items, a new folder with the same name as the archive will emerge, containing all of the decompressed files.
More Mac Zip Files Tips
Imagine damaging or corrupting your Zip files on MacOS while unzipping, copying, or moving them to another place - only you can imagine the despair. EaseUS Fix Document Repair stands out as a formidable application for Mac users looking for complete Zip repair solutions.
This program is quite useful for dealing with corrupted or damaged data caused by various situations. Whether you are experiencing Zip file faults or other document-related issues, EaseUS Fix Document Repair is intended to repair zip files on Mac and restore them to their ideal form. Its user-friendly interface and powerful repair capabilities make it a top option for repairing Mac document difficulties.
It is specifically developed to recover broken or unavailable Zip files, simplifying compression-related concerns. Batch repair lets users restore numerous damaged Zip files at once, improving productivity. Download and repair corrupted Zip files on Mac with this tool now:
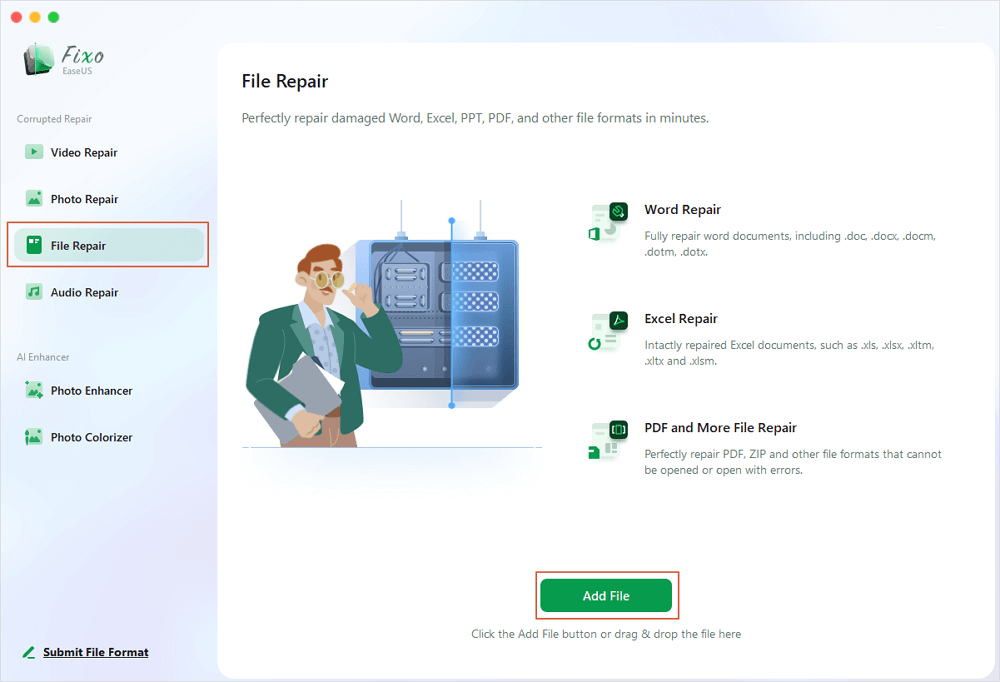
Step 1. Launch Document Repair Software
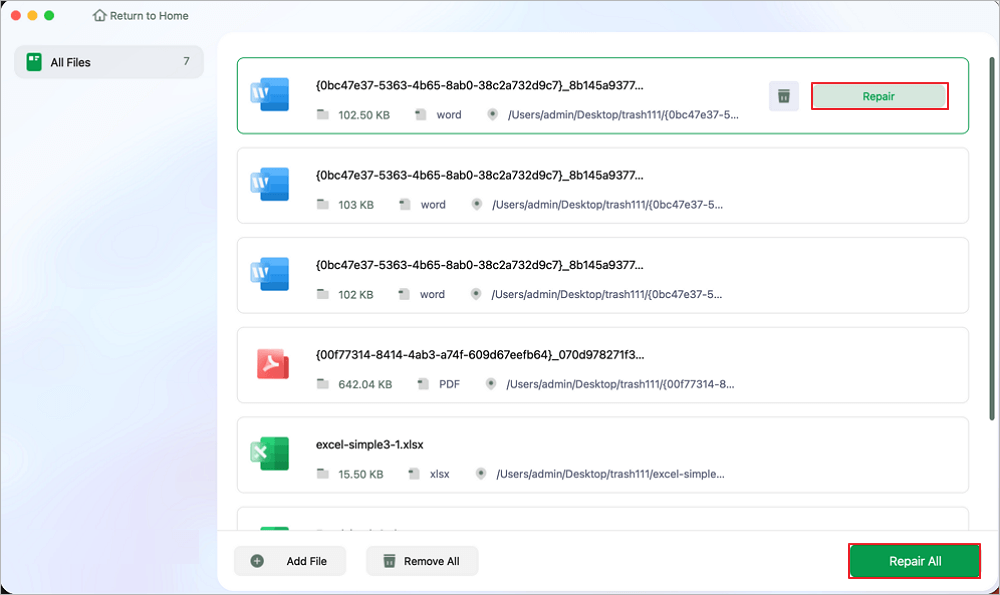
Run EaseUS Fixo Document Repair. Choose "File Repair" on the left panel. This software allows you to repair corrupted Office documents, including Word, Excel, PDF, and others.
Step 2. Choose and Repair Corrupted Document
Click "Repair All" to repair all the documents added. If you want to repair a single document, move the mouse pointer to the target document and click "Repair." To preview the repaired document, click the eye icon.
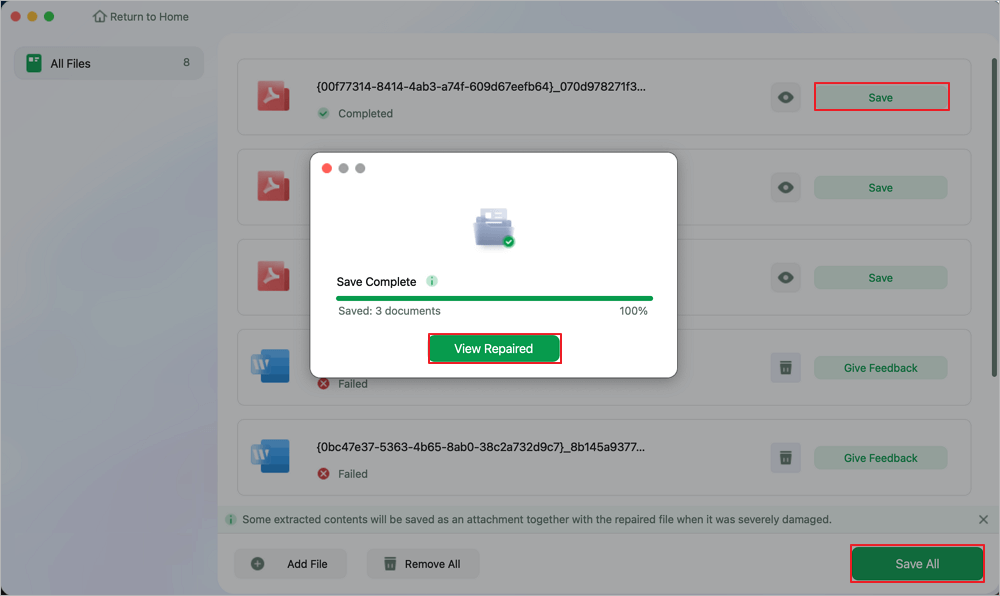
Step 3. Preview and Save the Repaired Document
When the repair process finishes, click "Save" to save a selected document. Also, you can click "Save All" to save all repaired documents. To locate the repaired folder, click "View Repaired".
Explore EaseUS Fix Document Repair's increased features to improve your Mac file management experience. Share this excellent resource on social media to assist other Mac users in easily overcoming document-related issues.
Summary
Mastering the technique of zipping files on the Mac provides users with effective data management capabilities. This article has offered detailed insights into the many accessible strategies, including compressing single files, bundling several directories, and utilizing terminal commands for expert users.
Furthermore, the addition of EaseUS Fix Document Repair provides another degree of usefulness, assuring that even in the event of document corruption or damage, Mac users have a dependable Zip repair solution. Streamline your experience, exchange expertise, and improve your Mac file management skills.
Zip on Mac FAQs
Following are some FAQs that Mac users search for when they need to zip their files on Mac:
1. How do I make a zip file of photos on my Mac?
To make a zip folder of photos on your Mac, you need to open Finder. Find the photos or folders that you want to compress. Right-click on the photos or folder and choose the compress option from the drop-down menu. If you compress a folder or multiple photos, the file will be saved as archive.zip.
2. How do I zip multiple files on my MacBook?
Compressing multiple files and directories is similar to compressing one. Follow the steps below:
- Open the folder with the files to compress.
- Select files for the compressed file.
- Right-click or control-click any item and choose Compress.
- Select numerous things to compress in the Finder drop-down.
- The compressed things are in Archive.zip in the same folder as the originals.
3. Why can't I zip files on the Mac?
There are various reasons why you may have issues while attempting to compress files on your Mac.
- Insufficient disk space.
- Incorrect file permissions.
- Corrupted files.
- System software may be out of date or corrupted.
- Security software interference or third-party antivirus programs
- File Size Limitations.
- Unsupported file formats.
Was This Page Helpful?
About the Author
Dany is an editor of EaseUS who lives and works in Chengdu, China. She focuses on writing articles about data recovery on Mac devices and PCs. She is devoted to improving her writing skills and enriching her professional knowledge. Dany also enjoys reading detective novels in her spare time.