Table of Contents
![]() About the Author
About the Author
![]() Related Posts
Related Posts
Twitch is a prominent game and video streaming network with over 100 million active monthly users and more than 20 million logged-in users every day. The platform also has a record 2+ million streamers. This number could appear low compared to YouTube. Still, it is also crucial to understand that players mainly use the platform to stream their gameplay online.
Twitch Keeps Buffering/Lagging/Stuttering
Nothing is more irritating than lying down and buffering Twitch streams. In particular, when watching your favorite Twitch streaming video. You can also miss some good gameplay as the video gets buffered on Twitch. This can ruin your viewing experience. This post will help you understand why your Twitch Stream buffers and how to effortlessly get rid of them.
Many Twitch users have recently taken the various forums to express problems with lagging and buffering while watching live streams. The problem is not new for Twitch users, and many individuals suffer buffering problems even if their internet works correctly. After our study through the internet, we have identified a few working ways to resolve this problem and stop buffering on Twitch.
Before we get into remedies, let's talk about the issues that first and foremost cause your Twitch feed to buffer. There are various problems like inadequate internet, bad cache files, browser problems, and country-limited content that could prohibit you from seeing the stream. Fortunately, we have come up with eight real and workable solutions.
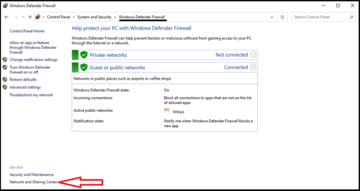
- 1. Check Firewall Settings
- 2. Make Sure a Good Internet Connection
- 3. Disable/Use VPN
- 4. Change Your DNS
- 5. Clear Your Cache
- 6. Change Your Browser
- 7. Close Background Applications
- 8. Disable Hardware Acceleration
8 Ways to Fix Twitch Stream Lagging or Buffering
The reasons behind the Twitch Stream buffering problem are identified. The best working method is straightforward to locate and use. However, suppose you have recently changed your computer or your network. In that case, we advise you to reverse these modifications and see if your problem is resolved.
1 - Check Firewall Settings
Several specific firewalls prevent you from streaming videos. If your device has a firewall, make sure to continue and deactivate the settings. The antivirus in the back can also be one of the problems with videos. You are busy downloading and uploading videos as a streamer; if your antivirus is not disabled, the procedure will be interrupted. There are two ways to fix the situation; you may either disable it or switch to game mode. You can only switch to the game mode in the last antivirus program while the disabled option is present. Choose the right choice for you and proceed.
2 - Make Sure a Good Internet Connection
You should check your internet connection and see whether you can get data. You will do this easily by searching any website such as SpeedTest.net or visiting any other website using your browser. If your Internet connection is poor, we recommend that you upgrade your internet plan to view Twitch streaming or use any third-party services to get Twitch Stream and videos without interruption.

If you're not sure about your internet speed or don't have the internet, try to reset your router and plug it back in after a few minutes.
3 - Disable/Use VPN
The reason that Twitch won't load may also be linked to problems in a certain country or territory. There is a fast fix – just use a VPN. You can choose to install a VPN browser extension or head to a VPN site directly.
Alternatively, if you use a VPN already, this may be a problem with not loading Twitch streams. In such a scenario, you can deactivate your present VPN and check if anything changes.
4 - Change Your DNS
.When you visit a Website, your browser needs to check for the IP address of the domain name, which is done using the DNS or Domain Name System databases. If your ISP cannot quickly discover IP addresses, your browsing experience could be affected. Fortunately, public DNS providers such as Google DNS, Cloudflare DNS, or OPEN DNS are faster and more secure than most ISPs.
It is fairly easy to set up a DNS service from a third party on your computer, and you can do that here:
Step 1. Click the "Control Panel" search bar and type Windows. Click on the first choice.
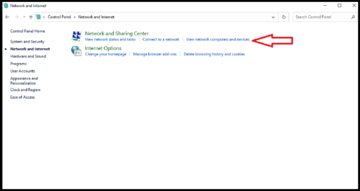
Step 2. Search for and choose the "Network and Internet" option. Click on the "View network status and tasks" button under the Network and Sharing Center on the following screen.
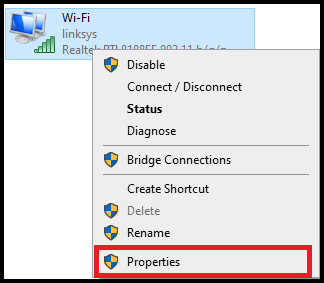
Step 3. Click on the left pane option "Change Adapter Settings." A box containing your network connection name will display on the following screen. Right-click it and select the option "Properties."
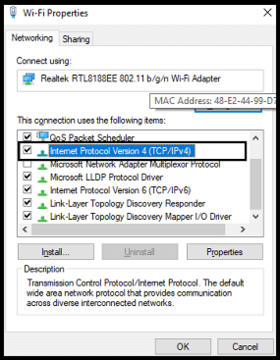
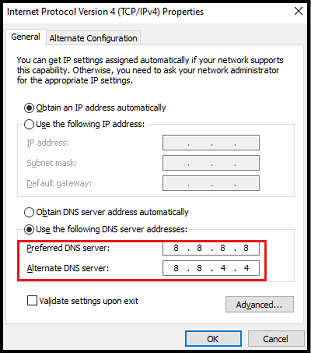
Step 4. Click on the networking tab under wifi Properties, look for "Internet Protocol Version 4", and click on it. Now just under the selection box, click on the Properties option.
Step 5. Click on the "Use the following DNS server addresses" option on the next screen, enter the following DNS server addresses, then click OK.
- DNS Server Preferred - 8.8.8.8
- DNS Server Substitute - 8.8.4.4
Finally, check the Twitch stream and see whether the video buffer problem has been resolved.
5 - Clear Your Cache
Cache files like Pictures, Javascript, and CSS, are saved on your computer locally for quicker access. However, these files may sometimes get corrupted or broken. They may cause many browsing-related problems such as not streaming videos, websites refusing to connect, not loading material etc.
To cure cache-related browsing problems, we must clear the cache files from our computers. Here are the precise steps.
- Click on the three-dot menu symbol and pick your Chrome browser settings.
- Click the "Privacy and Security" option in the left pane on the settings box.
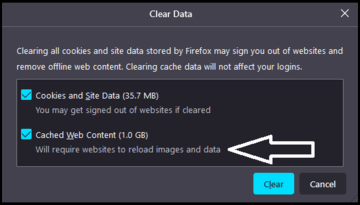
- Click on the "Clear Browsing Data" option under Privacy and Security.
- Choose "Time Range" as always and click on all checkboxes. Clear browsing data for Chrome
- Click the "Clear Data" button and wait to complete the operation. Finally, restart your browser and observe whether or not Twitch buffering is solved.
6 - Change Your Browser
The quickest approach to finding a solution for Twitch's lagging is probably using a different browser. You probably owe it to your browser if your Twitch stops running for unknown reasons or even starts. Updating it is also a remedy to the issue. Still, if you're too lazy to do so, you probably need to transfer to another browser, such as Firefox, or Opera are the best things for you.

7 - Close Background Applications
I guess you'd be rather surprised if you knew how many apps on your computer are presently open and running in the background. A simple place to look If you are on a Mac, your menu bar is right there. How many apps in the menu bar are open?
All those background procedures that are not necessary must be completed. You only need to execute your stream, which should take up valuable memory, CPU, and disc space. You might even have applications like Google Backup and Sync that send big files over your Internet connection and muck up your upload speeds without even being aware of them. Just kill all unnecessary apps, and this might make your stream smoother.
8 - Disable Hardware Acceleration
Twitch delay mostly occurs when you are using Chrome as your primary browser. Chrome is infamous for using a lot of RAMs and so leaving your stream next to nothing. You may immediately resolve this by visiting your Chrome settings and disabling "hardware acceleration".
- Open the Google Chrome browser on your computer with a double click or a search from the Start menu.
- At the upper right of the browser window, click on the three horizontal points. You should read: Google Chrome should be customized and controlled as you float over them. A drop-down menu is opened.
- Click the "Option Settings" at the bottom of the drop-down menu and scroll down to the "Advanced" button on this page. Please make sure that you click on it.
- Scroll down the new page until the System area is reached. Delete the Hardware Acceleration Checkbox next to the input for disabling hardware acceleration in Google Chrome.
- Make sure you restart your browser with Google Chrome, shutting and reopening it.
How to Fix Lagging Videos with EaseUS Fixo Video Repair
Sometimes videos don't play properly due to faulty conversion, video file corruption, inappropriate download, and untrusted sources. These deep-rooted technological faults require video repair tools for video playback correction. There are many tools available to assist you in repairing corrupt videos. EaseUS Fixo Video Repair is one such tool.
It is an all-in-one video and file repair solution. The broken MP4 videos, usually from digital cameras, can also be repaired. The most important features of this product are:
- Repair bulk videos at one time.
- PC, USB, SD card video repair and many more are supported.
- Repair videos, documents, and photos.
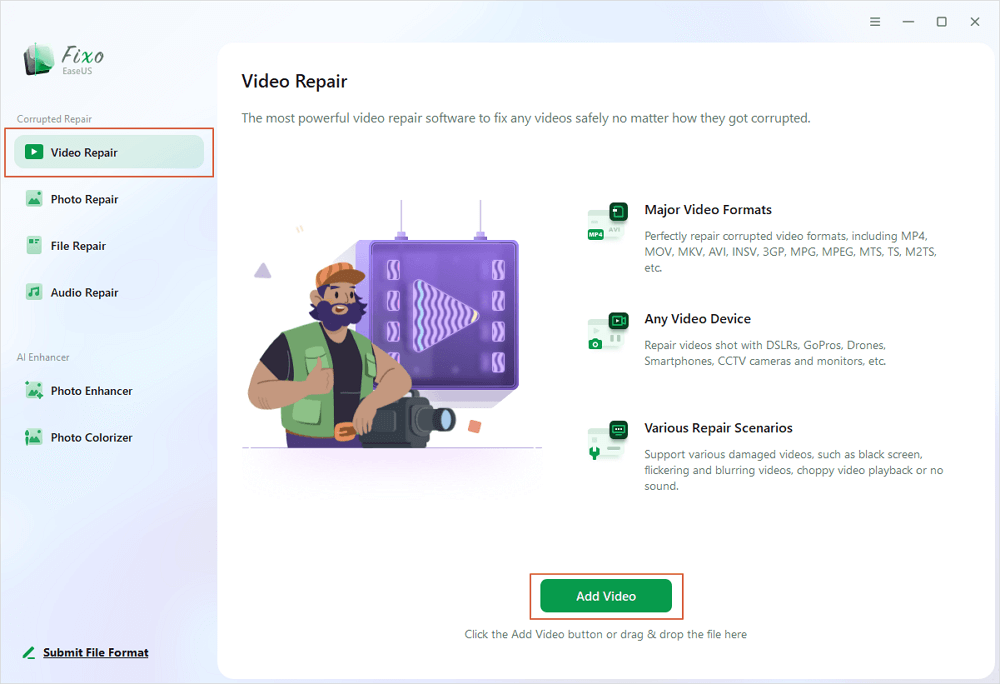
Step 1. Open Fixo on your local PC. Click "Video Repair" and add the corrupted MP4/MOV/AVI/MKV/3GP/FLV/MKV/WMV video files by clicking "Add Videos".
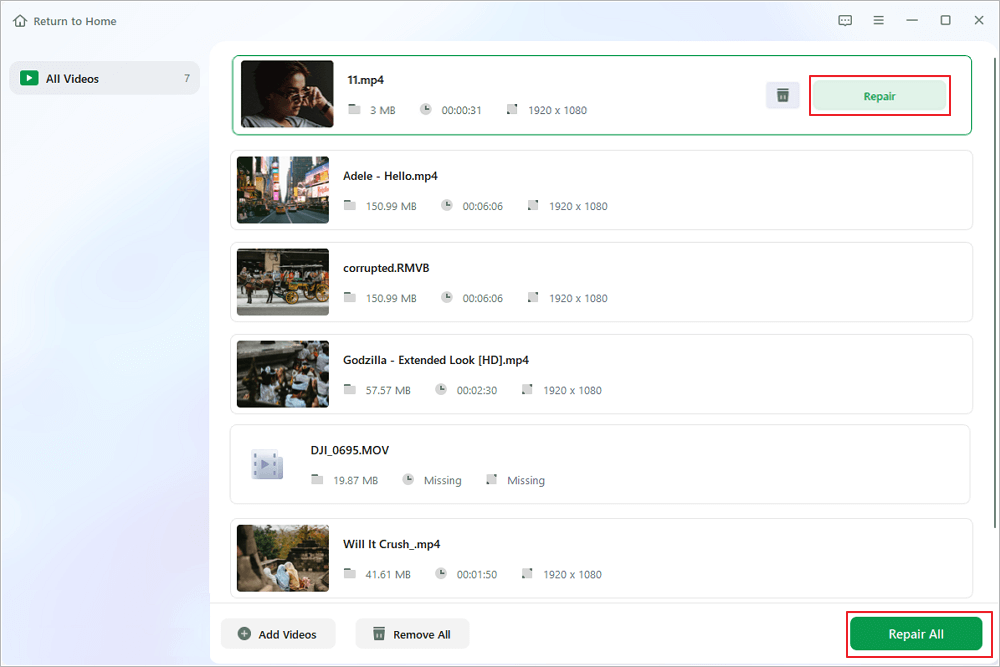
Step 2. Move the pointer to a video and click the "Repair" button to start the single video repairing process. If you want to repair all the videos, click "Repair All".
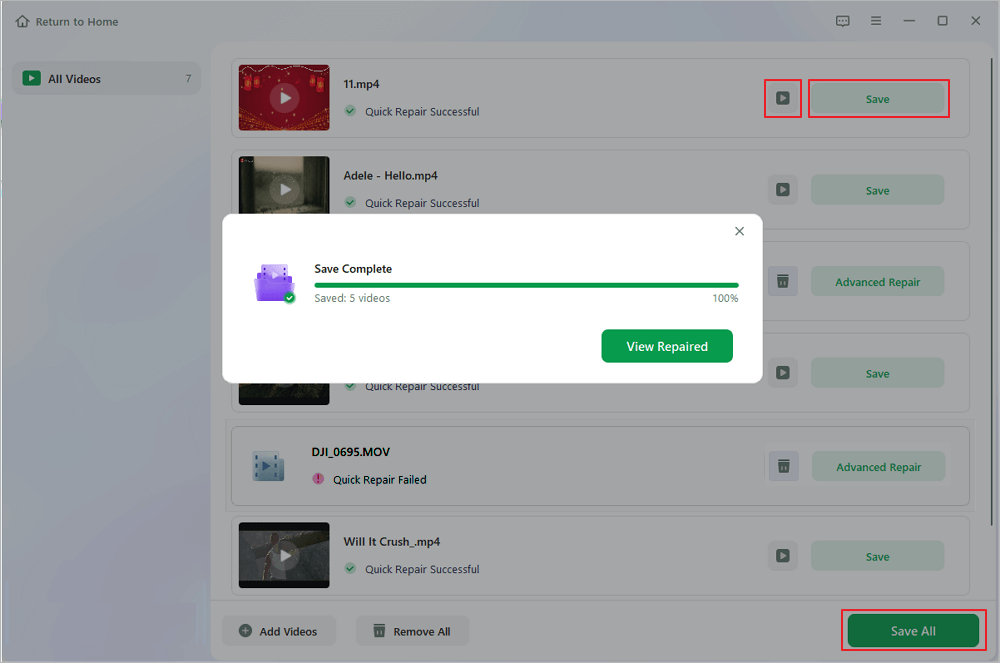
Step 3. Wait a few minutes, and the corrupted videos will be repaired. Click the play icon to preview the videos. You can save a single video by clicking the "Save" button next to the play icon. If you want to save all the repaired videos, choose "Save All".
Step 4. If the quick repair fails, you should utilize the advanced repair mode. Click "Advanced Repair" and add a sample video. Choose "Confirm" to ensure.

Step 5. A list of detailed information on corrupted and sample videos will show up. Click "Repair Now" to start the advanced video repair process. When the repair is complete, you can view the videos and click the "Save" button to save the repaired video files to an appropriate destination.

Conclusion
If your stream is buffering for the first time, and it is not a common issue on your device, you can likely reset or restart your device to stop the Twitch stream buffer. Similarly, if your device has a persistent problem, try the solutions mentioned or swap your device and check if you still have the same problem.
Was This Page Helpful?
About the Author
Brithny is a technology enthusiast, aiming to make readers' tech lives easy and enjoyable. She loves exploring new technologies and writing technical how-to tips. In her spare time, she loves sharing things about her game experience on Facebook or Twitter.