Introduction
The draw of Apple products is extreme to many people due to the various benefits the software offers, like reliable performance, a high-quality UI, and a feature-rich ecosystem. However, despite its uses and a relatively strong data security guarantee, malware and viruses are a concern for many.
For this, Apple's in-built anti-malware system named Xprotectservice is highly valuable in protecting macOS devices and has robust antivirus protocols in place. The updates occur consistently, defending against old and new virus threats accurately. Read ahead to know more details.
What Is Xprotectservice
Yes, the Xprotectservice is a built-in capable utility in Mac devices against viruses and software, but there is more to it than basic antivirus capabilities.
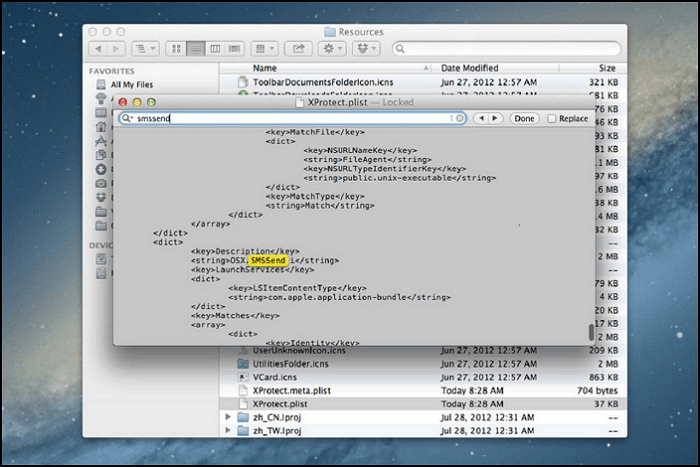
The feature primarily focuses on malware removal and signature-based detection. The latter utilizes YARA signatures and is updated consistently. It monitors any new malware strains that affect the device and automatically update signatures besides the system updates, which are manual-based. It instantly analyses any known malware and stops it from executing.
Notable Features:
Signature-based evaluation of new malware strains- On macOS 10.15 and later devices, the service starts working right after you launch a new app, update one in the file system, or the Xprotect signatures change. The software gets automatically blocked when there is a sign of malware, and the users get an instant notification.
Infection remediation- The Xprotectservice feature also comes with a built-in engine that remediates any infections after system and security updates. It periodically evaluates the system for new malware infections but will not reboot your macOS device.
Instant notifications after third-party installation- The software checks the files you download and will provide a warning prompt in case you download any app from file-quarantine-aware platforms, like Mail, Chrome, Safari, or iChat. The warning alerts users on the downloading details, from the website it was downloaded, and the time.
How to Run Xprotectservice
Now that you know what functions the Xprotect software handles let's discuss how to run the technology. You have to follow certain steps to enable the software updates regularly.
Step 1. Go to the Apple menu and choose "System Preferences".
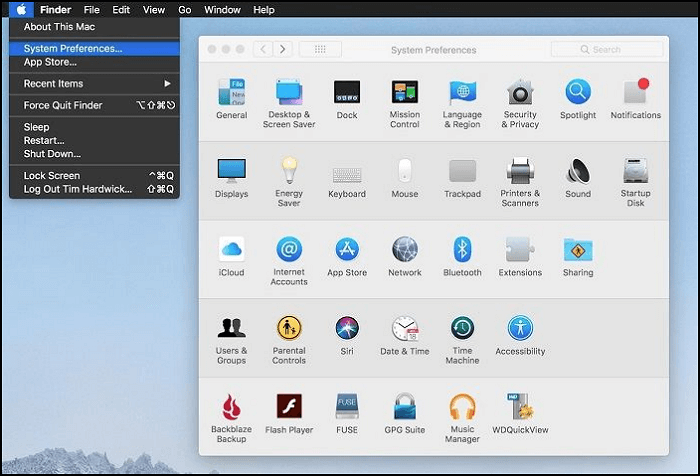
Step 2. Open App Store from the System Preferences menu. The settings will appear for the controls.

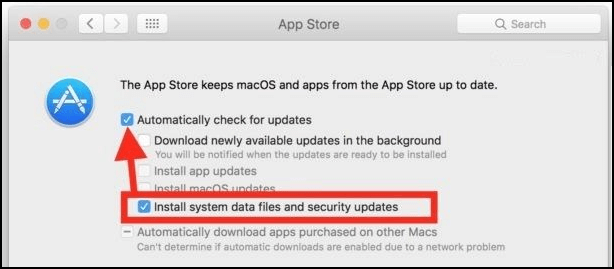
Step 3. Enable the check marks for "Install system data files and security updates" and "Automatically check for updates" to automate Xprotectservice to run consistently.
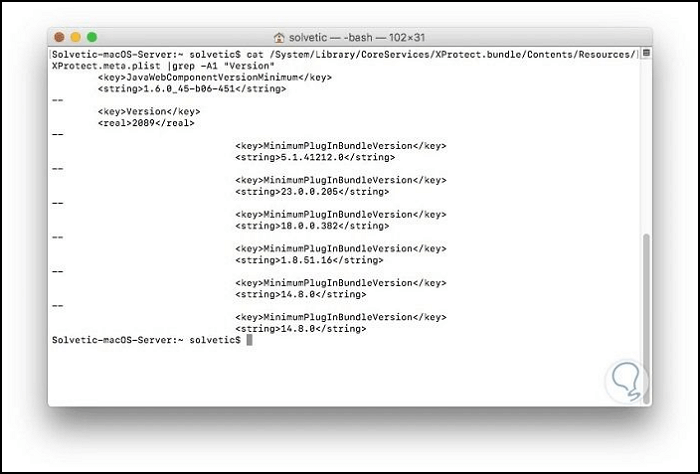
Step 4. The software automatically checks for newly updated malware in the Apple-approved malware blocklist. The command for this:
cat /System/Library/CoreServices/XProtect.bundle/Contents/Resources/XProtect.plist
So, if you want to check a specific one, like "A1 Version" for a particular version like OSX.Dok. B, you can run the following command:
cat /System/Library/CoreServices/XProtect.bundle/Contents/Resources/XProtect.plist |grep -A1 "Version", or,
cat /System/Library/CoreServices/XProtect.bundle/Contents/Resources/XProtect.plist |grep -A1 "OSX.Dok.B"
If there is a match, it will appear after you press "Enter".
How to Turn Off Xprotectservice
You can take the steps for automatic updates for Xprotectservice as mentioned in Part 3. Still, after upgrading to a new macOS version, like macOS Catalina from macOS High Sierra, you will have the latest Xcode compilation. This can slow your system when git checkout for multiple app files in the Xprotect.plist.
Here, you can deactivate the software on your device by disabling it in Recovery Mode. However, this stops the complete System Integrity Protection (SIP) functionality. You can do this for a tempera period and then re-activate it soon. Otherwise, your device will be susceptible to various malicious codes and cannot protect itself.
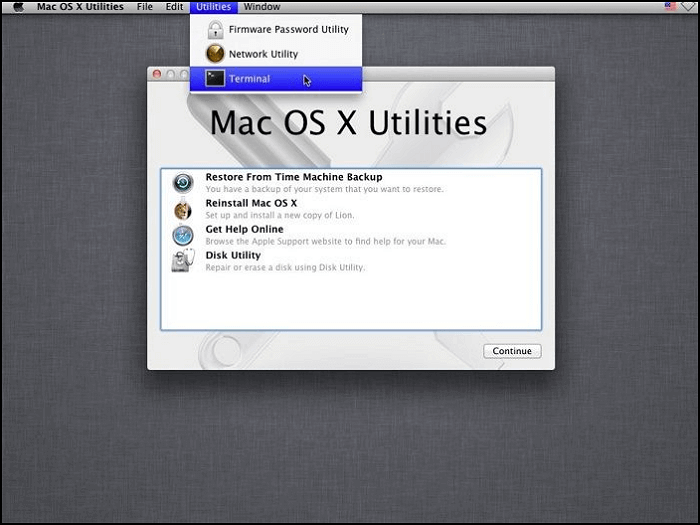
Step 1. Restart your macOS device in Recovery Mode by holding down the "Options + Command + R" keys. Wait for the boot chime.
Step 2. Go to "Utilities" > "Terminal".
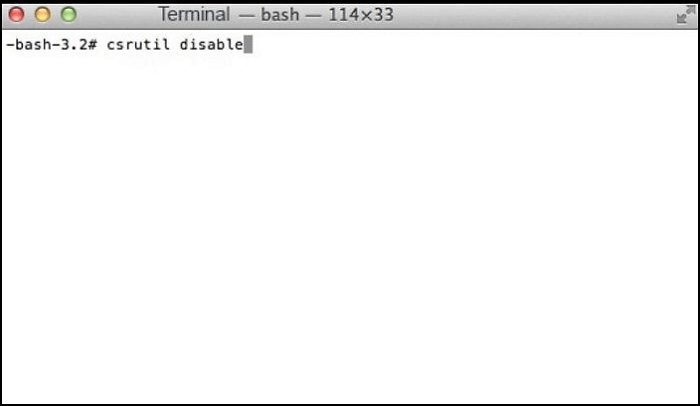
Step 3. Run the following command and then restart the device:
csrutil disable
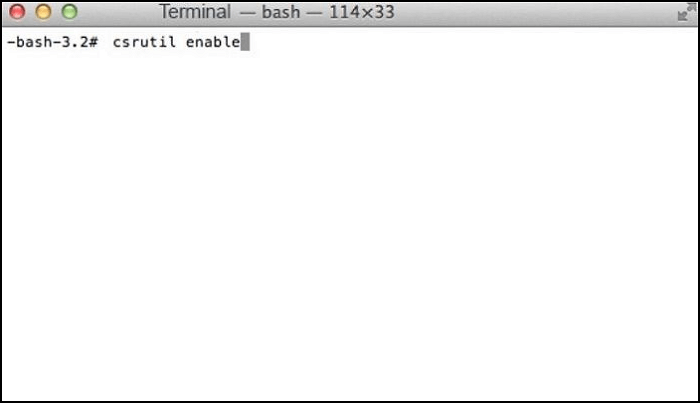
Step 4. Follow the same steps 1-3 to enable the SIP functionality. But instead of the disable command, add this:
csrutil enable
Step 5. Restart your Mac.
Fix "Xprotectservice Mac High CPU" Error
With the previous command, you can deactivate the Xprotectservice feature on your device due to its heavy database lagging the Mac computer. However, you can also fix the Xprotectservice Mac High CPU issue with specific solutions instead of directly disabling the software.
- Solution 1. Go to Activity Monitor for CPU Status
- Solution 2. Deactivate Third-party Extensions or Multiple Active Apps
- Solution 3. Disable Third-party Apps
- Solution 4. Fix the Issue via SMC/NVRAM/PRAM Reset after OS Updates
- Solution 5. Get the Database in PDF Format
Solution 1. Go to Activity Monitor for CPU Status
Sometimes, the system runs slowly even with no active app and starts just after switching the device on. There is no apparent cause for the issue you can go to the Activity Monitor > CPU, and see the status on all apps.
See if any app is running in the background without you launching them. Click on the "X icon" beside the ones you want to disable. If you see the "kernel_task" running in the background, do not terminate it even though it uses many resources. It is a vital part of the OS, and terminating it this way can cause system issues.
Solution 2. Deactivate Third-party Extensions or Multiple Active Apps
If your system's fan is generating more heat and noise while the system is running slowly, you can deactivate the multiple apps or any attached third-party software. These typically cause this issue. Follow the steps in Solution 1 to terminate the app functions. If the fan is defective, you should hire a hardware specialist to handle it or replace it.
Solution 3. Disable Third-party Apps
Due to incompatibility with some third-party apps, the CPU can show issues like slow performance. Uninstall them through the Activity Monitor.
Solution 4. Fix the Issue via SMC/NVRAM/PRAM Reset after OS Updates
A recent OS update can cause some system-centric issues sometimes as the new updates bring with them new extensions and security changes. You can reset the SMC by shutting the device and detaching the device power cord for 20 seconds. Then, attach it again and hold the "Shift + Option + Control + Power" buttons for 10 seconds together. Release them and restart the device.
Alternatively, you reset the NVRAM/PRAM feature by restarting your Mac computer and pressing down "Option + Command + P + R keys" after the startup chime. Wait for the device to restart.
Solution 5. Get the Database in PDF Format
You can download and install the PDFelement software on your macOS device and use the OCR functionality to detect the Xprotectservice device and save the data in a transferable file format. You can also create e-Signatures, edit the PDF files, and save them in another location after sharing. So, you can free your device from the files that are lagging the device down.
Conclusion
Xprotectservice is a capable software for Mac devices to protect them from malware as it analyses all recognized virus strains before they affect the device. Run it accurately and take preventive measures during system updates to rectify the slow CPU condition.
FAQs
Users still have some doubts regarding specific concepts and details related to Xprotectservice. Here are some of the commonly asked questions, all answered.
1. Does Apple have a virus scan?
The Apple devices have a built-in virus scan in the form of Xprotect, which checks for any malware signatures that match the regularly updated Apple database for malware strains. Another tool named Malware Removal Tool or MRT is also available that automatically deletes the malware from the system and then checks again for infections during login/restart.
2. What is Notarisation concerning the File Quarantine system (Xprotect)?
For scanning viruses, the Notarisation process is closely linked with Xprotect to check the newly installed apps. The in-built macOS feature, Gatekeeper, also stops users from launching any app that did not go through the Notarisation screen process.
3. Do all Mac devices come with Xprotectservice?
The Xprotect technology was launched in 2009 and was initially available on the macOS X 10.6 Snow Leopard version. All macOS devices and versions since then have this in-built feature.
Was This Page Helpful?
Daisy is the Senior editor of the writing team for EaseUS. She has been working at EaseUS for over ten years, starting as a technical writer and moving on to being a team leader of the content group. As a professional author for over ten years, she writes a lot to help people overcome their tech troubles.
Written by Tracy King
Tracy became a member of the EaseUS content team in 2013. Being a technical writer for over 10 years, she is enthusiastic about sharing tips to assist readers in resolving complex issues in disk management, file transfer, PC & Mac performance optimization, etc., like an expert.
Related Articles
-
Breaking Records: New 100TB SSD Sets a New Standard for Data Storage
 Roxanne/2024-11-27
 -
USB Read/Write Speed: All You Need to Know
 Cici/2024-07-19
 -
How to Export Kindle Highlights, Notes and Bookmarks
 Daisy/2024-01-11
 -
Full Backup Advantages and Disadvantages [2024 Review]
 Rel/2024-10-25
