How about playing Minecraft online, confined to your squad and not outsiders? Well, you guessed that right! We are talking about creating a Minecraft server. Thus, you can choose who will play with you online. Setting up a separate server would relieve you even if you are a parent concerned about your younger one's gaming and security. It will keep your little one safe from strangers. At the same time, it does require some hardware, and the cost incurred increases, but it is worth it. You can even set up your Server free by hosting it on Aternos. If you are looking for how to Make a Minecraft Server in 2022, then we have covered you all!
How to Add A Server to Minecraft
Adding and setting your Server on Minecraft for gaming is fun. There are several methods meant for this purpose. You would think of buying some memory on an external server and configuring the Server for yourself. Some of you would use your PC to add a server. While you can set up a server in Minecraft Pocket Editing using
How to Make A Public Server in Minecraft
Making a Public Server in Java is not a rocket-science if you implement everything carefully.
Follow the steps given below to make a public server in Minecraft:
Step 1: Update Java and Setup Minecraft Server Files
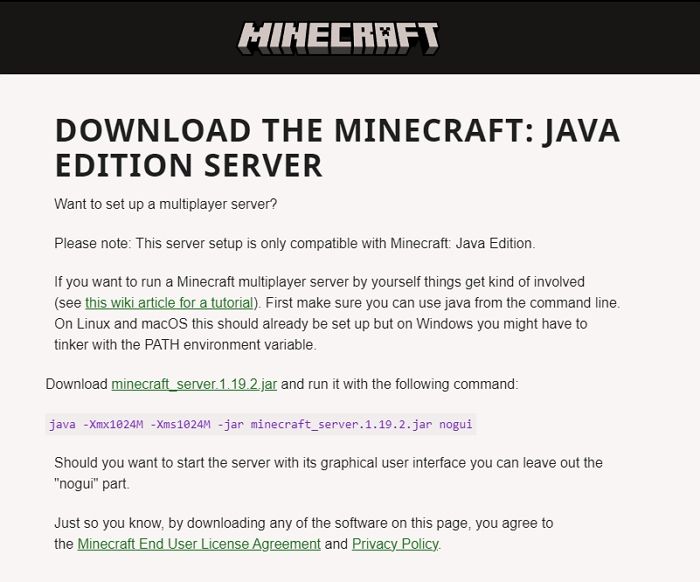
Minecraft is made using the Java programming language. Therefore, you should update Java to the latest version for setting up a server. Further, to set up Java server files, you will have to fetch them.
Here is how you can do it without paying a dime:
![Download Minecraft Java Edition]()
- Head over to Minecraft Server Downloads
- Navigate to and download the file minecraft_server.1.11.jar or server.jar
- Now create a new folder named Minecraft Server and copy the .jar file into it
- Now double-click the Minecraft jar file to run the server file
Note: If the JAR file you downloaded is named server.jar, make sure to use server.jar instead of minecraft_server.1.11.jar throughout the setup.
To run the server file accurately for setting up a server, follow the next step!
Step 2: Run the Server by Saving it as a Batch File
While saving a file in Notepad, you can add an extension and set the file type. Every file saved on Notepad default has a .txt extension, while Batch files have a .bat extension. Therefore, you should remove the TXT extension while keeping it as a Batch File.
Here's how you can save it as a Batch File and run the Server
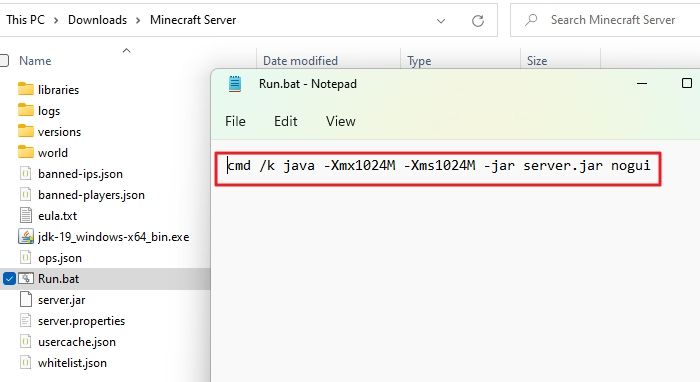
- Go inside the Minecraft Server folder
- Right-click, navigate to New and choose text document
- Tap on New and create a Text Document named Run
- Input the following statement
cmd /k java -Xmx1024M -Xms1024M -jar server.jar nogui
- Now, name the file Run.bat and set the Save As Type to All Files.
![Setup Minecraft]()
To use it, you will have to agree with its license agreements.
Step 3: Edit EULA
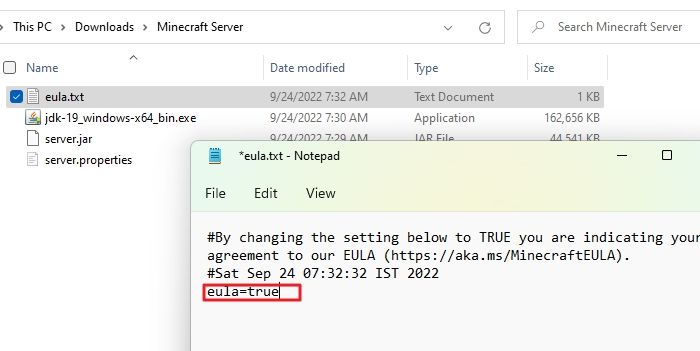
While you run any Minecraft Server, it presents you with a license agreement. You cannot run the Server without agreeing with the same. But you will not get a checkbox or button to agree; instead, you have to edit the EULA file with a .txt extension.
Here's how you can edit and agree to the EULA agreement:
![Edit EULA]()
- Open eula.txt file
- Modify eula=false to eula=true
Finally, run the BAT file to set up the Server on your PC.
Step 4: Launch your Server
To launch your Minecraft server, you can Double-click on Server.jar.
![Run Minecraft Server]()
Step 5: Join your Minecraft Server
To play using your created Server, you should connect with it! Follow the steps given below to join your Minecraft Server:
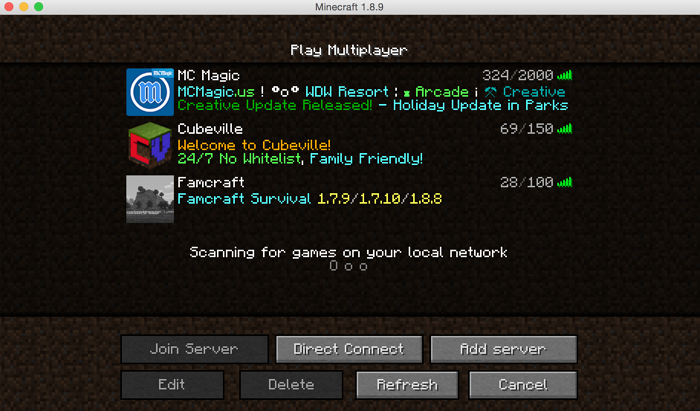
- Open Minecraft and select Multiplayer from the main menu. Next, tap on the Add Server button.
![Add Server to Minecraft]()
- In the Server Name, add your server name and enter localhost in the Server Address section.
- Press the Done button, and select your Server from the given list. Then, press the Join Server again.
You will not have to modify your Router Settings, allowing users to interact with your server computer. However, afterward, you have to forward ports.
Step 6: Check out your External IP
After forwarding the ports, for further ado, you will have to check what is your external IP address and note it down.!
Follow the steps given below to find your external IP:
- Visit www.google.com on your web browser
- In the search box, input external IP and search for it
The search engine will display your iPv4 or IPv6 Address, whichever you have. You should note down your External IP address carefully. Any player who wants to connect on your Server needs your External IP Address to communicate with yours.
Step 7: Connect with your Minecraft Server
It is now essential for you to connect your Minecraft server to the game.
Here's how you can do It!
- Open Minecraft, navigate to the main menu, and go to Multiple
- Press the Add Server button
- Enter your Server Name and Address in the desired fields
An IP address is longer in size. However, if you use iPv6-type, add square brackets at the beginning and end while inputting them.
- Hit the Done button, and Minecraft will now prepare to connect
- Then, choose your Server and tap on Join Server
Similarly, others can use your IP Address details to connect with your Server. For safety and security, you should send your External IP to the ones you are familiar with. Thus, only the ones you know will join your server computer.
To set preferred preferences on Minecraft, you must configure its settings.
Step 8: Configure Game Settings on your Server
The step is not necessary. However, it is a must-check out if you want to add customizations to your Server!
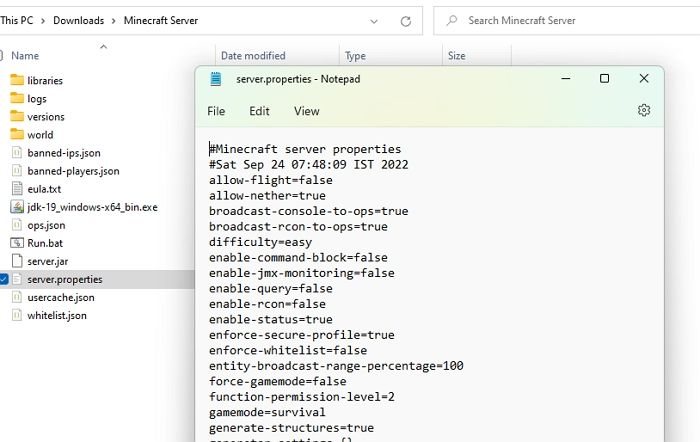
![Configure Game Settings in Minecraft]()
Follow the steps given below to configure your Server Settings:
- Open server.properties File using a text editor like VS Code or Notepad
- Change gamemode=0 to gamemode=1 for a creative mood
You can now modify whichever settings you like. But it would help if you knew how to change them in text editors. You should make sure and never edit the Server Editors file.
How to Make Your Own Minecraft PE Server for Free
Making a Public Server is easy peasy. But you would often think of creating a personal server for your squad's space without spending a penny!
Follow the steps given below to make your own Minecraft PE Server for Free:
Step 1: Open your web browser and visit https://aternos.org/go on it. Make sure to signup.
![Create Minecraft Server]()
Step 2: Press the blue button that says Create your Server. Input a suitable username you want for yourself in the Server. Press the Agree button and click on the X checkbox.
Step 3: Tap the Next button, and another window pops up. Enter the email addresses of people you want to allow to access the Server. Also, please set a password for their access.
![Setup Minecraft Server]()
Step 4: Press the Signup button Now, your Aternos Dashboard will open!
Step 5: Navigate to Software from the left pane.
Step 6: On the page's right side, click on Win10 / MCPE and tap on Reinstall
Step 7: Press the Yes, Reinstall button and proceed with your action. Thus, Aternos Server will install PocketMine's add-on it.
Step 8: Go to Server on the left pane and hit the green-colored Start button.
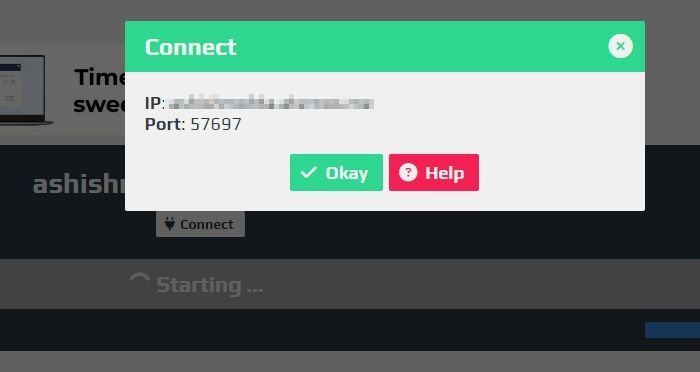
Step 9: Click on the Press button with power with a plug-shaped icon.
You will now see a pop-up on your monitor that shows your server details, including Server Name, Address, and port number. Note down both of them carefully.
![Server Details]()
Step 10: Now, head to Minecraft PE And click on Play.
Step 11: Navigate to the Servers tab and select Add Server.
Step 12: Enter the Server's name, Address, and Port number in their respective fields
Step 13: You are set for the game, so click on Play.
Hurrah! You have now set up a personal Minecraft Server for Free.
Why you Should Consider a Paid Minecraft Server Hosting Option?
While free hosting services like Aternos are great for casual play, they come with limitations such as wait times, lower performance, and fewer customization options. If you want a smoother, lag-free experience, especially for multiplayer sessions with mods or plugins, a paid hosting is a worthy investment.
With a premium hosting provider like Hostinger, you gain access to better hardware, higher uptime, and greater control over your server settings. This means you can install custom mods, tweak performance settings, and ensure a better gaming experience without the interruptions often found in free services. Plus, many paid services offer enhanced security features like DDoS protection, which is crucial when hosting a public Minecraft server.
Whether you’re building a private world for friends or launching a larger multiplayer community, investing in a reliable hosting service ensures you can focus on the game without worrying about lag, crashes, or unexpected downtime.
The Conclusion
After many searches, you would have got the answer to "how to Make a Minecraft Server in 2022!" You can buy space on an external server and configure it there. While using Minecraft Pocket Edition and Aternos hosting service, you can create a server for free! The methods include forming a server, running the files, launching it, noting the details, and adding them to the Minecraft game. So, what are you waiting for? Share the details with your squad and have some fun!