Windows provides built-in antivirus protection for Windows users, called Windows Defender or Windows Security on Windows 10 and 11. Window Defender can help safeguard your computer from viruses, malware, and other threats. Windows Defender is automatically enabled on your computer. If you disable Windows Defender, you need to allow the protection to be done manually.
Recommendation: If you're interested in other antivirus software, we recommend TotalAV, a real-time protection software application for computer protection.
 TOTALAV
TotalAV is an Award Winning Antivirus and Security Software. It Provides Real-Time Protection from Viruses, Malware & Online Threats.
Antivirus Protection Enabled
This article explains how to enable Windows Defender to comply with your company's antivirus policies and fix accessibility issues.
What Is Windows Defender
A software program called Windows Defender protects your personal computer from viruses or other threats. An anti-spyware tool was created to prevent unauthorized access and shield Windows systems from malicious malware. Since the release of the Windows Vista installation bundle, Microsoft Security Essentials has been available for free download. Microsoft AntiSpyware was the previous name for Windows Defender. Microsoft Defender Antivirus is the leading antivirus program on the device in active mode. Risks are remedied, files are checked, and threats are listed in the Windows Defender.
How to Enable Windows Defender [With Steps]
Windows Defender is a free tool with the Windows 8/10/11 operating system that aids in defending your computer against security threats such as viruses, spyware, and malware. It is a feature of Microsoft Windows' anti-malware program. In contrast to other antivirus programs from third parties, Windows Defender doesn't need to be downloaded and installed separately. Windows Security, Microsoft Defender, Windows Defender Antivirus, or Microsoft Defender Antivirus are additional names for Windows Defender. Let's take a look at the methods one by one. They are:
1. Enable Windows Defender on Windows 11
2. Turn on Windows Defender on Windows 10
3. Turn on Windows Defender on Windows 8
1. Enable Windows Defender on Windows 11
Most of Windows 11's settings are in one place. Users may configure systems, add new users, and update Windows from the System Settings pane. If Microsoft Defender is turned off, then to enable Windows Defender steps to do so are listed below:
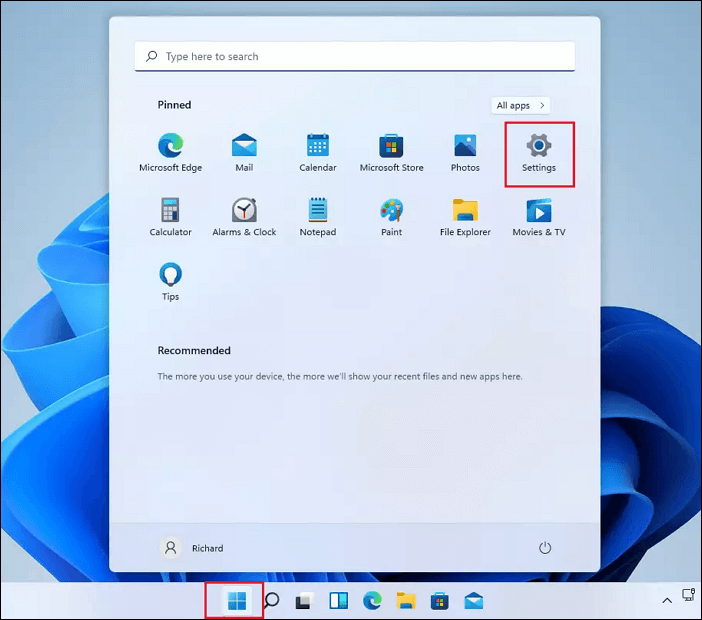
Step 1. To get to System Settings, click on "Start" and then click on "Settings."
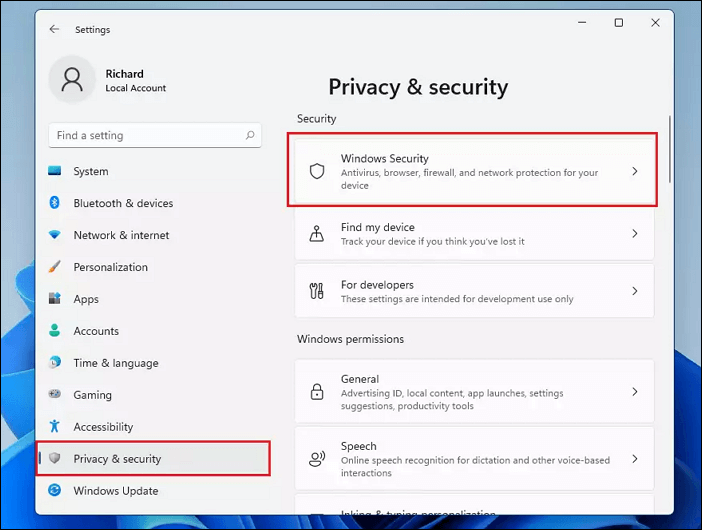
Step 2. In Windows Settings, click "Privacy & Security" and select "Windows Security" on the right pane of your screen.
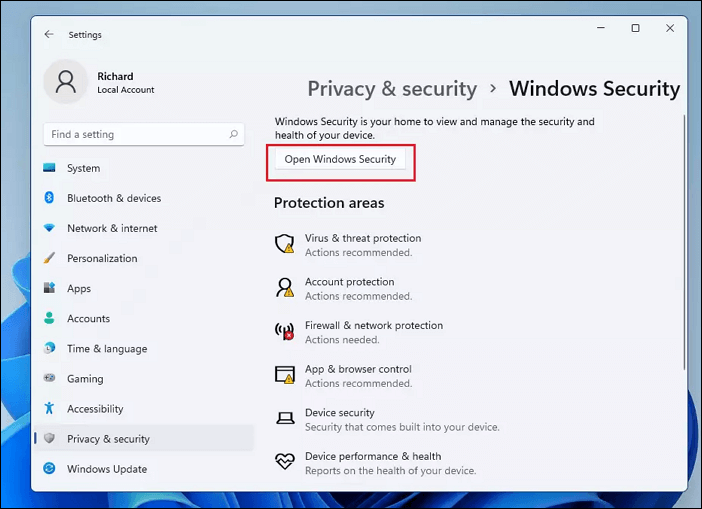
Step 3. On the Windows Security setting pane, click the "Open Windows Security" button as highlighted below.
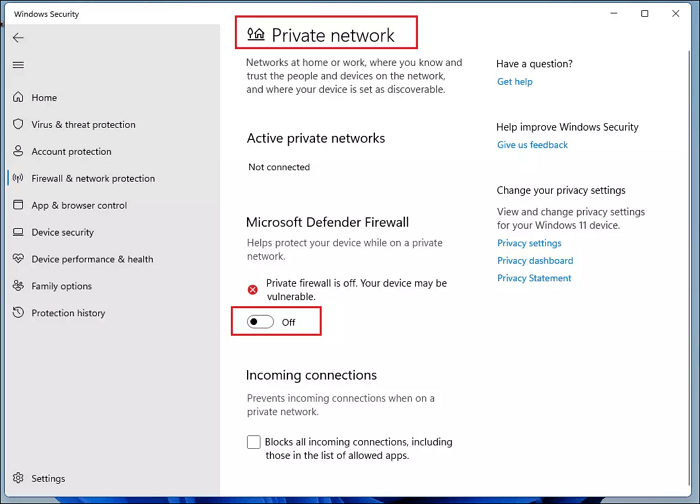
Step 4. You can go into each network profile above and turn on or turn off the "Microsoft Defender firewall" for each.
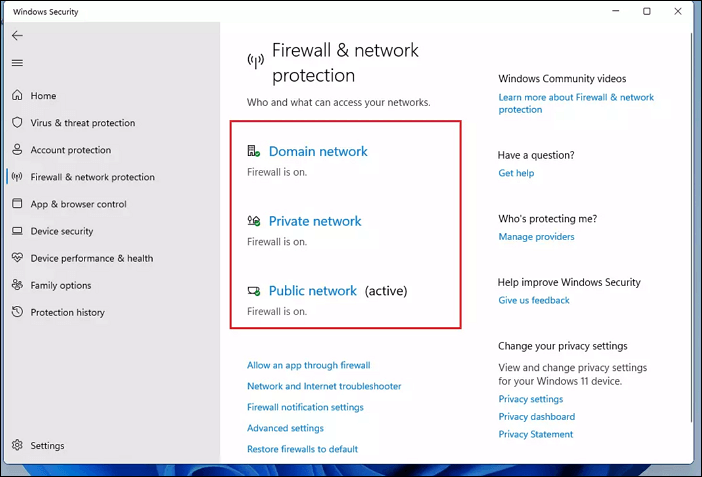
Step 5. Select "network profile" and turn it on or enable it if it is already disabled.
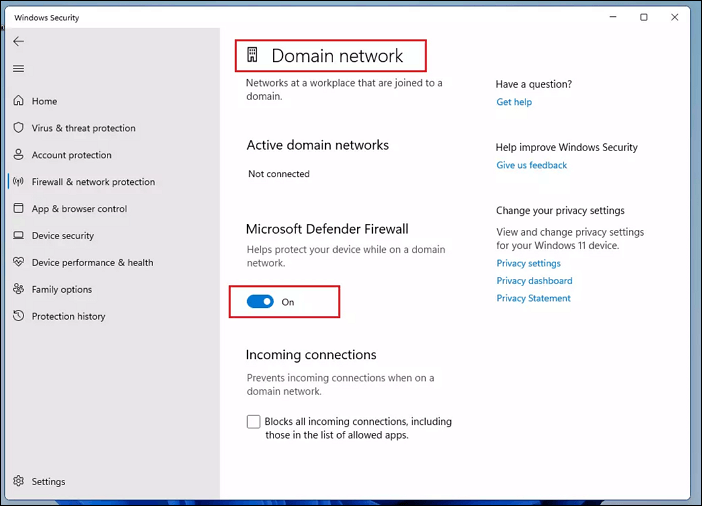
Step 6. If the profile is enabled, you can "disable" or turn it off.
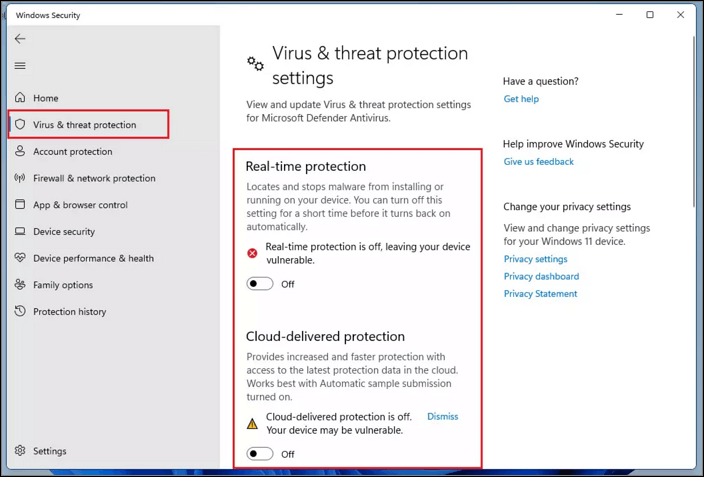
Step 7. Next, go to "Virus & threat protection" on the left menu. Under "Virus & threat protection" on the right pane, click the "Manage" settings link. Then enable or turn on "Real-time protection" and "Cloud-delivered protection."
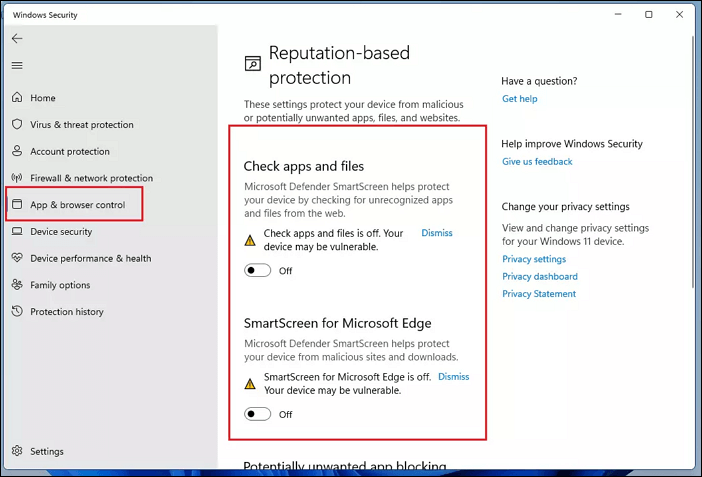
Step 8. App & browser control can also be turned "Off" or disabled.
2. Turn on Windows Defender on Windows 10
After numerous improvements and updates, it is now relatively easy to disable or enable Windows Defender in Windows 10. The Windows 10 built-in protection app will be available when you complete this process.
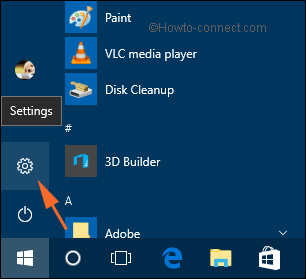
Step 1. To begin with, click the "Win" logo on the taskbar and select the "Settings" icon.
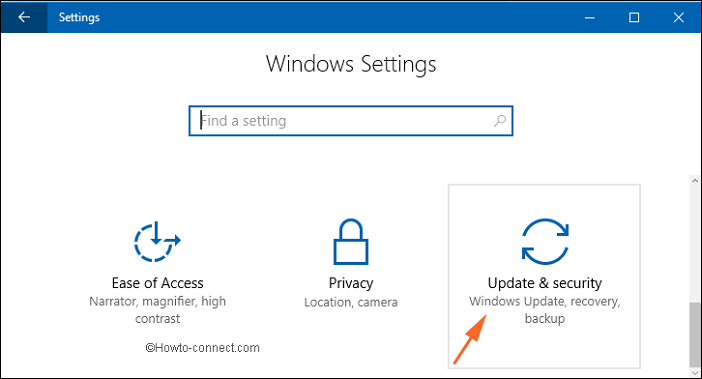
Step 2. Click on "Update & Security."
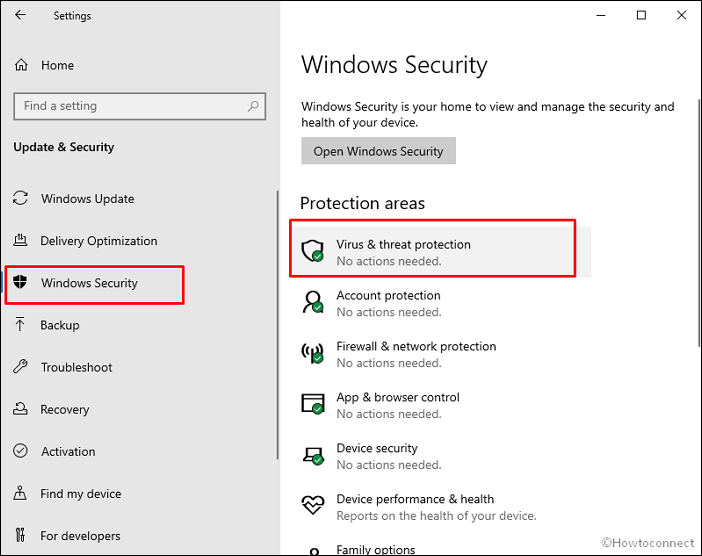
Step 3. Click on Windows Security and select "Virus & threat protection."
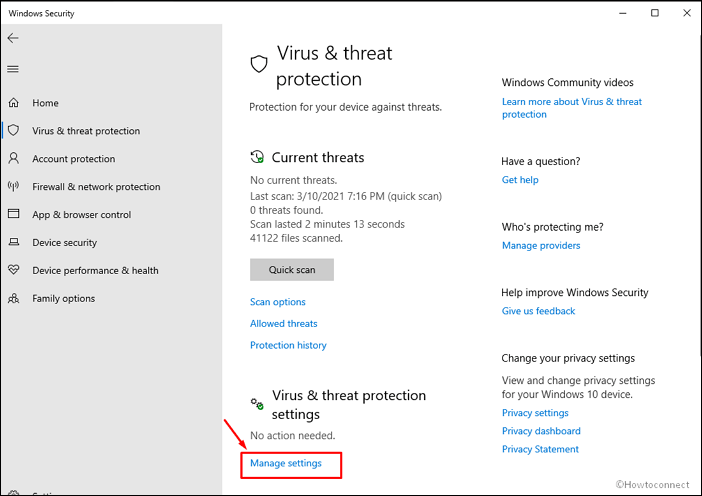
Step 4. Under Virus & Threat Protection settings, click the "manage" settings link.
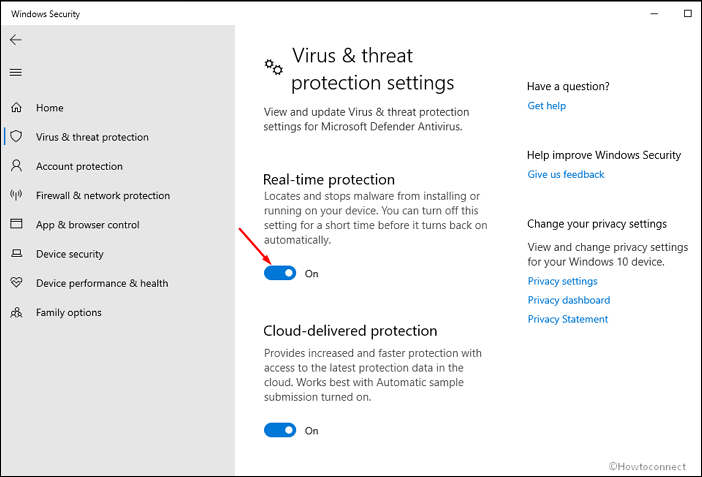
Step 5. Click on the toggle switch under "Real-time protection."
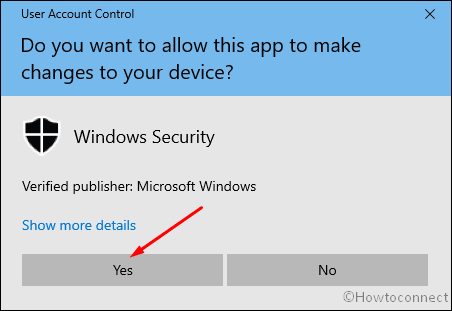
Step 6. Select "Yes" when the User account control prompt appears.
3. Turn on Windows Defender on Windows 8
If you learn that Windows Defender on Windows 8 has been disabled, you can use Action Center to verify its status, and then you can switch it back on by following the instructions below.
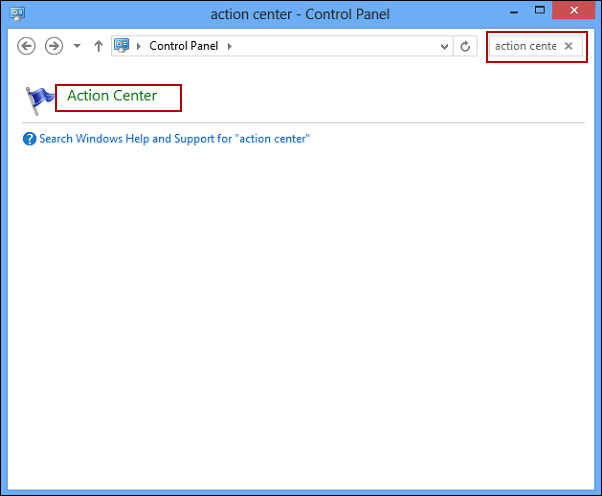
Step 1. Enter "Action Center" into the top-right search box of the Control Panel and press "Action Center" to enter.
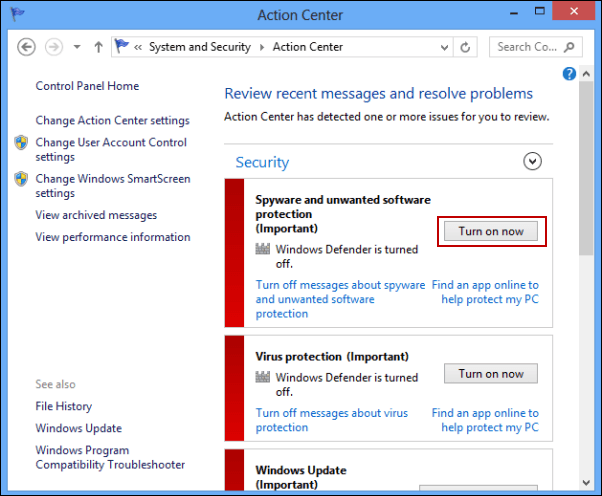
Step 2. In the box to the right of "Spyware and Unwanted Software Protection," click on the "Turn on" now button.
Conclusion
Installing a third-party antivirus program shouldn't be necessary, as Microsoft Defender is the best antivirus option for Windows computers. Changing to a different antivirus only changes the source of the malware definitions. Installing multiple antivirus programs can result in problems ranging from inadequate protection to an inability to shut down your Windows.
Was This Page Helpful?
Daisy is the Senior editor of the writing team for EaseUS. She has been working at EaseUS for over ten years, starting as a technical writer and moving on to being a team leader of the content group. As a professional author for over ten years, she writes a lot to help people overcome their tech troubles.
Related Articles
-
Access Denied When Copying Files Windows 10/8/7
![author icon]() Brithny/2024-05-20
Brithny/2024-05-20 -
[SOLVED] The Action Can't Be Completed Because the File Is Open in Another Program
![author icon]() Brithny/2024-07-01
Brithny/2024-07-01 -
Frustration and Loss: The Sandisk Extreme Pro Portable SSD Not Working
![author icon]() Jaden/2024-05-22
Jaden/2024-05-22 -
What is WindowServer on Mac and How to Fix WindowServer High CPU
![author icon]() Jaden/2024-02-21
Jaden/2024-02-21
EaseUS Data Recovery Services
EaseUS data recovery experts have uneaqualed expertise to repair disks/systems and salvage data from all devices like RAID, HDD, SSD, USB, etc.
