The DNS Probe Finished No Internet Error is a network error that occurs due to mistakes in DNS (Domain Name System). There are multiple reasons why this error occurs, it could be due to Cache, cookies, or the DNS server itself. We have tried a few fixes to solve this issue for various reasons. Let us know to fix the DNS Probe Finished No Internet Error issue.

If you are wondering what exactly DNS is, it is like a mapping system between browsing sites and users. The DNS converts the browse requests for the sites into IP addresses and delivers the requested sites to the user. In much simpler words, DNS converts human-readable domain names to IP addresses. Check this quora answer by Jyothi Gupta to know more about DNS.
To summarise, why the error occurs quickly if you are trying to access a site online? The device uses DNS to match the requested site on the server and process your request. If there is an error at the DNS level, the system shows DNS_PROBE_FINISHED_NO_INTERNET.
When It Happens in a Browser
In most cases, the issue is with the browser, primarily Google Chrome. Users have been experiencing (Including me) this error frequently on chrome, while the other browsers are working just fine for the same URL. If this is not your default browser and you are facing the same issue on different search engines too, it could be due to Cache.
Sometimes the problematic Cache, cookies, and browsing data result in this error. Clearing all this data could resolve the DNS-PROBE_FINISHED_NO_INTERNET error.
Let us see the steps to clear all the browsing data and Cache on different browsers. They are mainly:
1. Google Chrome
Step 1. Open Google Chrome on your device.
Step 2. Navigate to the three dots in the top-right corner and click on them.
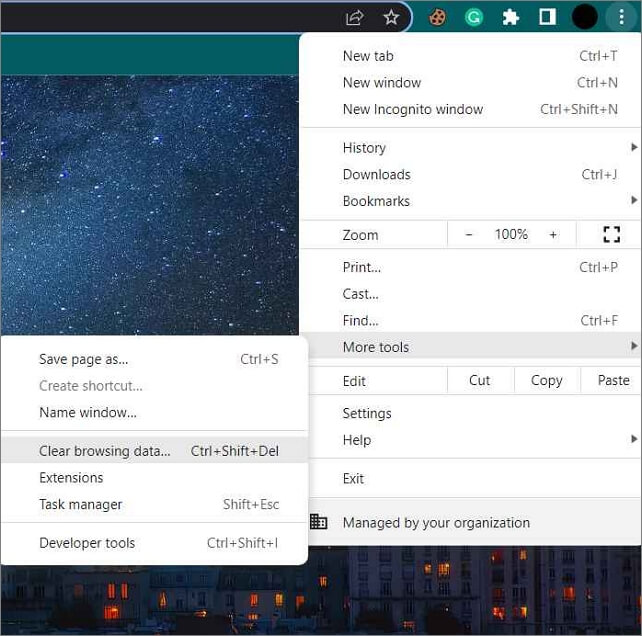
Step 3. In the Dialog box, move your cursor onto "More tools" to see the "Clear Browsing data" options.
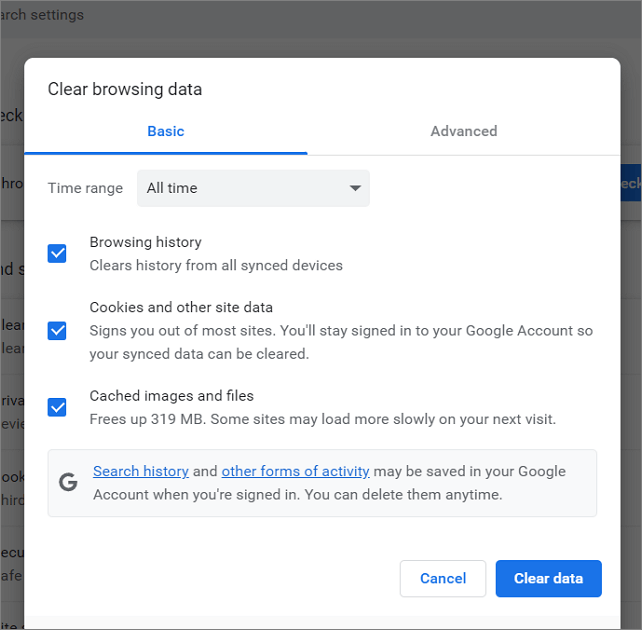
Step 4. Click on it and select a time frame in the new windows and press "Clear data."
You can choose and customize the type of data you want to keep while clearing the browsing data.
2. Microsoft Edge
Step 1. Open the browser and click on the three dots in the top-right corner of the screen.
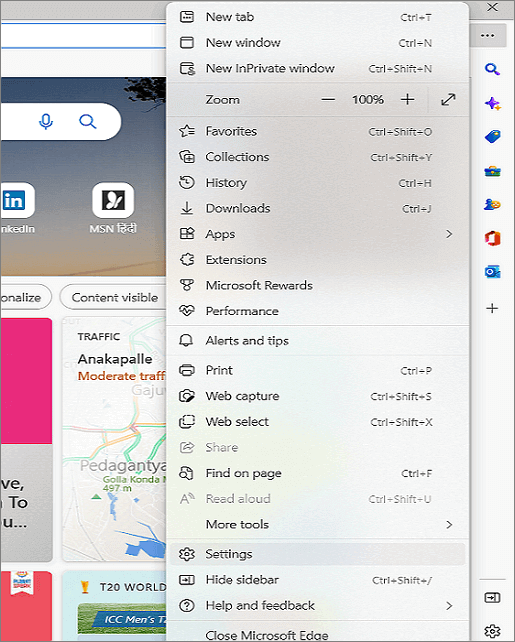
Step 2. Navigate to the Settings.
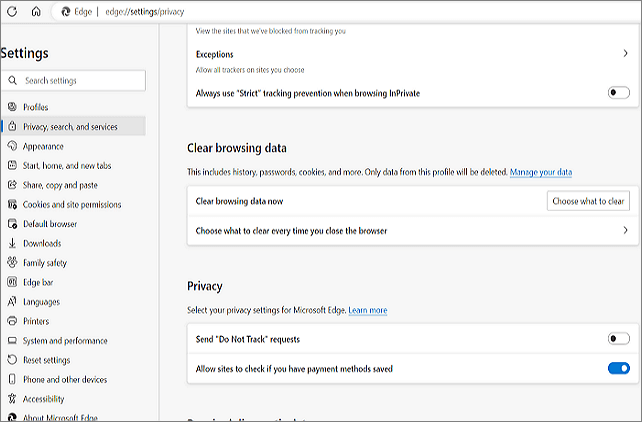
Step 3. Click on "Privacy, Search, and Services".
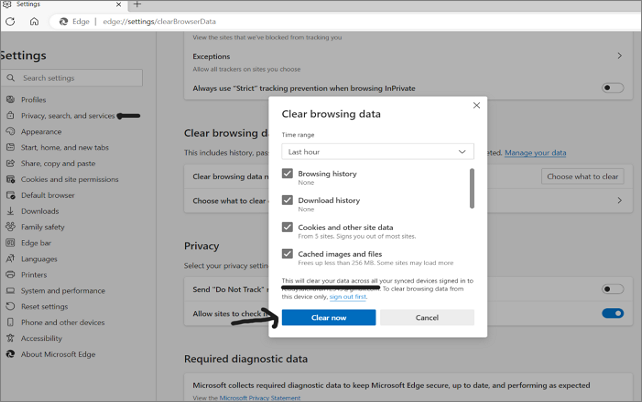
Step 4. Scroll down and Click on "Choose what to clear." Select a time range and Clear browsing data.
When It Happens on Your Device
Suppose you still face the issue after clearing the browsing data and Cache. The case may not be with the browser. There could be network adapter, Wi-Fi, or DNS-related problems. Let us see the potential reasons and possible solutions for the error.
- 1. Router/Modem Problems
- 2. Release and Renew the current IP Address
- 3. Clear the DNS cache
- 4. Network Adapter or Winsock Reset
- 5. Update the Network Driver
- 6. Change your Device's DNS Server
1. Router/Modem Problems
If you notice the error in all devices connected to the single router and the browsing is working fine with the mobile data, it could be a router issue.
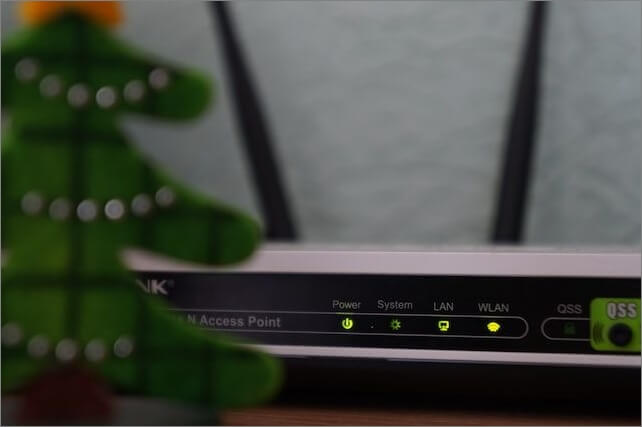
The first thing you can do is a power flush. Disconnect the power to the router/modem, wait some time and reconnect. Now check whether you are facing the error or not.
Try restarting the Wi-Fi from the taskbar, and check your network. Try connecting to the internet using another router and it works fine, consider changing your router.
2. Release and Renew the current IP Address
Computers use IP addresses to connect on the Internet with other servers so that the data transfer is secure and unique. The DHCP server assigns the IP addresses. It leases and monitors the IP addresses on computers. As soon as the lease period expires, the IPs are withdrawn.
In some cases, when the withdrawal or assignment does not automatically renew, it causes internet issues like this.
The steps to release and renew the current IP address are as follows:
Step 1. Search for Command Prompt on your computer and "Run as administrator."
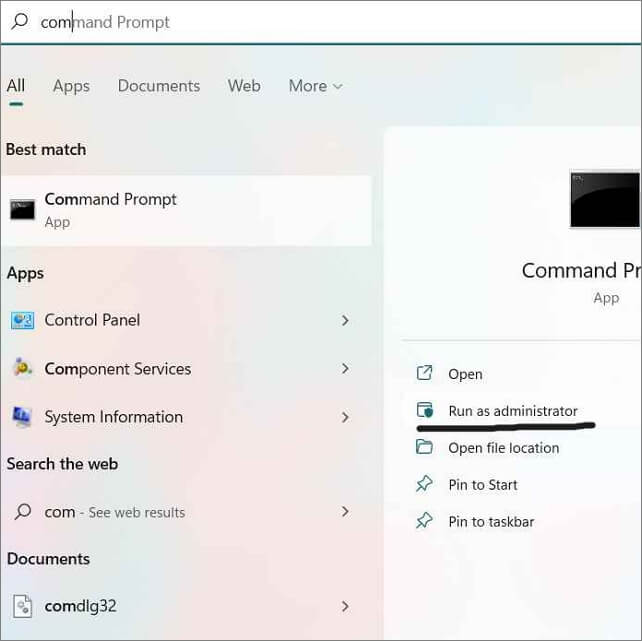
Step 2. After the windows shows up, type the following commands and click "Enter" after entry.
ipconfig /release
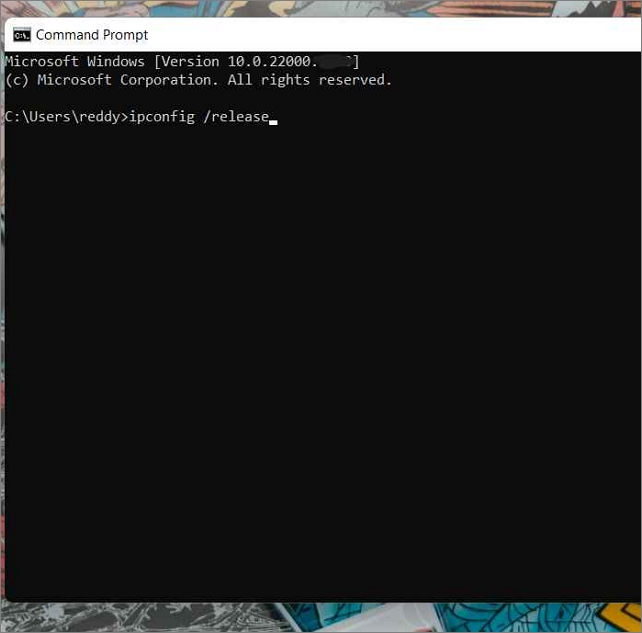
ipconfig /renew
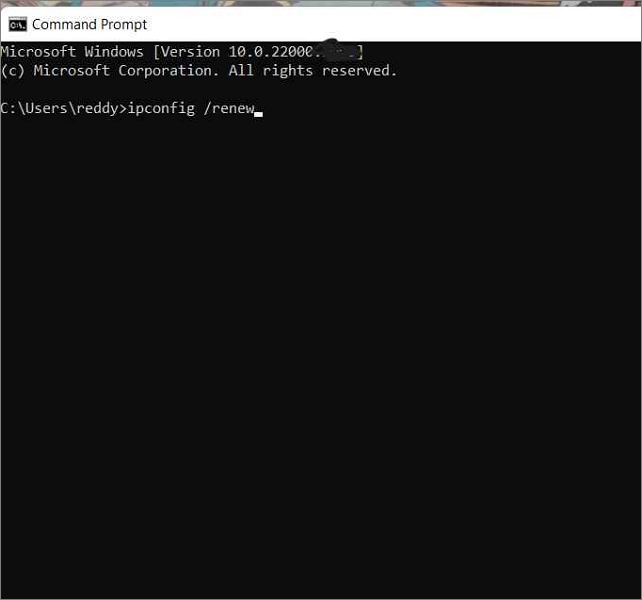
Step 3. Restart the device and check for the error. You can do this on "Windows PowerShell" too.
3. Clear the DNS cache
The devices stores the DNS information of the recent or frequent URLs you type while surfing the Internet. Over time, the DNS cache builds up and corrupts the information. This will either slow down the network speed or cause internet issues.
To get rid of this DNS cache, you can flush/clear it on your computer. The steps to flush the DNS are as follows:
Step 1. Open the Command Prompt on your computer.
Step 2. Type the following command and press "Enter."
ipconfig /flushdns
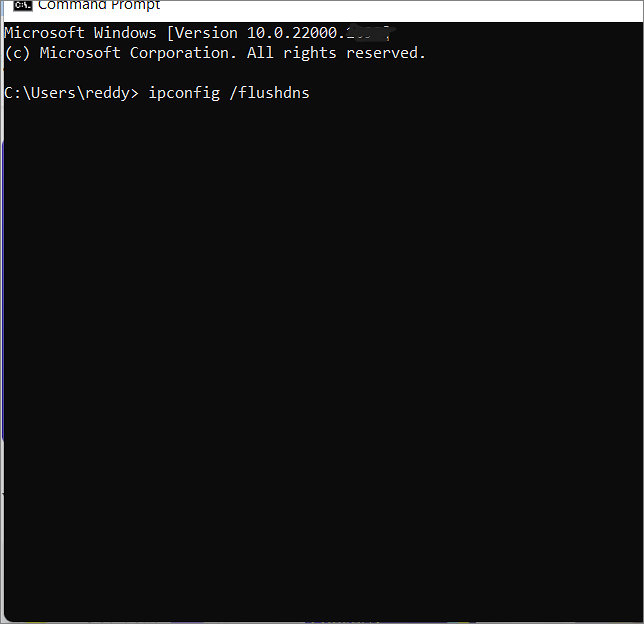
Step 3. Restart the computer after this.
4. Network Adapter or Winsock Reset
Winsock (Windows Socket) is an API that monitors how websites use the computer's network. If there is a problem with it, the device's internet access gets problematic.
Steps to reset Winstock/network adapter:
Step 1. Open the command prompt on your computer.
Step 2. Type the following command and press "Enter."
netsh Winsock reset

5. Update the Network Driver
Sometimes a network driver that is outdated can also give rise to such errors. The drivers are responsible for communicating between OS and hardware to process the internet requests.
You can update network drivers in multiple ways, like the windows update, but let us see how to do it using Device Manager.
Step 1. Search for Device Manager on your computer.

Step 2. Find and Expand the "Network Adapters."
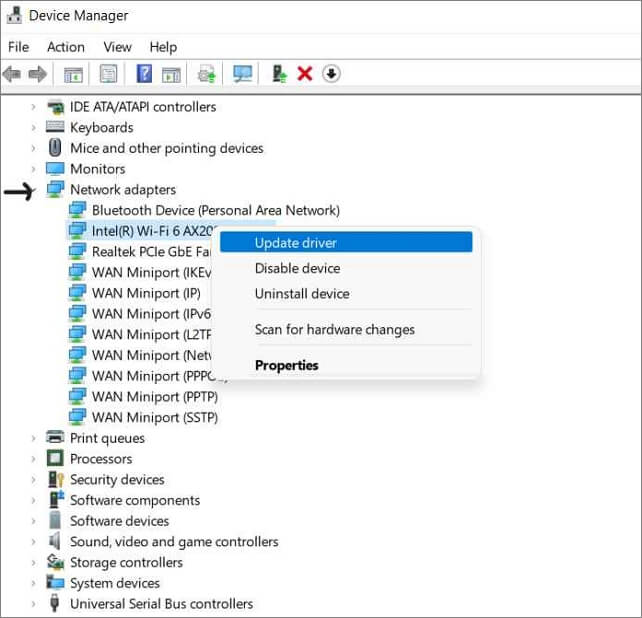
Step 3. Find the Wi-Fi driver, right-click on it and update the driver.
If you see multiple network drivers, look for the "Wi-Fi" driver and update it.
6. Change your Device's DNS Server
Your Internet provides a DNS server to handle internet requests. These servers are unreliable in all cases and result in network issues
In such cases, you might want to change your DNS server. Let us see the steps to do the same.
Step 1. Search for View Network Connections on your computer.
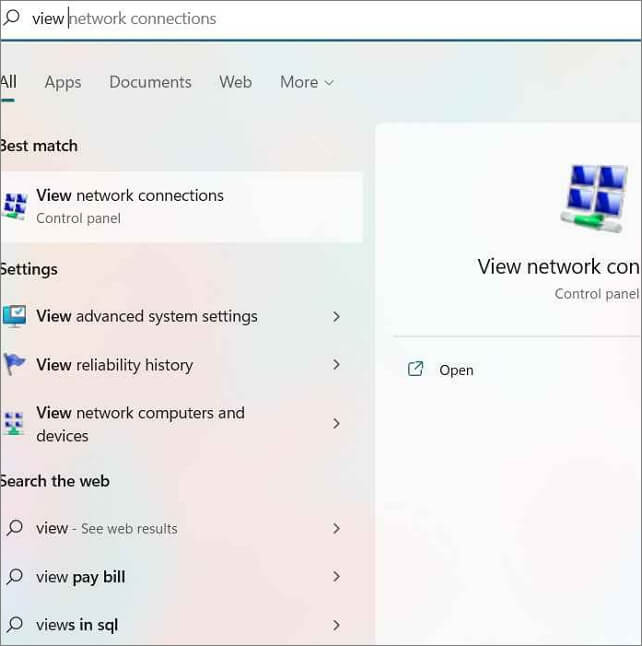
Step 2. A new window, showing all your connections opens up. Go to your internet connection and right-click on it. Select the Properties.
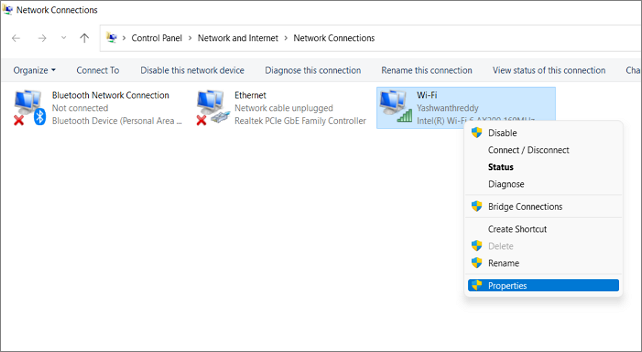
Step 3. Select Internet Protocol Version 4 (TCP/IPv4) and click on the "Properties" button.

Step 4. Now in the next window, select "Use the following DNS server addresses" and enter the given server addresses.
Preferred DNS Server: 8.8.8.8
Alternate DNS Server: 8.8.4.4
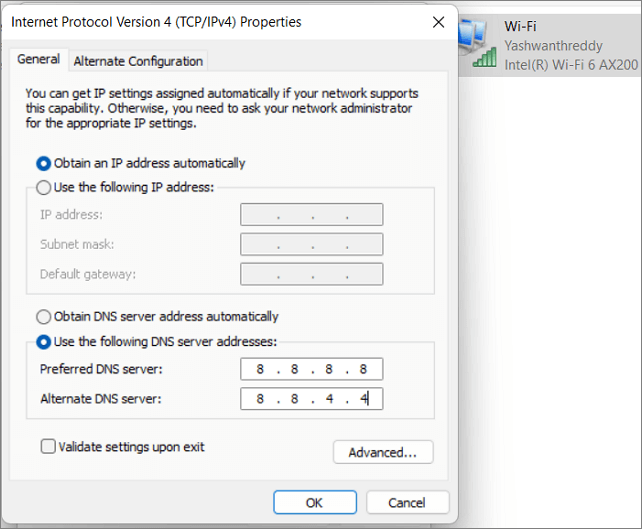
Step 5. Click "OK" and check for the error.
Conclusion
The DNS_PROBE_FINISHED_NO_INTERNET error is a common network error encountered by users. The errors occur due to multiple issues on the browser and network errors. The solutions to this error are quite simple, as you must follow some basic steps to rectify it.
Chrome users majorly encounter the error, if it is not an issue with the browser, you can try out the six fixes to solve your problem, and I think you will be browsing as usual in no time. If the issue persists, I hope the Microsoft Community helps you.
If you find this article, share it with your friends, and leave a comment below to let me know about it. If you have any queries regarding the fixes, let me know in the comment box.
FAQs
The article answers most of the questions related to the DNS Probe Finished on the Internet, but let us look at the most frequently asked questions about the topic.
1. Can you Ping Google?
Yes, we can ping Google from our computers. Use the command prompt to do it. Open the command prompt and type "Ping google.com." Press enter to see the IPs of the website.
2. Does it happen with all devices on the network?
Well, the cases are different for due to multiple reasons. If this error occurs on all the devices connected to a single network, it could be a problem due to the router/modem, Wi-Fi, or ethernet cable. Reset your router, restart your Wi-Fi and reconnect your Ethernet cable to rectify the issue.
Was This Page Helpful?
Daisy is the Senior editor of the writing team for EaseUS. She has been working at EaseUS for over ten years, starting as a technical writer and moving on to being a team leader of the content group. As a professional author for over ten years, she writes a lot to help people overcome their tech troubles.
Related Articles
-
How to Disable Startup Repair Windows 7 in Simple Steps [2025]
![author icon]() Alin/2026-06-18
Alin/2026-06-18 -
Internet Browsers Not Working after Windows Upgrade? Fix It Now!
![author icon]() Tracy King/2025-07-04
Tracy King/2025-07-04 -
2025 Tips| Are You Sure You Want to Copy This File Without Its Properties [Fixed]
![author icon]() Brithny/2026-02-12
Brithny/2026-02-12 -
Star Citizen Stuttering/Lagging (Optimize for Low FPS)
![author icon]() Oliver/2026-06-12
Oliver/2026-06-12
EaseUS Data Recovery Services
EaseUS data recovery experts have uneaqualed expertise to repair disks/systems and salvage data from all devices like RAID, HDD, SSD, USB, etc.