Whether you're a gamer or a hard-core PC user, you may have had trouble starting or restarting your Windows 10 computer because of the ''Could not initialize graphics system" error. Most of the time, the error is observed while installing or updating an application, which may require using the Graphics Processing Unit (GPU). The GPU is a specialized processor that accelerates 3D graphics and video effects rendering.
In other cases, you can also observe the error due to incompatible drivers. The graphics driver is the software on your computer that communicates with your graphics card and displays the image on your screen. If this driver isn't working properly, the ''Could not initialize the graphics system" error occurs.
Another possibility behind this issue is a hardware failure, which can happen anytime. For example, if your graphics card has some technical fault, it can cause this problem.
During gameplay, it's common for Windows to automatically update the drivers and change resolution settings, ending up with incompatibility between the game and your system.
How to Fix "Could Not Initialize Graphics System" on Windows 10 Computer
If you've encountered this error on Windows 10, here's a quick breakdown of solutions to help you get out of the water:
- Method 1. Update Your Graphics Driver
- Method 2. Run Your Software in Compatibility Mode
- Method 3. Update Latest Windows
- Method 4. Manually Install DirectX
Let's look at how each method works in the next part.
Method 1. Update Your Graphics Driver
One of the most common causes of Windows 10 errors is outdated or corrupt drivers. As a result, if you keep getting the "Could Not Initialize Graphics System" error, the culprit is most likely the outdated or corrupt Graphics Drivers. You can update them through Device Manage or via your device manufacturer's website.
Guide 1. Update Through Device Manager:
Step 1: Open the Run prompt by pressing Windows + R simultaneously.
Step 2: Enter "devmgmt.msc" into the empty text box, then click OK or press Enter.
Step 3: Navigate to the Display adapter on the Device Manager window and click the arrow mark to expand its menu.
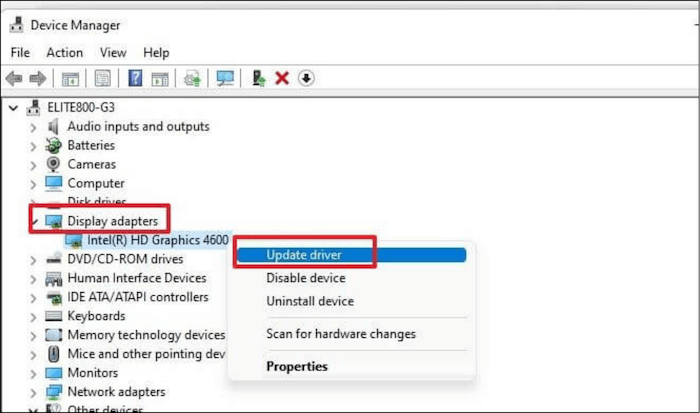
Step 4: Right-click on the device to be updated and select Update Driver from the submenu.
Step 5: Search automatically for updated driver software at the next prompt. Your system will automatically search for and install the most recent drivers. (You must have an active internet connection.)
Guide 2. Update Through Device Manufacturer's Website:
In rare cases, updating Graphic drivers through Device Manager may only sometimes yield the desired results. T ensure 100% results, a rule of thumb is to directly go to the NVIDIA, AMD, or Intel websites and install the most recent driver updates without any problems.
After successfully updating the Graphic driver, open the program/game displaying the error and see if it has been resolved.
Method 2. Run Your Software in Compatibility Mode
If your Windows 10 PC cannot initialize the graphics system, League of Legends can be run in compatibility mode. Follow these steps:
Step 1: Select Properties from the right-click menu of the LoL app.
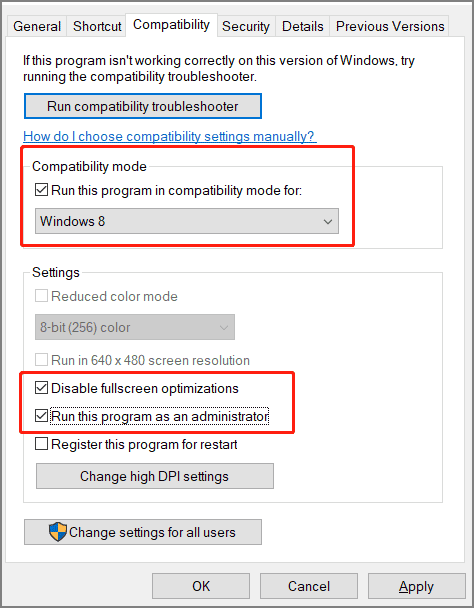
Step 2: On the Compatibility tab, select Run this program in compatibility mode for a system.
Step 3: Select the Disable fullscreen optimizations and Run this program as administrator checkboxes.
Step 4: To save the change, go to Apple > OK.
After that, relaunch the game to see if the "Could Not Initialize Graphics System" error still appears or if it has been resolved.
Method 3. Update Latest Windows
Every Windows 10 update improves your system's performance and fixes various existing errors and glitches. As a result, it is recommended that you install all available updates regularly. As a result,
Step 1. To begin, type Updates into the desktop search bar and select the option Windows update settings from the search results.
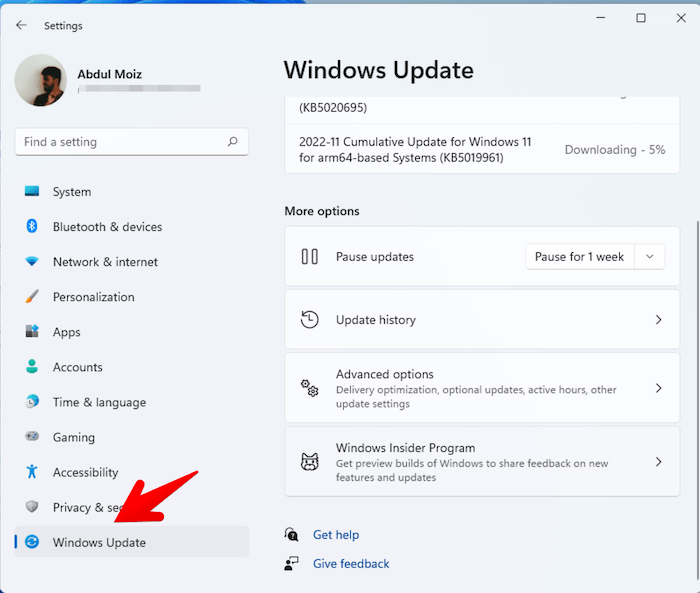
Step 2. On the next screen, select the Check for Updates option. It will search for and install all available updates on your system.
Step 3. Restart your system once the updates have been installed.
After that, re-run the relevant game to see if the issue has been resolved.
Method 4. Manually Install DirectX
Microsoft DirectX is a collection of technologies accelerating hardware for multimedia applications such as HD videos and 3D games. It's a necessary part of the Windows operating system. Windows updates make newer versions available. However, if you are still having problems with your game at this point in our guide, you should try manually installing the DirectX update:
Step 1: Download DirectX from Microsoft's website.
Step 2: To download the setup file to your computer, click the red Download button.

Step 3: To finish the installation, run the dxwebsetup.exe file and follow the on-screen instructions.
Step 4: It will only take a few seconds to install. After the process is finished, restart your computer.
Conclusion
With the above solutions, you can solve this annoying error in less than 10 minutes, depending on your PC's running efficiency.
Whichever method you choose, carefully follow the steps to enjoy a smooth and uninterrupted game experience.
Was This Page Helpful?
Updated by Tracy King
Tracy became a member of the EaseUS content team in 2013. Being a technical writer for over 10 years, she is enthusiastic about sharing tips to assist readers in resolving complex issues in disk management, file transfer, PC & Mac performance optimization, etc., like an expert.
Daisy is the Senior editor of the writing team for EaseUS. She has been working at EaseUS for over ten years, starting as a technical writer and moving on to being a team leader of the content group. As a professional author for over ten years, she writes a lot to help people overcome their tech troubles.
Related Articles
-
The First Descendant Save File Location & Config File Location
![author icon]() Jerry/2025-07-04
Jerry/2025-07-04 -
How to Fix 'Searching for Time Machine Backups' Forever on a Mac
![author icon]() Brithny/2026-05-21
Brithny/2026-05-21 -
Tekken 8 Save File Location & Config File Location How to Back Up It
![author icon]() Larissa/2025-07-04
Larissa/2025-07-04 -
⚠️Update Apple ID Settings Stuck on Your Mac? 6 Solutions to Fix It
![author icon]() Brithny/2026-06-12
Brithny/2026-06-12
EaseUS Data Recovery Services
EaseUS data recovery experts have uneaqualed expertise to repair disks/systems and salvage data from all devices like RAID, HDD, SSD, USB, etc.