
Content
Page Table of Contents
About the Author
Hot Topics
PAGE CONTENT:
I have both hibernation off and pagefile set to 5000. I also have 35 GB of free space and want to shrink 20 GB, but I can only shrink 297 MB. Any ideas why? - from Reddit
As shown in the real user case above, many users have reported being unable to shrink their C drive even when a large amount of free space is available. If you're also wondering why can't shrink C drive with all of the space free and want to know how to fix it, this post from EaseUS Software is right for you.
Why Is My C Drive Not Shrinking
Here are the most common reasons why Windows cannot shrink your C drive. Please check them out below.
- Unmovable System Files: Windows may be unable to shrink the C drive because critical system files such as pagefile.sys, hiberfil.sys, and System Restore points are locked at the end of the partition. These files limit the amount of space that can be reduced.
- Fragmented Free Space: Even if your drive shows plenty of available storage, fragmented free space can prevent Windows from shrinking the partition effectively.
- Unsupported File System: Windows Disk Management only supports shrinking NTFS partitions. Drives formatted as FAT32 or exFAT cannot be shrunk using this feature.
Method 1. Use the C Drive Partition Resizer🔥
After figuring out why can't shrink C drive with all of the space free, let's start with the easiest solution by using a third-party tool. As a powerful and comprehensive disk partition management tool, EaseUS Partition Master helps you efficiently manage your C drive. With its intuitive Resize/Move feature, you can easily adjust partition sizes, such as shrinking the C drive, extending the C drive, and optimizing storage without data loss.
- Notice:
- The following demo video uses the D drive as an example. But you can also refer to its operating steps to shrink the C drive.
Step 1: Locate and select target partition to shrink
Go to the Partition Manager section, right-click on the partition that you want to shrink and select "Resize/Move".
Step 2: Adjust to shrink partition
Use your mouse to drag the end of the target partition to shrink partition space.
You can also adjust the partition size box to shrink the target partition. Once done, click "OK" to continue.
Step 3: Execute operation
Click the "Execute 1 Task(s)" button and "Apply" to keep all changes.
Method 2. 5 Phases to Fix the C Drive Not Shrinking Issue
In addition to the C drive partition resizer, you can try the second method, which has 5 phases, to address this problem. Please refer to the following phases in order.
Phase 1. Temporarily Disable System Protections | 3 Operations
Why can't shrink C drive with all of the space free? As mentioned above, unmovable system files is one of the reasons. In this case, temporarily disabling features like system protection, hibernation, or virtual memory can help free up space on the C drive and allow the volume to shrink. Be sure to re-enable them afterward.
1️⃣Disable the Page File (Virtual Memory)
Please refer to the following steps.
Step 1. Please press Win + R to open the Run box > type sysdm.cpl in the search bar > click OK or hit Enter.
Step 2. In the System Properties window, click Settings under the Advanced tab. Then, in the Performance Options window, select Advanced > click Change.
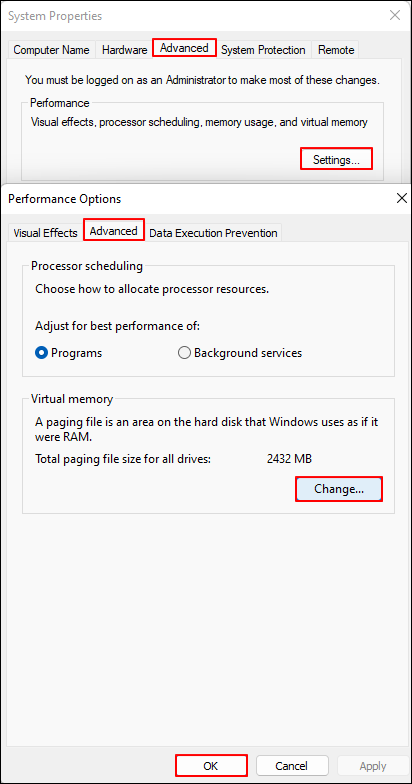
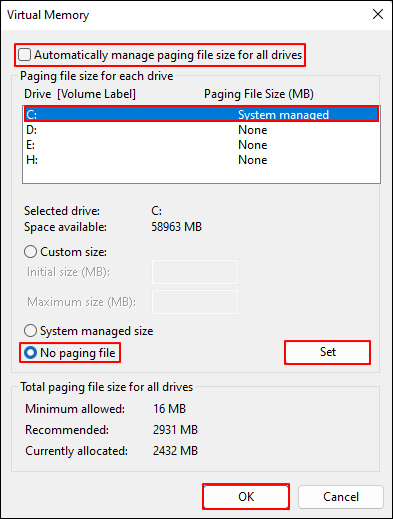
Step 3. Uncheck the Automatically manage paging file size for all drives > choose the C drive > select No paging file > click Set > click OK.
2️⃣Turn Off Hibernation
Let's show how it works.
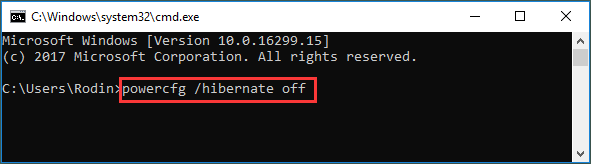
Step 1. To open an elevated Command Prompt window, type cmd in the search bar > click Run as administrator.
Step 2. Type powercfg /hibernate off > press Enter.
3️⃣Disable System Protection
Here are the steps.
Step 1. Please press Win + R to open the Run box > type sysdm.cpl in the search bar > click OK or hit Enter.
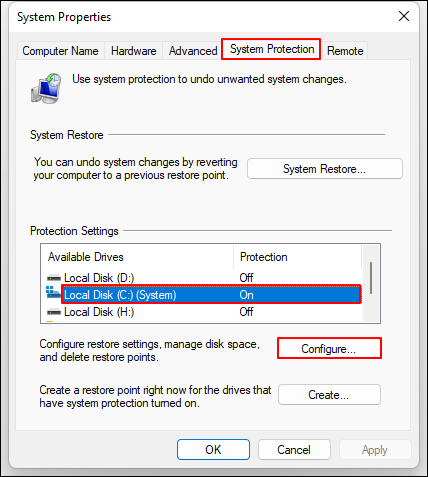
Step 2. In the System Properties window, click System Protection. Then, select the local disk C drive > click Configure.
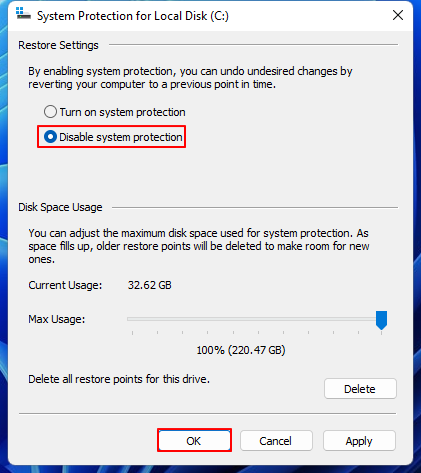
Step 3. Select Disable system protection > click OK.
Phase 2. Free up Disk Space | 2 Ways
Before shrinking your C drive, it is important to remove unnecessary files that may be consuming disk space or interfering with the shrinking process. Cleaning up junk files, temporary data, and unused items can help free up space and improve the success of disk partition resizing.
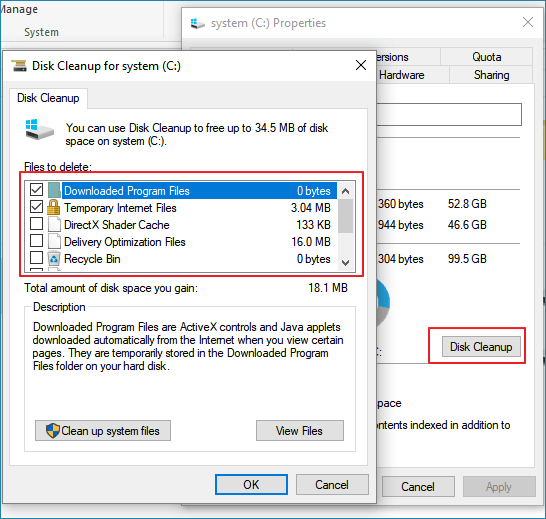
1️⃣Run Disk Cleanup
Please refer to the steps carefully below.
▶️Please press Win + E to open File Explorer > right-click on your C drive > select Properties > select Disk Cleanup > under the Files to delete tab, choose the files you want to remove > click OK.
2️⃣Delete Temp files
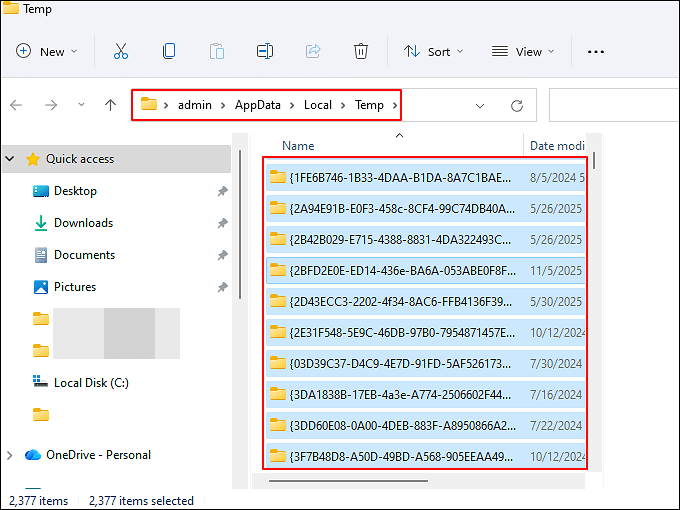
The following steps demonstrate how to delete temporary files manually. On the contrary, if you want Windows to automatically delete Temp files, you can refer to another guide.
▶️Please press Win + R to open the Run window > type % temp% in the search bar > click OK or press Enter to open the Temp folder > press Ctrl + A to select all the temporary files > right-click on them > click Delete.
Phase 3. Perform a Disk Defragmentation
Even if free space is available, disk fragmentation or file system errors may still block the shrinking process. The built-in disk defragmentation utility helps prepare and optimize your drive for smooth, successful partition resizing. Below are the details.
Windows 10 Slow: Why Is My Computer So Slow All Of A Sudden [7+ Fixes]
If your Windows 11 or Windows 10 becomes slow, you can also run Disk Defragmentation to fix this issue. Want more fixes to speed up your Windows 10/11 PC? Please read more >>
Step 1. Type defrag in the search bar > select Run as administrator.
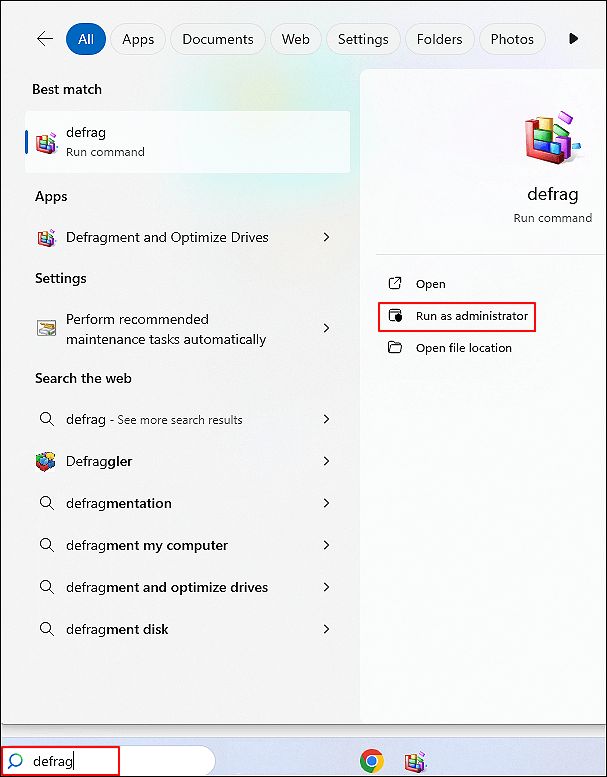
Step 2. Select the C drive > click Optimize.

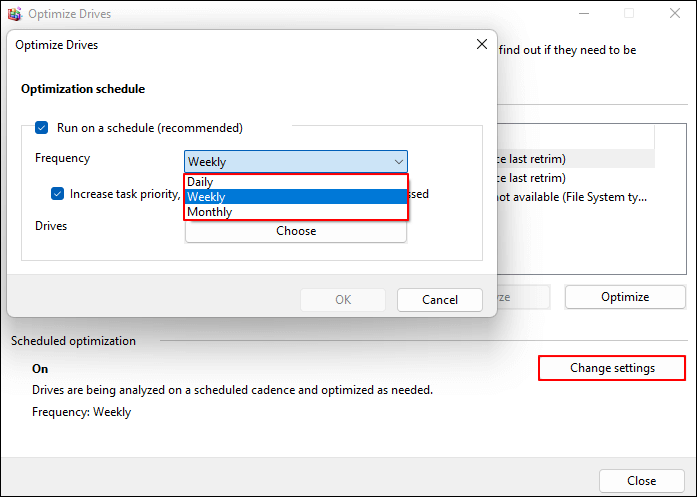
Please note that Windows automatically optimizes your drives on a weekly schedule by default. To customize the optimization frequency, go to Change settings and select Daily, Weekly, or Monthly based on your preference.
Phase 4. Shrink the C Drive
After clearing system files and consolidating disk space, you can safely and cleanly shrink the drive without errors or restrictions. Here are the steps.
Step 1. Please press Win + X, then choose Disk Management to open the Windows advanced storage utility.
Step 2. Right-click on the C drive > select Shrink Volume.
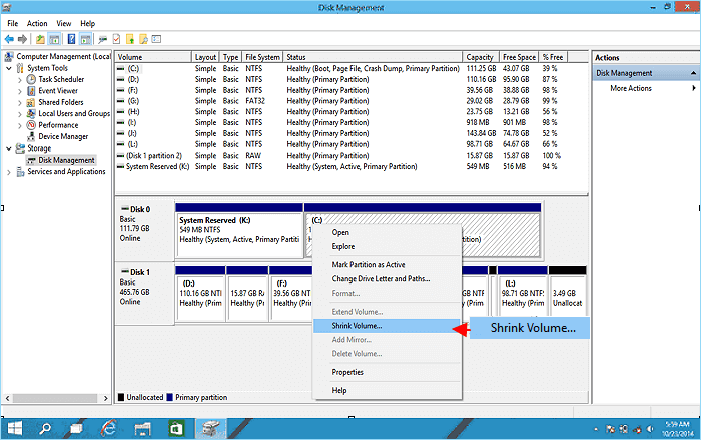
Step 3. Enter your desired shrink amount > click Shrink.
Phase 5. Restore System Functions
As the title suggests, this phase aims to re-enable the features you previously turned off.
- Page File: Repeat the steps to open the System Protection window, then check the Automatically manage paging file size for all drives option.
- Hibernation: Re-enable it by running powercfg /hibernate on in an Admin Command Prompt window.
- System Protection: Open the System Protection window, select the C drive, and then enable system protection on this C drive.
Conclusion
Why can't shrink C drive with all of the space free? This problem is usually caused by system limitations such as unmovable files, disk fragmentation, or file system errors. This article explains these common reasons and helps you solve this issue.
While Windows tools can help with basic disk optimization, the most effective solution is to use EaseUS Partition Master. It can handle system restrictions automatically, making it easier and safer to shrink or manage your C drive without errors.
How Can We Help You
About the Author

Sherly joined EaseUS in 2022 and she has always loved writing articles and enjoys the fun they bring. She receives professional training here, focusing on product performance and other relative knowledge. She has written over 200 articles to help people overcome computing issues.

Cici is the junior editor of the writing team of EaseUS. She accepted the systematic training on computers at EaseUS for over one year. Now, she wrote a lot of professional articles to help people resolve the issues of hard drive corruption, computer boot errors, and disk partition problems.
Product Reviews
-
I love that the changes you make with EaseUS Partition Master Free aren't immediately applied to the disks. It makes it way easier to play out what will happen after you've made all the changes. I also think the overall look and feel of EaseUS Partition Master Free makes whatever you're doing with your computer's partitions easy.
Read More -
Partition Master Free can Resize, Move, Merge, Migrate, and Copy disks or partitions; convert to local, change label, defragment, check and explore partition; and much more. A premium upgrade adds free tech support and the ability to resize dynamic volumes.
Read More -
It won't hot image your drives or align them, but since it's coupled with a partition manager, it allows you do perform many tasks at once, instead of just cloning drives. You can move partitions around, resize them, defragment, and more, along with the other tools you'd expect from a cloning tool.
Read More
Related Articles
-
How to Extend C Drive Space in Windows 11 [2026 Tutorial]
![author icon]() Tracy King/2026/09/16
Tracy King/2026/09/16 -
Guide to Clone SSD to NVMe SSD (with Pictures🏞️)
![author icon]() Tracy King/2026/09/29
Tracy King/2026/09/29 -
How to Divide C Drive into D and E Safely🔥
![author icon]() Cici/2026/09/29
Cici/2026/09/29 -
Resize Windows 10 Partition with Free Windows 10 Partition Manager
![author icon]() Jean/2026/08/13
Jean/2026/08/13
 Tracy King/2026/09/16
  Jean/2026/08/13