Welcome
Thank you for choosing EaseUS Todo Backup as your integrated solution for data and OS protection. Our software has been installed on millions of home computers, providing efficient and stable backup capabilities to safeguard your operating system, emails, disks, partitions, documents, photos, pictures, and music.
With EaseUS Todo Backup, you can create reliable .pbd images which can be easily recovered in the event of a system crash, partition or disk corruption, virus infection, or unexpected data loss. And unlike OEM backup solutions, our software does not require any extra hidden partitions on your hard drive for backup or restoration.
Thank you again for choosing EaseUS Todo Backup, and we are here to support you in protecting your valuable data.
Getting Started
This part outlines basic parameters to use EaseUS Todo Backup. It is to help you acquire a general understanding before you get started.
Hardware Requirements
500 MHz processor or faster
A minimum of 1 gigabytes (GB) RAM; A minimum of 2 GB RAM for Window 8/8.1/10
A minimum of 1 GB of available space on the hard disk
CD-R/RW, DVD-R/RW, DVD+R/RW or DVD+R DL drive
Keyboard, mouse and other compatible pointing devices
System Requirements
Make sure you are running any one of listed operating systems:
- Windows Vista®
- Windows® 7/8/8.1/10/11
Supported File Systems
EaseUS Todo Backup supports file systems, including FAT12, FAT16, FAT32 and NTFS. Other files systems are shown to be Other. EaseUS Todo Backup supports the sector-by-sector Backup and Clone of Other Partition/Volume.
Supported Hard Disks
EaseUS Todo Backup supports disks, including IDE, EIDE, SATA, ESATA, ATA, SCSI, iSCSI, USB 1.1/2.0/3.0 disk, and Firewire disks. As for CD-R/RW DVD-R/RW DVD+R/RW DVD+R DL, EaseUS Todo Backup supports saving backup images to them without issue.
Dynamic disk, MBR and GPT disks are supported. EaseUS Todo Backup supports the disk capacity up to 16TB.
Activation
To access the full version of the software, users of the Free version can click on the gift icon located in the right corner or the Upgrade button in the left corner of the interface. This will open the activation window where a 25-digit license code can be entered to upgrade to the full version..
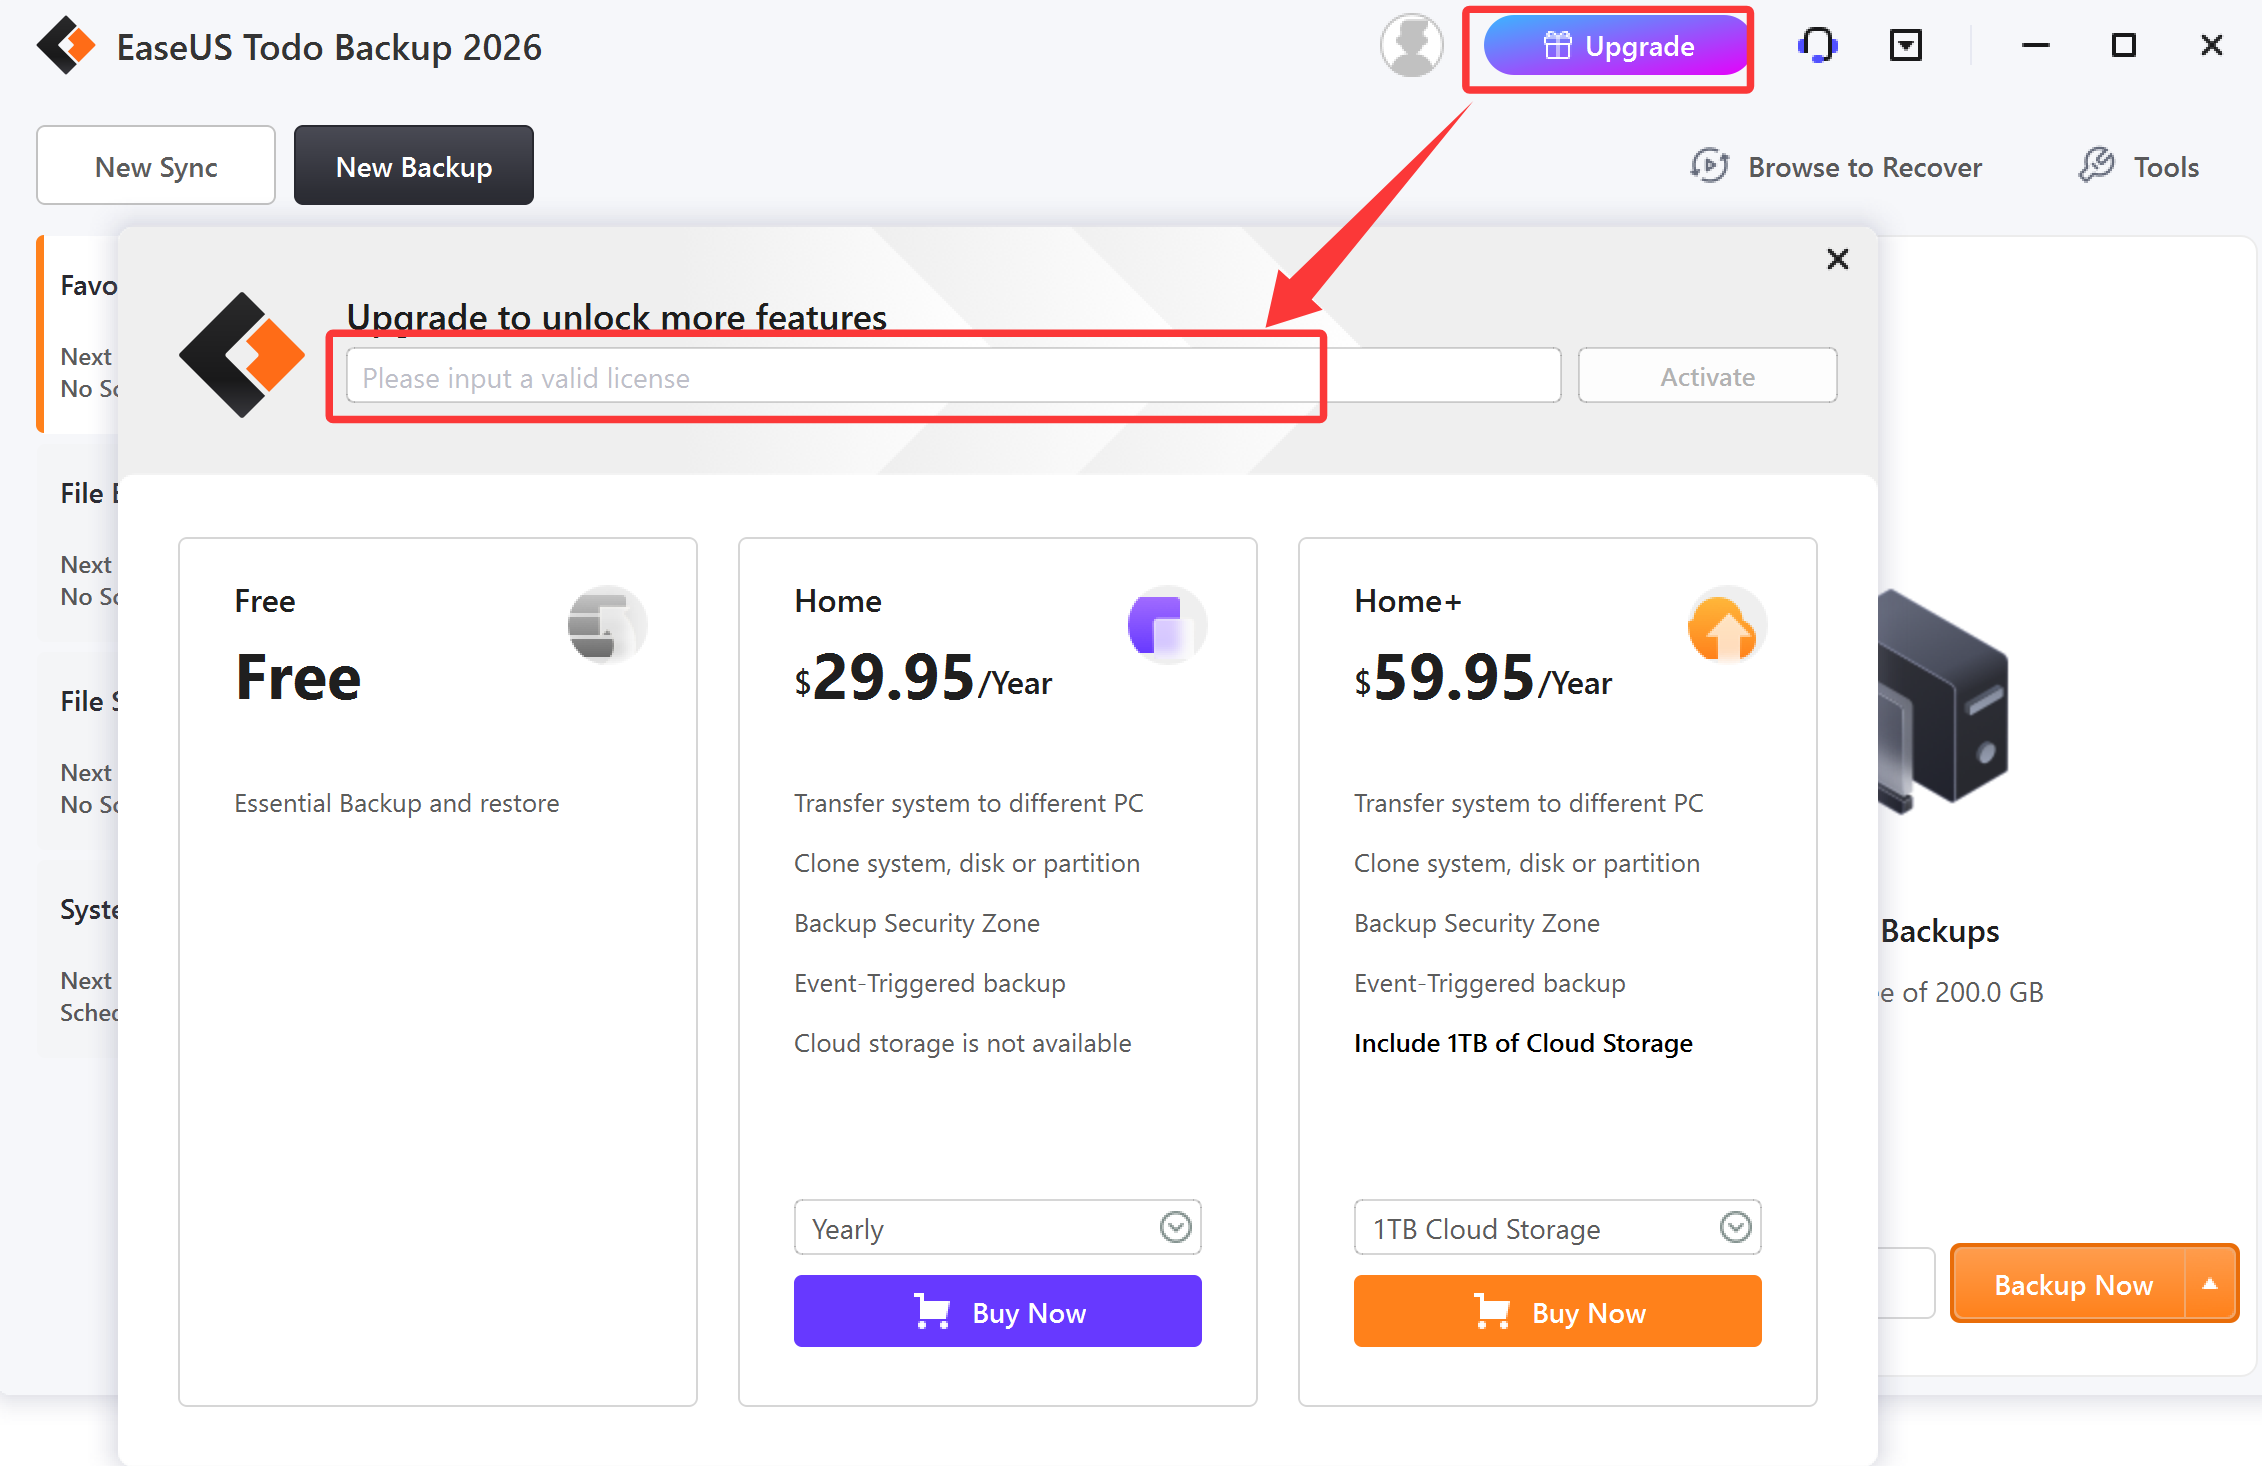
To access the full version of the software, users of the Trial version can click on the shopping cart icon located in the right corner or the Activate button in the left corner of the interface. This will open the activation window where a 25-digit license code can be entered to upgrade to the full version.

Offline activation
To perform an offline activation when your computer is not connected to the internet, please click here.
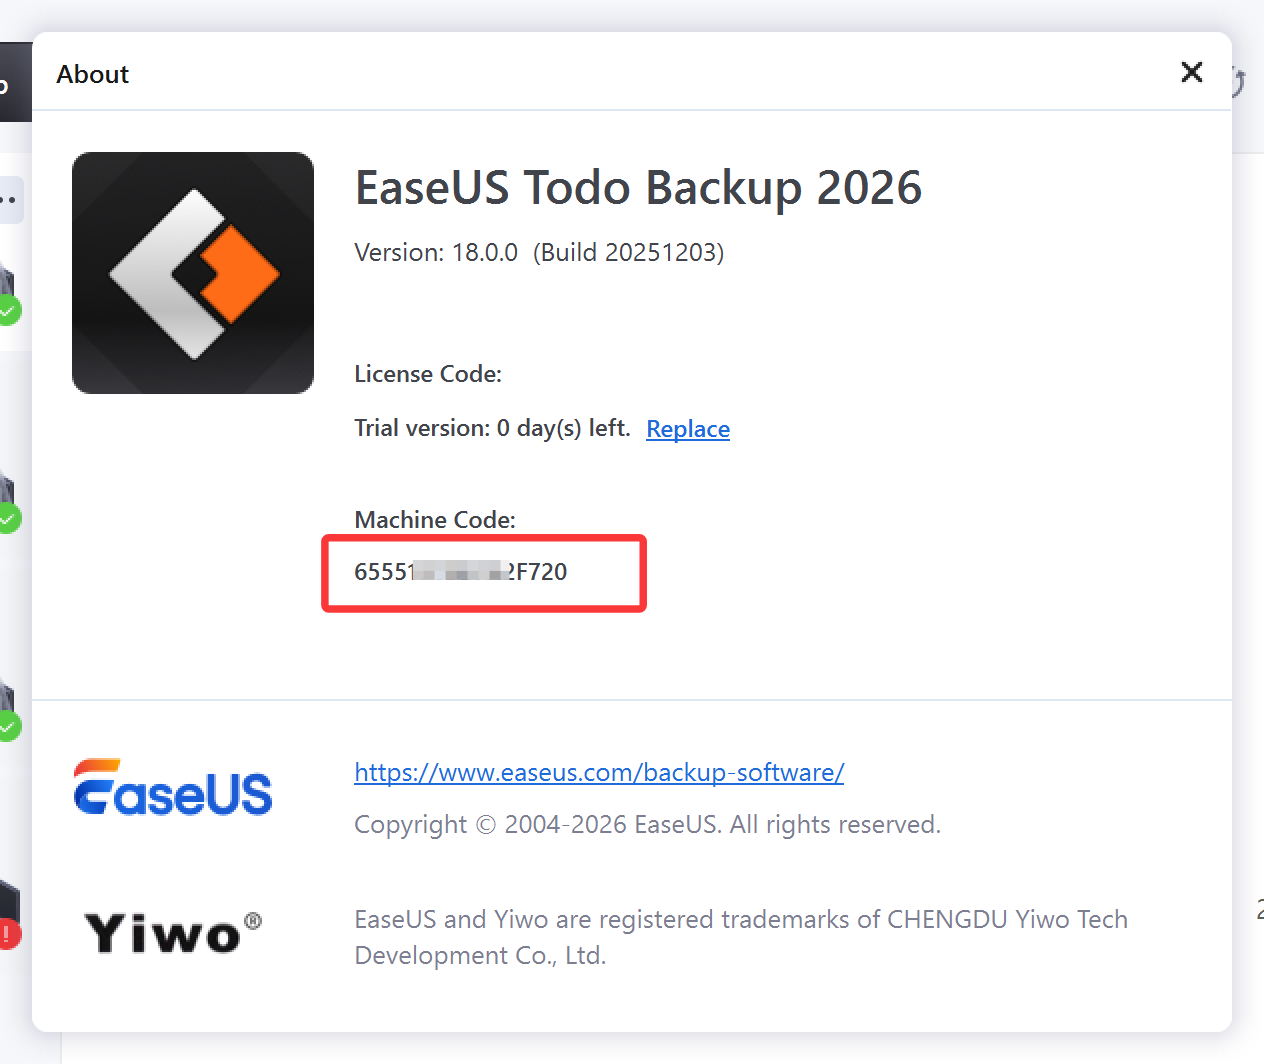
Tips:
The machine code is a unique identification number that is generated by EaseUS Todo Backup based on your hardware information. It is closely associated with the license code and is required for an offline activation.
Replace license code
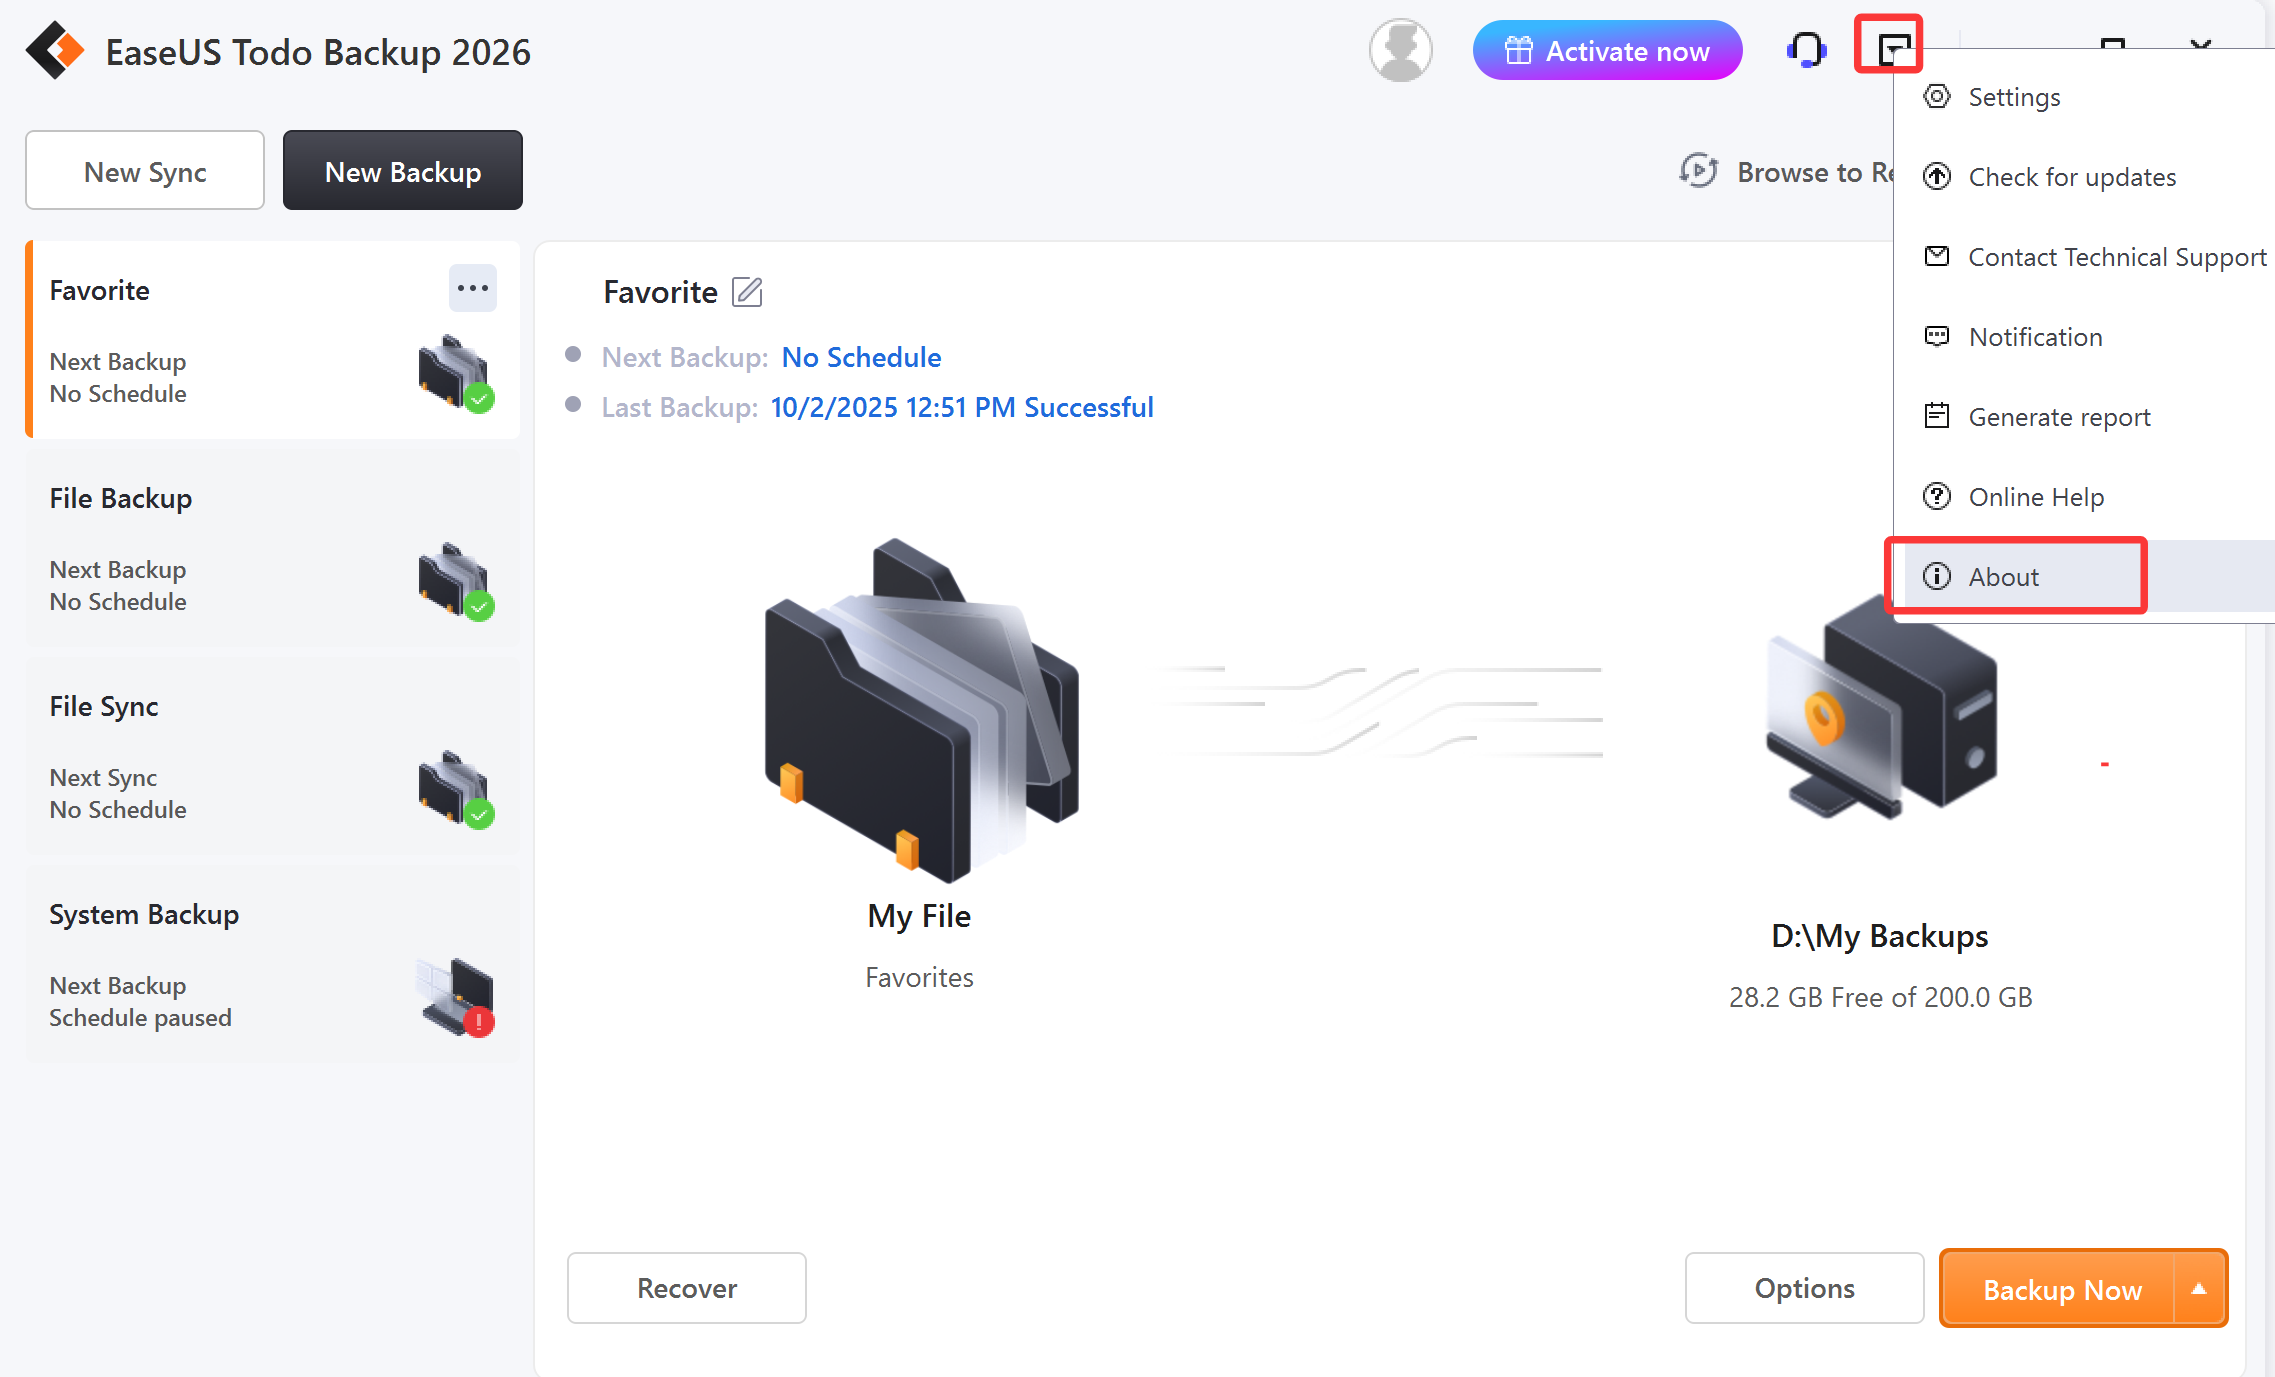
If you need to enter a new license code on a machine that already has a previously activated code, simply click the button located in the top right corner of the interface. From there, select About followed by Replace to enter the new license code.
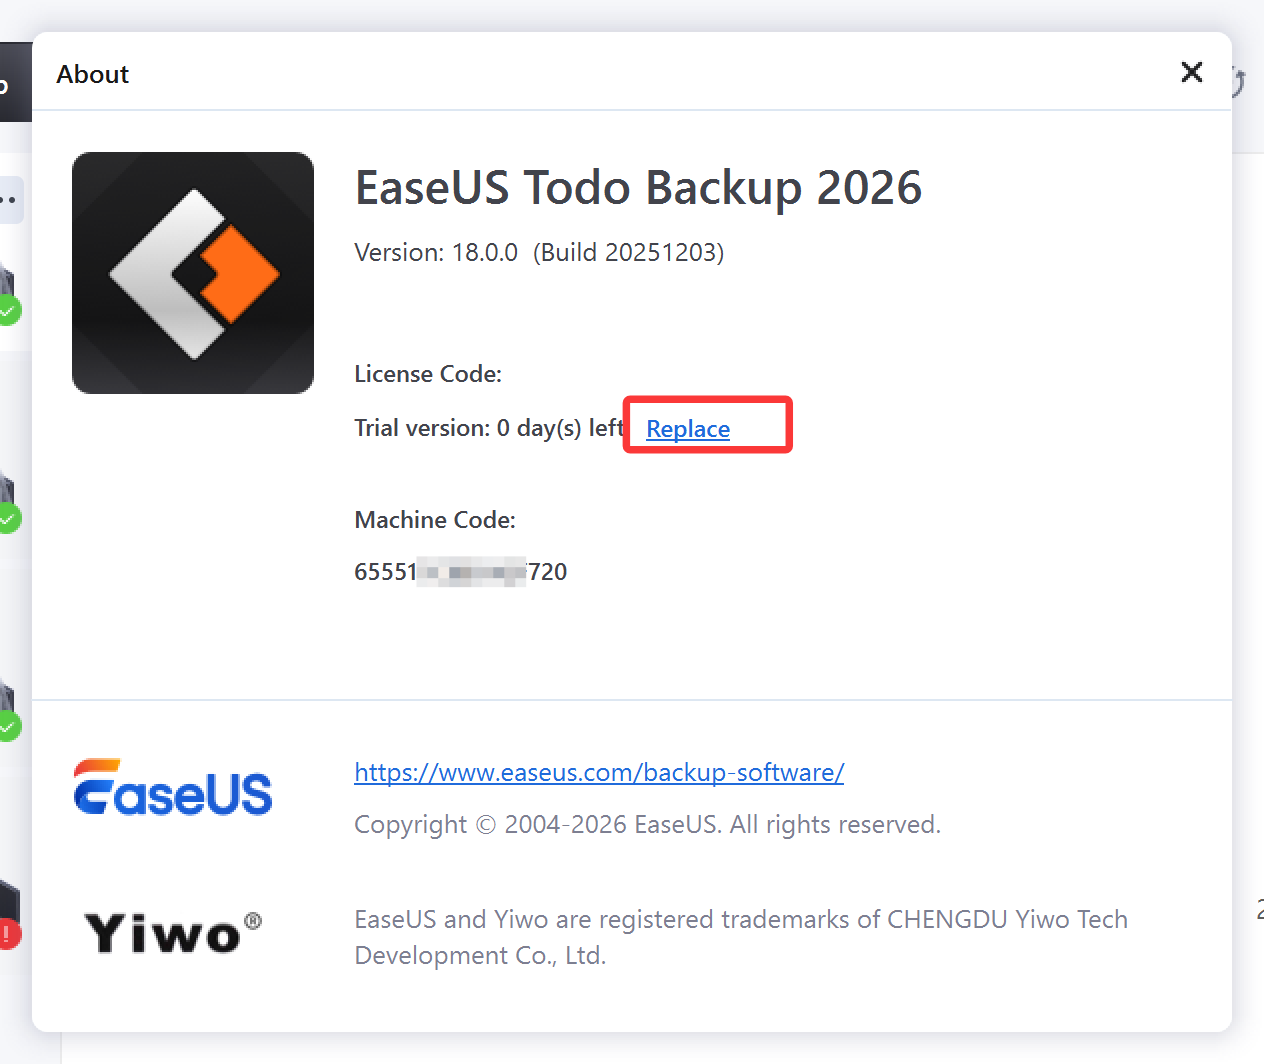
Note:
It's important to note that each edition of the software has its own unique license code. As such, only codes from the same edition can be replaced.
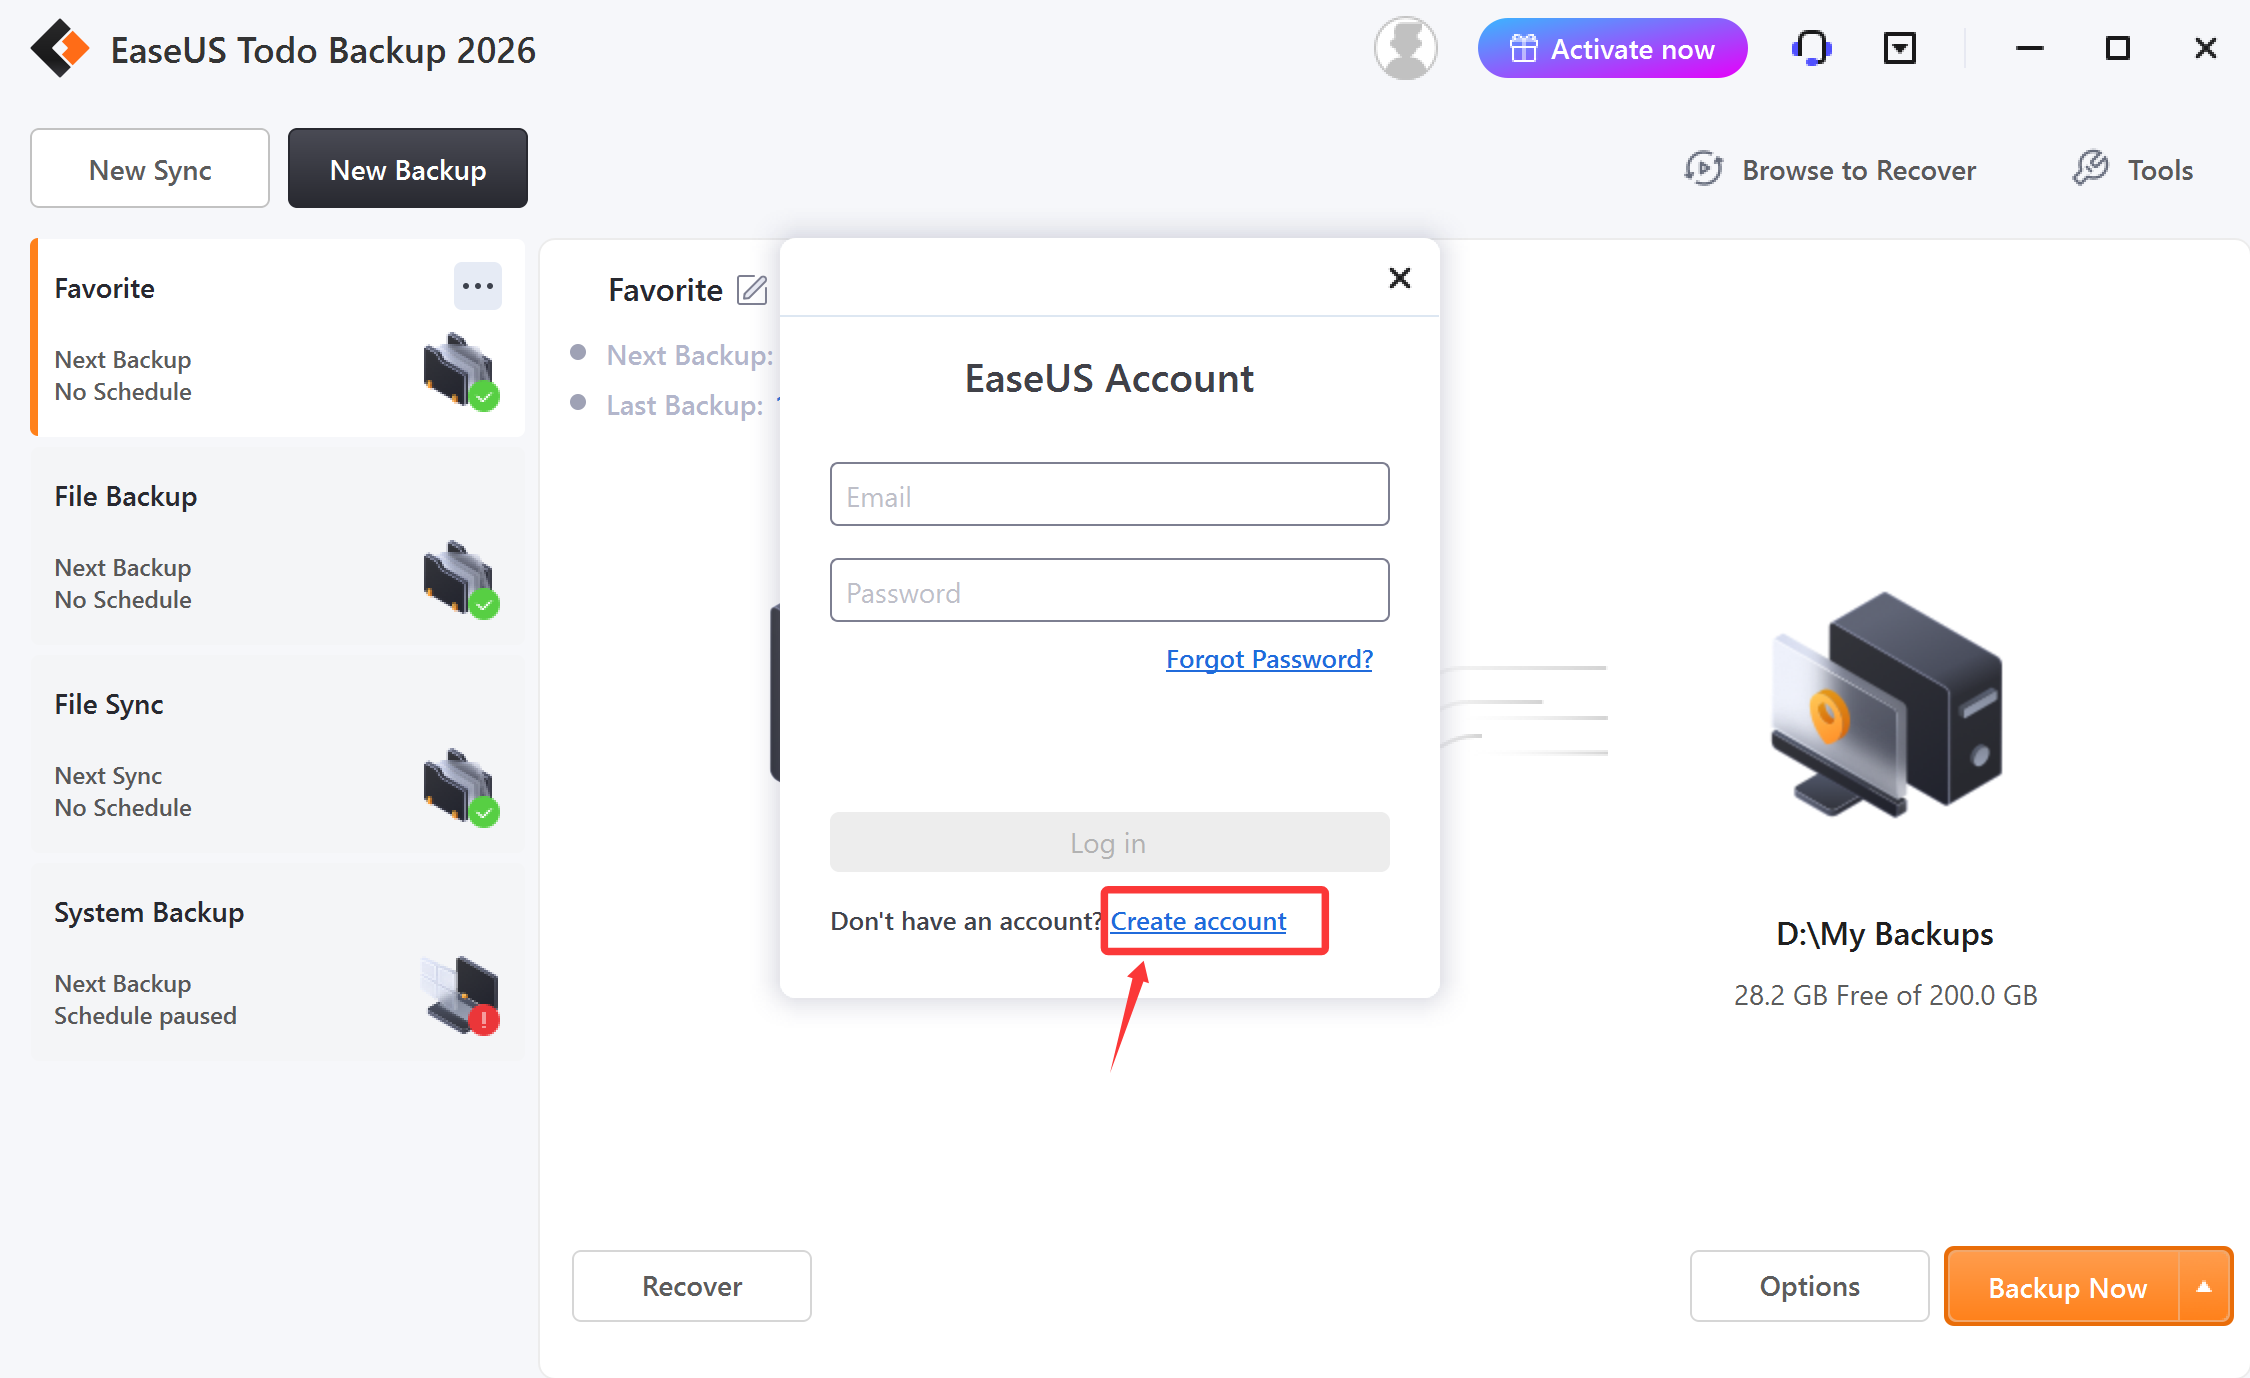
EaseUS Account
Logging into your EaseUS account enables you to connect to the Cloud Server, allowing for backup images to be saved directly to the EaseUS Cloud. If you already have an account, simply click on the left corner of the interface to login.

If you do not have an account, please click on Create account option located on the login page to register for your own account.
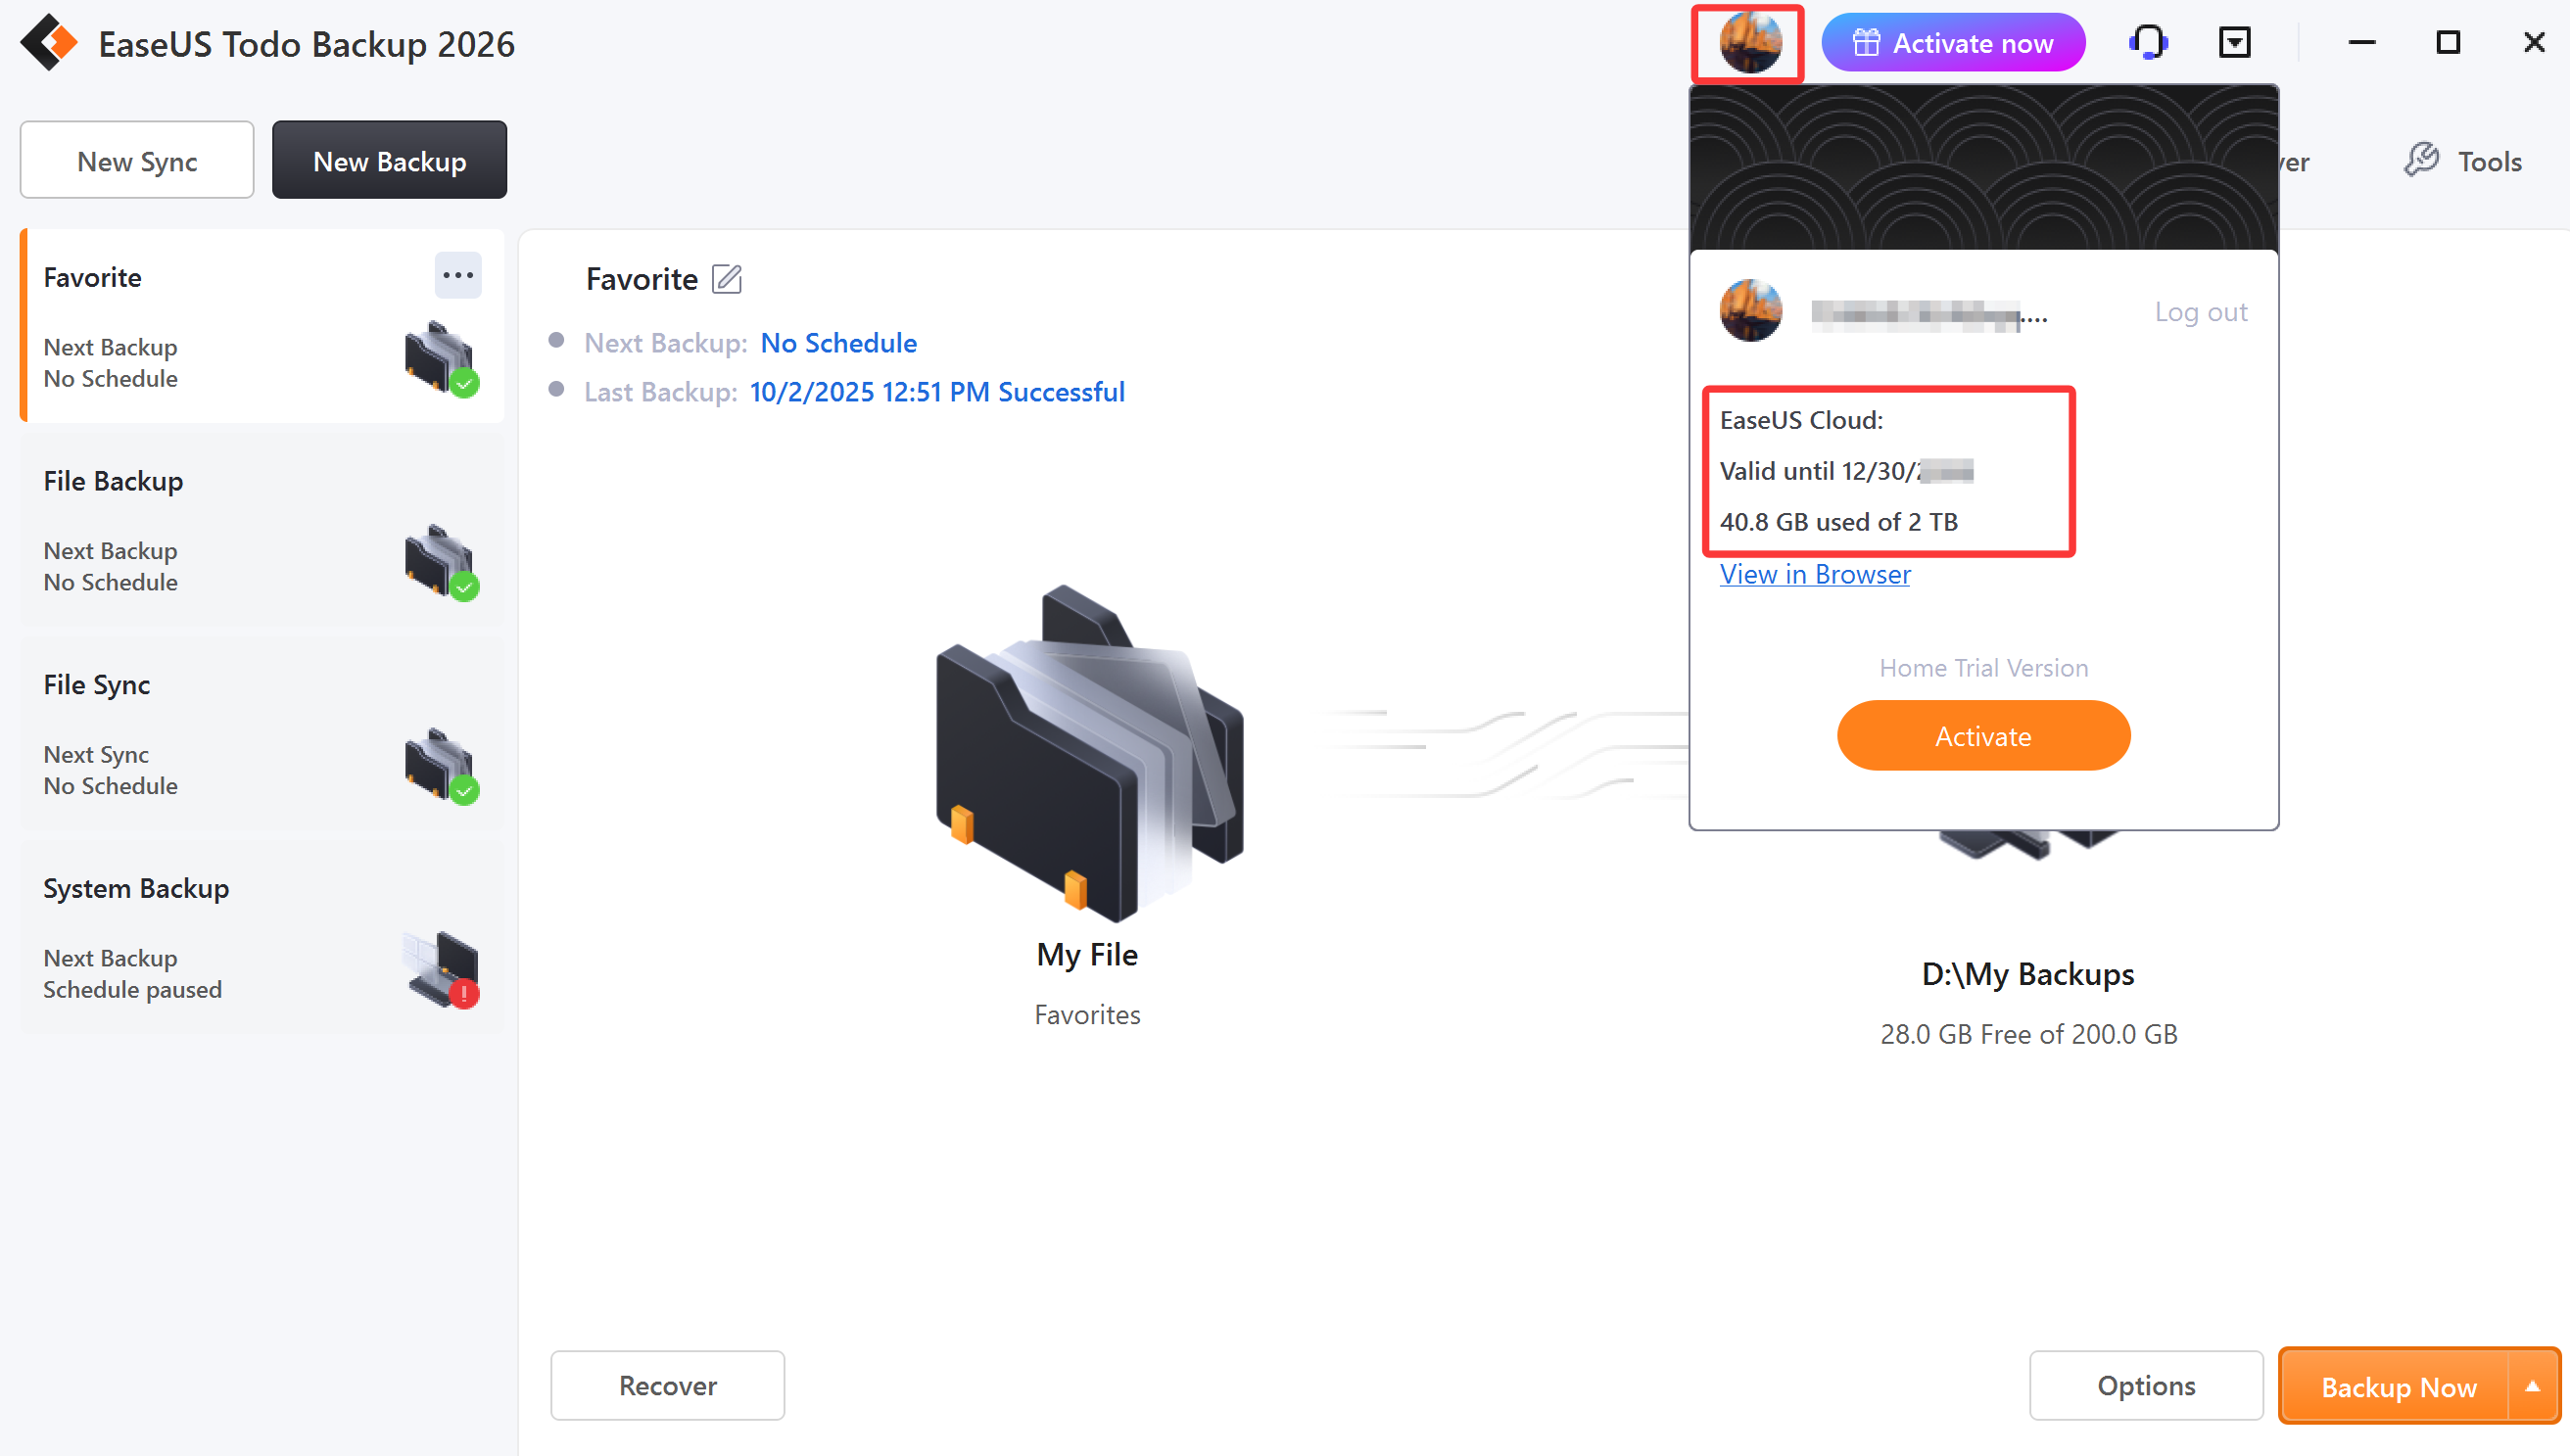
After logging in, the available storage space and the validity of your Cloud Service will be displayed.
Edition Comparison
EaseUS provides two editions for home users, including the Home and Free editions.
Free Edition - Solely intended for home users and its license allows usage of the software on one computer for personal use only.
Home Edition - Basic version designed for home users that features more advanced functionality such as backup/cloning of dynamic volumes, system transfers, and Outlook backups.
Tips:
Home edition offers a free trial for 30 days for evaluation purposes. Users can also activate the free edition to the Home Edition by simply using a Home License Code.
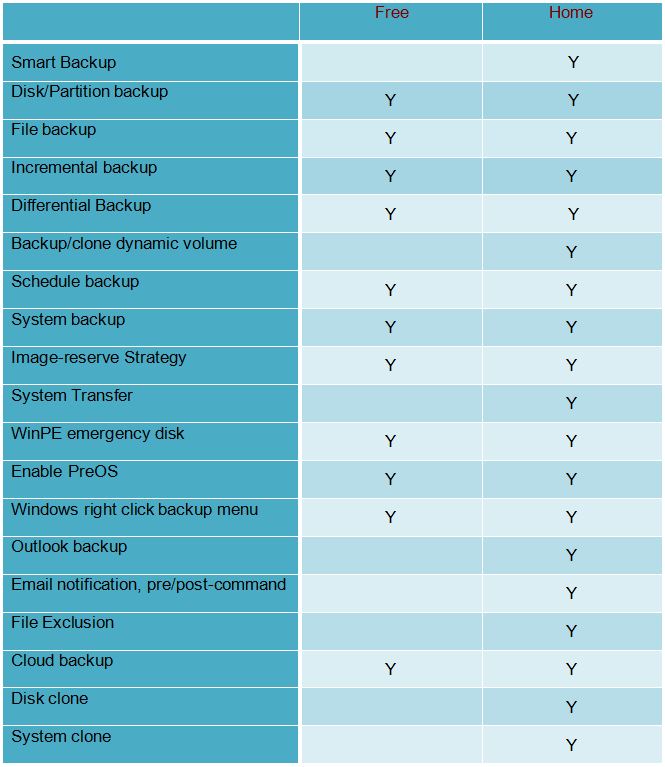
Feature Comparison
Home Page
EaseUS Todo Backup is designed to simplify your routine backup tasks and make the process smoother. The home page is divided into three main sections.
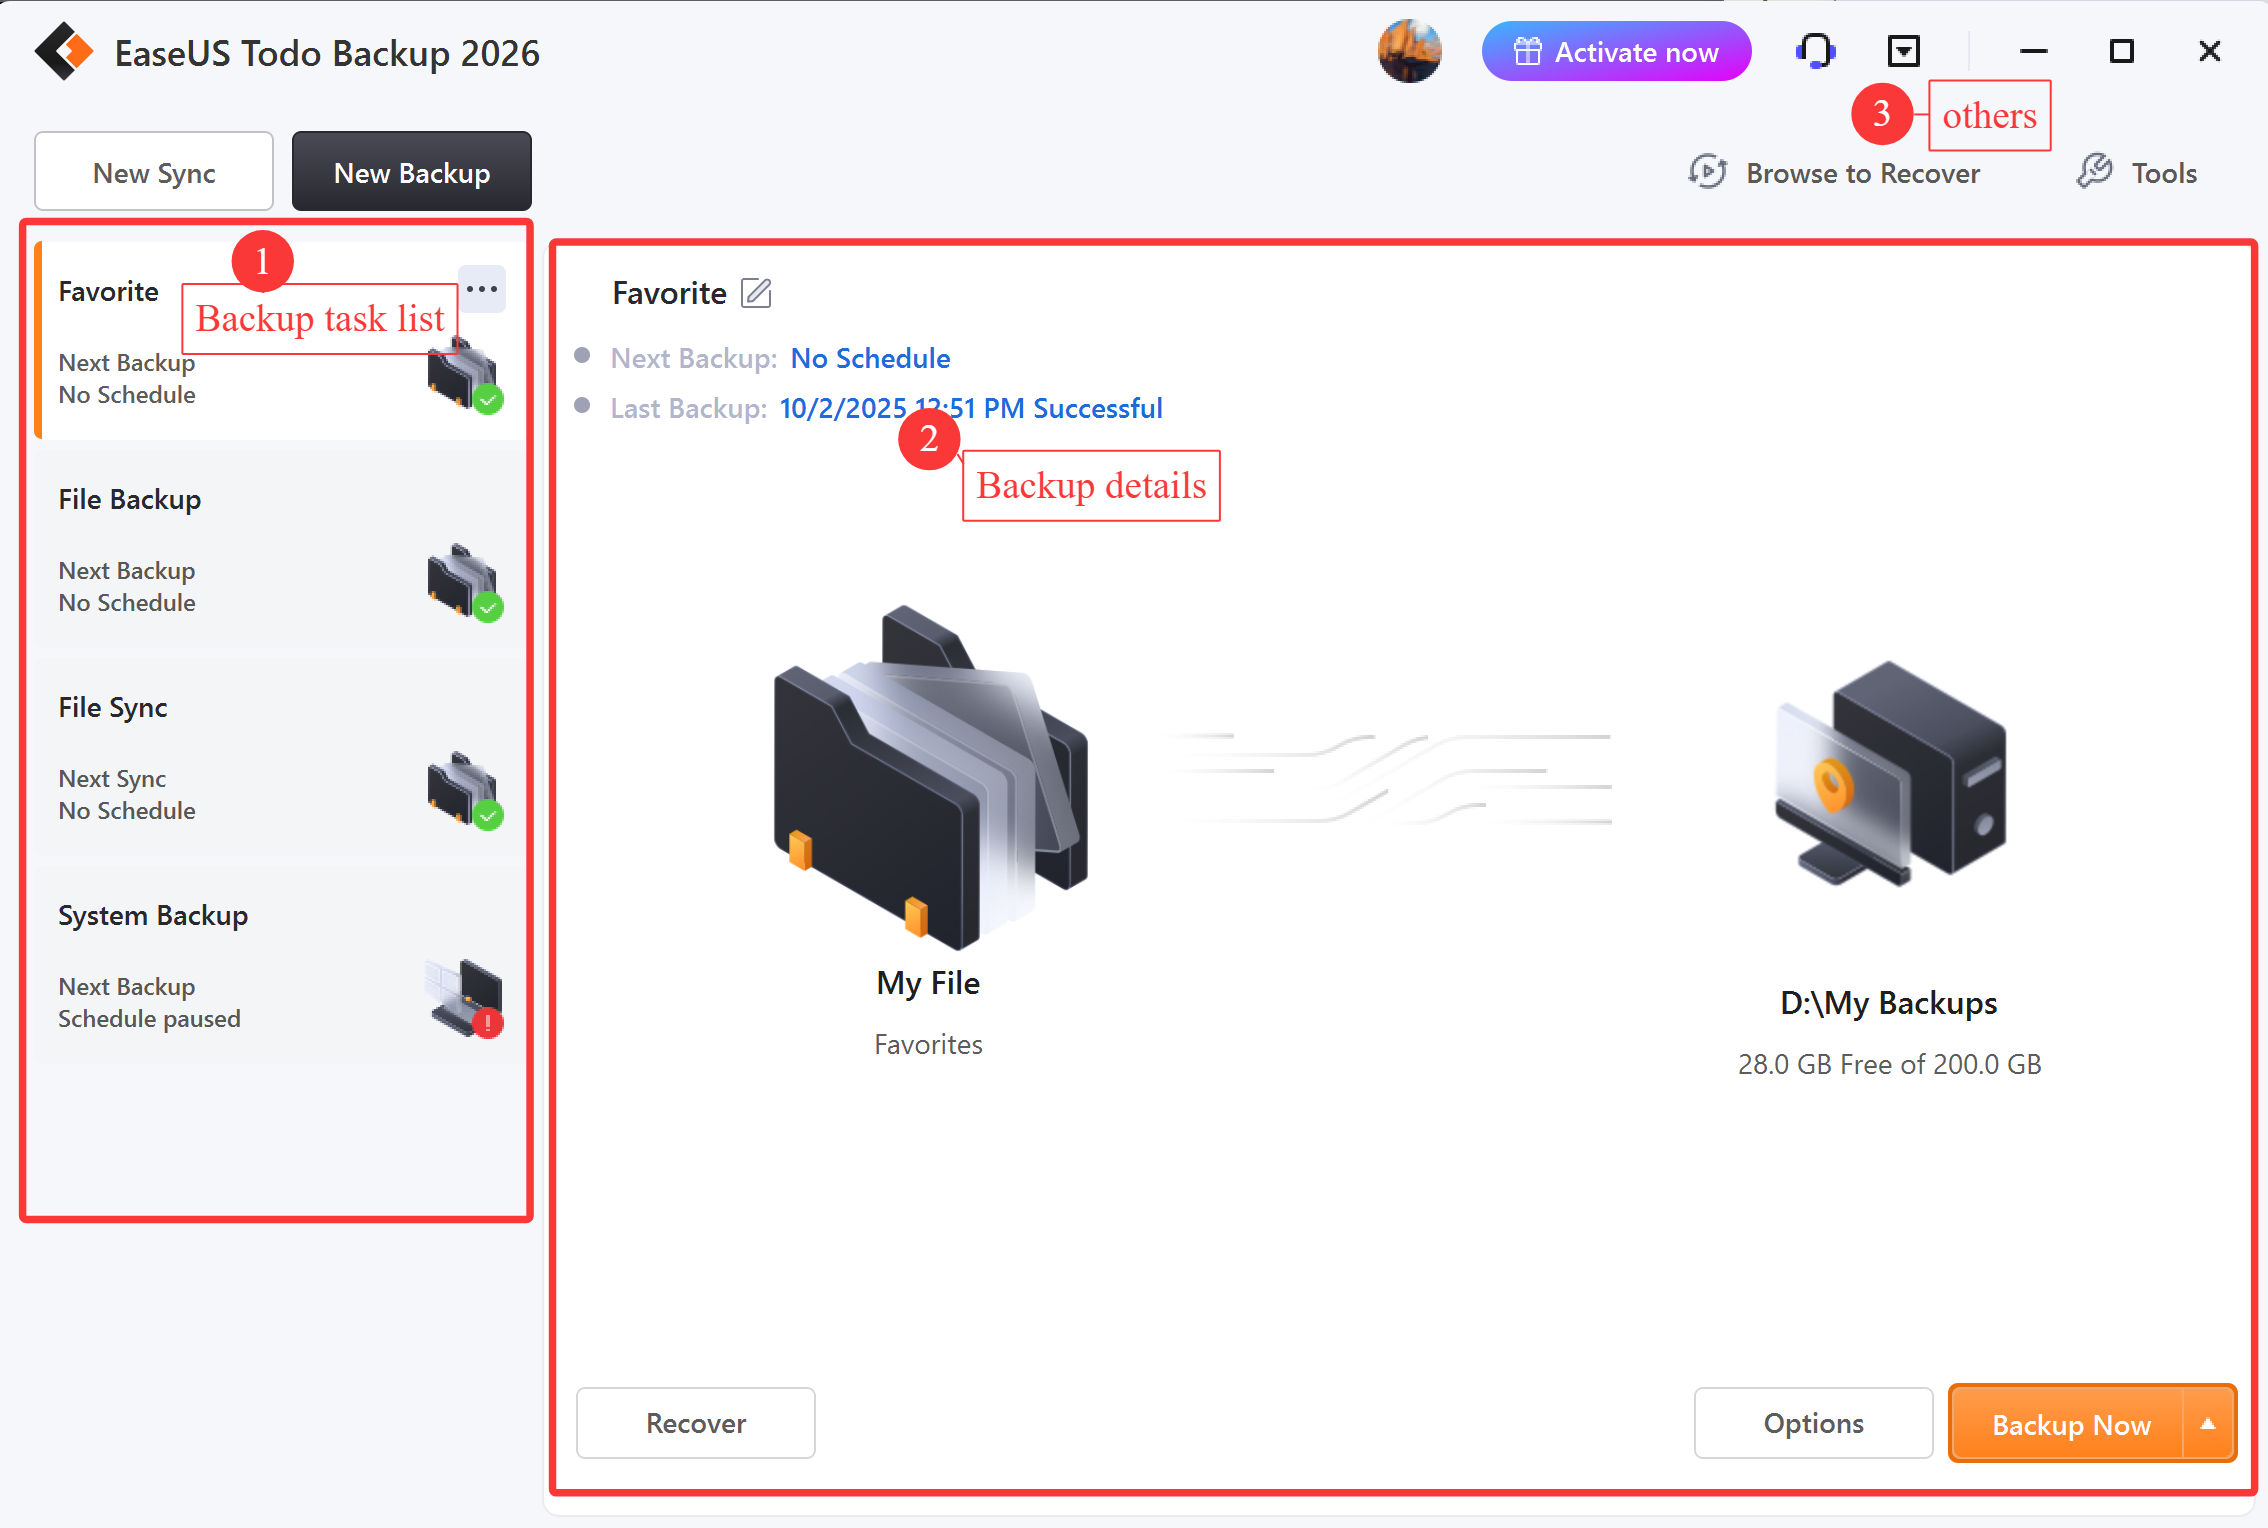
Backup Task List
Within this section, you can view all of your existing backups and create new ones by clicking the "+" symbol. For detailed instructions on how to use each feature, please refer to the corresponding paragraph.
Disk/Volume backup, System backup, File Backup, Smart Backup, Mail Backup.
Backup Details
All essential information about a backup task can be easily accessed from the list, such as the last and next backup time, source and target locations. You can also modify the backup options if needed.
Additionally, you can access the Recover configuration page by clicking on Recover located in the right corner.
Other
This area contains several useful features such as Browse to Recover, Clone, System Clone, System Transfer, and Check Image.
Backup
The primary purpose of backup is to create duplicate copies of essential data to enable data recovery in case of an unexpected computer disaster. Backups serve as an effective remedy for system failure or data loss. Here are some benefits of regular backup:
The benefits to protect your system with a regular backup tool:
1. Backup can be scheduled (e.g. regular automatic backups that require no user interaction);
2. Backup changes can be appended incrementally or differentially (i.e. after a full backup, subsequent backups will take less time and occupy less space than the first one);
3. Backups allow you to keep several versions of the backed up data and you can restore to one of the previous versions (e.g. you can keep backups from one, two and three weeks ago on the same disk and you can recover the backup from the moment that you need);
4. Backup can be mounted and searched through (e.g. if you want to quickly find, view and copy a file from it).
User can easily get system running again after recovering a system image file to original drive even a new drive.
Tips:
In order to ensure a rapid and successful backup process, please close all other applications before starting the operation and never try to save the image file to the partition/disk which you are backing up.
Regularly backing up your data provides numerous benefits for protecting your system, including:
1. Data recovery: In the event of a system failure or data loss, backups serve as a reliable source for restoring your data.
2. Automatic scheduling: Backups can be scheduled to run automatically, requiring no intervention from the user.
3. Incremental backups: After an initial backup, subsequent backups can be incremental, significantly reducing the time and space required to complete the backup process.
4. Multiple versions: Backups allow you to store and restore multiple versions of your data, making it possible to recover from a wider range of issues.
5. Quick access to files: Backups can be mounted and searched, making it easy to find, view, and copy specific files from the backup.
In summary, regular backups are an essential tool for protecting your system from unexpected disasters and data loss.
System Backup
Windows Operation System is very important for a computer. It is necessary to protect it in the event of system crash.
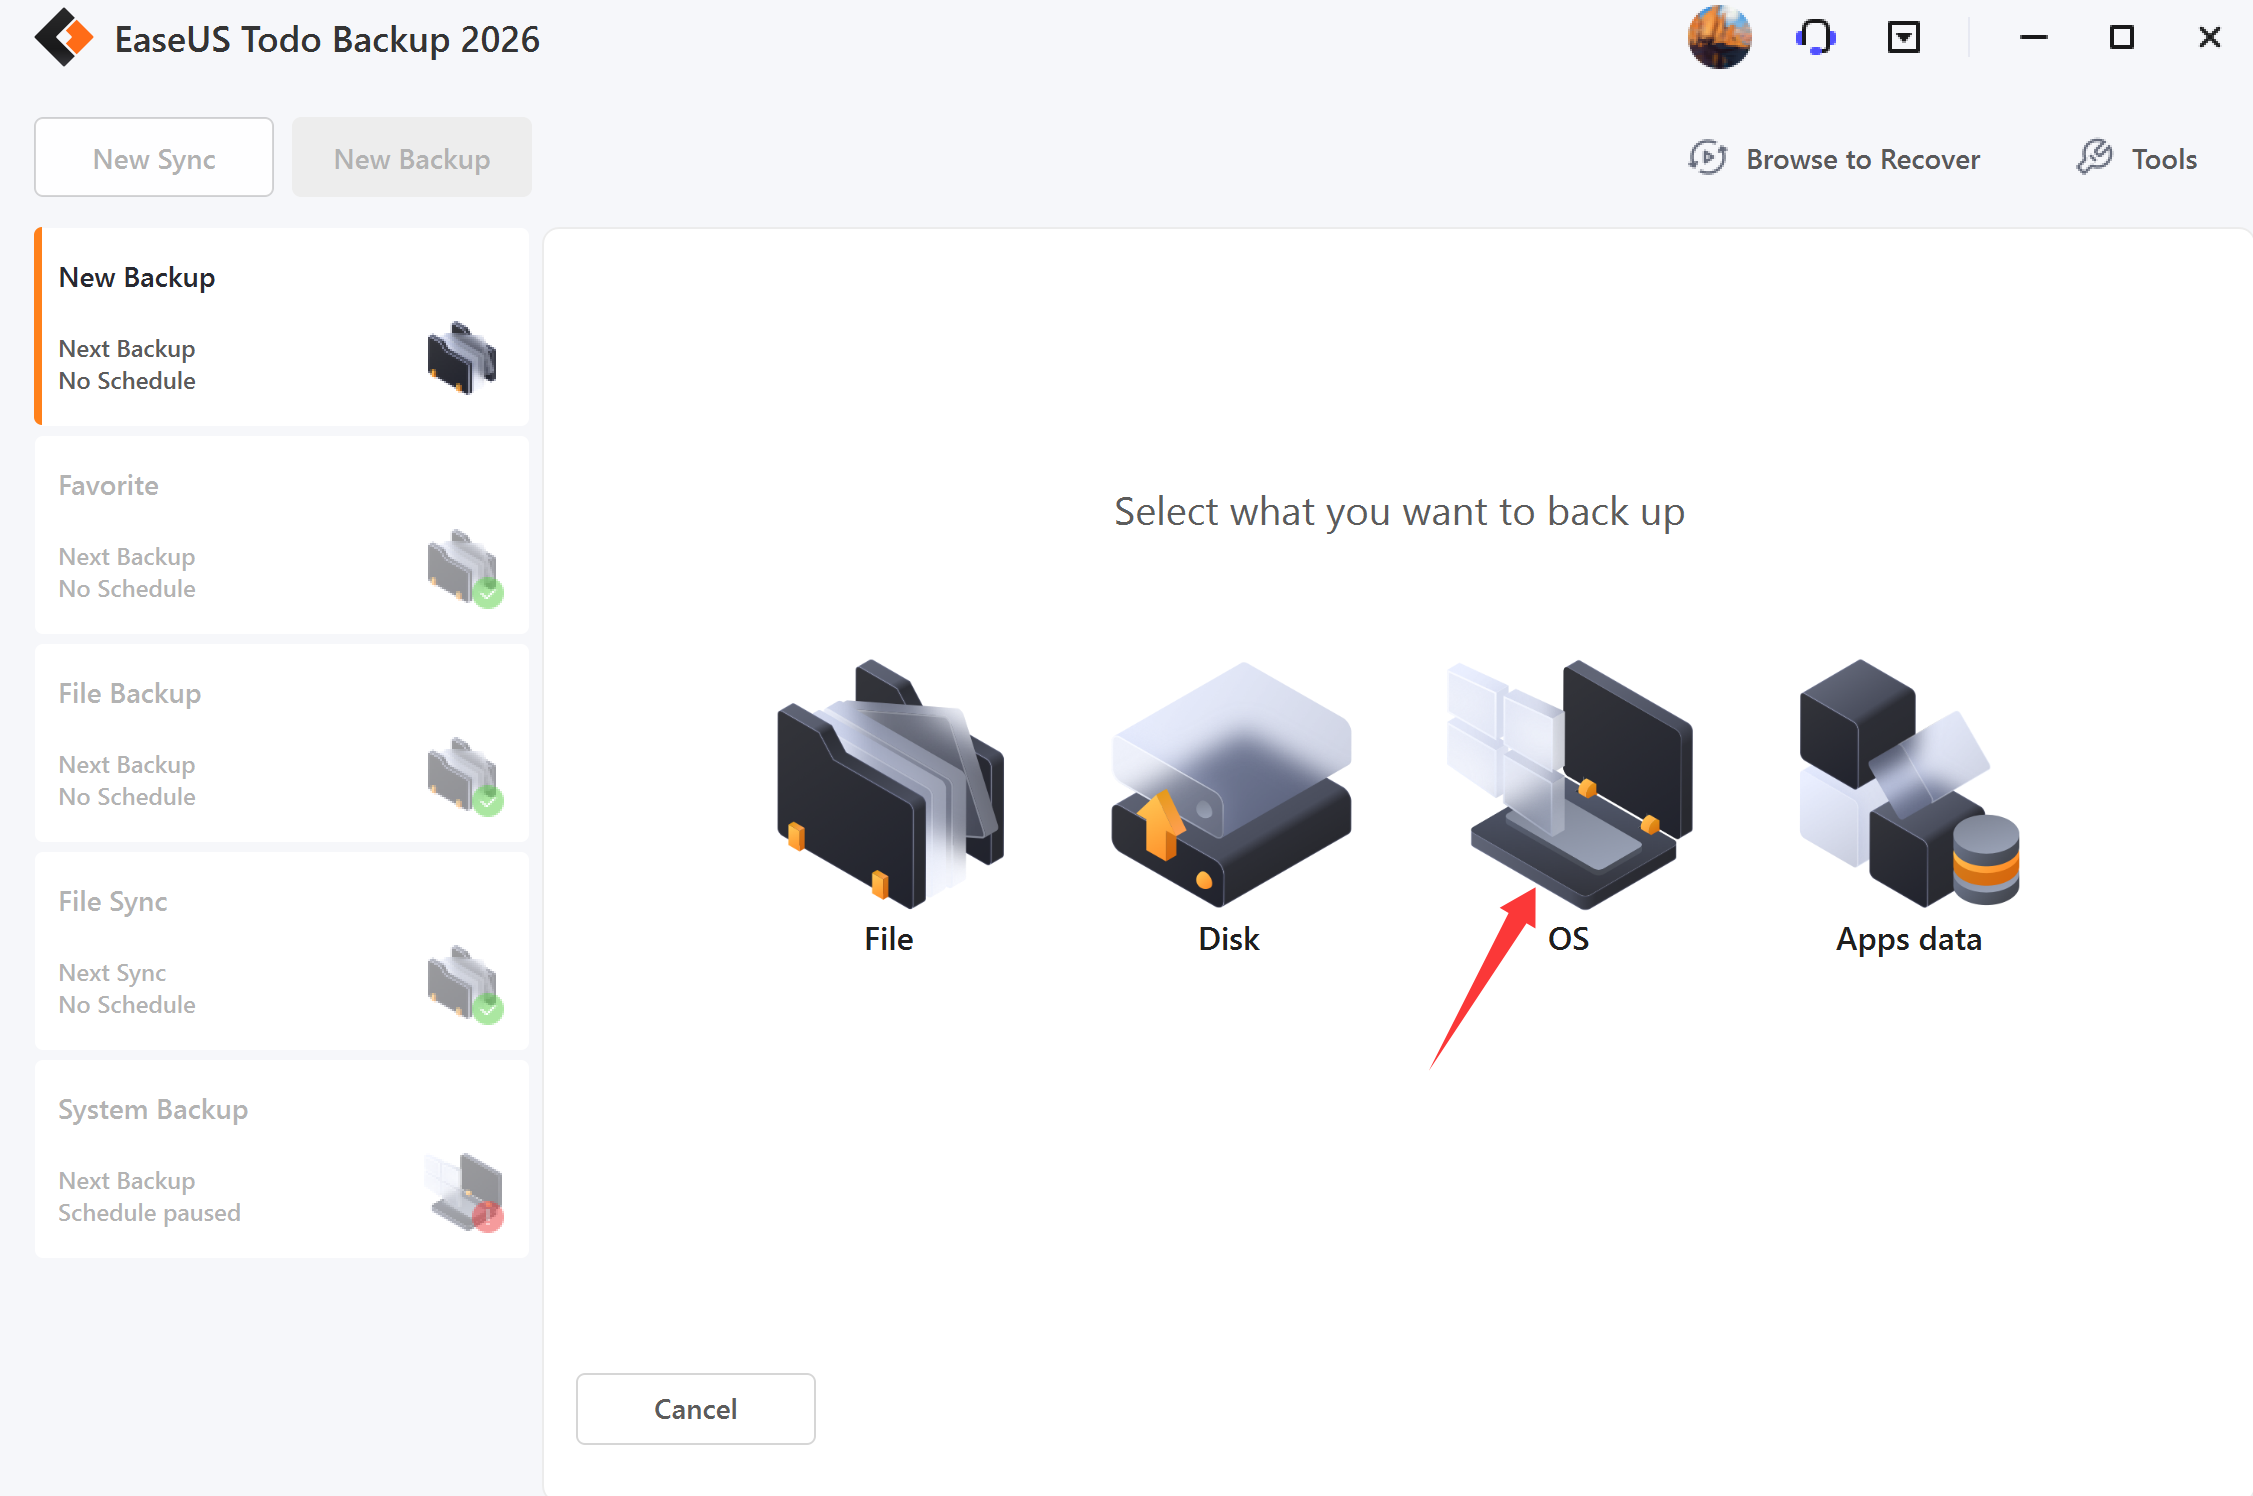
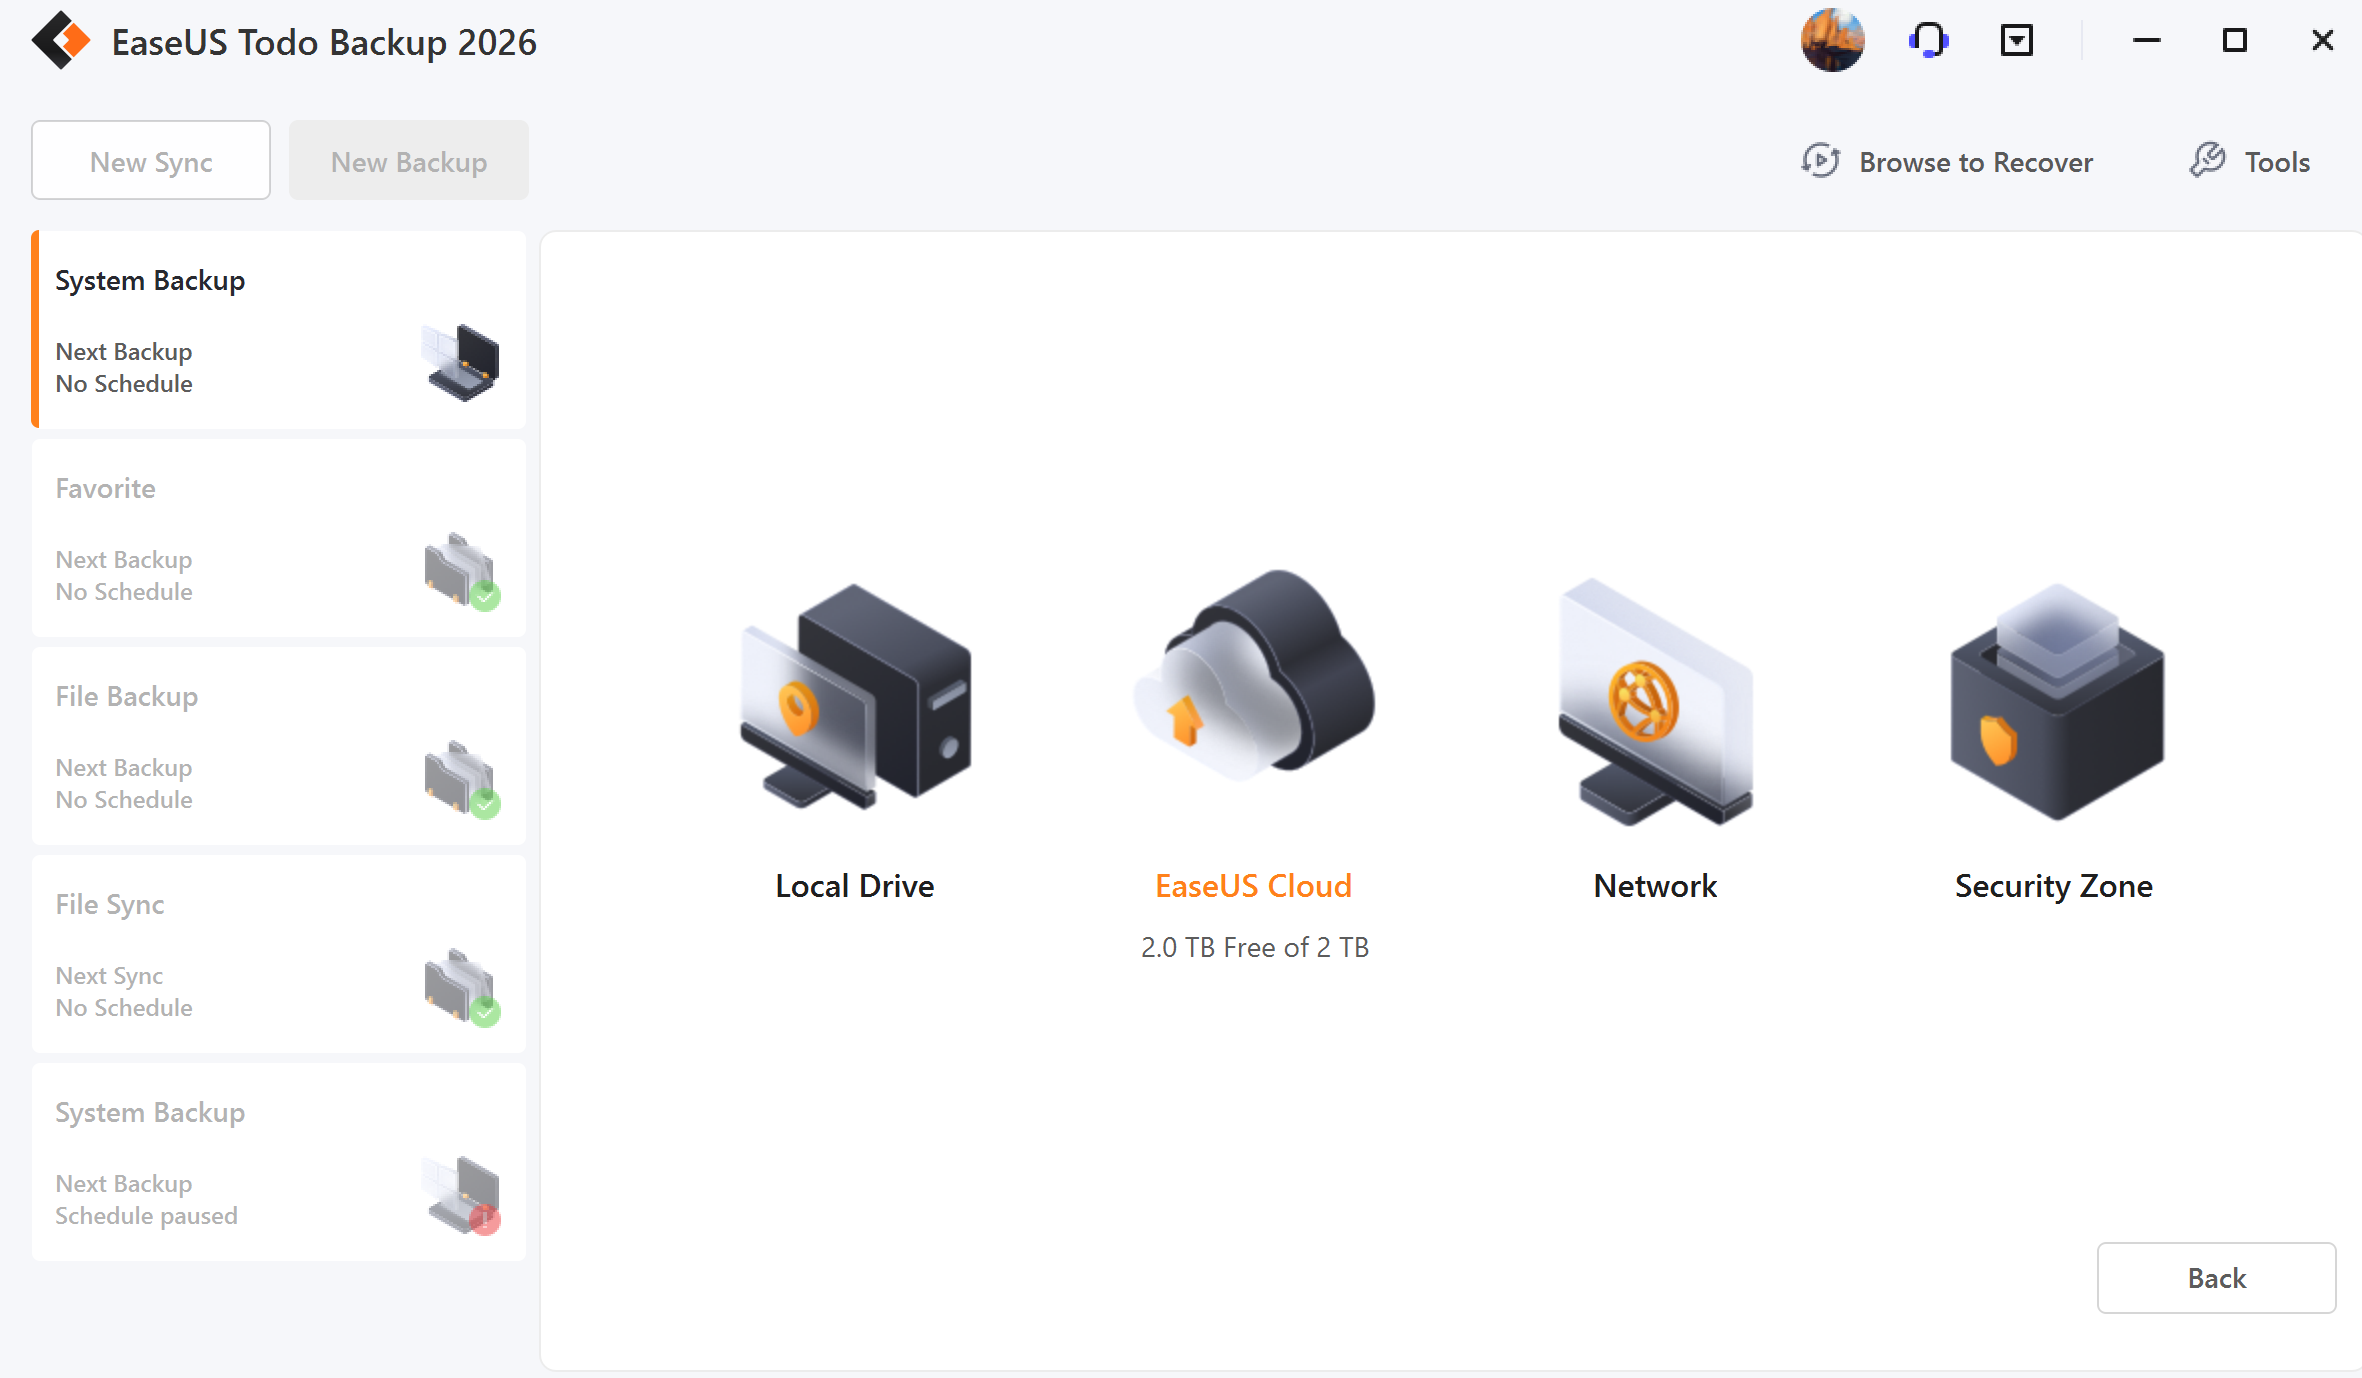
EaseUS Todo Backup provides the easiest way to protect your operating system. In System backup, the necessary partitions for system boot will be selected automatically.
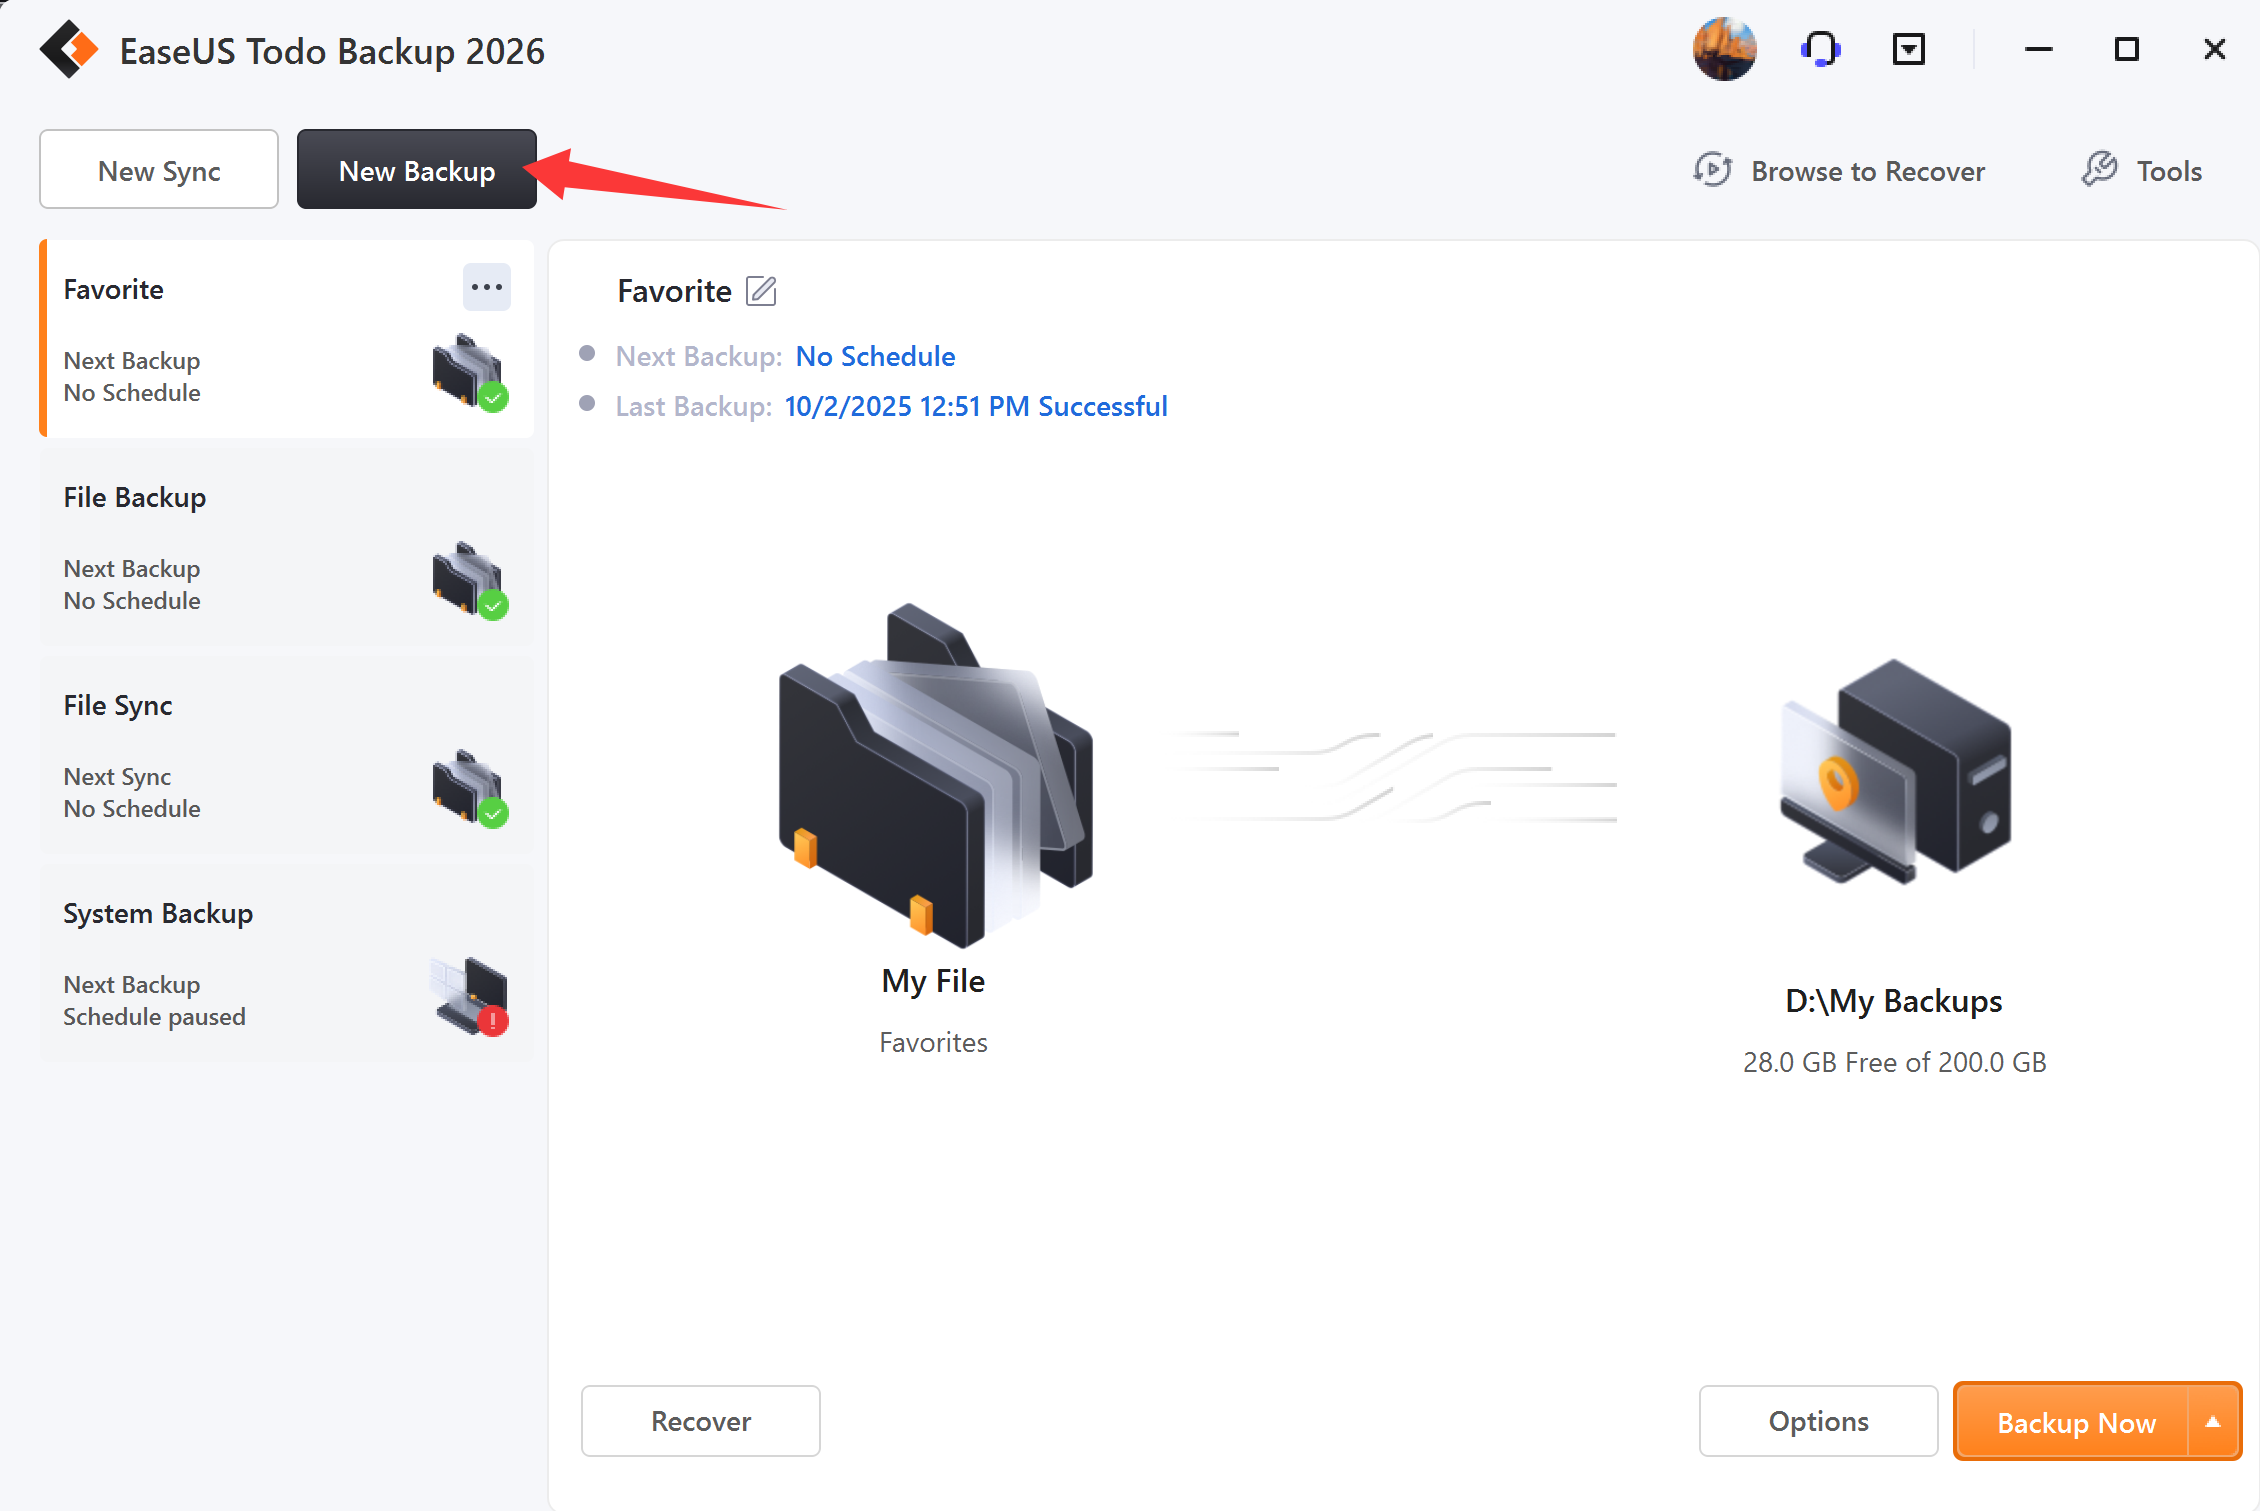
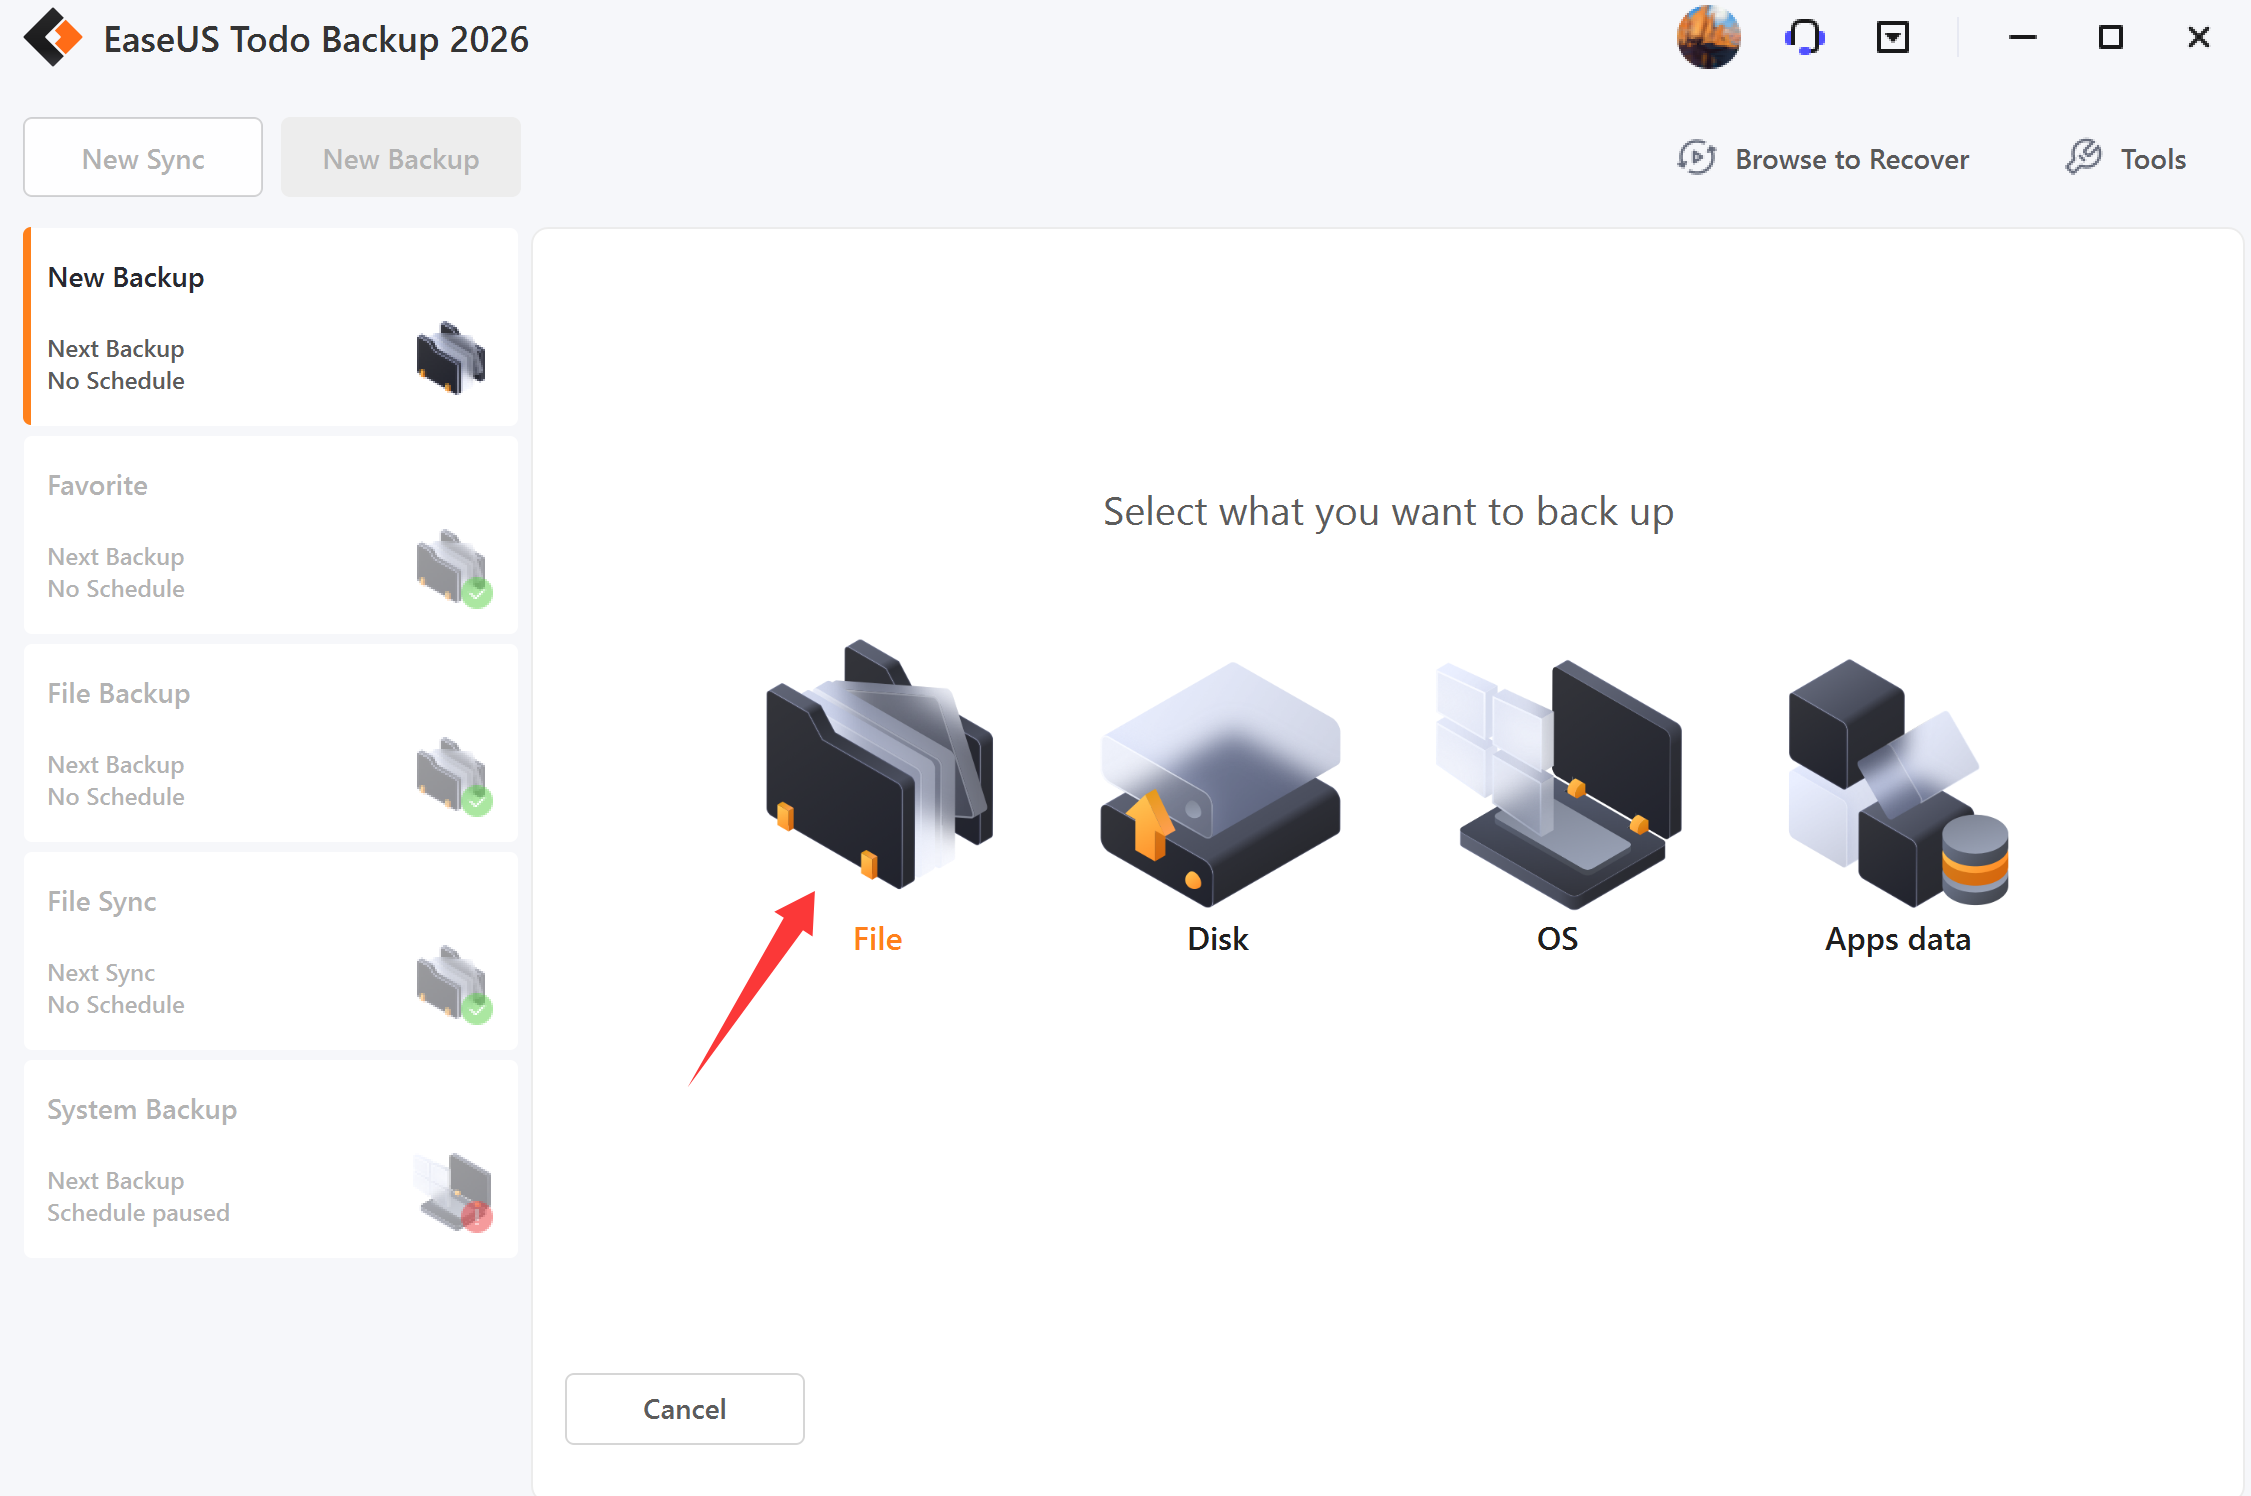
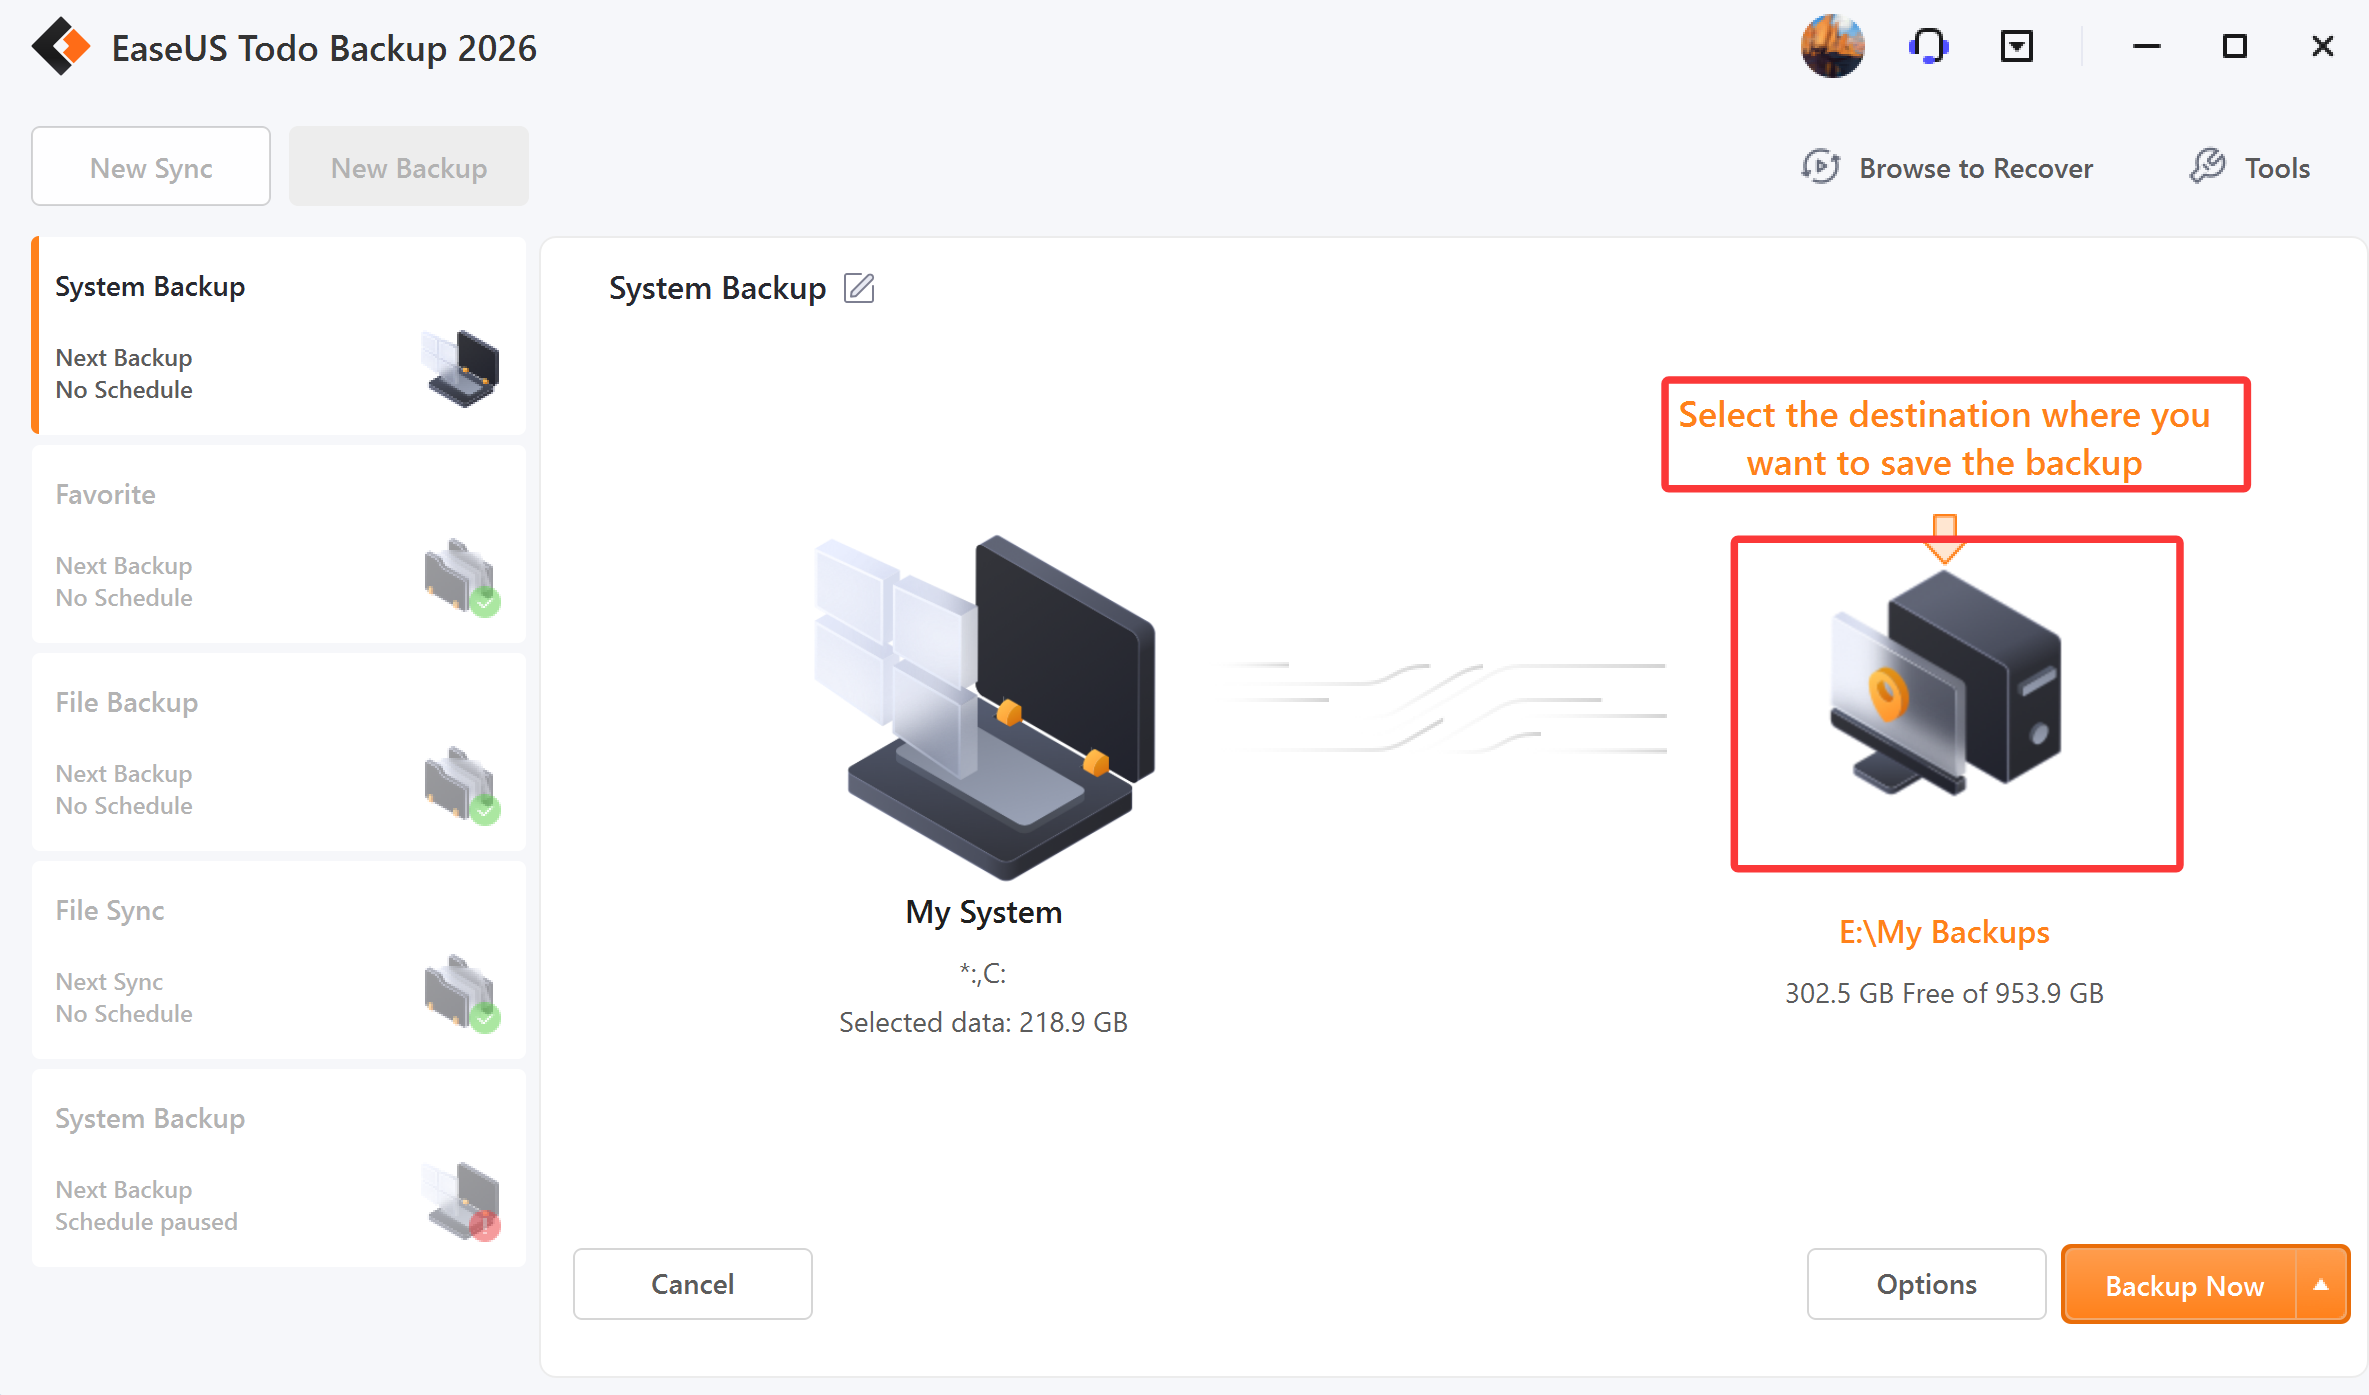
Please click New Backup on the left side, select OS as the backup contents, select the destination location, then click Backup Now. The backup plan name can be edited, too.
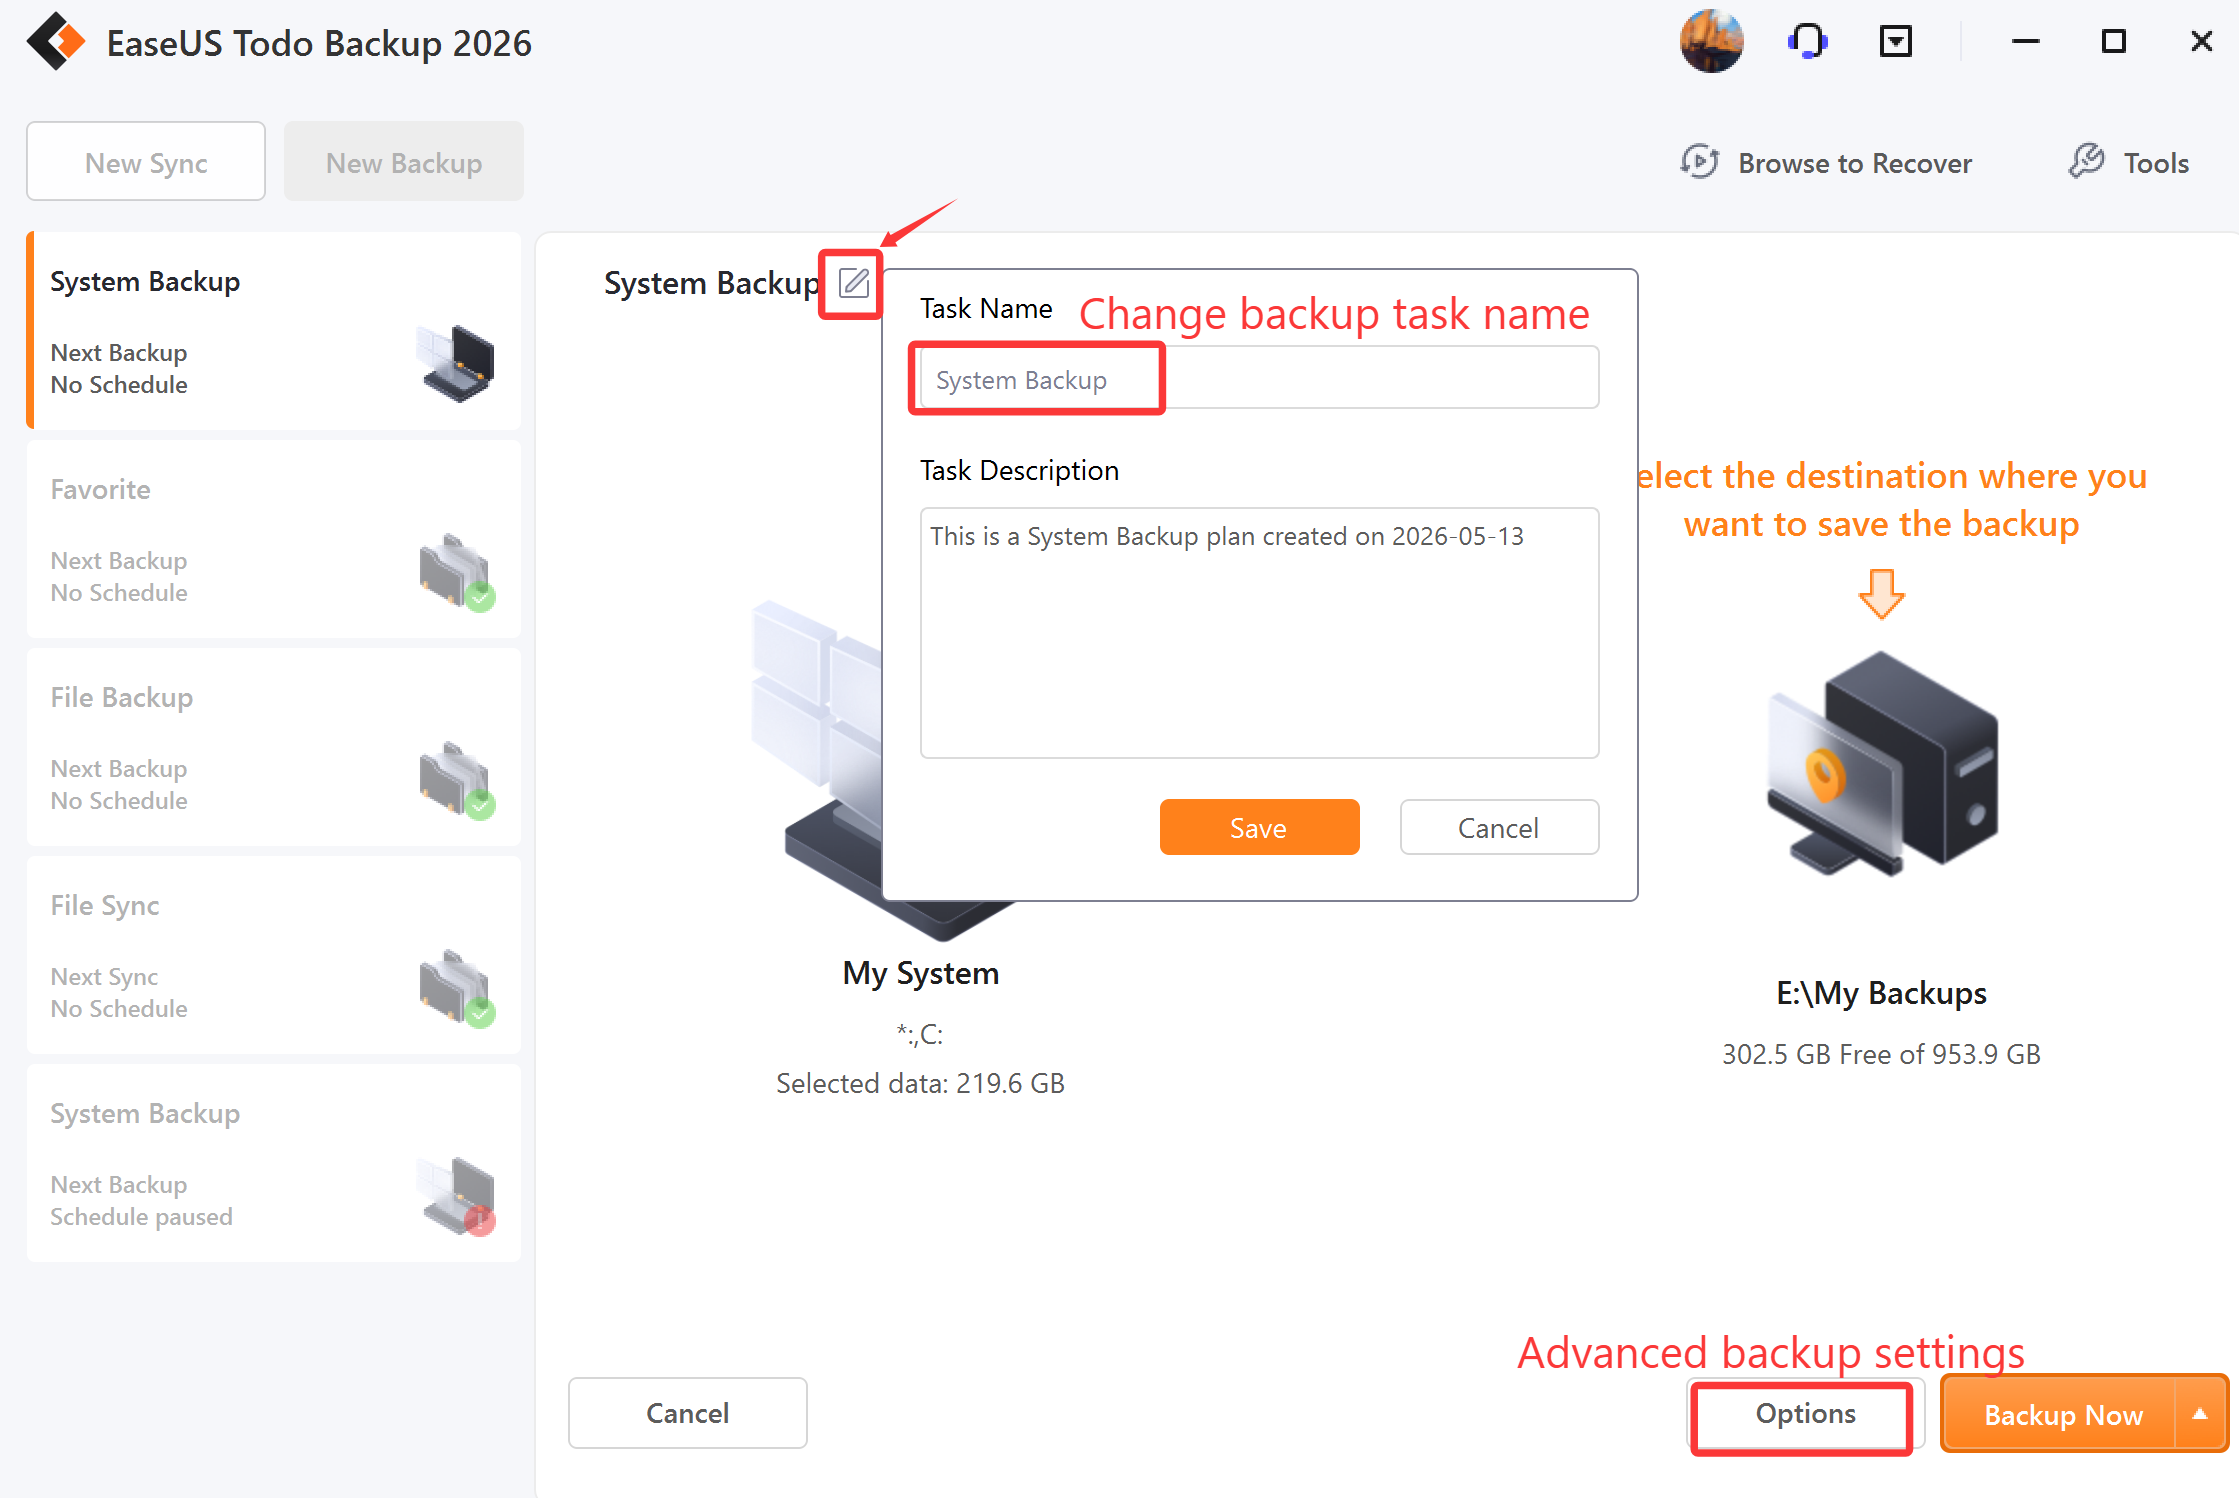
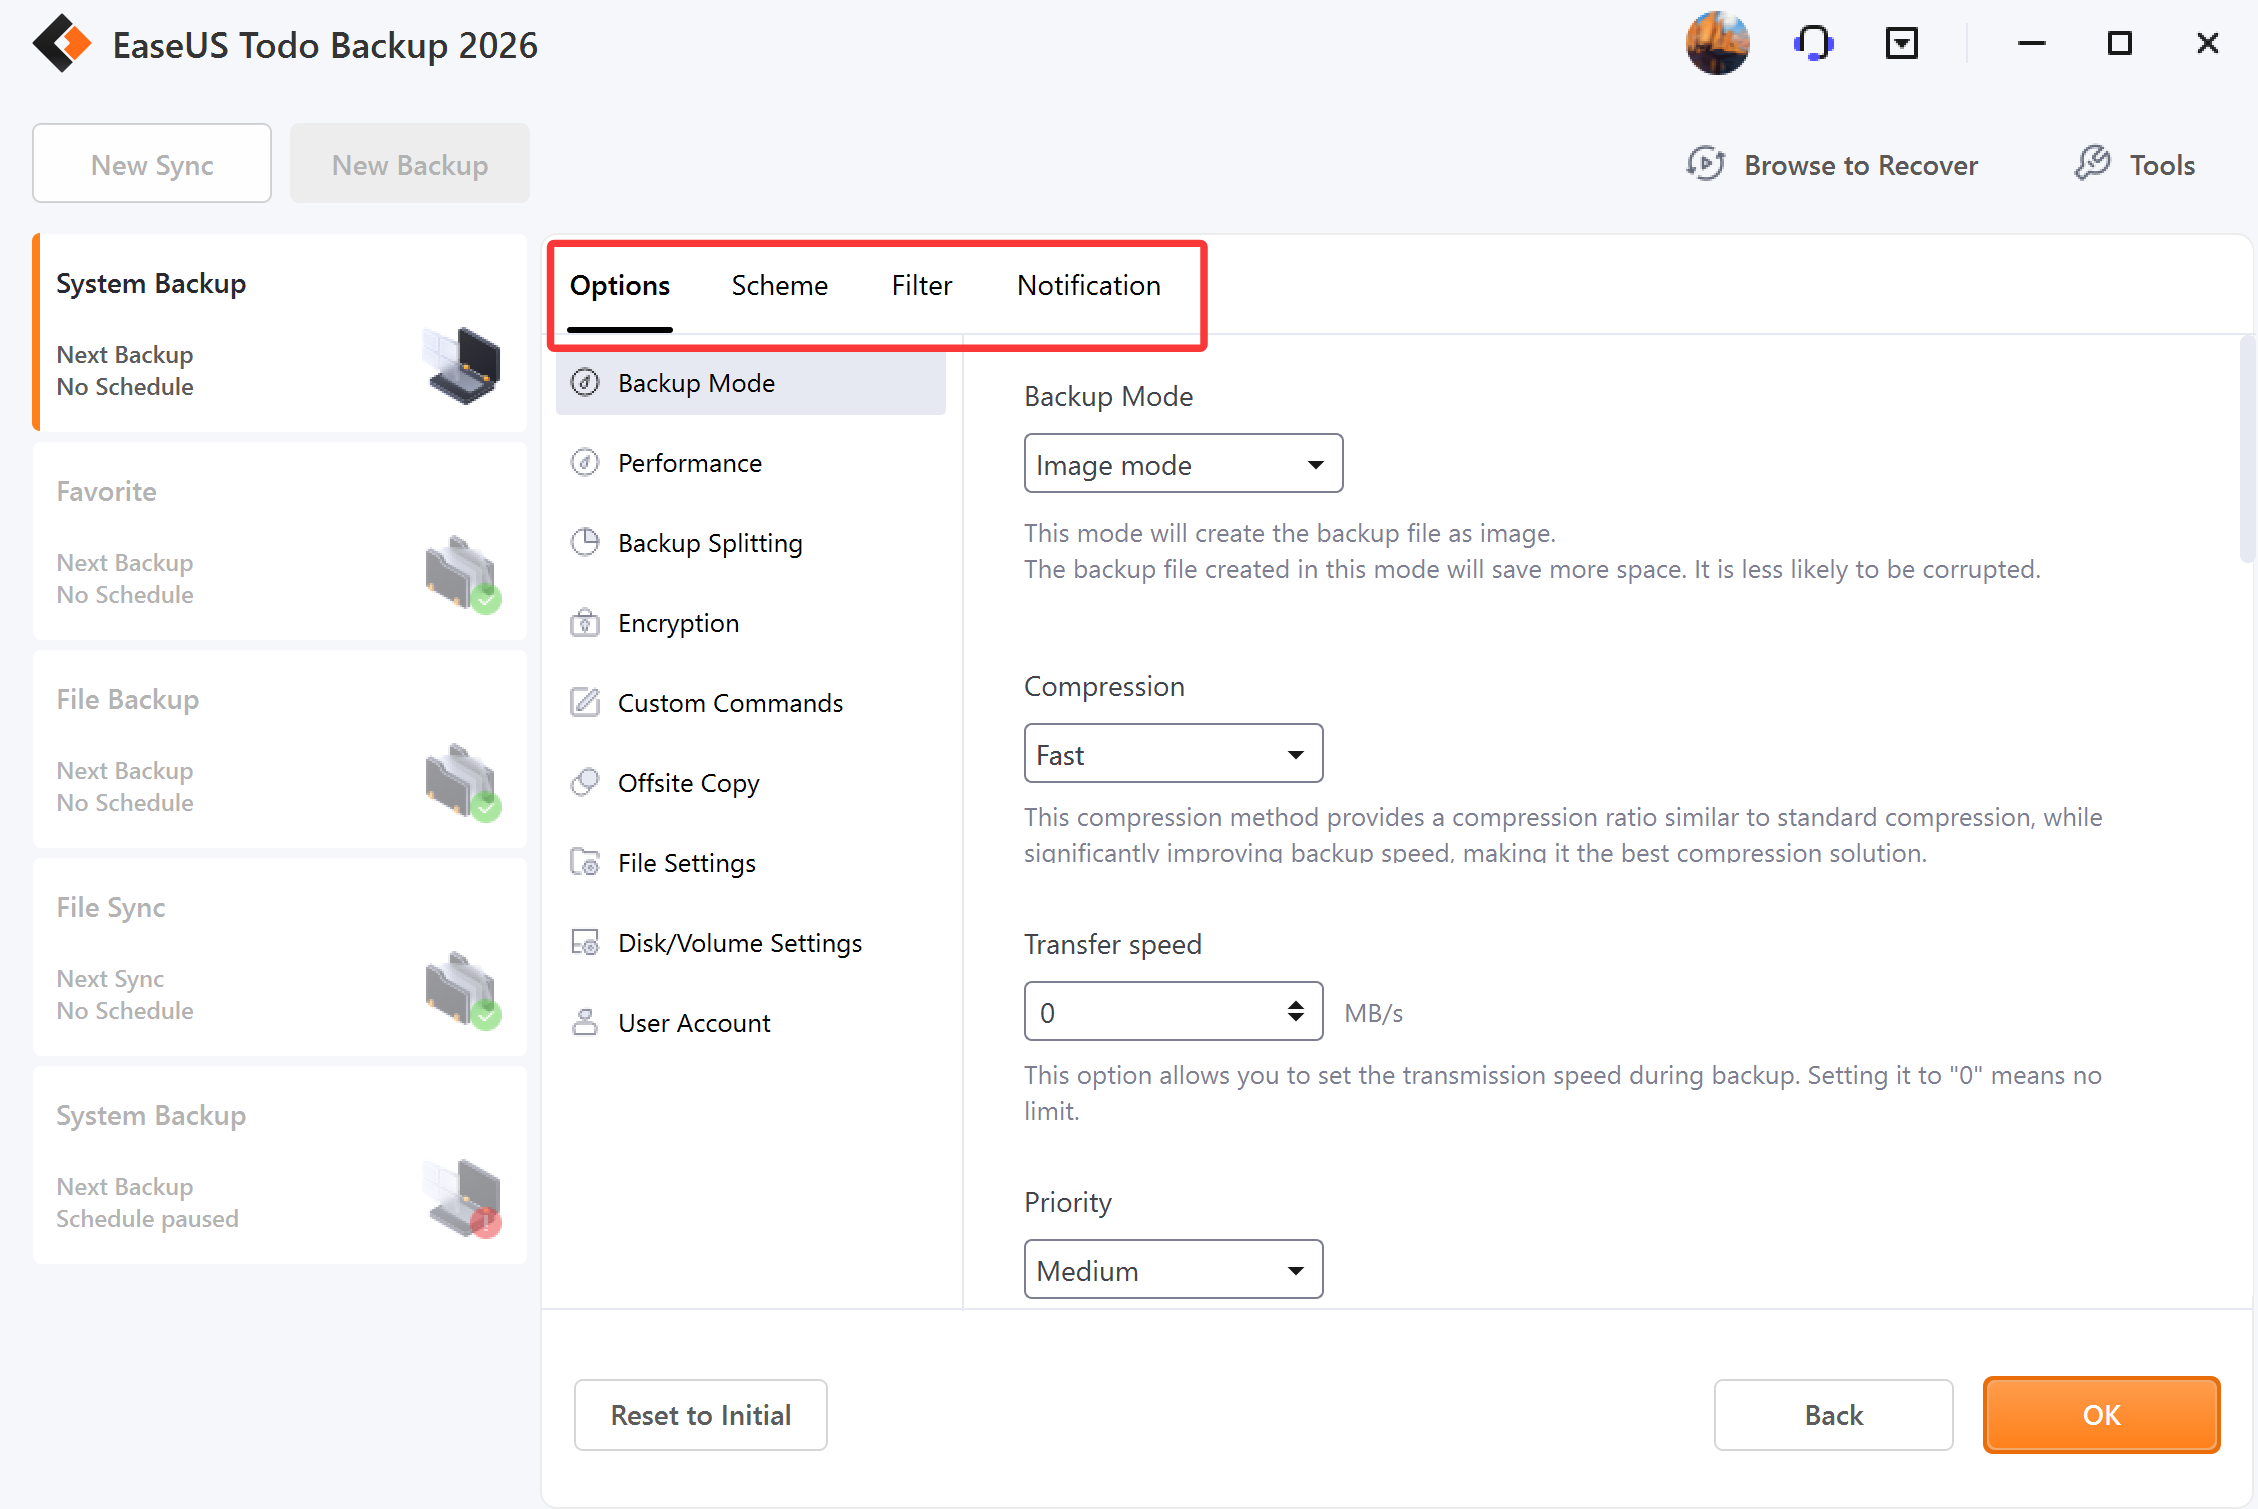
Advanced backup settings
Advanced backup settings provide flexibility and automation when creating a backup plan. Backup options is to edit the advanced parameters. Backup Scheme is to create an automatic backup plan. Backup Filter is to exclude the added file types and folders to avoid backing up unnecessary files. With Backup Notification, you may monitor backup status with E-mail notification.
For more details, please click:
Backup option, Backup Scheme, Backup Filter, Backup Notification.
Tips:
Advanced backup settings are for reference only but not a prerequisite for backup.
Disk/Partition Backup
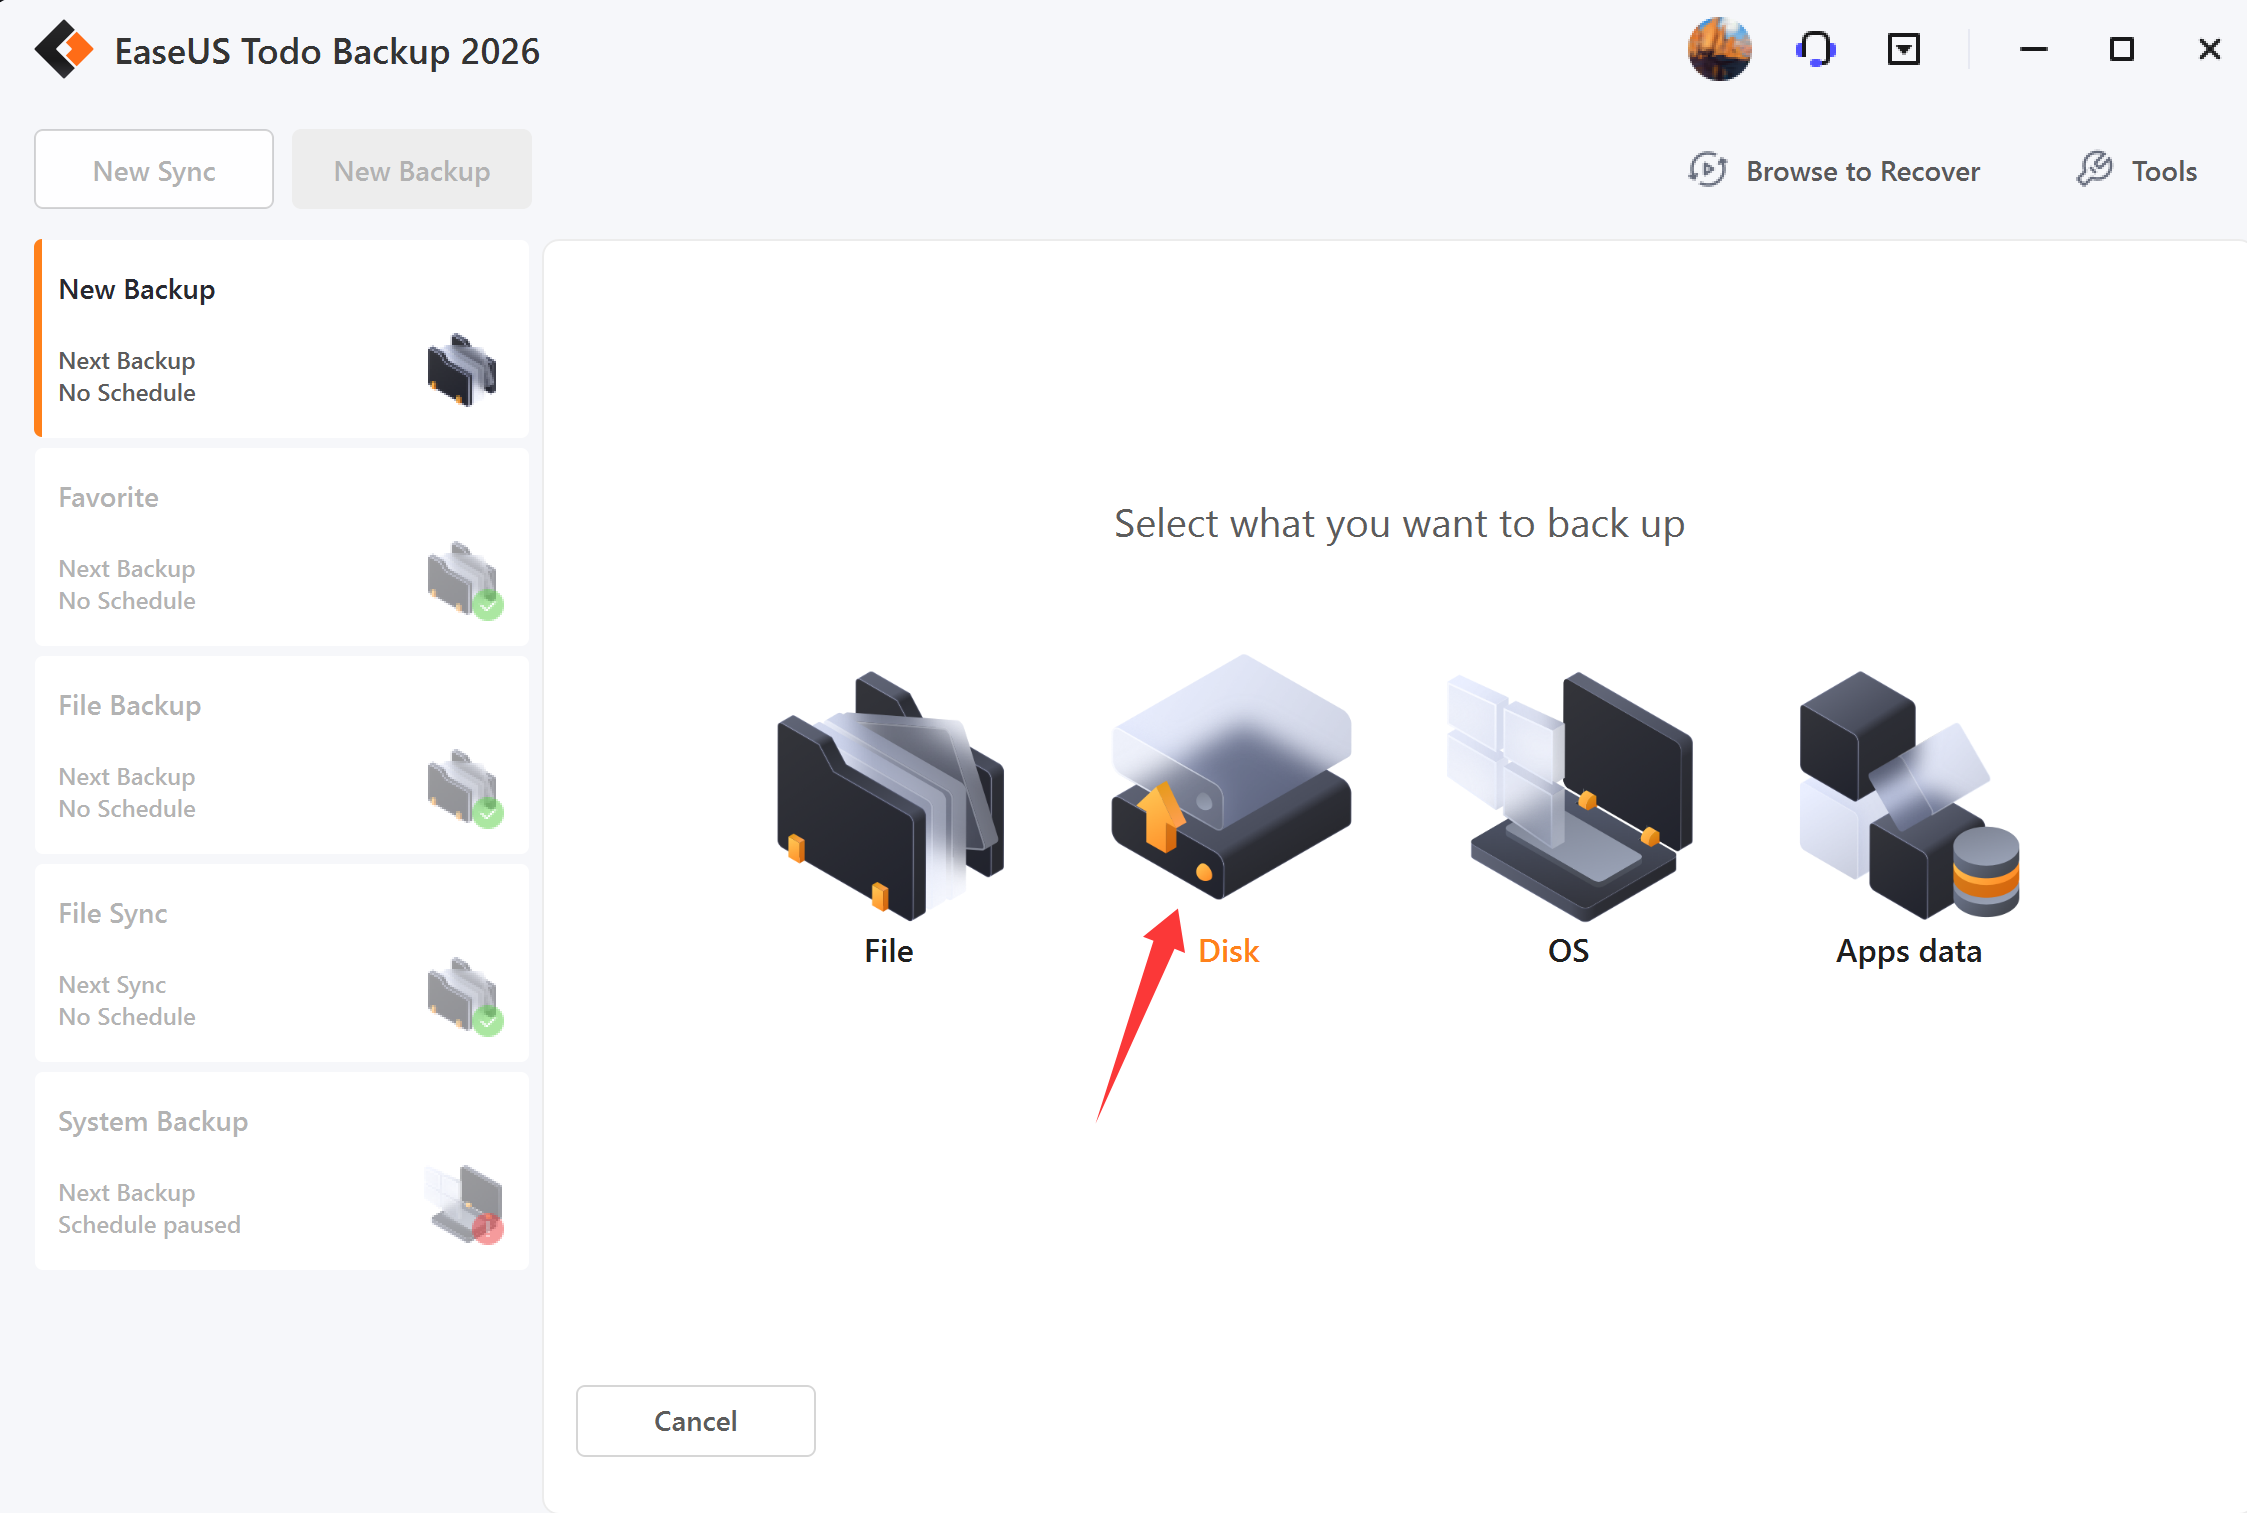
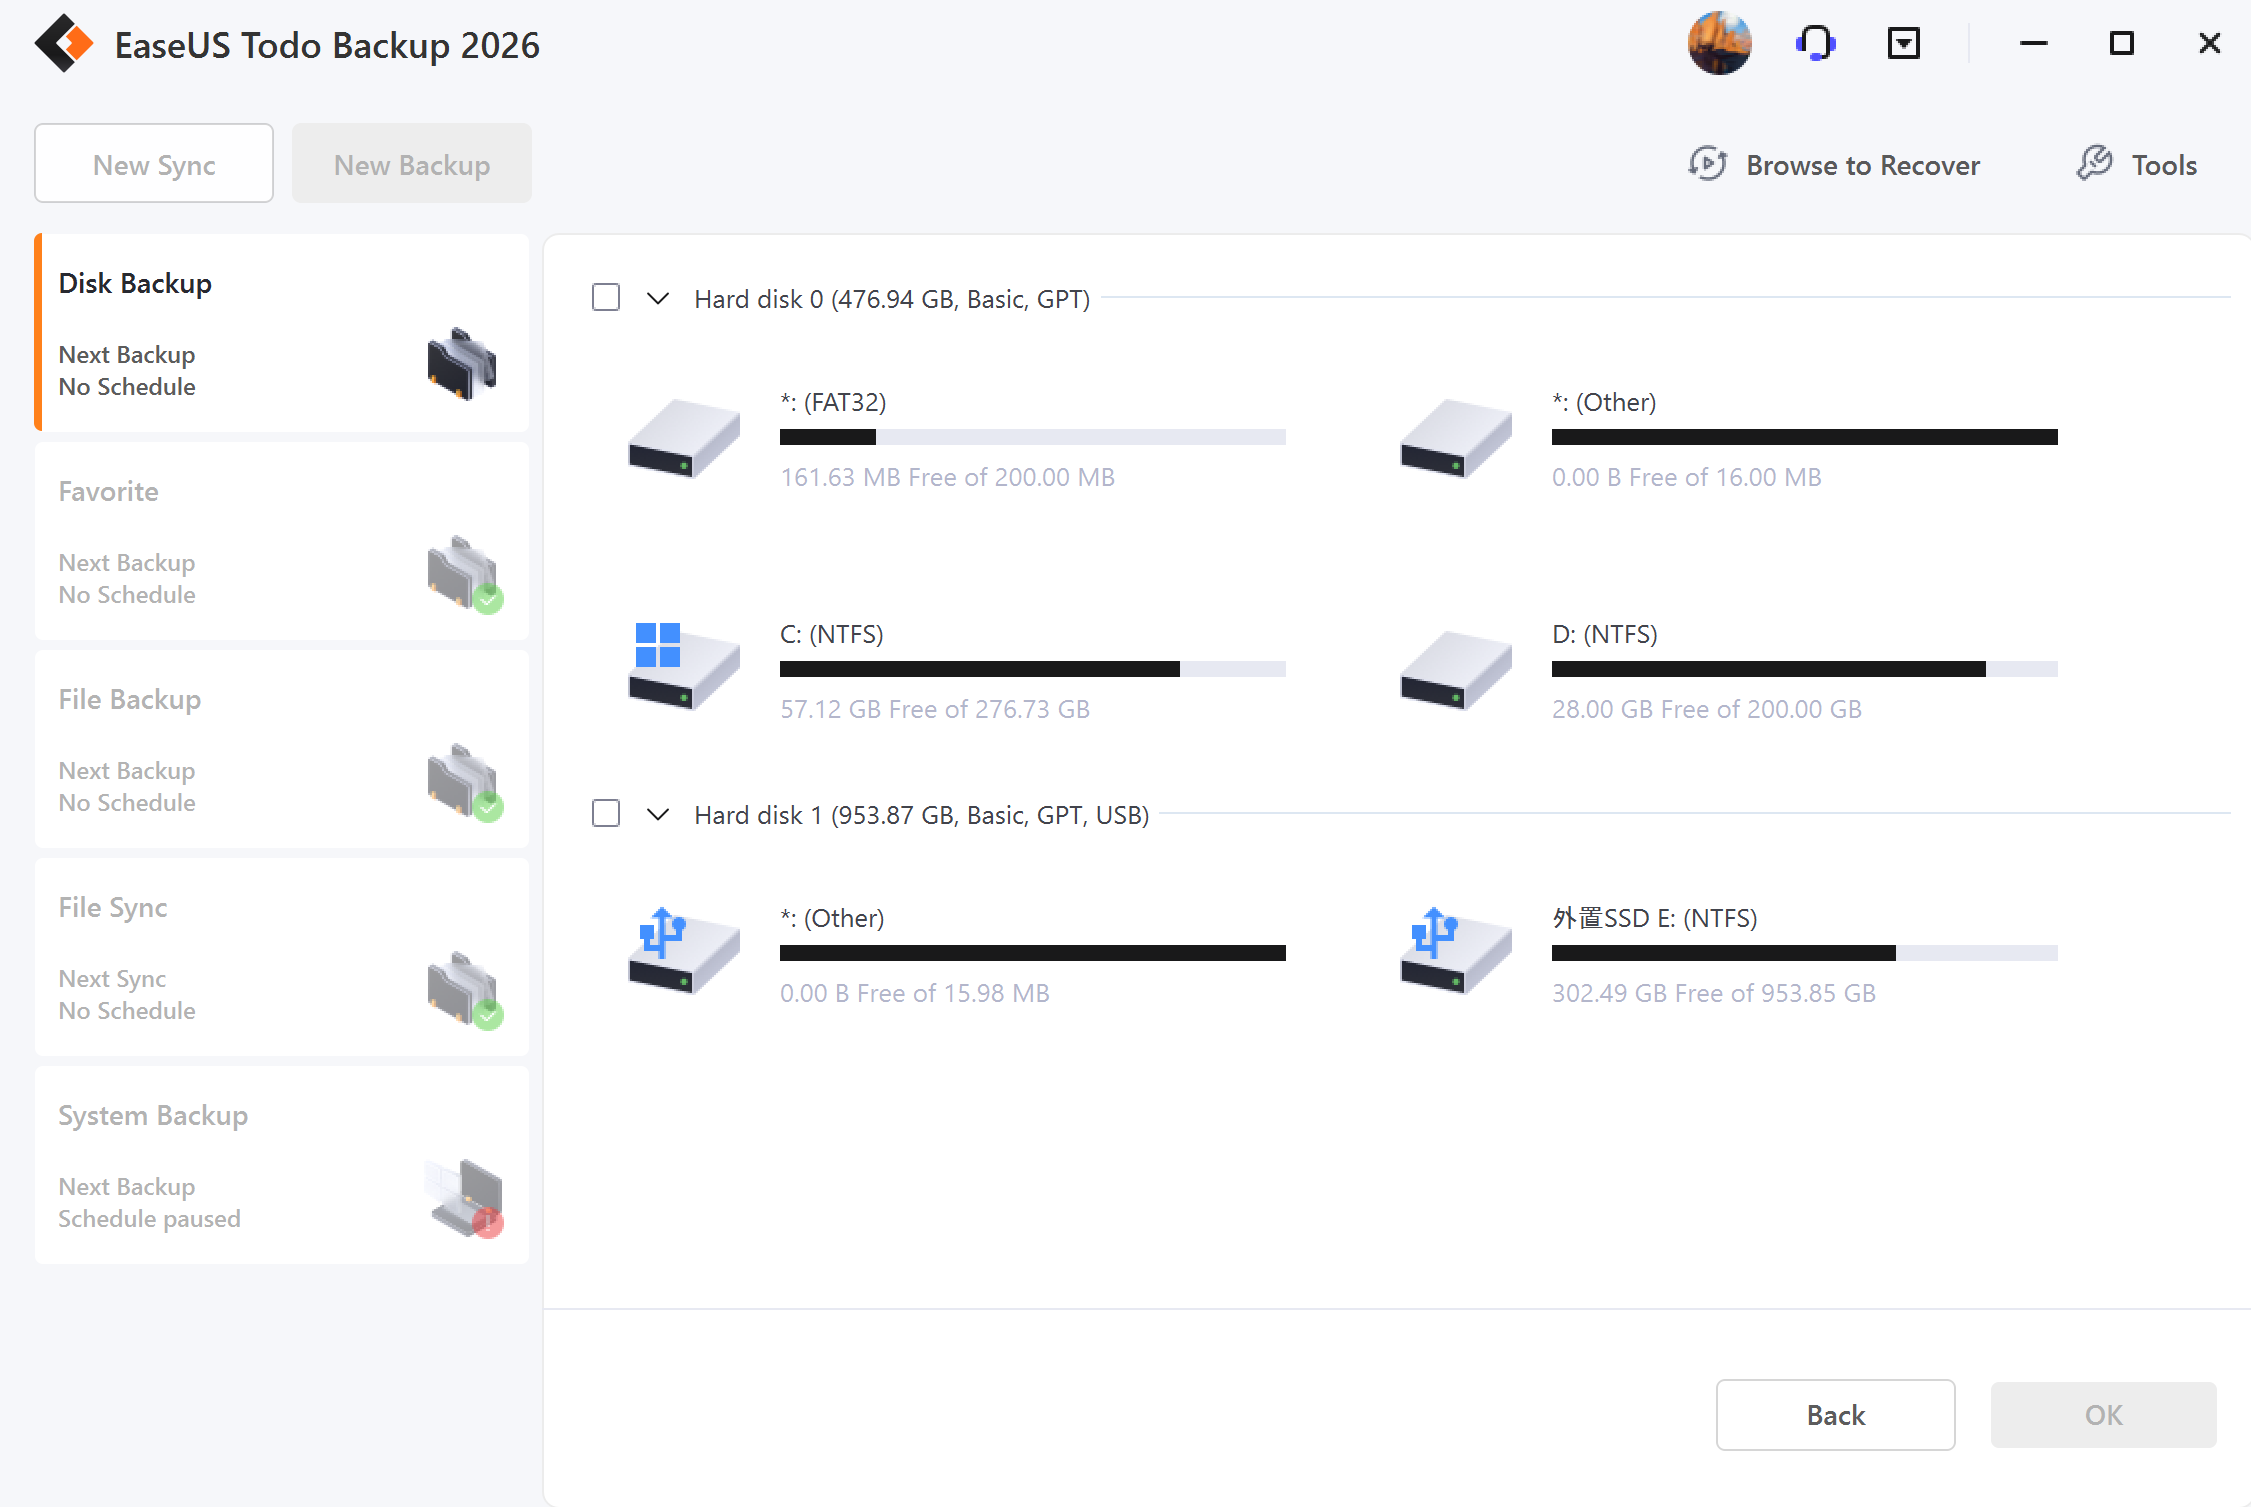
If your computer has only one disk with multiple partitions, the System Backup function will only back up the partition where the system and boot files are located. To back up the other data partitions, you should use the Disk/Partition Backup feature.
To get started, click on New Backup on the left side of the screen. Then select Disk as the backup contents and check the source disks/partitions you want to back up. Next, choose the destination location and click Backup Now to start the backup process.

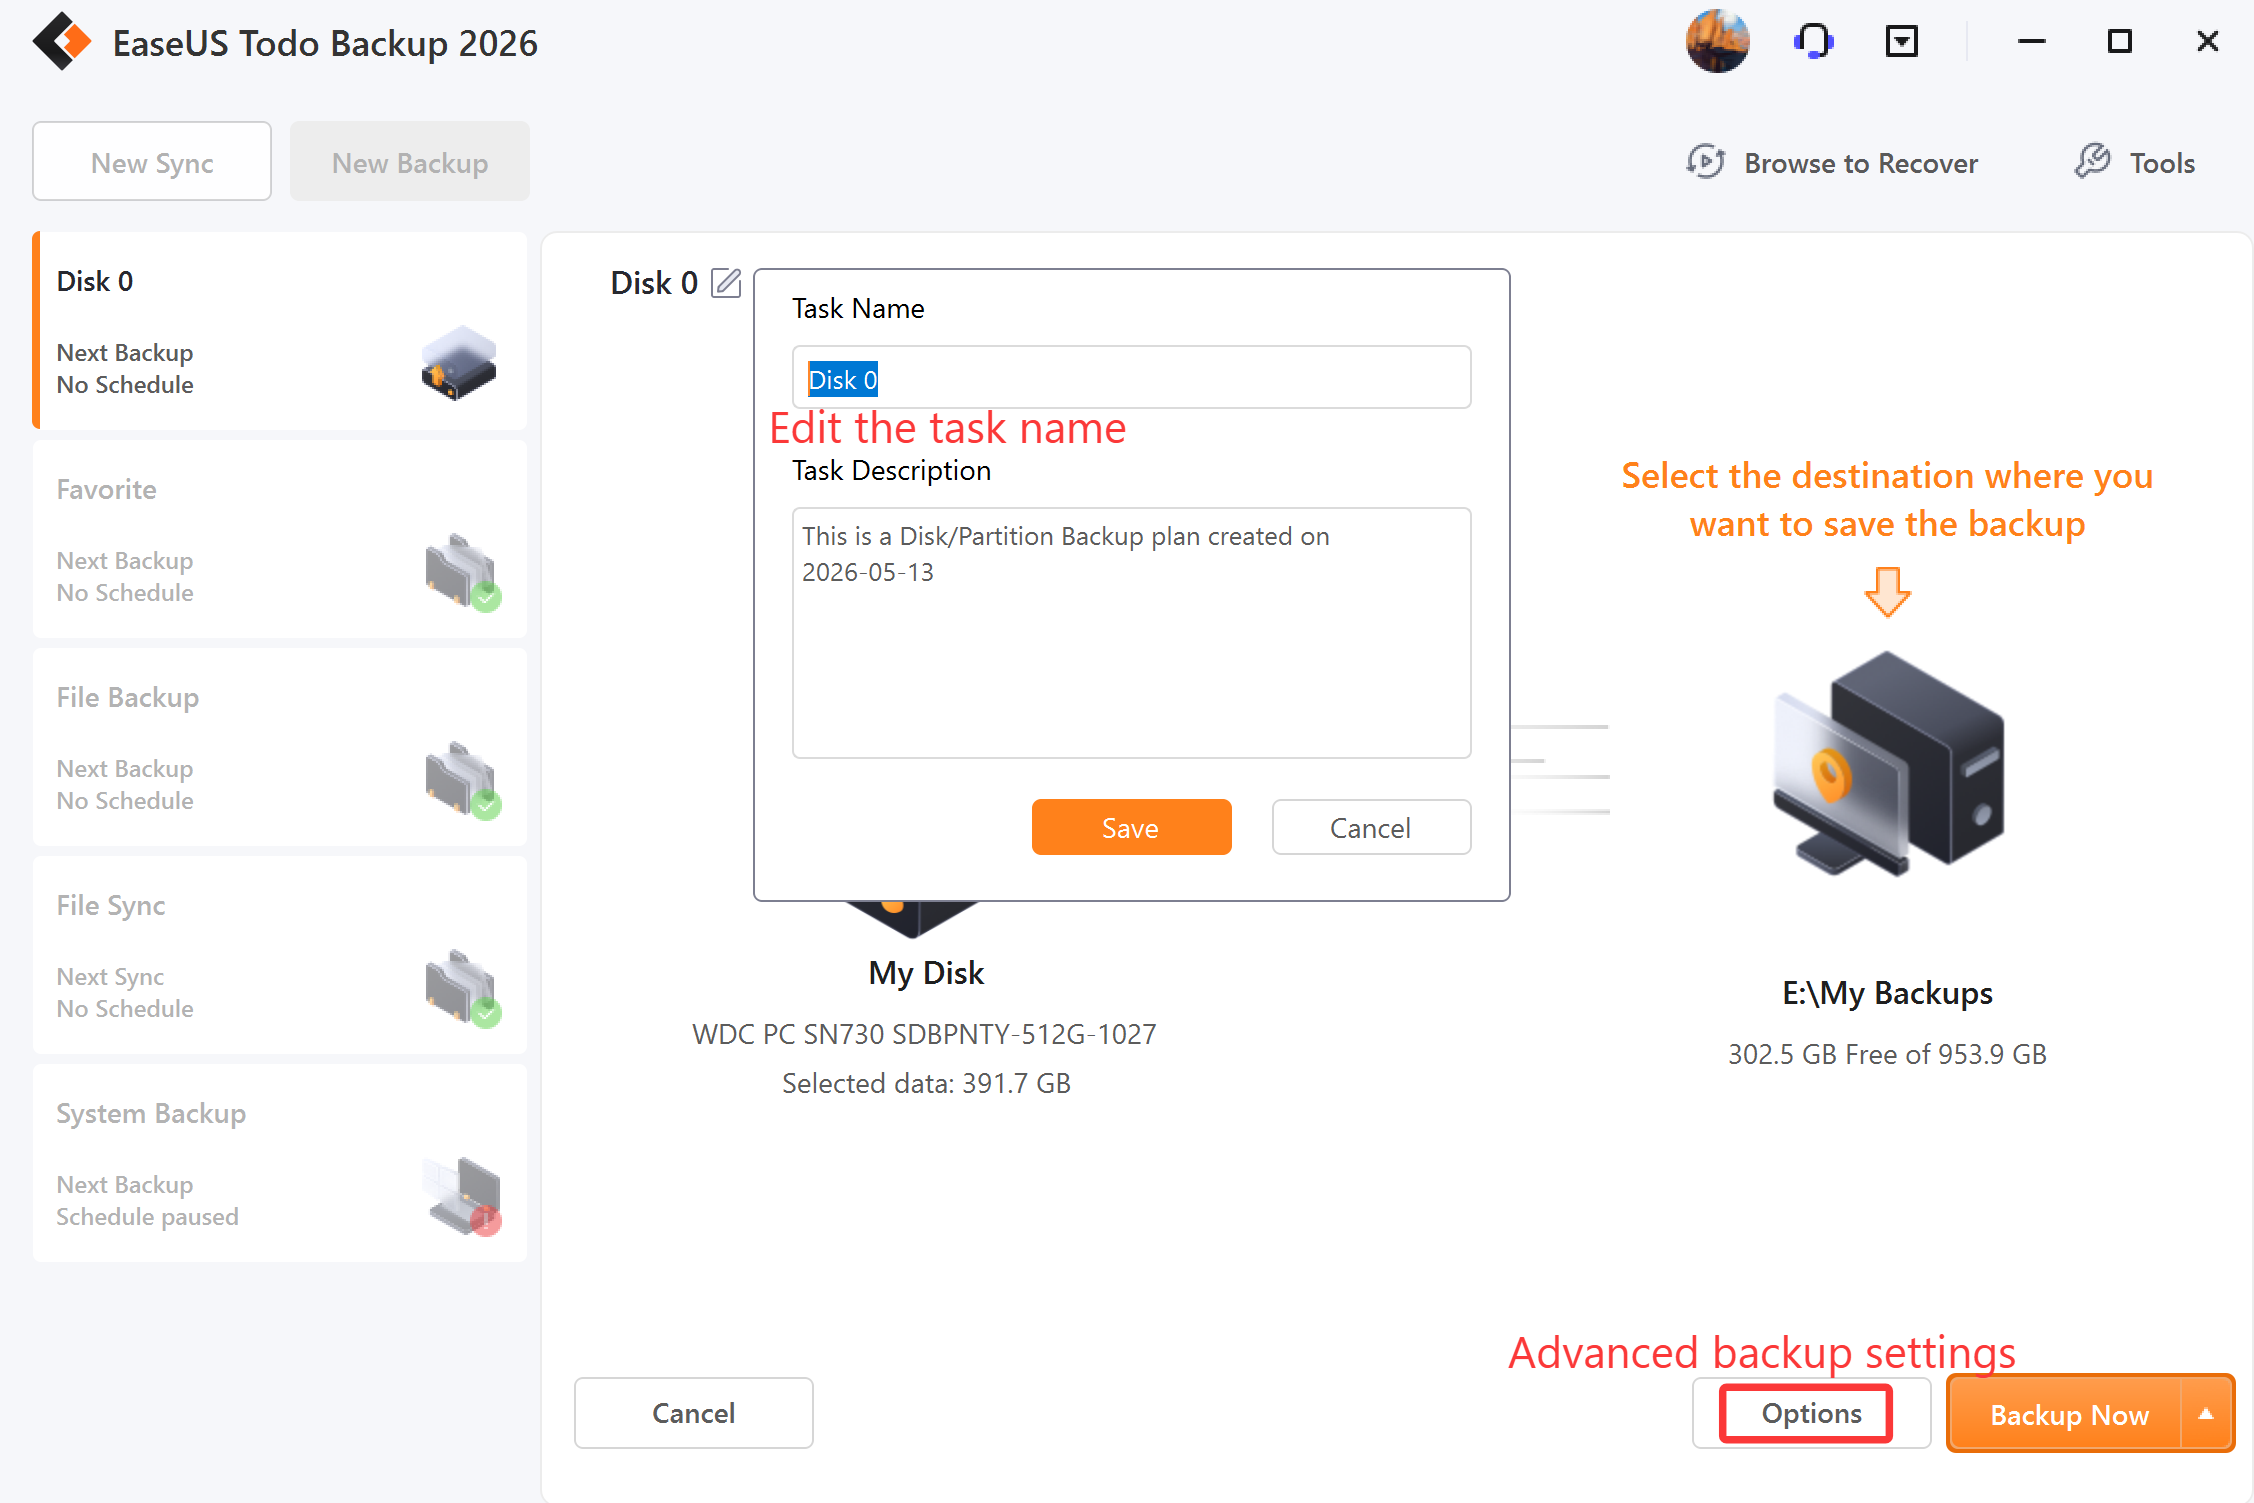
Advanced backup settings
Advanced backup settings provide flexibility and automation when creating a backup plan. Backup options is to edit the advanced parameters. Backup Scheme is to create an automatic backup plan. Backup Filter is to exclude the added file types and folders to avoid backing up unnecessary files. With Backup Notification, you may monitor backup status with E-mail notification.

For more details, please click:
Backup option, Backup Scheme, Backup Filter, Backup Notification.
Tips:
Advanced backup settings are for reference only but not a prerequisite for backup.
FAQ:
1. What's the difference between System Backup and Disk/Partition Backup?
A: Please click here to view the answer.
2. Can I backup the network drive?
A: No, EaseUS Todo Backup can just help you backup the files and folders on the network drive. It cannot back up the whole network drive.
3. Where should I save the backup image file?
A: When creating a backup image, you have the option to save it to a local hard drive, network drive, or other storage device. However, it's important to avoid saving the backup image to the same partition you are trying to back up. This may result in data loss or corruption in the event of a system failure or disaster.
4. What is dynamic volume? Does EaseUS support its backup?
A: Dynamic volume is a part of a dynamic disk. Dynamic disk manages the volumes with a LDM (short for Logical Disk Manager) database. Compared with the basic disk, the dynamic one is divided into multiple types of volumes. Most dynamic volumes have advanced features in data storage, such as data redundancy in a Mirrored volume and fault-tolerant features in a RAID-5 volume.
Backup is supported. The backup process is the same as disk/partition backup on a basic disk. One big difference lies in the display. To be more precise, all the volumes on different disks are listed all together.
File Backup
As time goes on, you may accumulate a large amount of important data such as documents, pictures, music, and videos. It's always a good habit to regularly back up your files to protect against unexpected data loss.
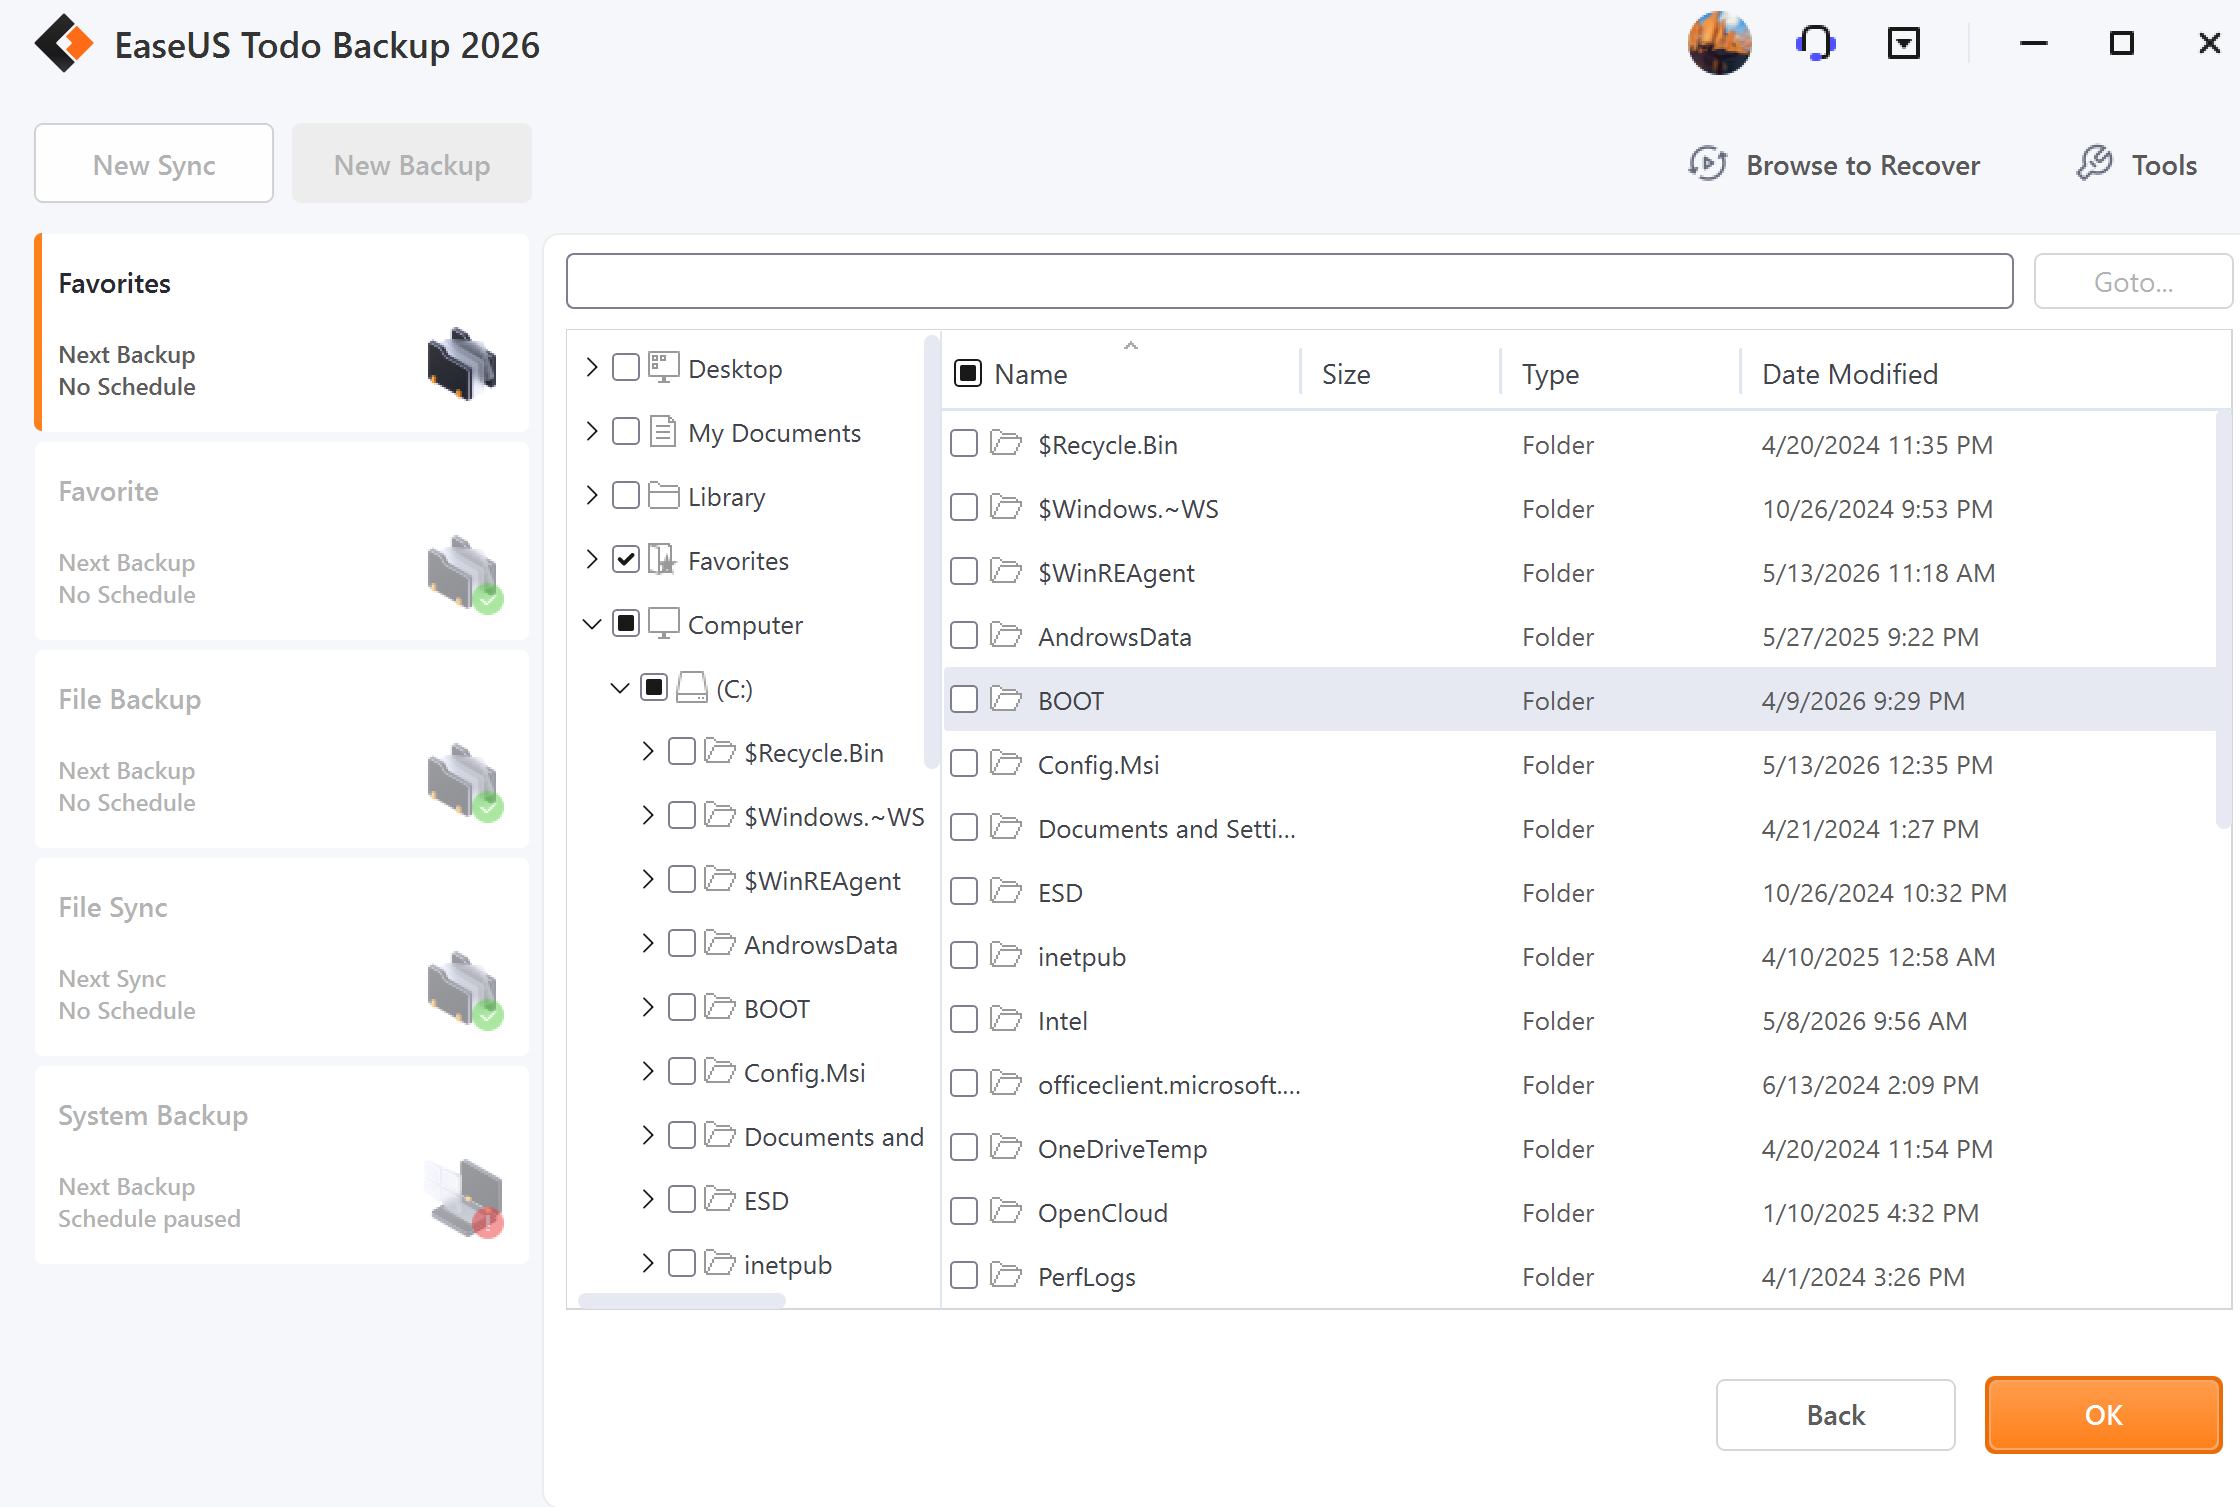
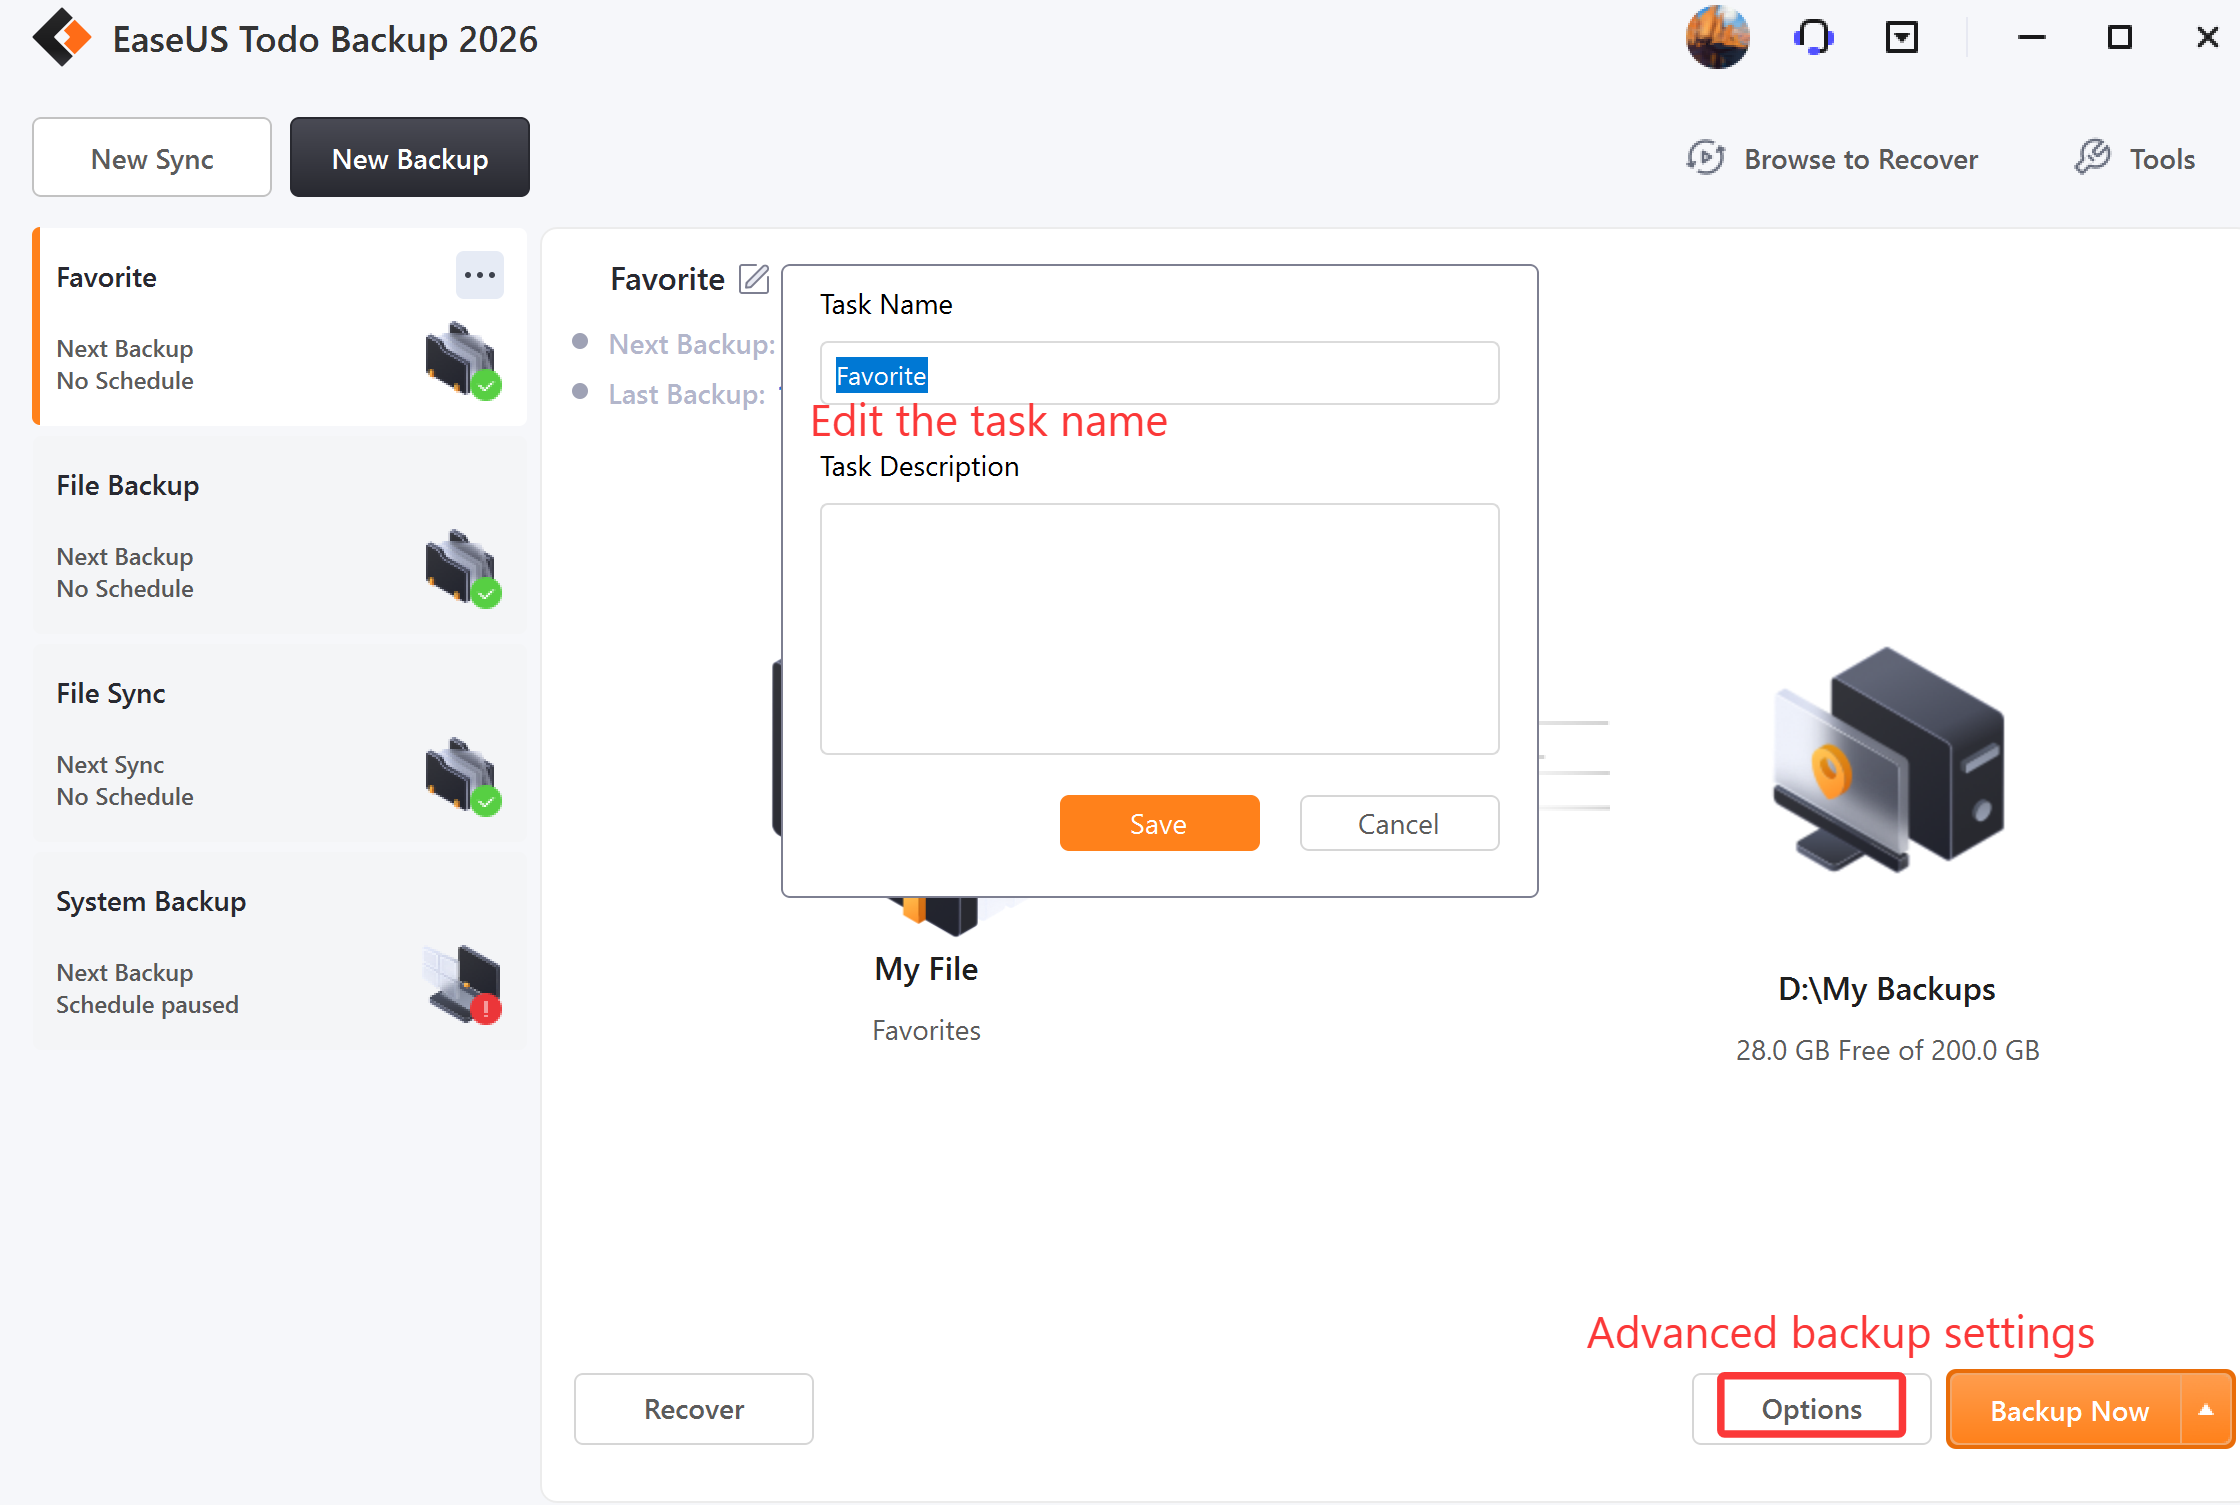
File Backup is an excellent option for protecting your valuable data. To get started, click on New Backup on the left side of the screen. Then select File as the backup contents and browse for and select the files/folders you wish to back up. Finally, give your backup plan a name and click Backup Now to start the backup process.

Advanced backup settings
Advanced backup settings provide flexibility and automation when creating a backup plan. Backup options is to edit the advanced parameters. Backup Scheme is to create an automatic backup plan. Backup Filter is to exclude the added file types and folders to avoid backing up unnecessary files. With Backup Notification, you may monitor backup status with E-mail notification.
For more details, please click:
Backup option, Backup Scheme, Backup Filter, Backup Notification.
Tips:
Advanced backup settings are for reference only but not a prerequisite for backup.
Smart Backup
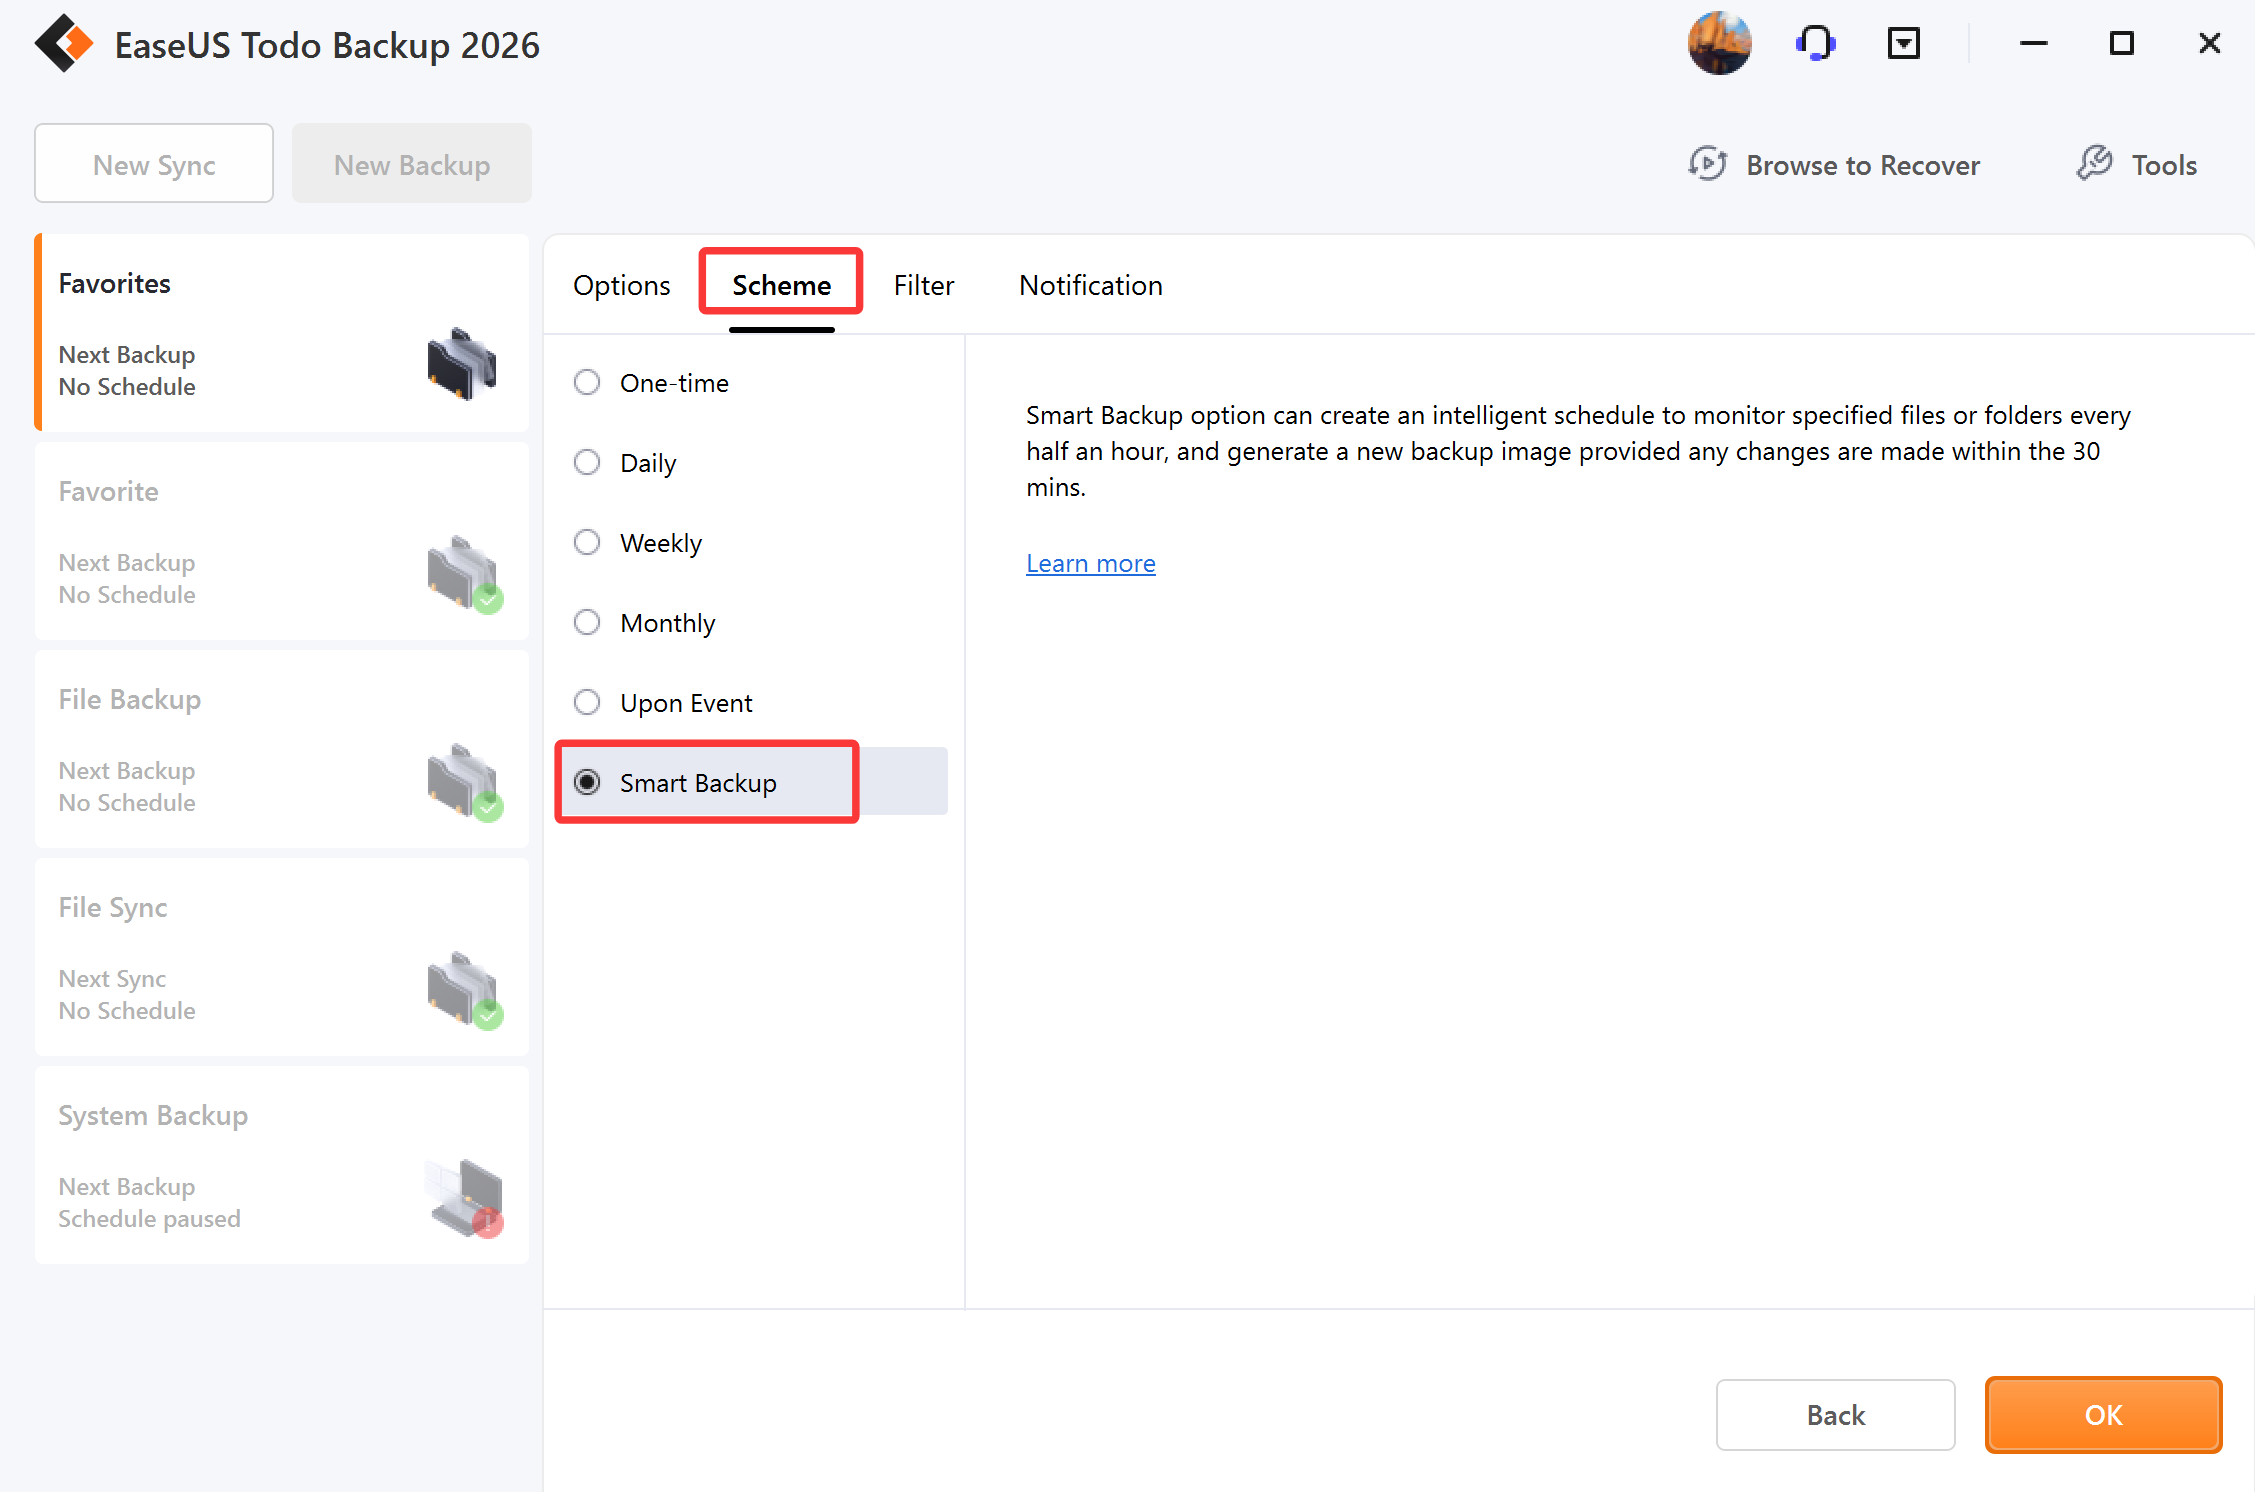
Within File Backup, there is a special backup schedule called Smart Backup. This schedule will run every half hour, provided changes have been made to the files being backed up. To access this feature, go to Options and select Backup Scheme.
Note:
Smart Backup does not have the capability to perform disk or partition backups. Additionally, it is unable to support the backup of files and folders stored in a network drive.
When You Need Smart Backup
Cases:
1. To protect frequently changing database files
2. To backup the frequently updated shared files
3. To create multiple backup points for recovery or rollback purposes.
Before you move to what you are going to get with Smart Backup, you may need to have a knowledge of the differences among full, incremental, and differential backup.
How Smart Backup Creates Images
The initial image of Smart Backup is always Full.
Subsequently, a fresh Full image is generated every seven days: the first image on day 1 of the following week is Full.
The first image on days 2-6 is Differential. Any subsequent images on day 1 after the Full, or on days 2-6 after the Differential, are Incremental.
If your computer is turned off or disconnected, no backup images will be created.
How Smart Backup Manages Images
1. All Incrementals created yesterday will be deleted upon completion of today's first Differential image.
2. There can only be a maximum of 6 Differentials. The first Differential from day 2 will be deleted after the completion of the one following day 1's Full image. For example: The Differential created on day 2 will be deleted upon completion of the Differential on day 8 (day 2 of the following period).
3. There can only be a maximum of 2 Full images, meaning you can restore images only within the past 15 days.
Tips:
Smart Backup supports to backup of the folders/files by right-clicking in Windows Explorer. Select Create Smart Backup for the selected file(s) in the Windows menu to start the smart backup.
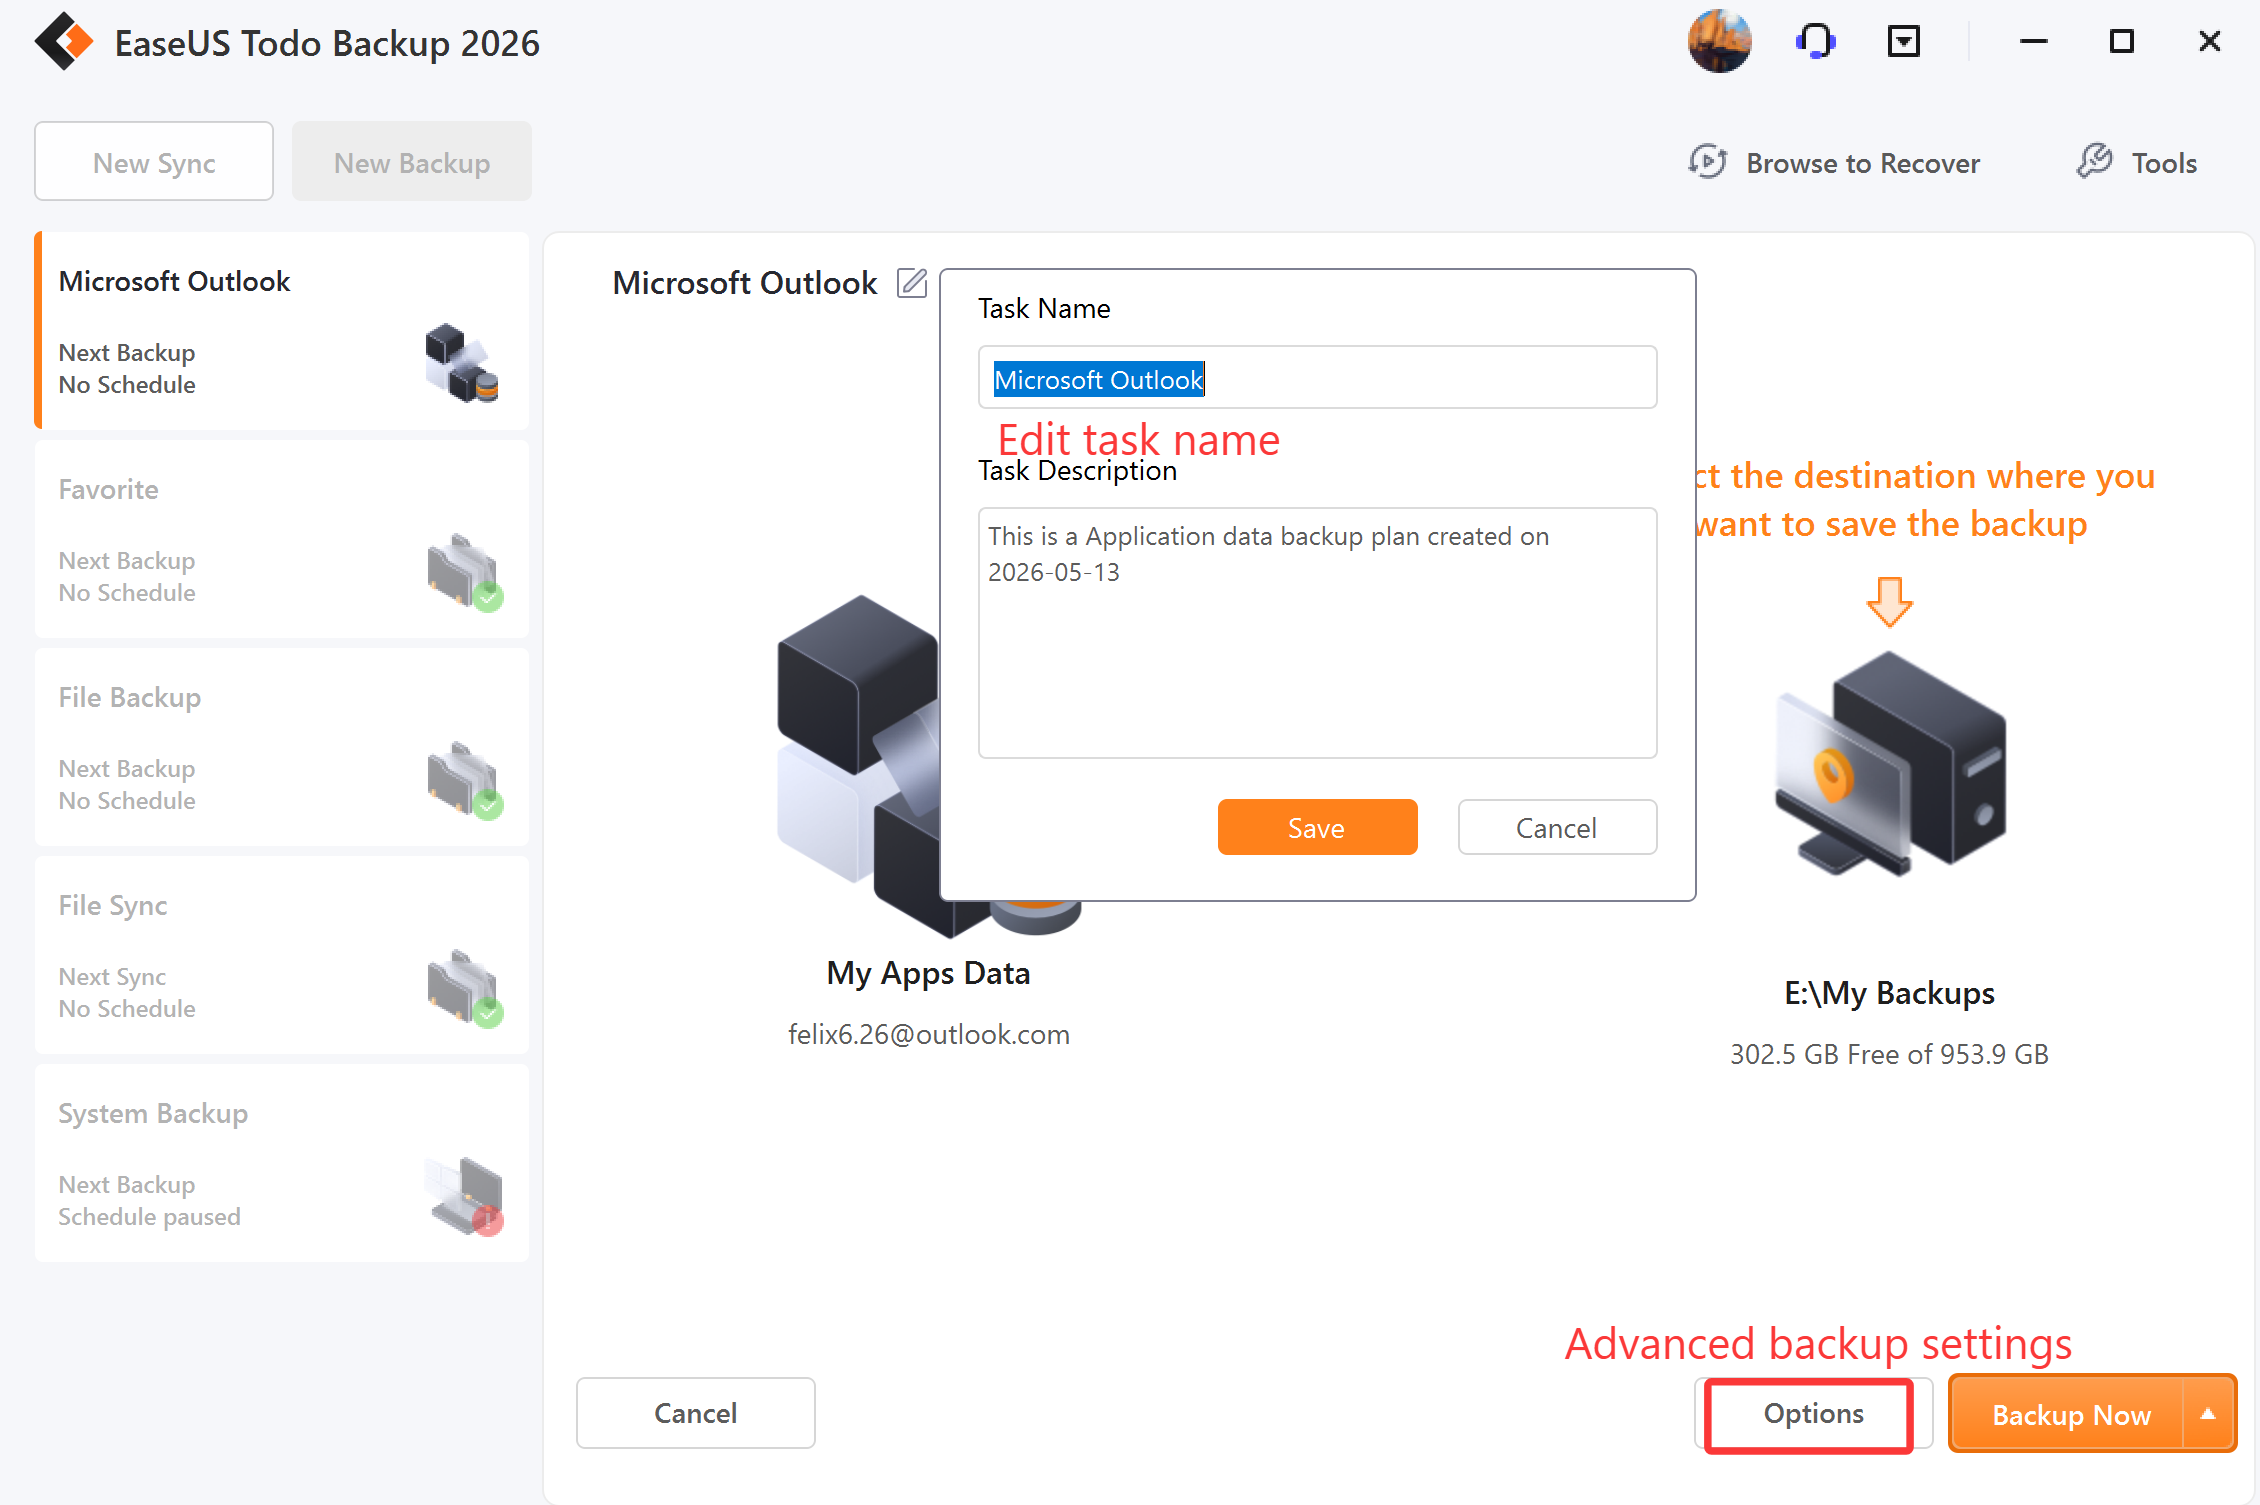
Email Backup
Communication via email is a popular manner and Microsoft Outlook is the most commonly-used email application. After a long time using it, you may have many important emails to be backed up. EaseUS Todo Backup can be your guardian to protect these emails.
Tips:
Windows Live Mail and Mozilla Thunderbird are not supported.
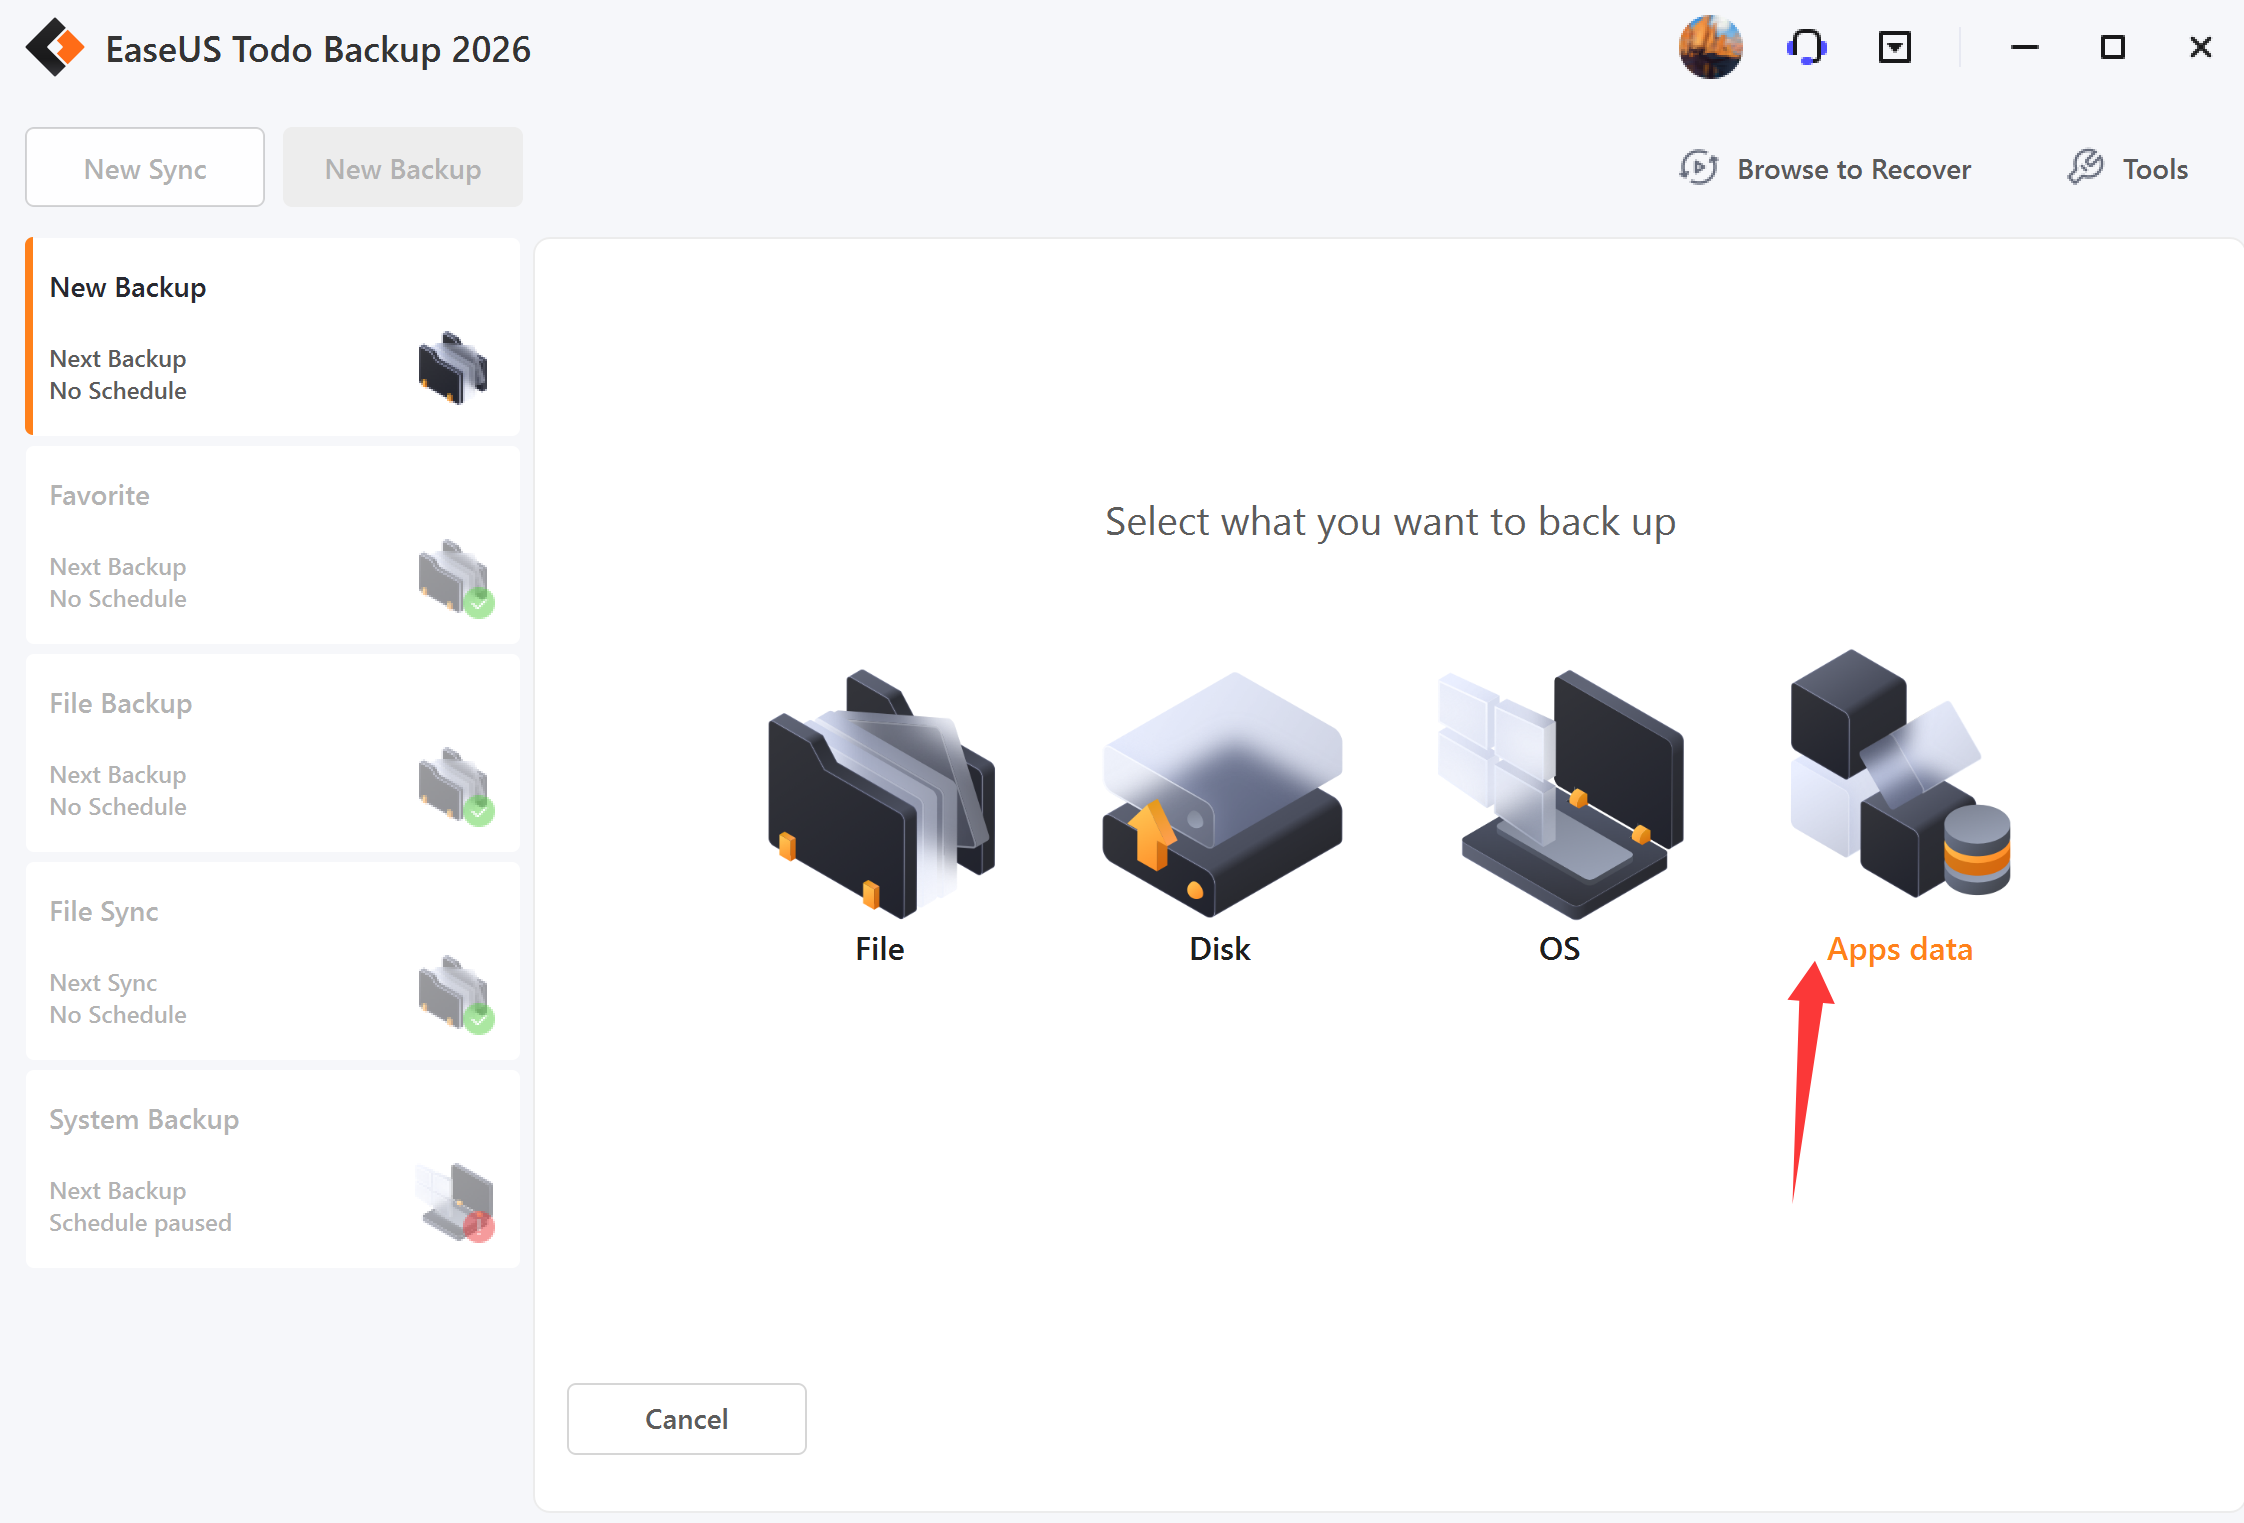
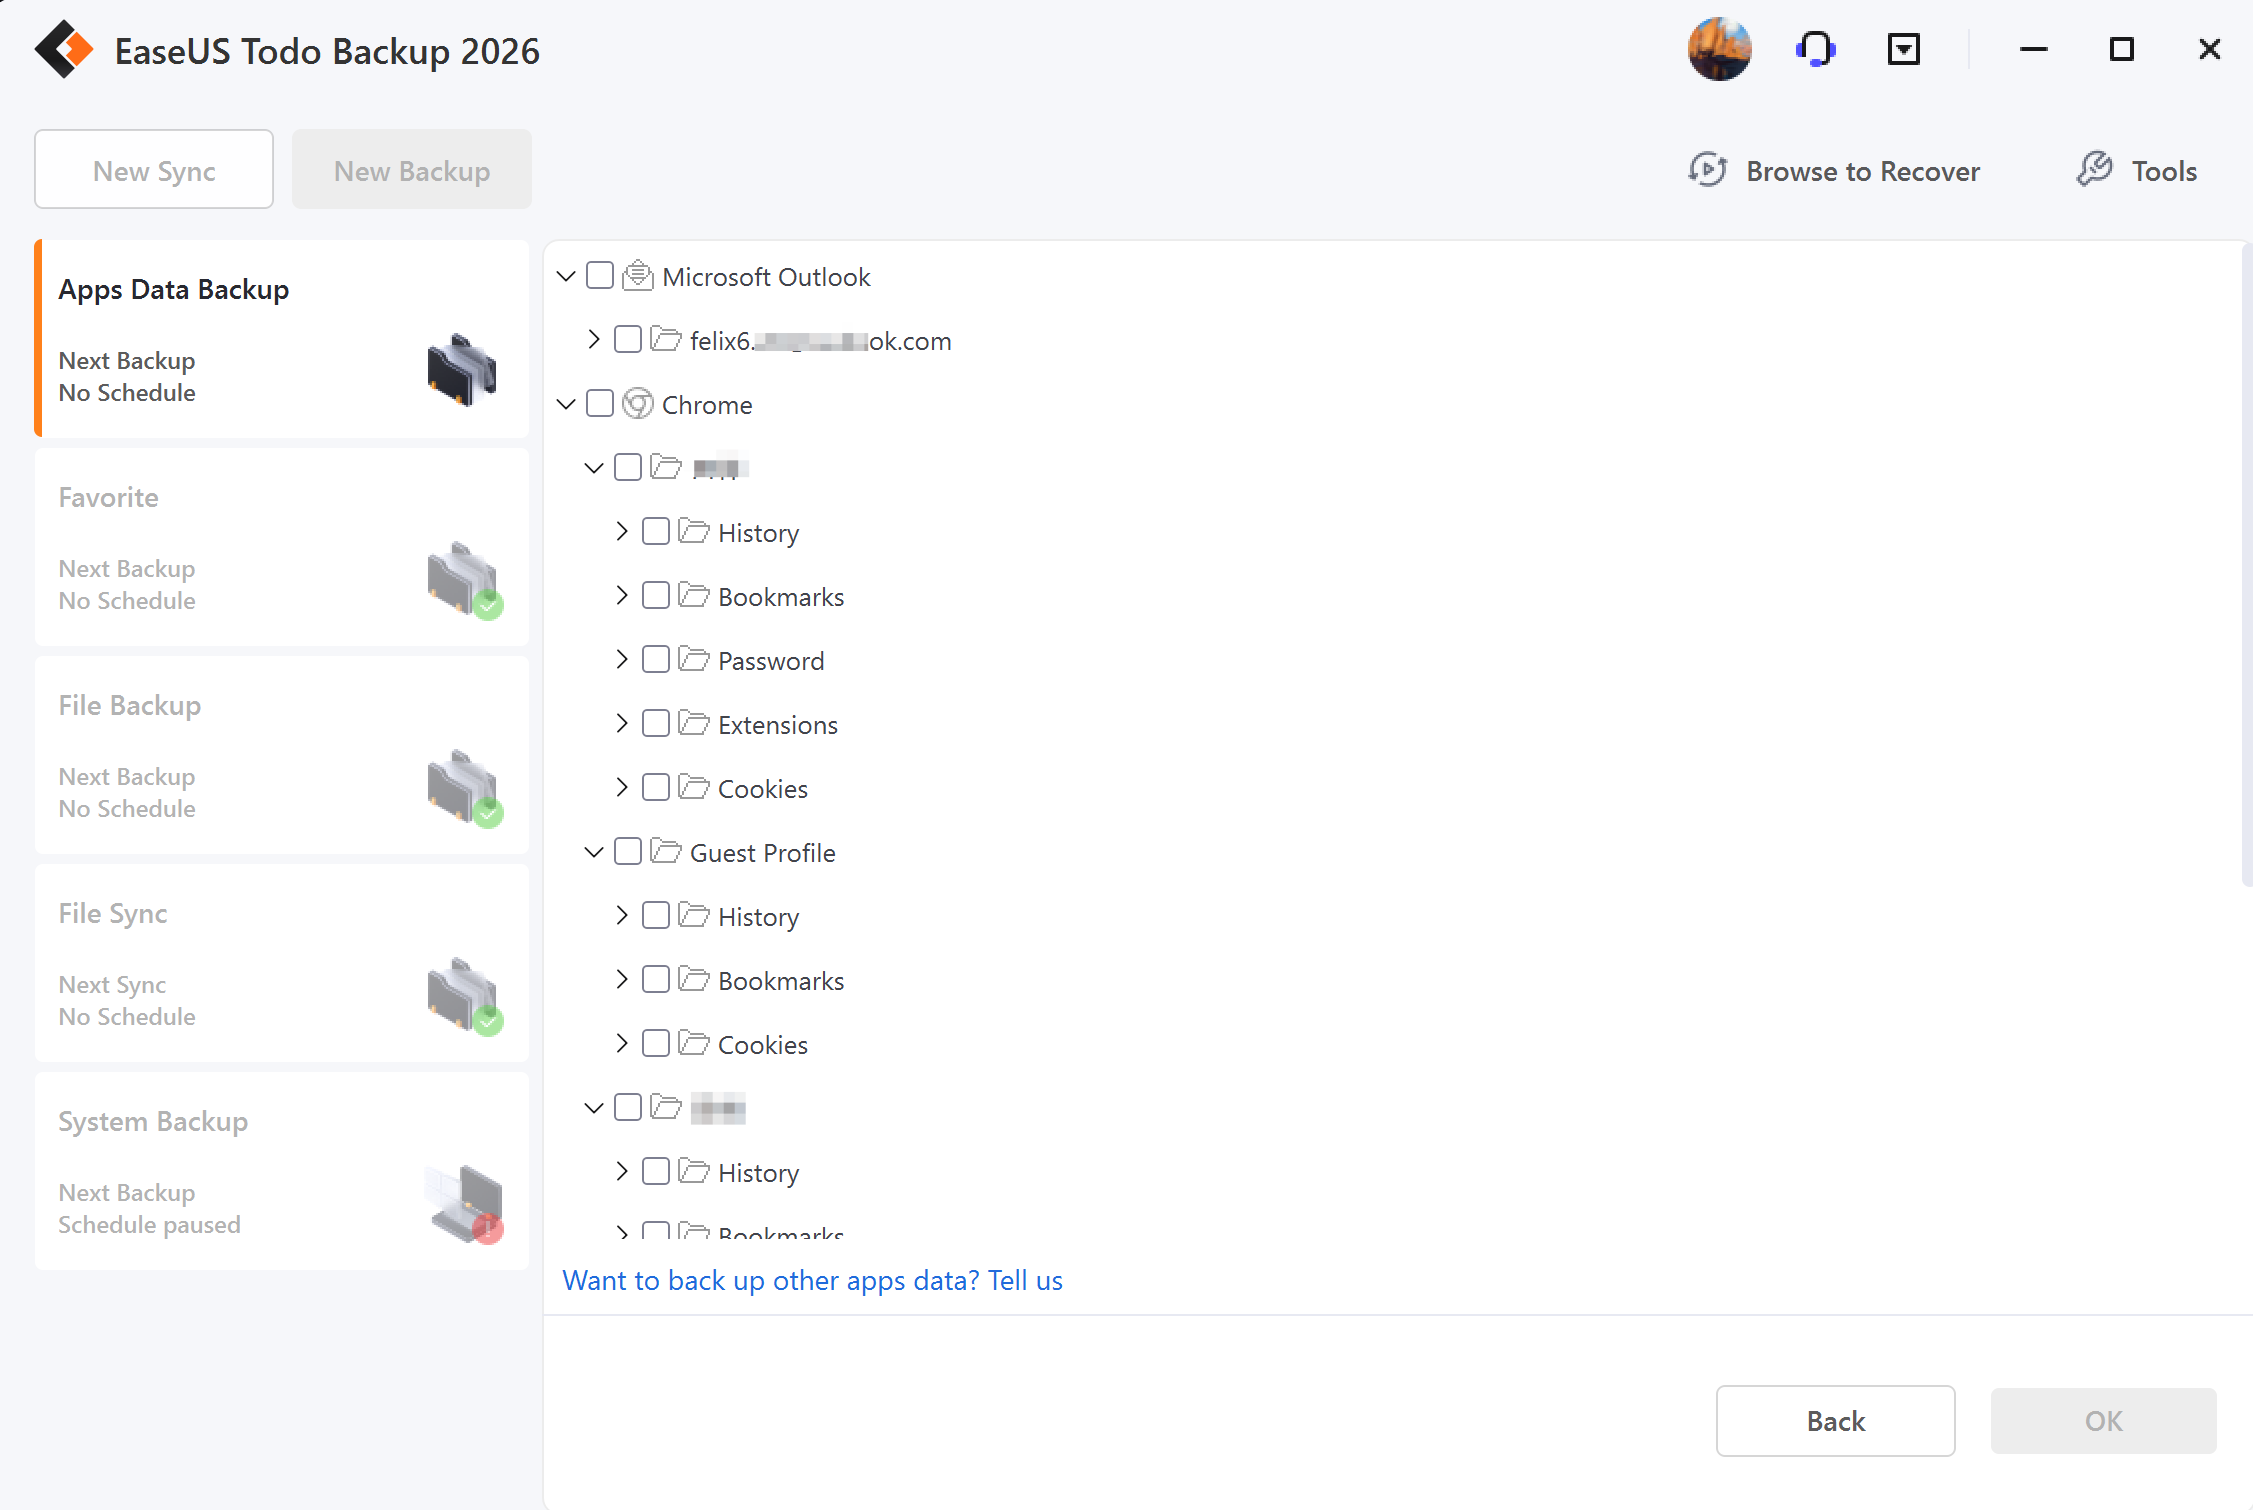
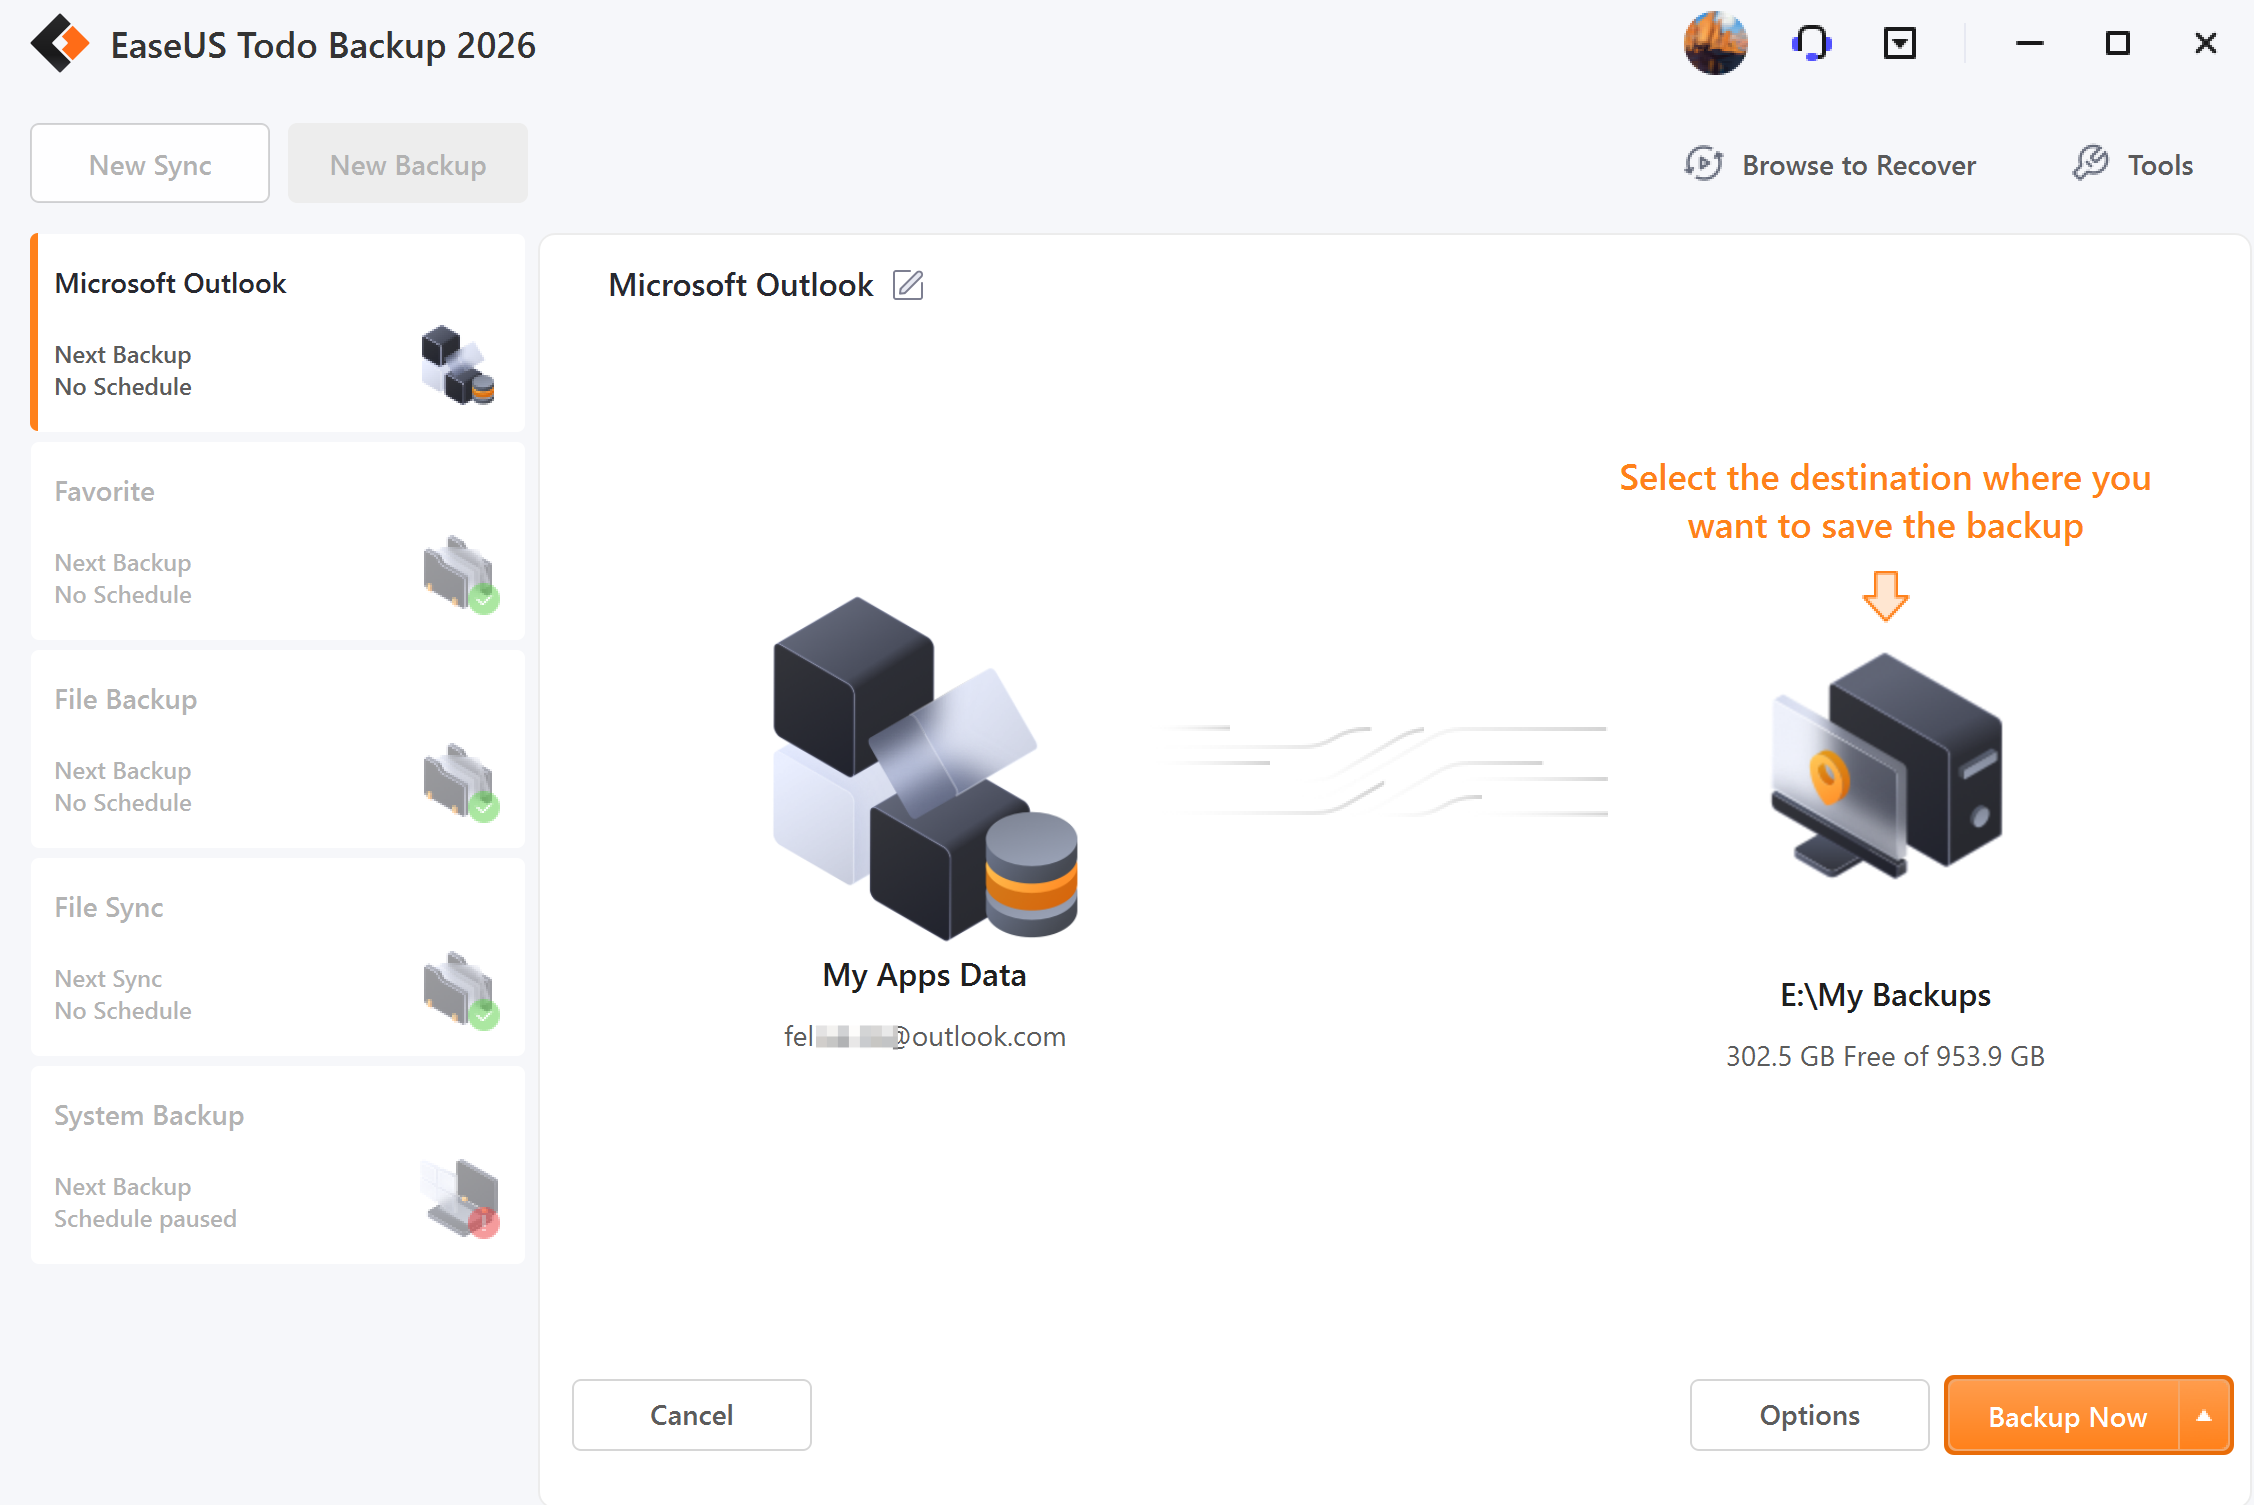
Please click New Backup on the left side, select Apps data as the backup content, specify the content for backup, and then click Backup Now. The backup plan name can be edited, too.
You may back up the whole mailbox, individual folder(s), Contacts, Calendar, etc.
Advanced backup settings
Advanced backup settings provide flexibility and automation when creating a backup plan. Backup options is to edit the advanced parameters. The Backup Scheme is to create an automatic backup plan. Backup Filter is to exclude the added file types and folders to avoid backing up unnecessary files. With Backup Notification, you may monitor backup status with E-mail notification.
For more details, please click:
Backup option, Backup Scheme, Backup Filter, Backup Notification.
Tips:
Advanced backup settings are for reference only but not a prerequisite for backup.
Advanced Backup Settings
Automated backups are scheduled to run at regular intervals or at specific points in time. Below, we'll provide you with a quick overview oF how to configure advanced settings.
Backup Options
Backup Options are available for both created backups and newly created ones.
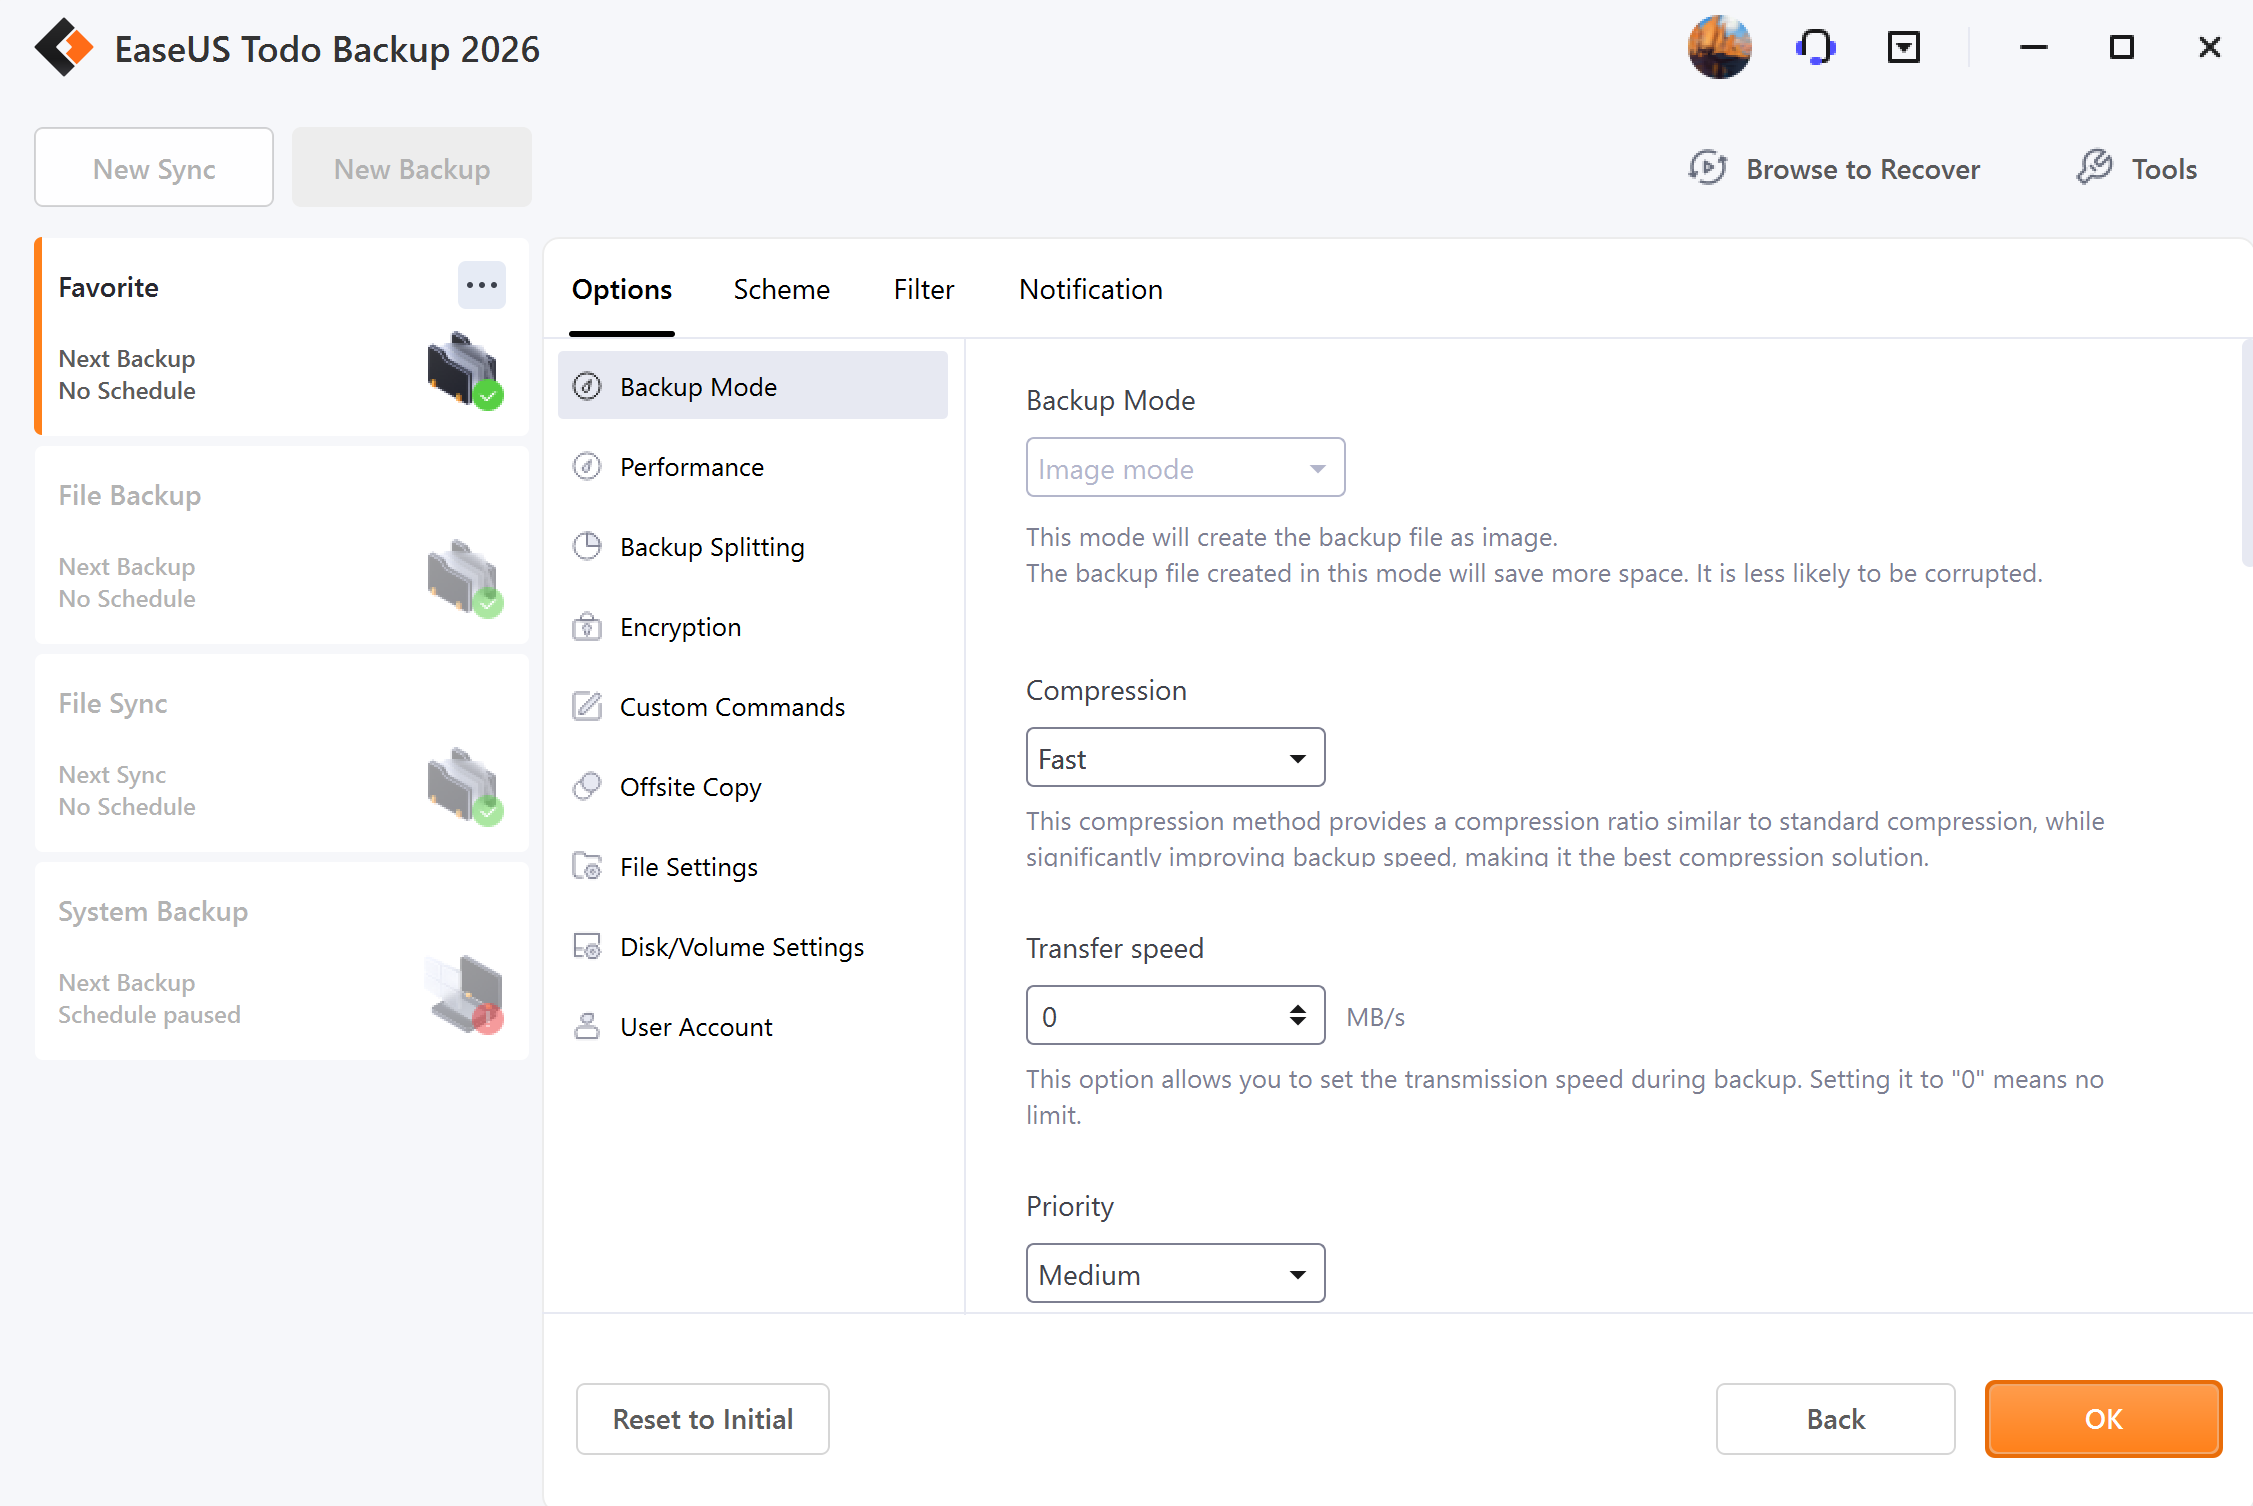
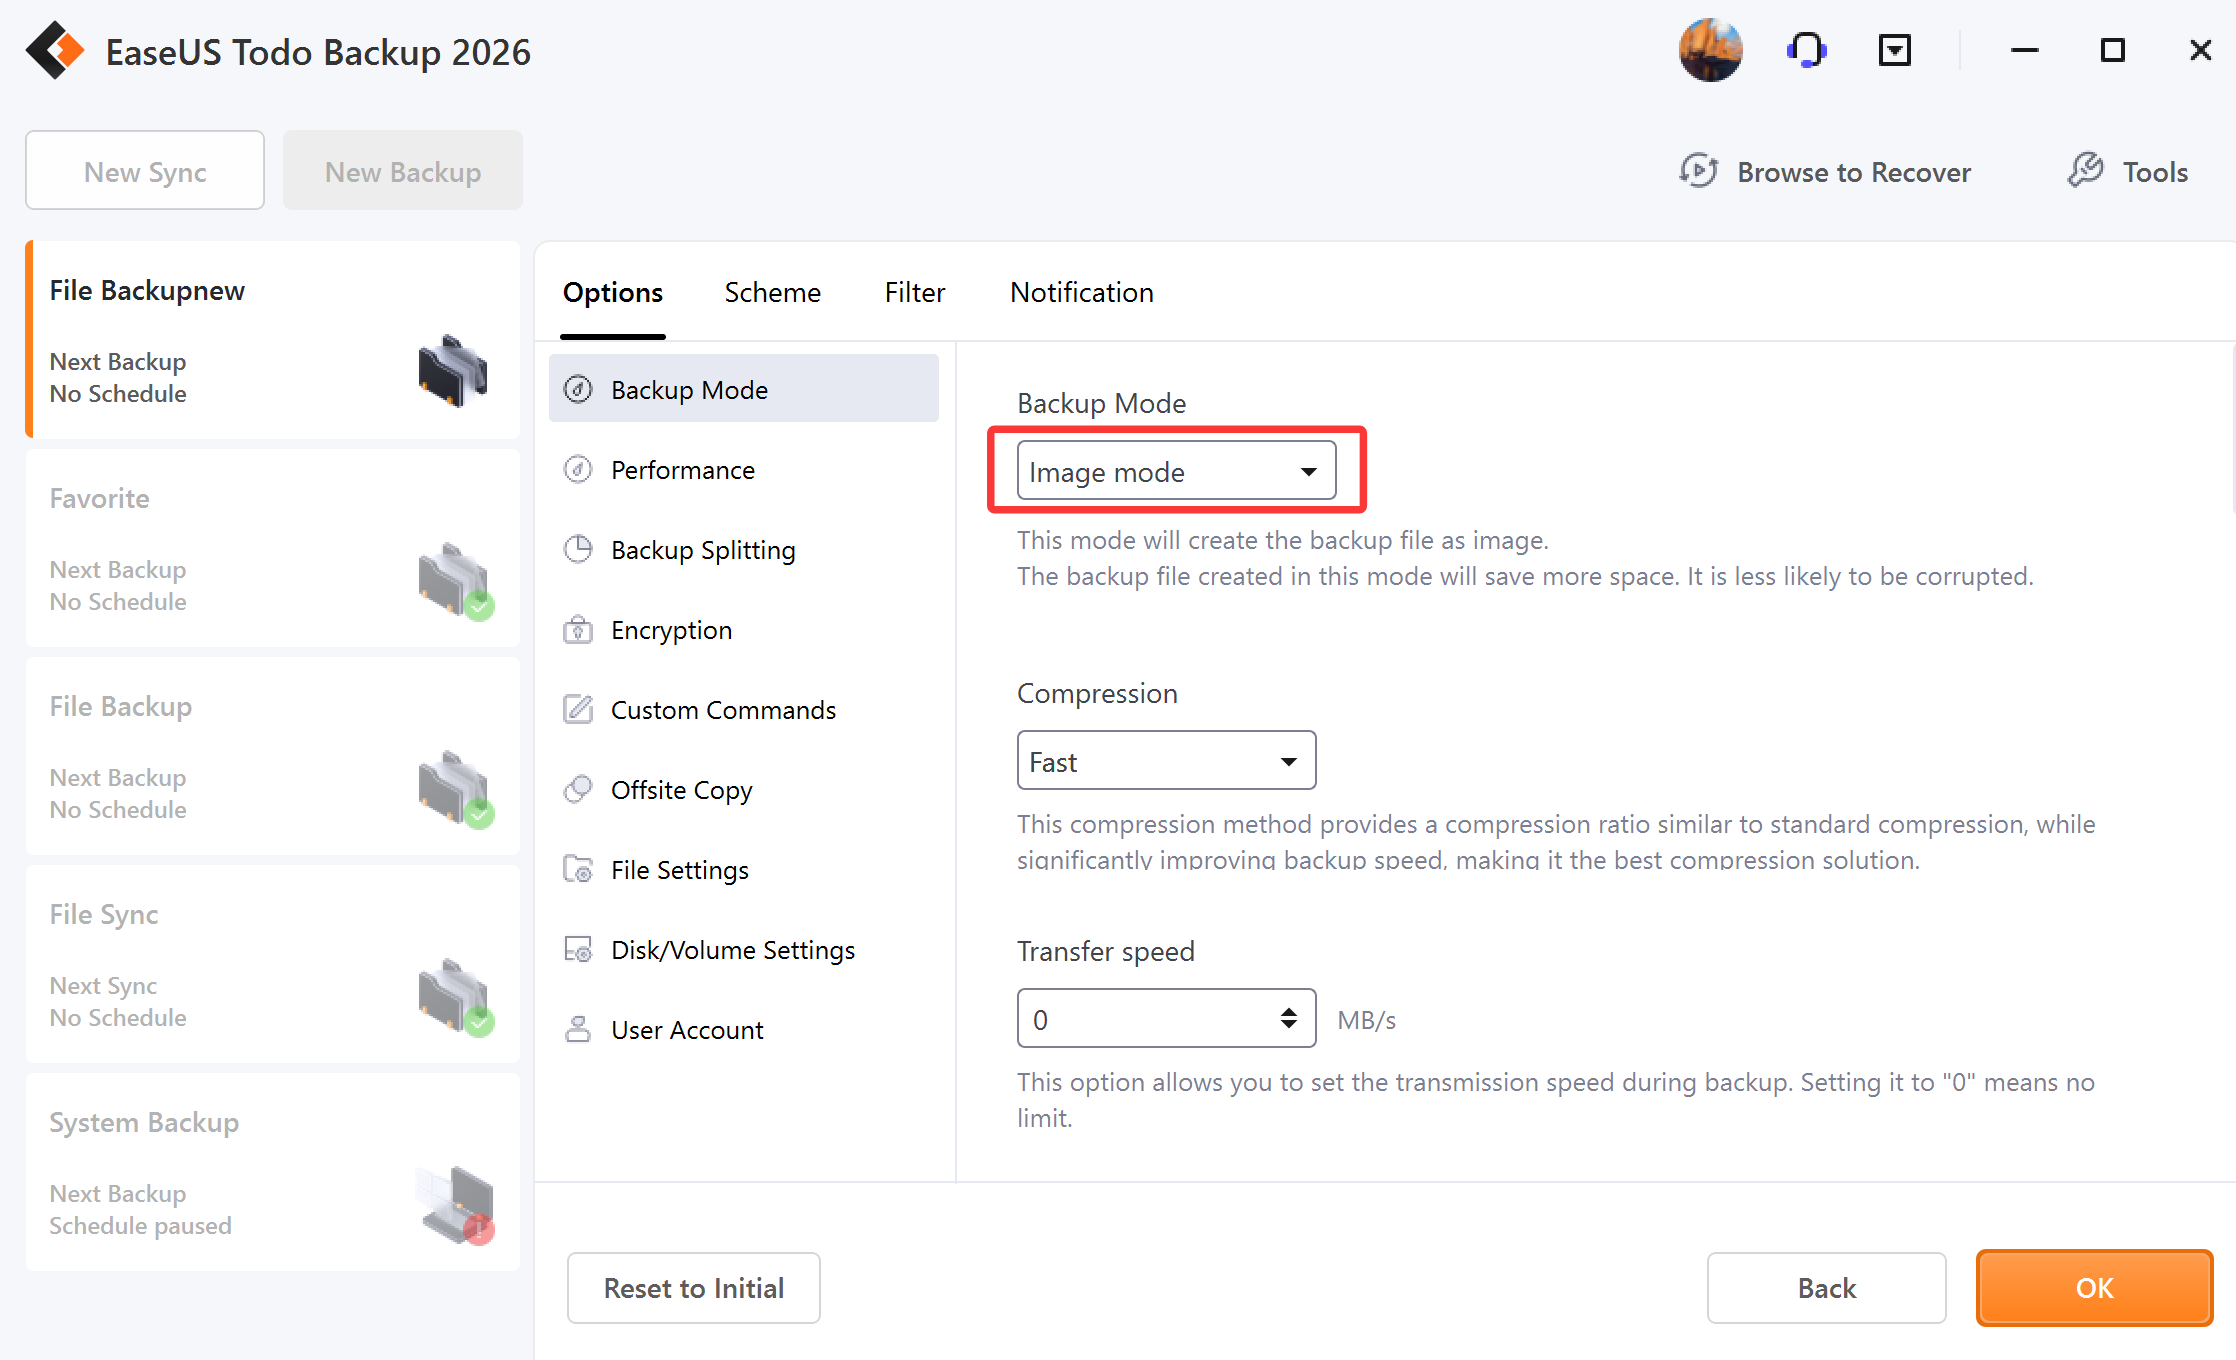
Backup Mode
Backup Mode includes Image Mode and Native Format Mode.
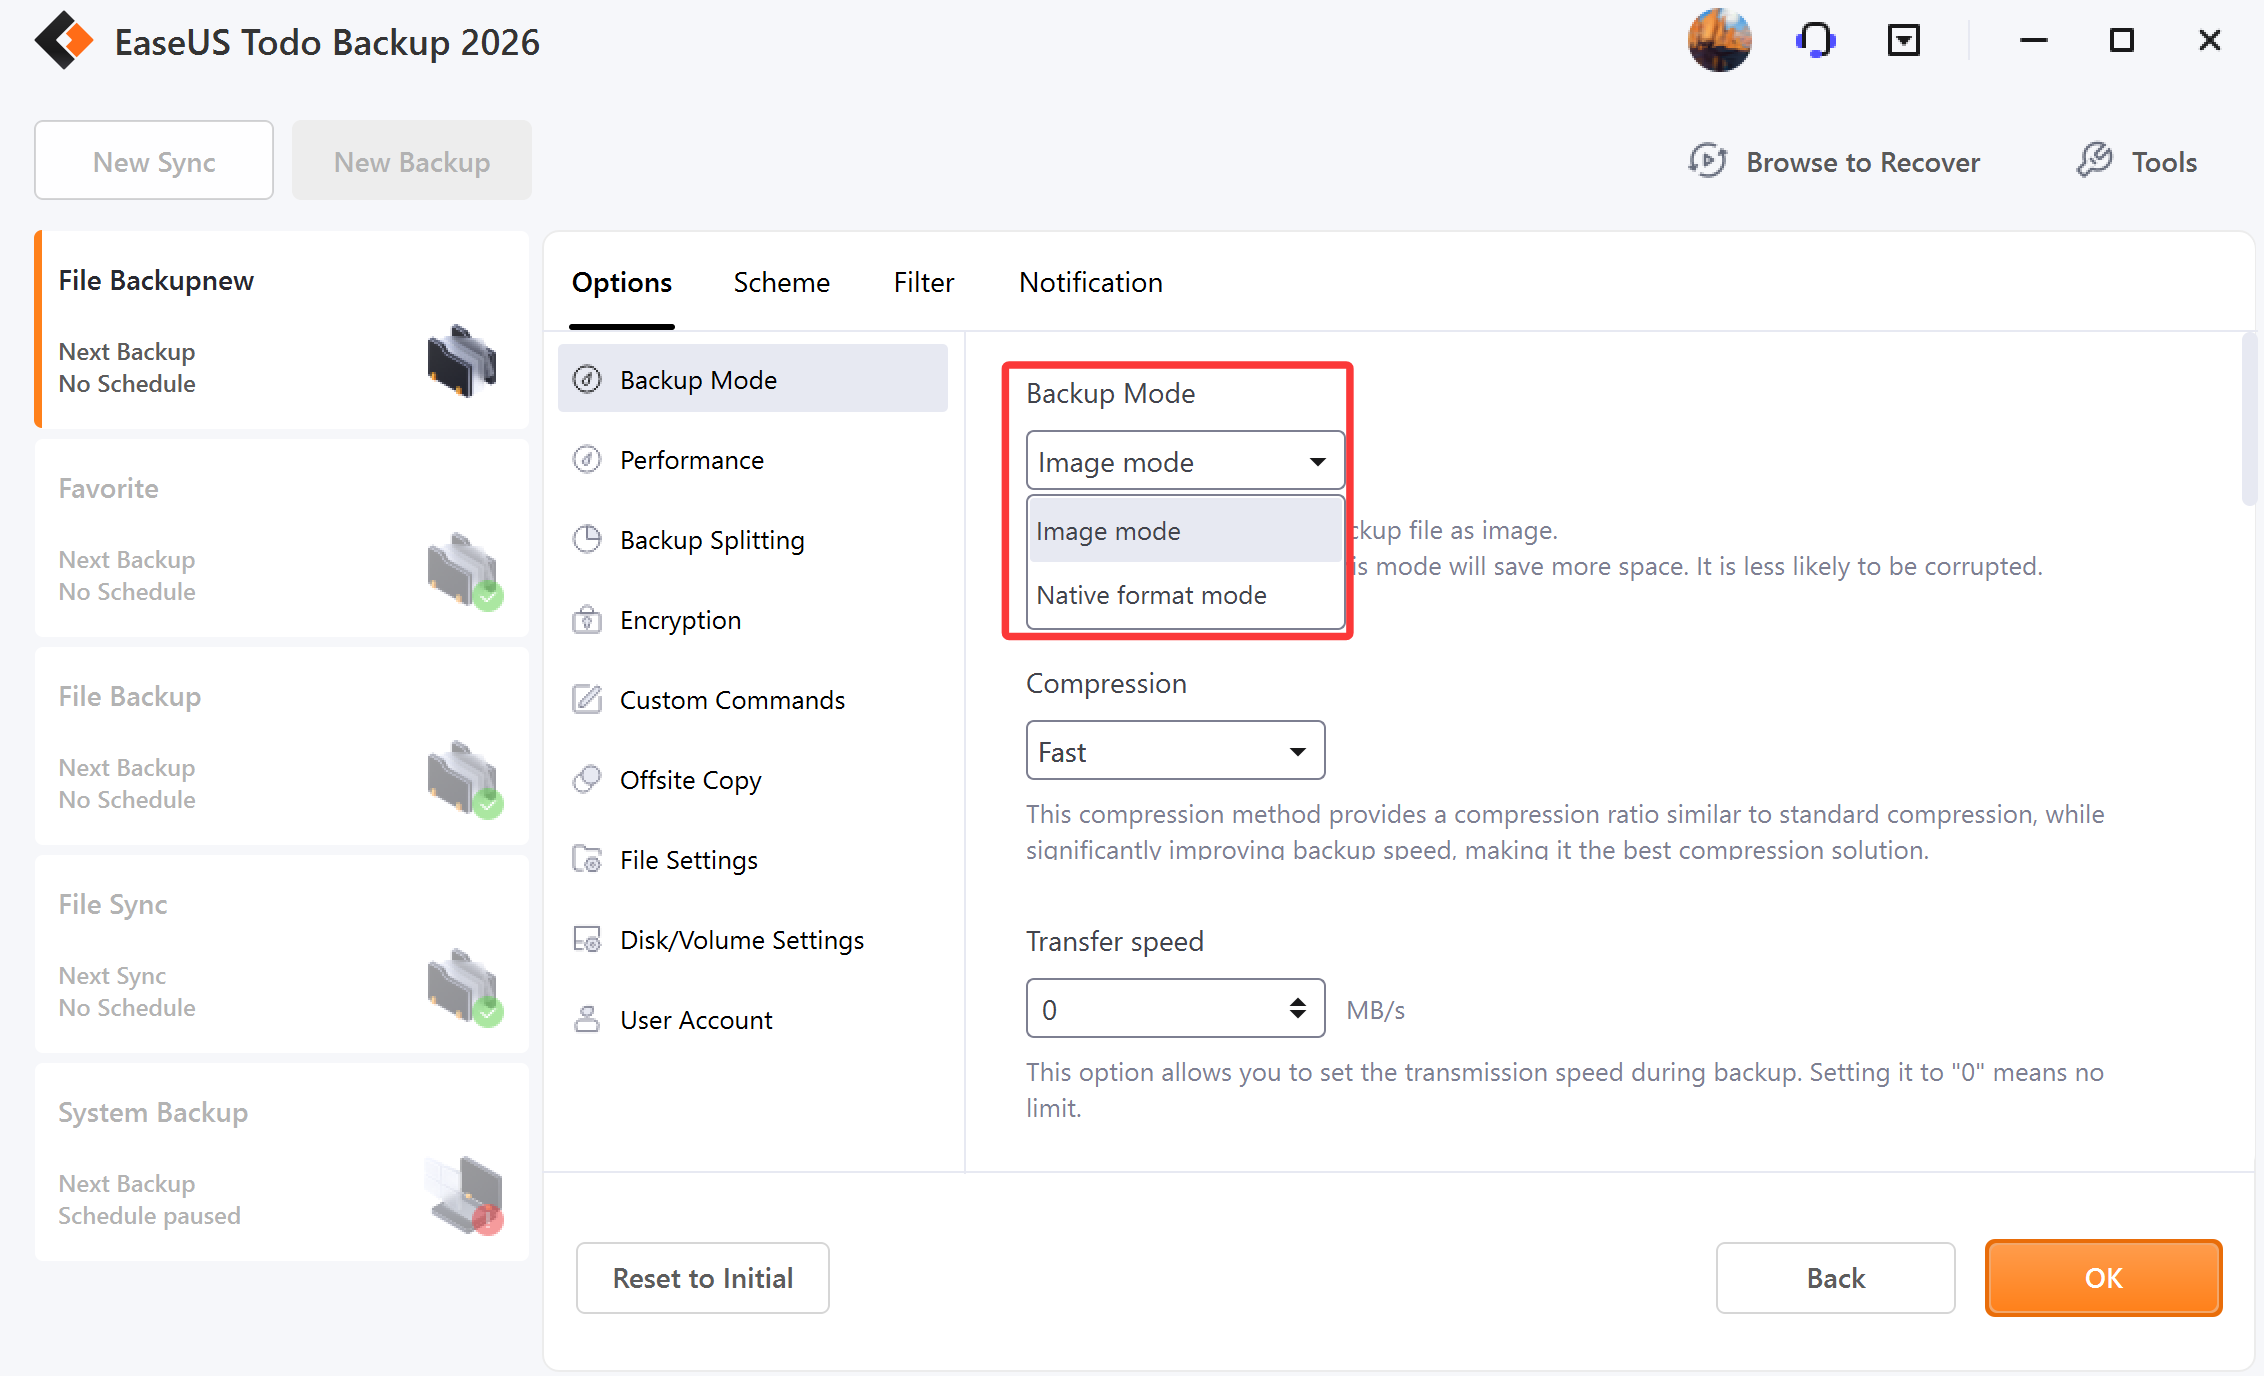
Image Mode - This mode is a practice of backing up the drive/folders you select by creating a .pbd image file. This image file will be compressed to save space on the hard drive.
Native Format Mode - This mode creates a duplicate of the folder you select. The backup will not be compressed, encrypted, or split. All the files in the backup can be directly explored.
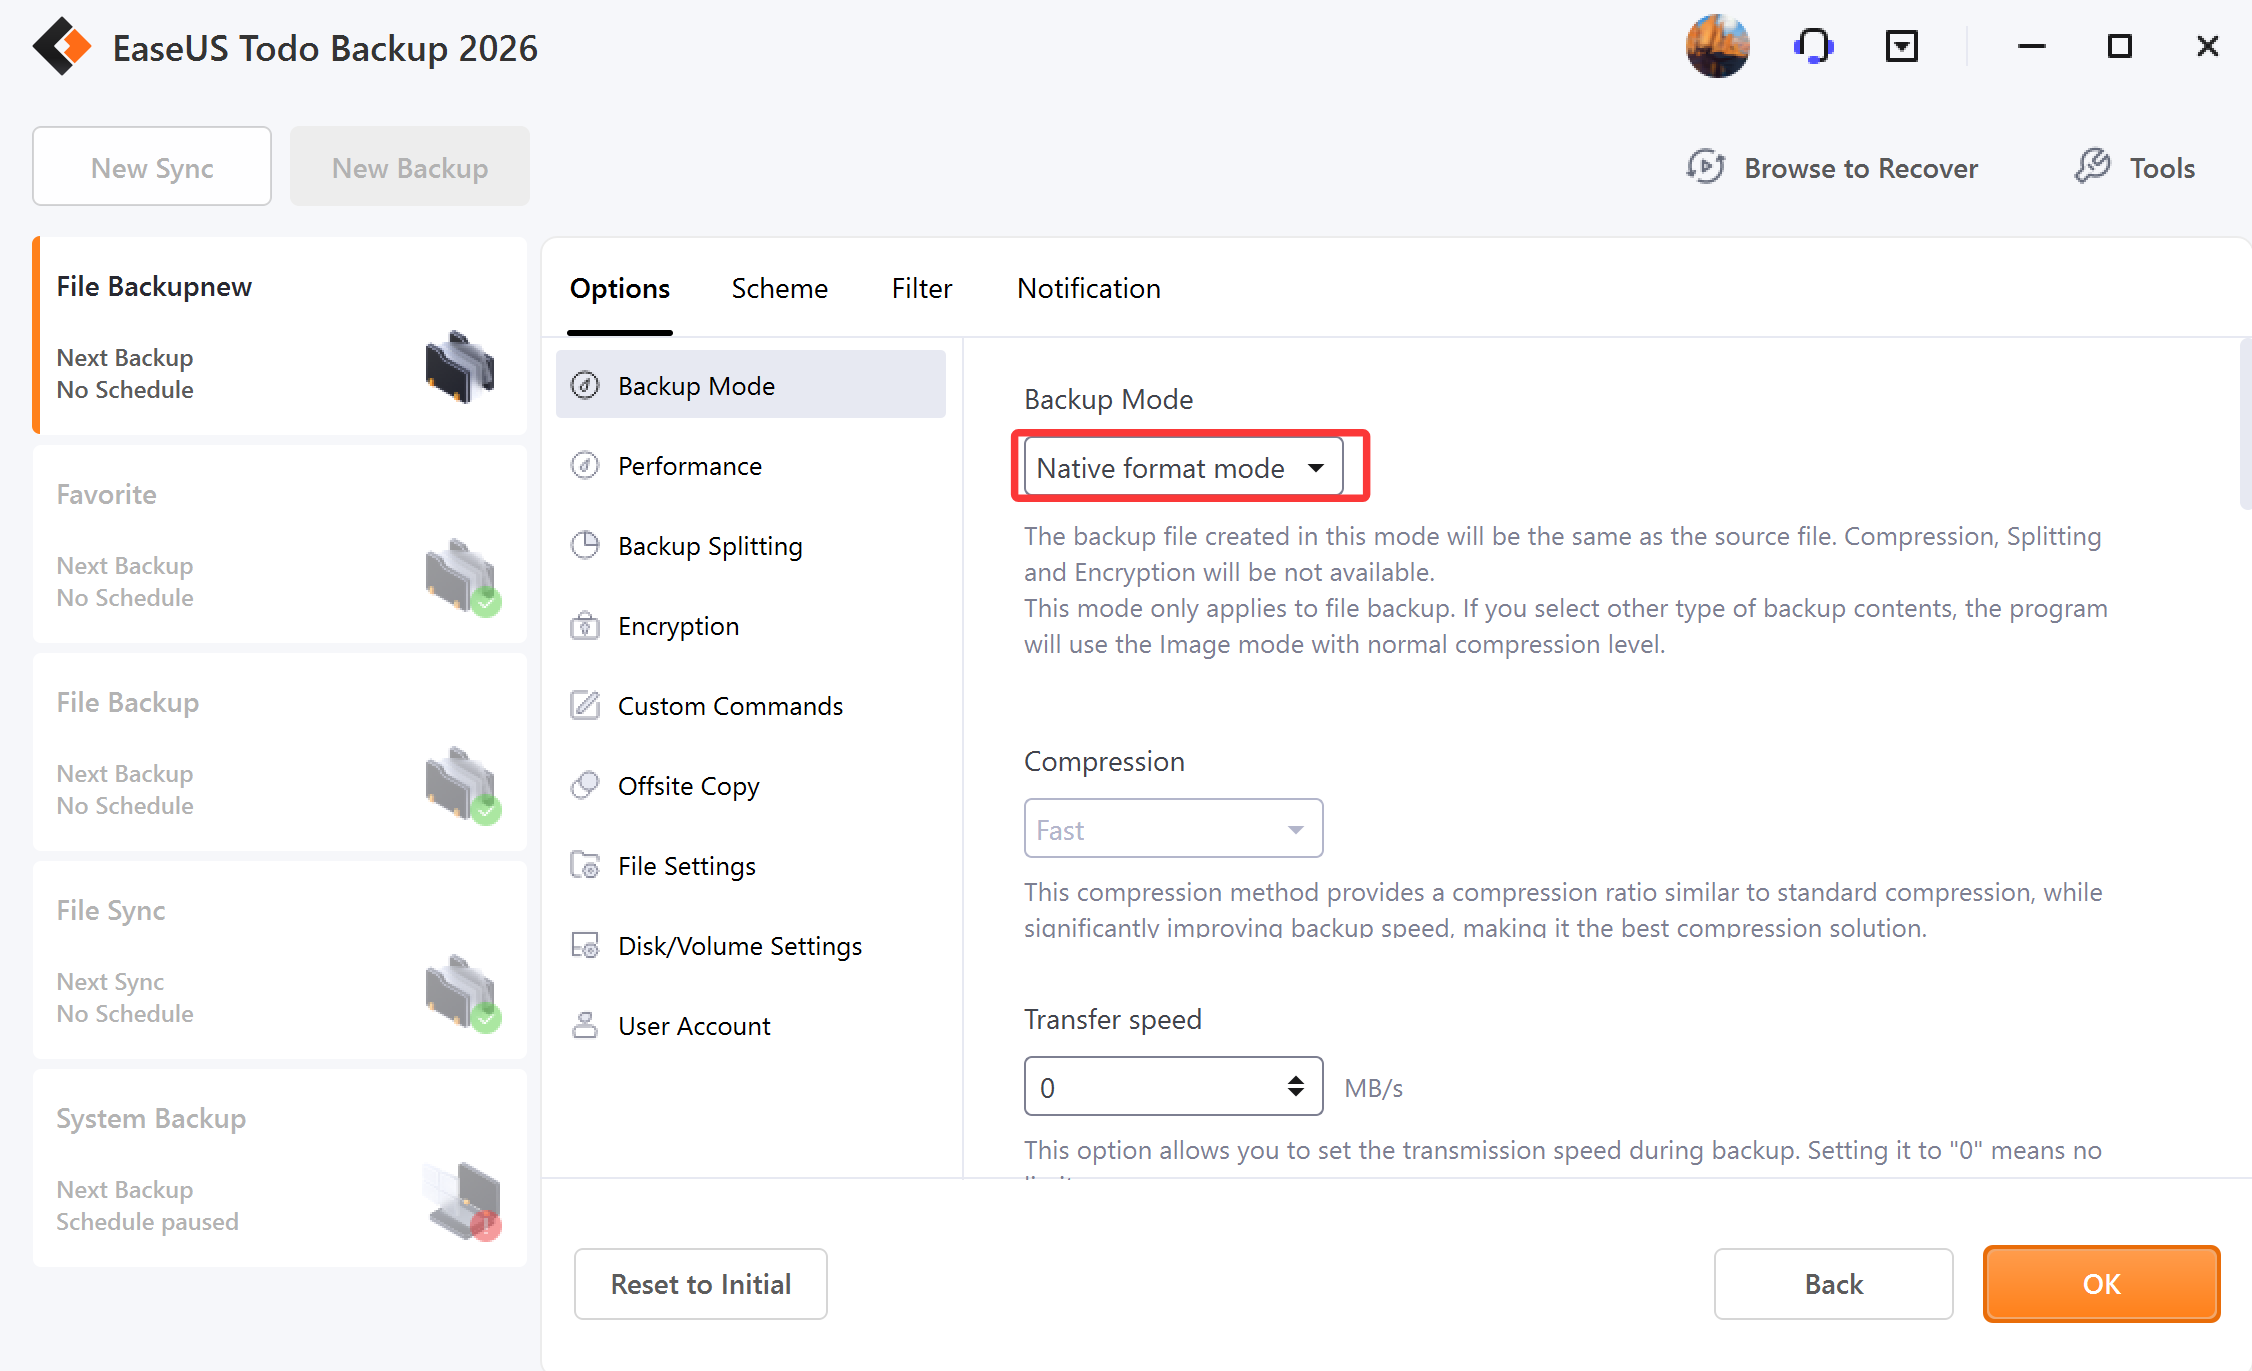
Note:
Only File Backup is supported in Native Format Mode. If you enable Native Format Mode and select disk, operating system, or your outlook at the same time, the backup will automatically be switched to Image Mode.
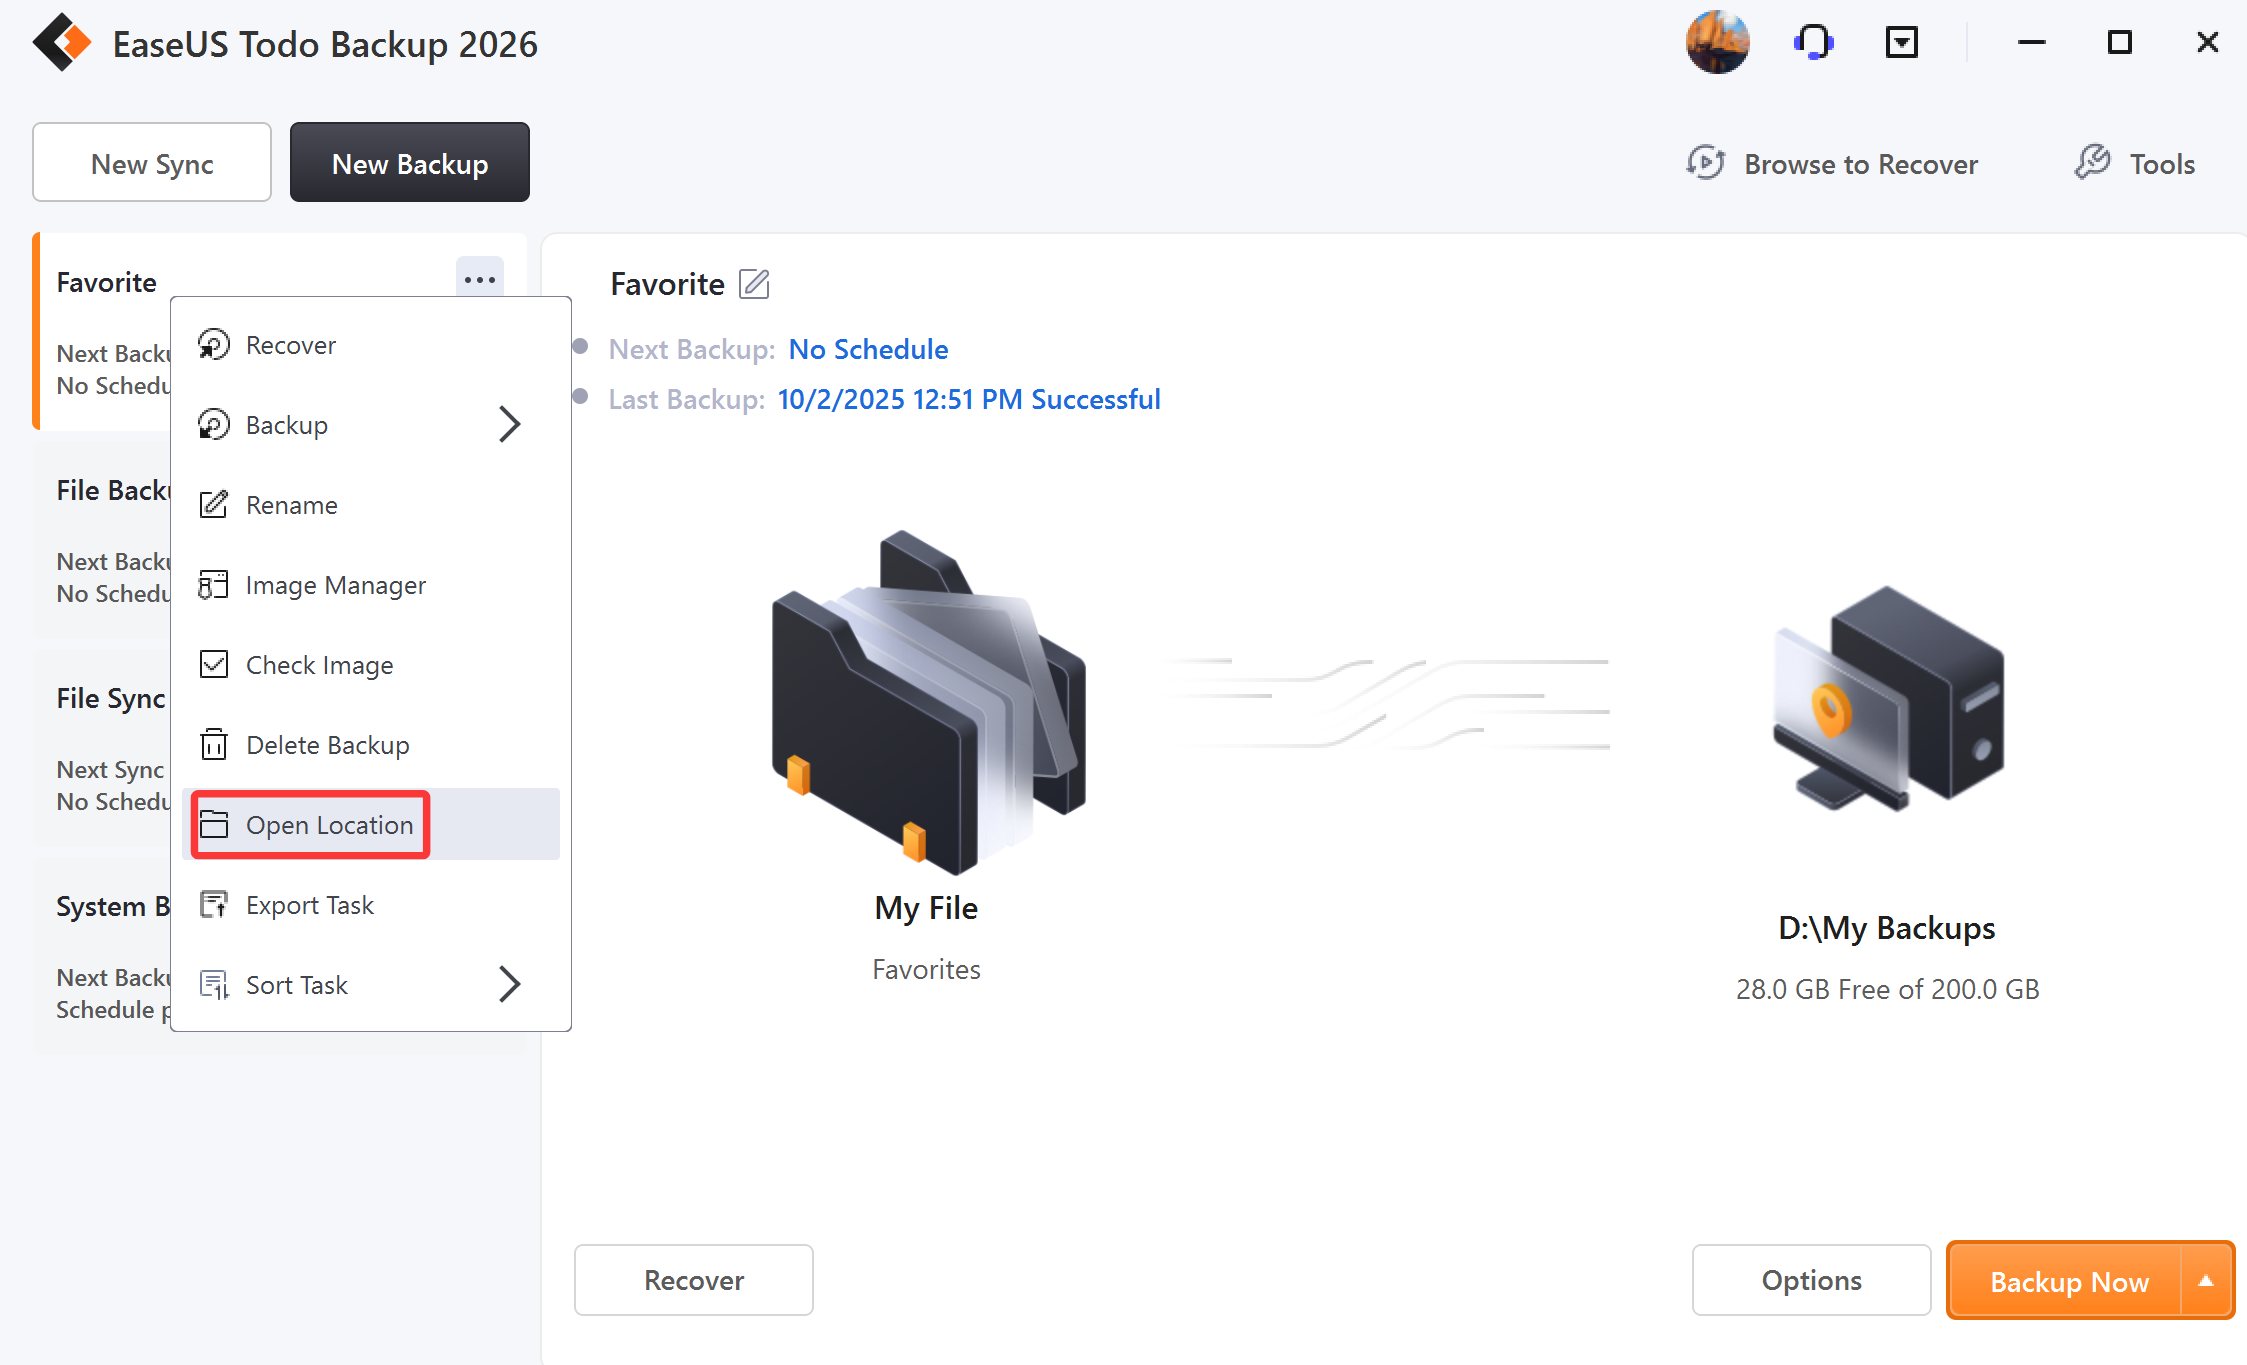
To explore the files in a Native Format Backup, highlight the File backup task, right-click, and select Open Location to check the files inside directly.
Tips:
When you select a native format backup, Compression, Splitting, or Image Encryption are not available.
Offsite Copy and Backup to the public cloud are not supported in Native Format Mode.
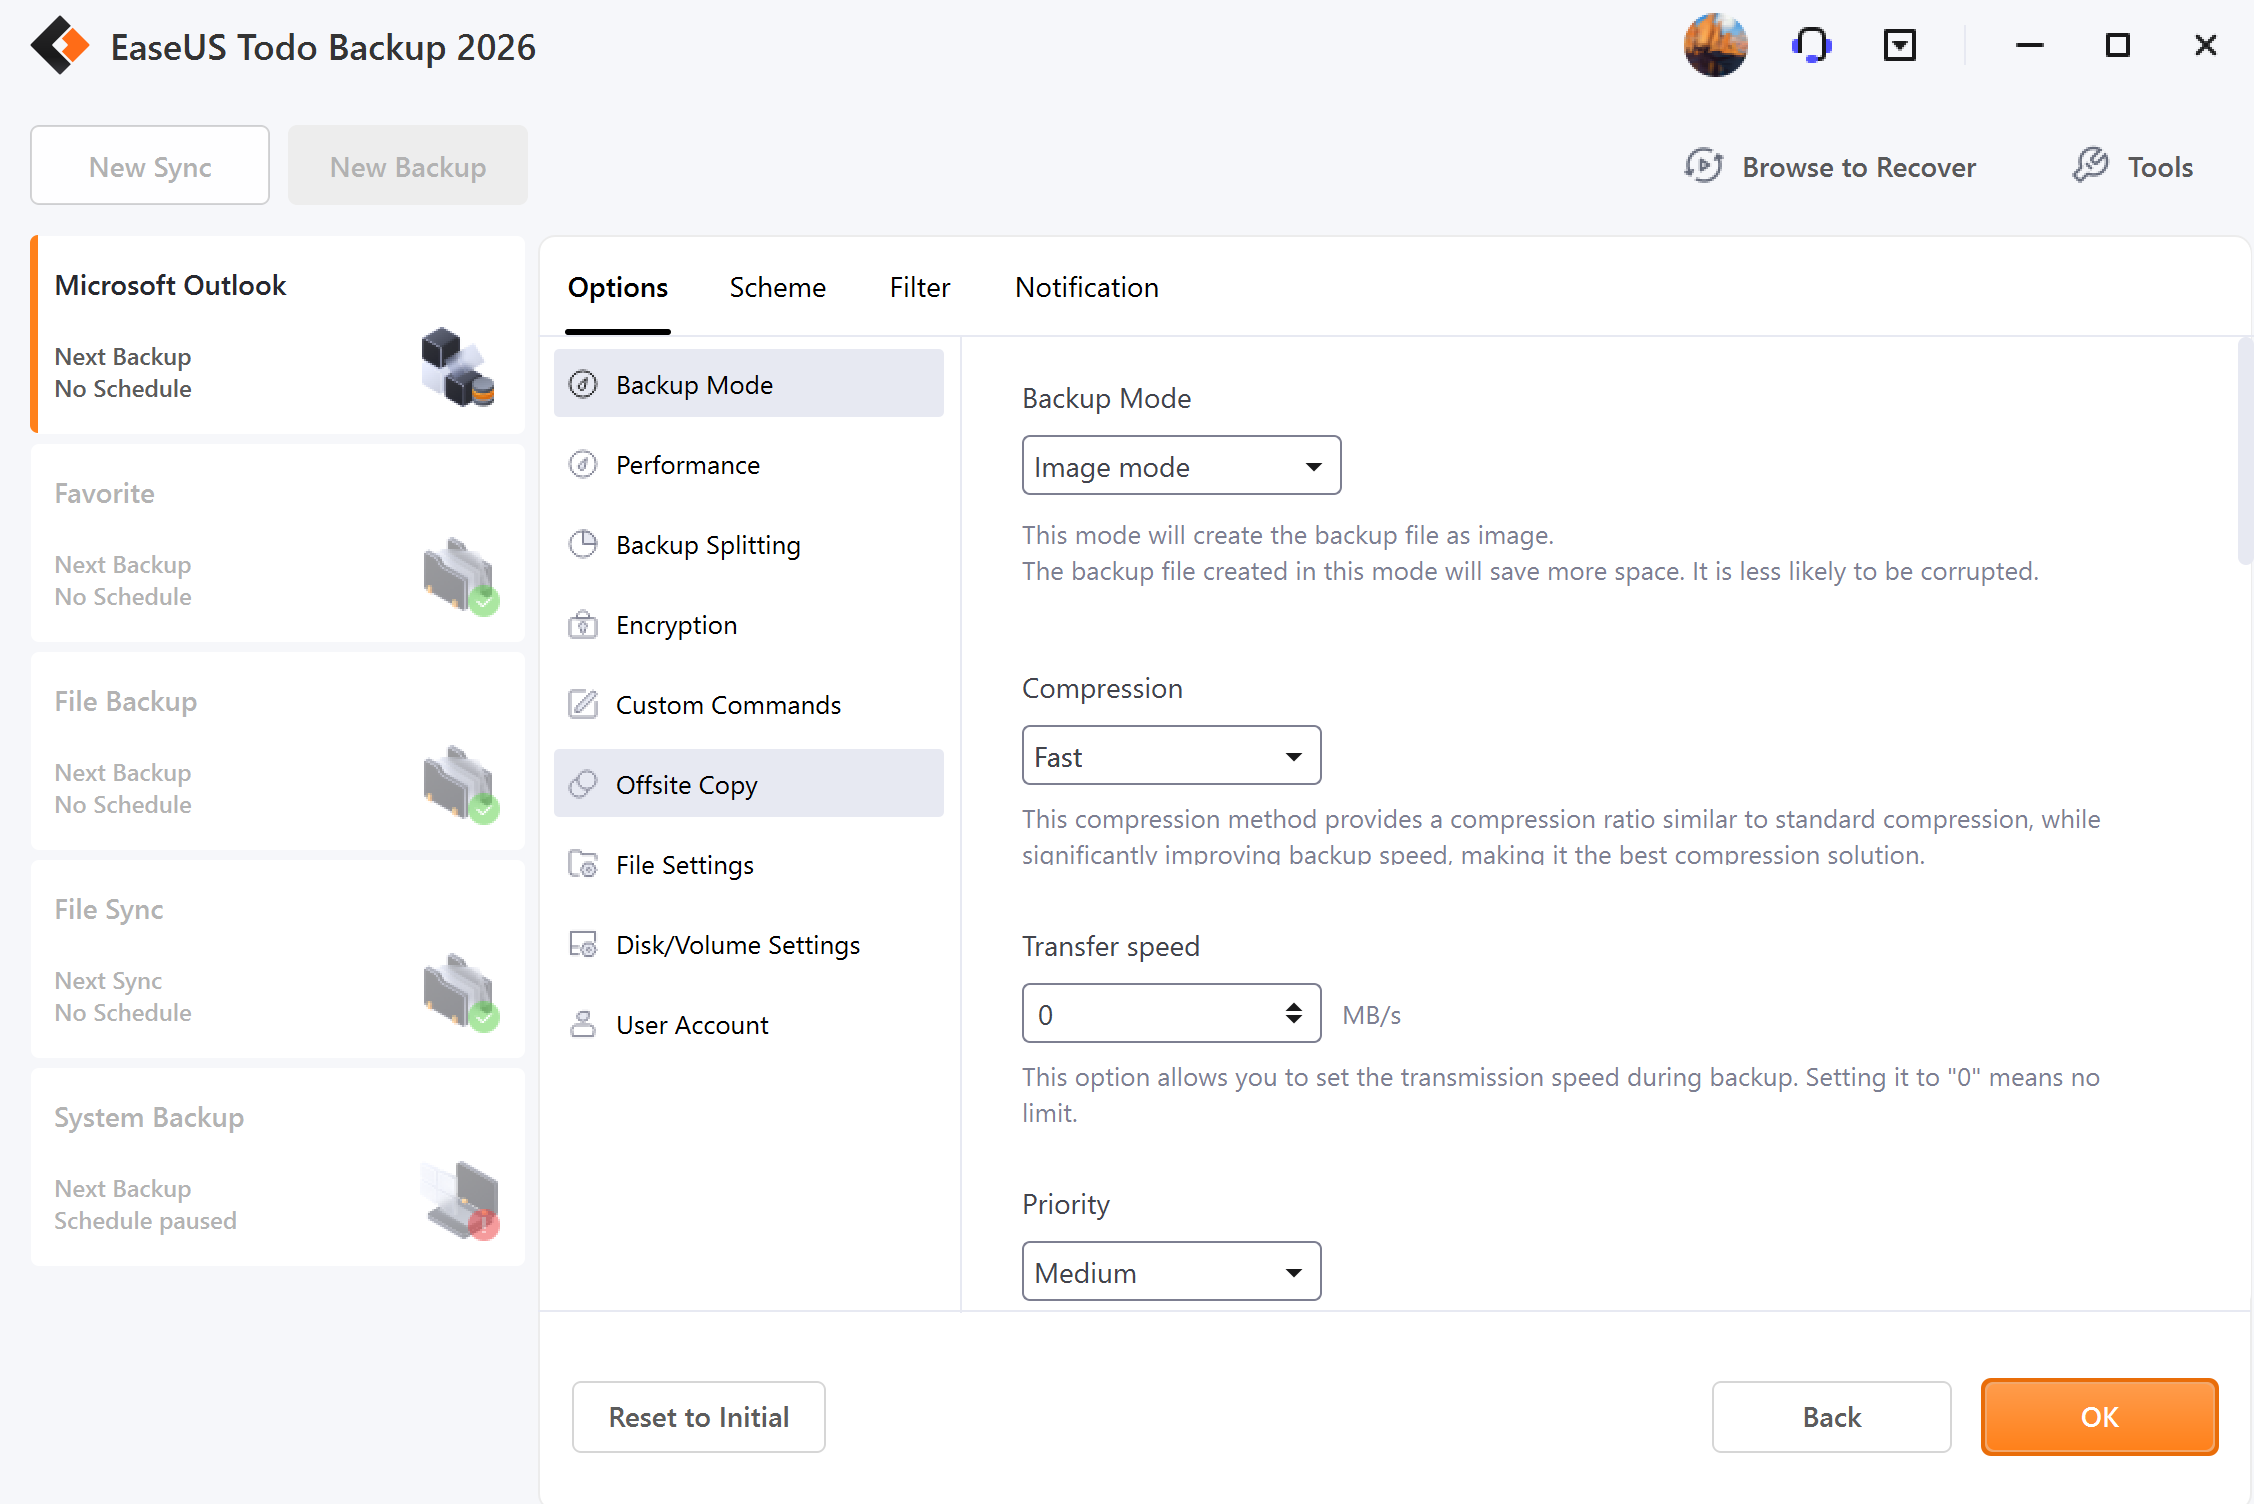
Performance
Performance includes Priority and Network.
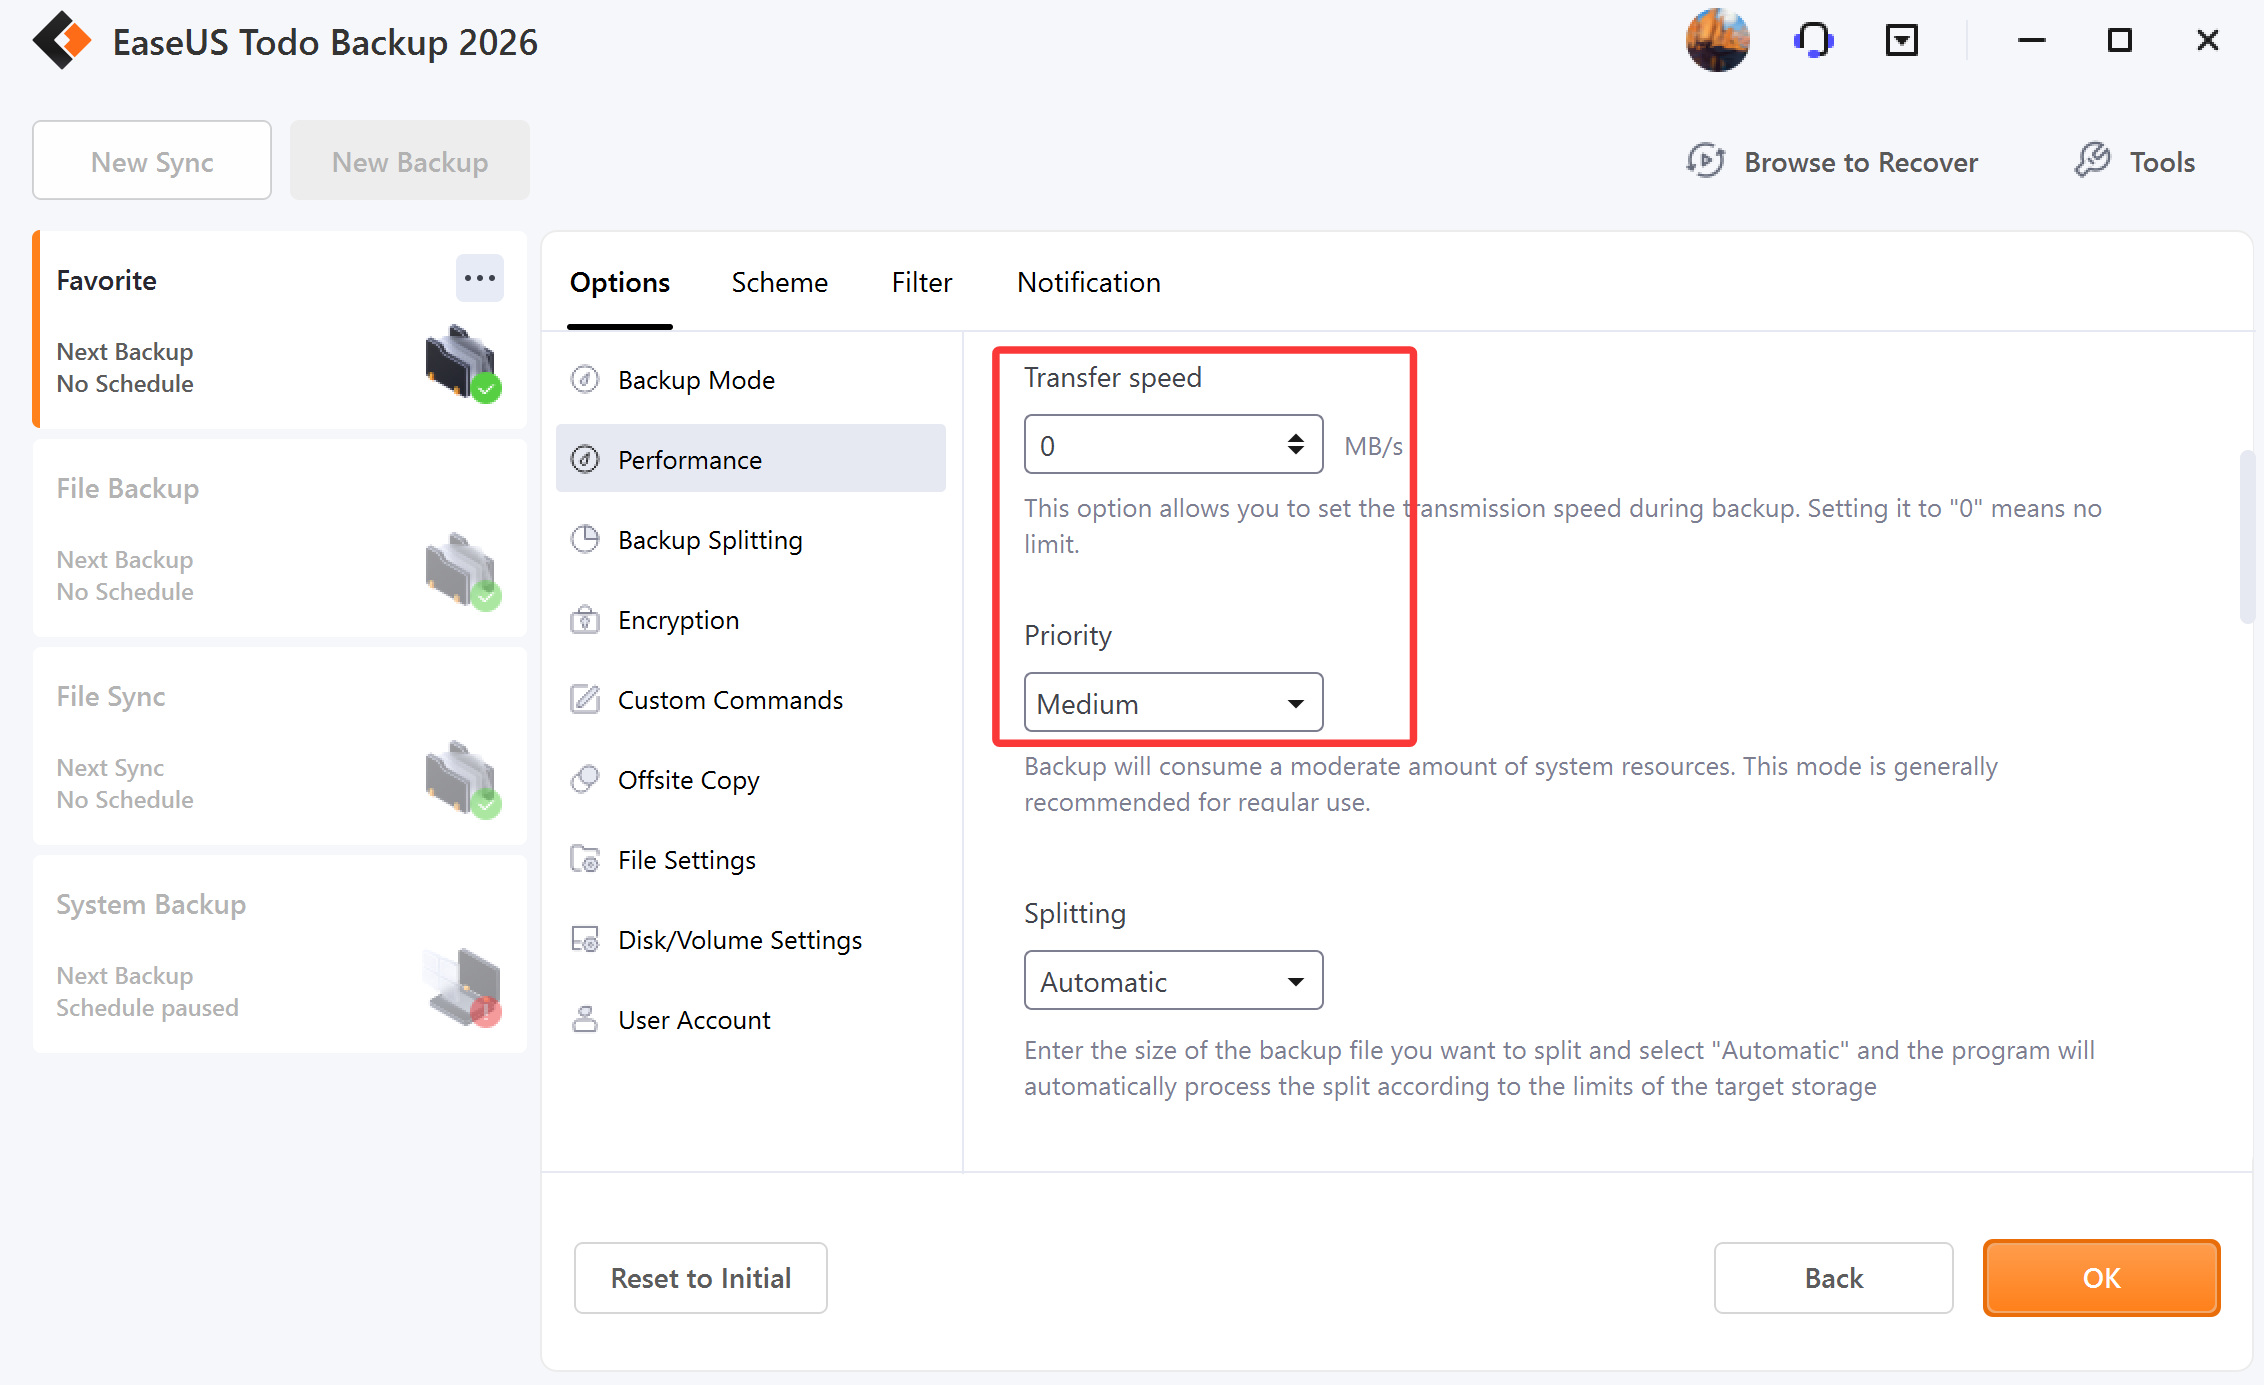
Priority
Windows is a multitasking operating system that supports the simultaneous running of multiple applications. Backup runs faster with Priority checked.
Transfer speed
This option means the network transfer limit. It is 0 Mbps by default. In this case, EaseUS Todo Backup is unlimited in utilizing the network and disk I/O resources.
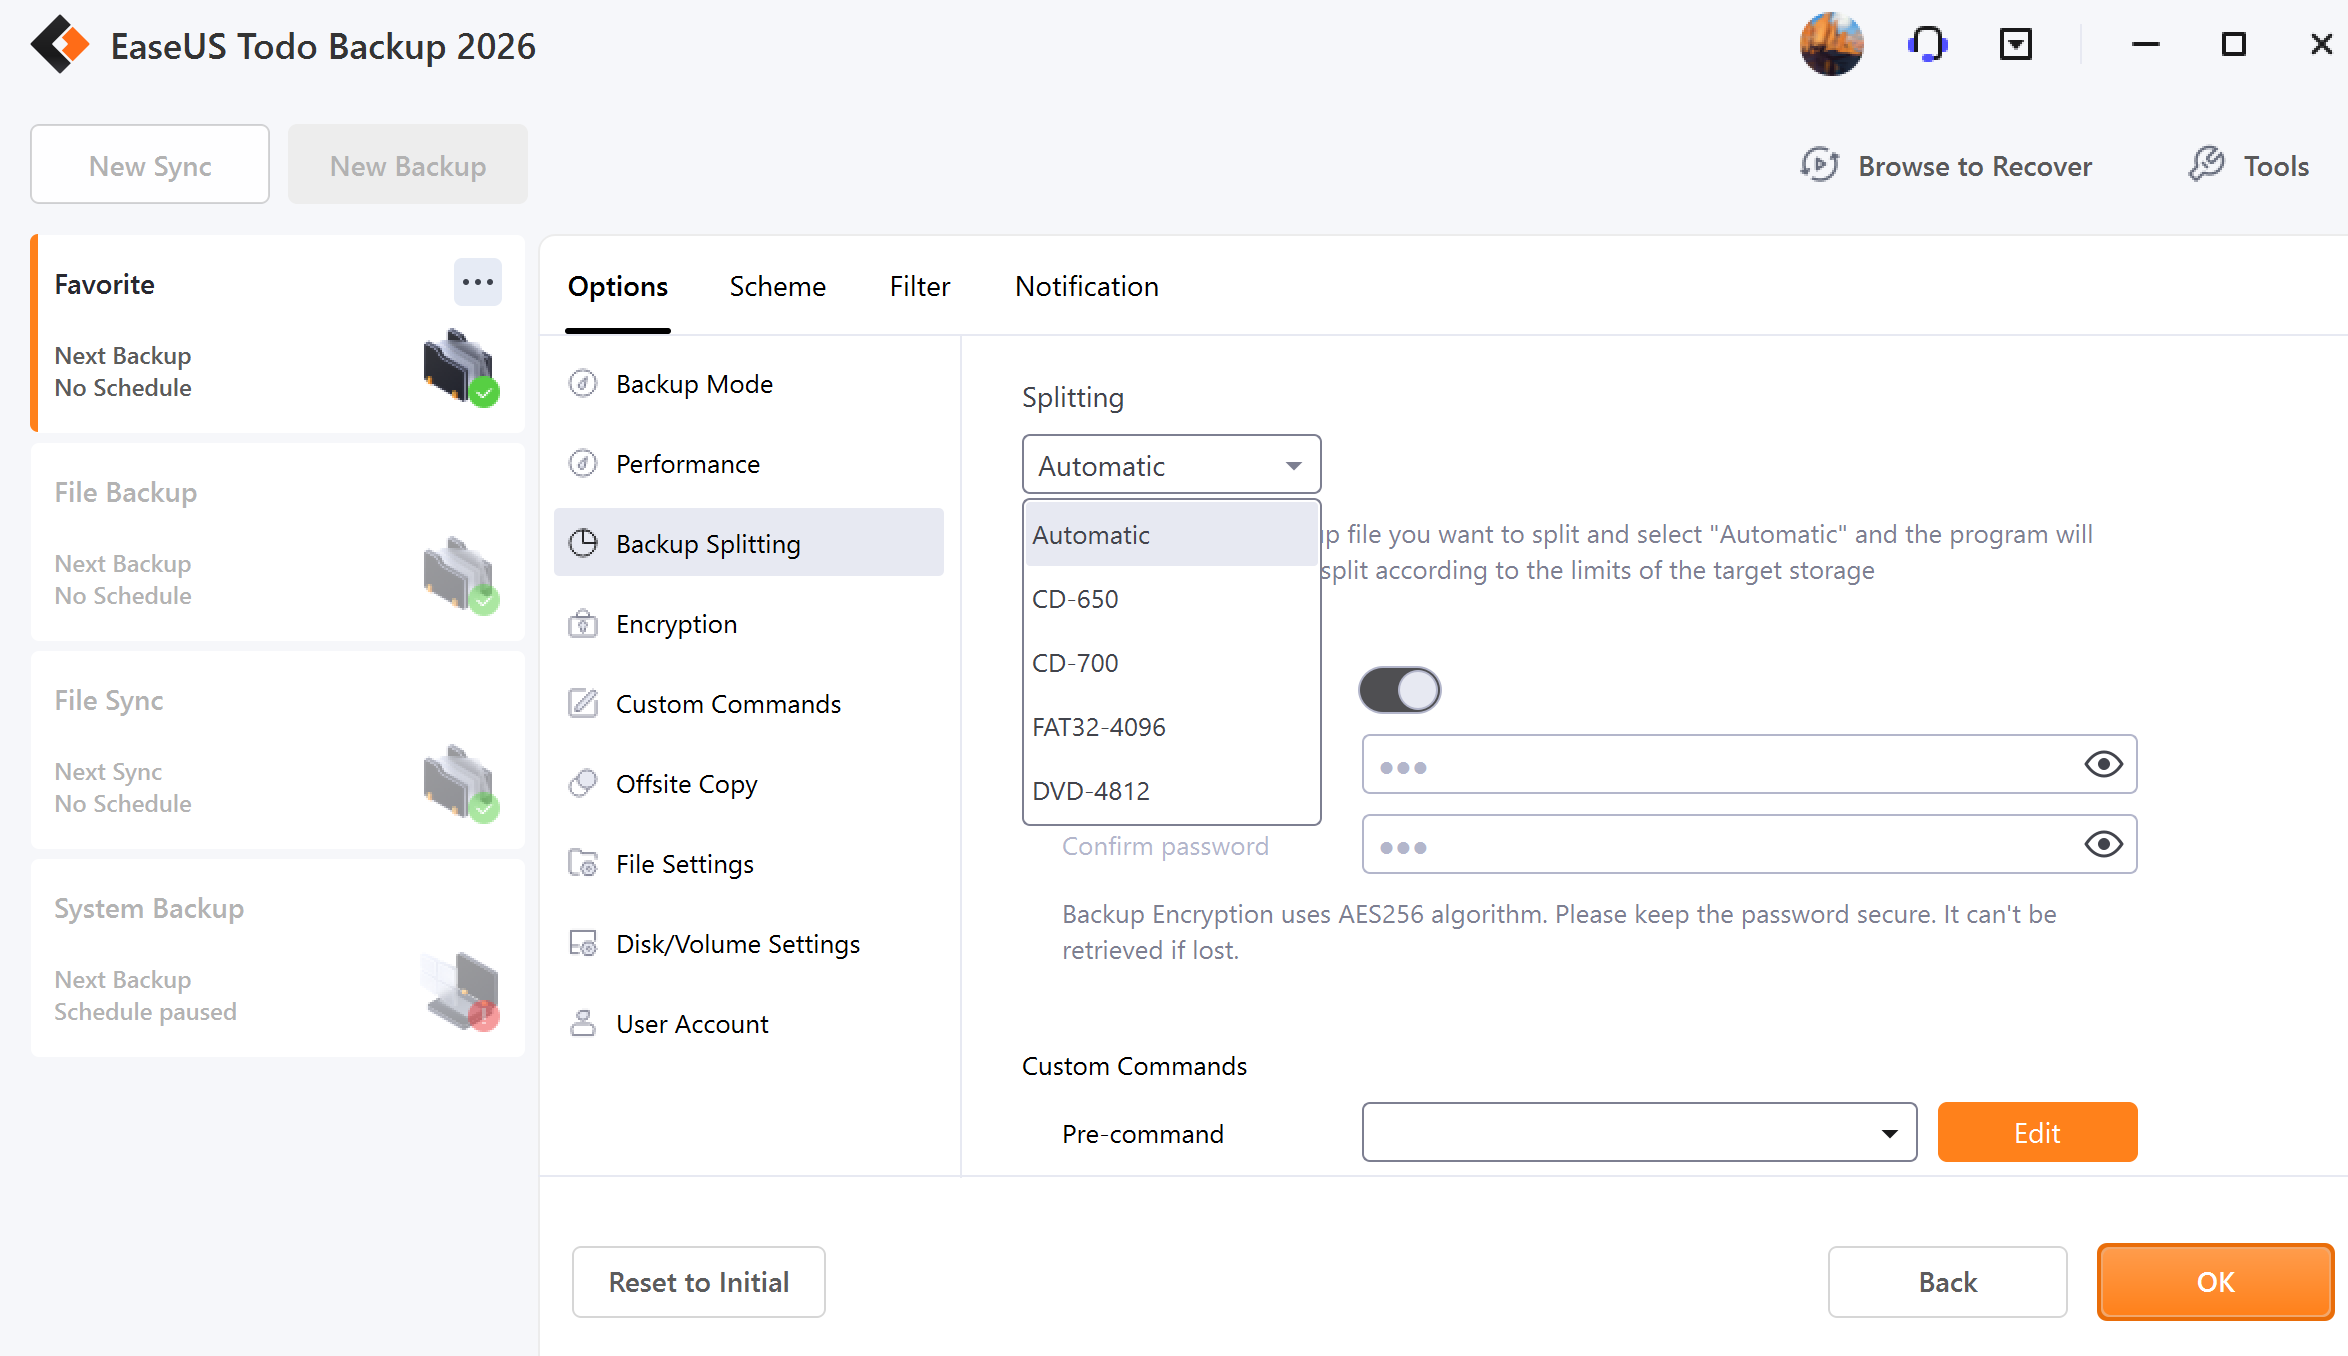
Backup Splitting
Backup Splitting includes Compression and Splitting.
Compression
A backup file can be compressed using different levels of compression. Generally, images that are highly compressed are smaller in size than those compressed with none or fast compression.
Tips:
A backup with a high compression level is not intended to produce a small image. This is because certain files, such as .jpg, .pdf, and .mp3, that have already been compressed will not be compressed again.
Splitting
To accommodate different storage mediums, images require to be split into small pieces with Backup Splitting.
Automatic - Image size is automatically split by file system type of destination storage device with Automatic checking.
Encryption
To protect images with a password, please Enable Backup Encryption. The password adopts the AES256 algorithm, which should be less than 15 characters.
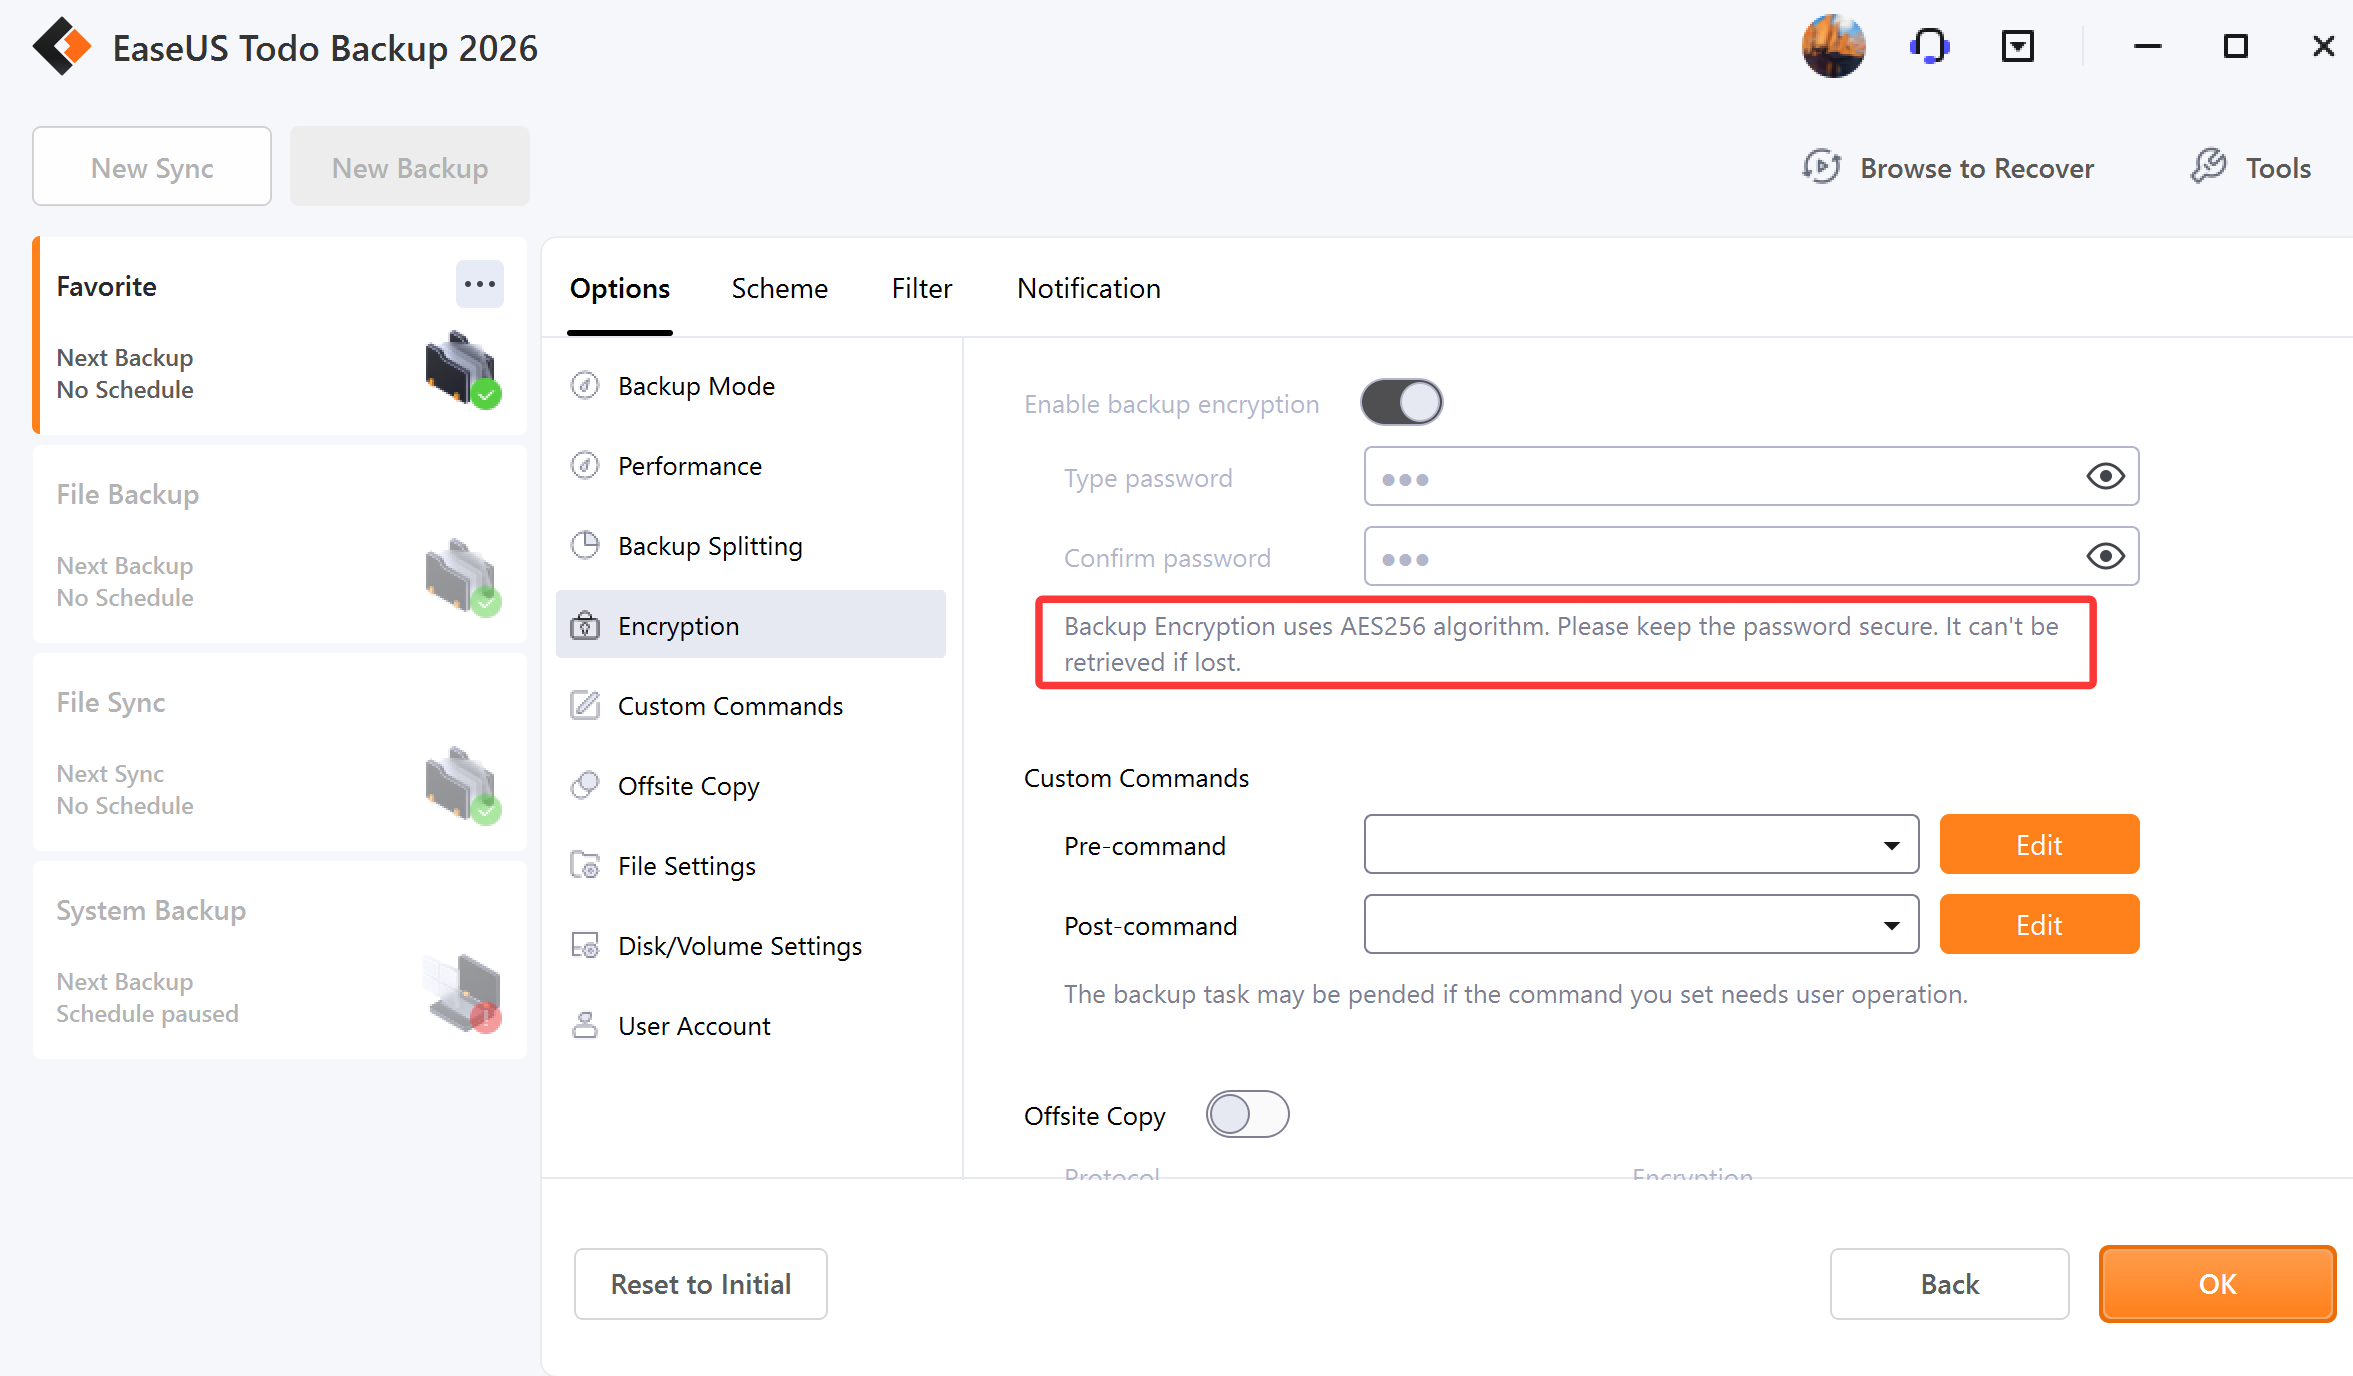
Note:
Make sure the password is properly saved. EaseUS is unable to decrypt the encrypted images.
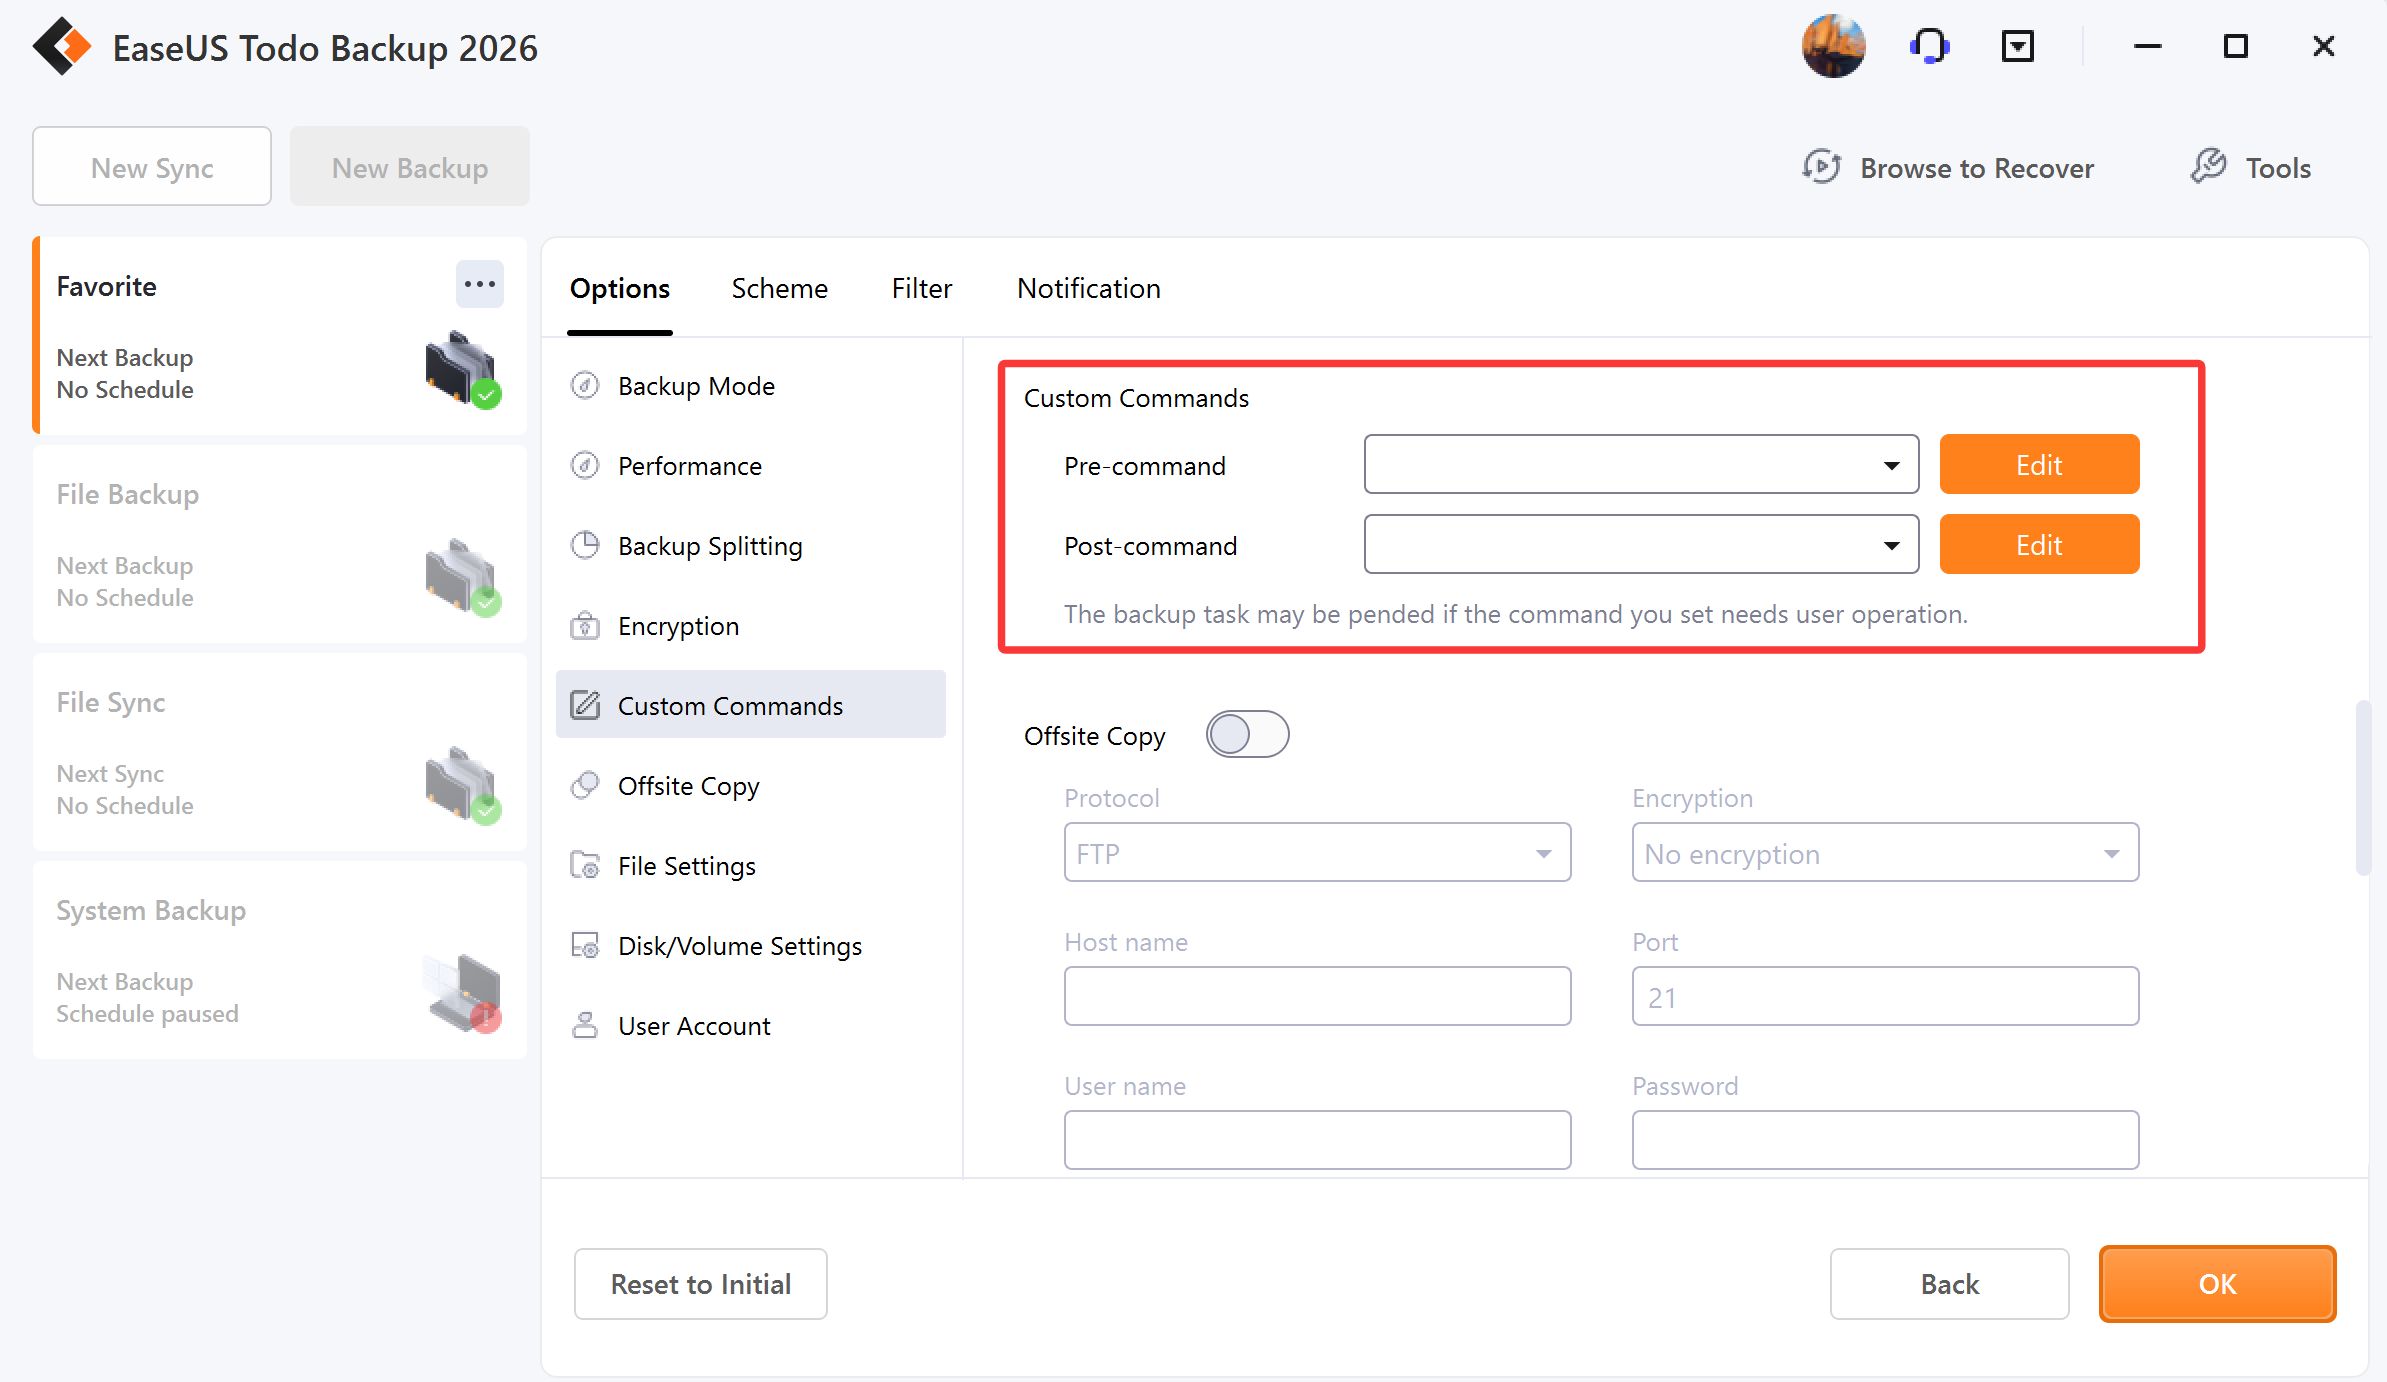
Custom Commands
You may set any commands to be executed before or after a backup plan. For more details, please click here.
Offsite Copy
To enhance image protection, you can Enable Offsite Copy. This feature will automatically replicate images to an FTP server once the backup process is completed.
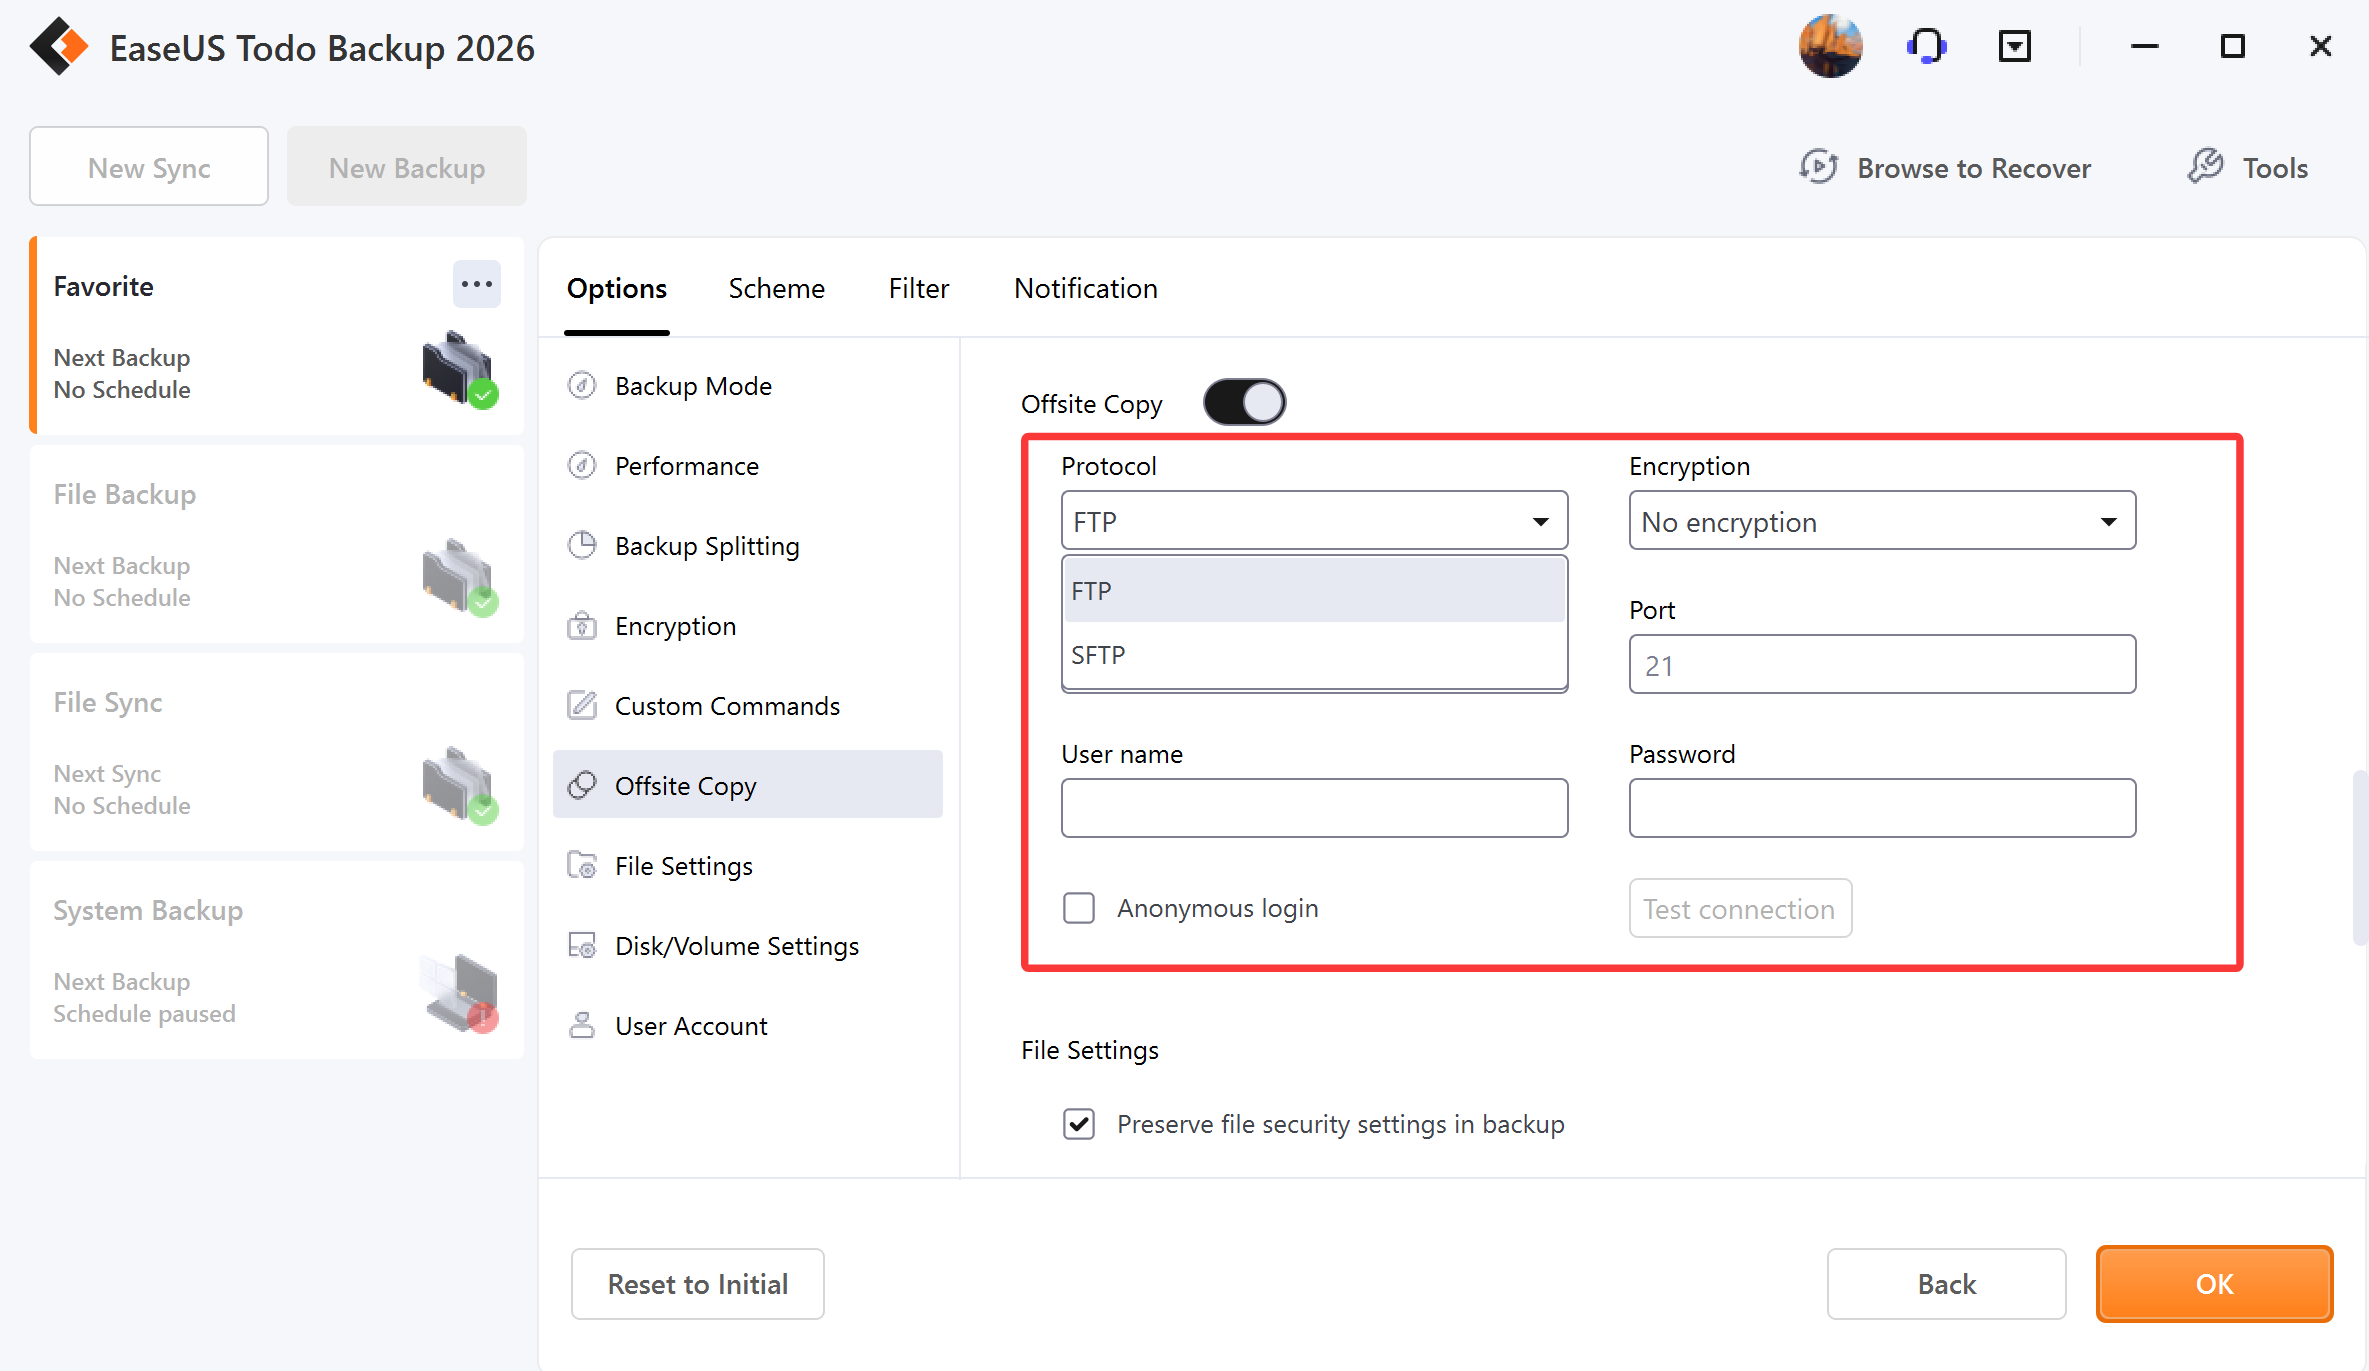
Basic settings:
FTP address - Specify the FTP address with the subdirectory included.
Port - Specify a port number for the FTP connection.
Username and Password - Input the username and password to log in to the FTP.
Note:
Check Anonymity when there is no FTP password or user name or FTP is accessible to everyone.
Additional settings:
Retry - Set the retry times. EaseUS Todo Backup automatically retries to connect to the server as many times as it is specified in case of FTP connection failure.
Passive mode - FTP has two working modes, PORT and PASV. The default mode is PORT.
Test connection - Test parameters for FTP to make sure FTP is accessible before backup.
File Settings
This feature allows for the preservation of file security settings during backup, as well as the inclusion of all contents referenced by a Reparse Point.
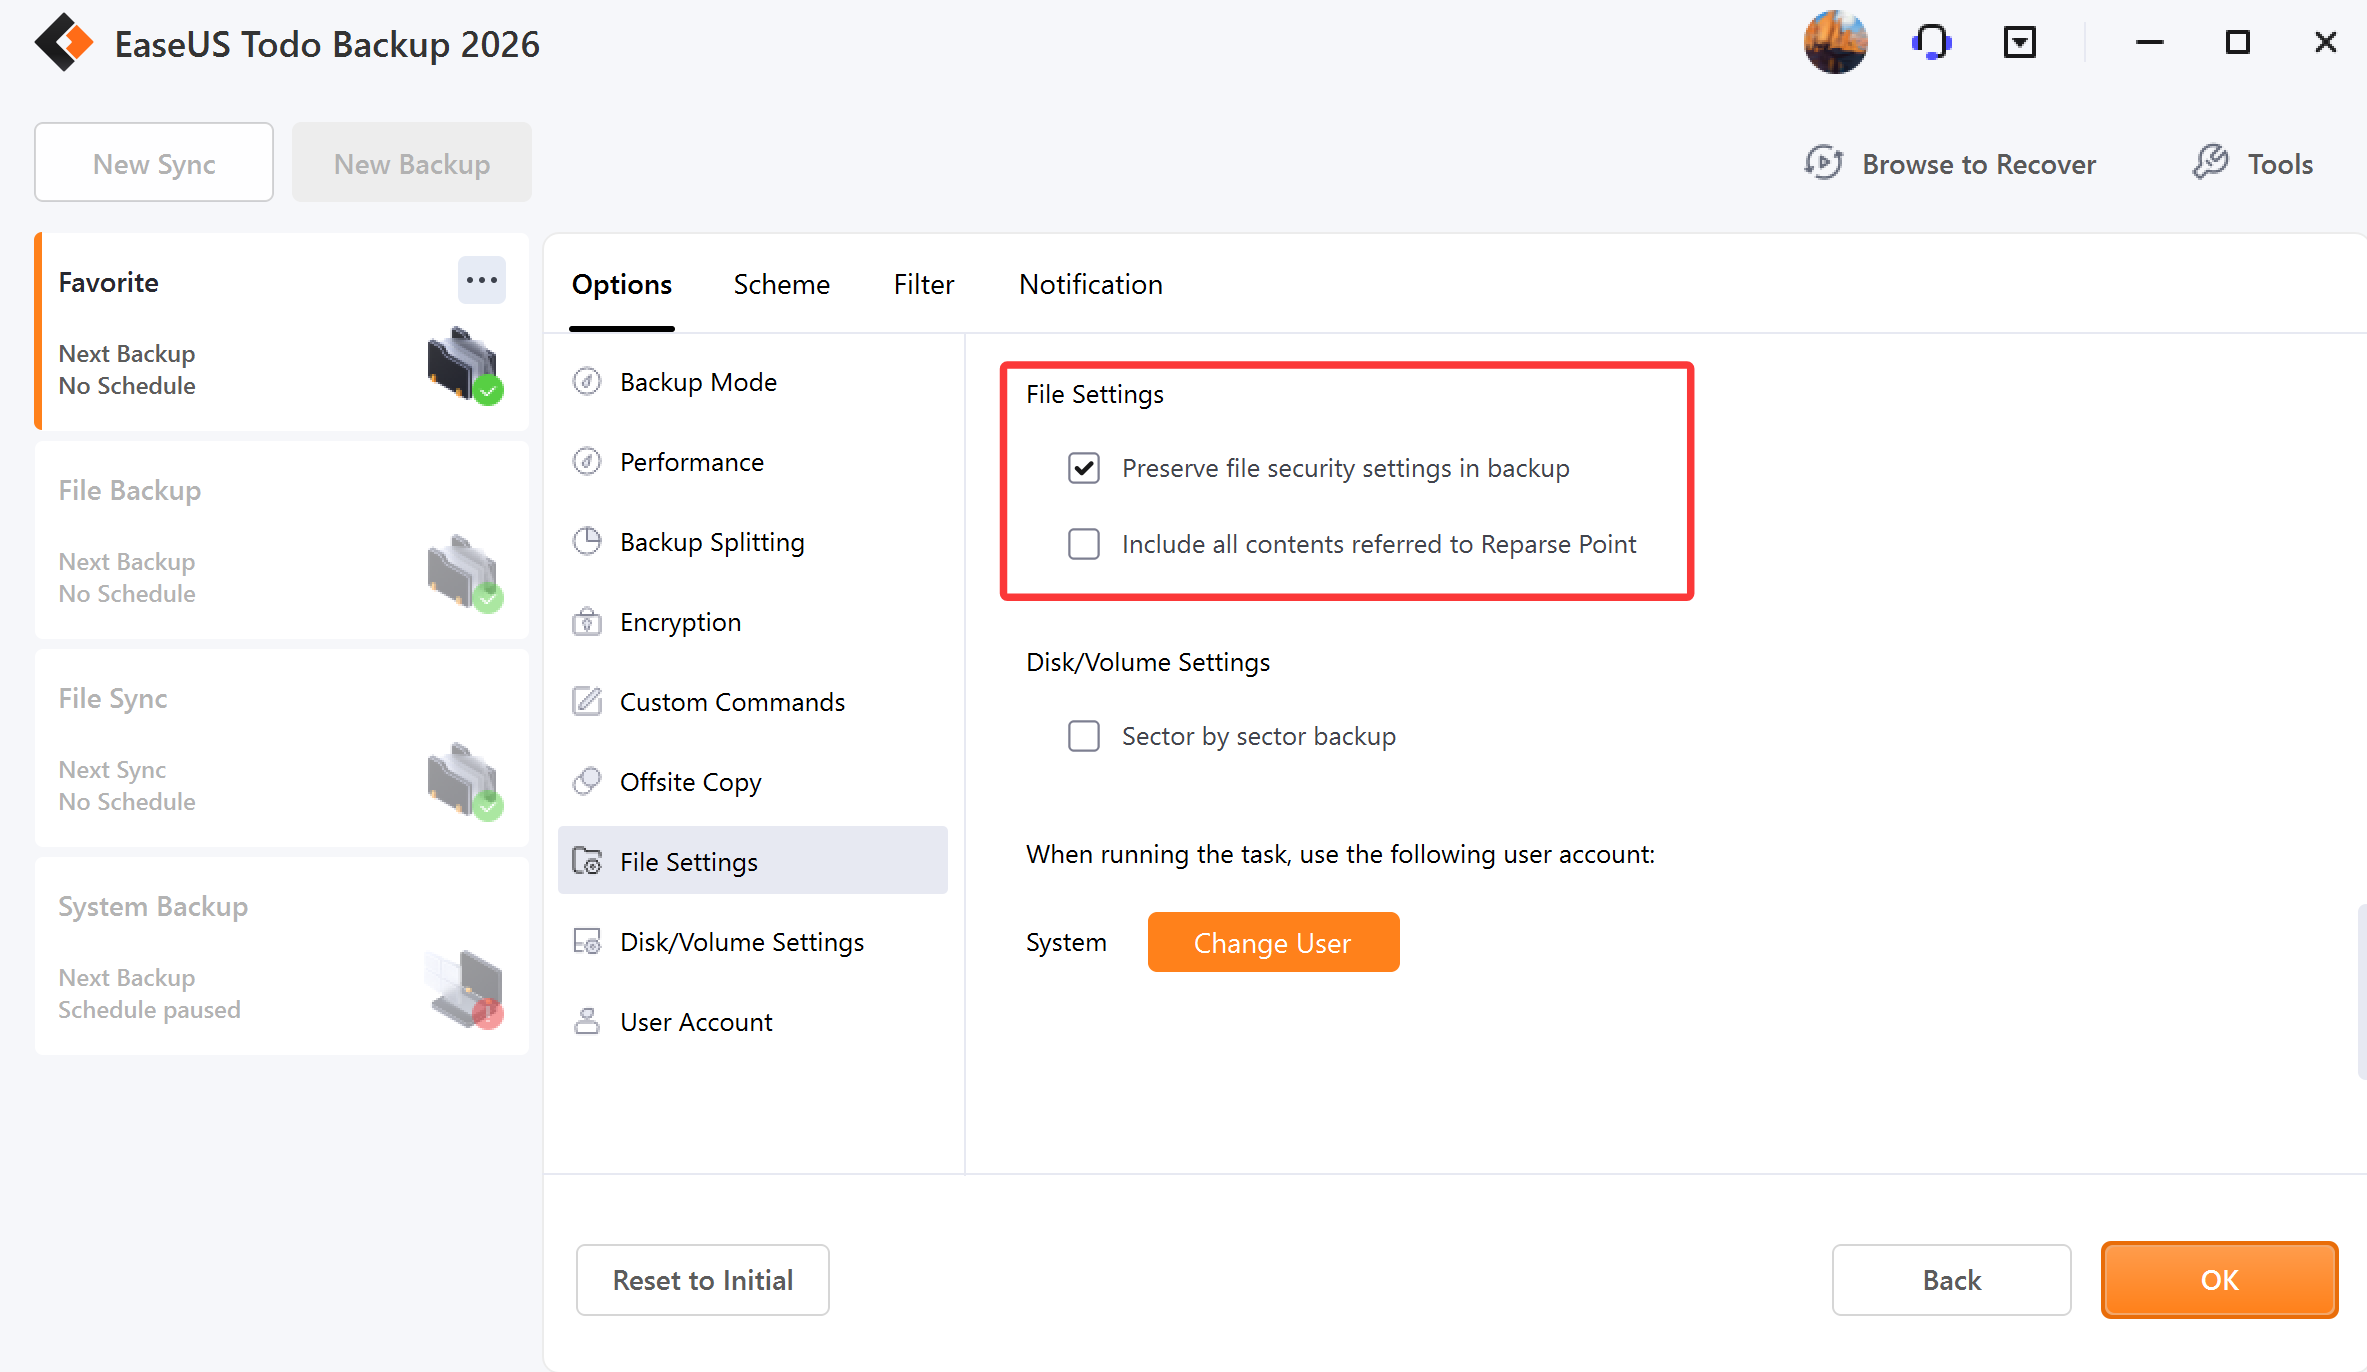
Disk/Volume Settings
This functionality is accessible for disk, partition, and system backups. By selecting Sector by sector backup, all data sectors and empty ones are included in the backup. This feature is beneficial when file system errors are present. However, it may decrease the backup speed and produce a larger image in comparison to a regular backup.
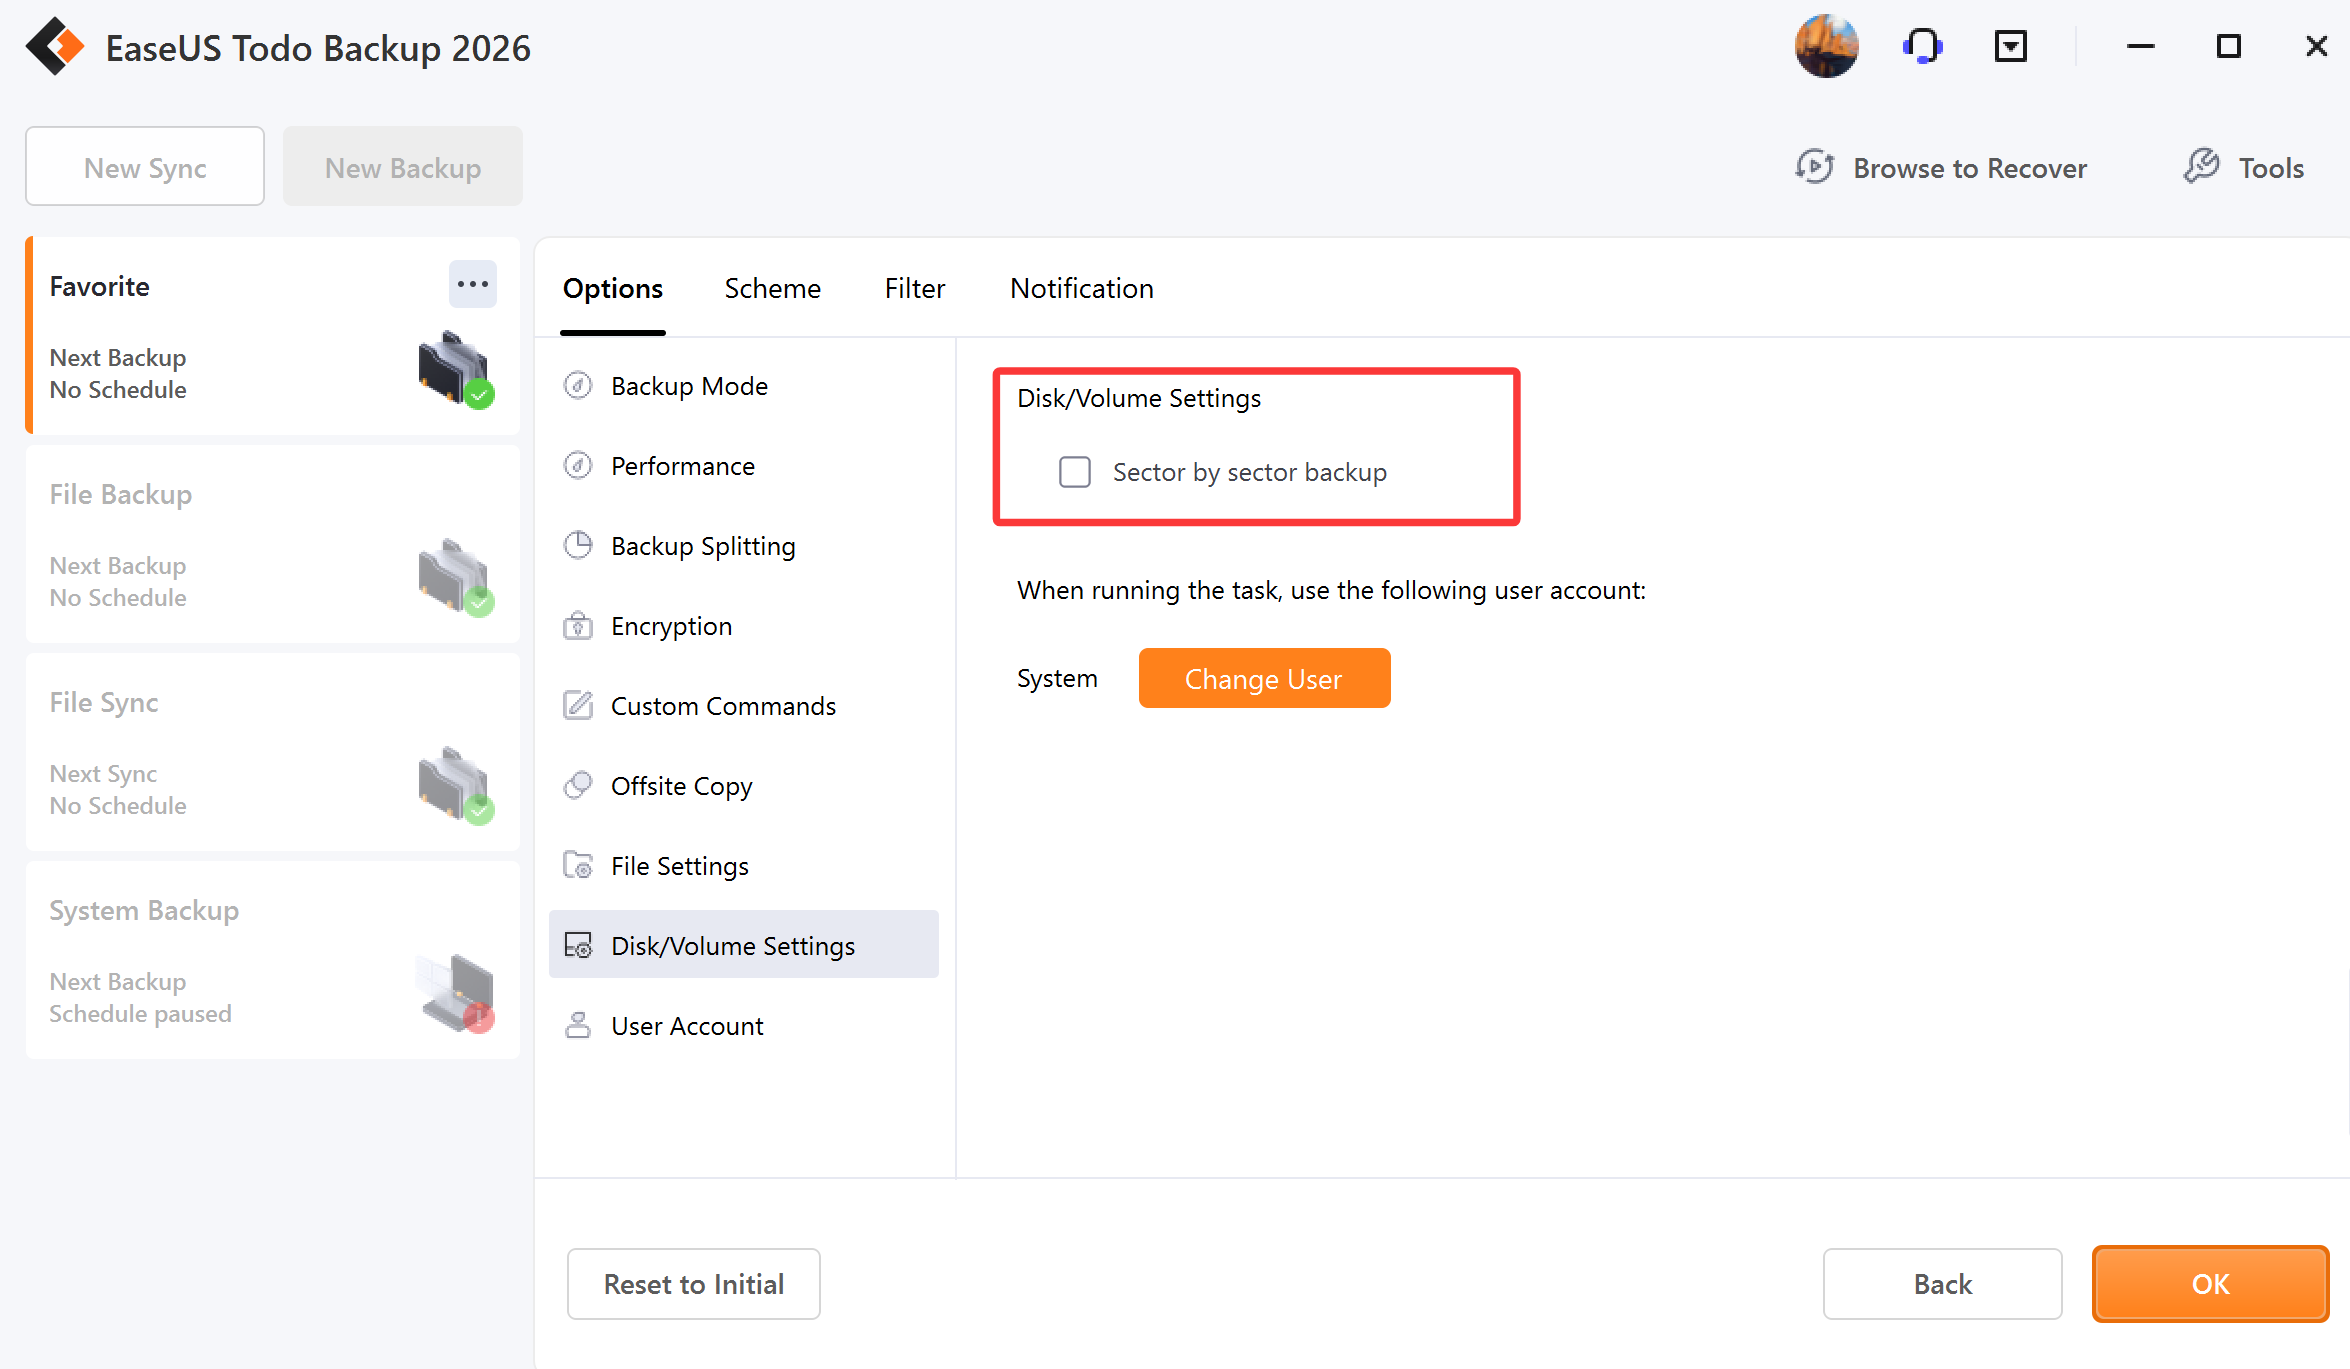
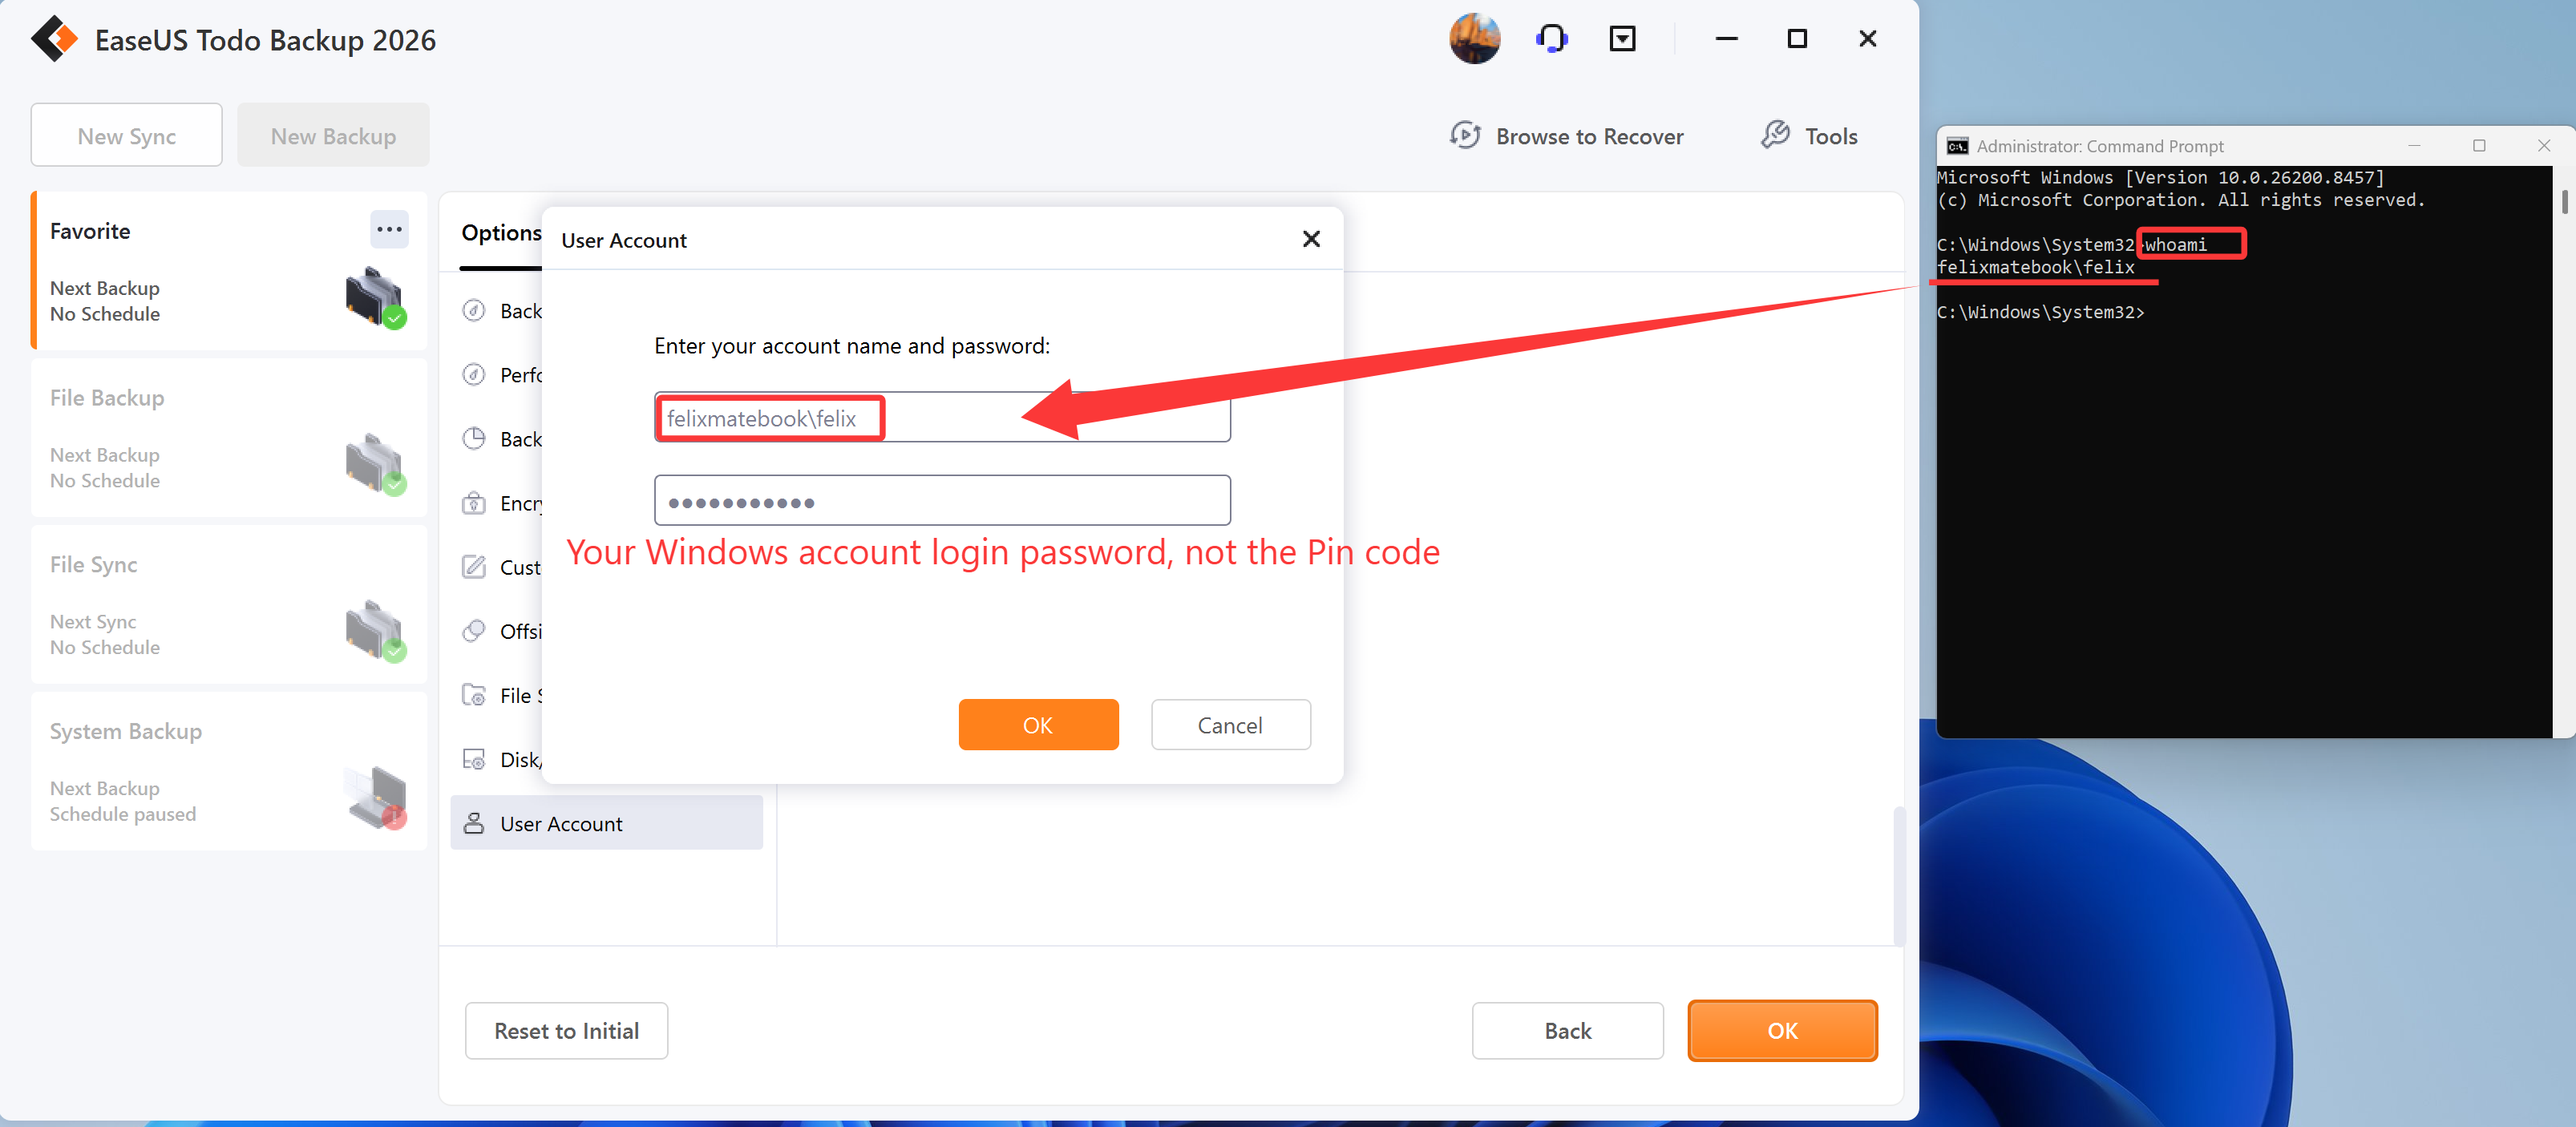
User Account
You can specify the user account to run the task. Please click Run As and enter the correct account name and password.
Backup Scheme
EaseUS Todo Backup provides six Schedule Types.
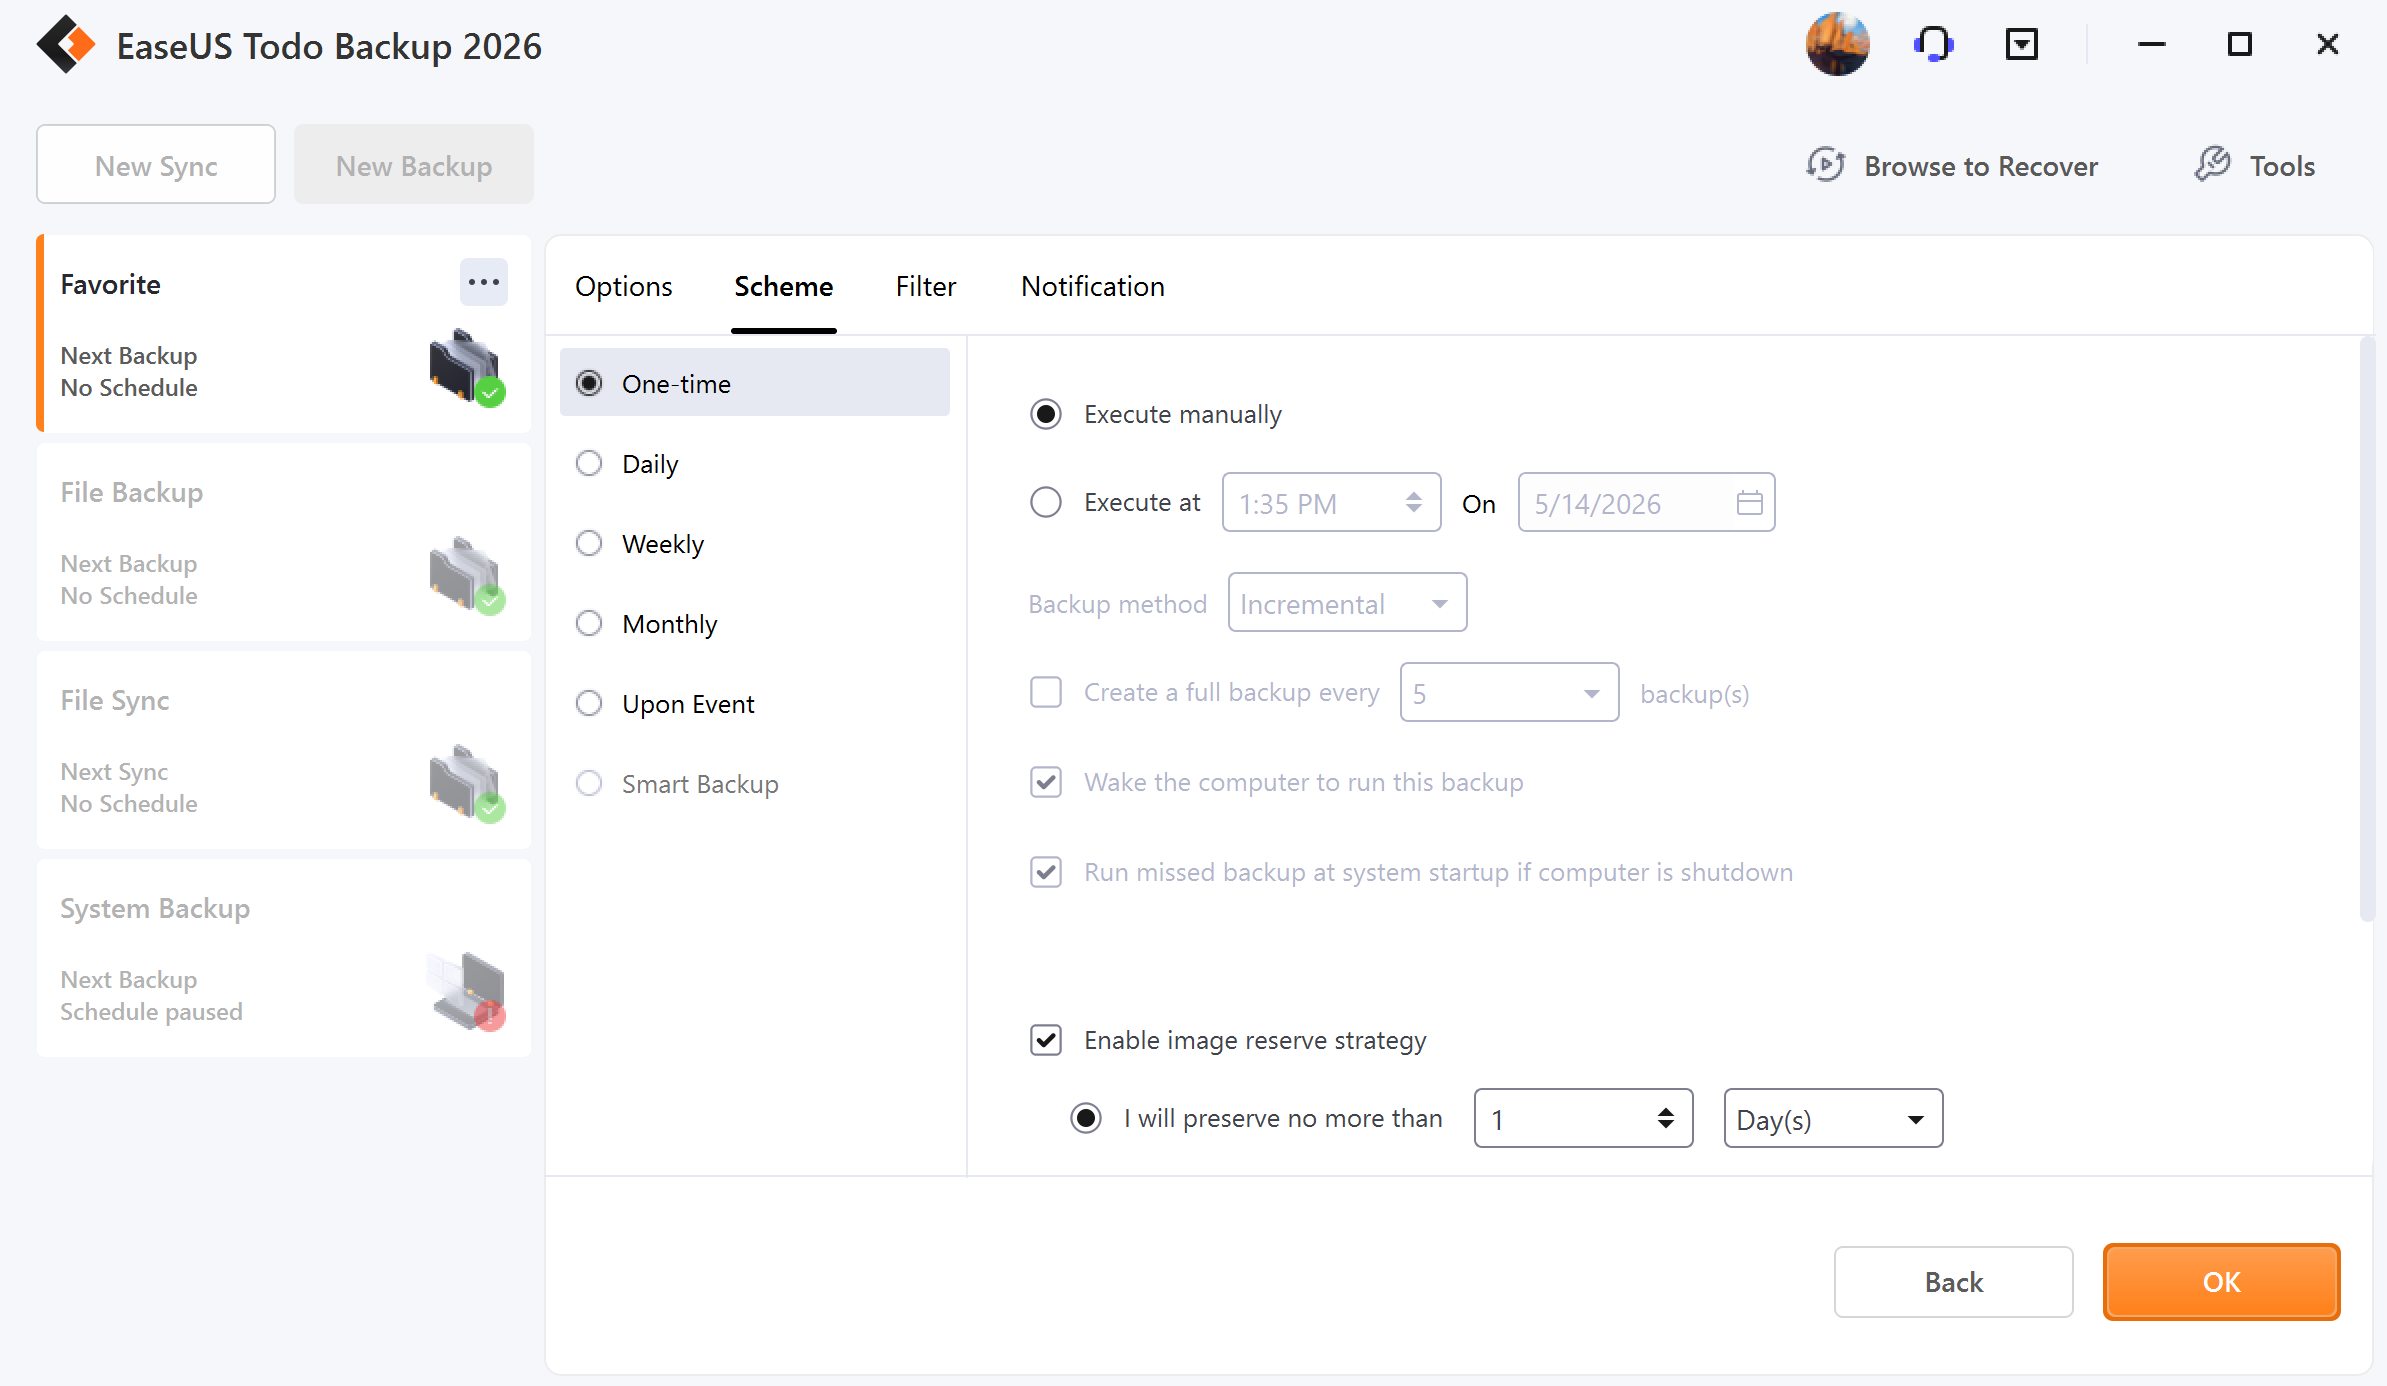
One-time backup
It specifies a time to execute the backup task once.
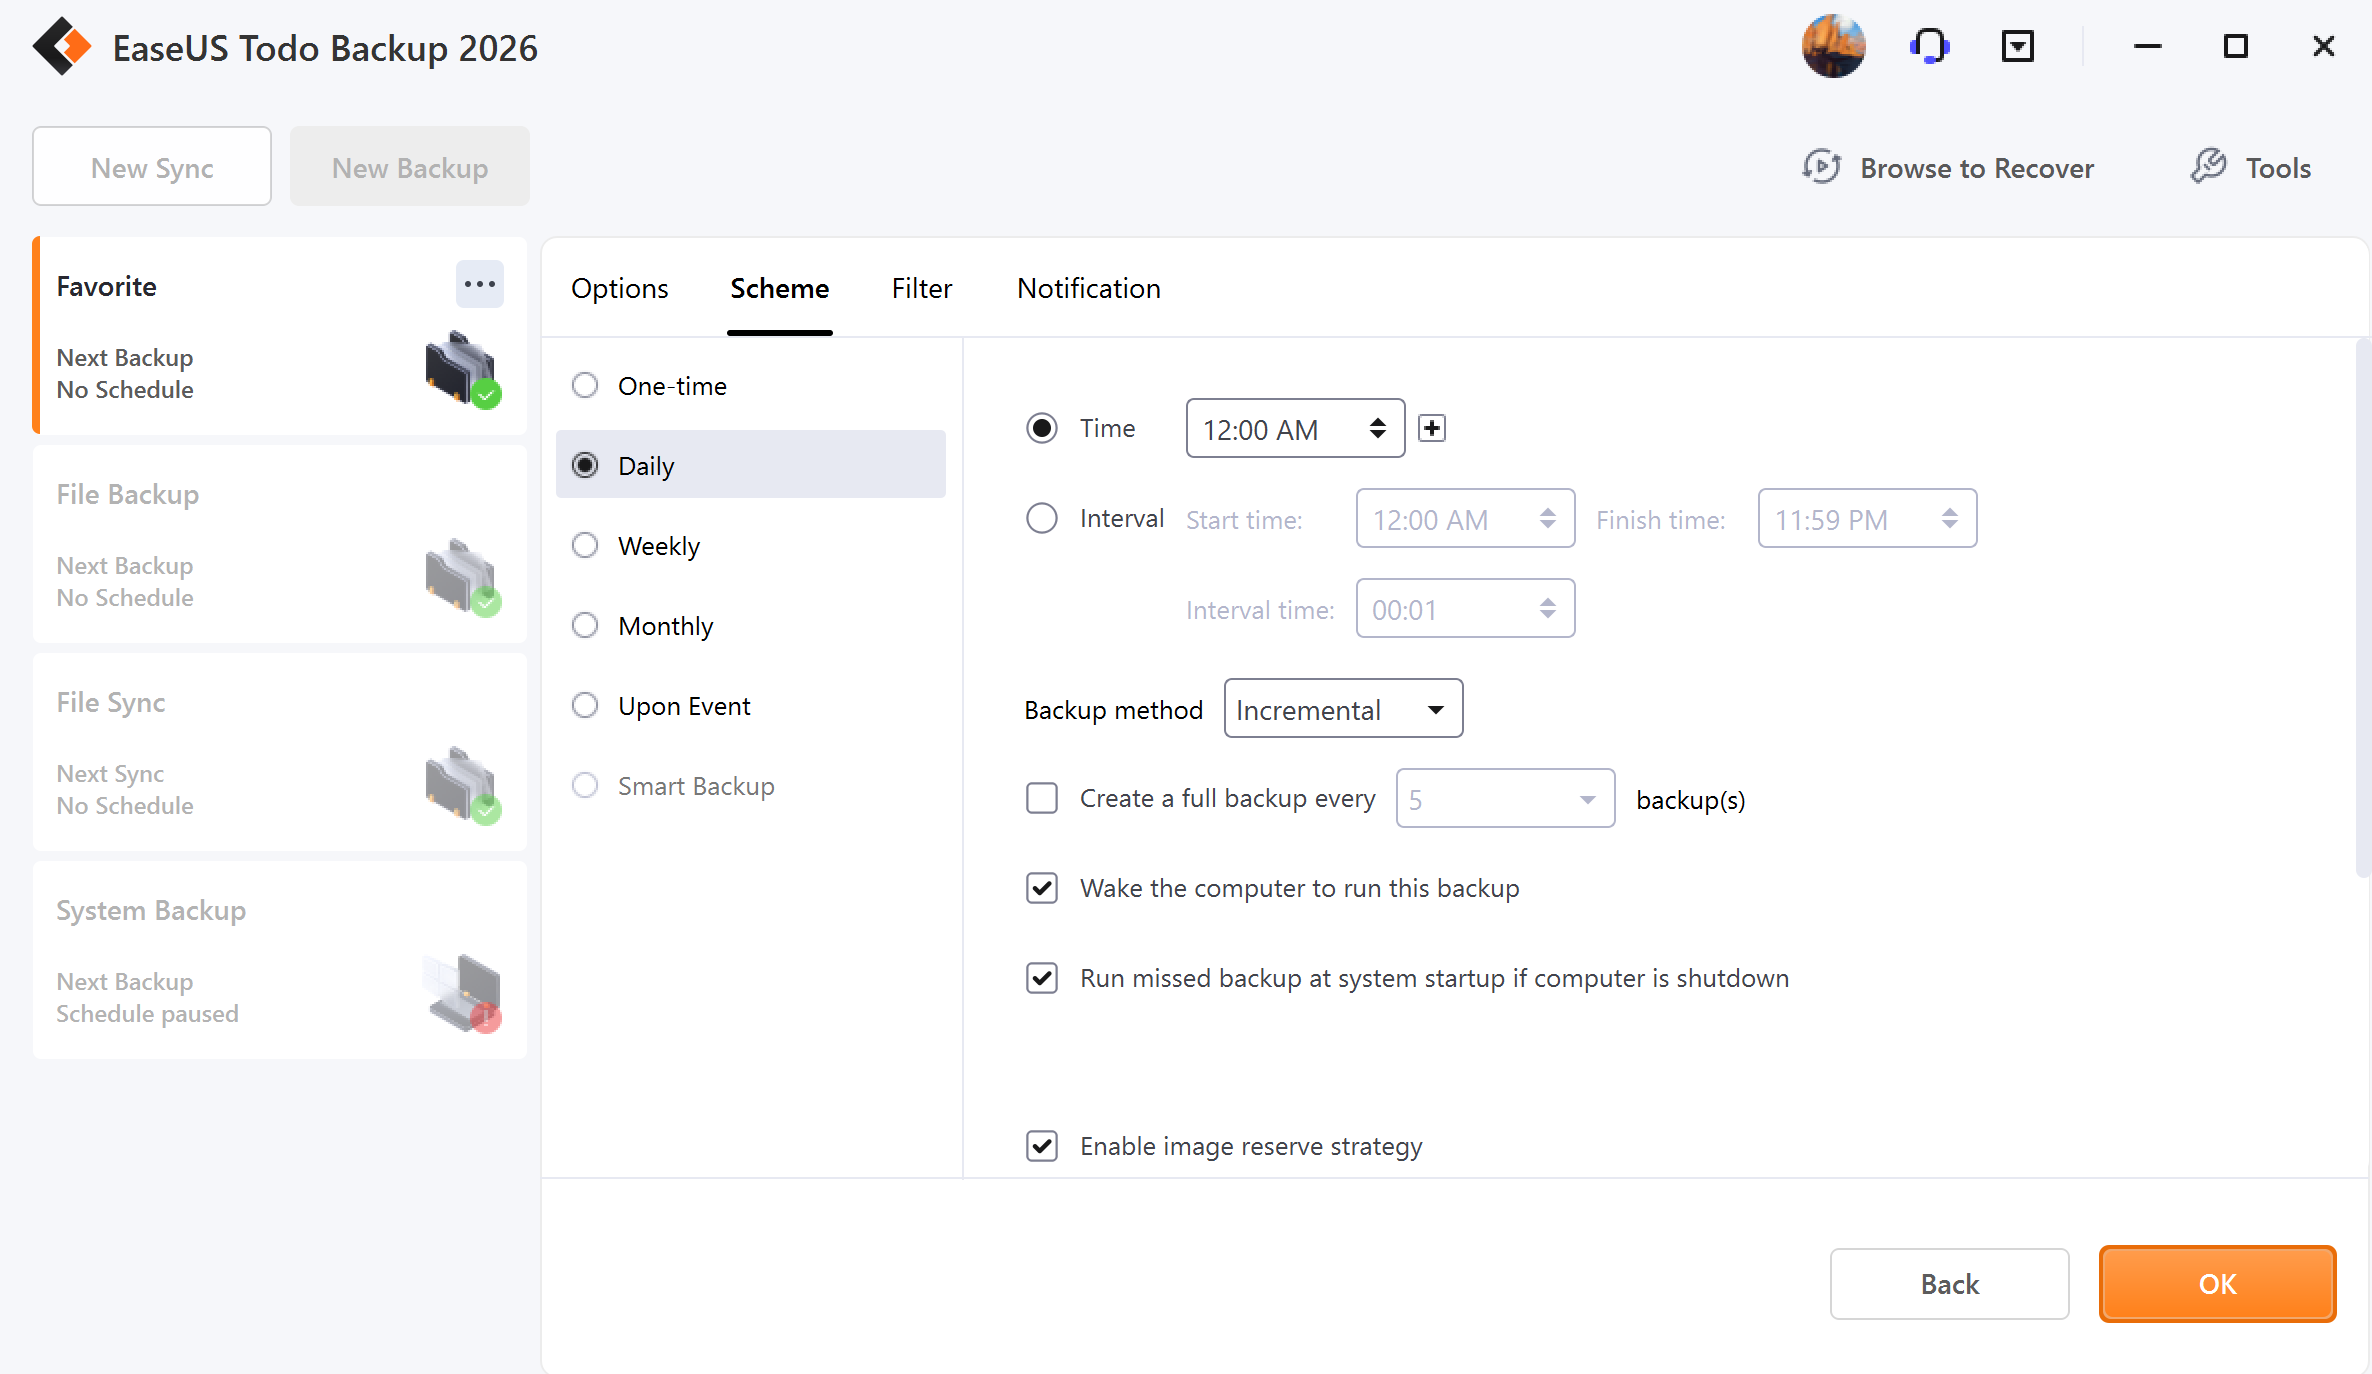
Daily backup
The backup is to be automatically executed at the scheduled time every day, which may be either at a specific time point(s) or by time interval.
Time - Execute the plan at a specific time point(s). Click + to add new time points. Five-time points are limited to one day. To remove the time point, please click -.
Interval - Set start time, finish time, and interval time for the plan. Suppose the start time is at 6:00 am and the finish time is at 10:00 am with a 2-hour interval time. Backups will be executed three times at different time points, 6:00 am, 8:00 am, and 10:00 am.
Weekly backup
The backup is to be automatically executed at the scheduled time every week.
Monthly backup
The backup is to be automatically executed at the scheduled time every month, which may be based on date or week. An exact time point on the exact day(s) to execute the backup is required.
Every - Schedule the time by week. You may choose the first, second, third, fourth, or last week of each month to execute the backup.
On - Schedule the time by date. You may choose any exact day(s) to execute the backup in each month.
Upon event
The backup is to be automatically executed in the event of:
System startup - Backup runs automatically when system starts up.
System shutdown - Backup runs automatically when system is shutdown.
User log on - Backup runs automatically when user logs in.
User log off - Backup runs automatically when user logs off.
USB device plugged in - Backup runs automatically when the USB device is plugged in provided that it is set to be the destination.
Once a day only
The event backup will be executed once a day only in any cases with Once a day only checked.
Specified date
The event backup will be executed on the exact date checked only. The event backup is to be executed every day with the Specified date unchecked.
Note:
Exchange backup does not support the Upon event.
Smart backup
The Smart Backup option can create an intelligent schedule to monitor specified files or folders every half an hour and generate a new backup image provided any changes are made within 30 minutes. For more information please click here.
Apart from choosing the backup time schedule, there are other options like the Backup method and Image Reserve Strategy.
Backup method
There are three backup methods, Full, Incremental, and Differential. You may get a knowledge of differences among Full, Differential, and Incremental here.
Create a full backup every X backups
You can set up to create a full backup regularly. For example, if you set the number as 5, the 6th, 11th, and 16th backup images would be full ones.
Run missed backup at system startup if the computer is shutdown
The latest missed backup will be automatically executed at the startup of Windows in the case your computer happens to be shut down or power failure in the Daily, Weekly, or Monthly scheduled backup.
Image reserve strategy
Destination storage is to be out of space sooner or later without an Image Reserve Strategy. It can delete the old backups automatically. Here is how it works in the image retention rule to save storage space.
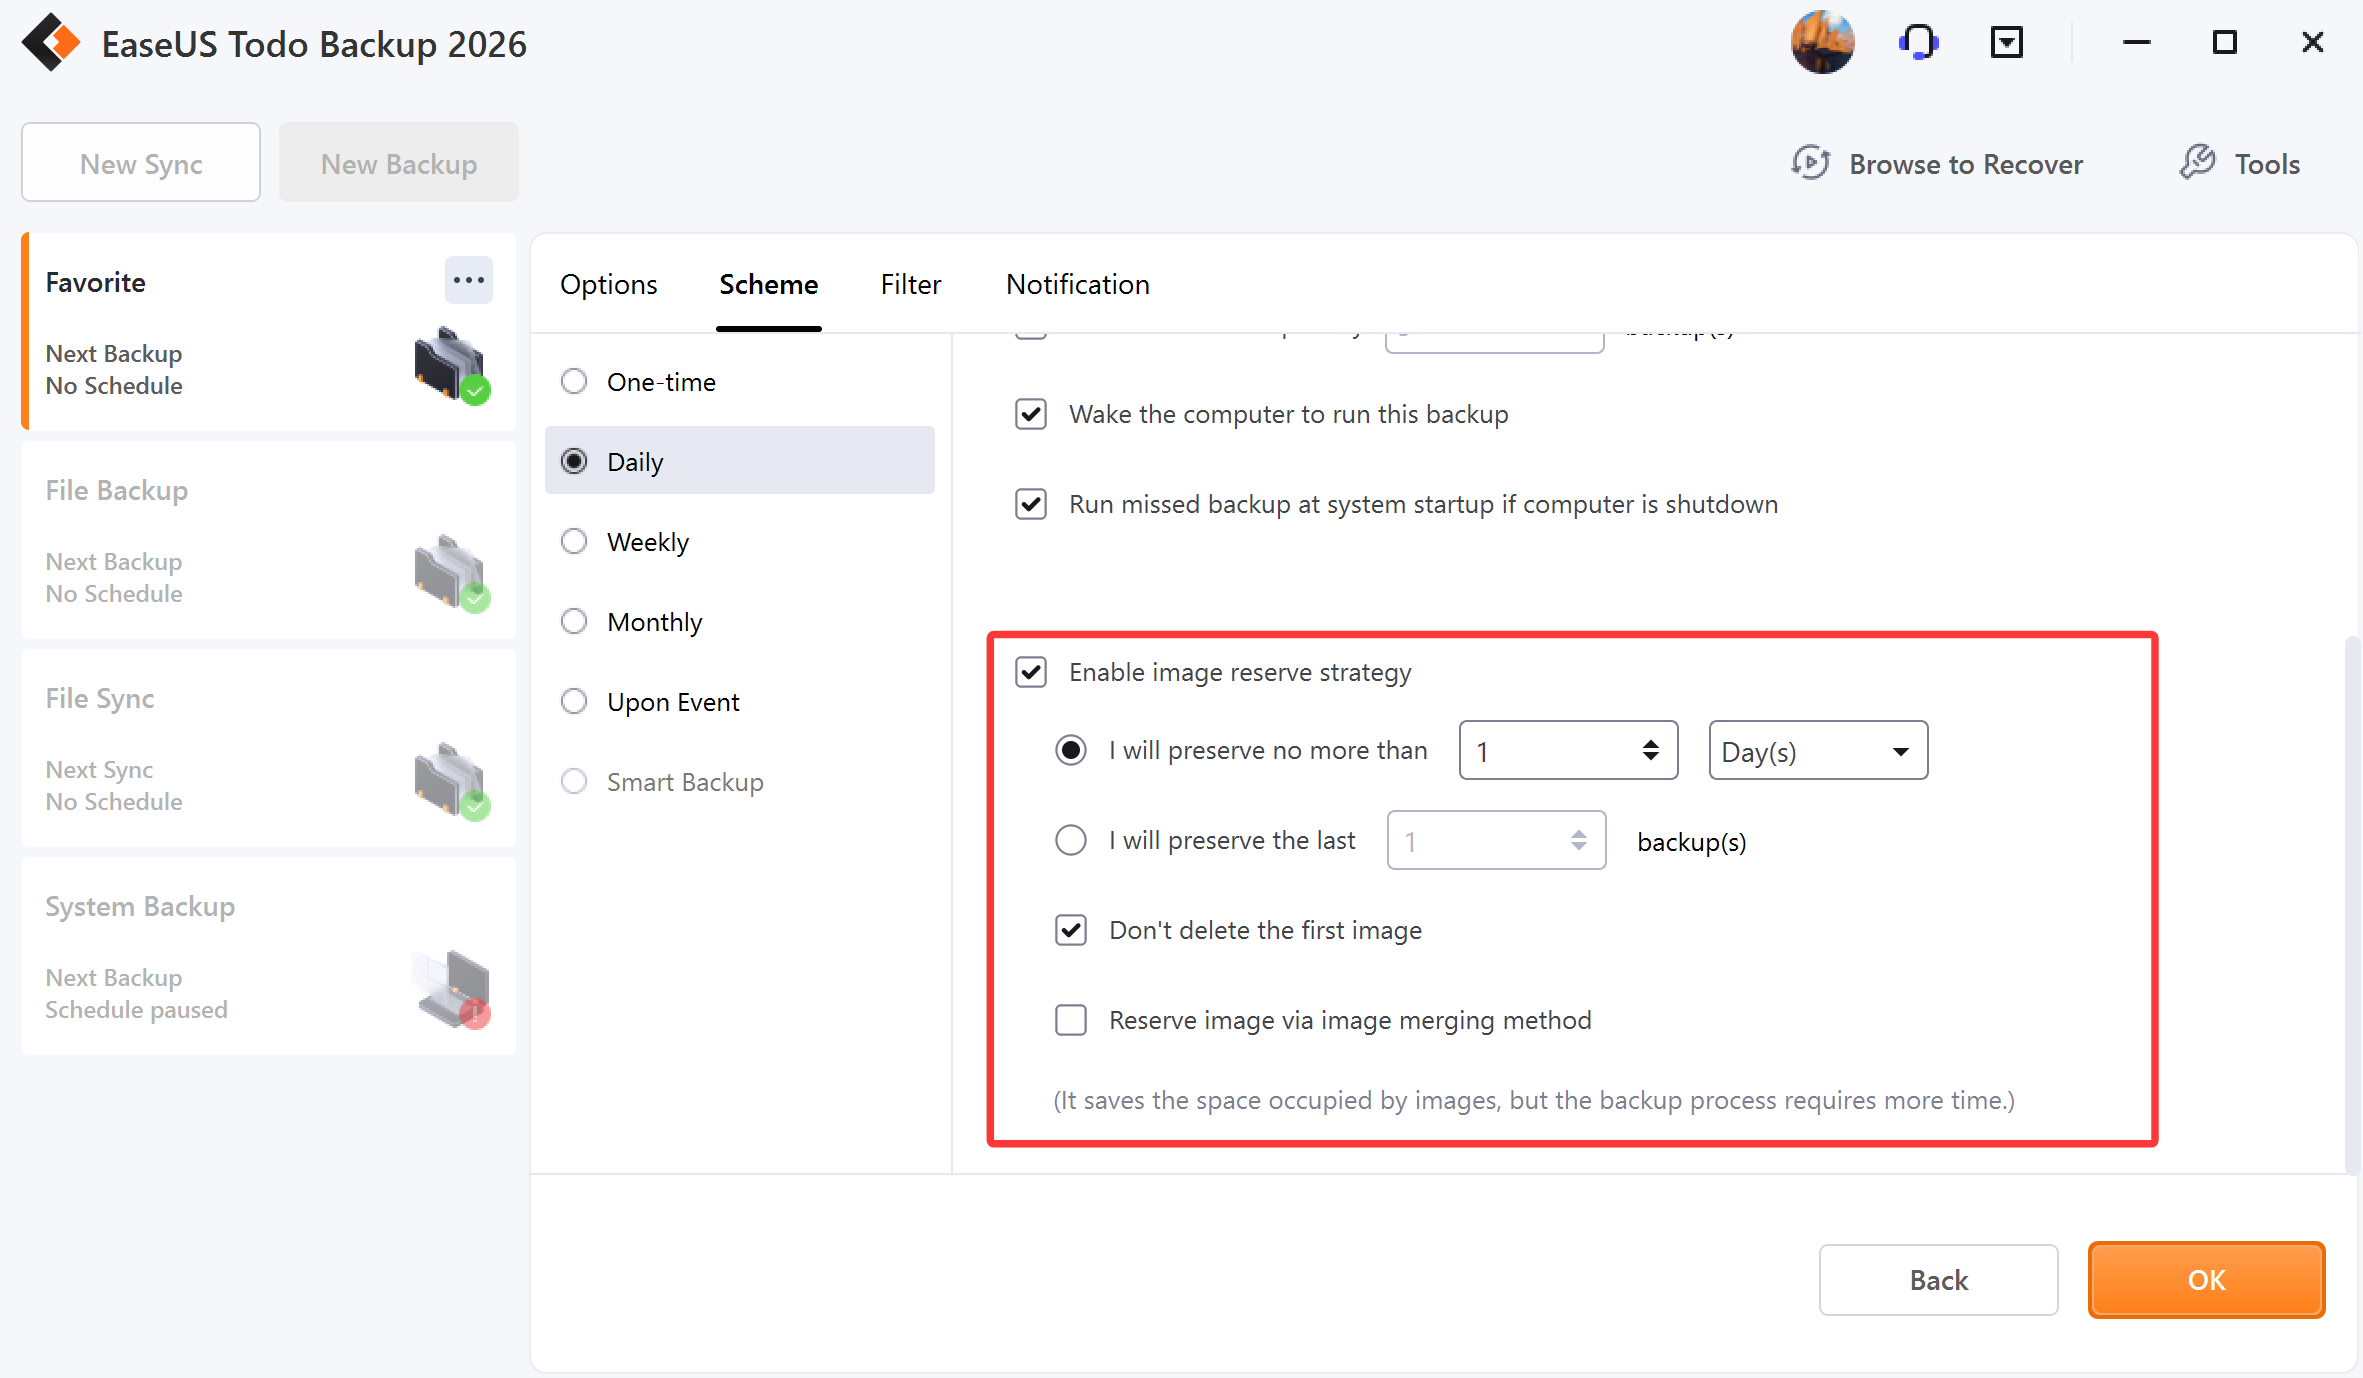
Images are deleted on the basis of period, numbers, week, month, and year. For more details, please click here.
Don't delete the first image - The first full image will neither be deleted nor be counted into preserved images as per the image retention rule Don’t delete the first image checked.
Reserve image via image merging method - Images are to be intelligently merged with Reserve image via image merging method checked. For more details, please click here.
Backup Filter
This feature can exclude certain file types and folders to avoid backing up unnecessary files. You can add the files/folders by inputting the file extension, path, or by browsing them. Click the delete icon to remove them from the filter list.
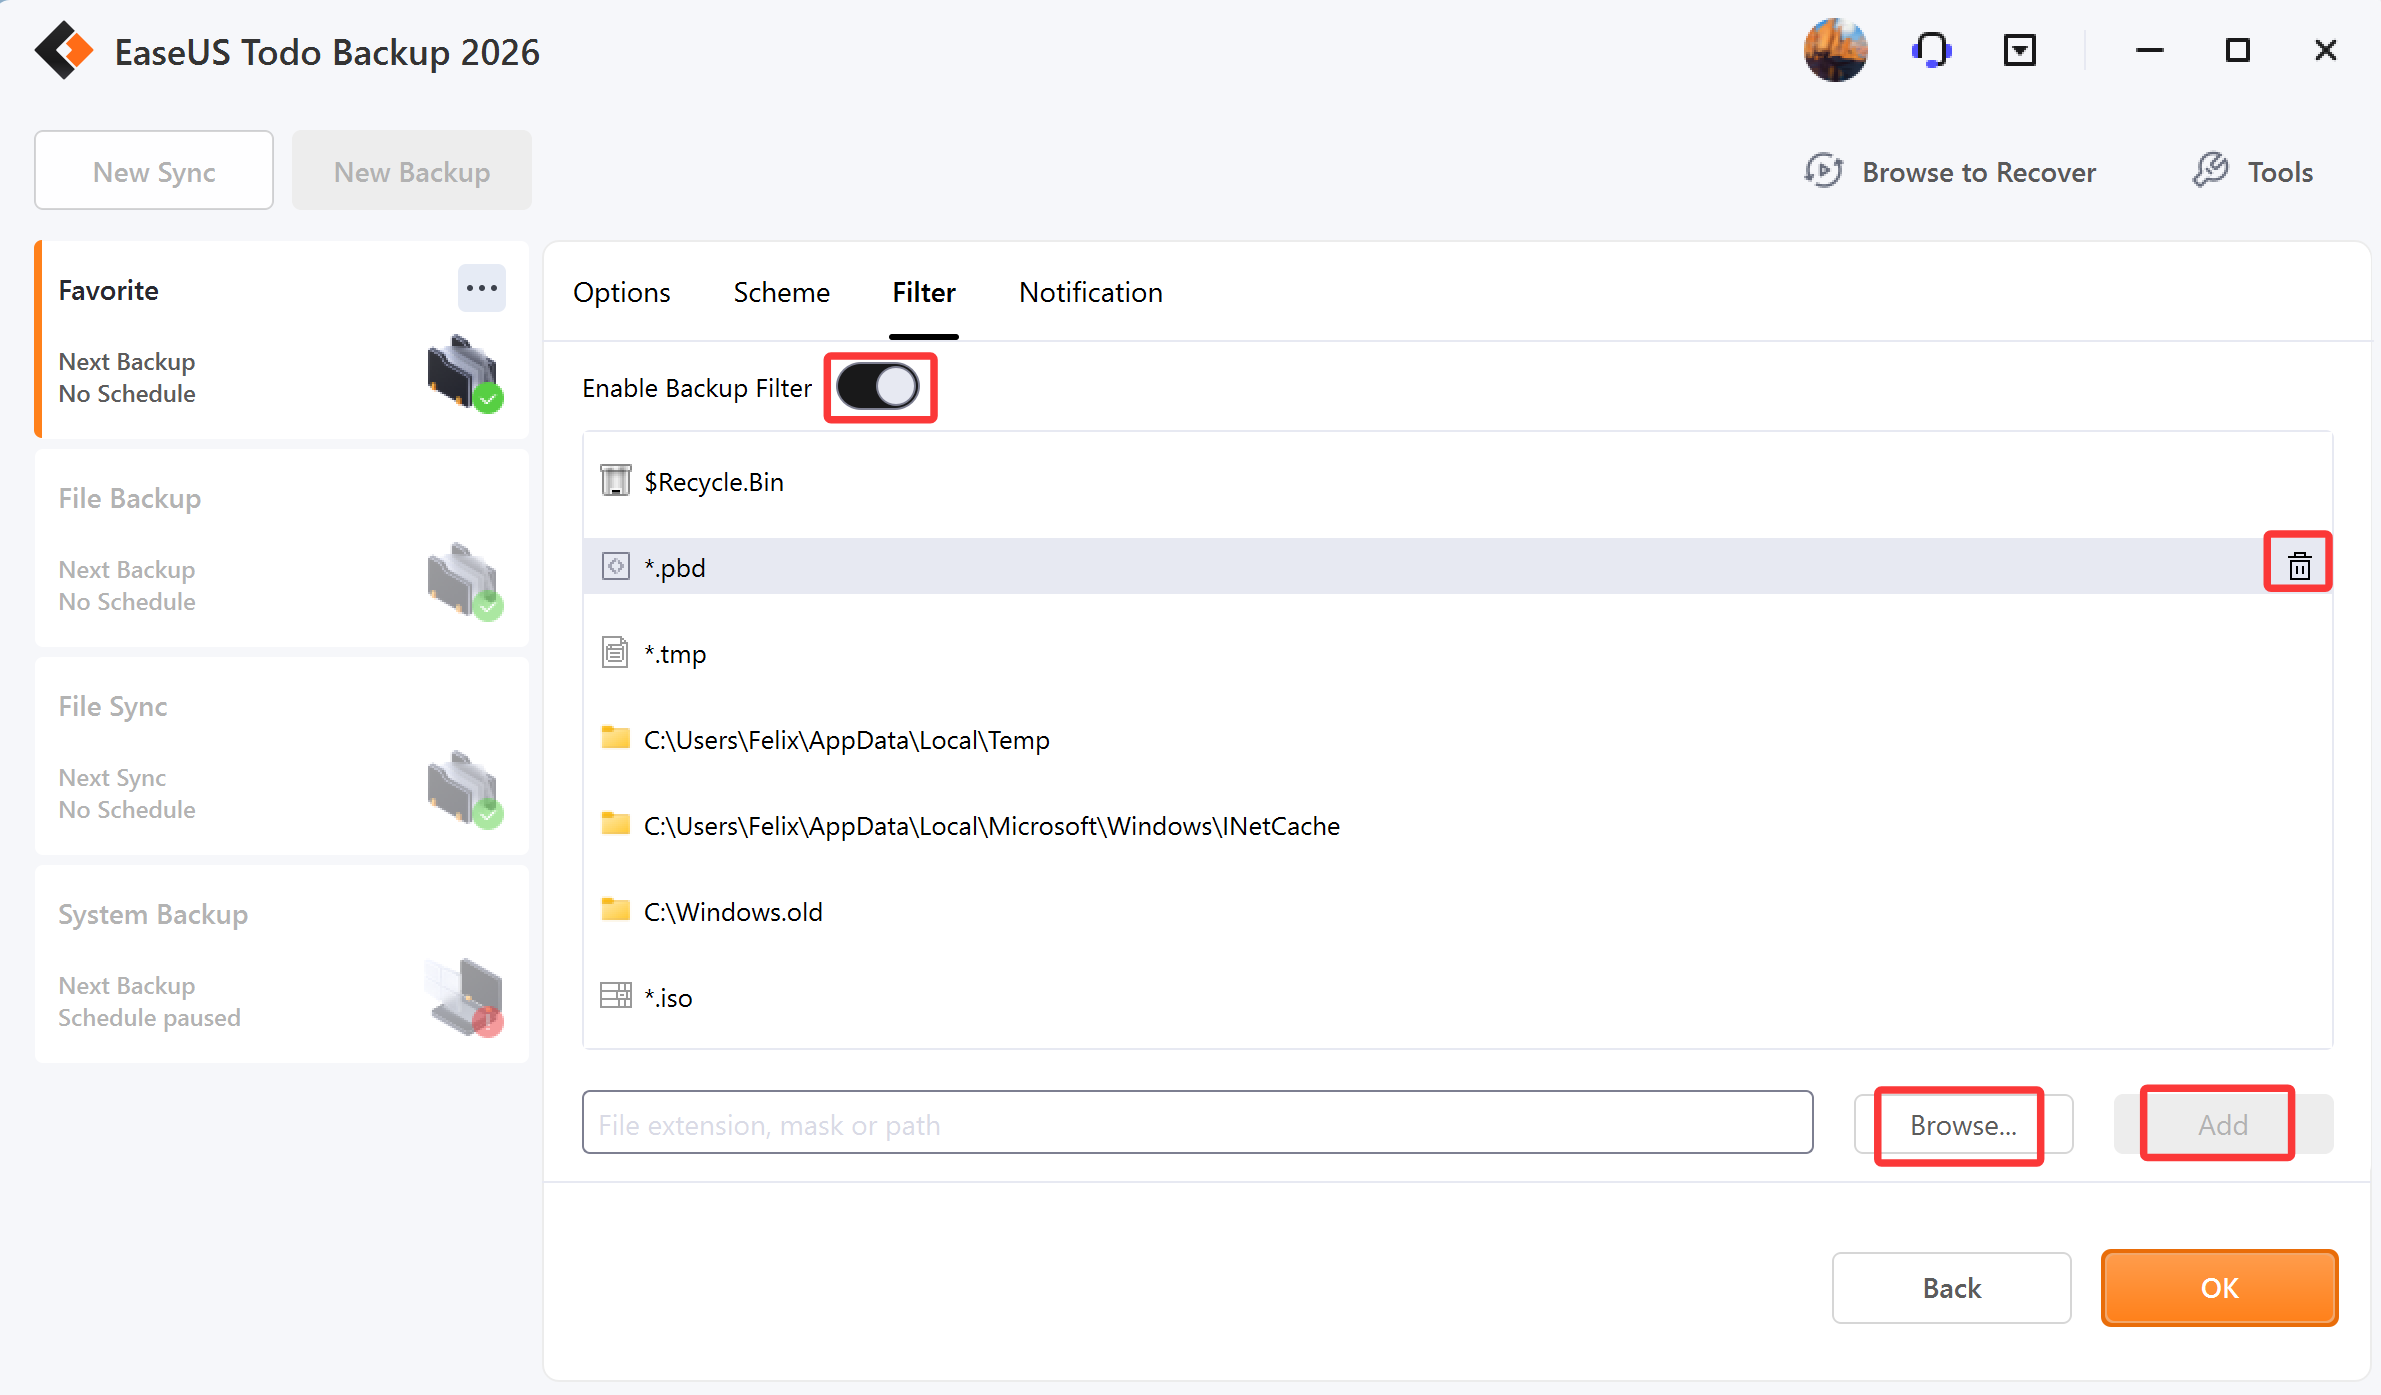
Note:
You can not edit the Backup Filter list when creating System Backup.
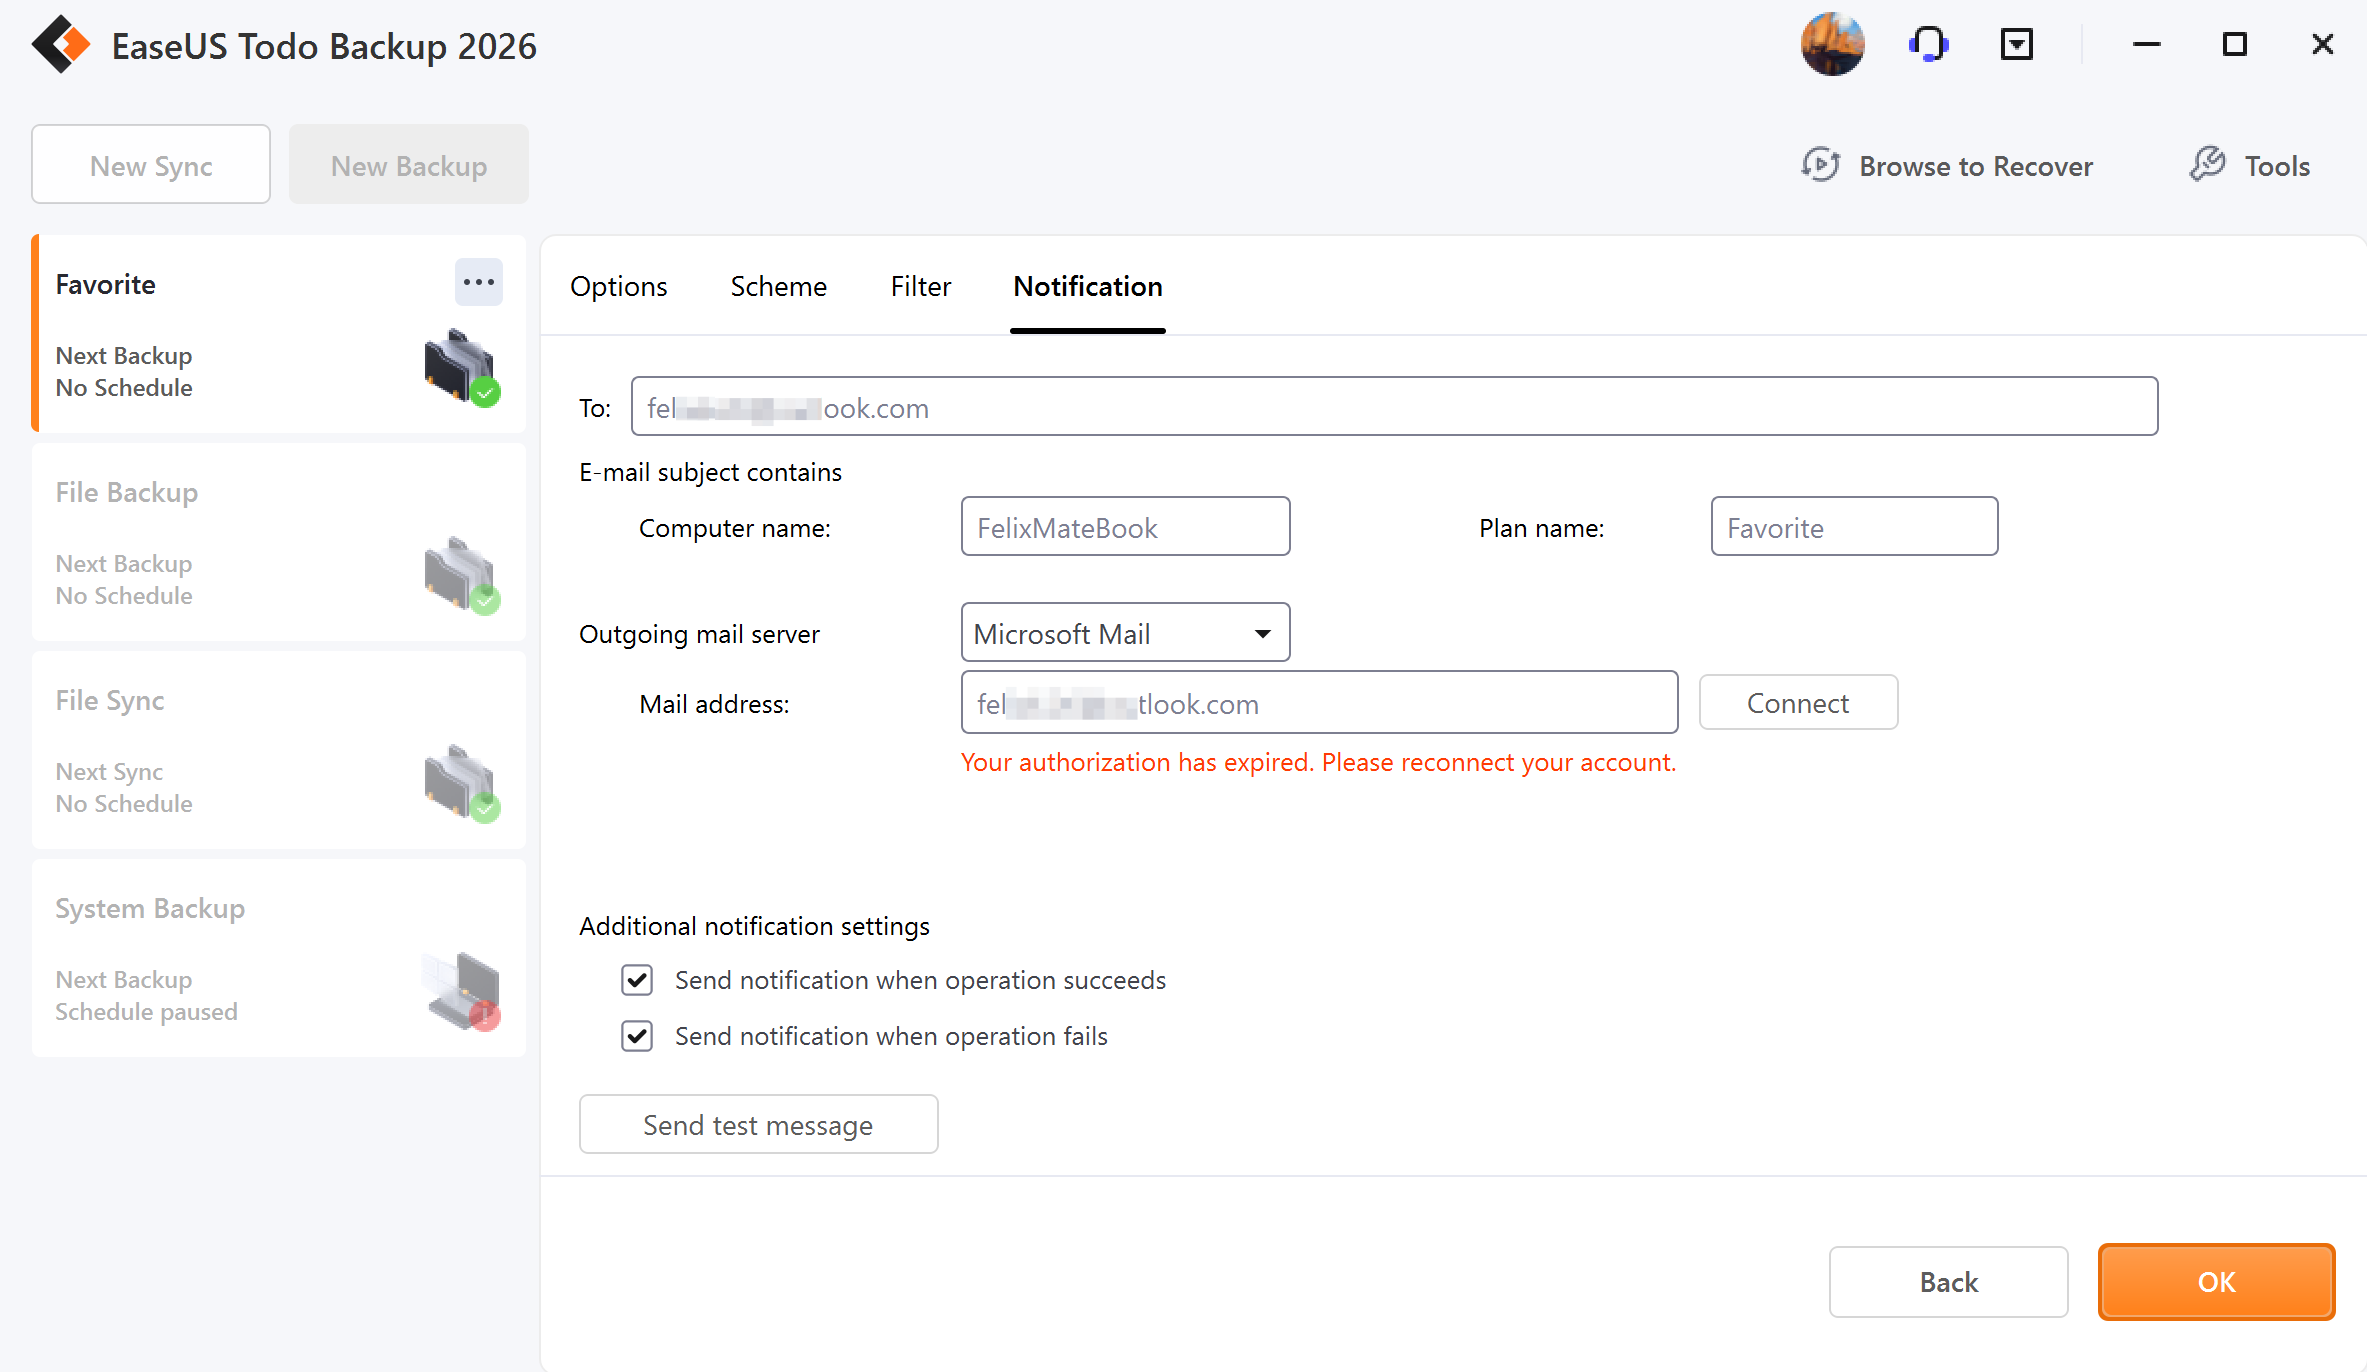
Backup Notification
You may monitor the backup status with an E-mail notification. Here is how to set an email notification. For more details, please click here.
Edit Existing Backup Task
Highlight the task and you will see the execution time of the last and the next backup on the home page. By clicking the source and destination icon you can change the backup content and the destination locations.
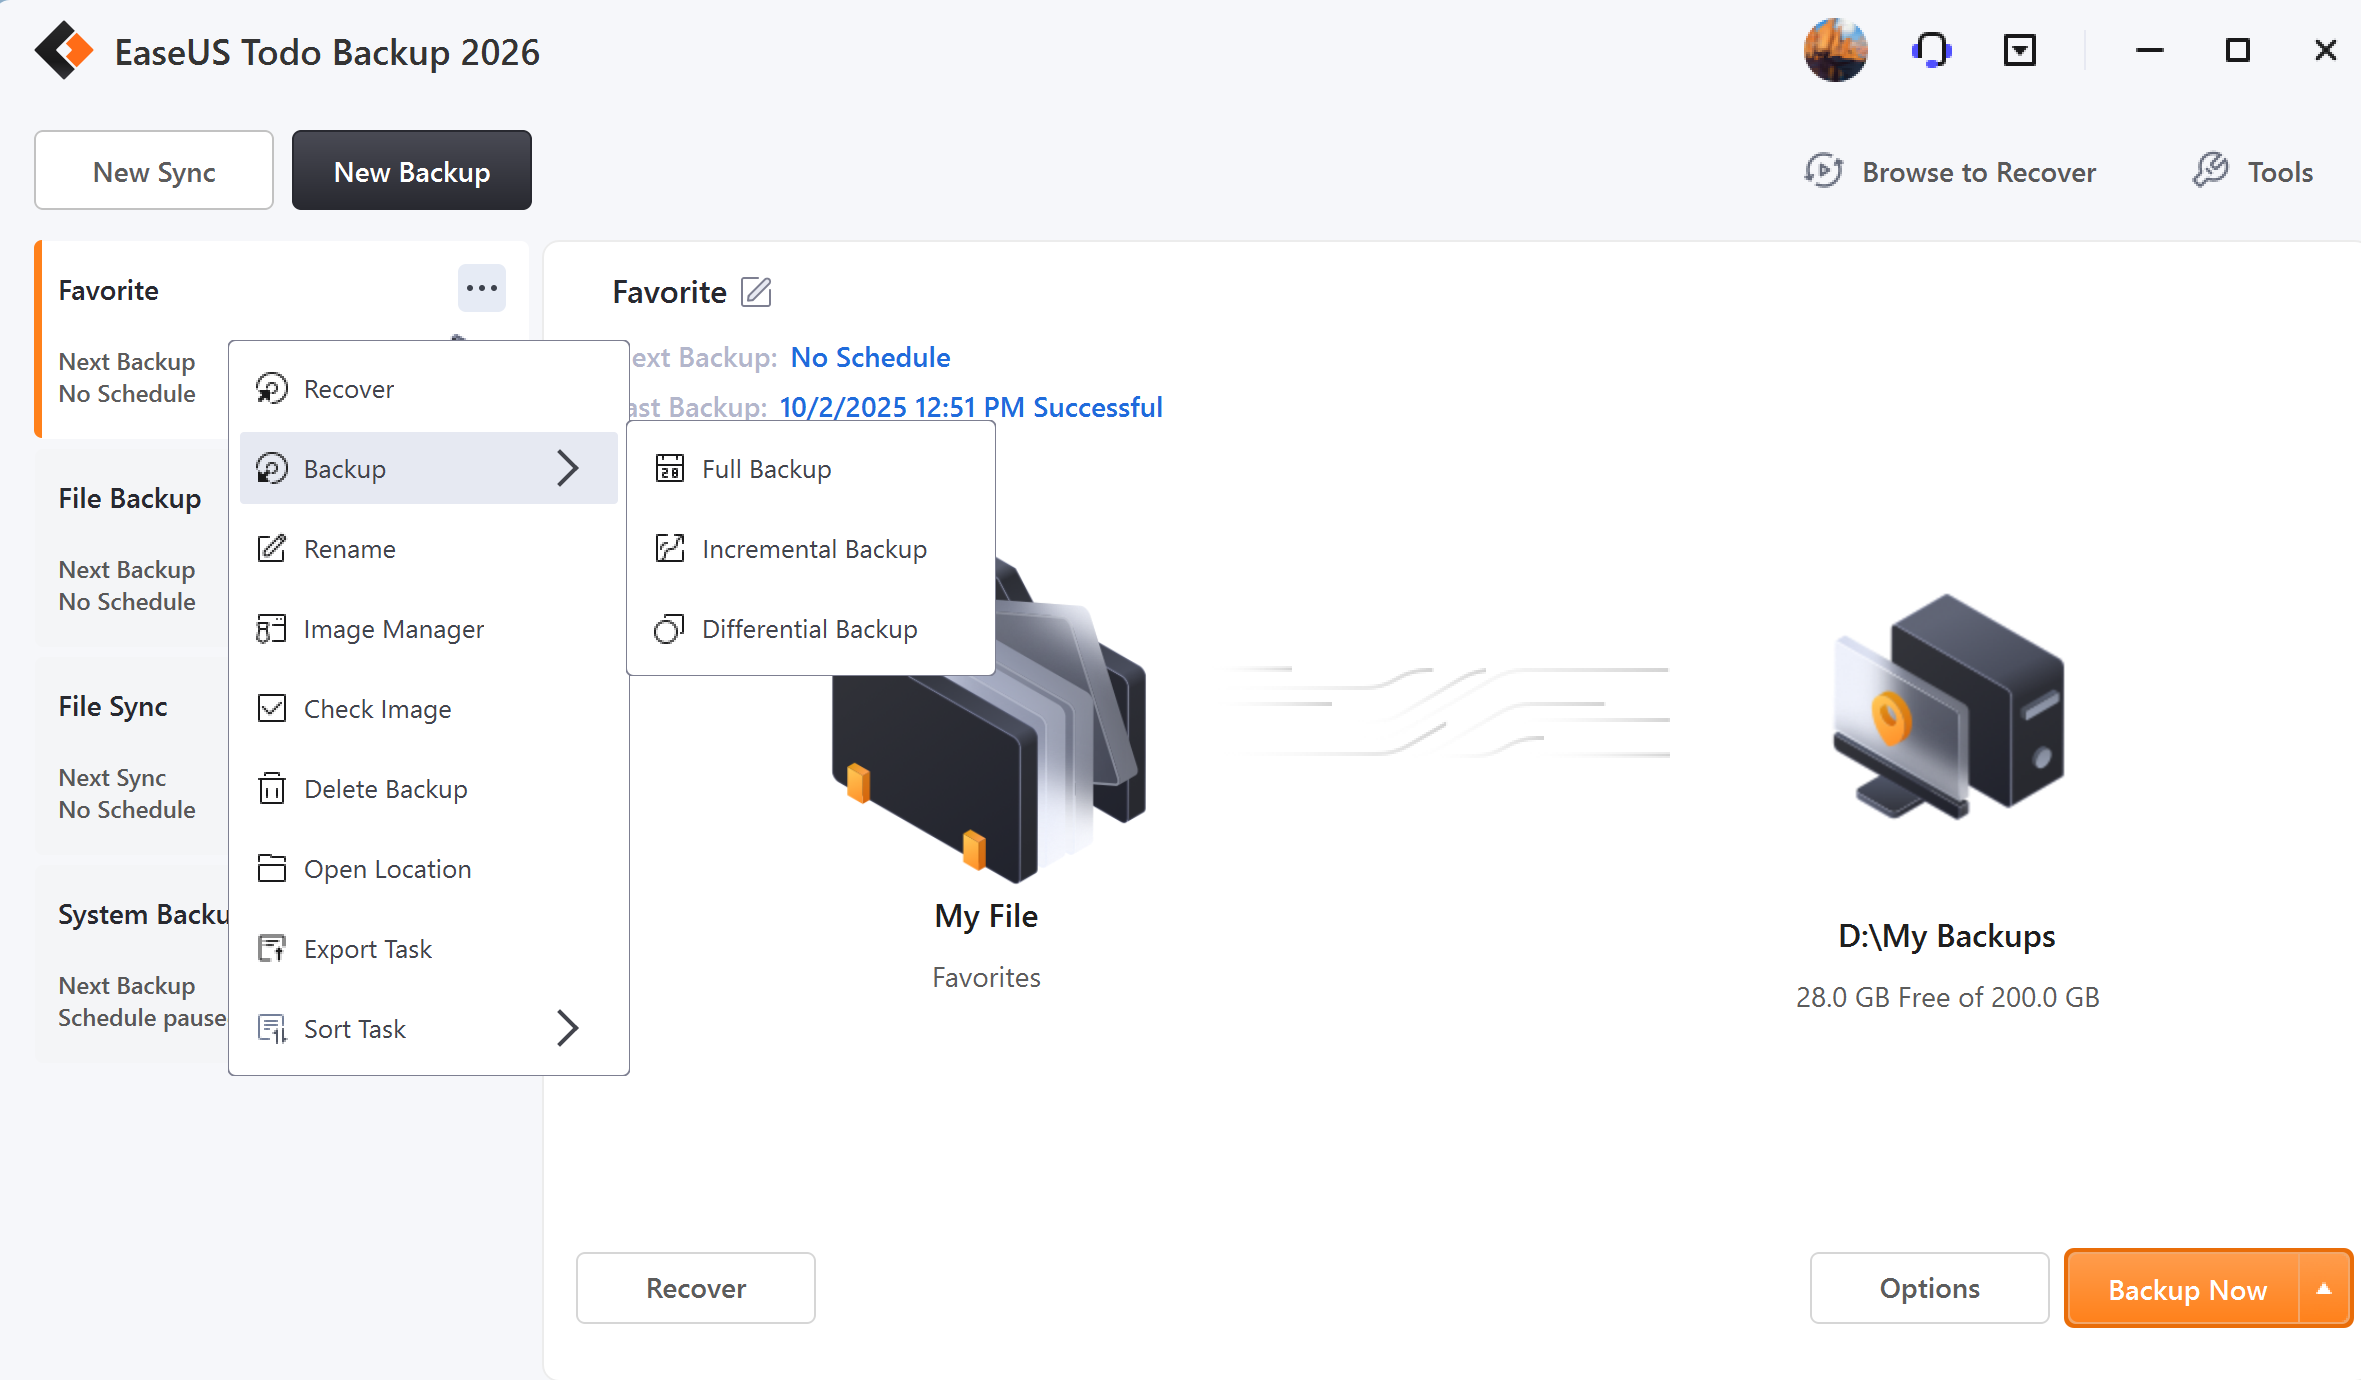
Right-click the existing backup task, there are several other options including Recovery, Backup, and others.
Recovery
To click Recovery is to restore the backup. For more details, please click Recover.
Backup
To click Backup is to manually run a Full, Incremental, or Differential backup, which will not affect the subsequent scheduled backups.
Rename
To rename the backup task.
Image Manager
To click Image Manager is to manually delete or merge the created images.
Check image
For more information, please refer to Check Image.
Delete Backup
To remove the backup task only with Delete related images unchecked.
Open Location
To access the file directory where you saved the backup image file.
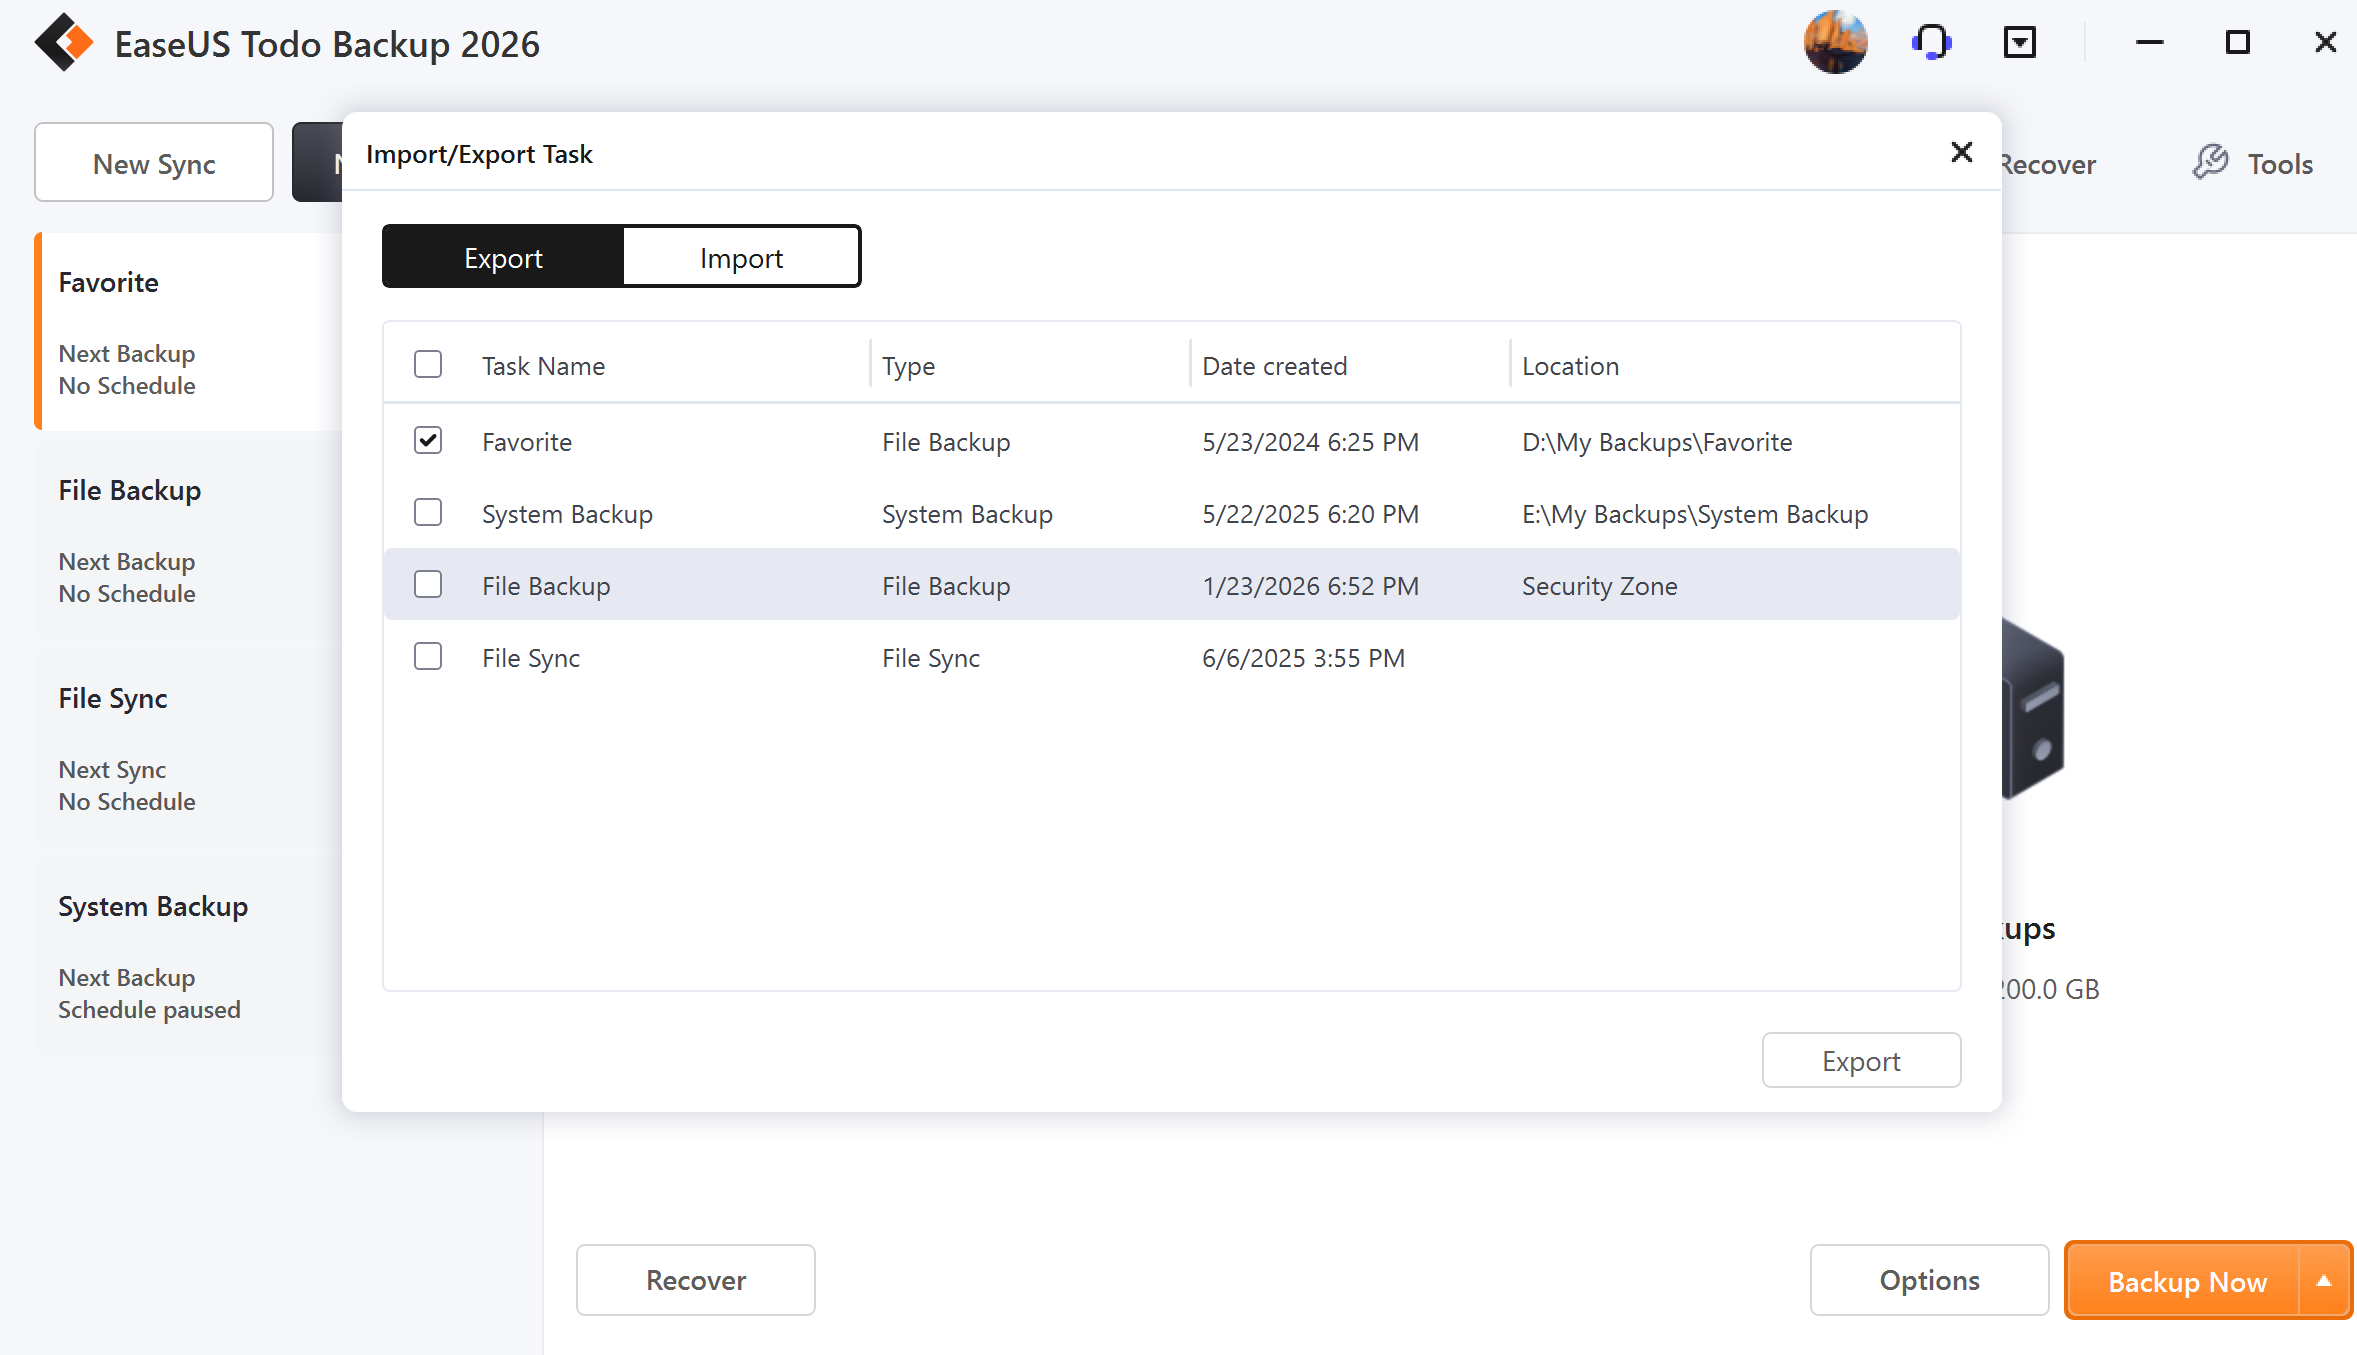
Export Task
To export the backup tasks to a new computer.
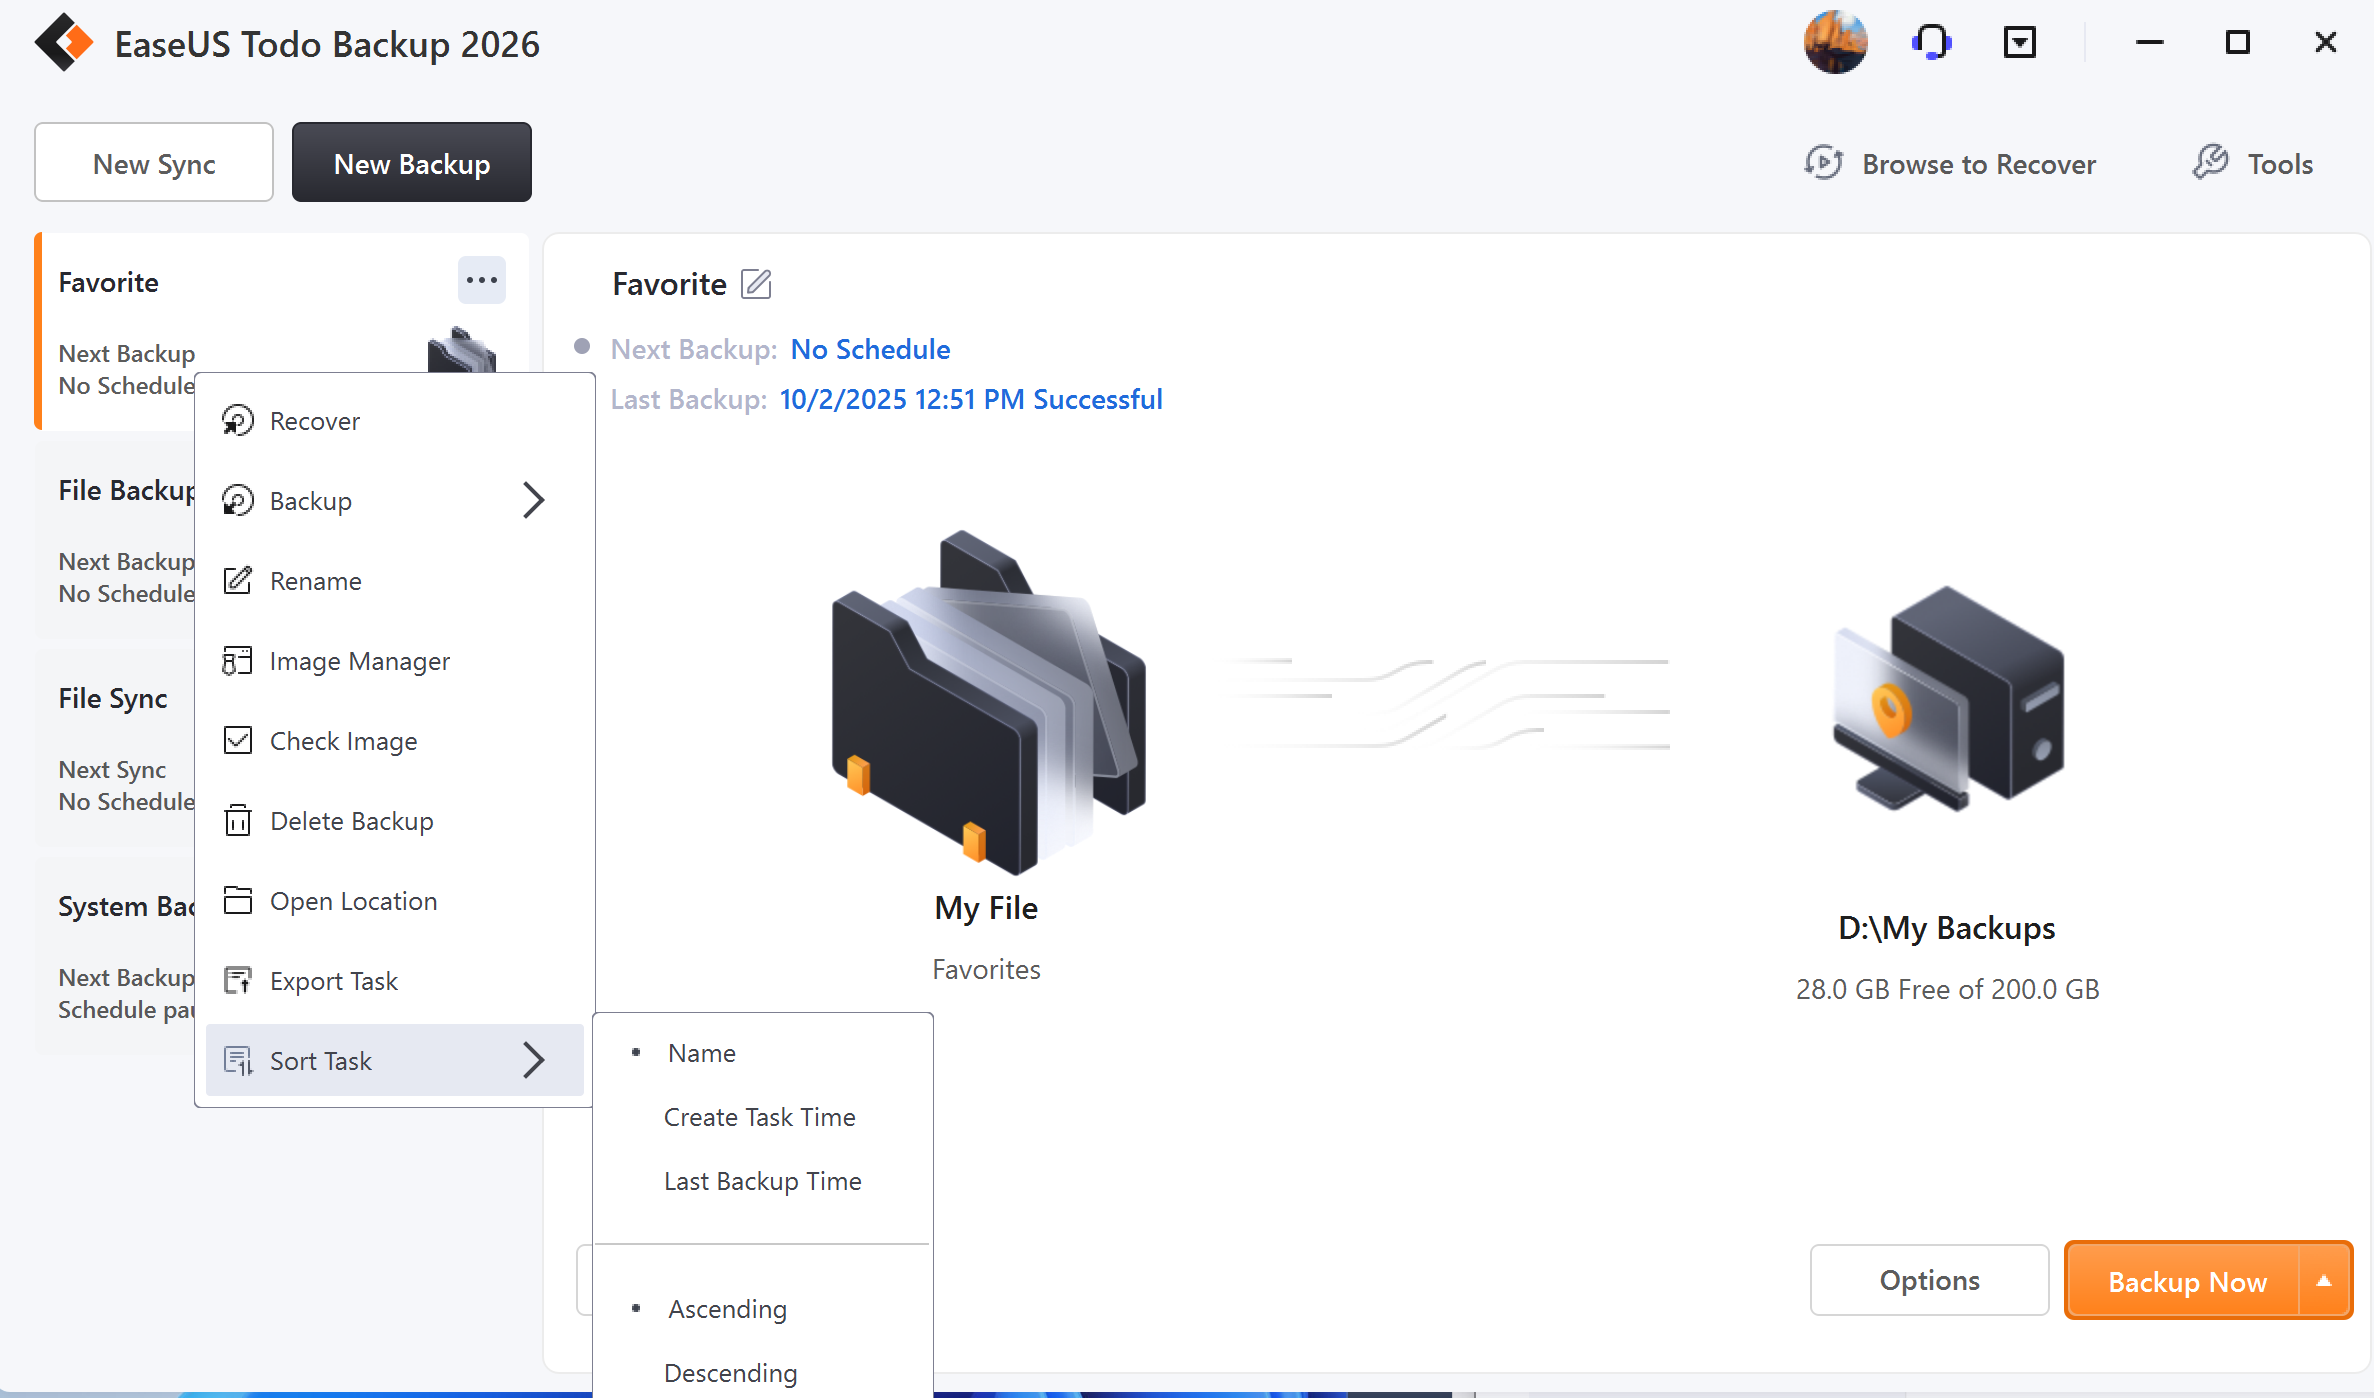
Sort Task
You can easily organize your backup task list according to various criteria. Specifically, you have the option to sort tasks by Name, Create Task Time, or Last Backup Time, in either ascending or descending order.
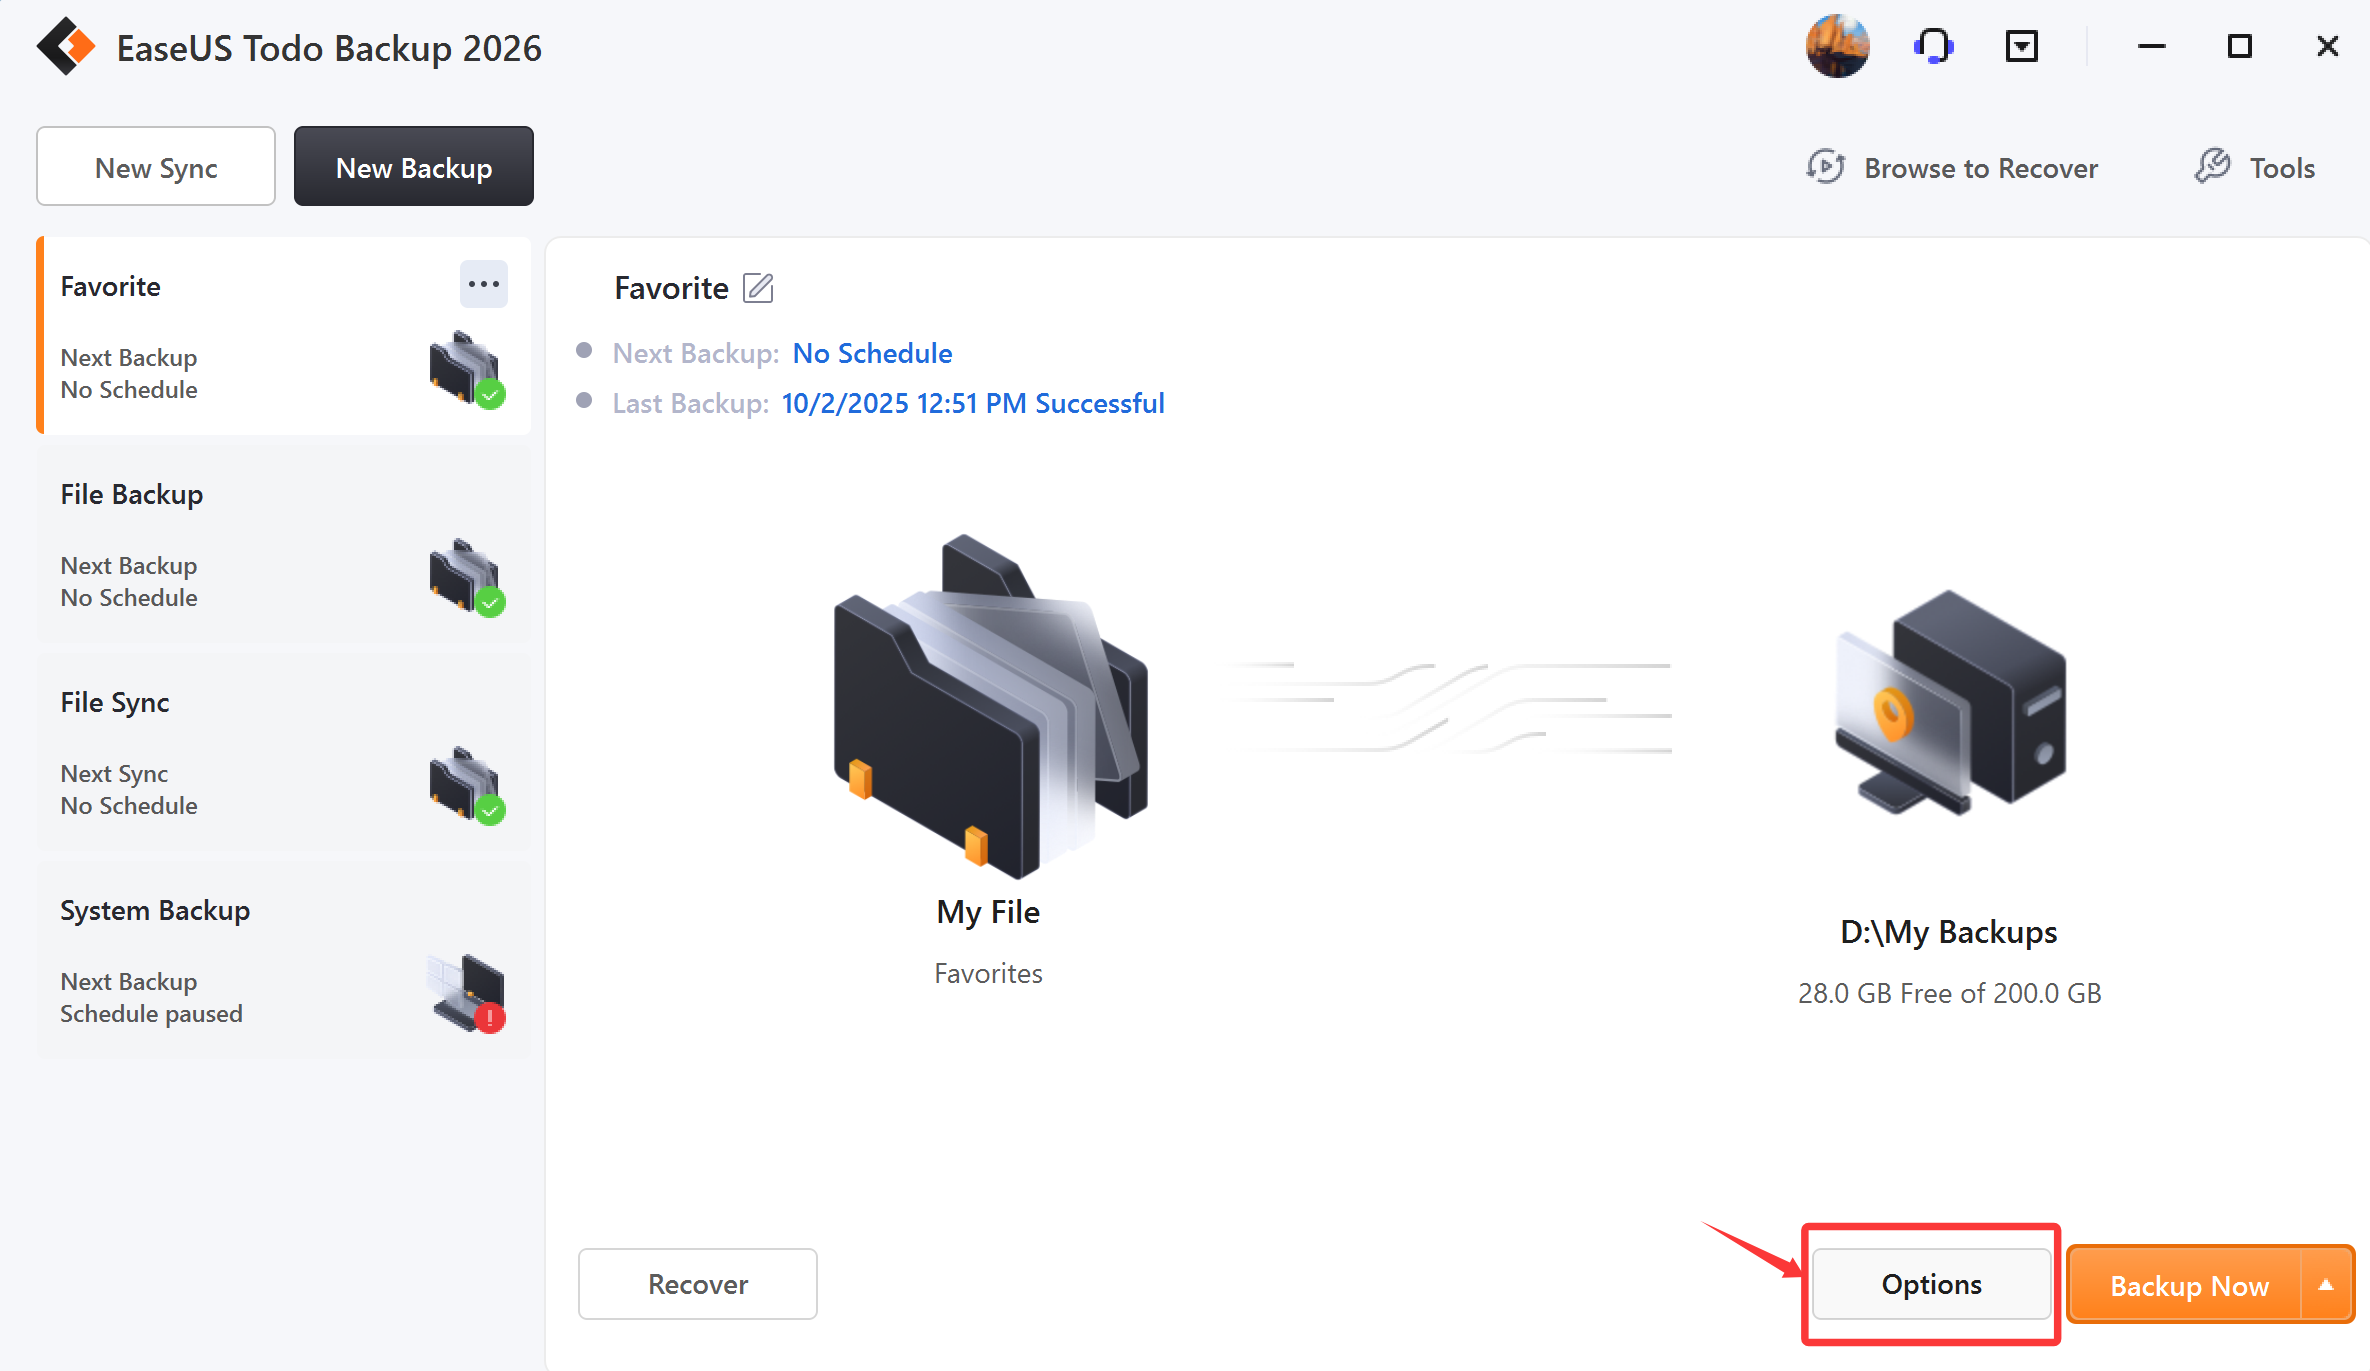
Edit Task
Highlight the backup plan and click Options.
Cloud backup
Currently, we offer Public Cloud Storage and EaseUS Cloud Storage options in Todo Backup Home.
Public Cloud Storage
You can back up to public cloud storage like OneDrive, DropBox, GoogleDrive, Amazon S3 (AWS), Wasabi, SugarSync, Mega, etc. Cloud backup supports File backup, Smart backup, Mail backup, and Exchange backup only.
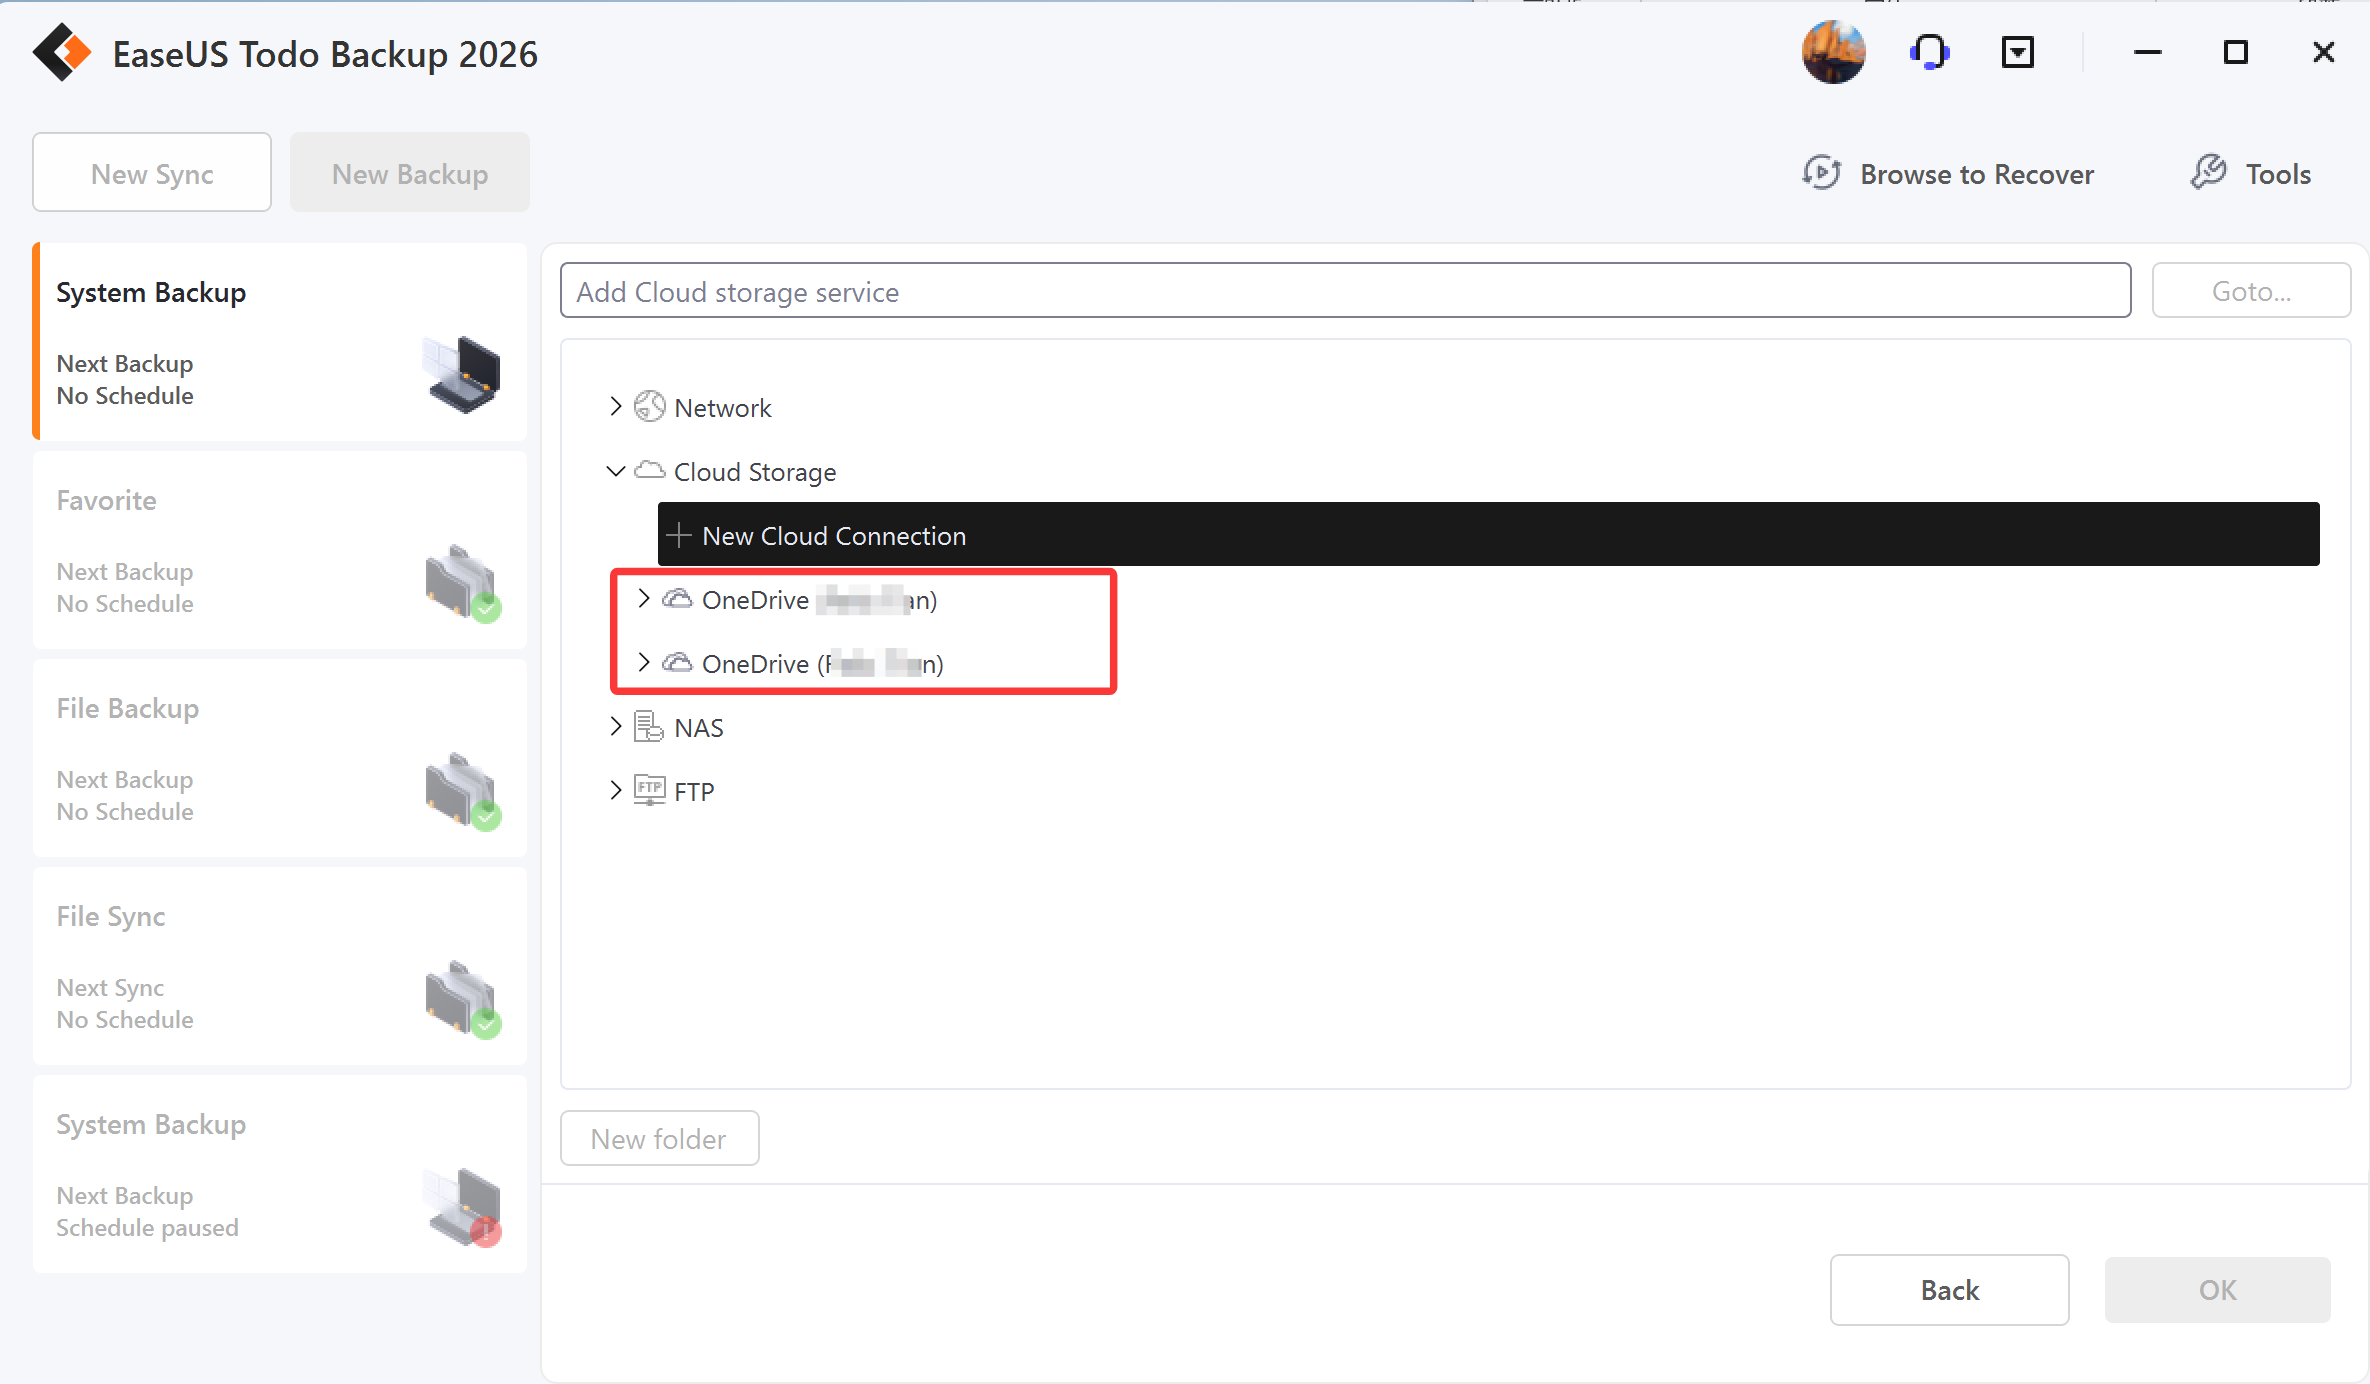
You will find the Cloud backup in Network->-Cloud Storage.
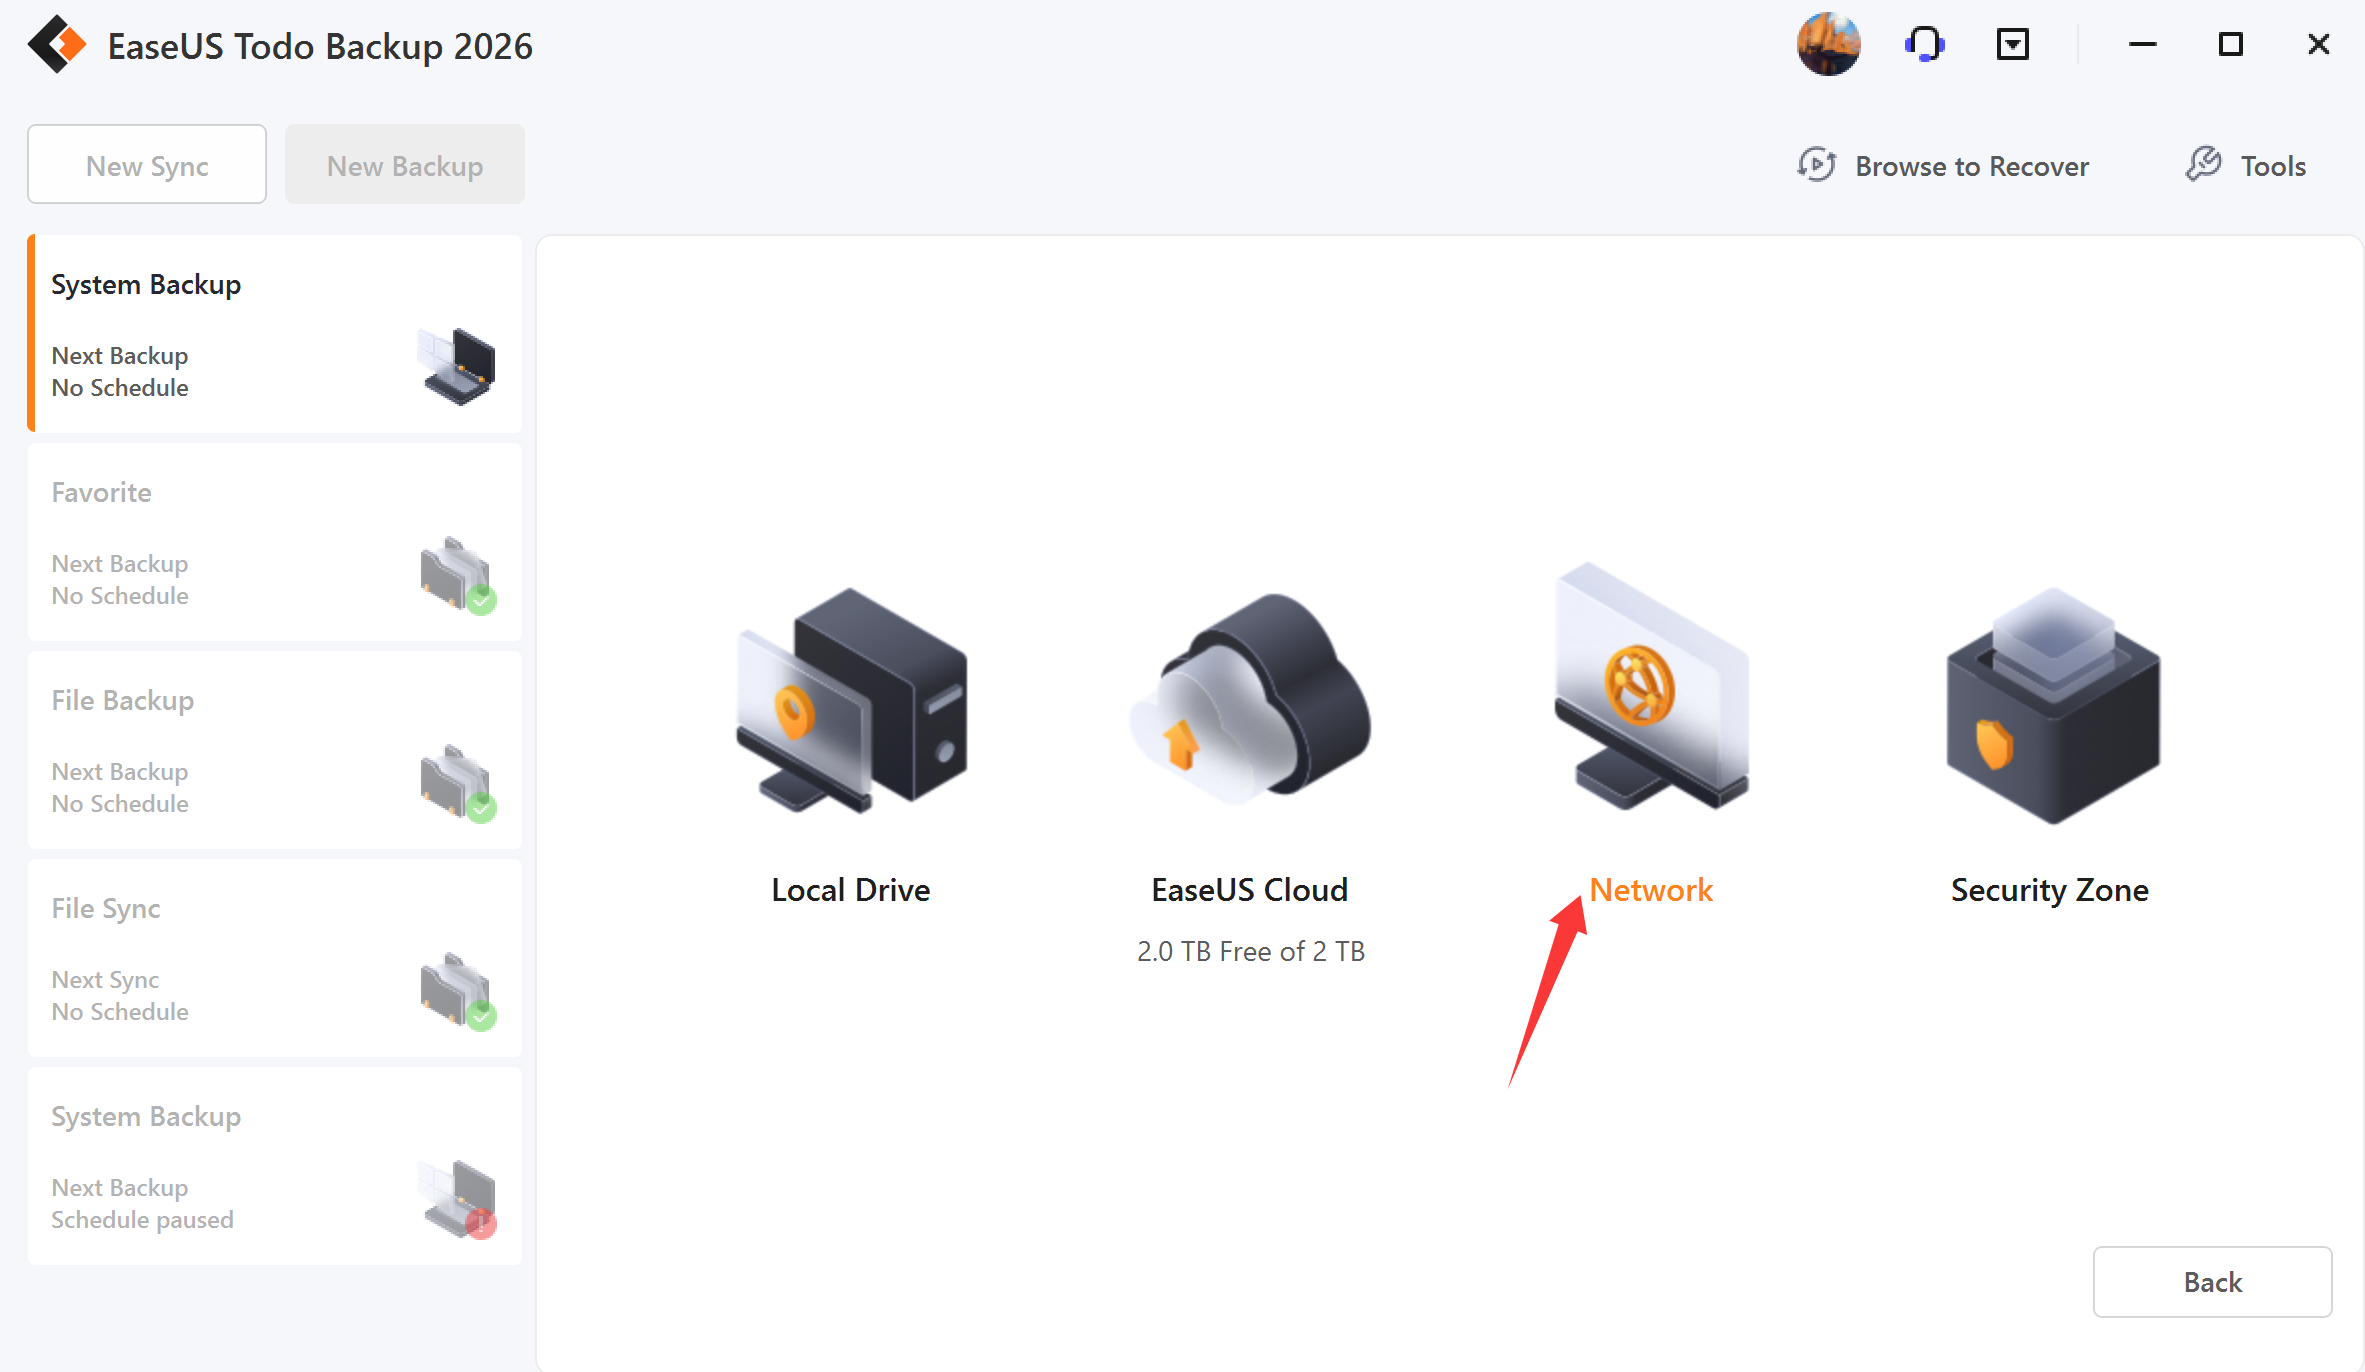

Then choose the Cloud Service and get authorization to access your account.

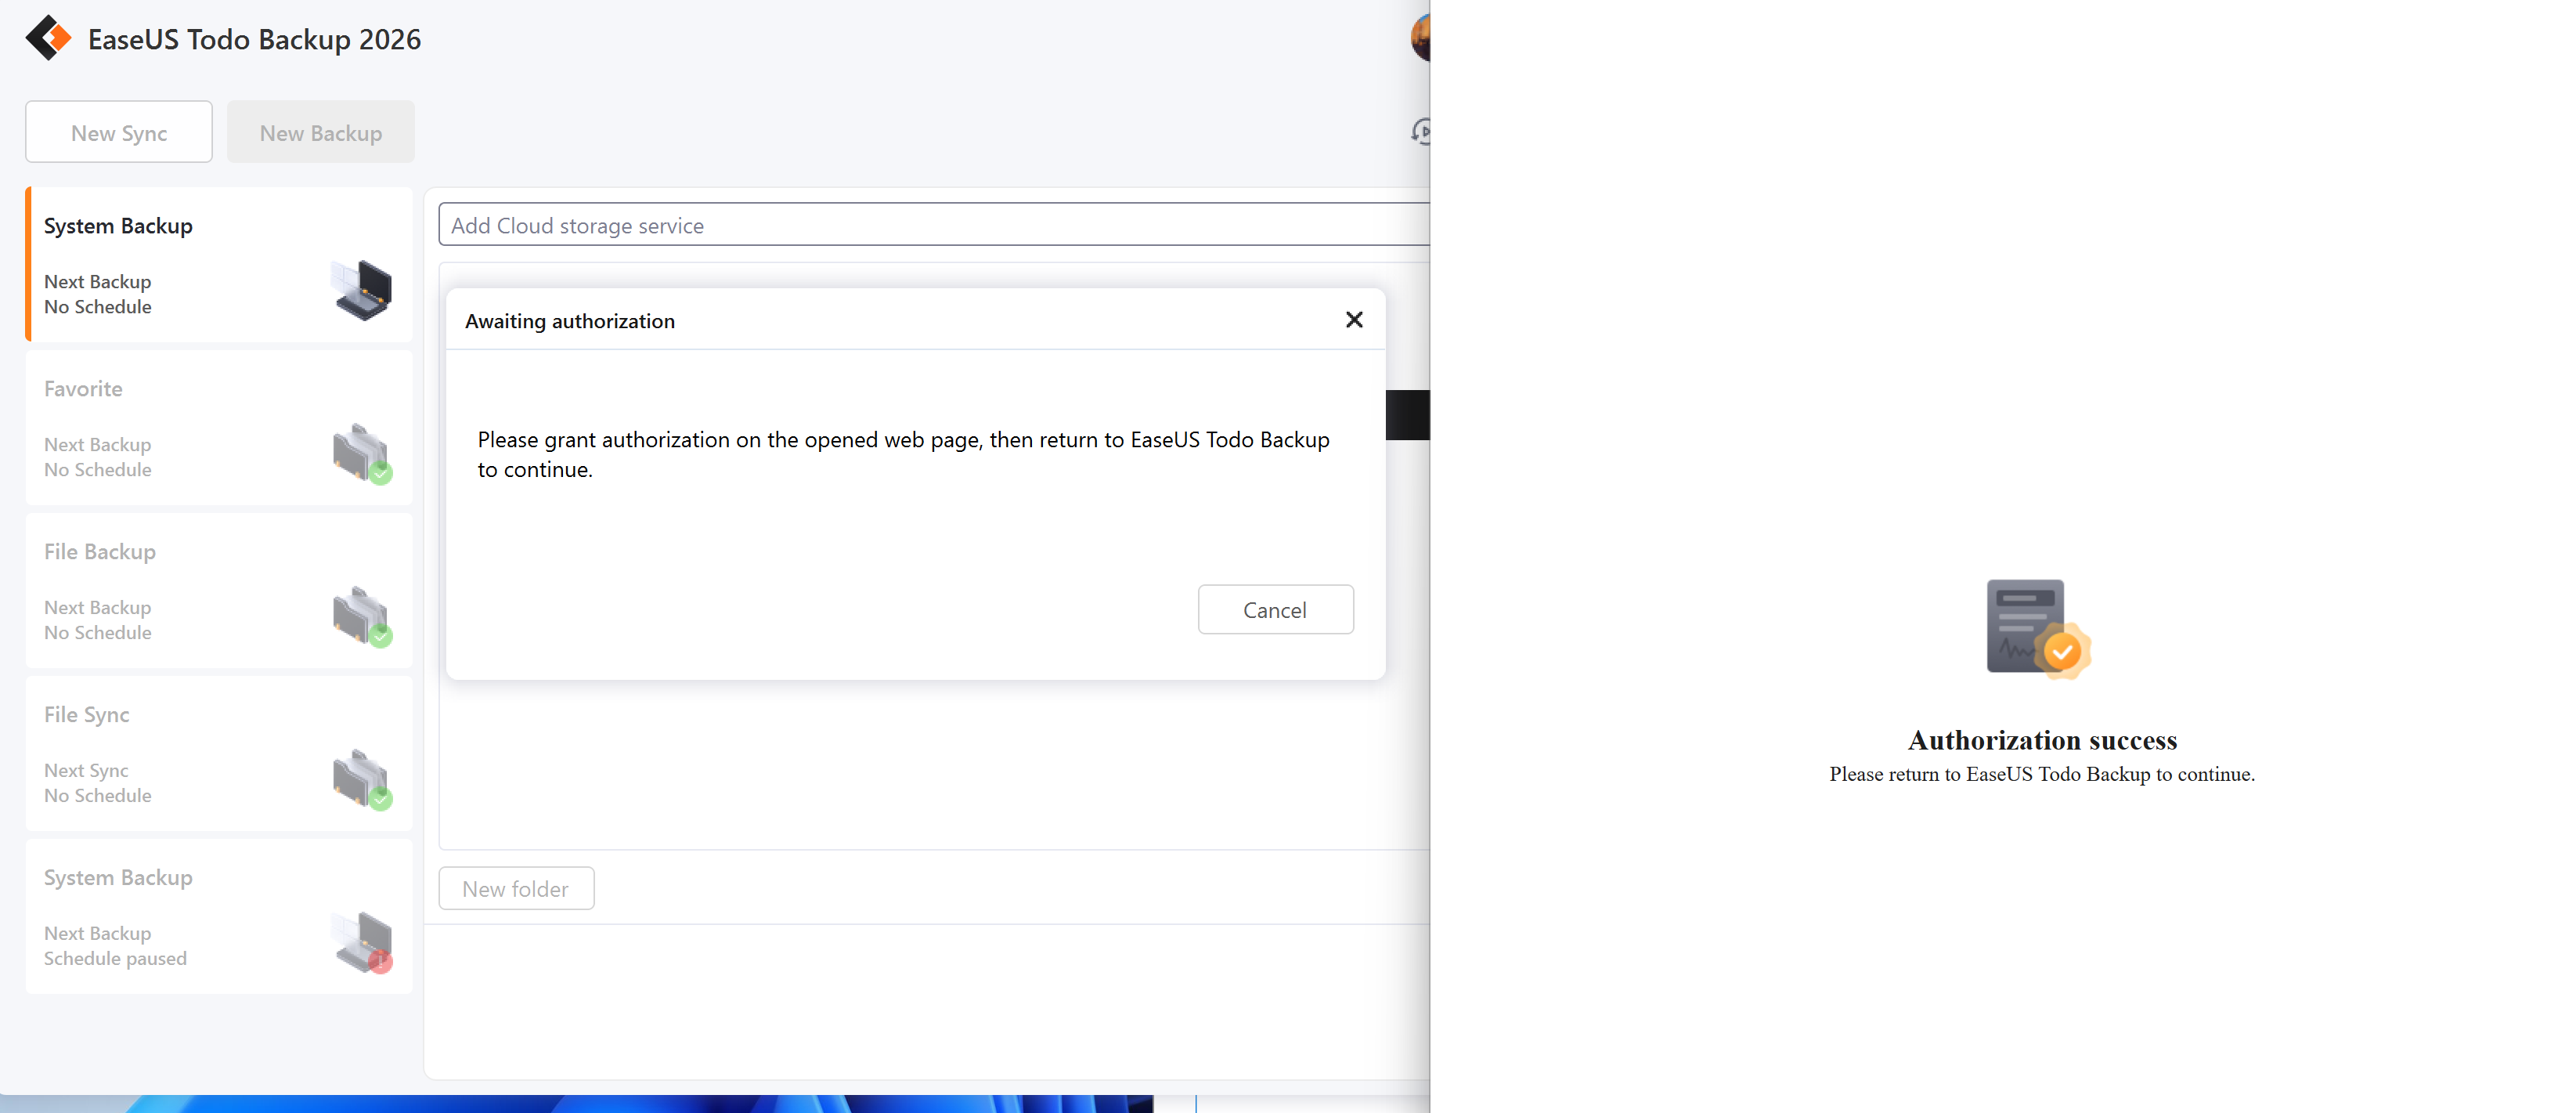
Cloud storage requires authorization via a webpage and authorization window. Here is an example of OneDrive:
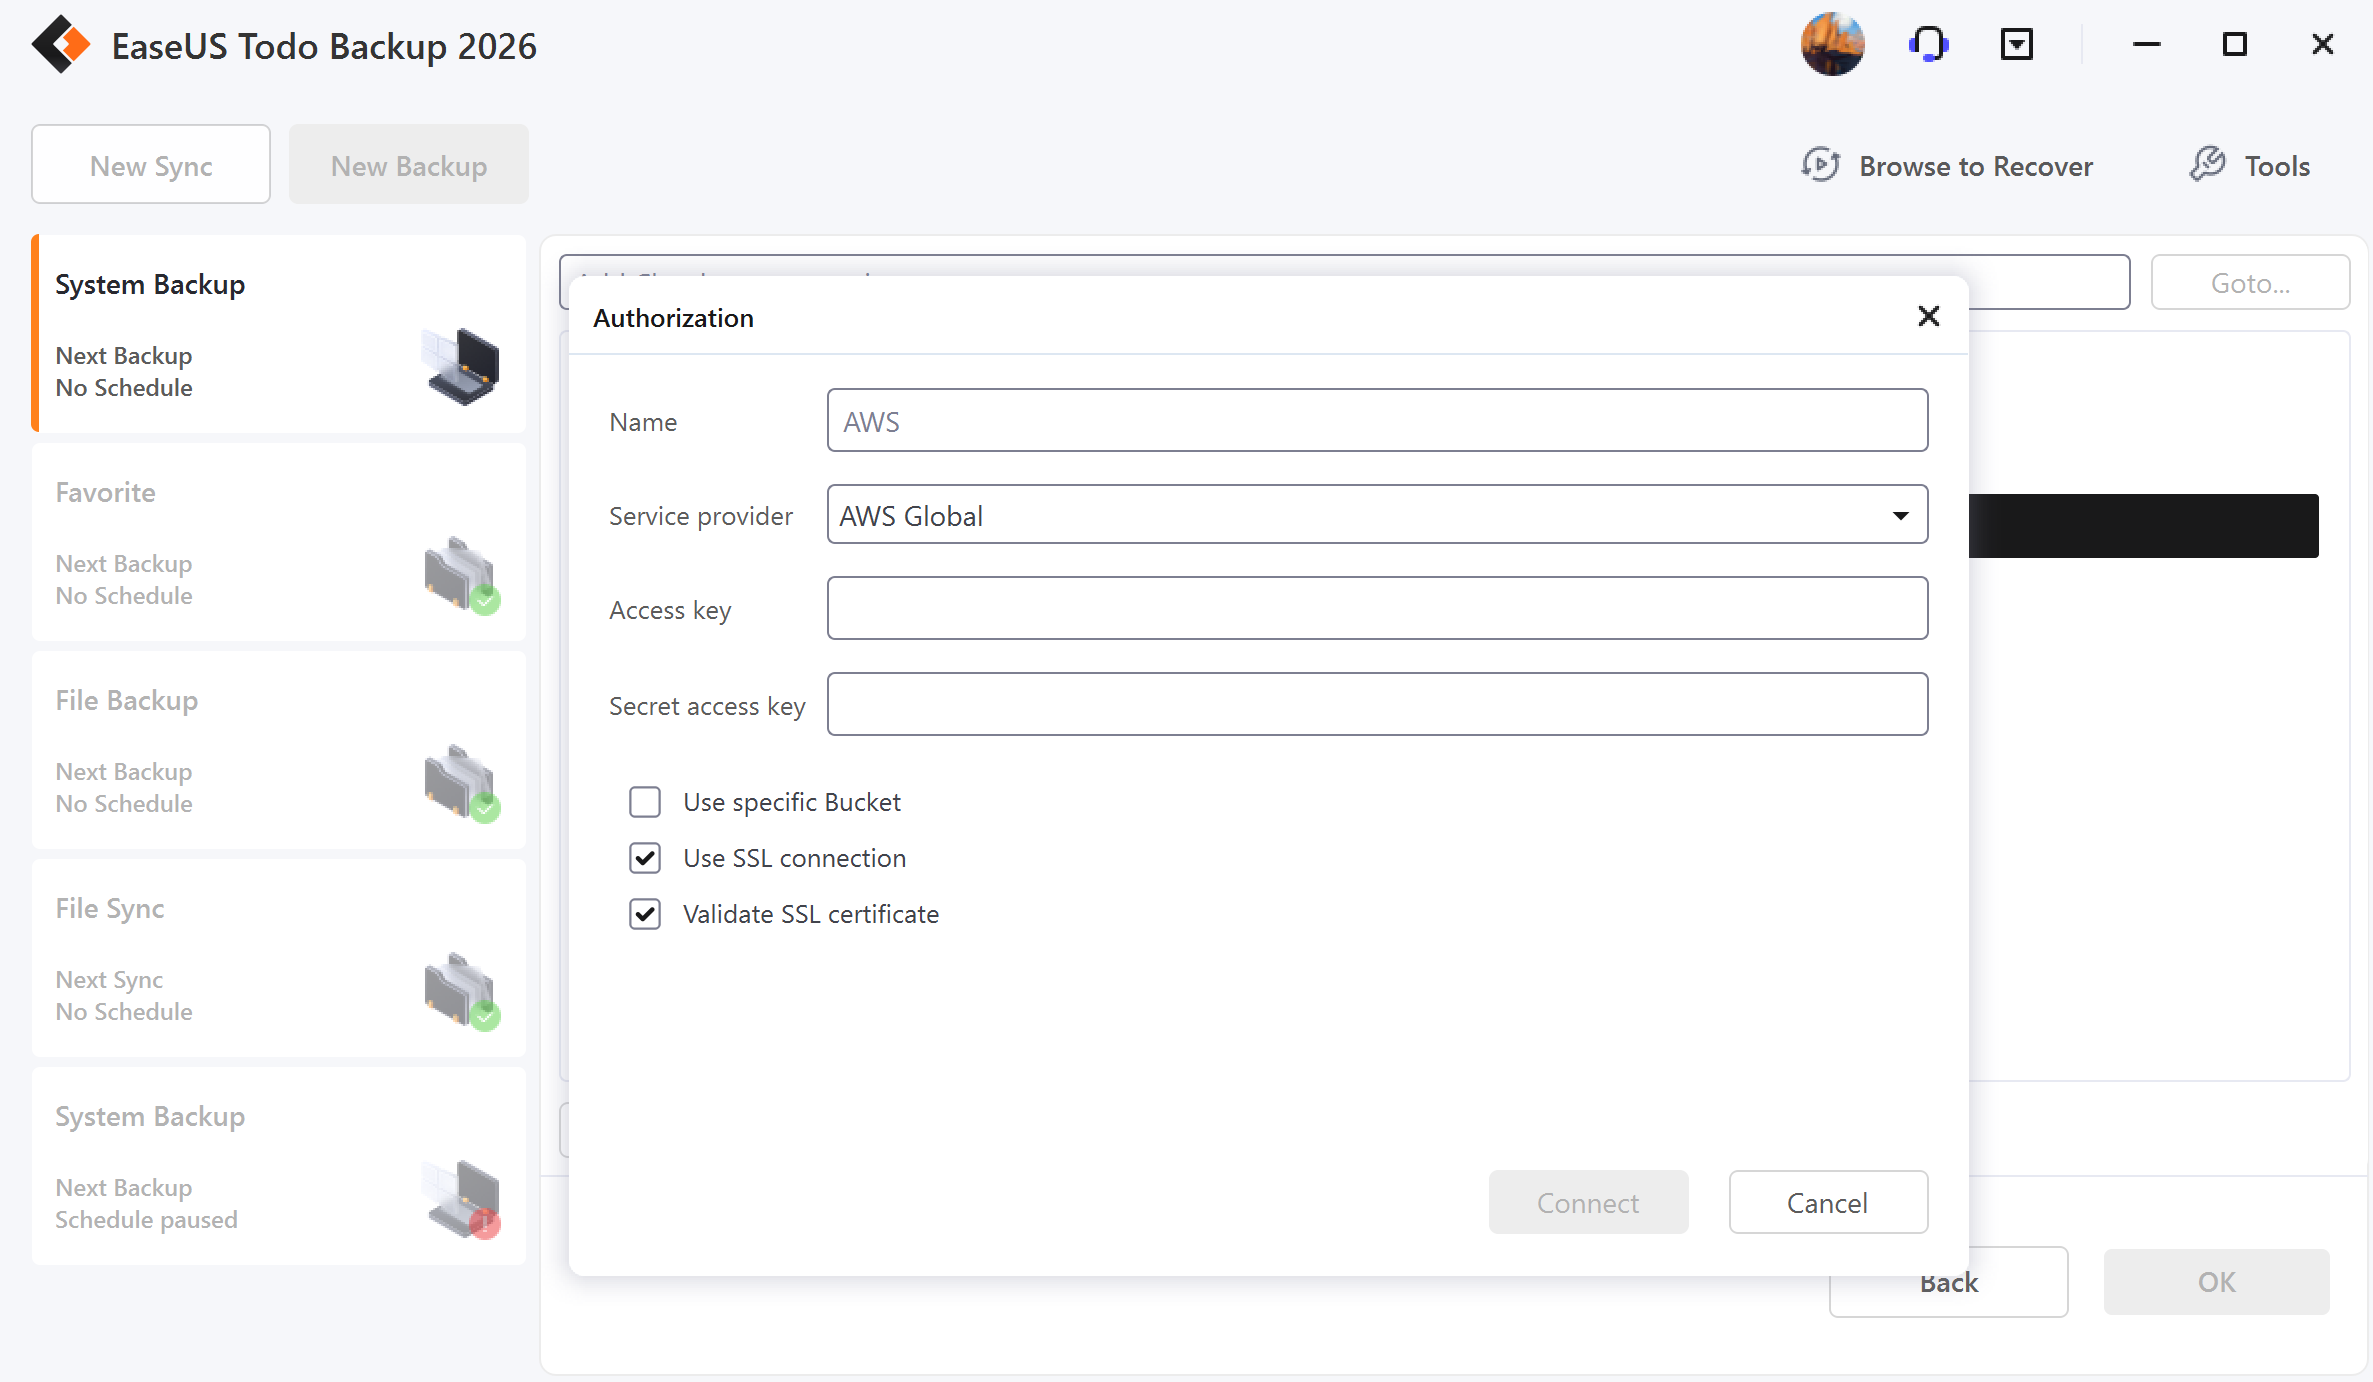
Here is an example of AWS.
EaseUS Cloud Storage
Based on Amazon S3, EaseUS Cloud Storage is provided for cloud subscription users. The backup images can be saved to EaseUS Cloud directly.
Currently, it supports File Backup, System Backup, Partition Backup, and Disk Backup.
Recovery
This feature is the reverse process of a backup. It will expand the compressed files in the backup image and restore files to the time point when the image file was created.
With a simple recovery process, you can rescue the computer from a variety of disasters, such as virus infection, system crashes, partition failure, and data loss.
System Recovery
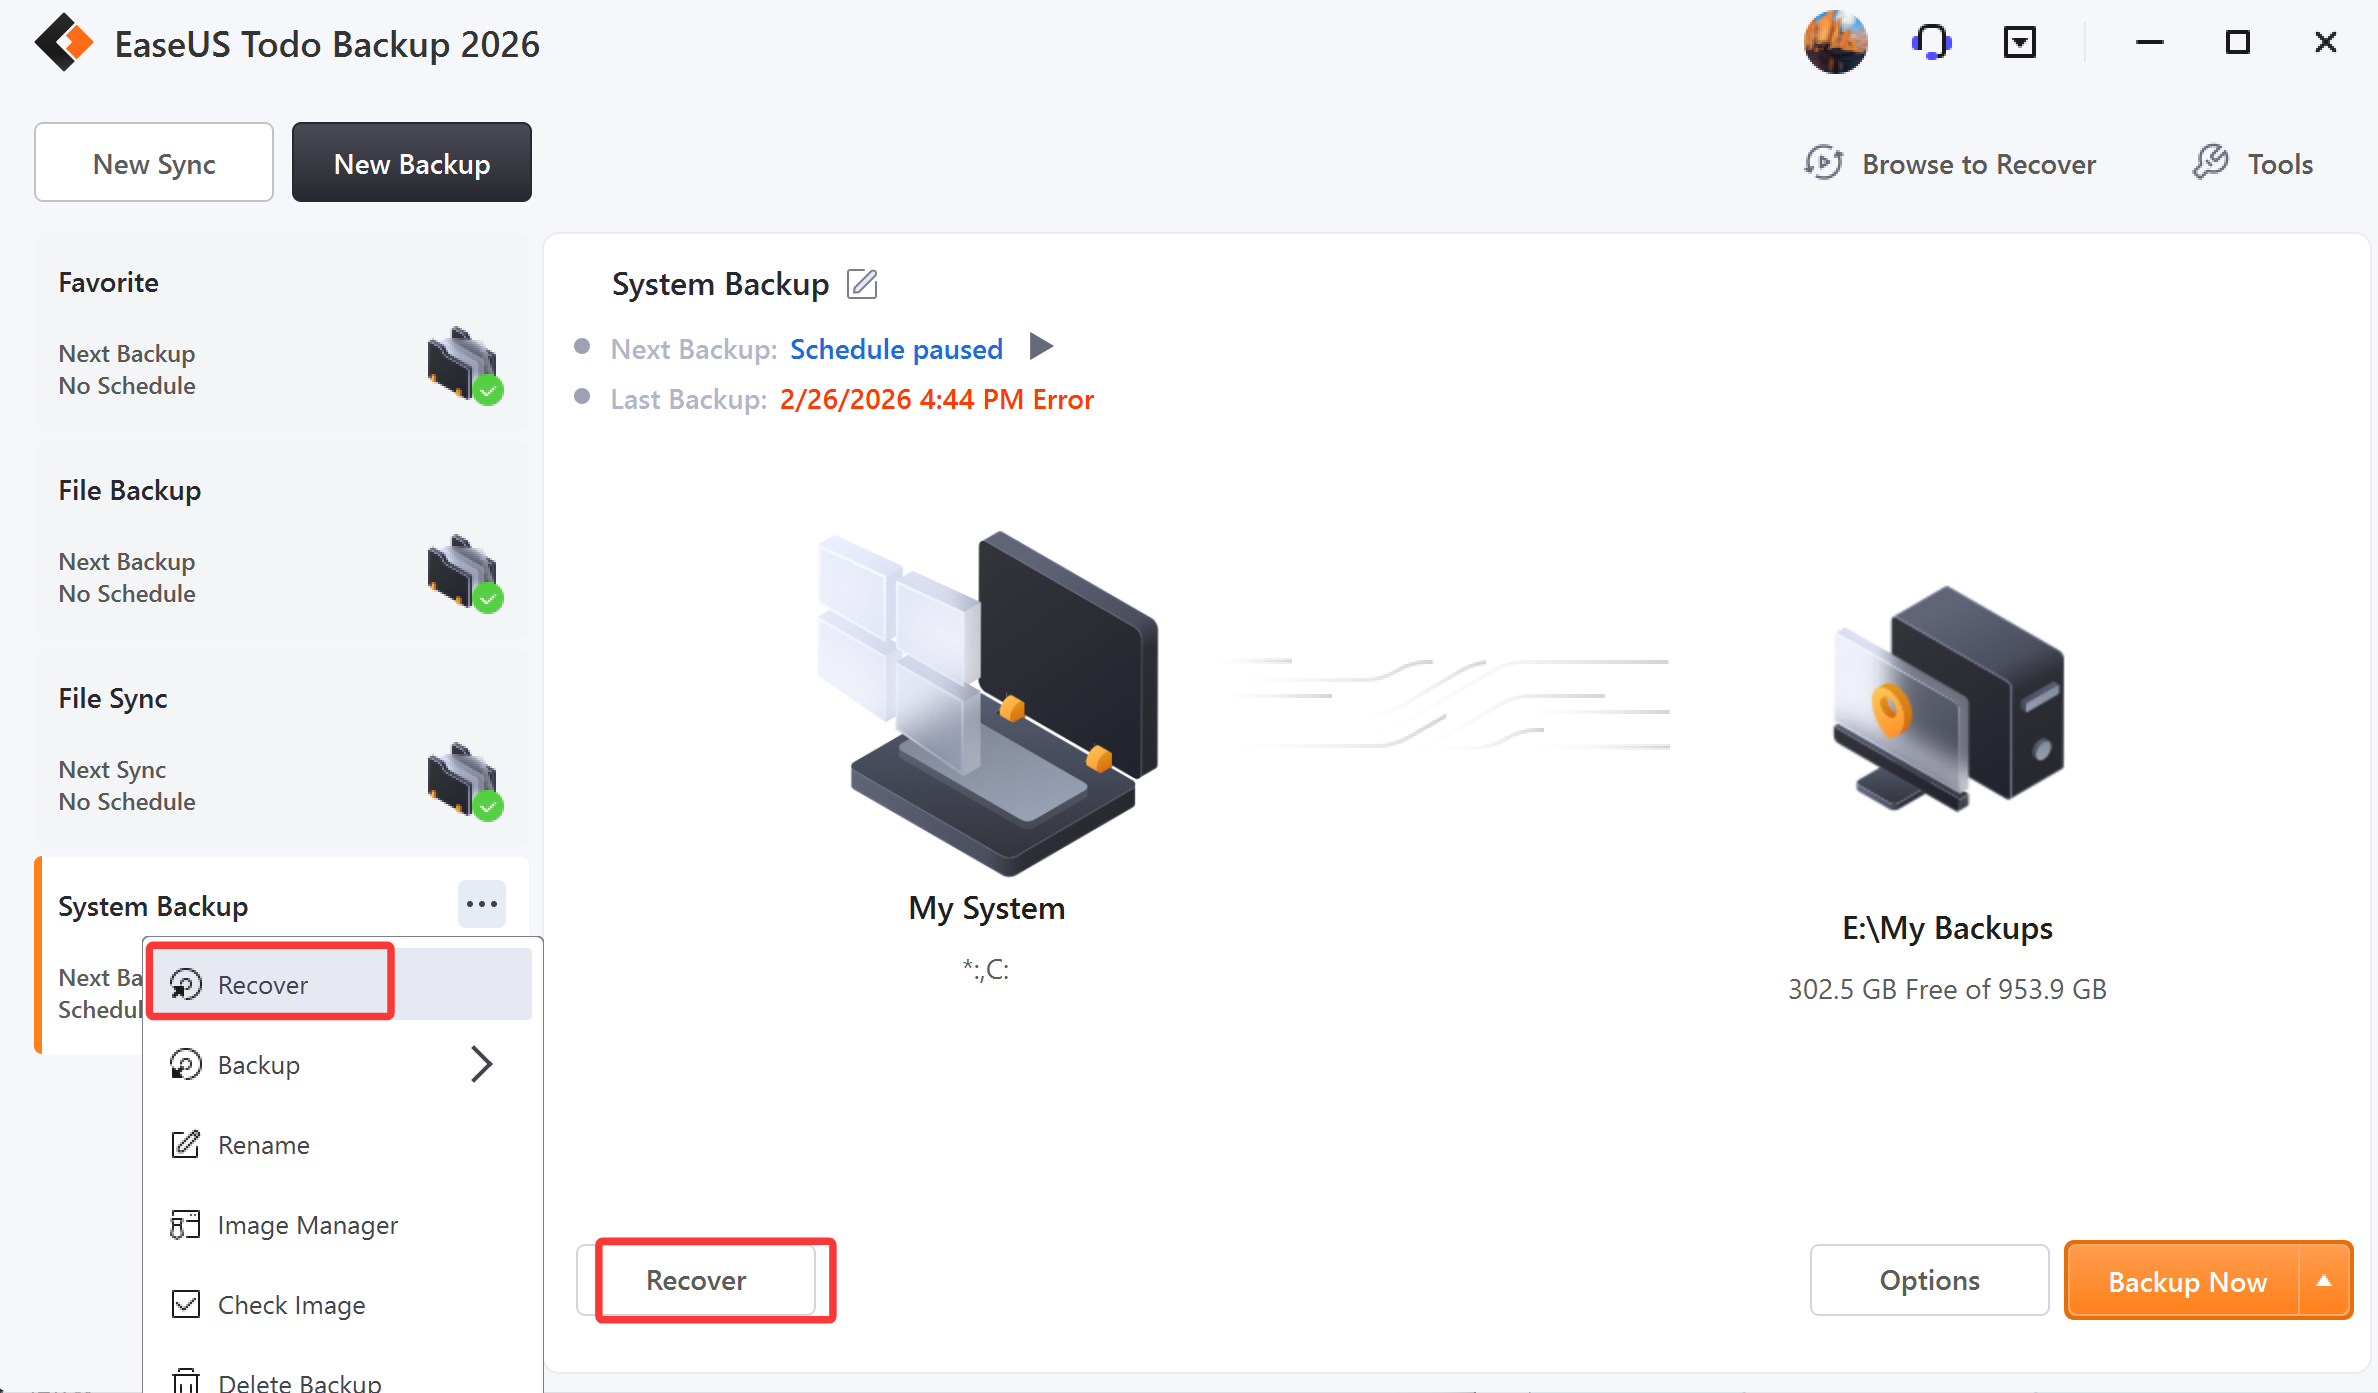
1. Highlight the backup task, right-click and select Recover, or click Recover in the right corner.
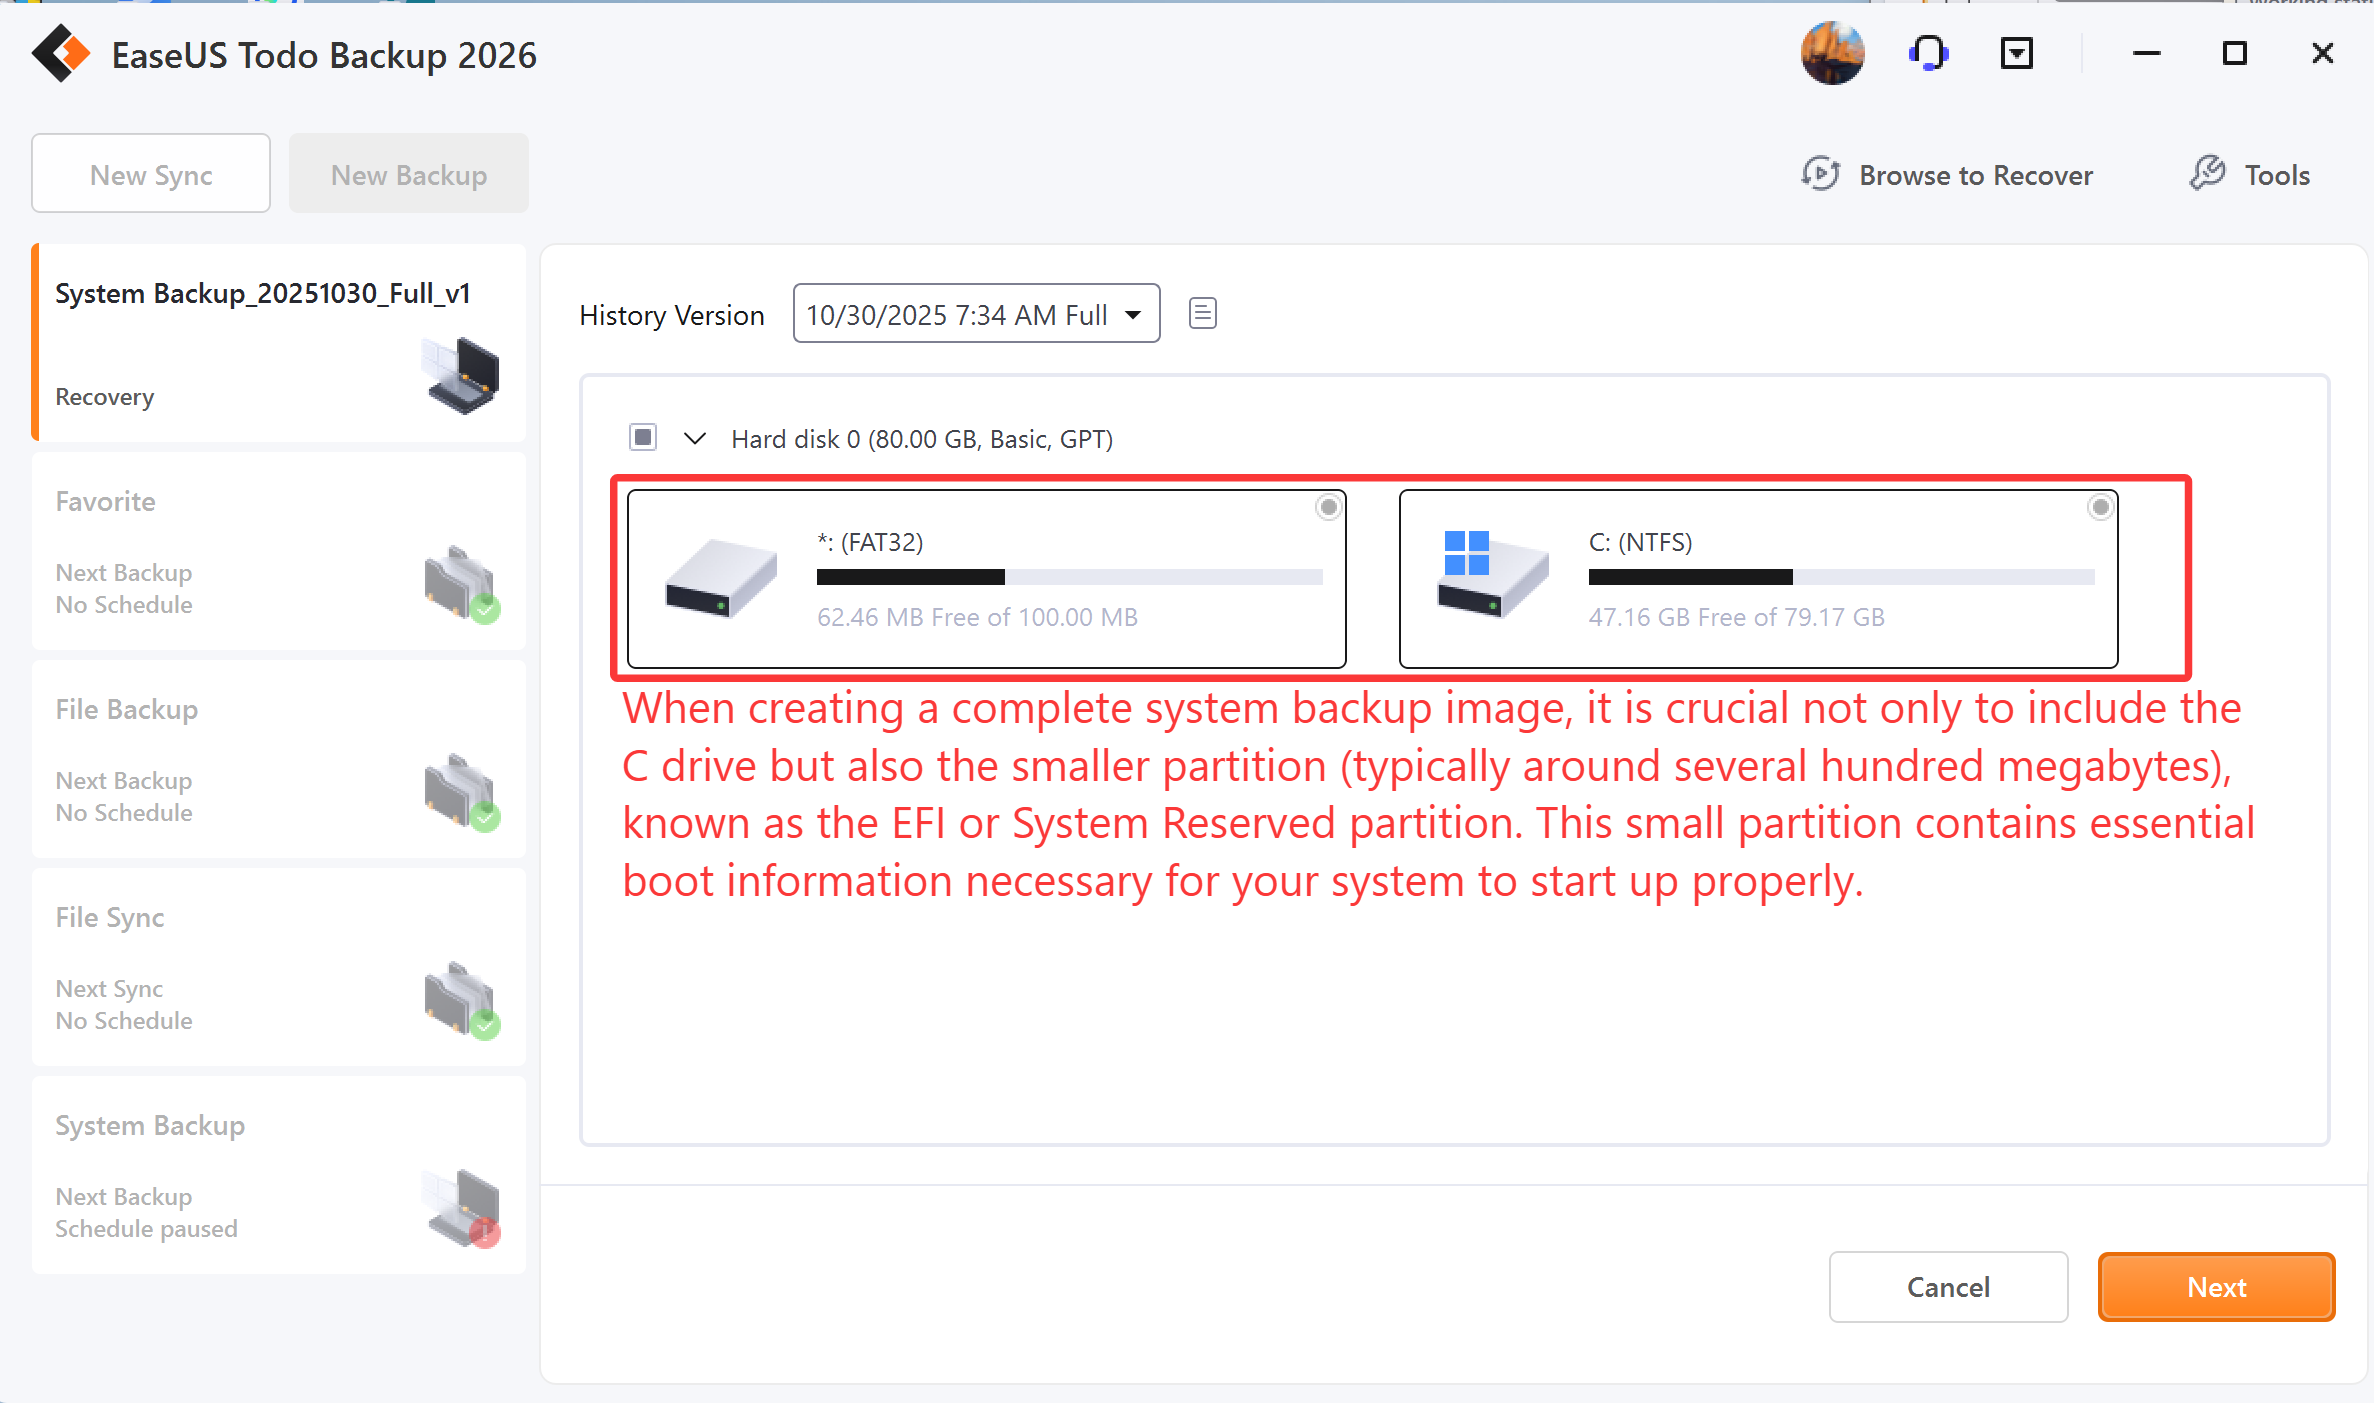
2. Choose one History version of the backup image, after confirming the contents, click Next button.
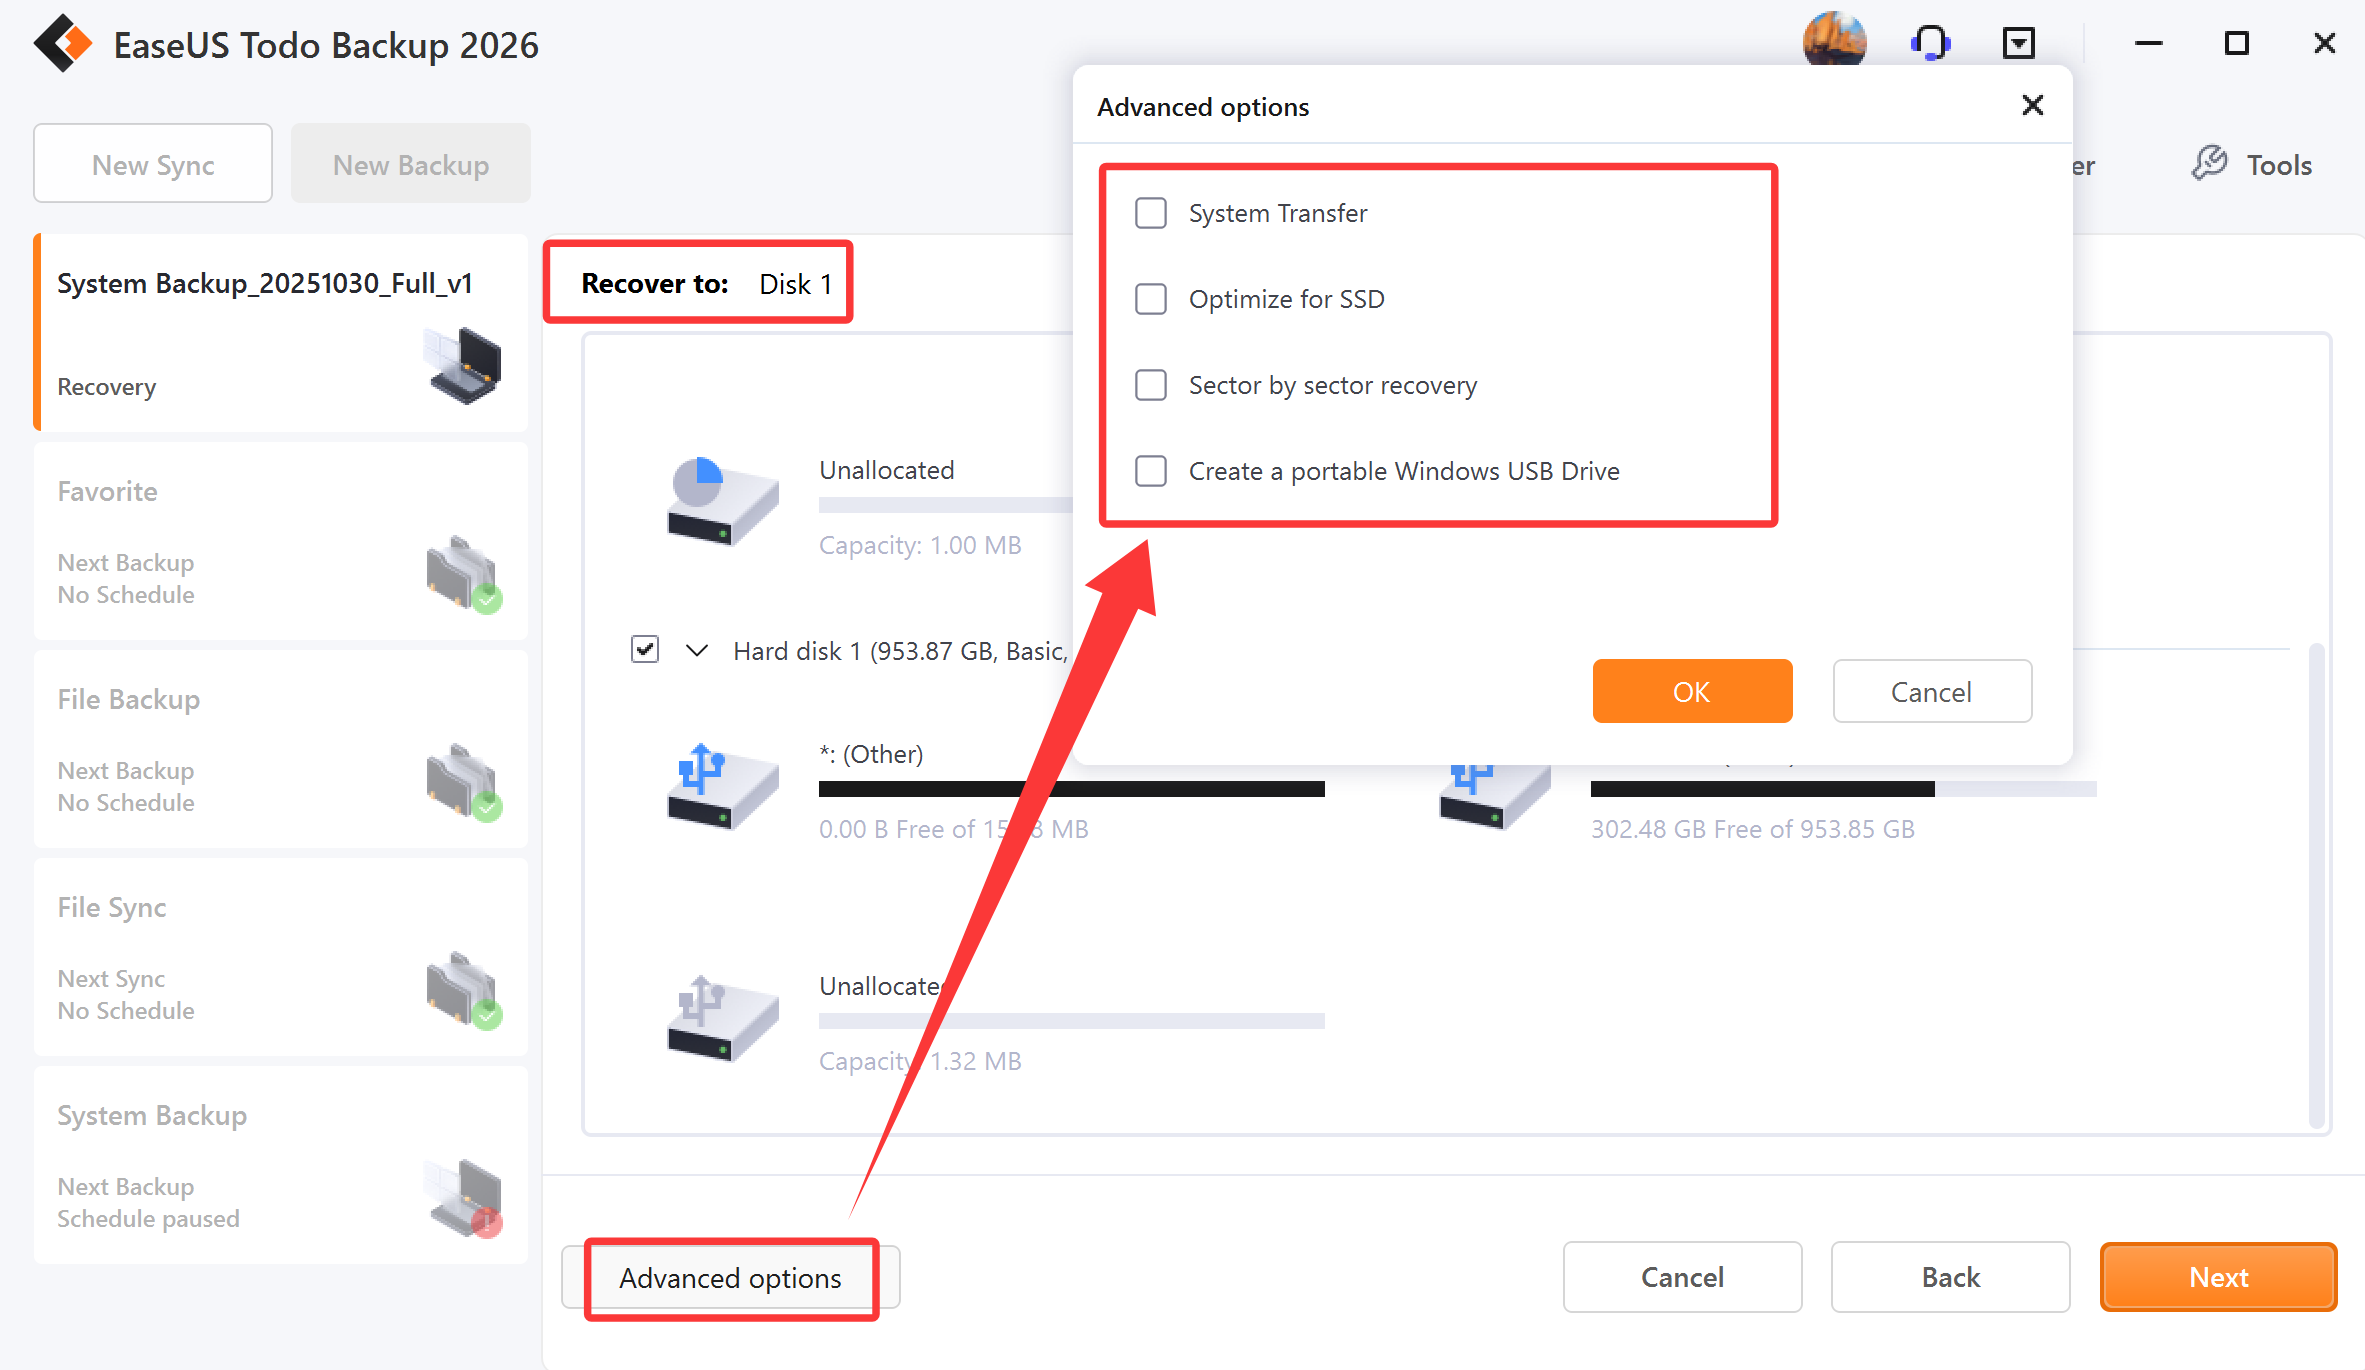
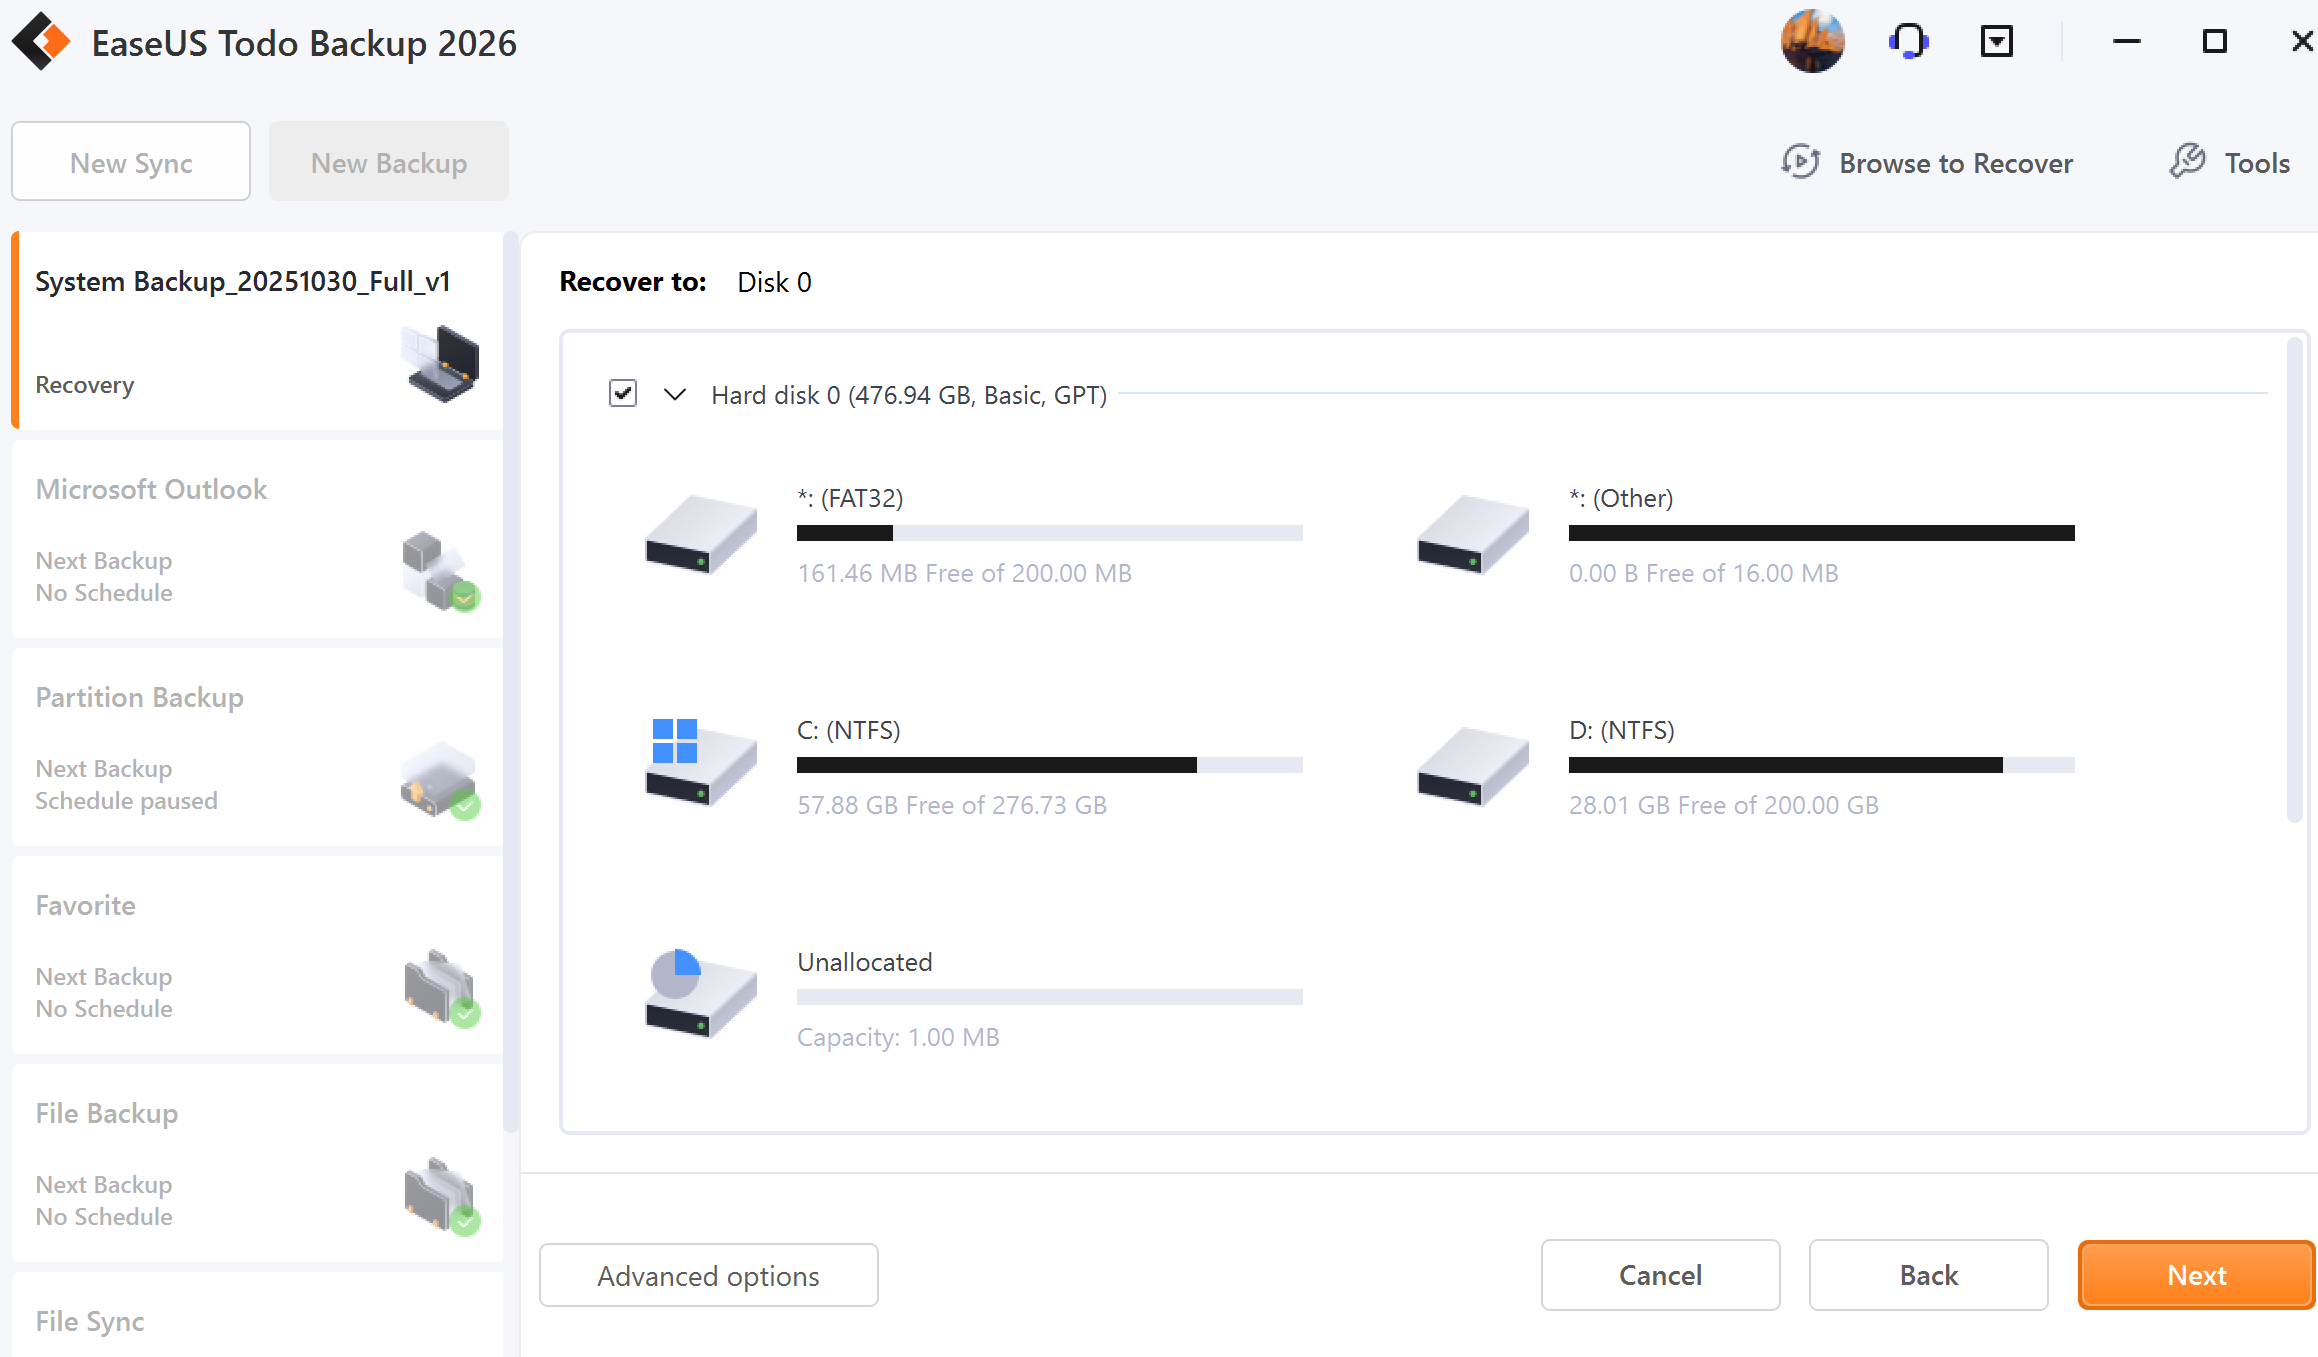
3. Choose the target disk and tick the Advanced Options if needed, then click Next.
Note:
The original system will be overwritten once the recovery starts.
A WinPE bootable disk or Pre-OS is required for recovery in the case of OS failure.
Advanced restoration settings
These advanced settings can help you restore the backups more stably and smoothly in some special cases. However, without these advanced settings, EaseUS Todo backup can still give you a full restoration.
System Transfer - Restore the image which contains the Windows system to a dissimilar computer, for details please click here.
Optimize for SSD - If the destination disk is SSD, check this option will ensure sector alignment in the process.
Sector by Sector recovery - Checking this option will recover the contents from an image file sector by sector. It ensures that the recovery process finishes successfully even if there are some logic errors on the original partition or hard disk. If you want every file distributed to its original sector after recovery, checking this option will meet that goal.
Create a portable Windows USB Drive - Check this option if the target disk is connected via USB.
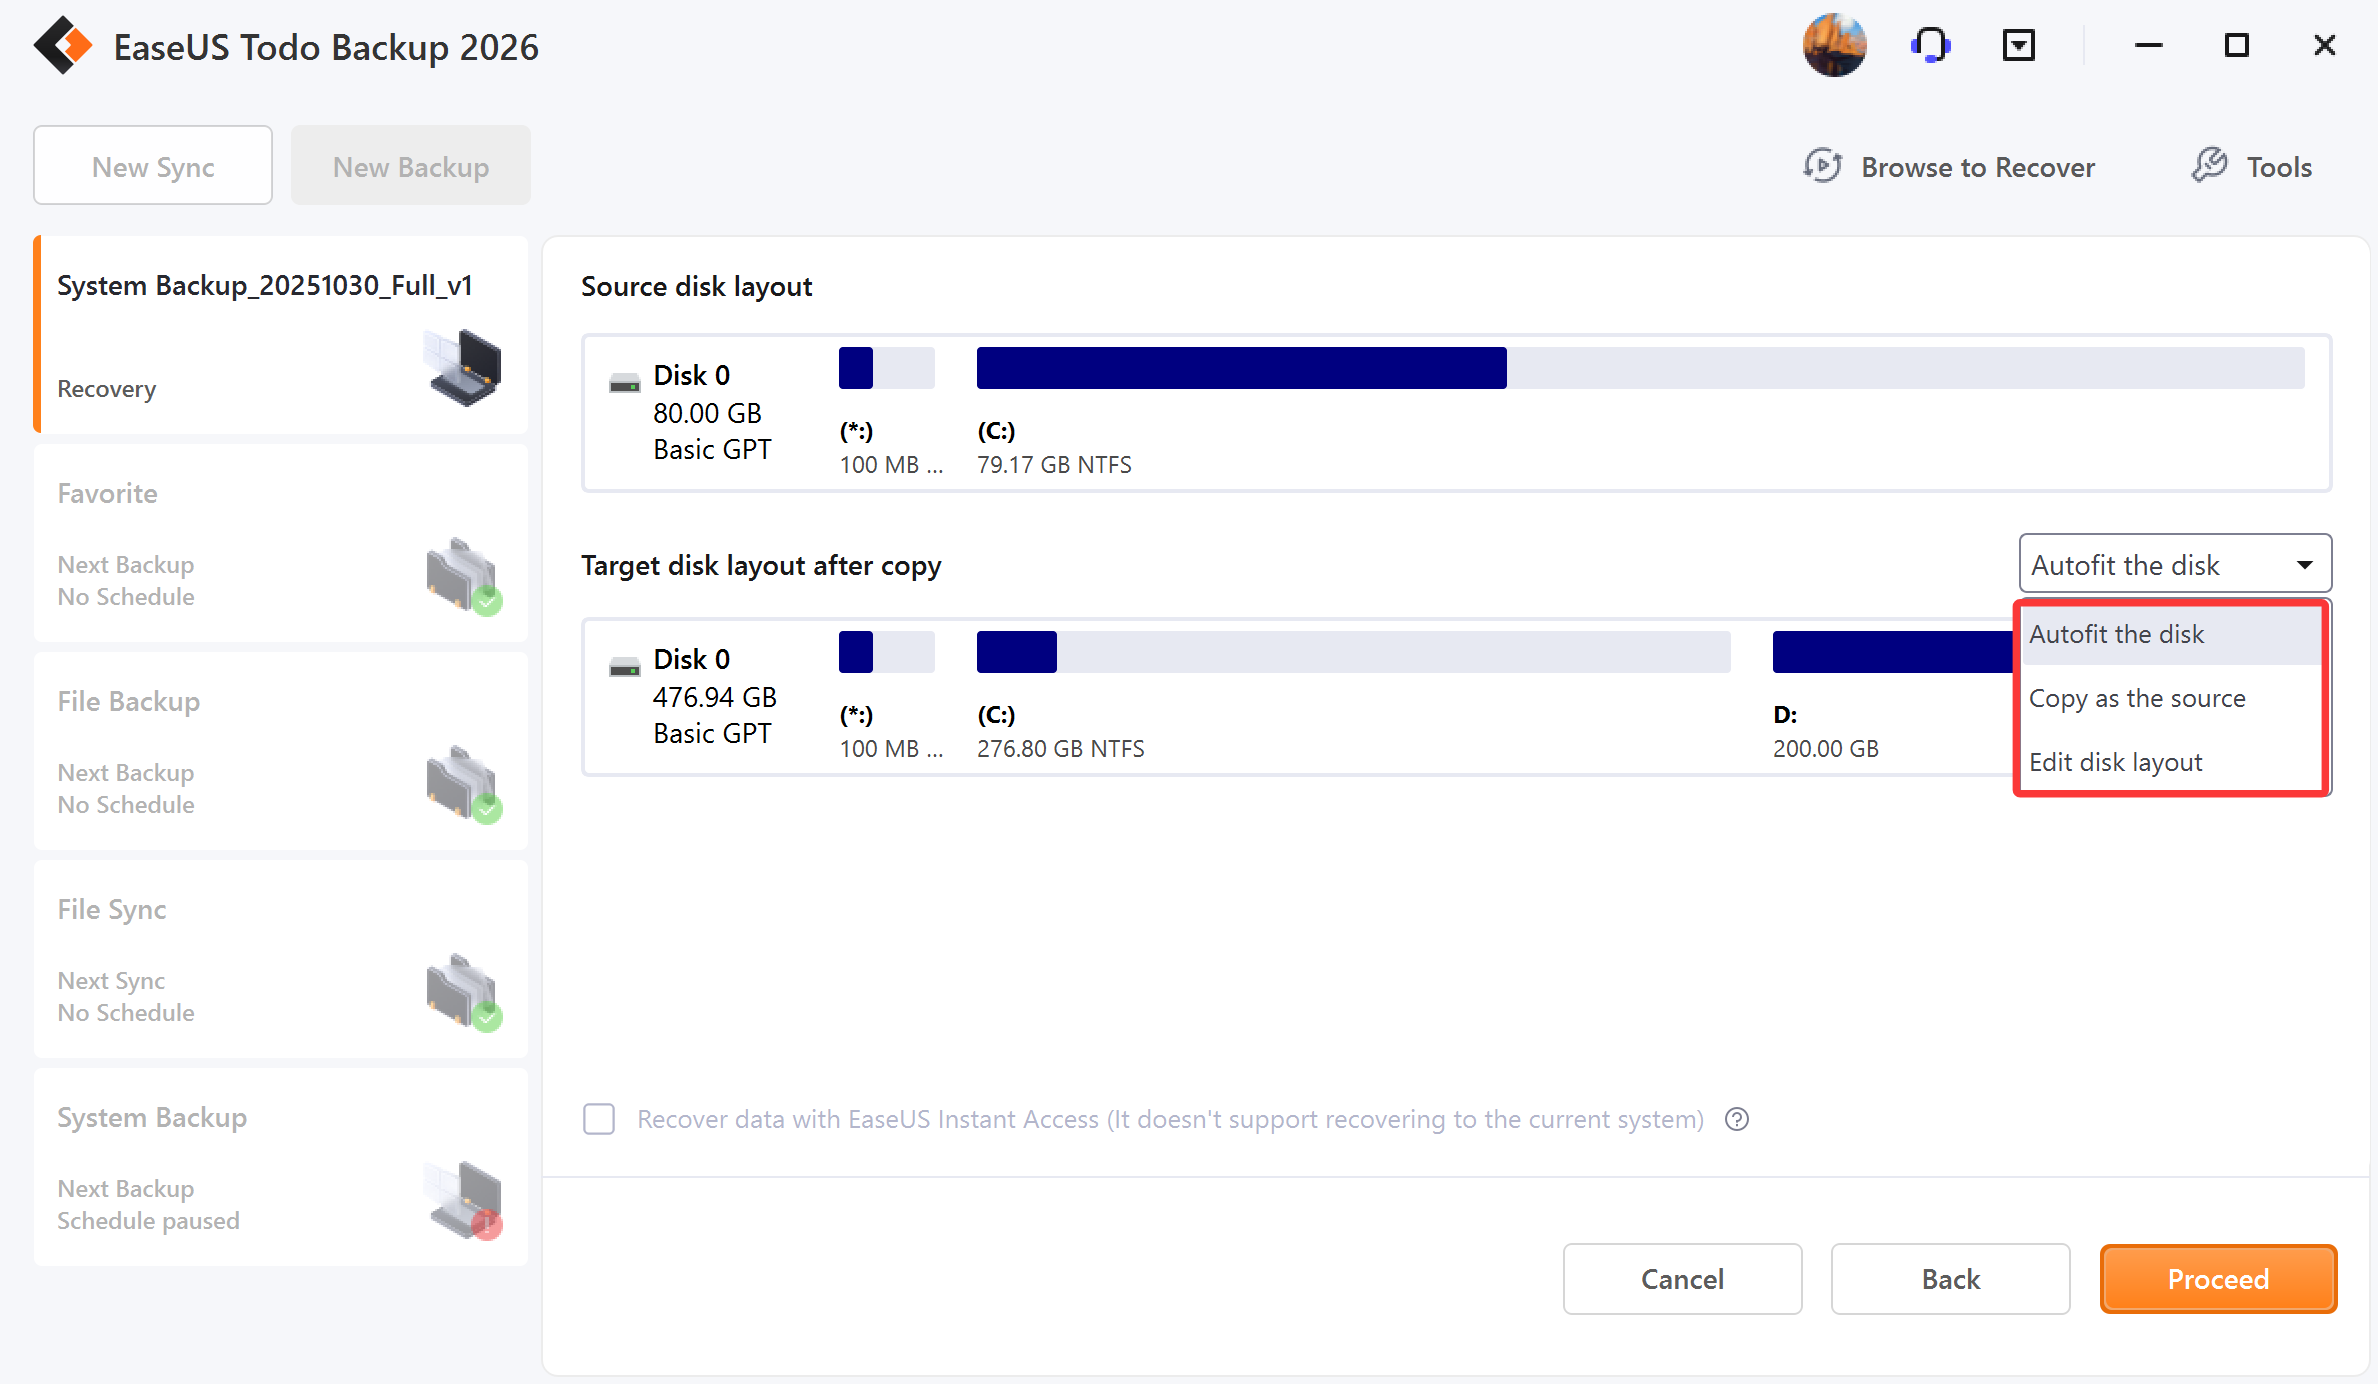
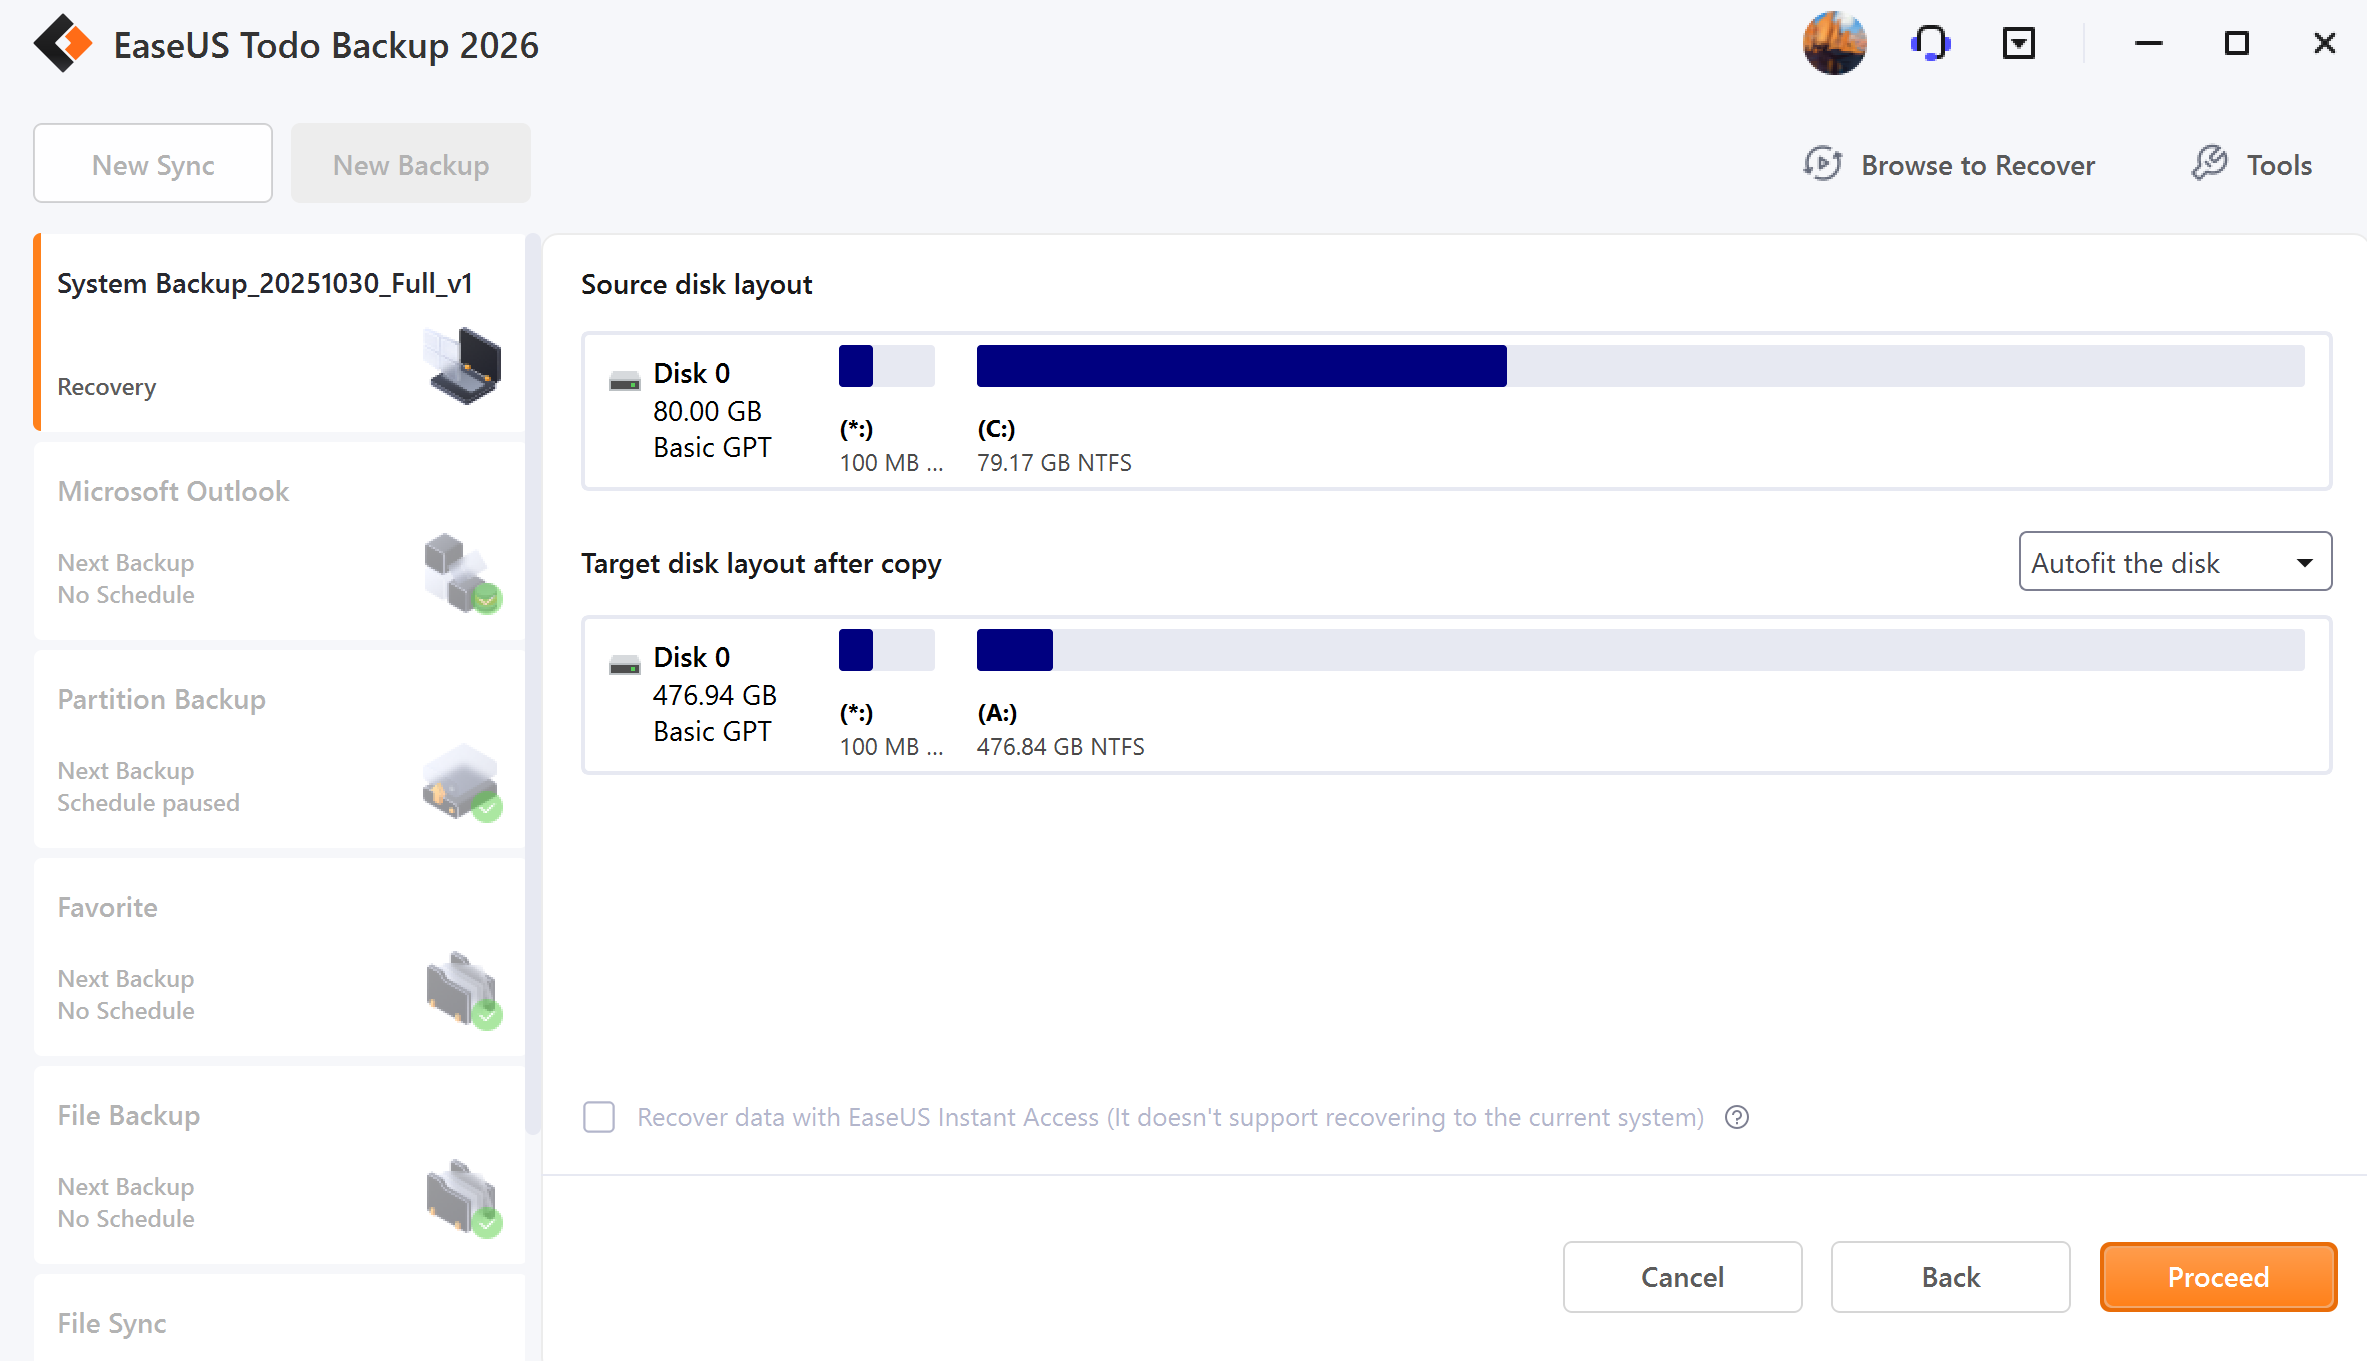
4. Adjust the disk layout of the target disk, then click Proceed.
Disk/Partition Recovery
1. Highlight the backup task, right-click and select Recover, or click Recover in the right corner.

2. Choose one History version of the backup image, after confirming the contents, click Next button.
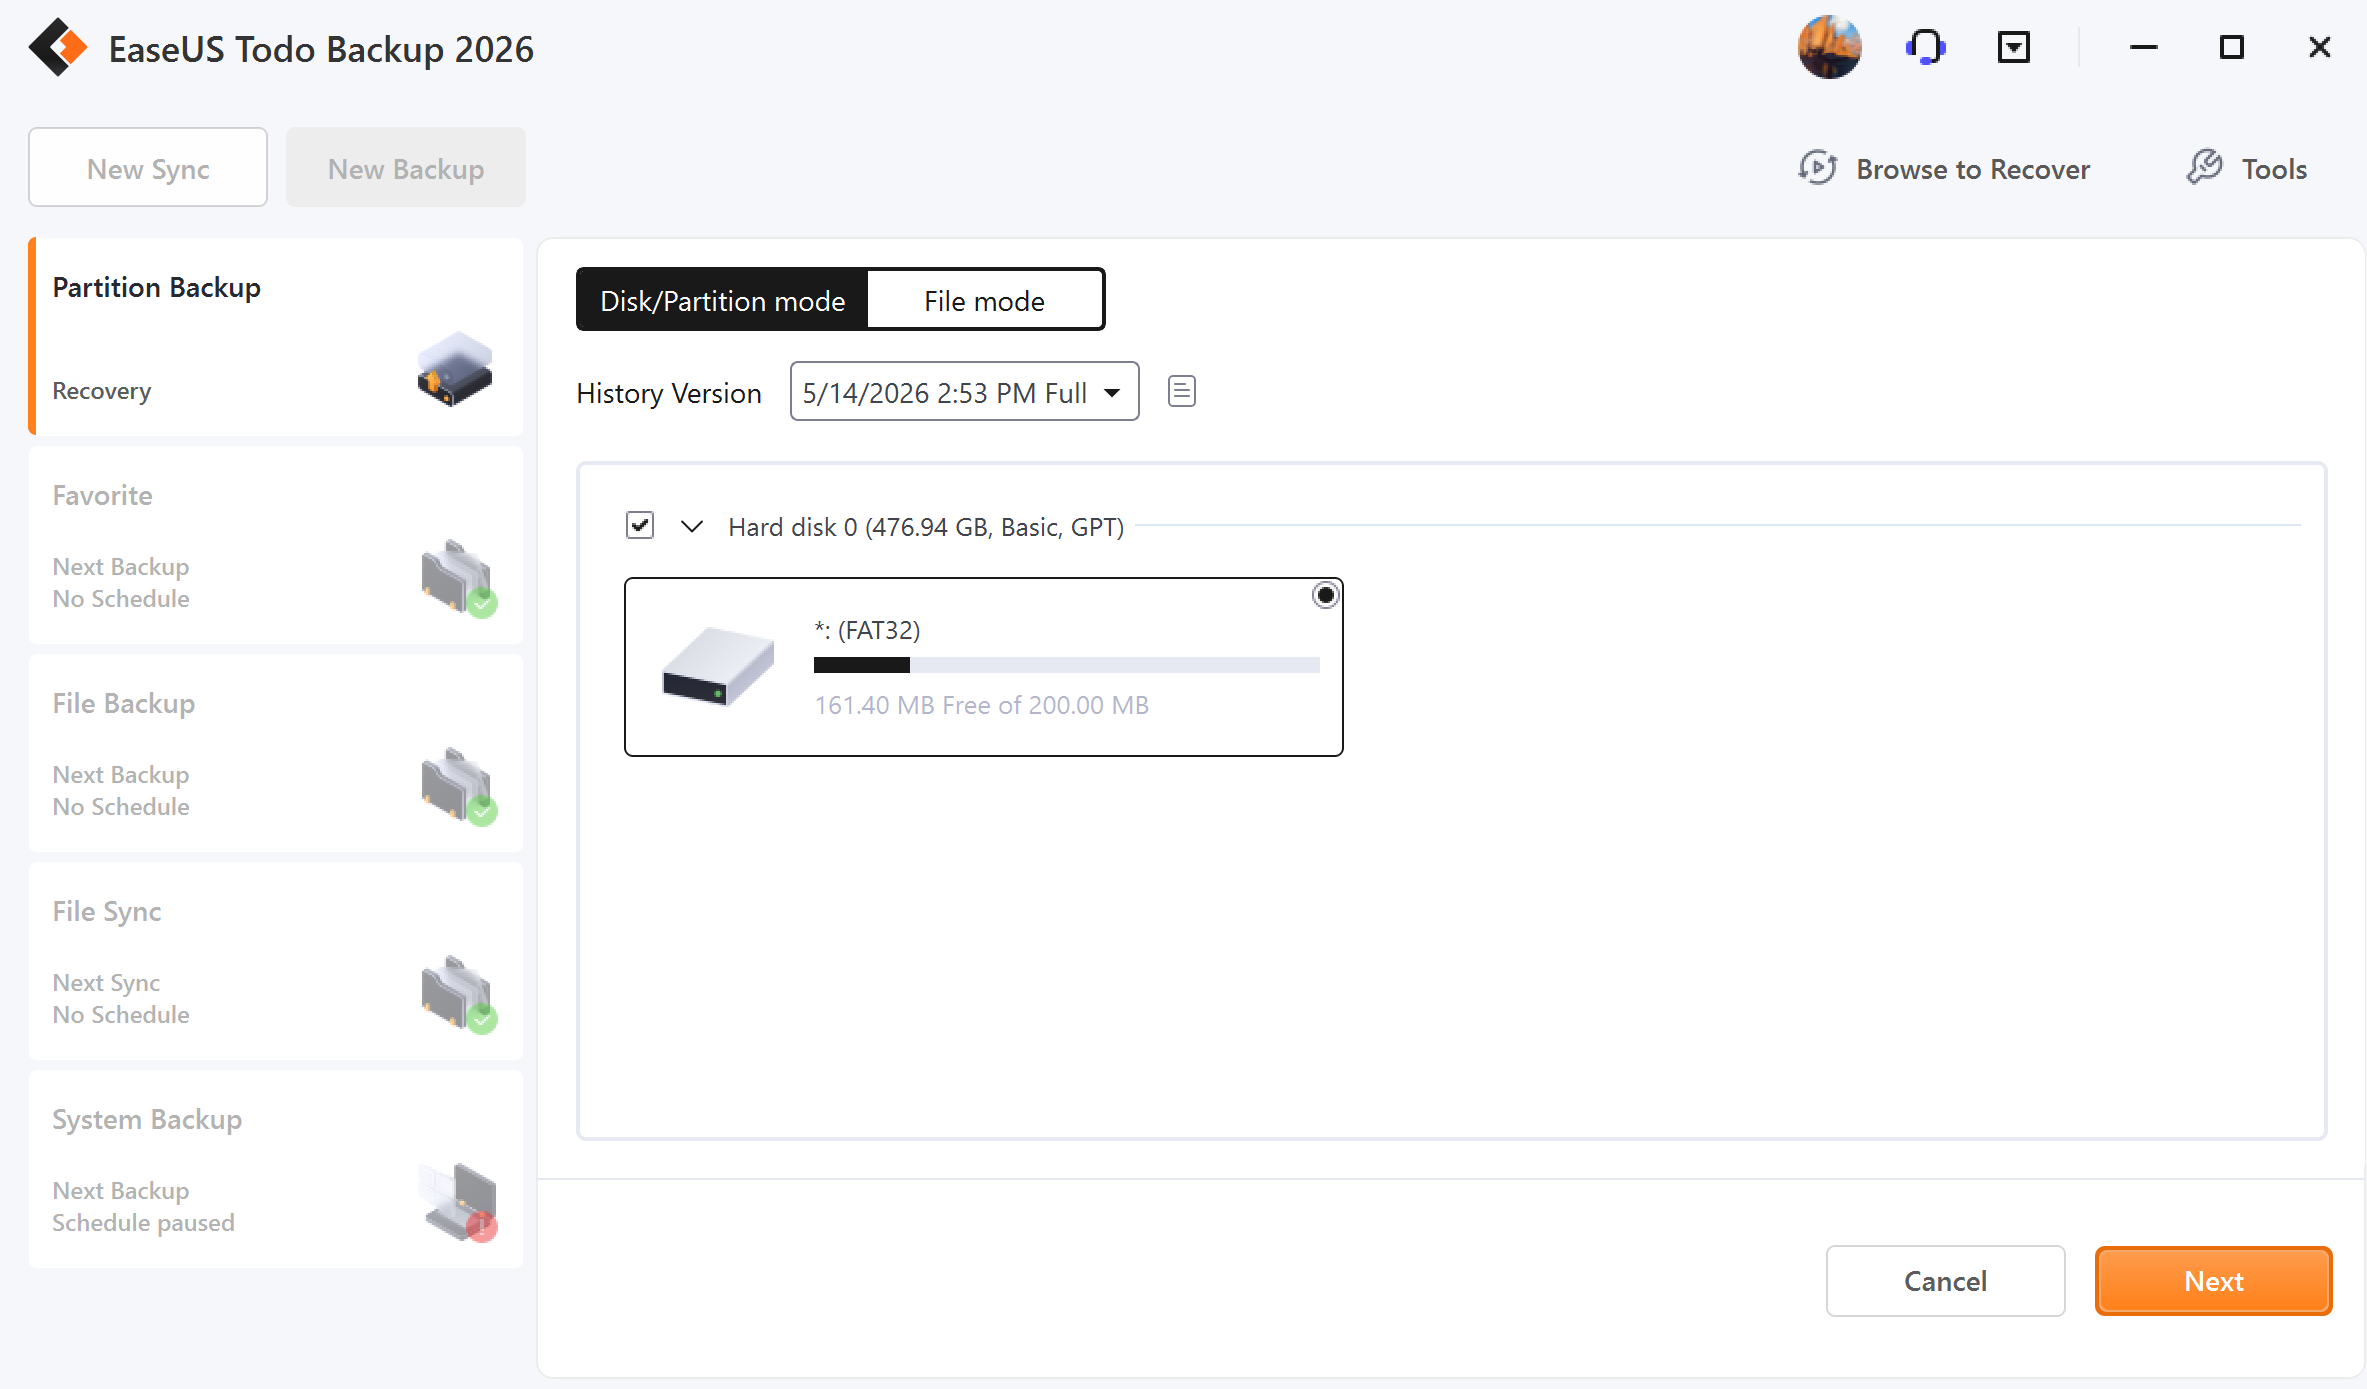
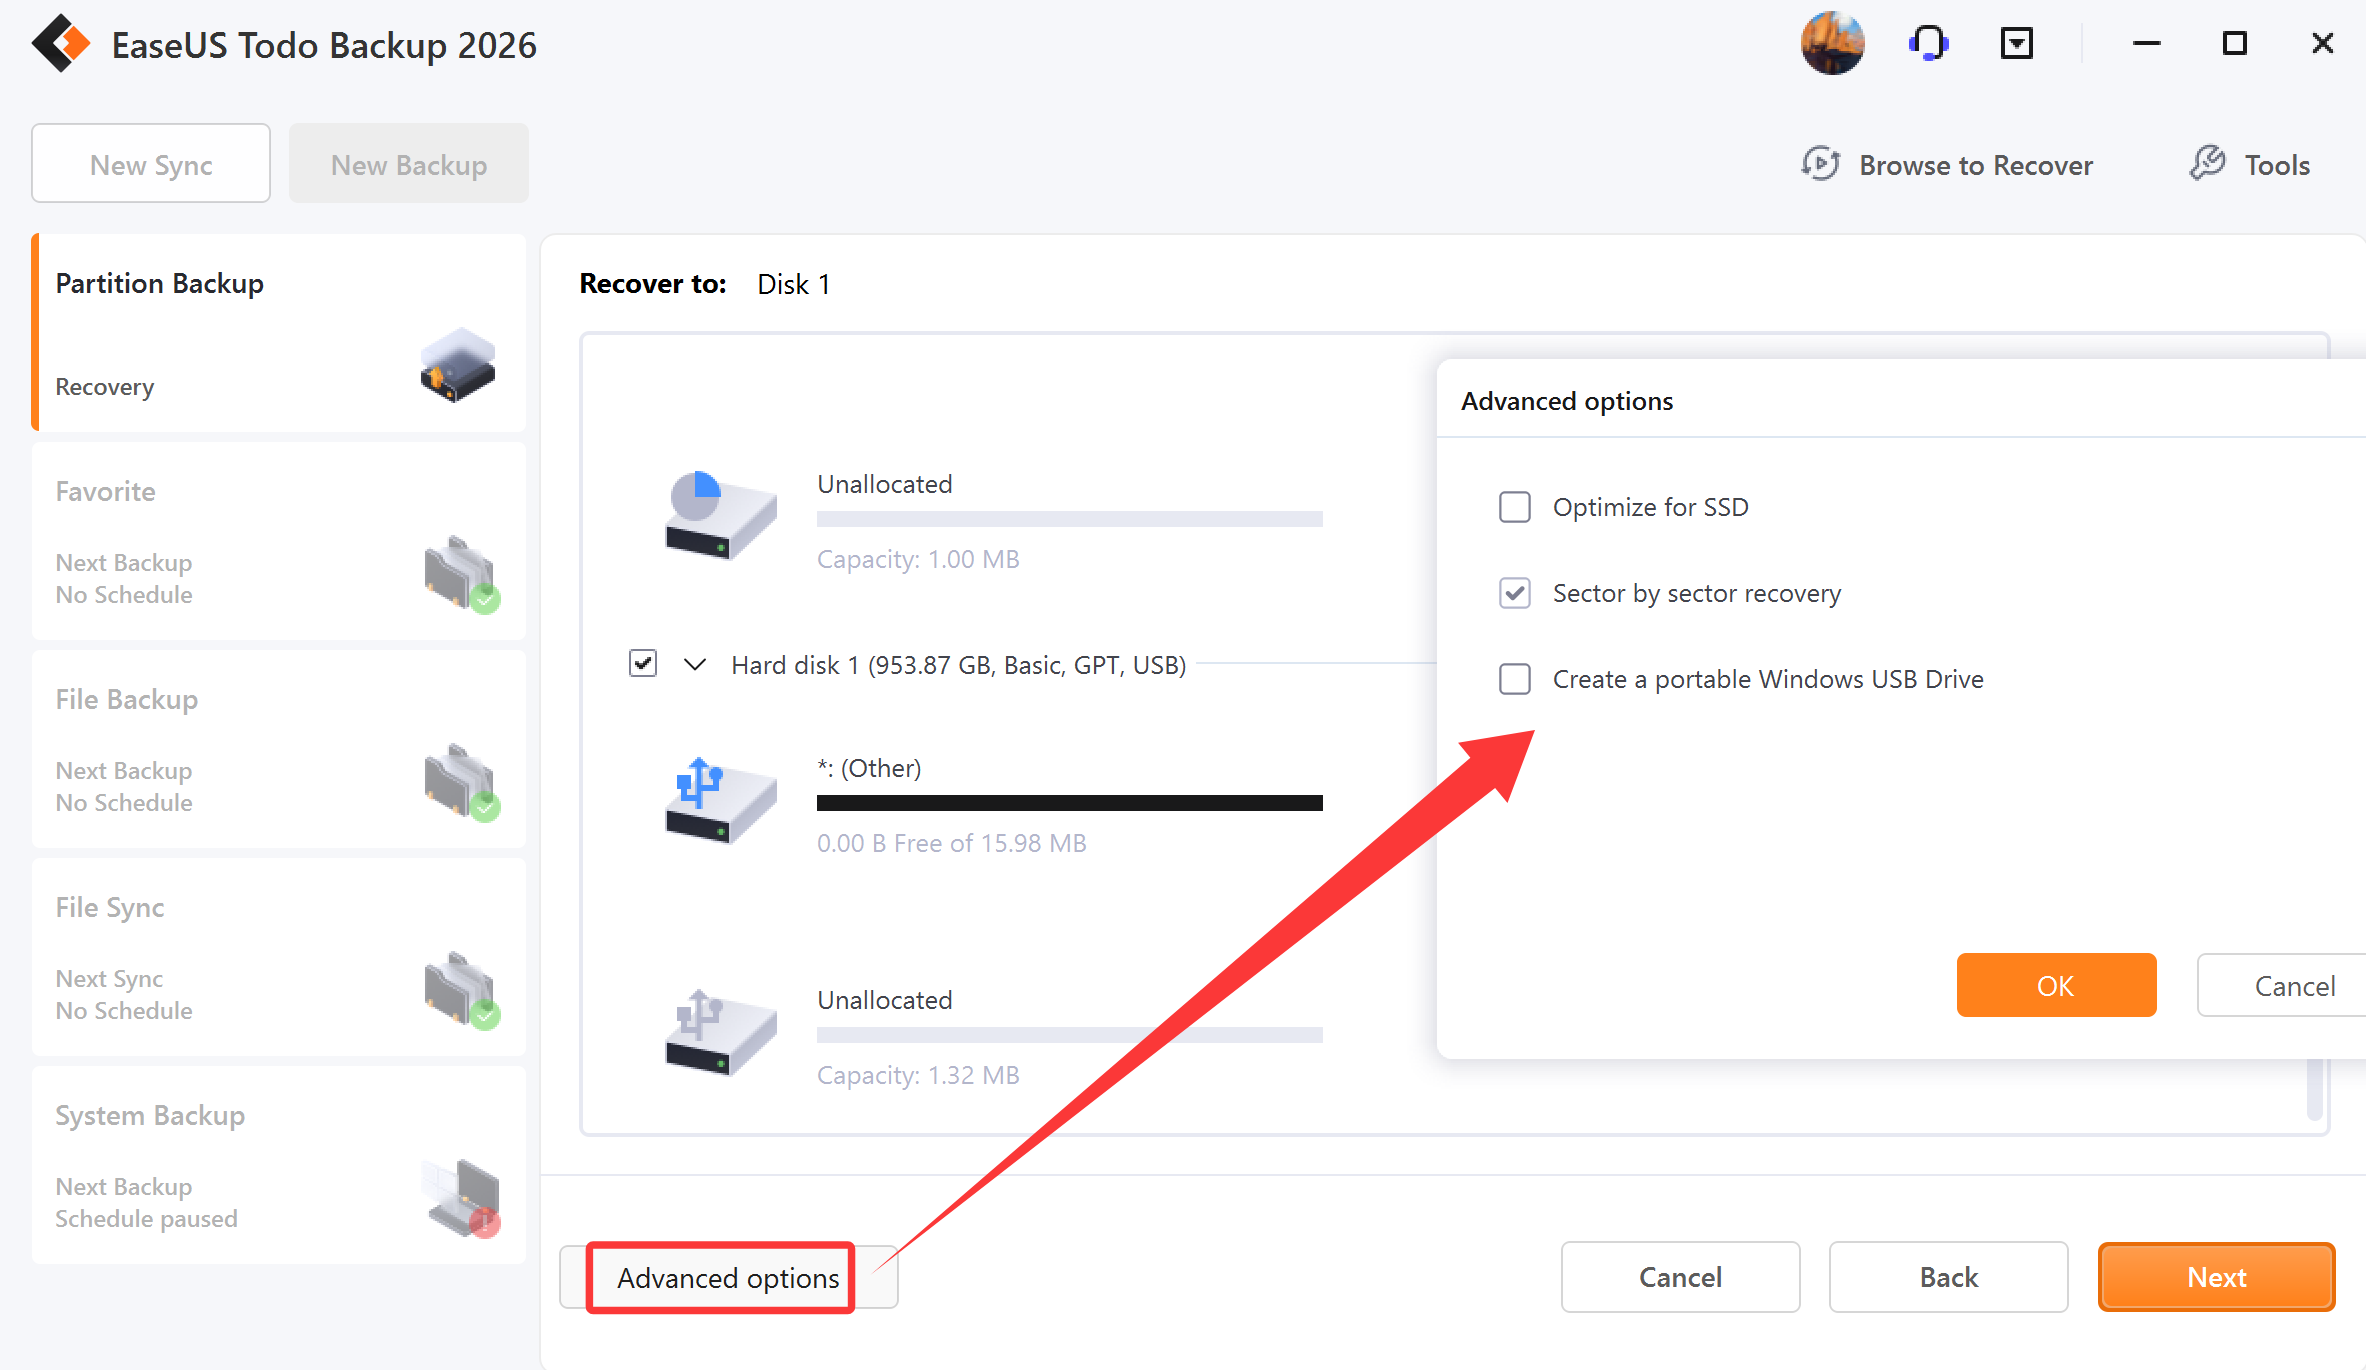
3. Choose the target disk and tick the Advanced Options if needed, then click Next.
Note:
When you proceed with a Disk/Partition recovery, the data on the destination drive will be overwritten, please be careful when selecting the correct drive to restore.
Advanced restoration settings
These advanced settings can help you restore the backups more stably and smoothly in some special cases. However, without these advanced settings, EaseUS Todo backup can still give you a full restoration.
Optimize for SSD - If the destination disk is SSD, check this option will ensure sector alignment in the process.
Sector by Sector recovery - Checking this option will recover the contents from an image file sector by sector. It ensures that the recovery process finishes successfully even if there are some logic errors on the original partition or hard disk. If you want every file distributed to its original sector after recovery, checking this option will meet that goal.
Create a portable Windows USB Drive - Check this option if the target disk is connected via USB.
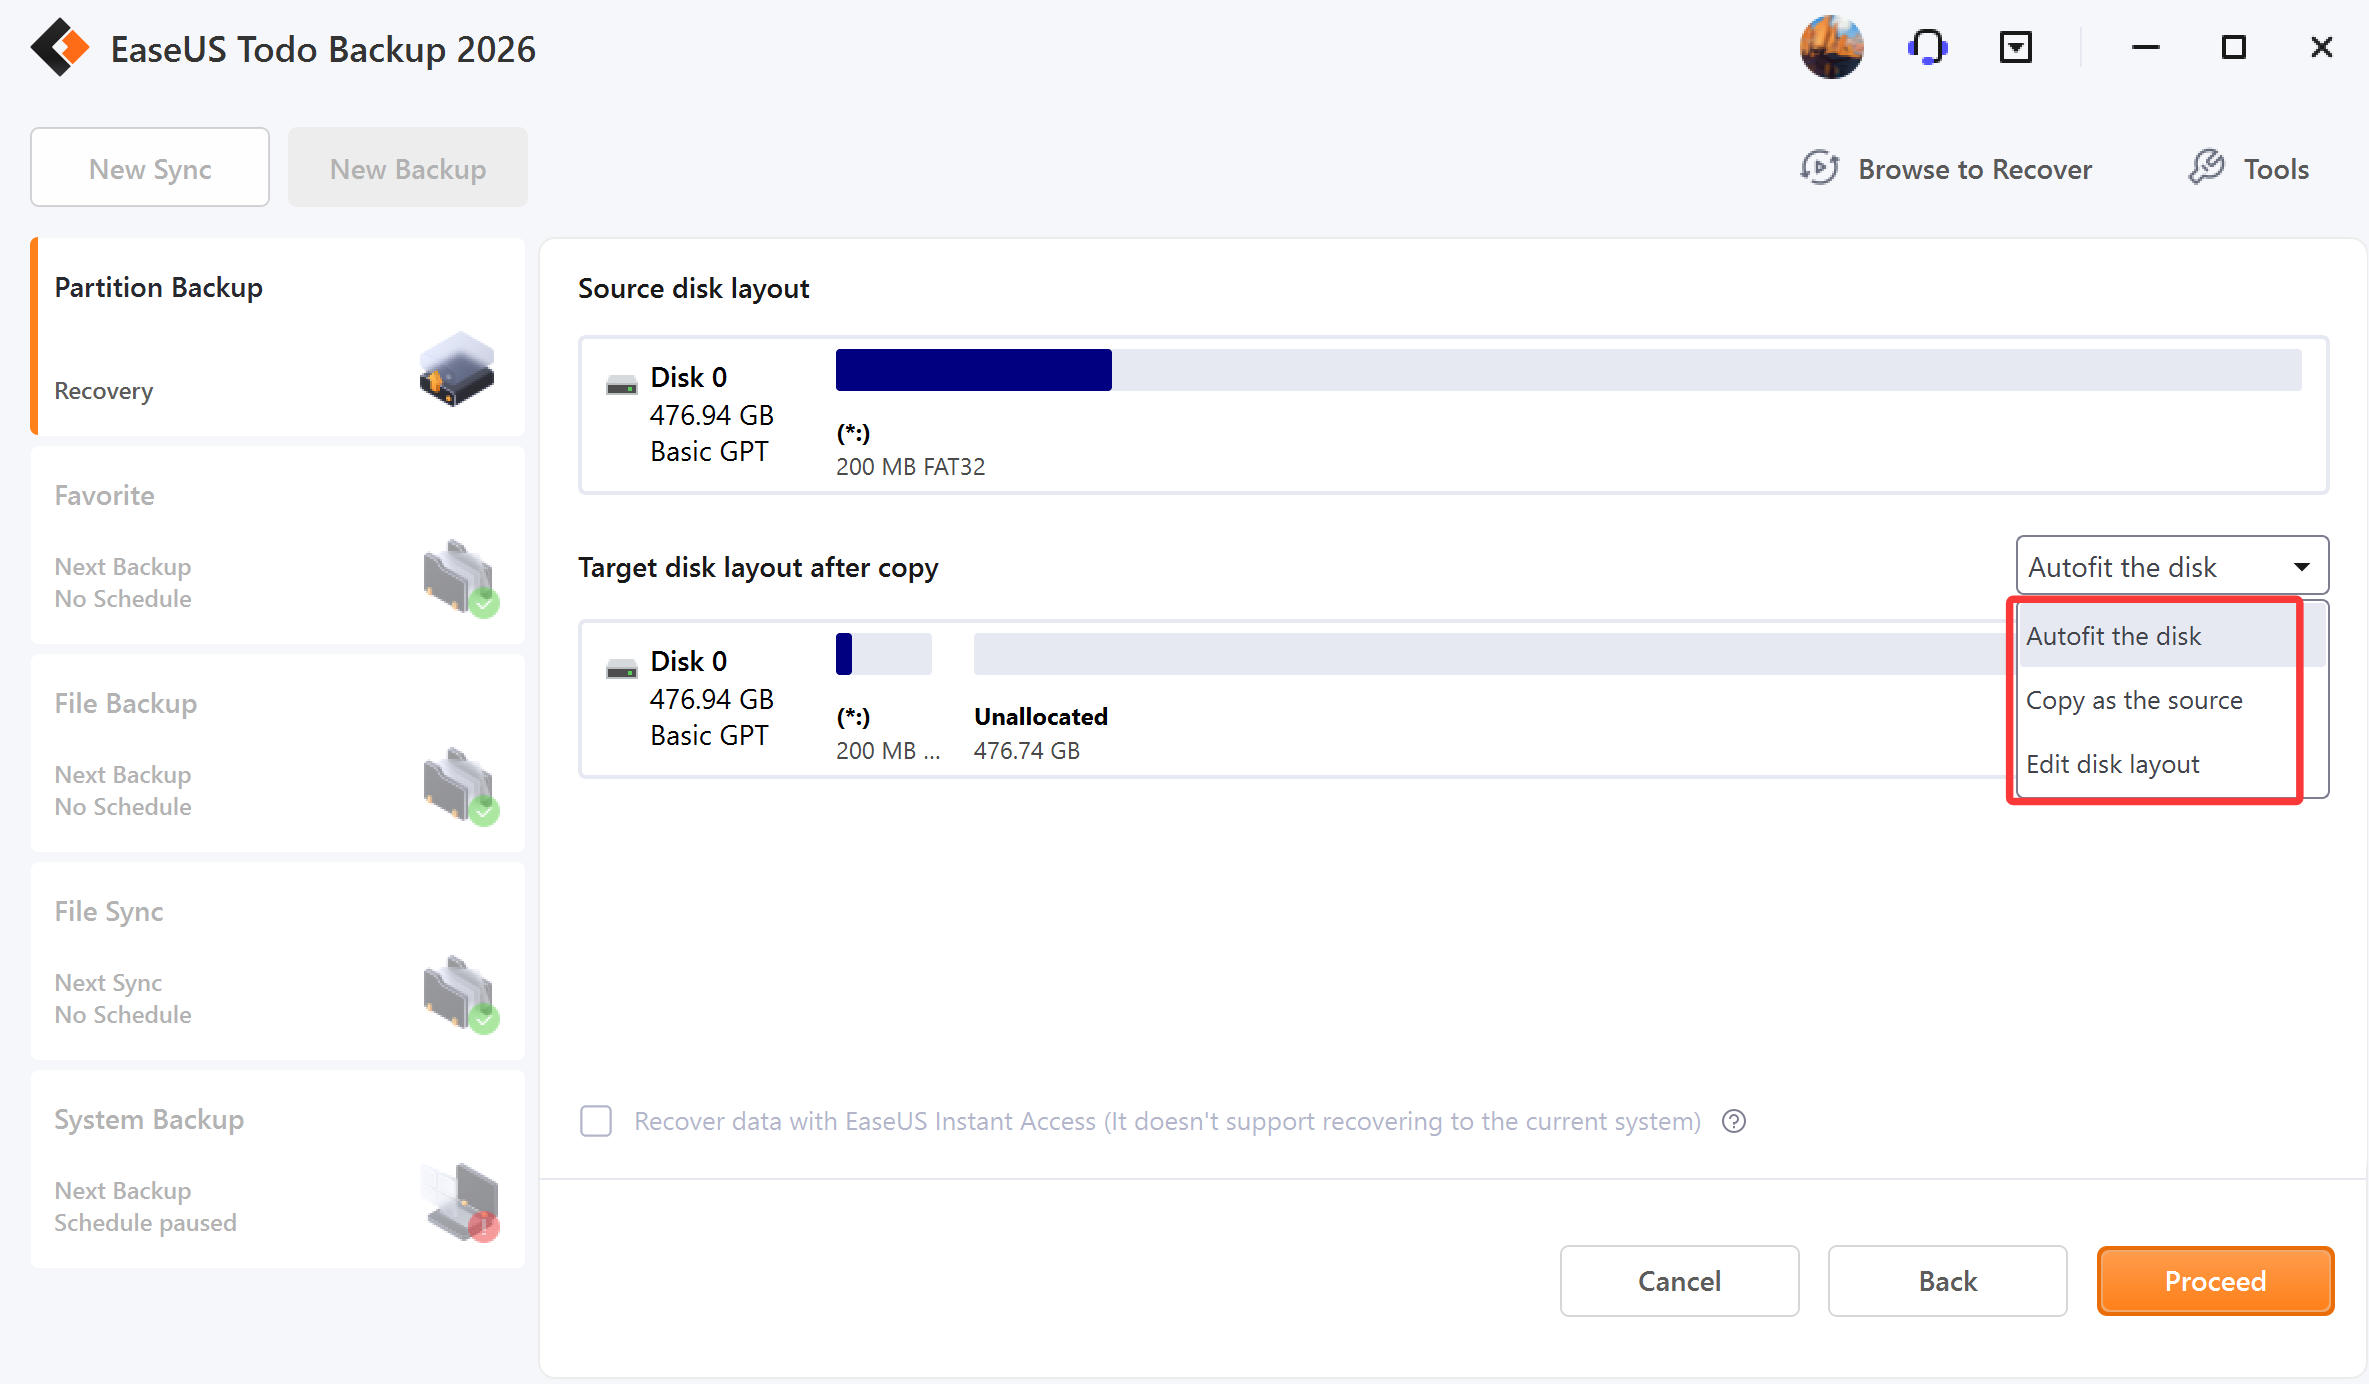
4. Adjust the disk layout of the target disk, then click Proceed.
Disk/Partition mode and File mode
Two options are available for Disk/Partition recovery. Apart from restoring the entire backup as a disk/partition, you can restore individual files from the disk/partition image flexibly.
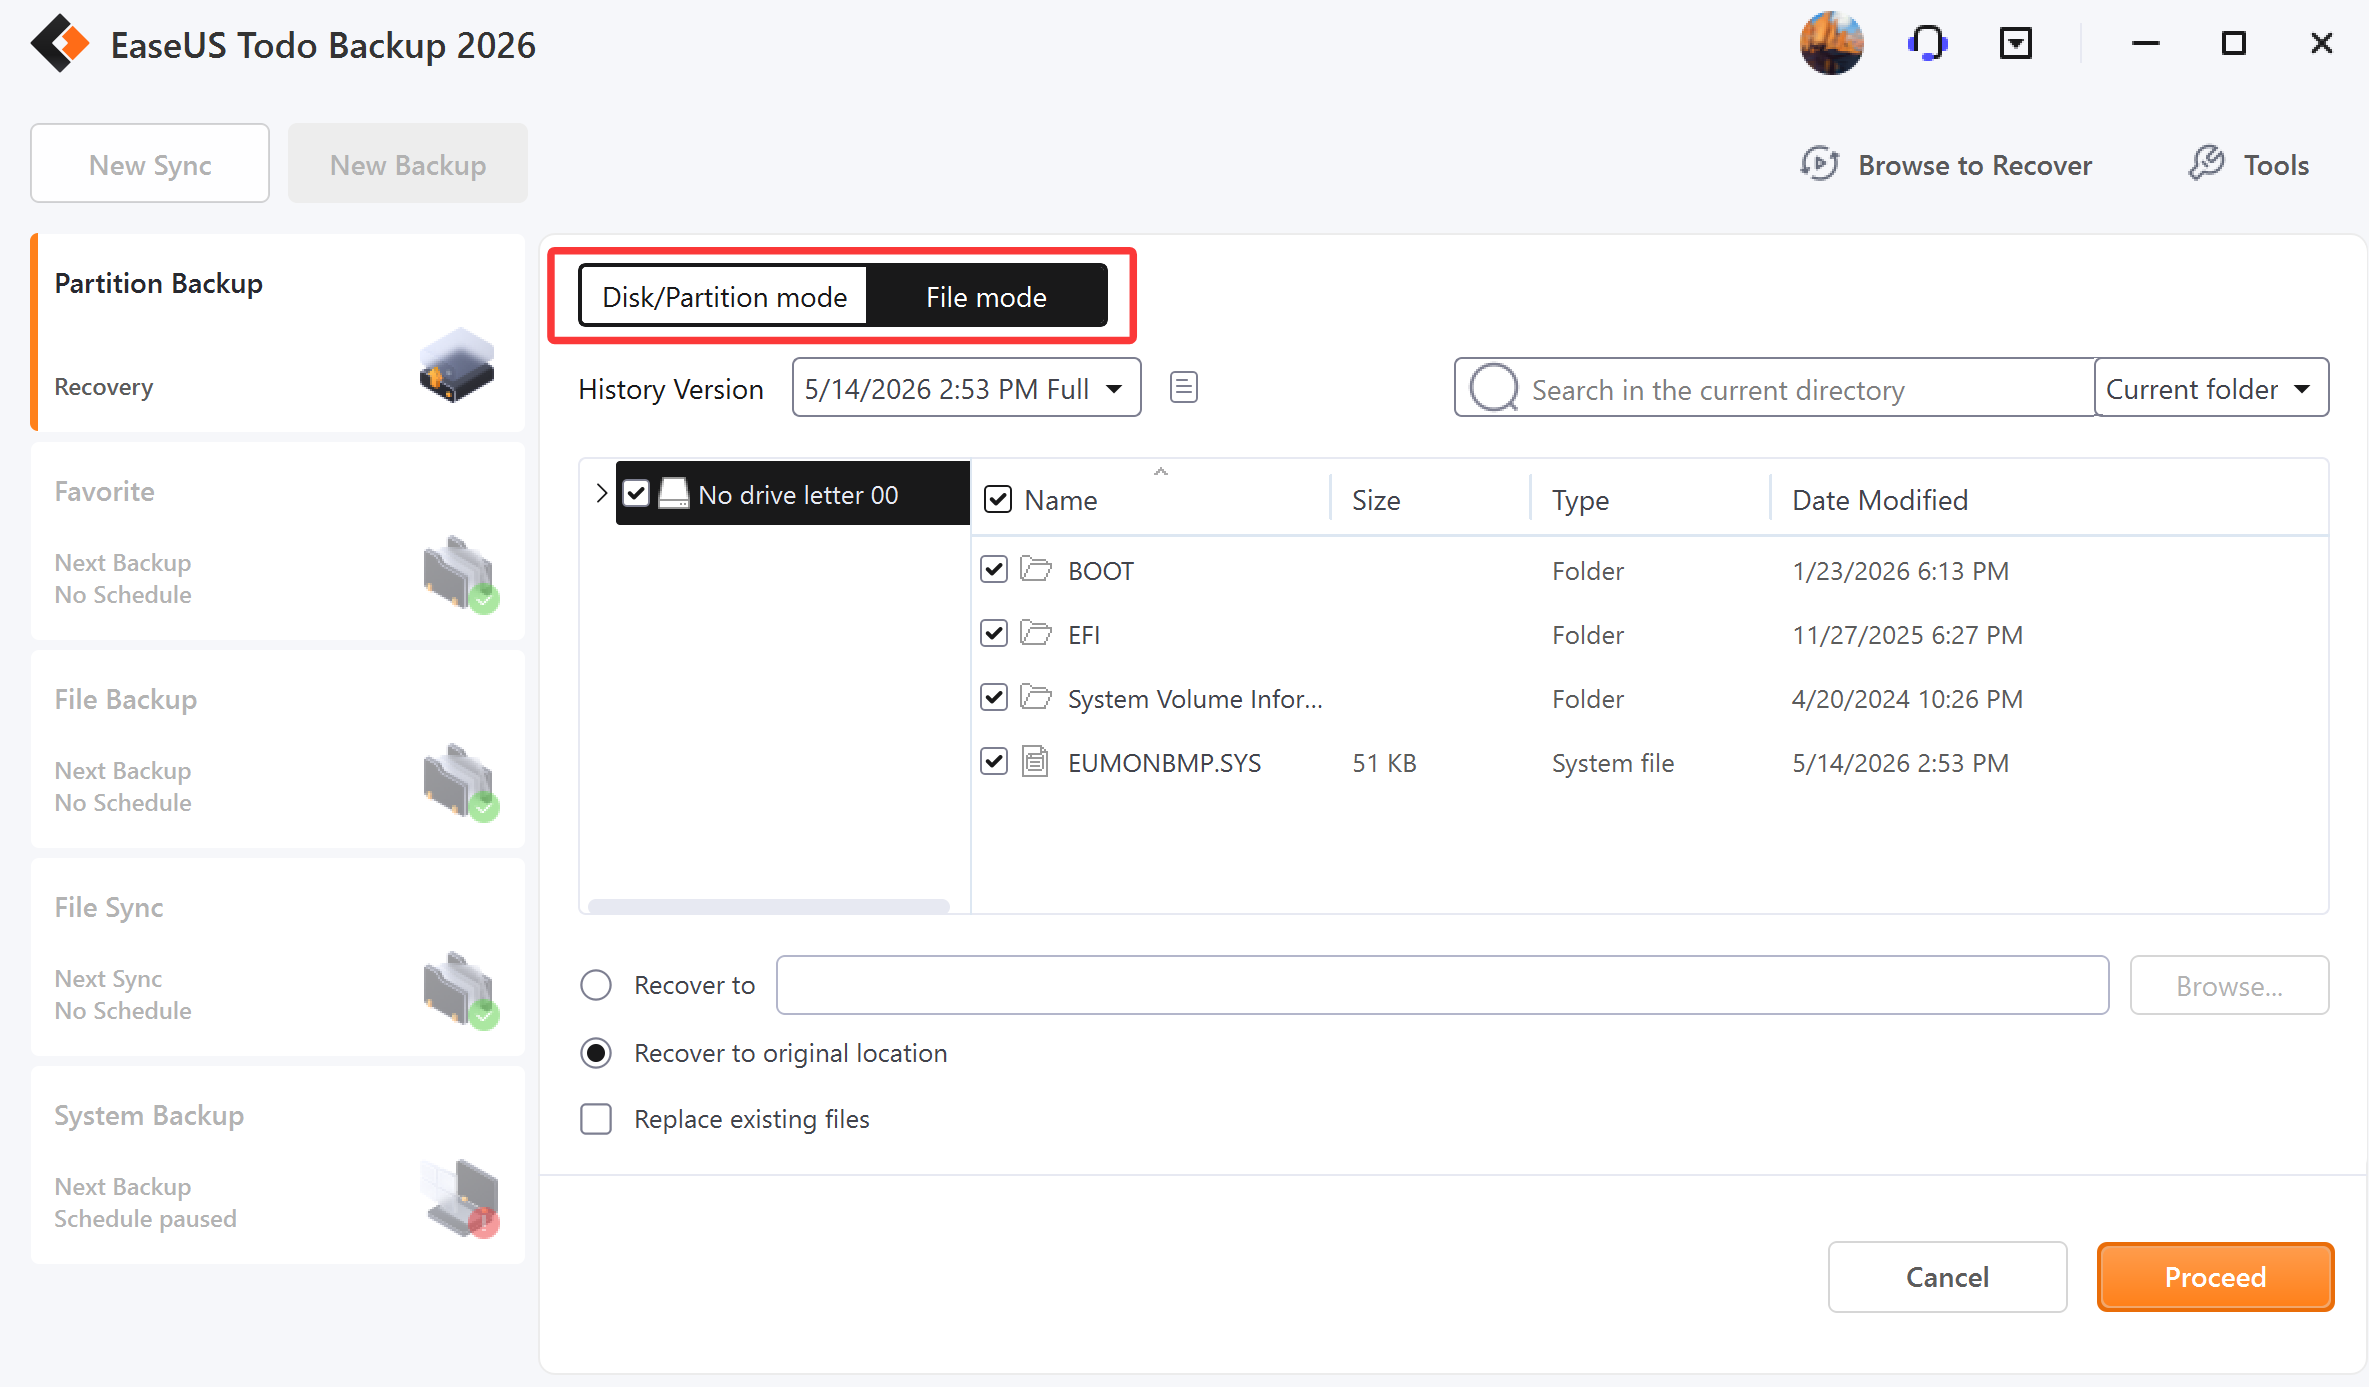
Disk/Partition mode
Restore the entire disk/partition image.
File mode
Recover individual file/folder(s) from the Disk/Partition backup image.
Specify a recovery location - The selected files or folders will be recovered to a specified location.
Recover to the original location - The files or folders will be recovered to their original location.
Dynamic volume recovery
Dynamic volume recovery is similar to partition recovery on a basic disk.
Note:
The Dynamic volume with an operating system will be a primary partition after being recovered to a basic disk.
File Recovery
1. Highlight the backup task, right-click and select Recover, or click Recover in the right corner.
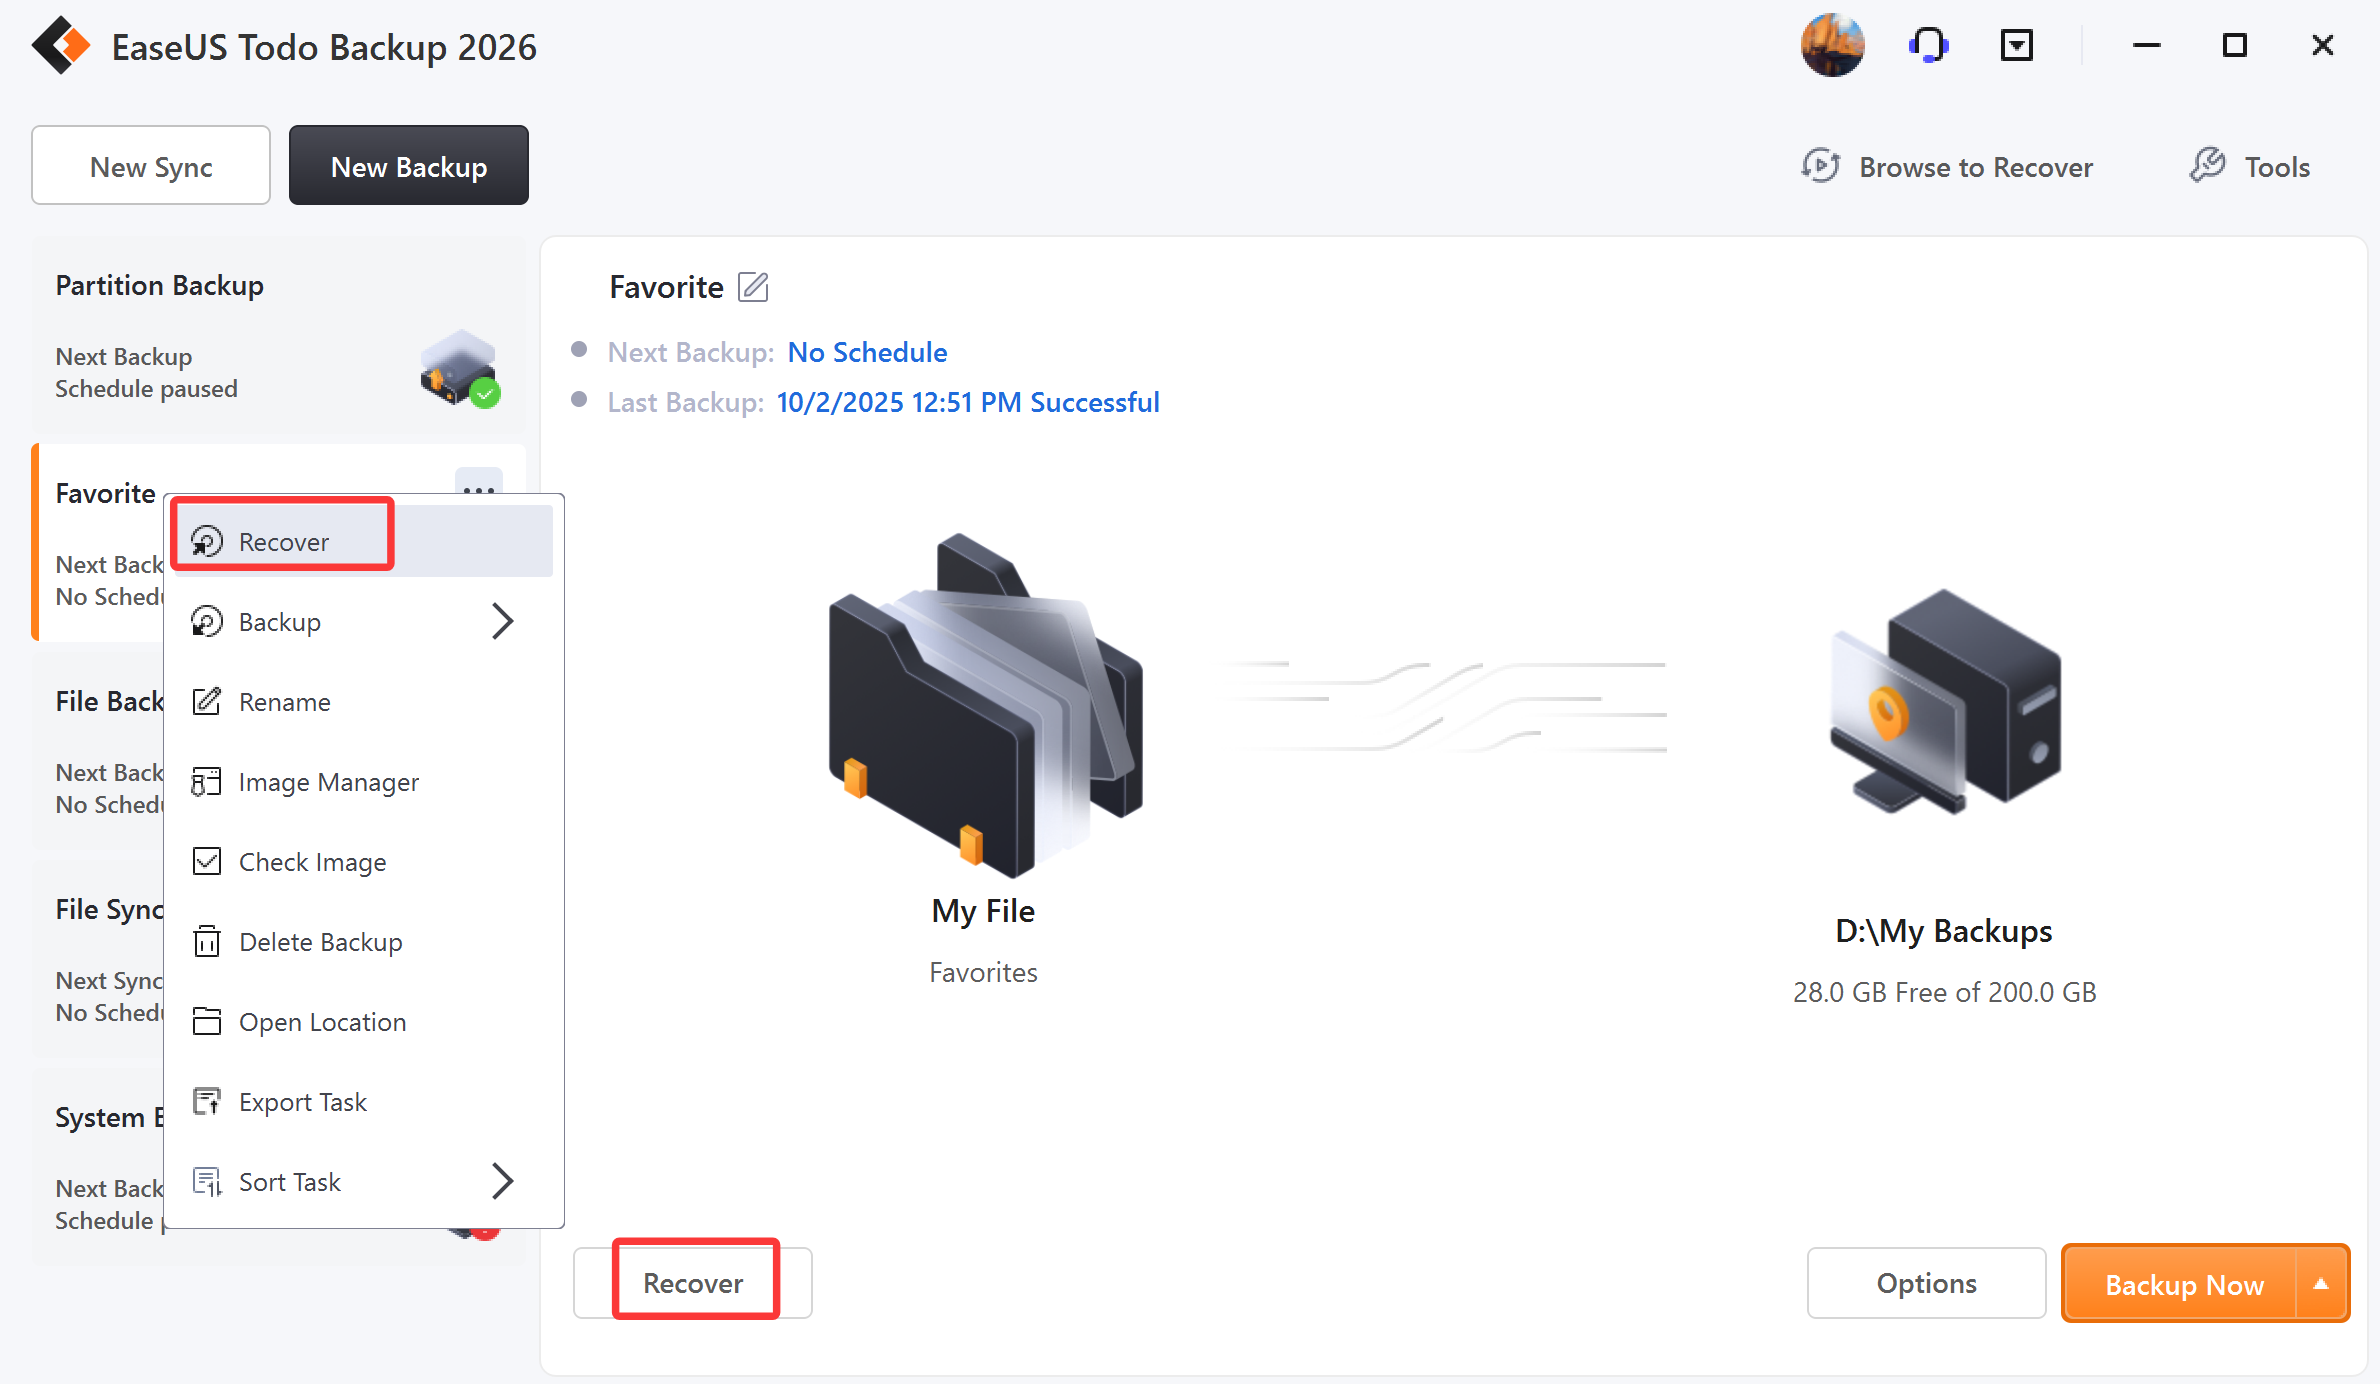
2. Choose a History version of the backup image, confirm the contents, and select a target location for recovery.
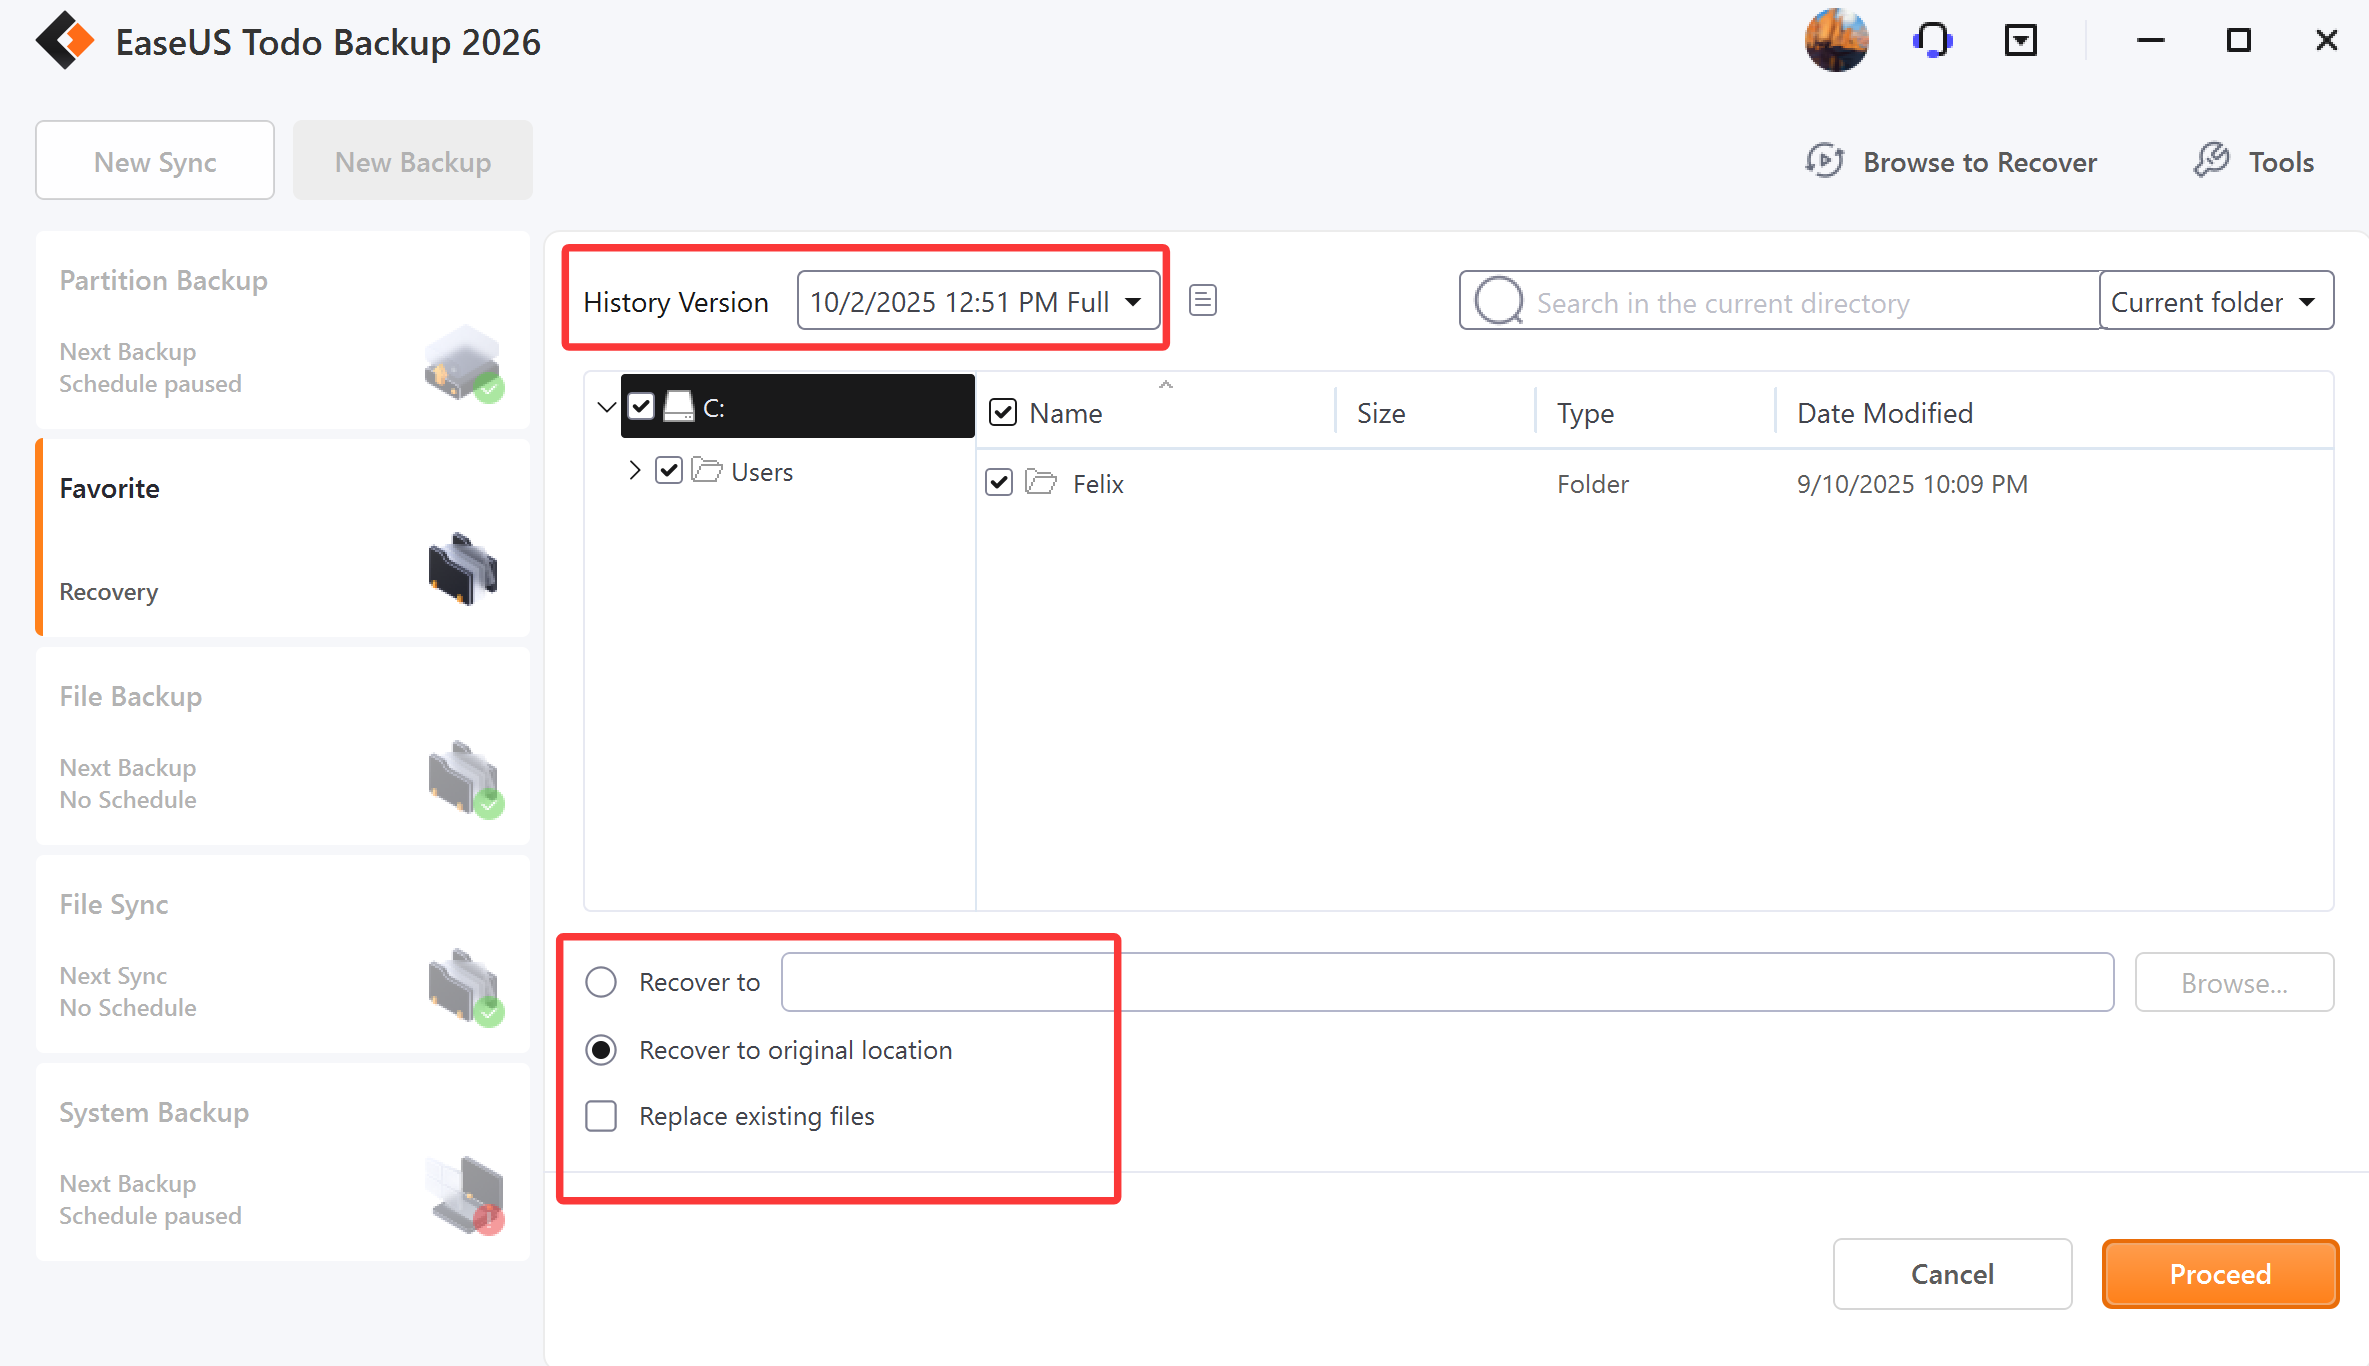
You can recover the files and folders to the original or a different location.
Replace existing files - After checking this option, the original files and folders will be overwritten after recovery.
Email Recovery
1. Highlight the backup task, right-click and select Recover, or click Recover in the right corner.
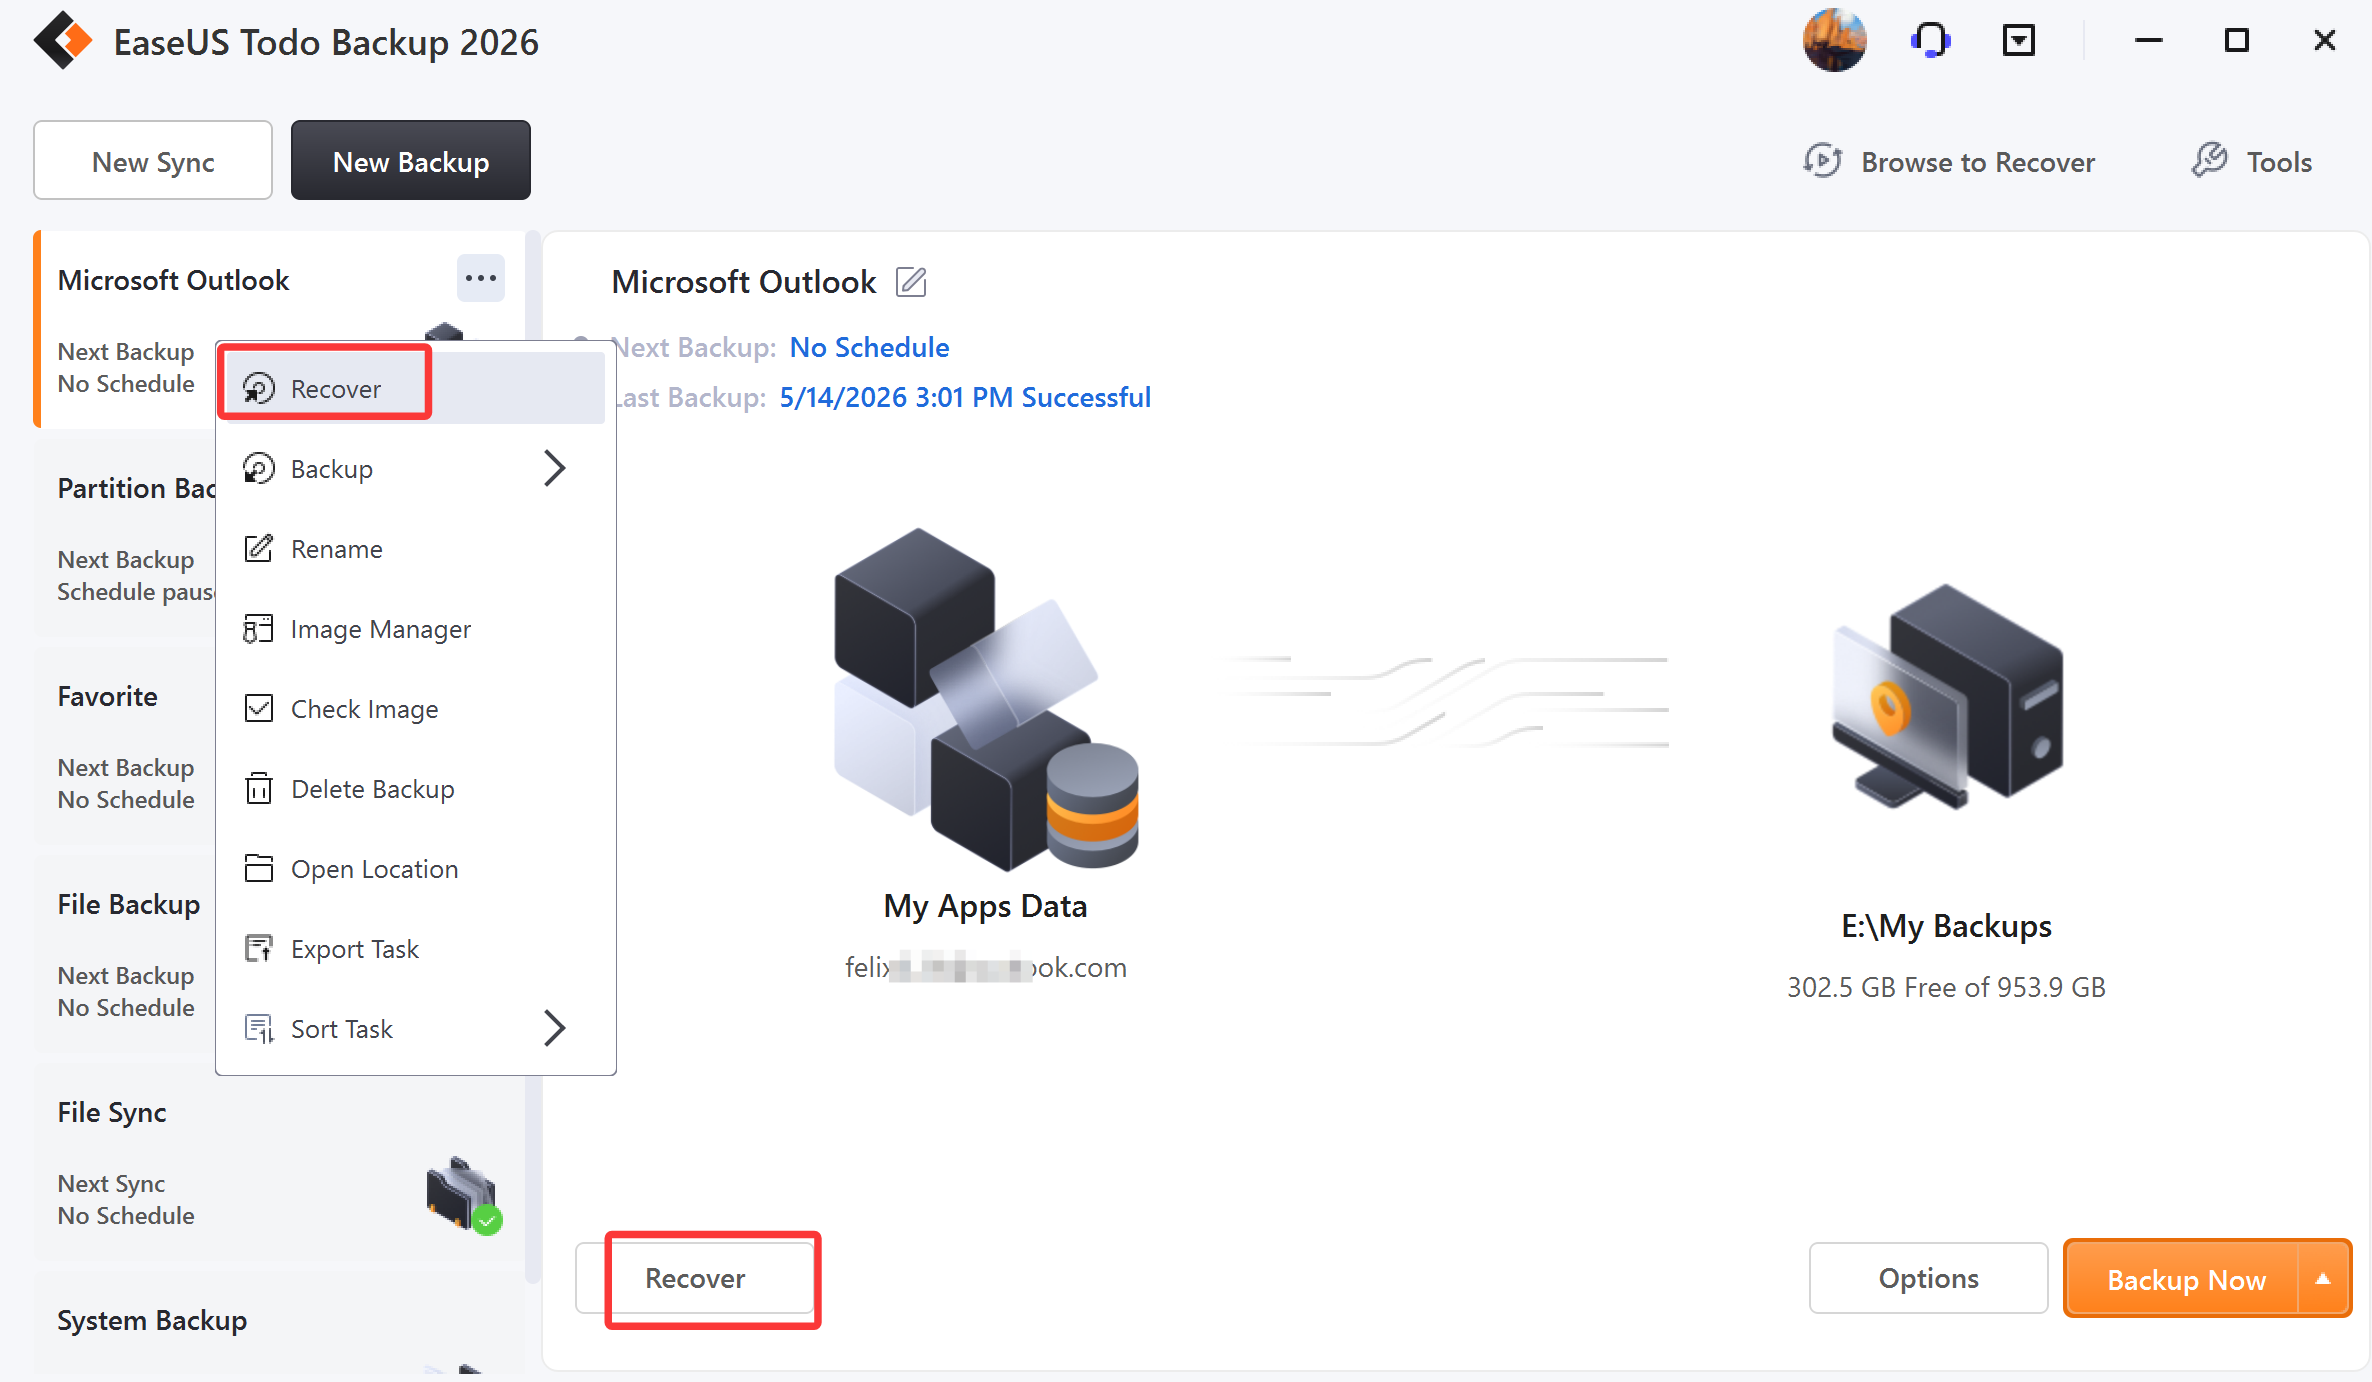
2. Choose one History version of the backup image. Indicate the mailbox/folder/file(s) you want to recover to.
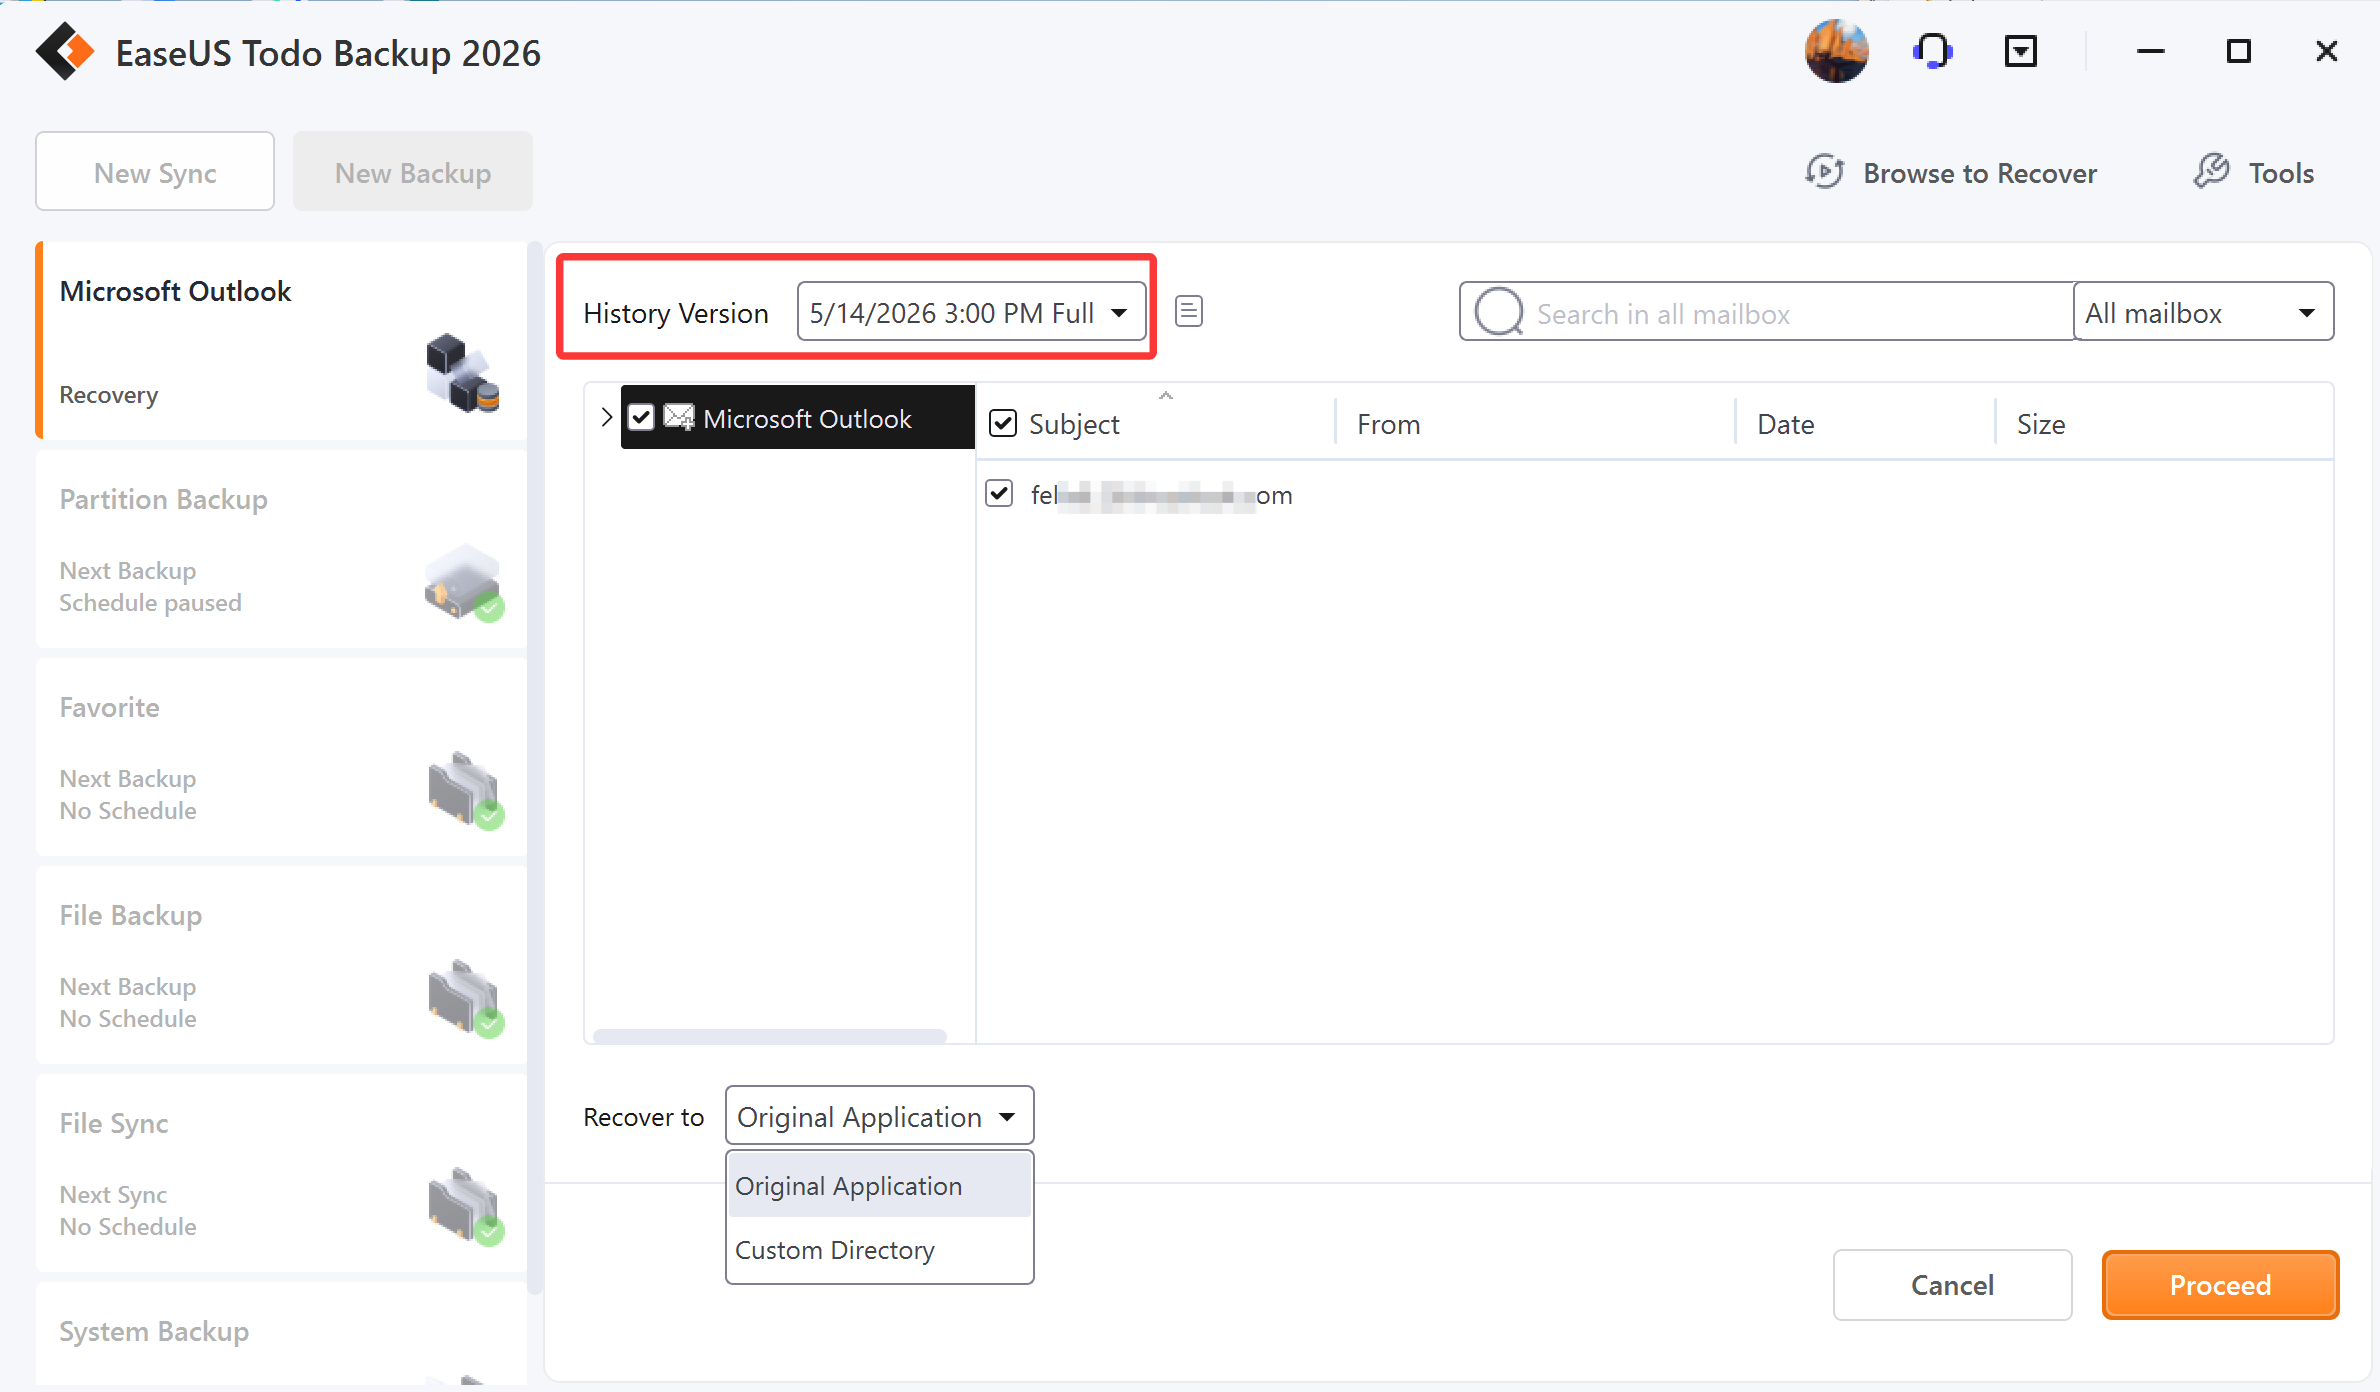
3. After confirming the contents, please select a target place and click Proceed to restore.
The email backup image can also be restored to another computer, provided that the version of Outlook on the target computer is equal to or higher than the one which you took the backup from.
Note:
The existing emails/contacts will not be overwritten. In other words, it is a filling-up restore in the process of mail recovery.
Browse to Recover
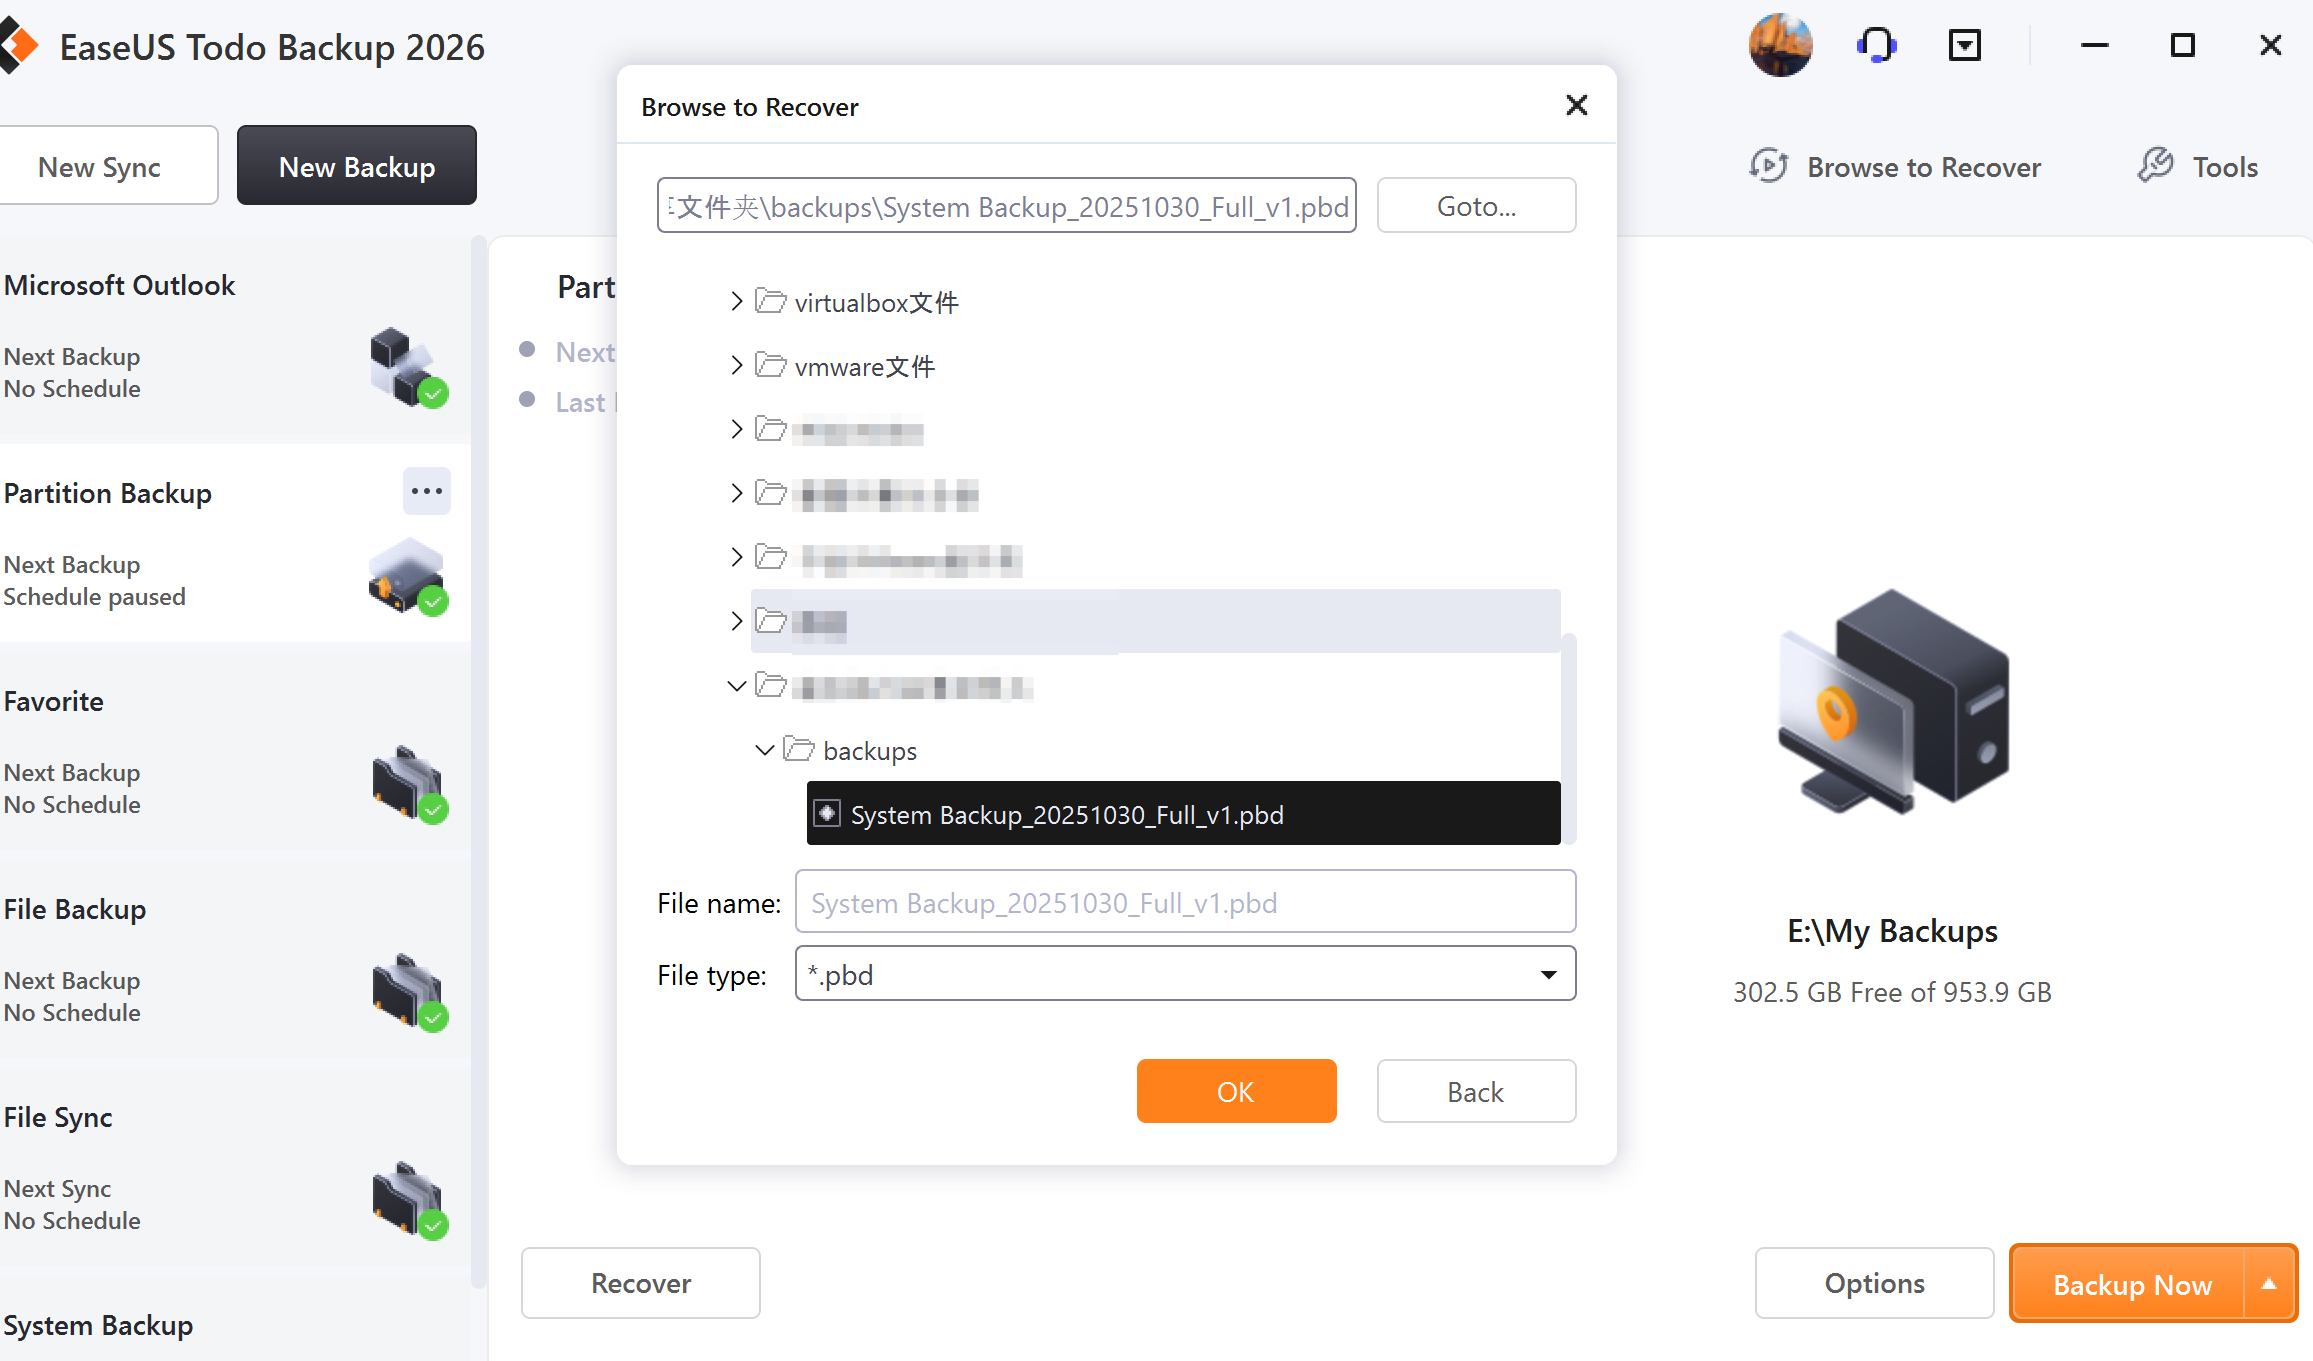
Sometimes, If the backup plans are lost due to the reinstallation of EaseUS Todo Backup, and you cannot find the plan record on the Home page. Or you try to restore under WinPE emergency disk. Then the Browse to Recover option is necessary.
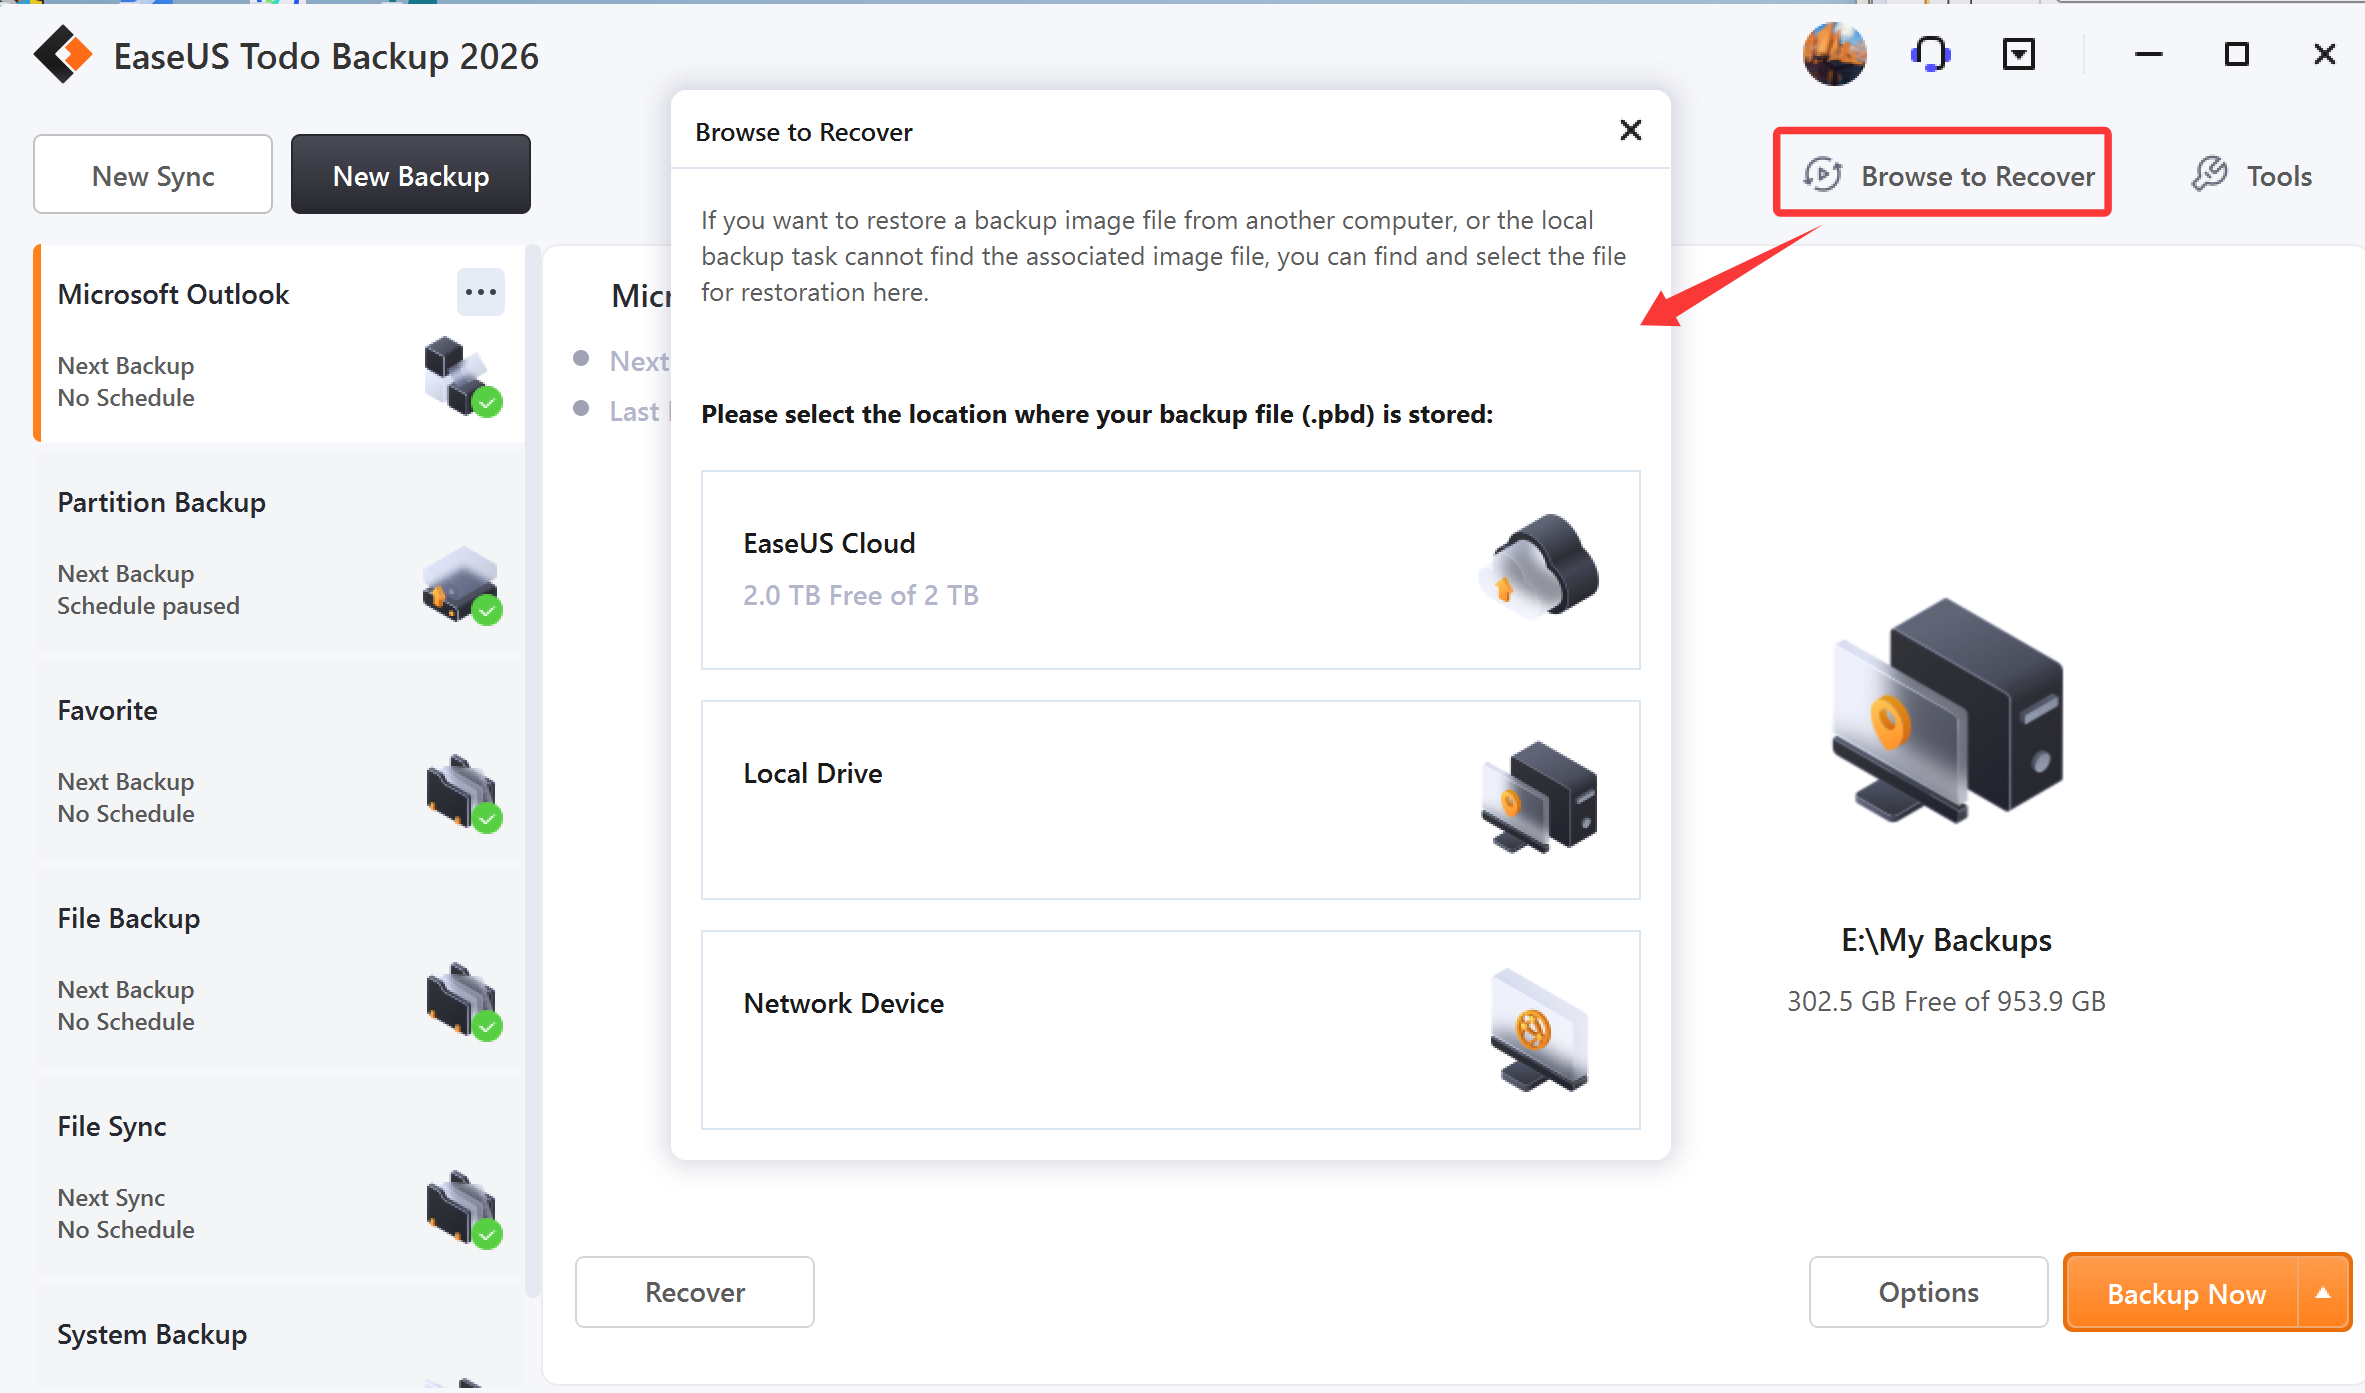
Click Browse to Recover in the right corner, then locate your image file manually from the Local disk, LAN, or EaseUS Cloud to do the restoration.
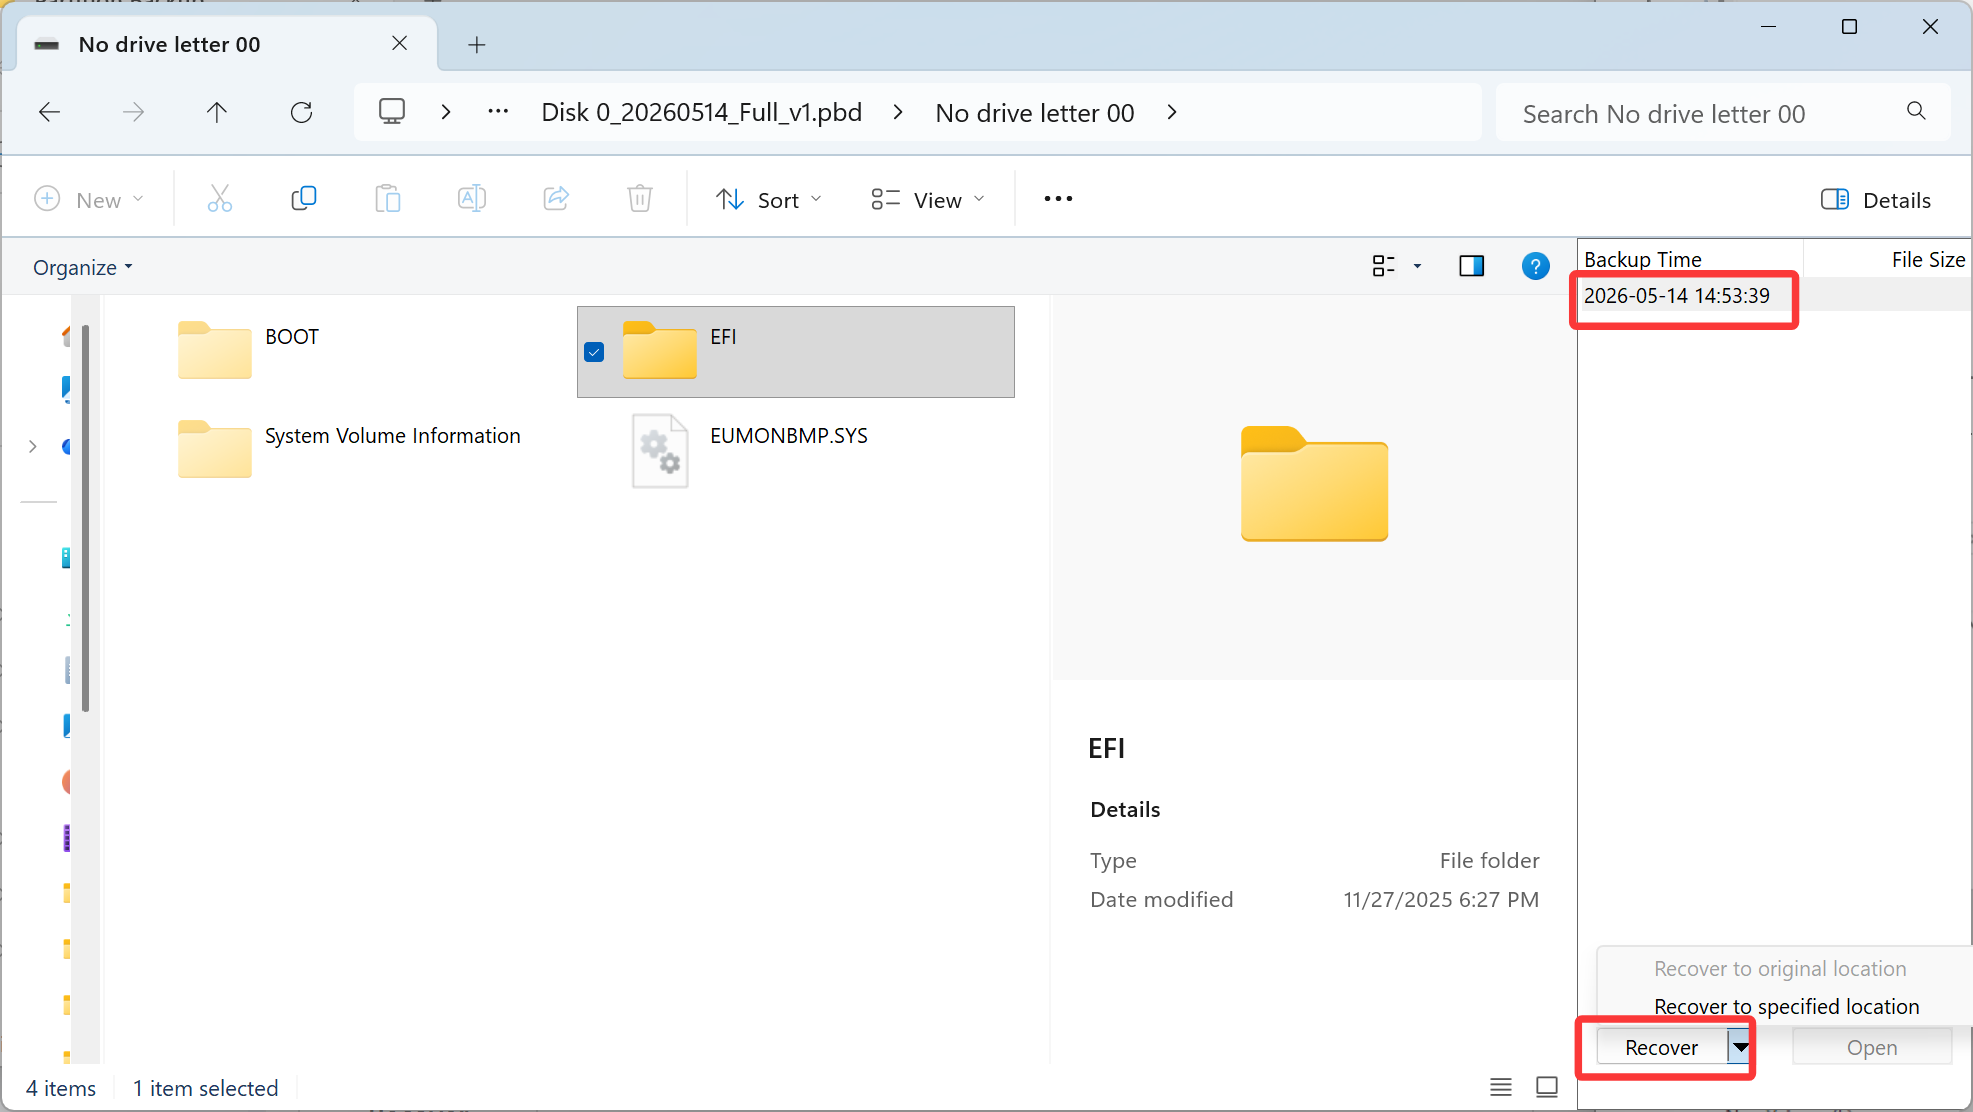
Individual File Recover
EaseUS image files can be easily accessed by double-clicking on the *.PBD image or right-clicking and choosing Open to browse it. Once you locate the target file, you can right-click to display the menu and then open, copy, and recover specified files within the image.
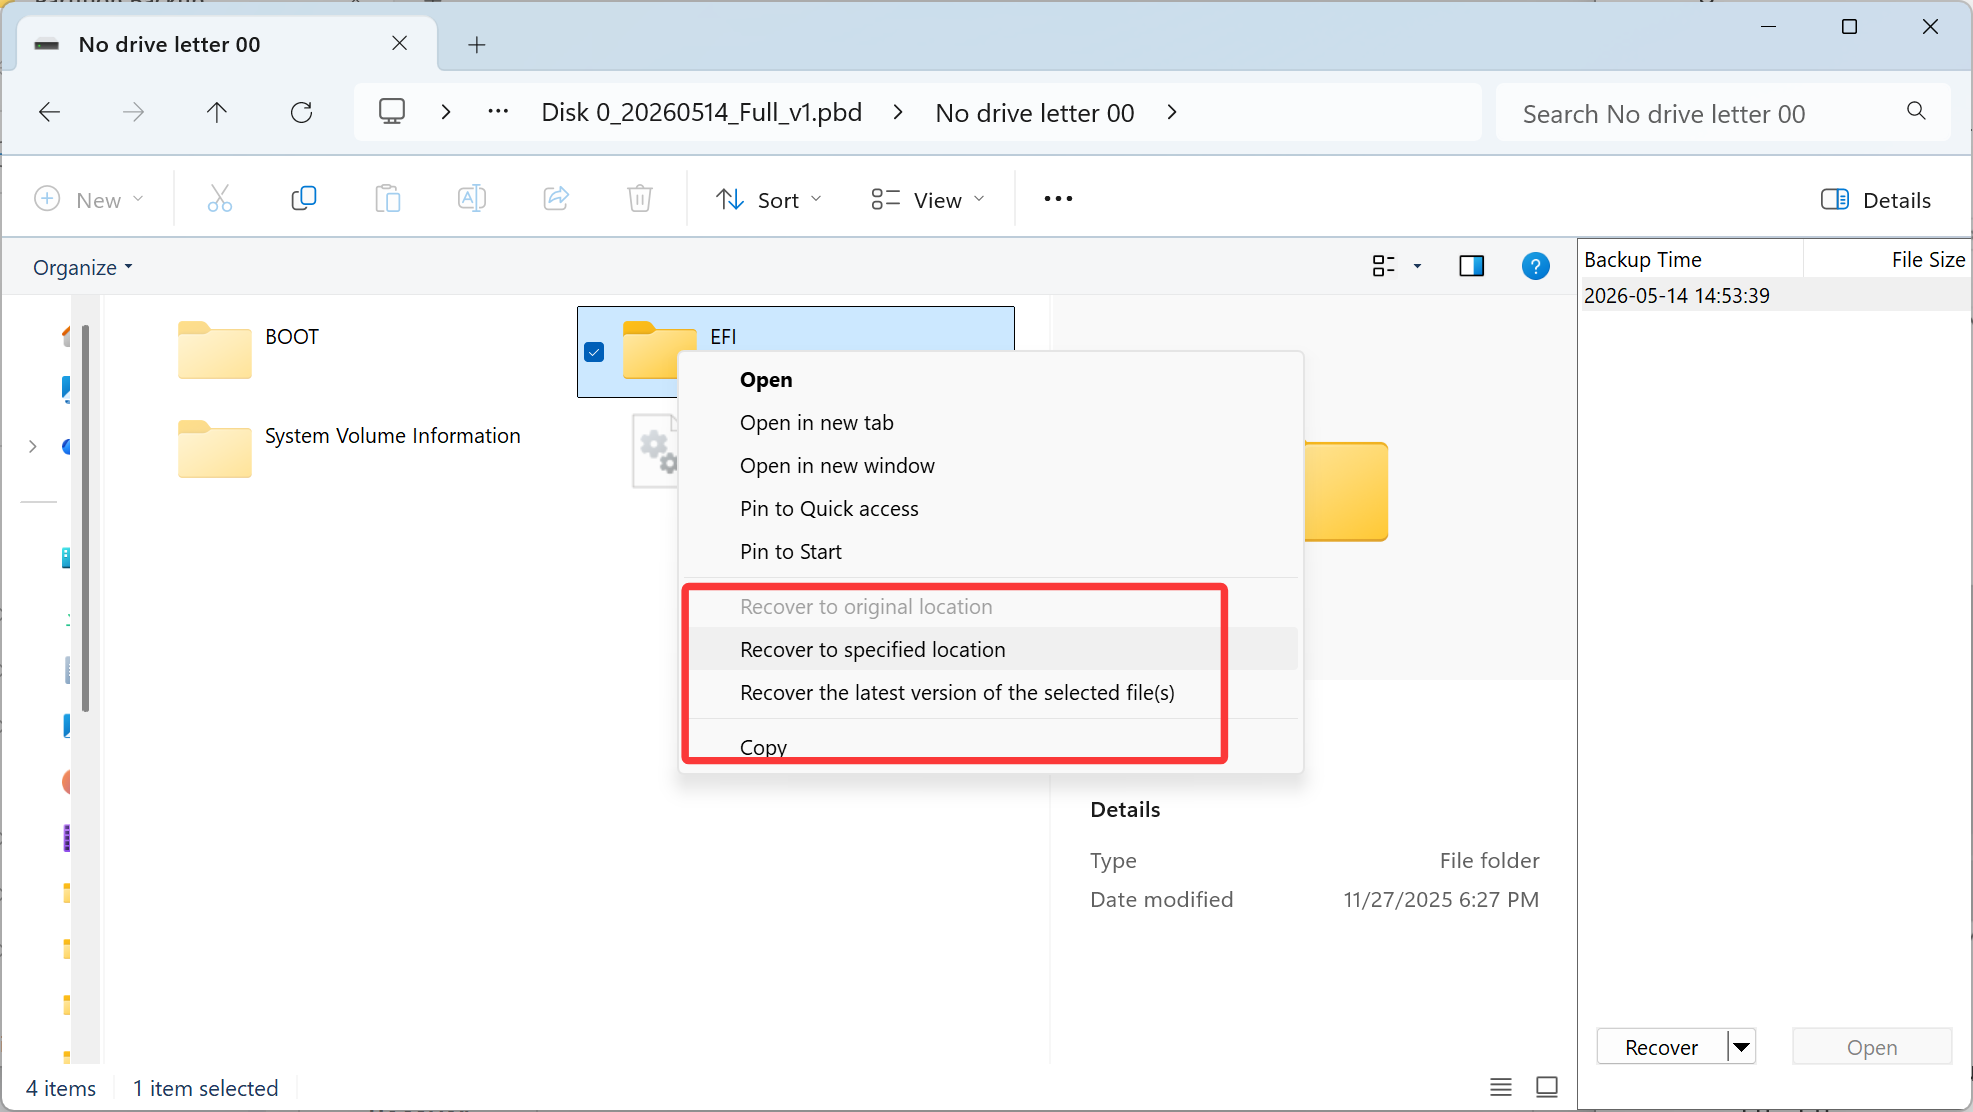
Another method is to select a version to recover according to the backup time.
Instant Access
By clicking on Open volume, you can select the volume that you desire to access during the restoration process. However, please bear in mind that the access speed to these files may be slower than usual, as the restoration process is still in progress.
Instant Access is a uniquely providing option that ensures uninterrupted access to your files, even during the disk/partition image restoration process. This means you can read, write, and work with your files without waiting for the entire restoration to complete.
Tick the option labeled Recover data with EaseUS Instant Access before initiating the restore process.
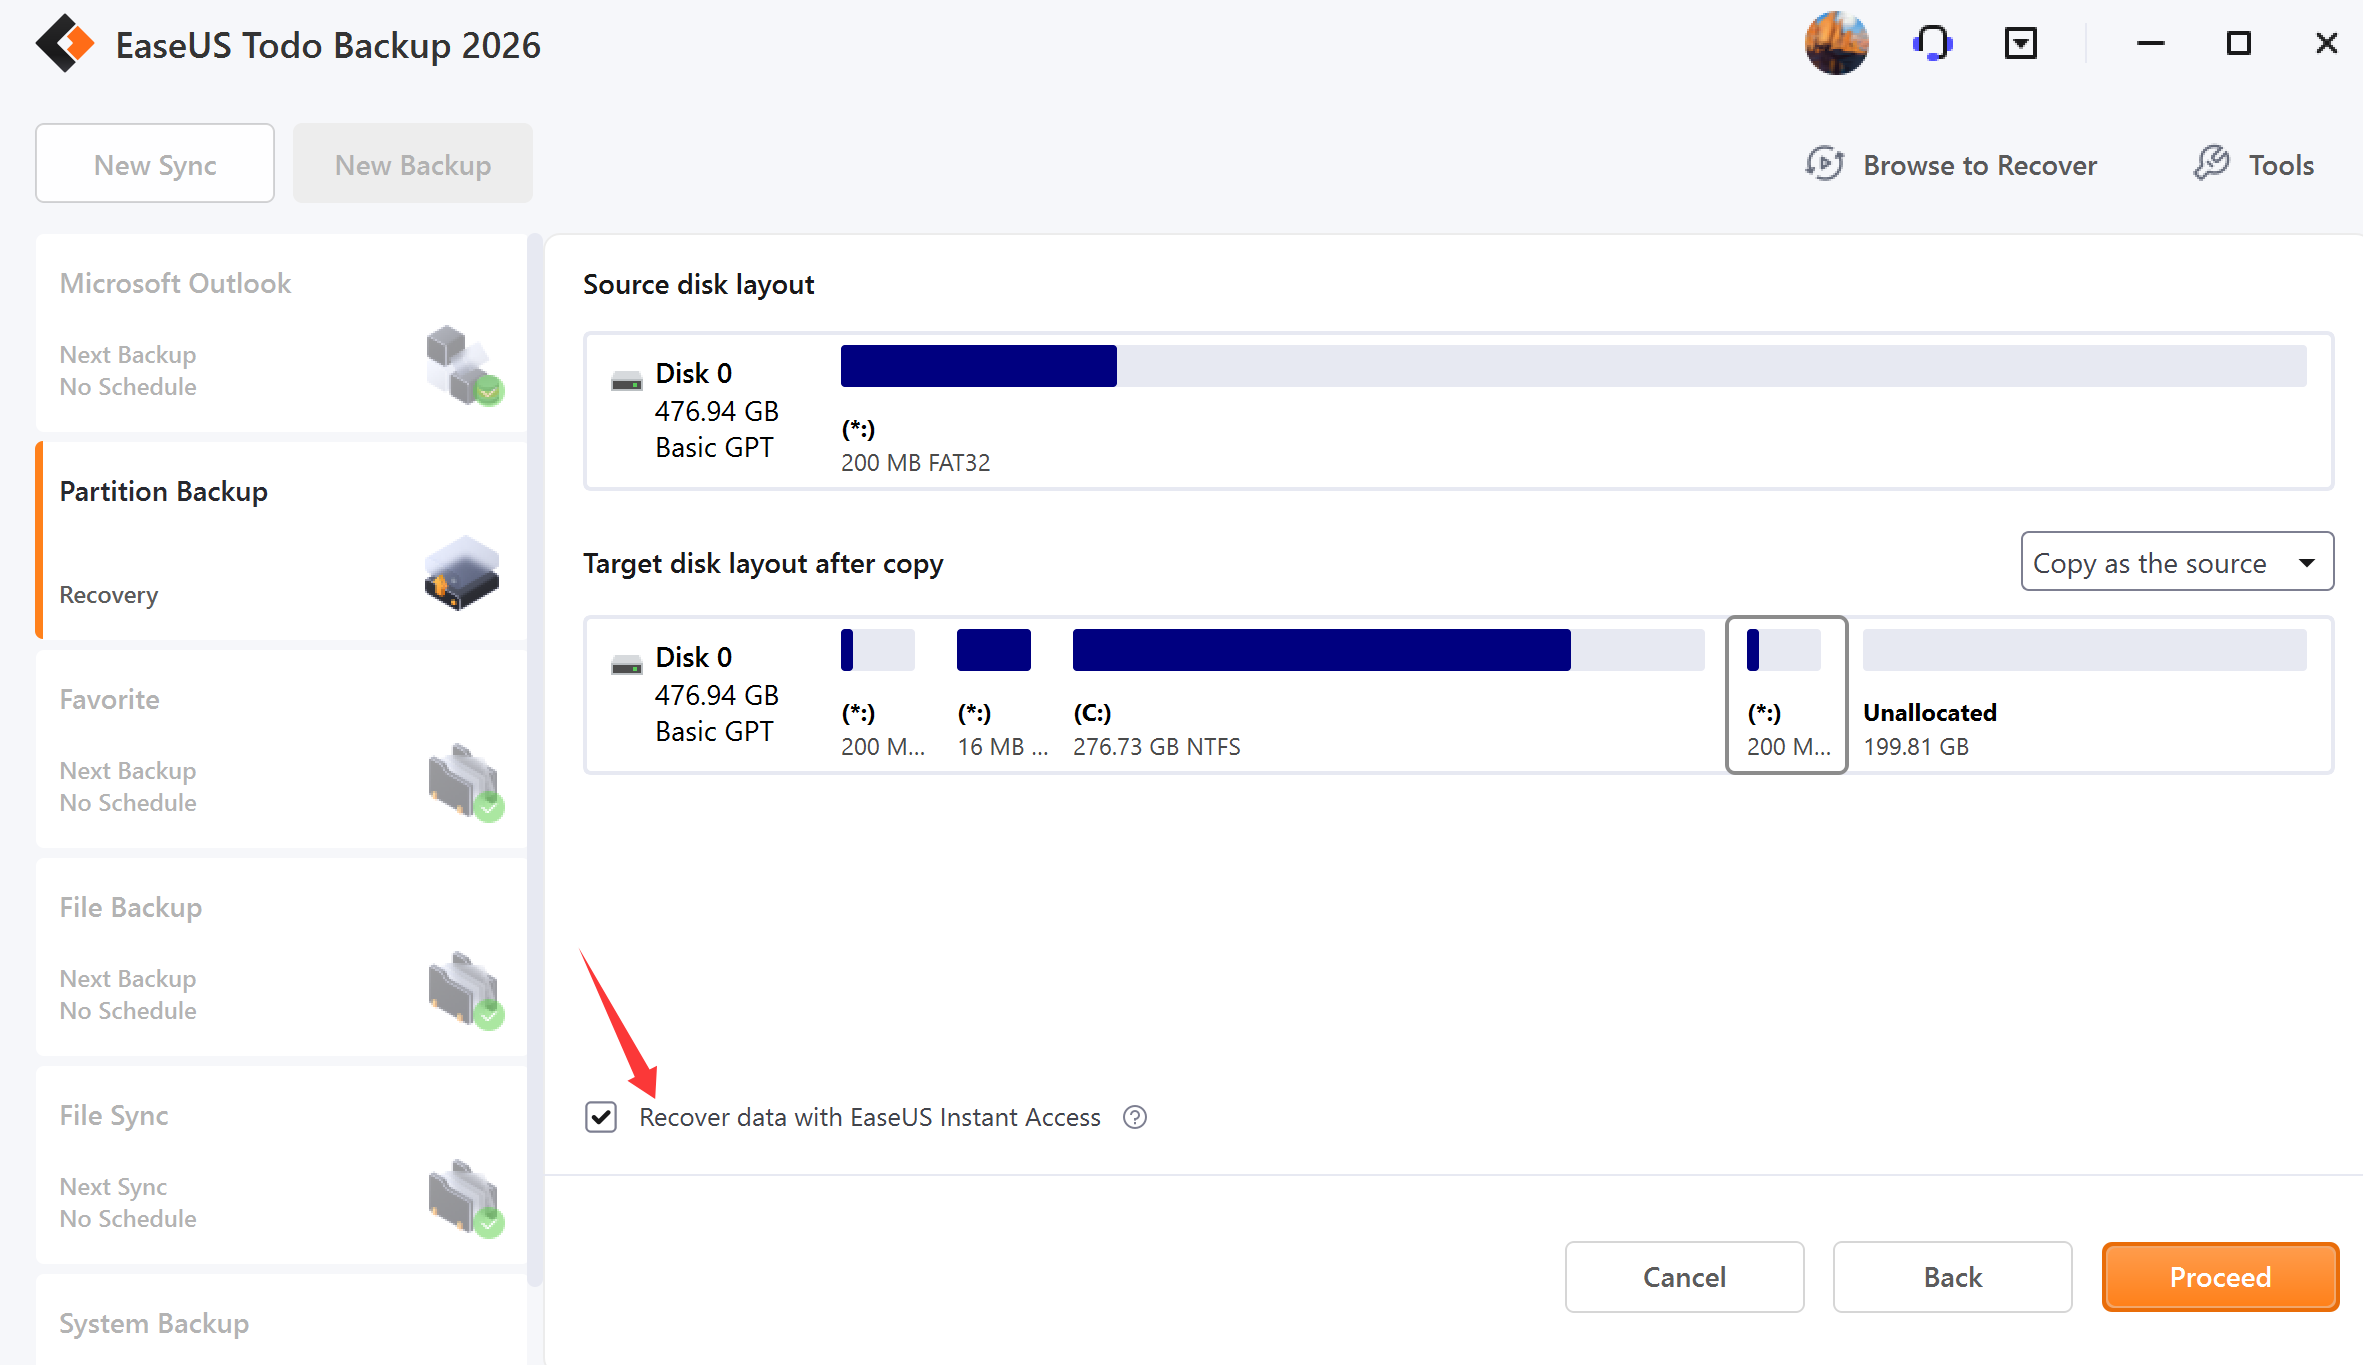
Once the restoration of partition and file directories is completed, a prompt box will be displayed on your screen:
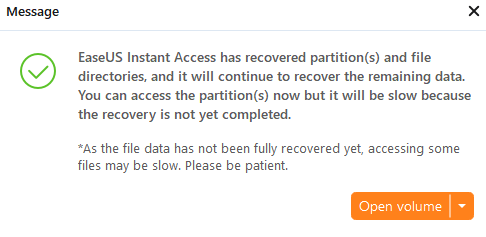
By clicking on Open volume, you can select the volume that you desire to access during the restoration process. However, please bear in mind that the access speed to these files may be slower than usual, as the restoration process is still in progress.
Note:
System Recovery does not currently support this feature.
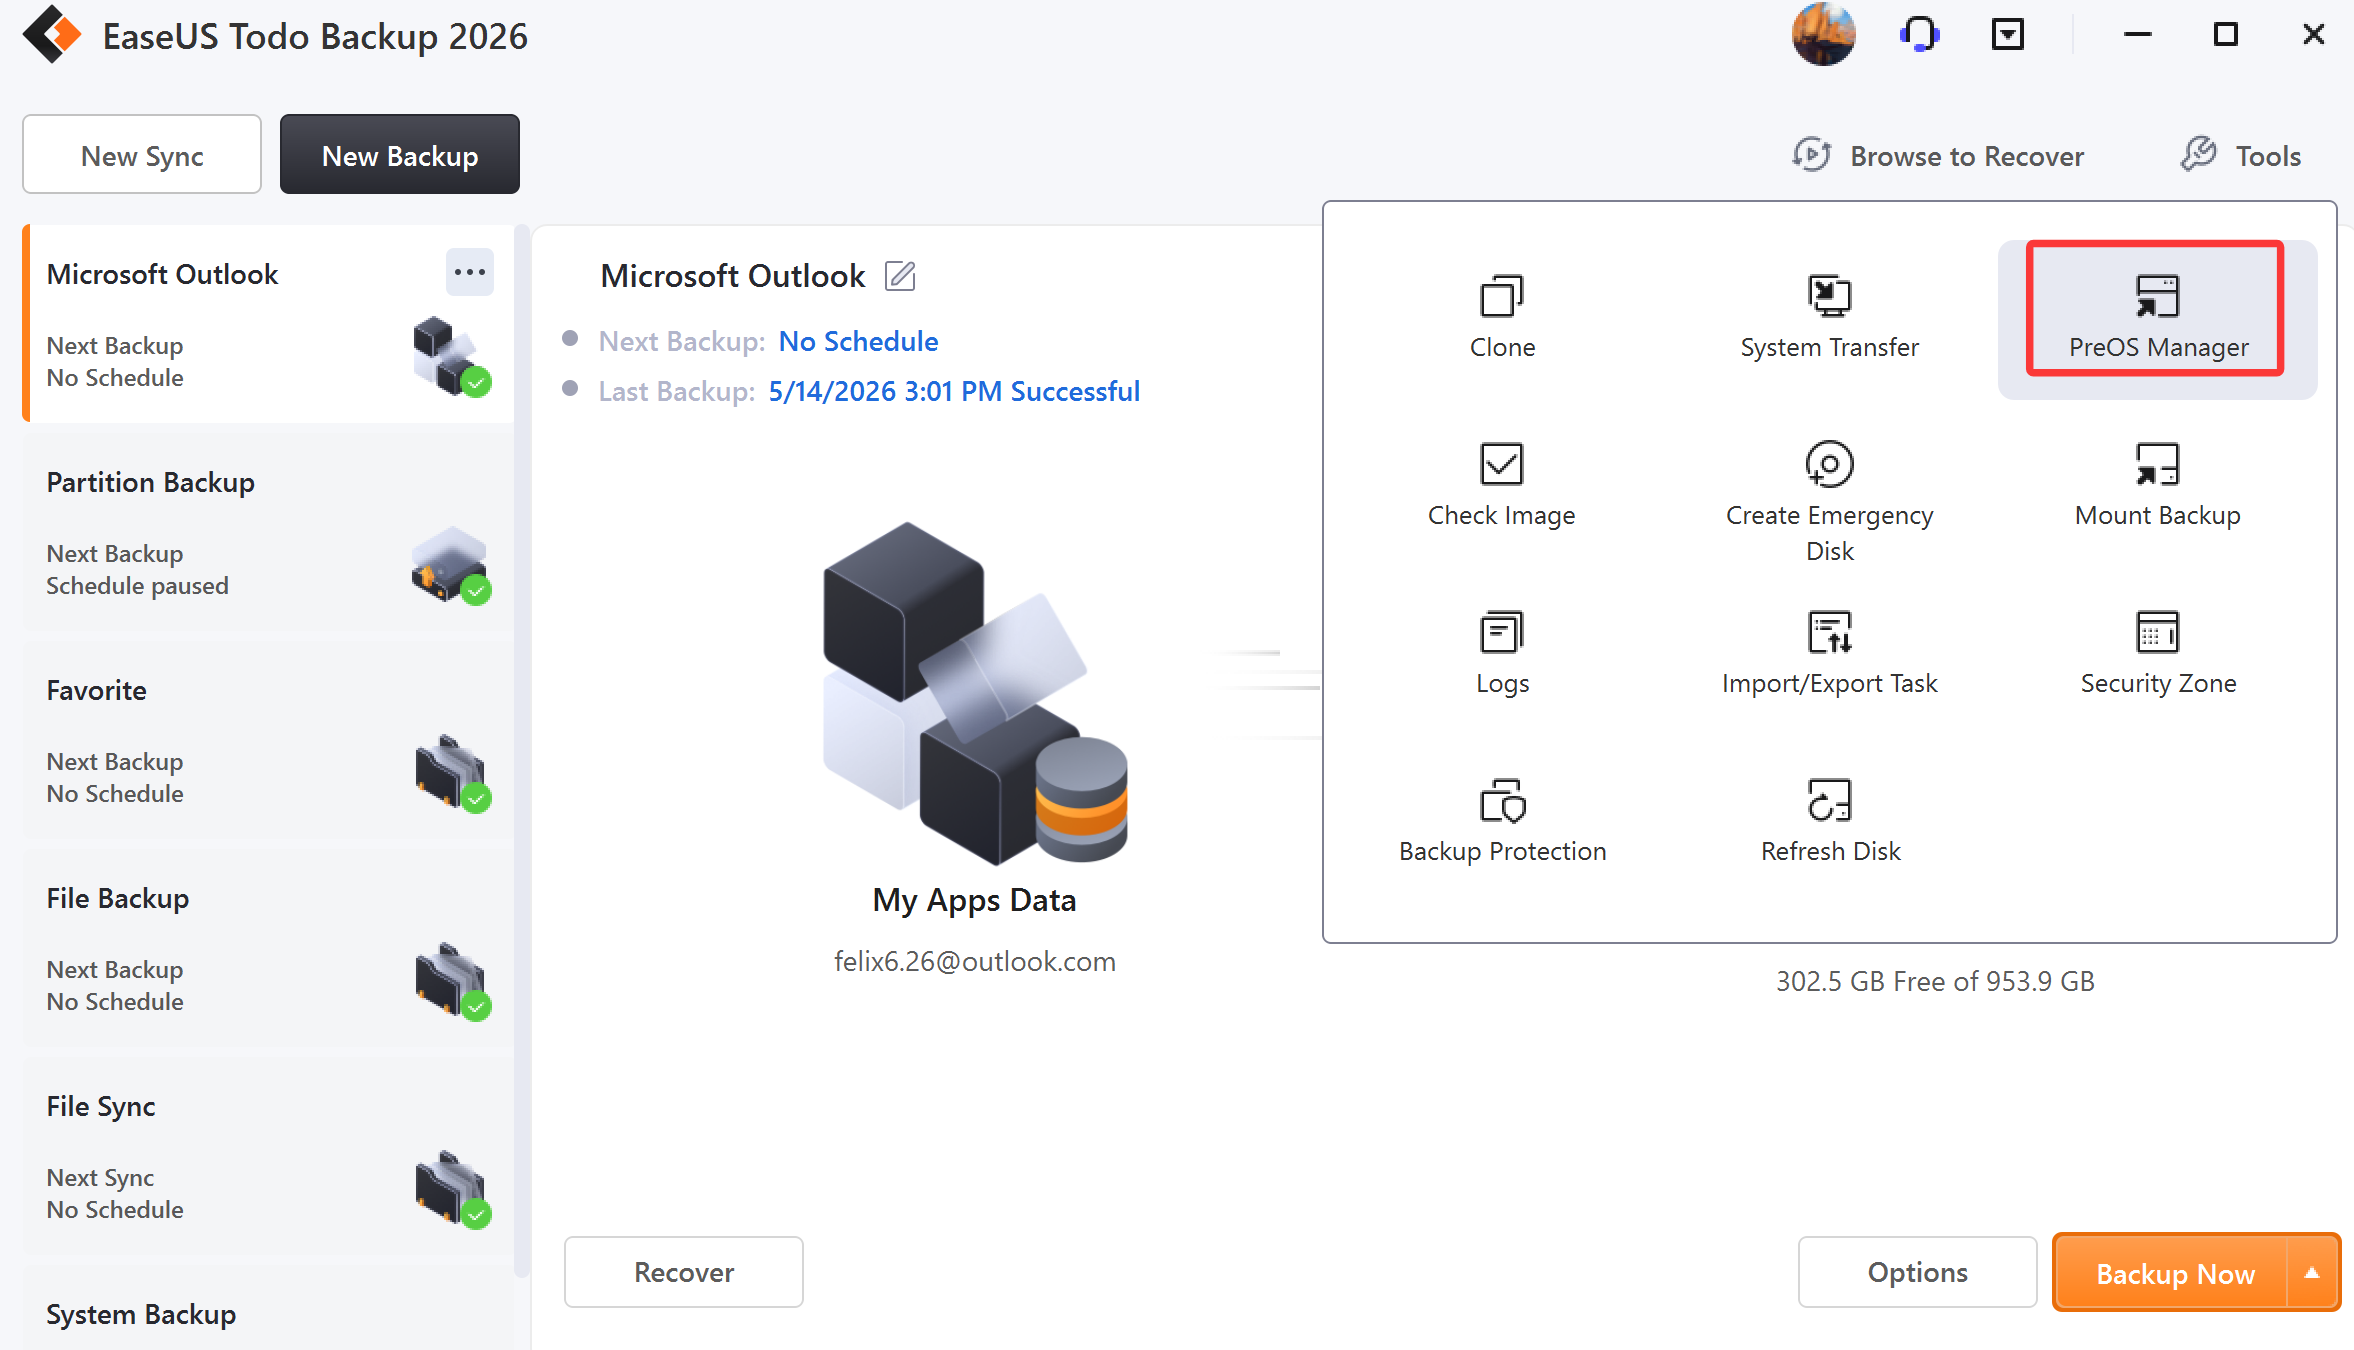
Tools
The Tools menu offers several useful features that can significantly enhance the efficiency and flexibility of your backup and recovery process.
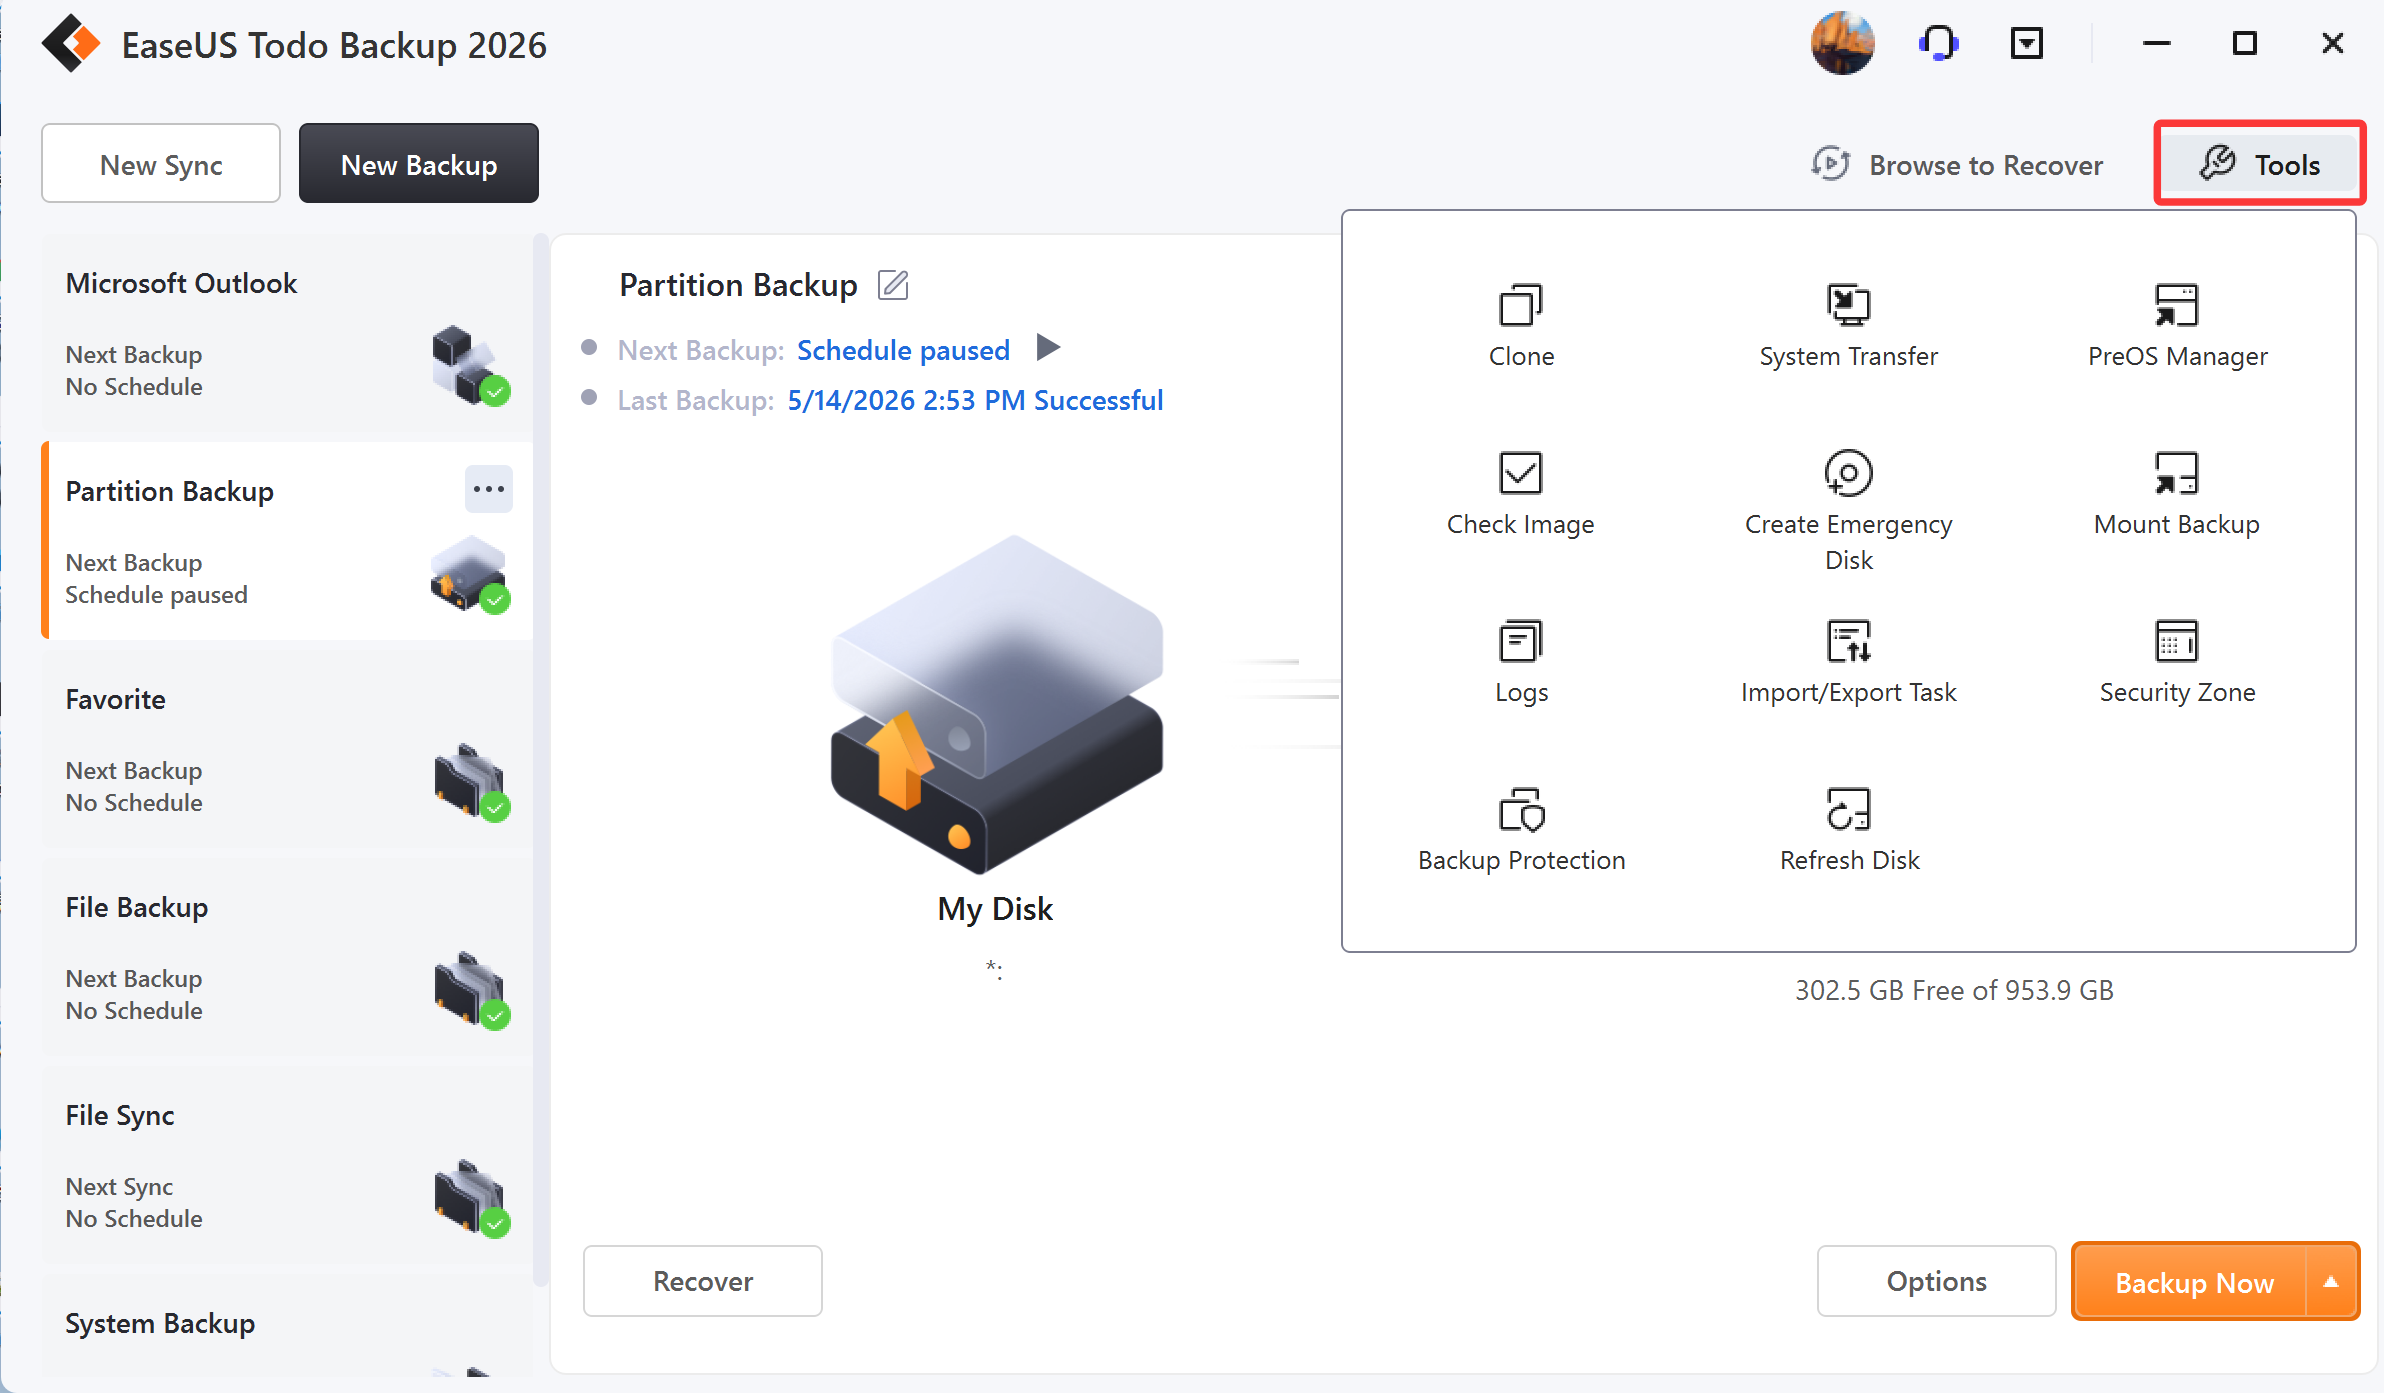
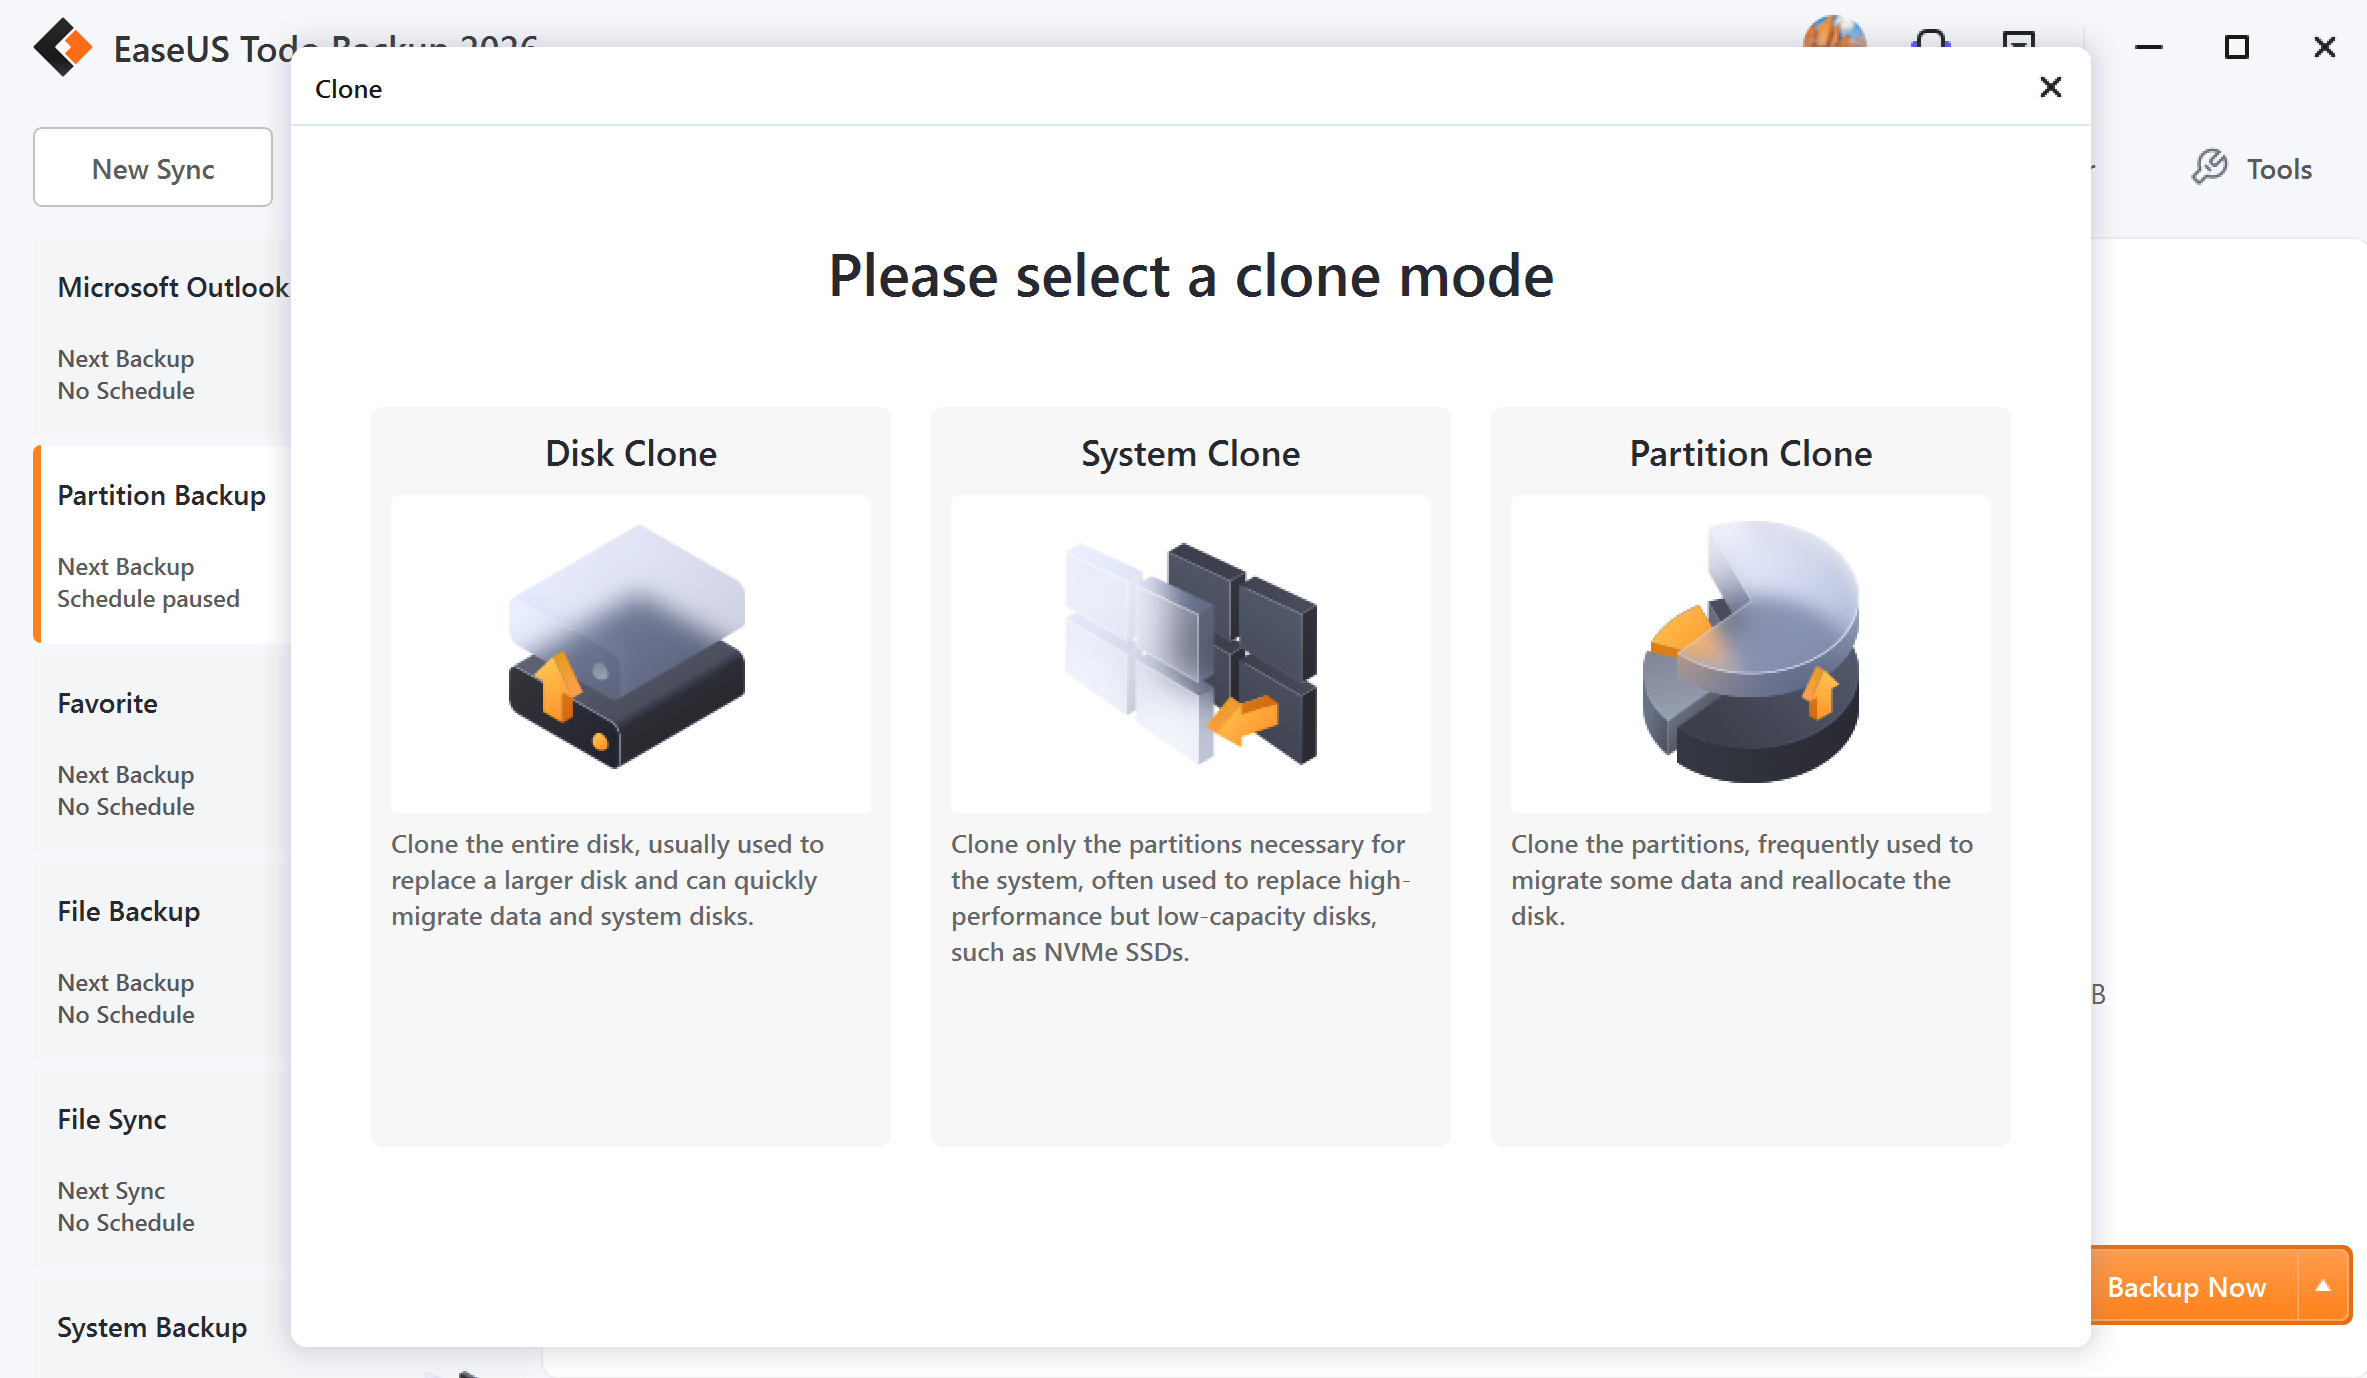
Clone
Disk/Partition clone will transfer all data on the selected hard disk to another. It is especially useful when you want to replace a hard disk with a new one. For a successful clone, please ensure that the capacity of the destination disk/partition is larger than the used space of the source disk/partition.
Steps:
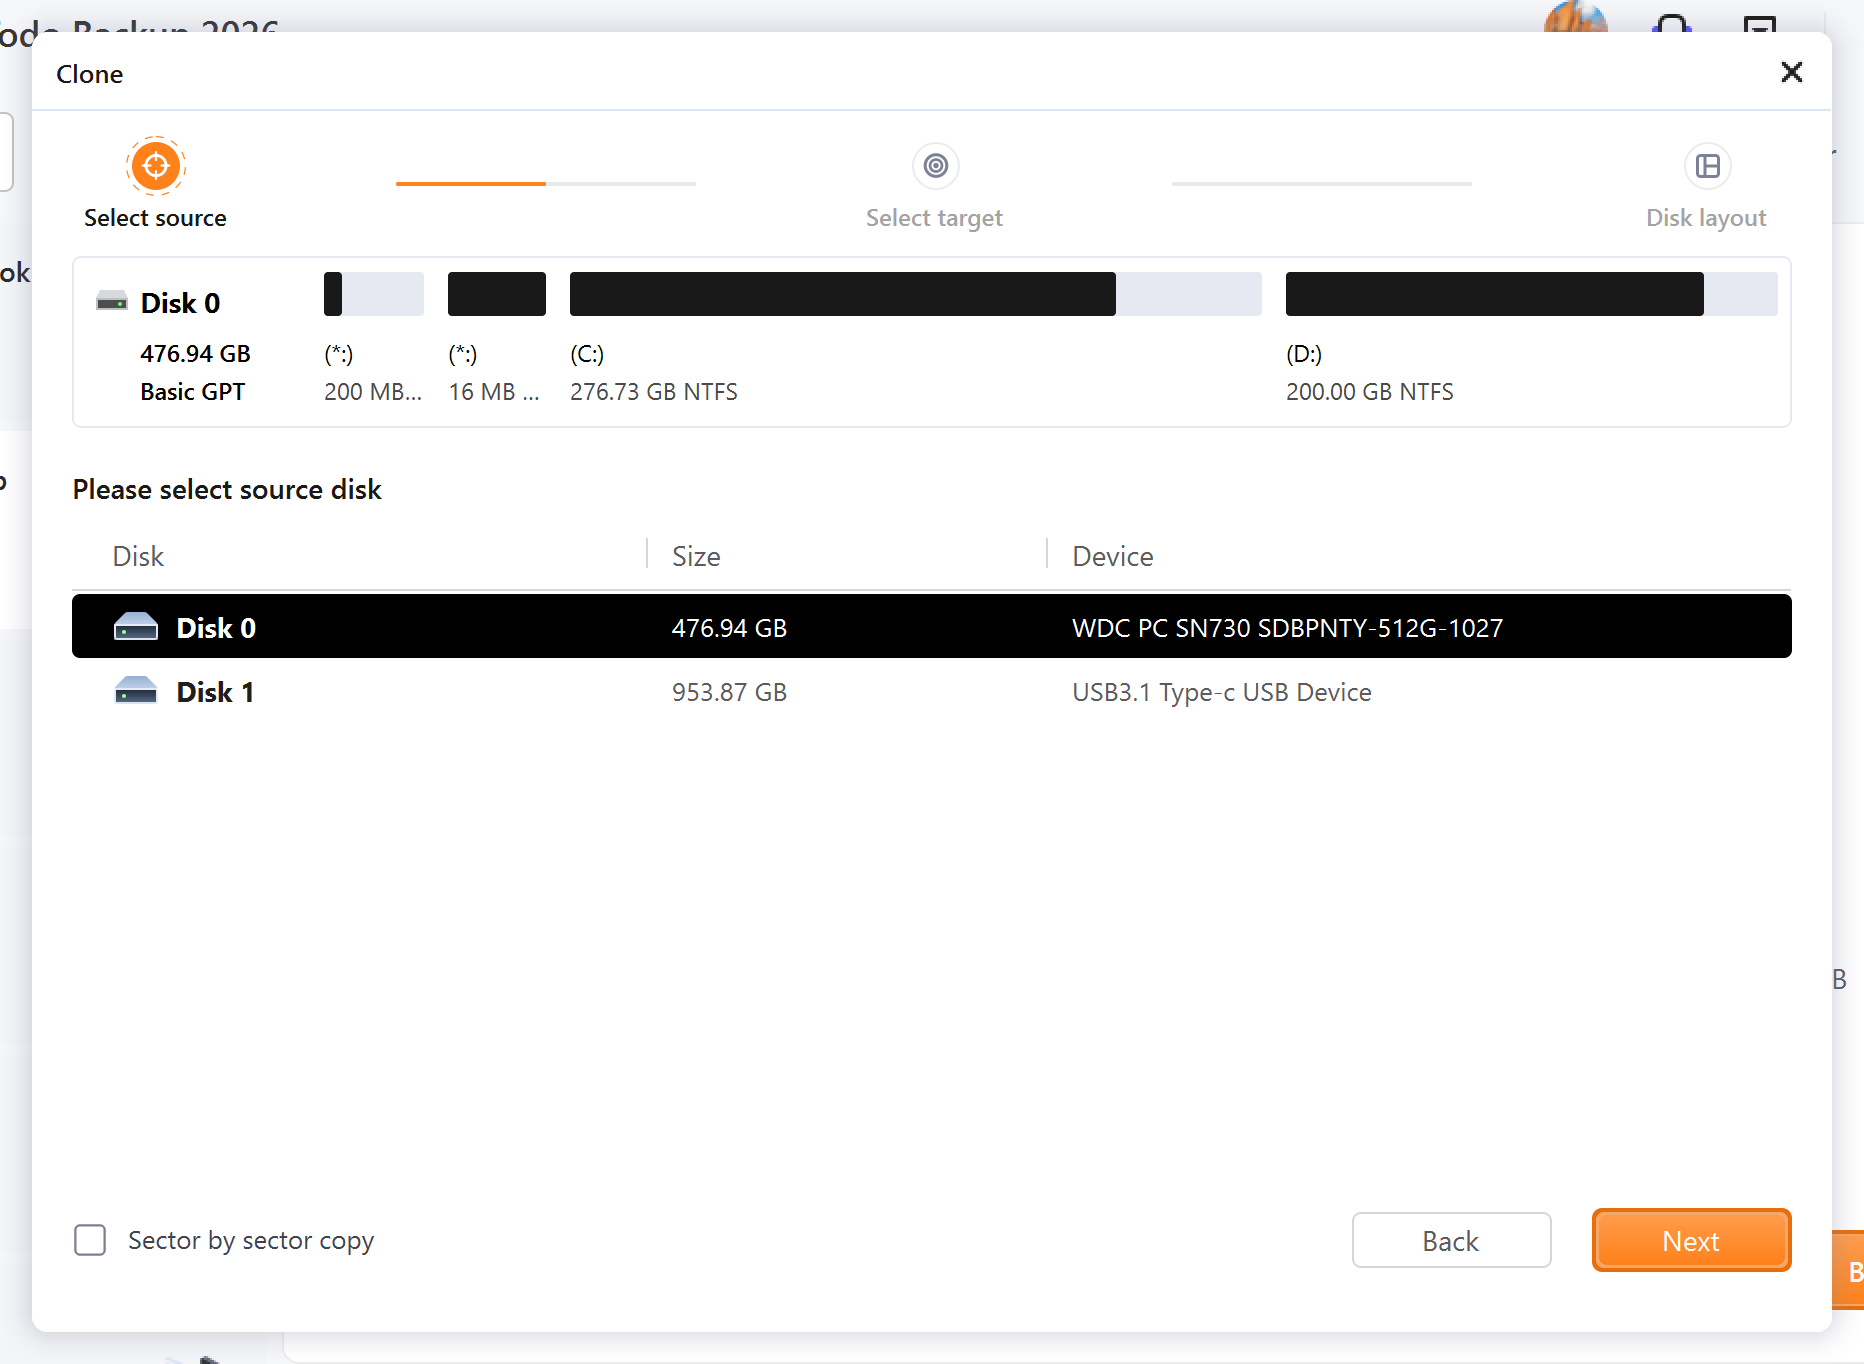
1. Click Tools, and choose Clone.
2. Choose the source disk/partition, and click Next.
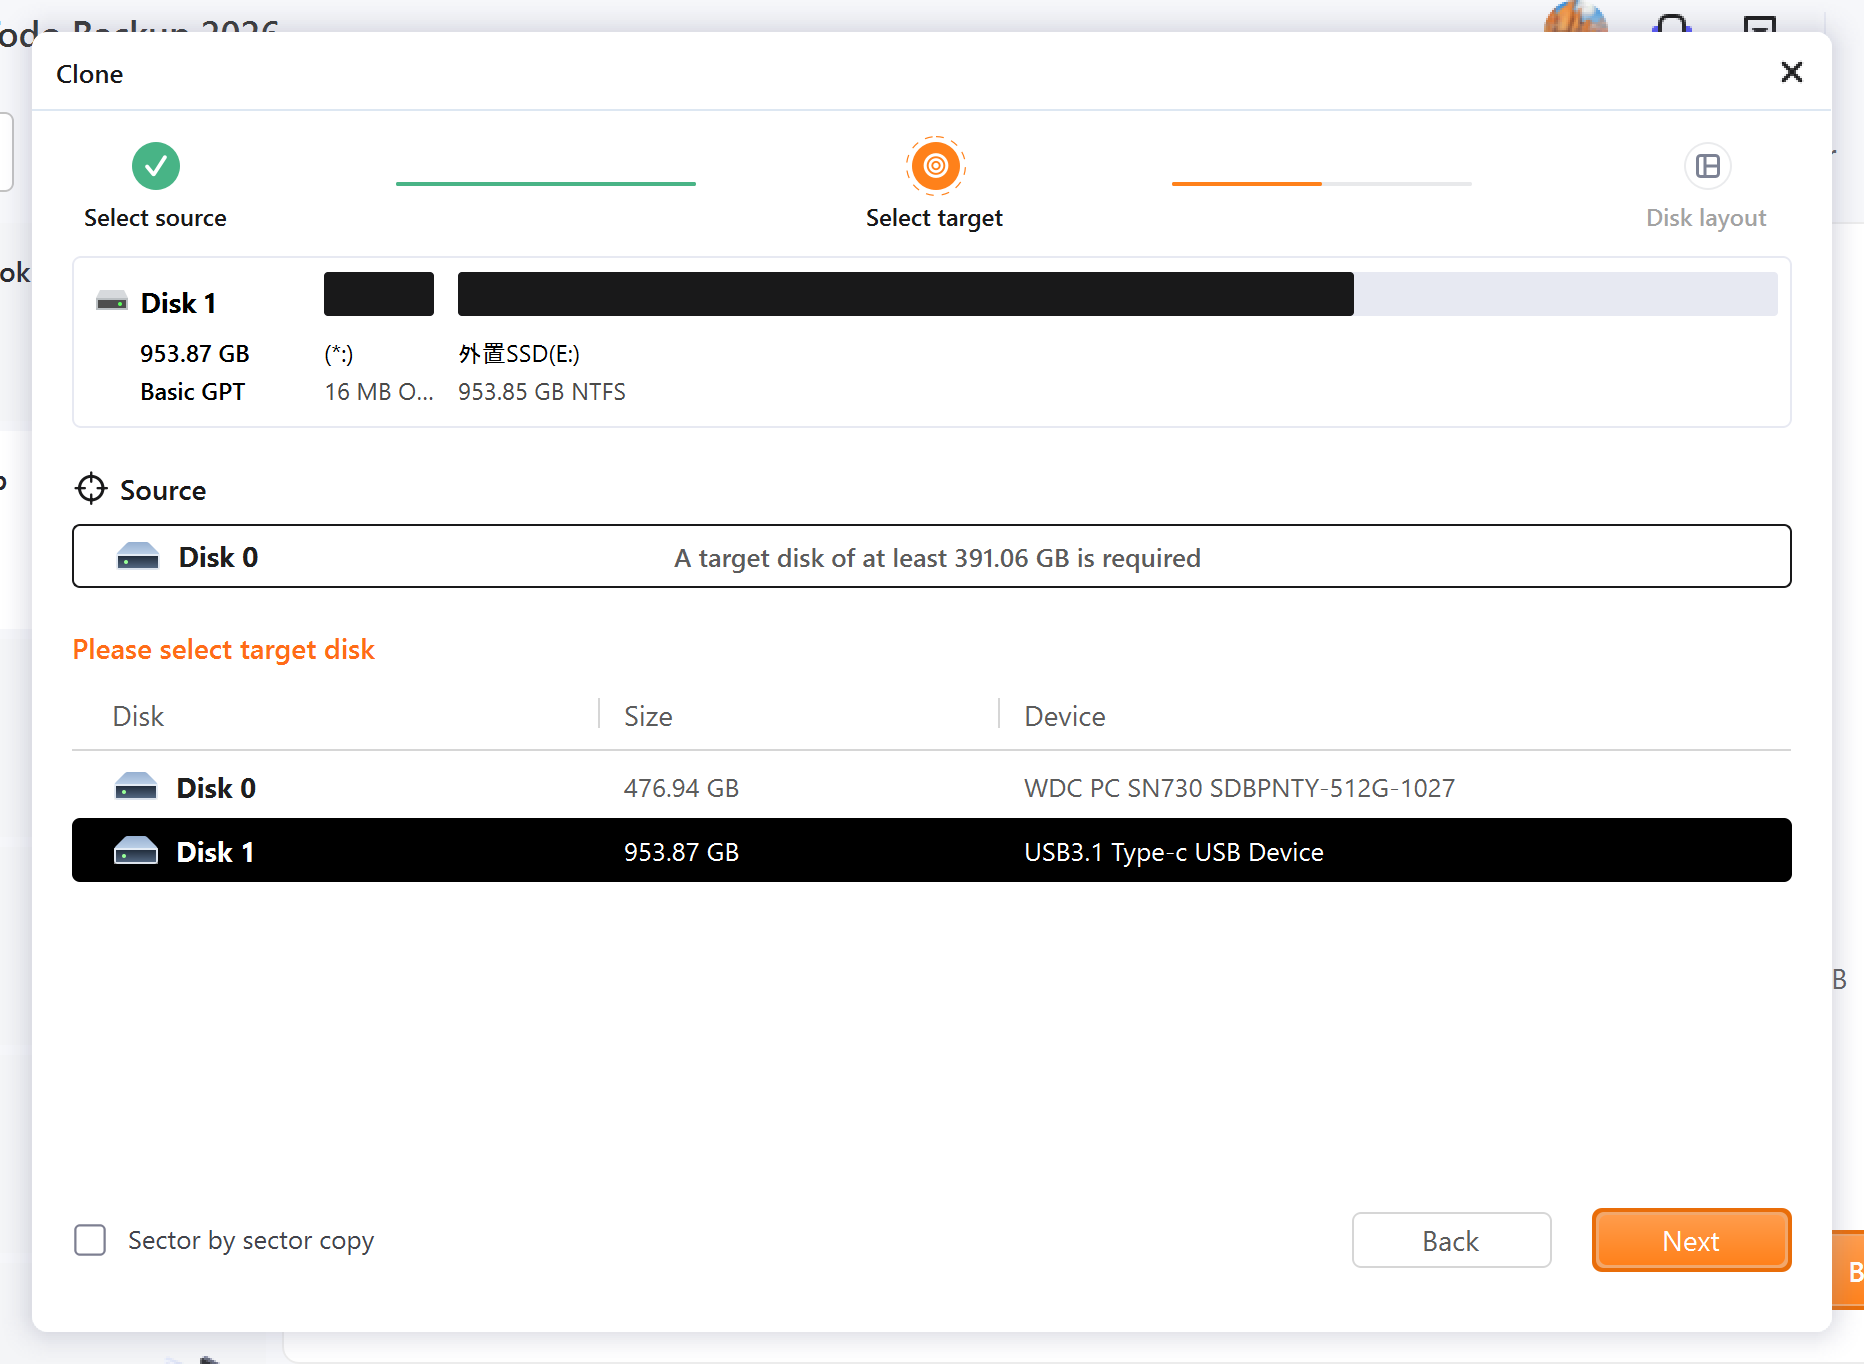
3. Select the target location and click Next.
Advanced options
These advanced settings can help you clone a drive more stably and smoothly in some special case. However, without these advanced settings, EaseUS Todo backup can still give you an exact and intact clone.
Optimize for SSD - If the destination disk is an SSD, checking this option will ensure sector alignment in the process.
Sector by sector clone - A sector-by-sector clone ensures that the destination hard disk/partition is exactly the same as the source hard disk/partition. It will clone all the sectors if the option is checked, even if the sector is blank. As a result, the target will be equal in size to the disk being cloned after the process. This option is found in the same step where you choose the destination hard disk/partition both in the Disk clone and Partition clone wizard.
Create a Portable Windows USB drive - It will appear when you want to clone the system drive. This option ensures that the cloned USB system disk is able to boot normally.
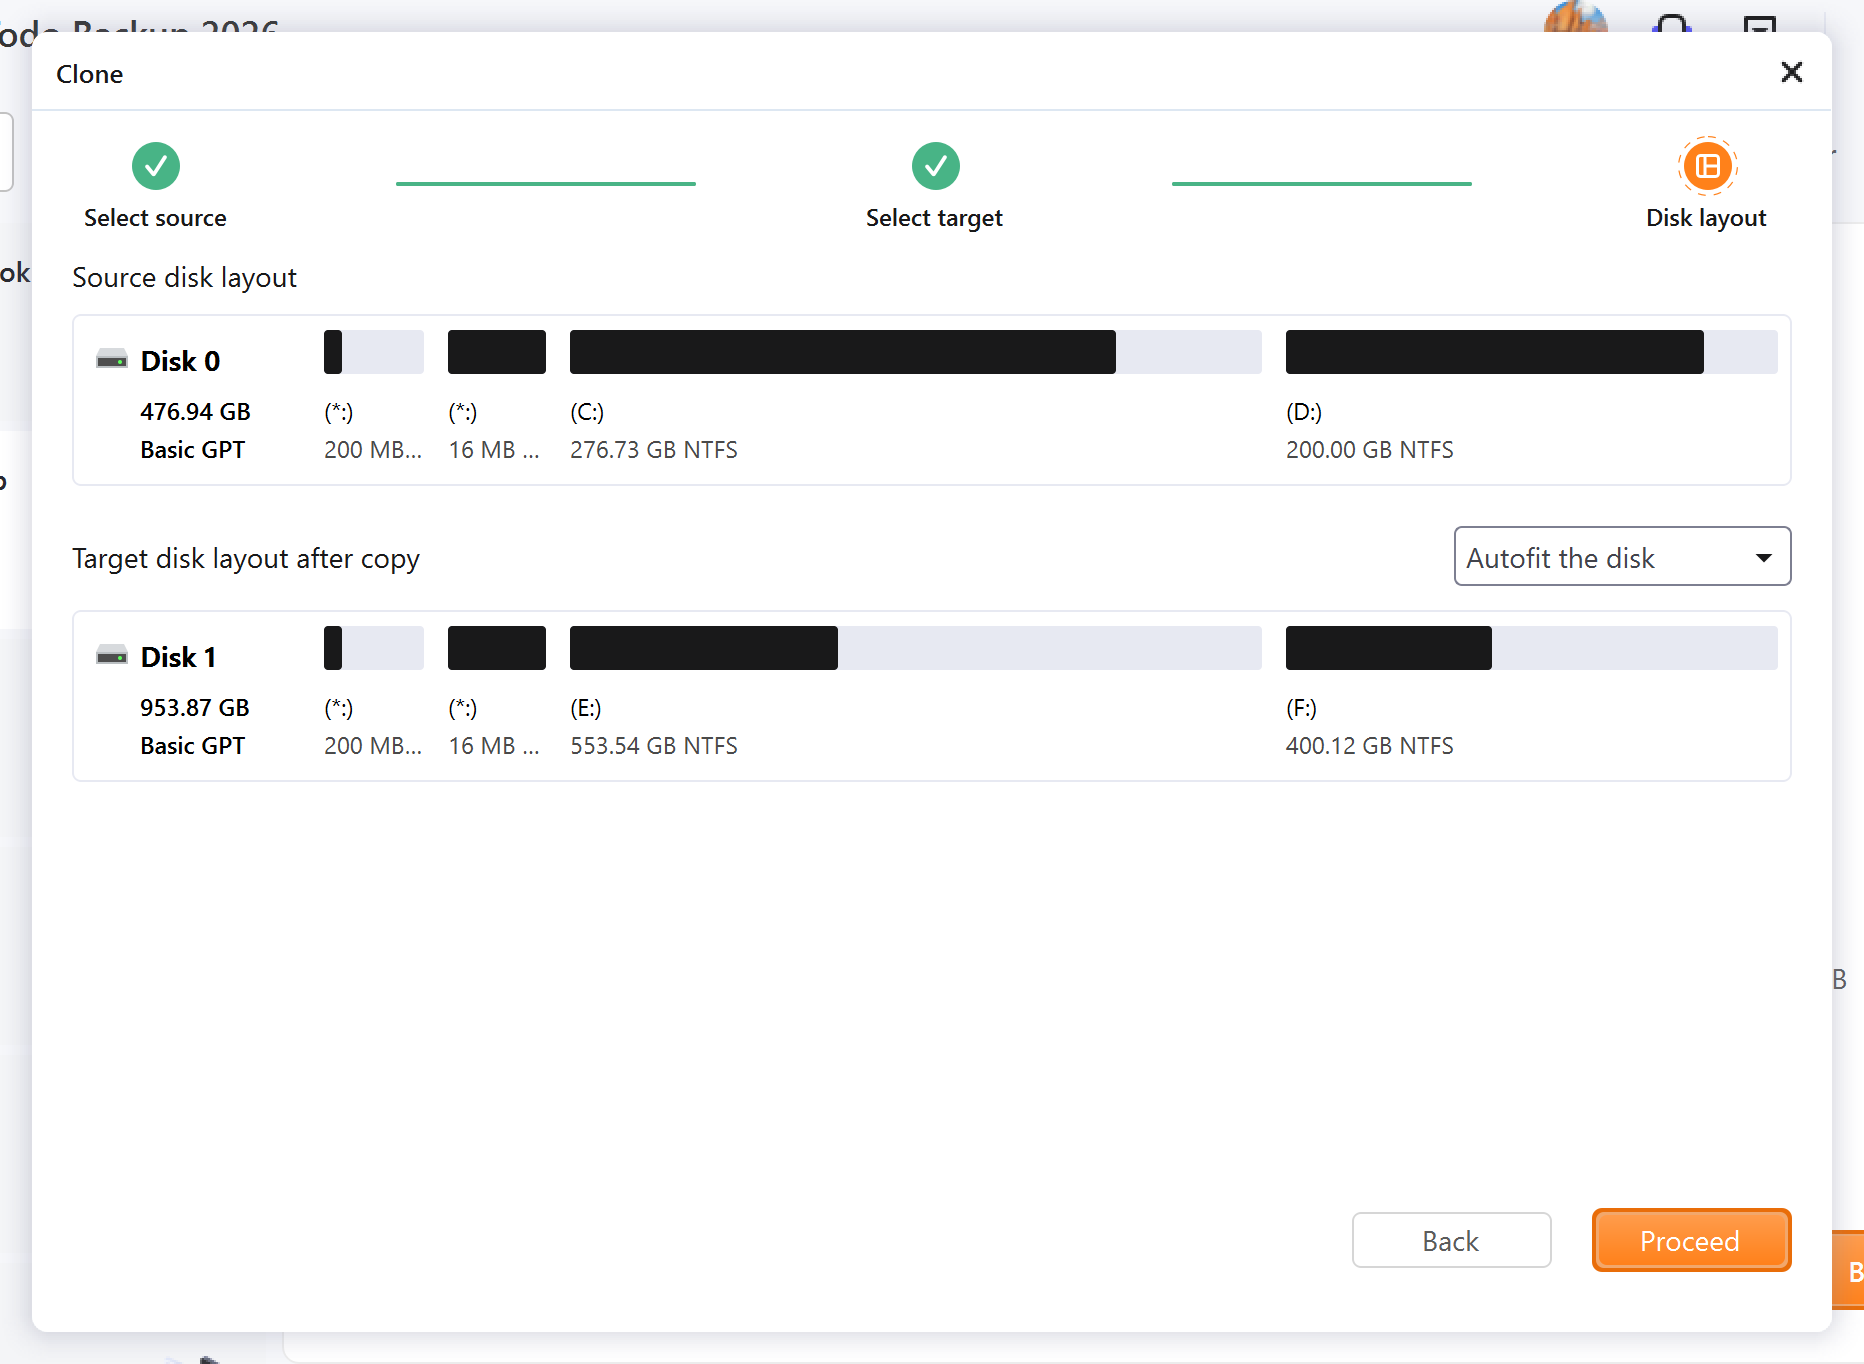
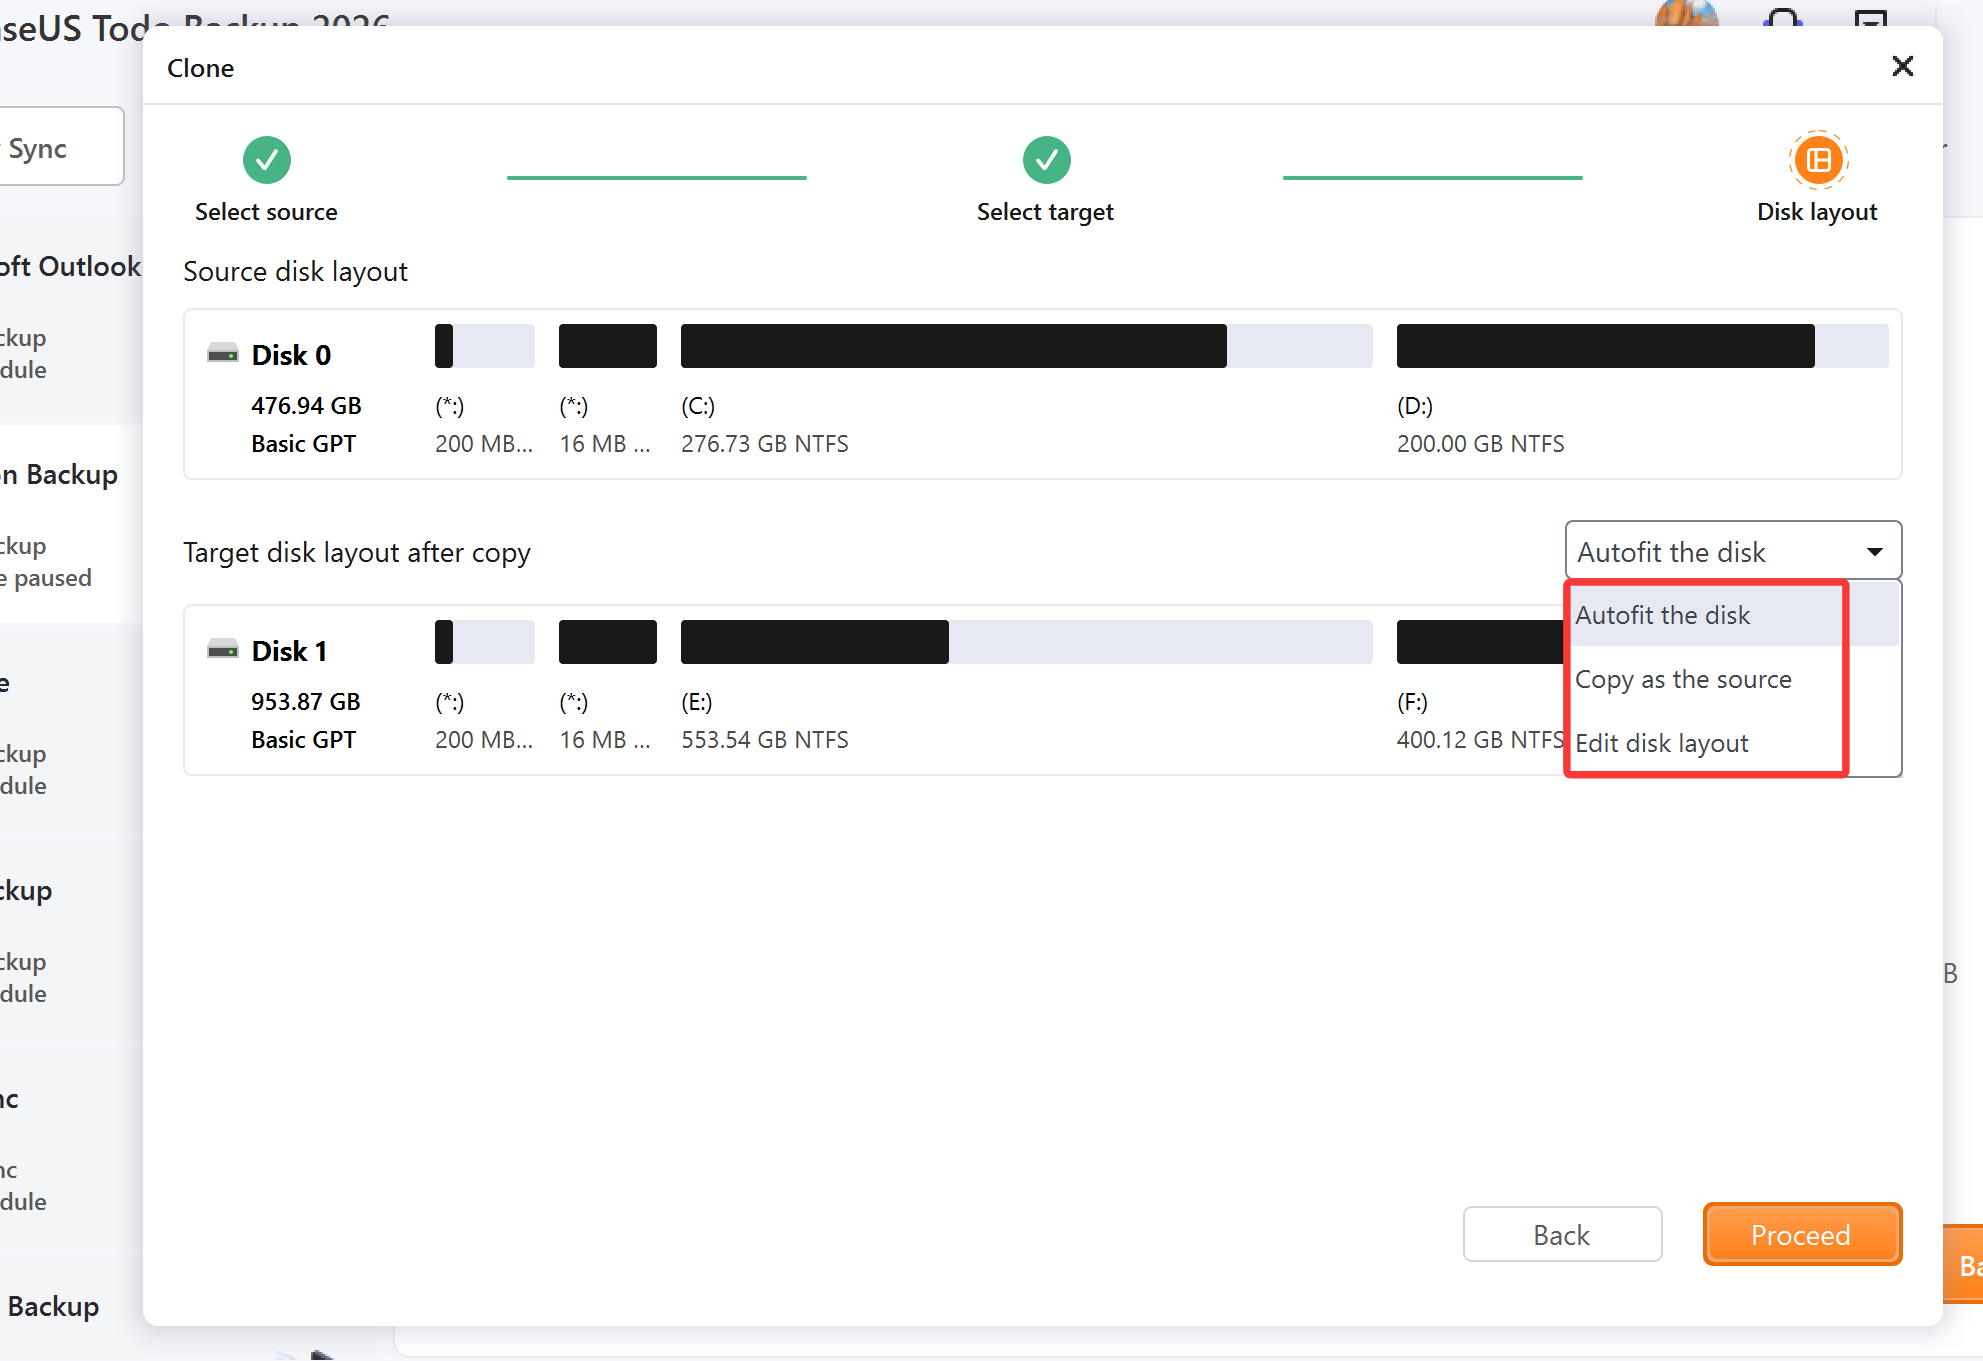
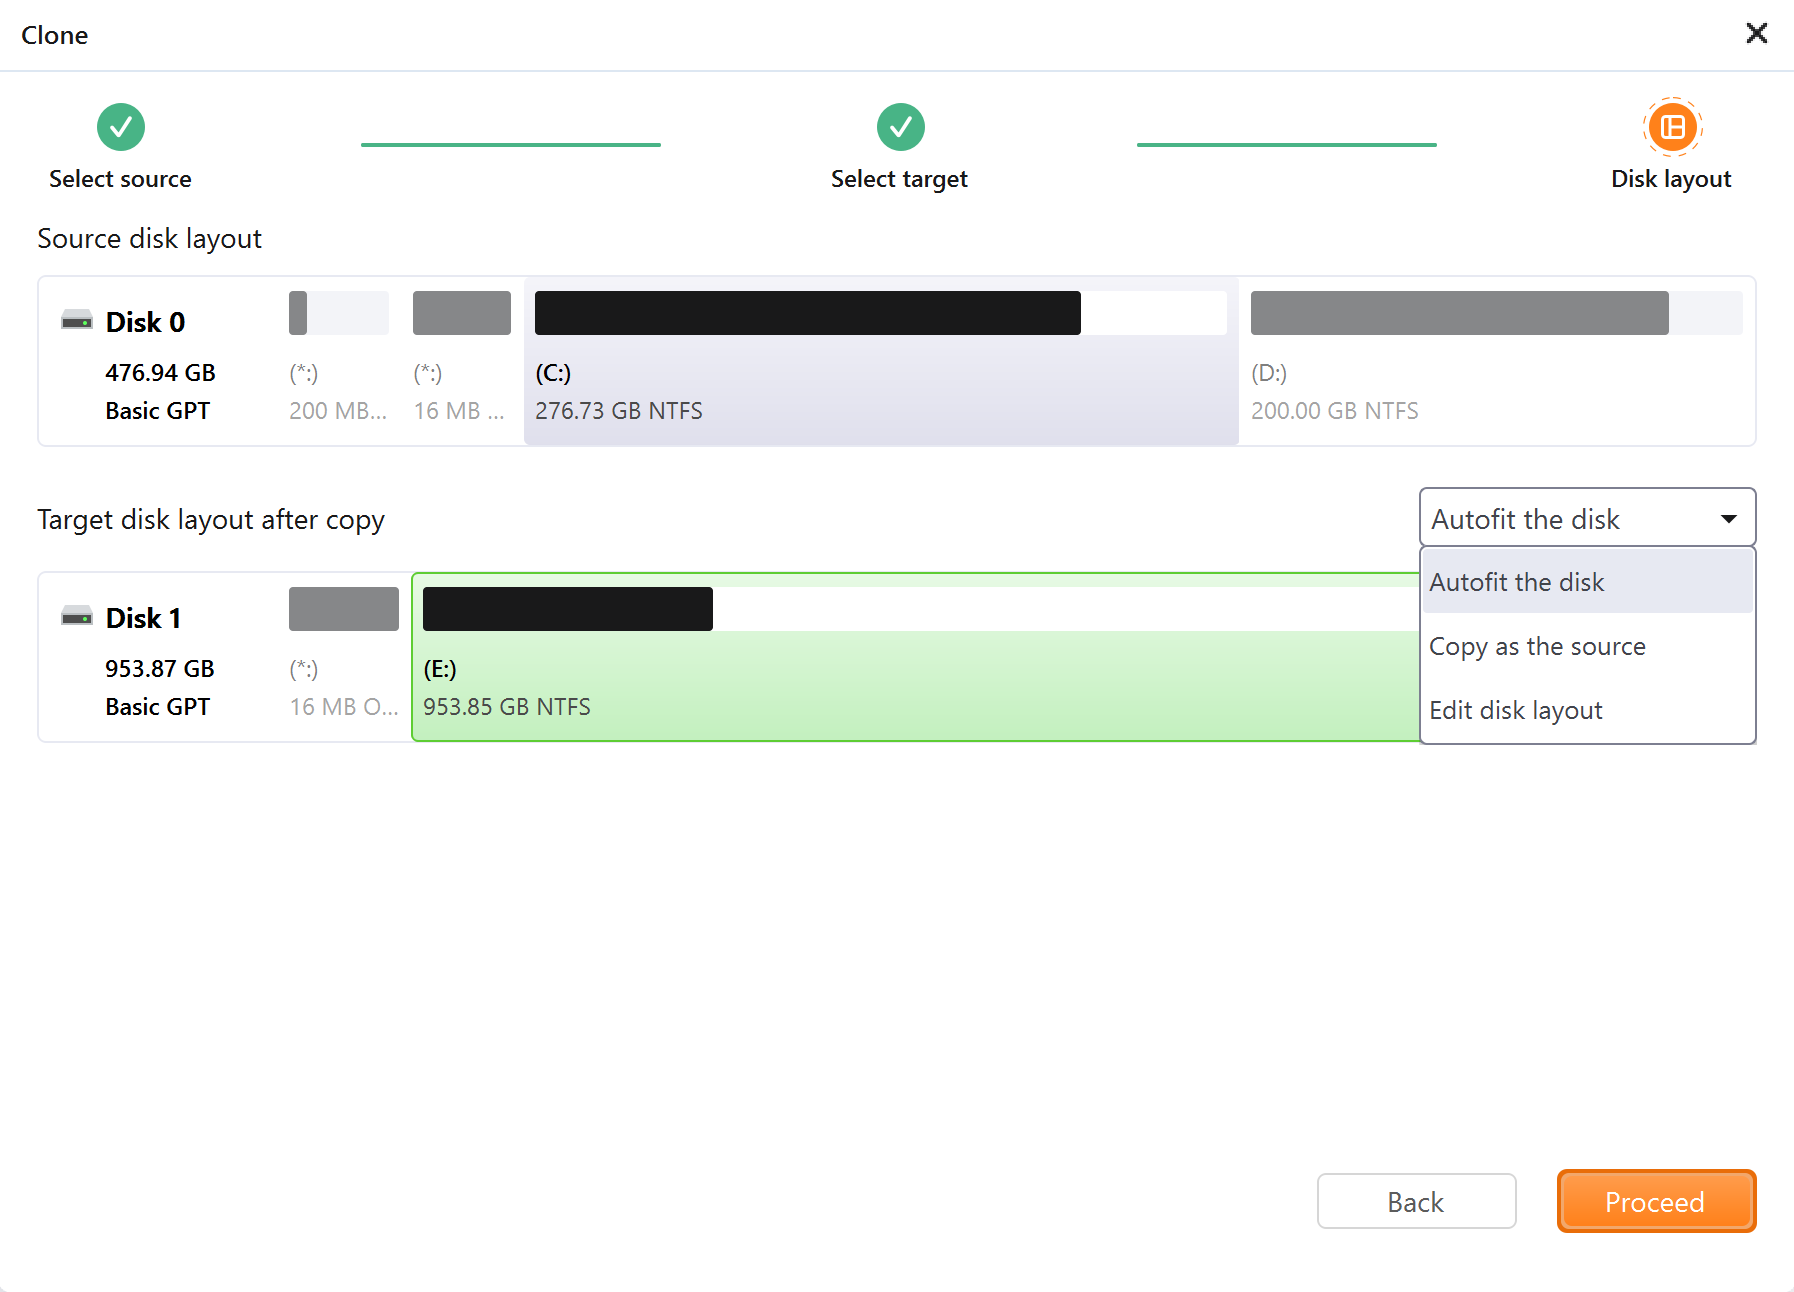
4. You can select to autofit the disk or edit the disk layout yourself. After you preview and confirm the hard disk layout, click Proceed to start the clone.
Note:
The disk/partition cannot be resized if you choose to clone your disk in the Sector-by-sector mode.
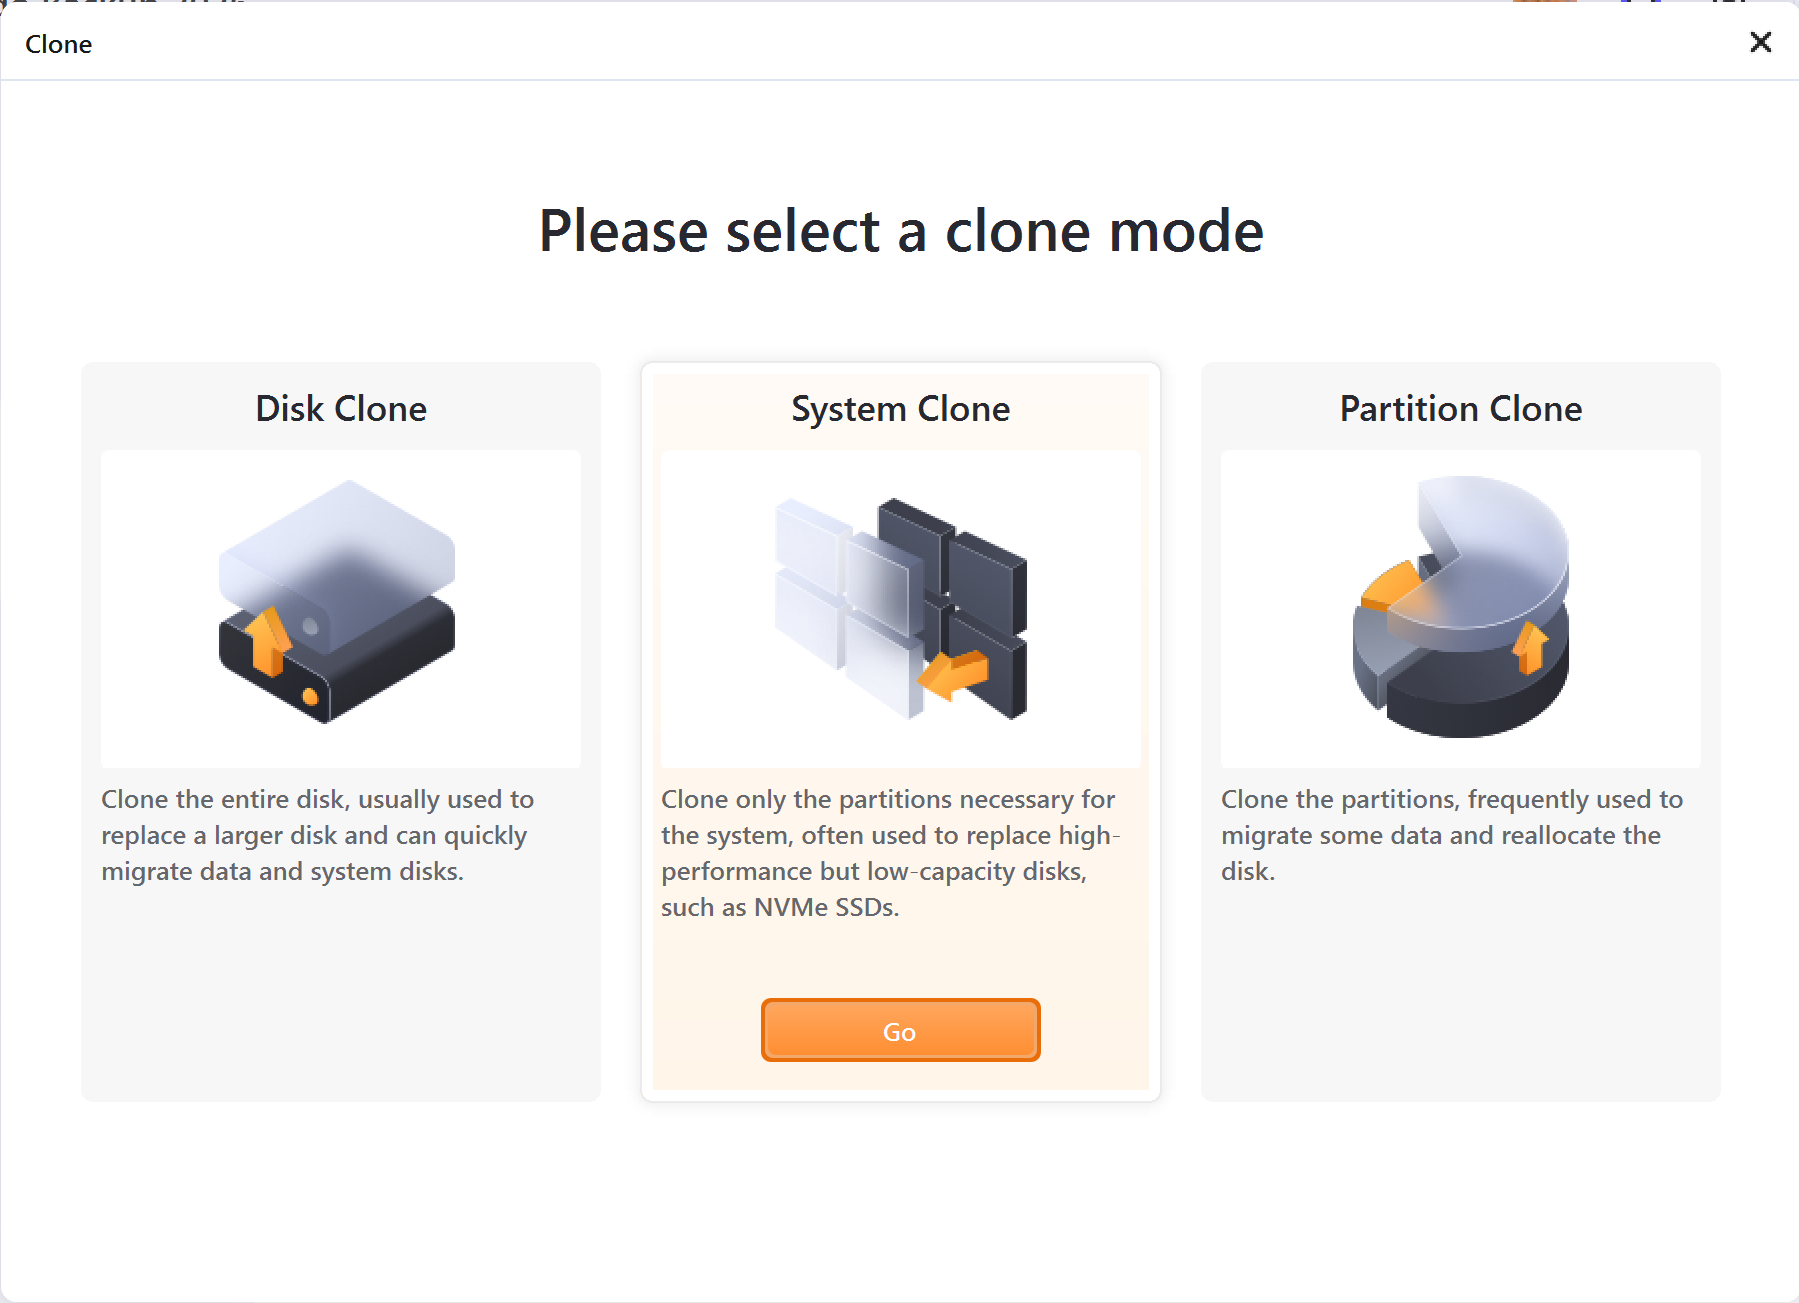
System Clone
This option enables you to migrate only the system and boot partitions to a new hard drive.
Steps:
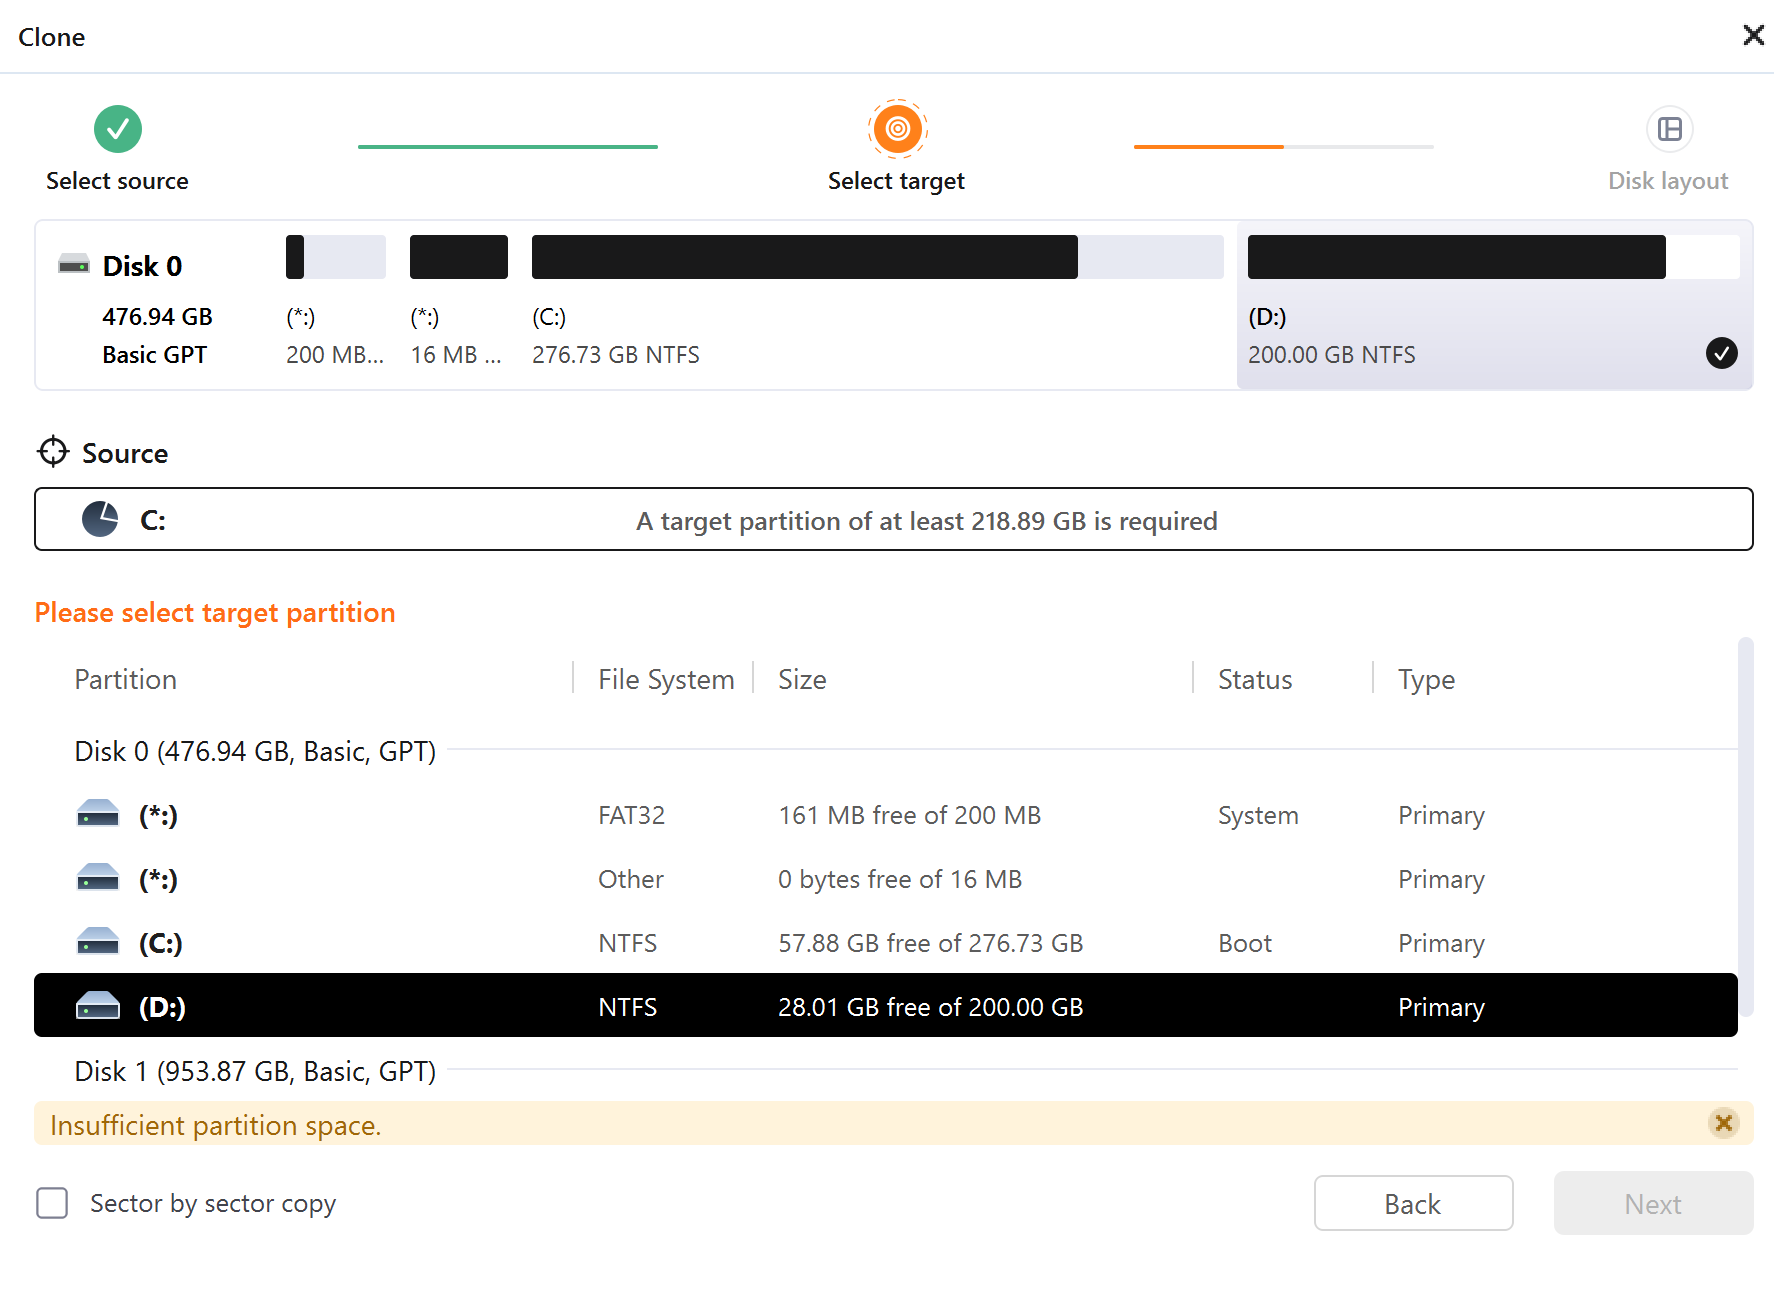
1. Click Tools, and choose System Clone.
2. The current system partition and boot partition will be automatically selected. Select the target drive in the disk list and click Next.
Advanced options
These advanced settings can help you clone a drive more stably and smoothly in some special cases. However, without these advanced settings, EaseUS Todo backup can still give you an exact and intact clone.
Optimize for SSD - If the destination disk is an SSD, checking this option will ensure sector alignment in the process.
Sector by sector clone - A sector-by-sector clone ensures that the destination hard disk/partition is exactly the same as the source hard disk/partition. It will clone all the sectors if the option is checked, even if the sector is blank. As a result, the target will be equal in size to the disk being cloned after the process. This option is found in the same step where you choose the destination hard disk/partition both in the Disk clone and Partition clone wizard.
Create a Portable Windows USB drive - It will appear when you want to clone the system drive. This option ensures that the cloned USB system disk is able to boot normally.
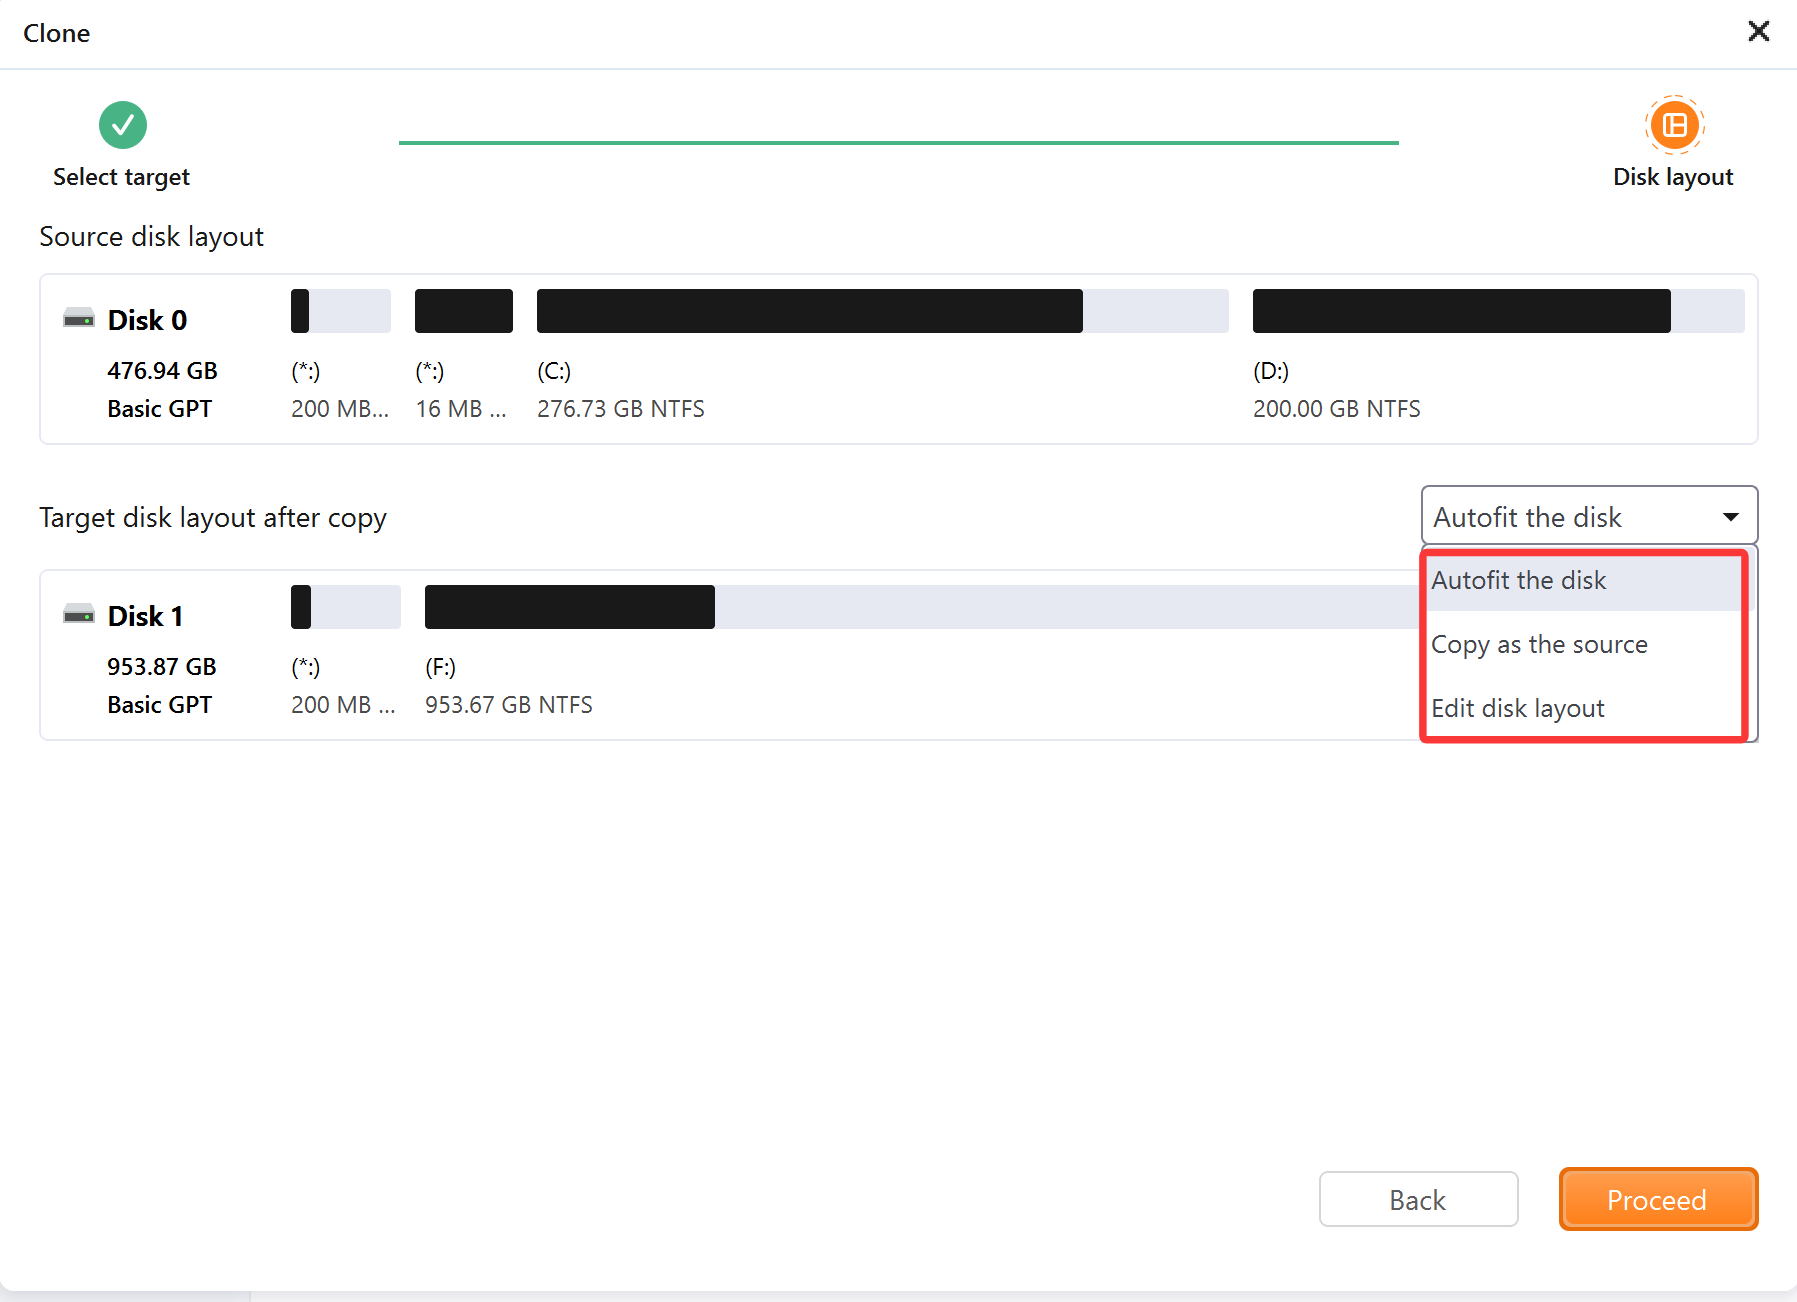
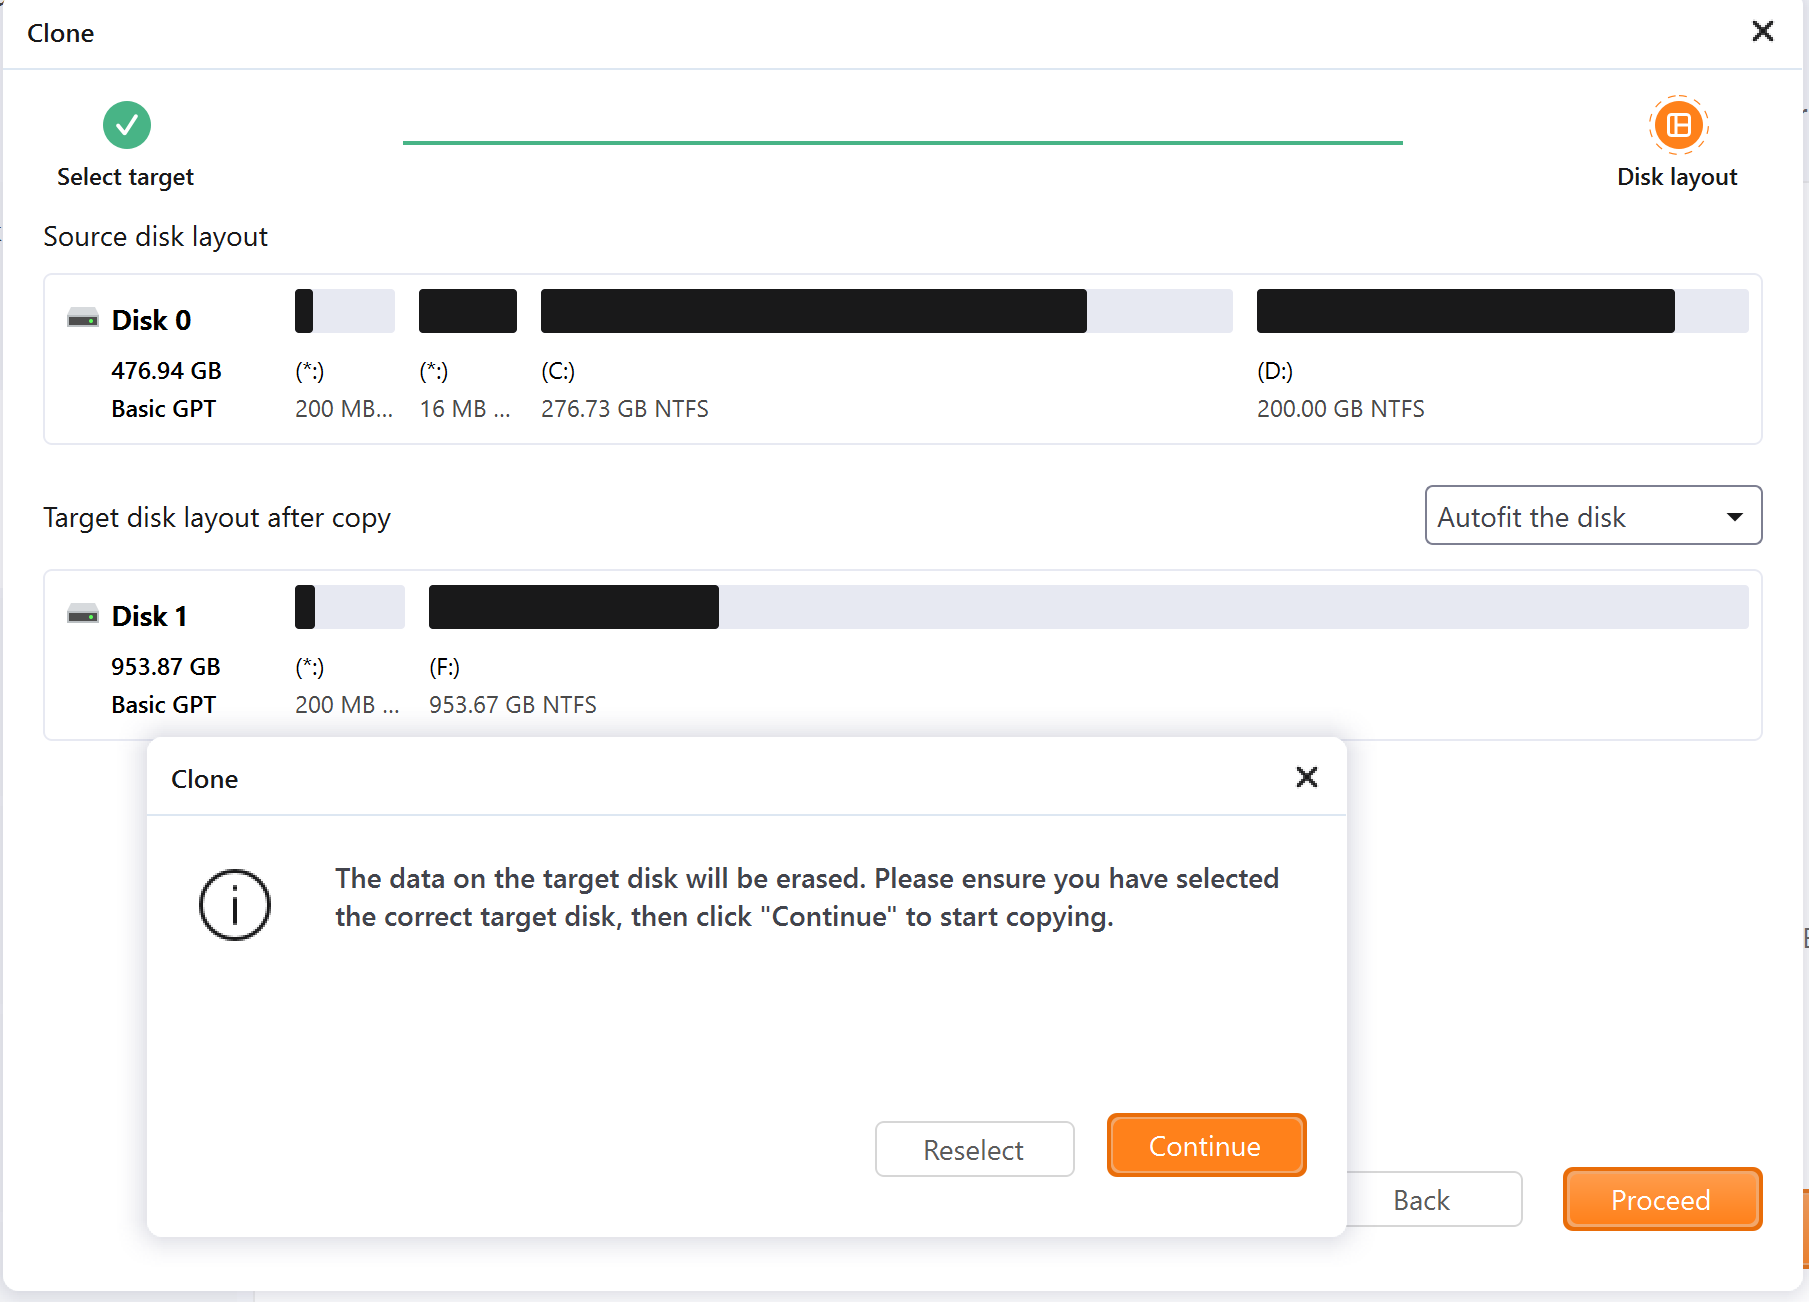
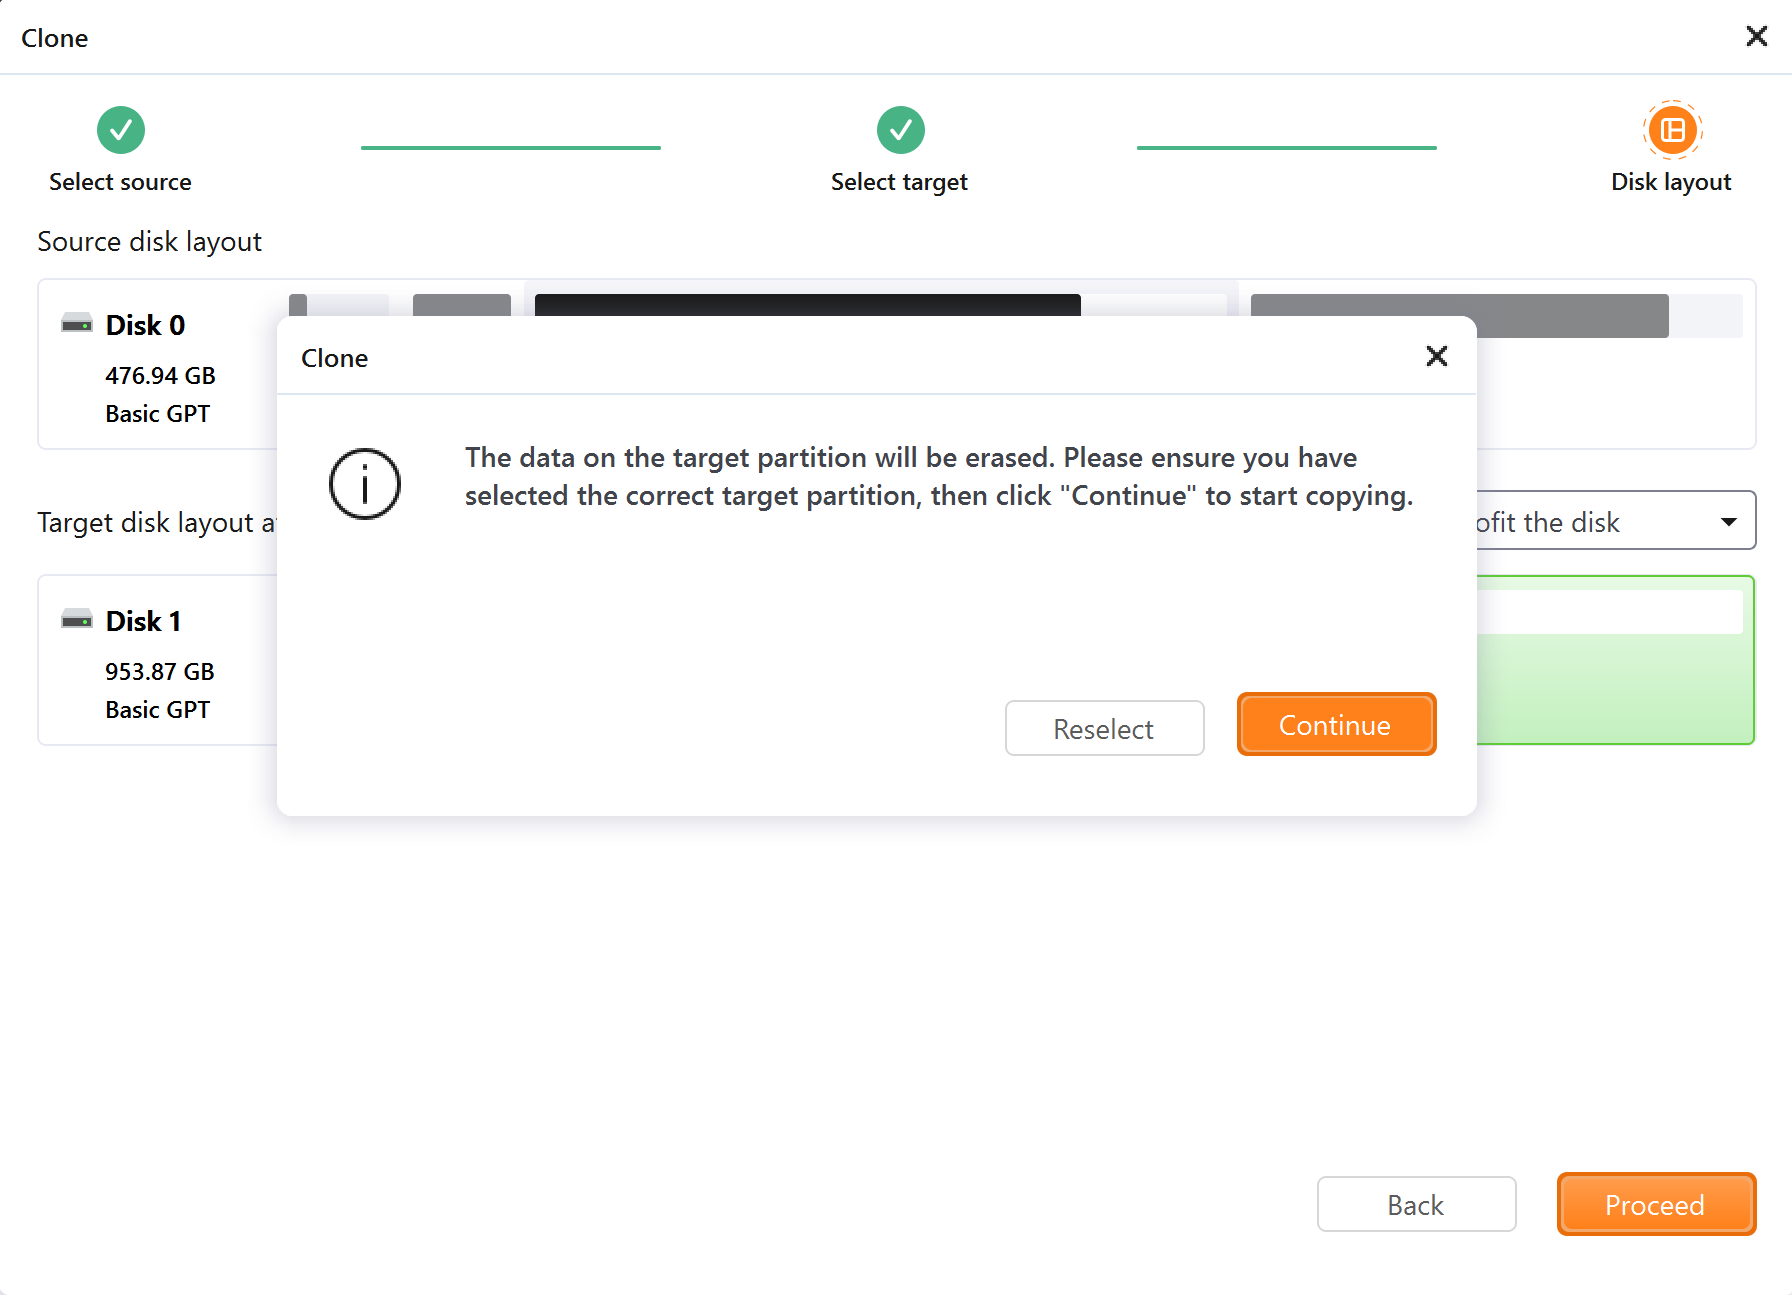
3. If the unallocated space on the target disk is not large enough, the error message will pop up, asking you whether you want to delete the following partitions. Click Continue to confirm the deletion.
4. For the target disk layout, you can select to autofit the disk or edit the disk layout yourself. After you preview and confirm the hard disk layout, click Proceed to start the clone.
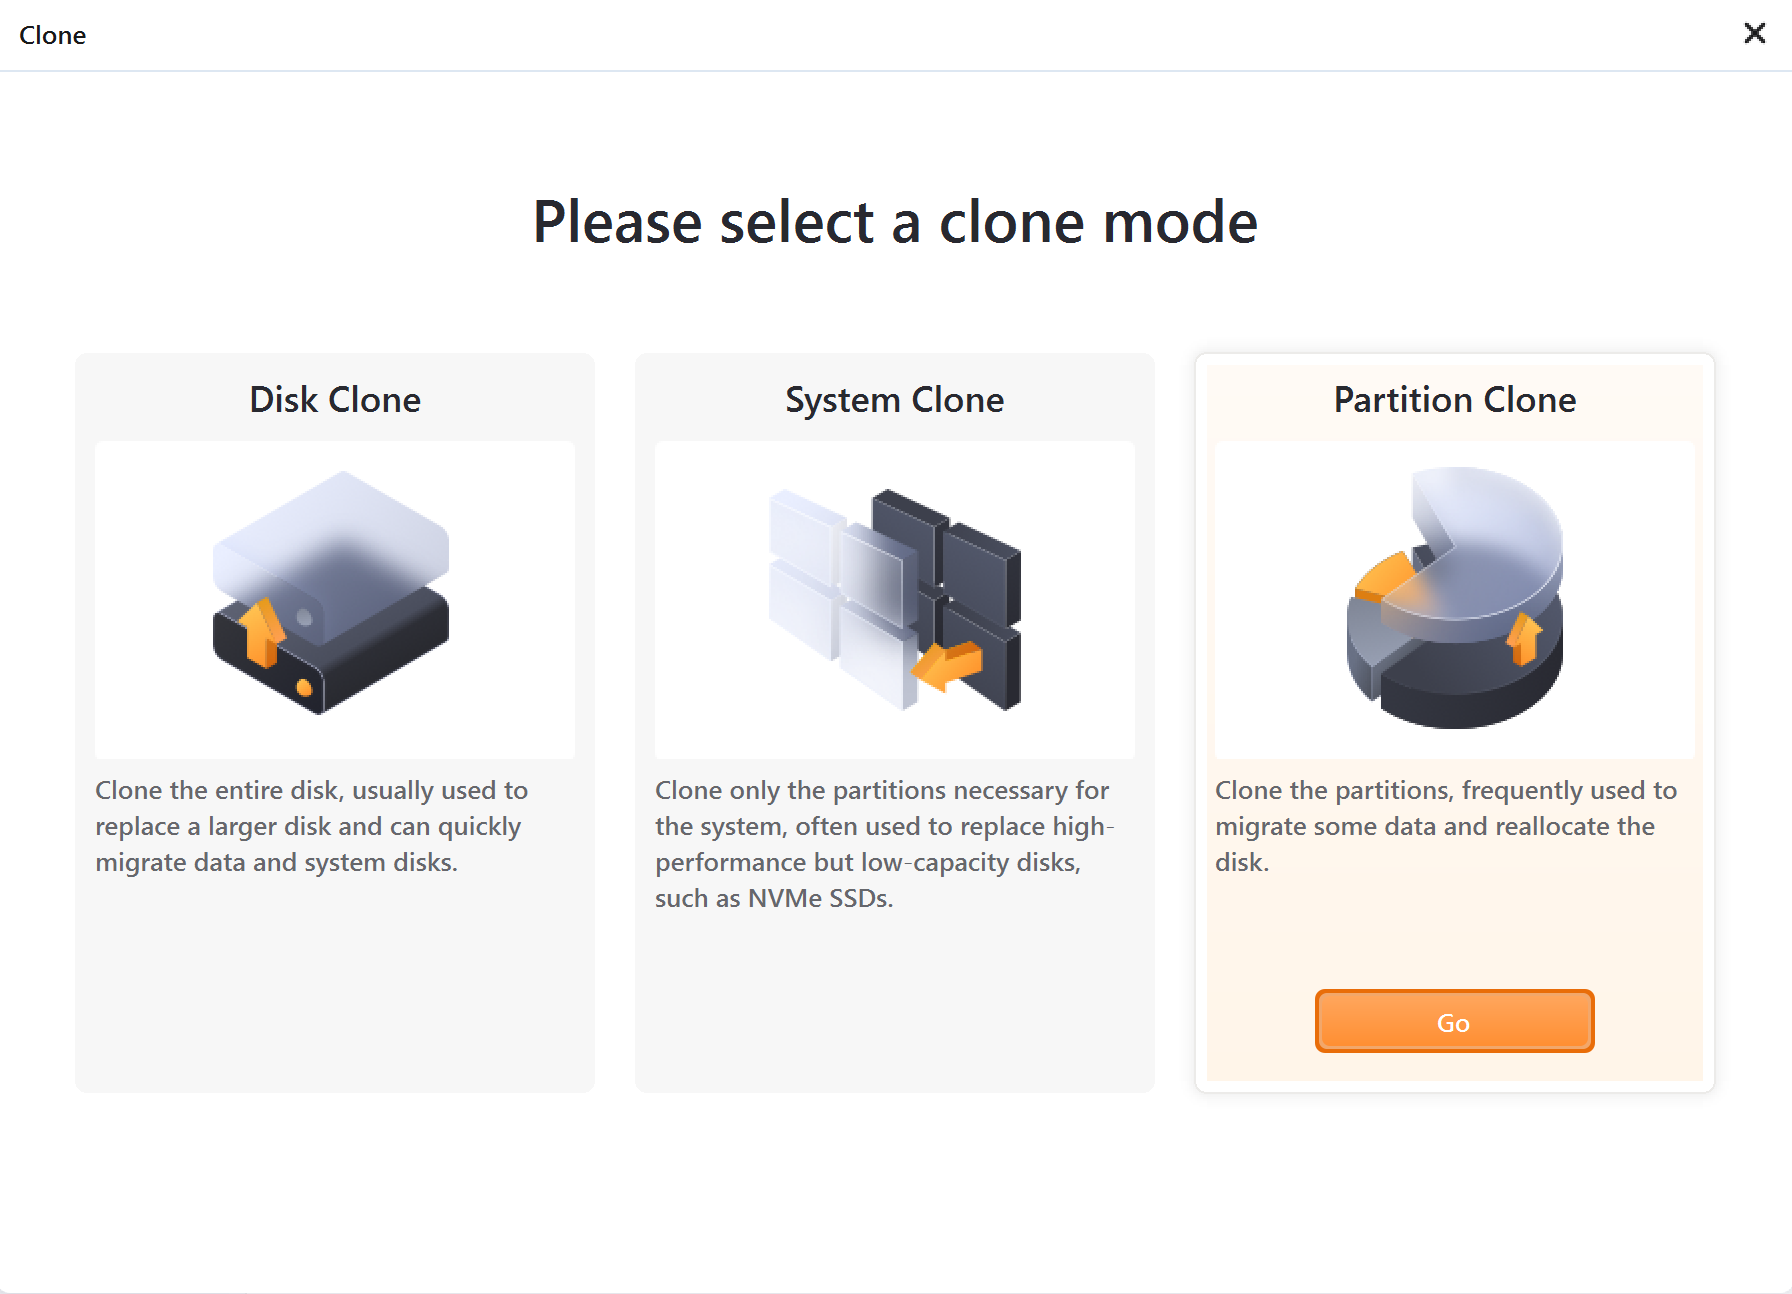
Partition Clone
This option allows you to clone a specific partition instead of the whole disk to a new partition.
Steps:
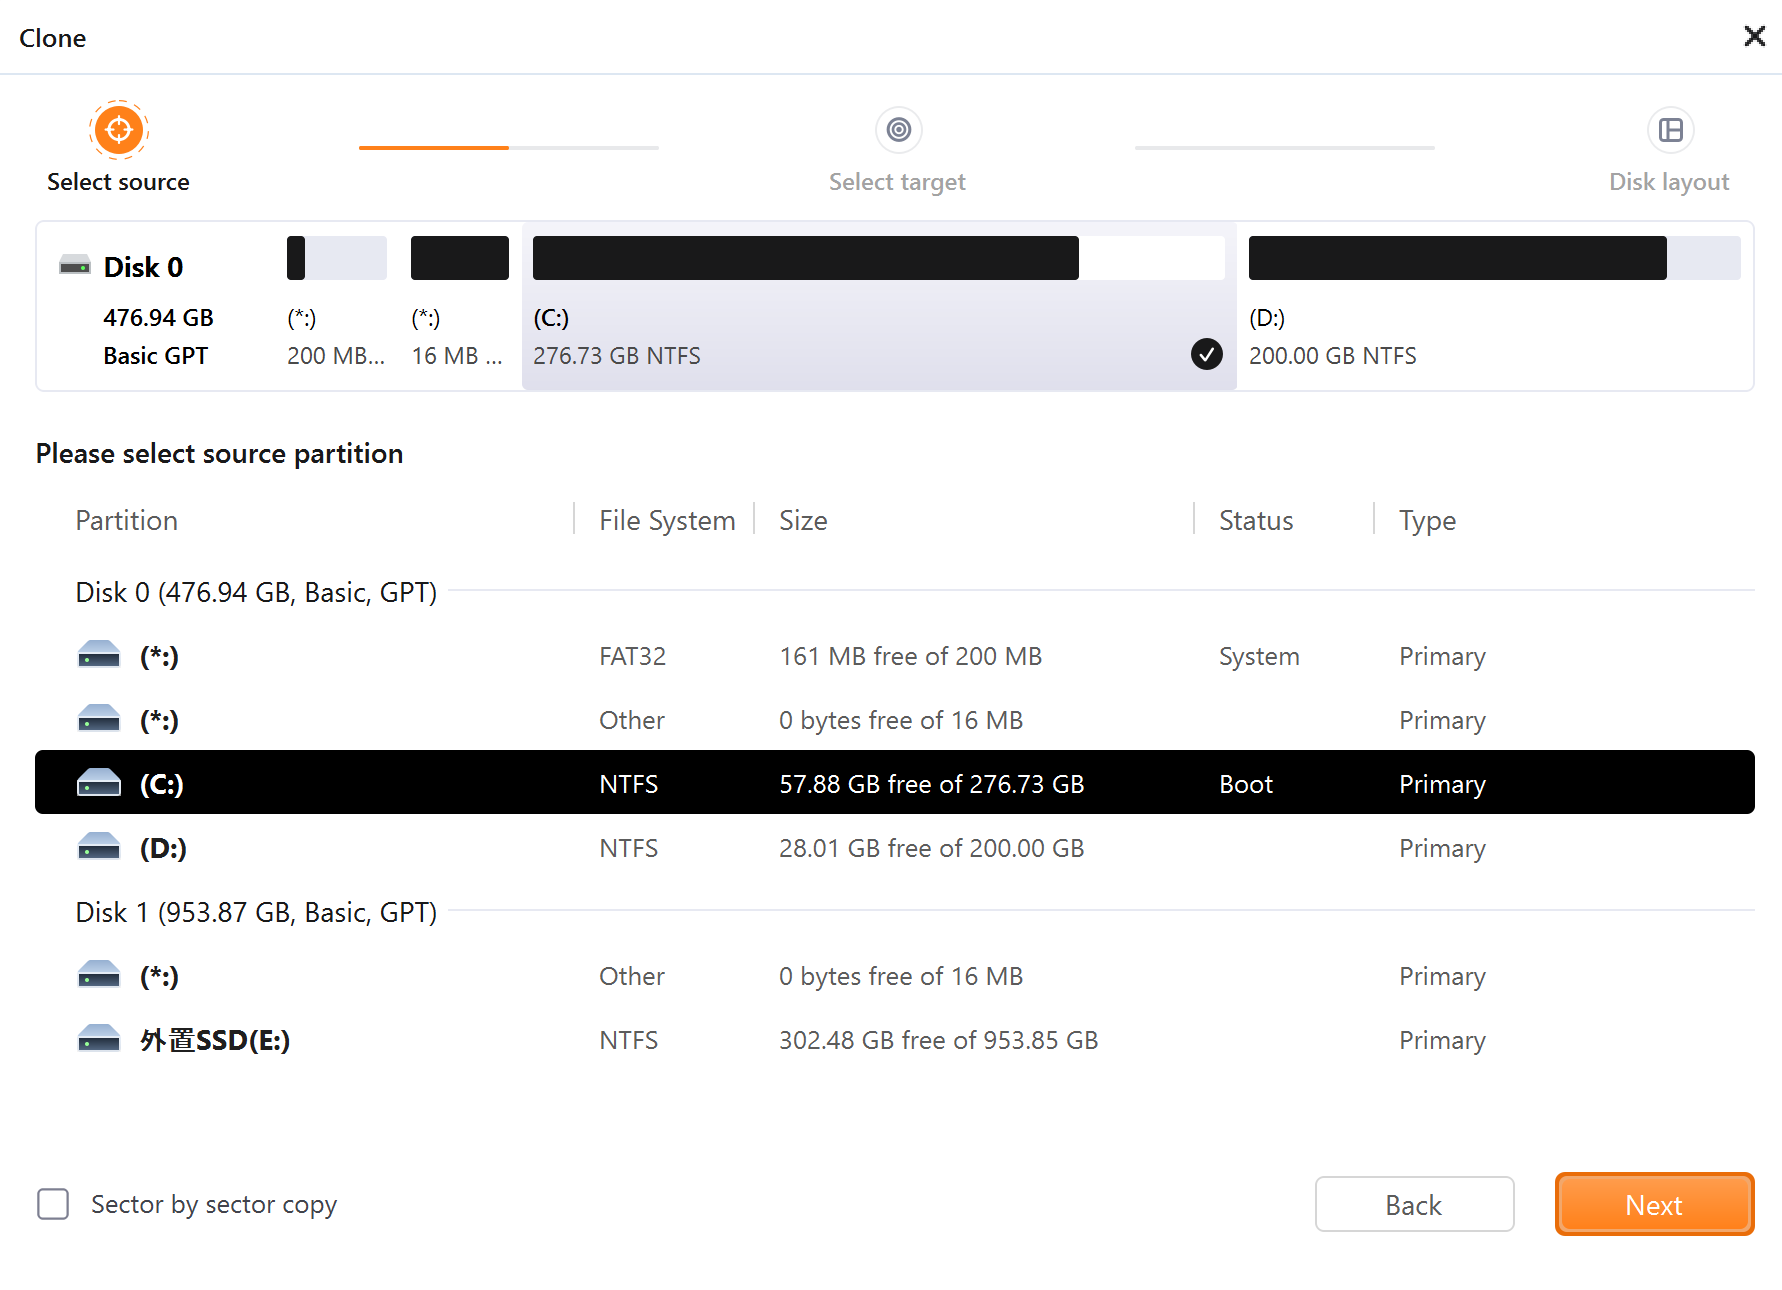
1. Click Tools, and choose Clone-Partition Clone.
2. Select the source partition and target partition in the disk list and click Next-Proceed.
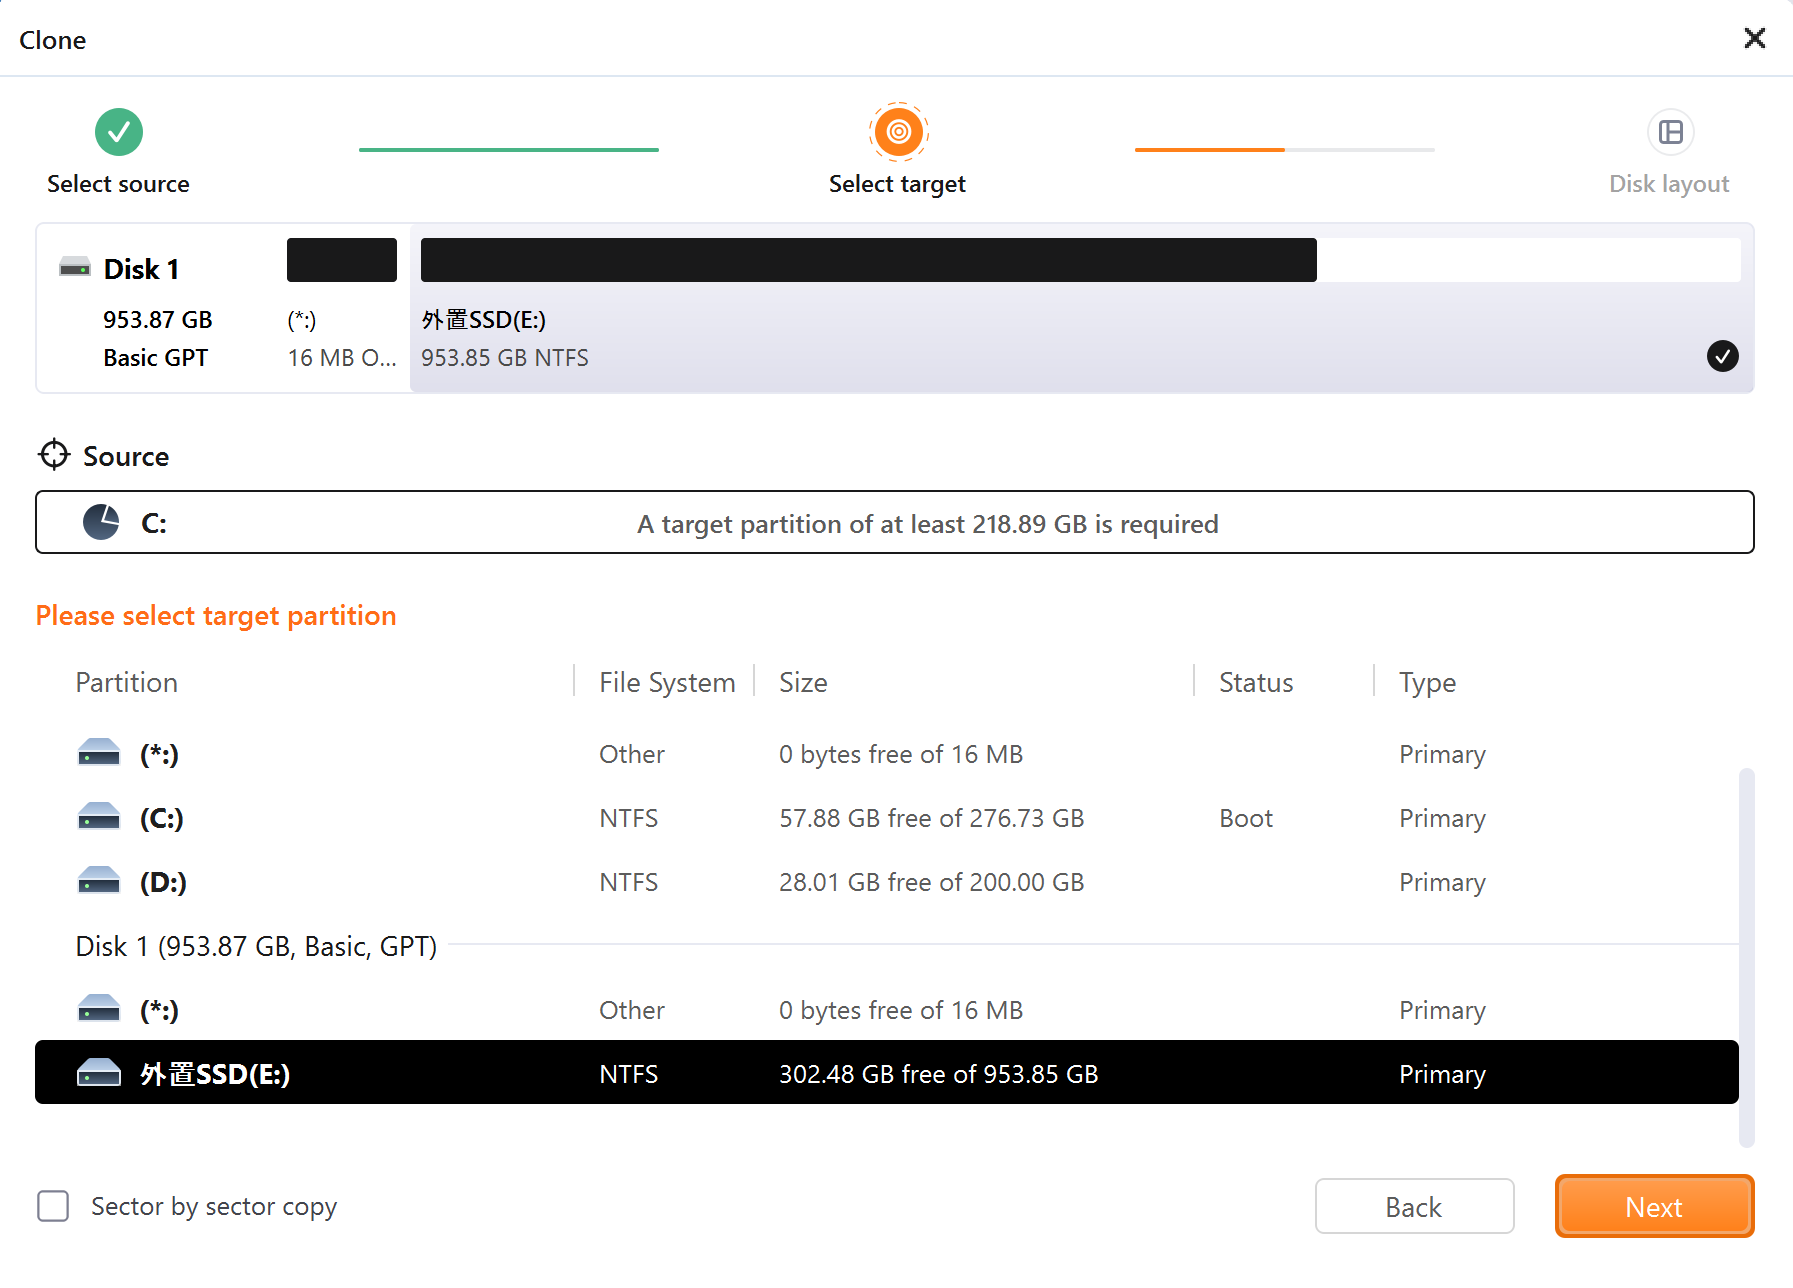
3. The popup of a warning erasing the target partition data will appear, please click Continue.
System Transfer
As most hardware requires a corresponding driver to be installed in order to function, it is not feasible for users to simply transfer their system to a new machine with a different hardware configuration and expect it to run smoothly without the necessary drivers.
EaseUS Todo Backup offers a solution to this problem with its System Transfer feature. This option is particularly useful in situations where users need to migrate their system to a new, more powerful PC or restore the old system after some hardware upgrades.
Before starting the recovery process, make sure that you have the following:
1. A valid system image file created with either the System Backup or Disk/Volume Backup.
2. A proper WinPE emergency disk/USB that can be loaded correctly on the target machine.
3. The inf driver file of the new hardware on the target machine.
Note:
System Transfer is only available for Home and higher editions.
It is allowed to place the system image file and the inf driver file on the WinPE bootable drive if you have enough free space there.
Steps:
1. Load the target machine from the WinPE emergency disk and ensure the drive that contains system image files has been connected to the machine already.
2. Find the option System Transfer in the Tools menu in the right corner.
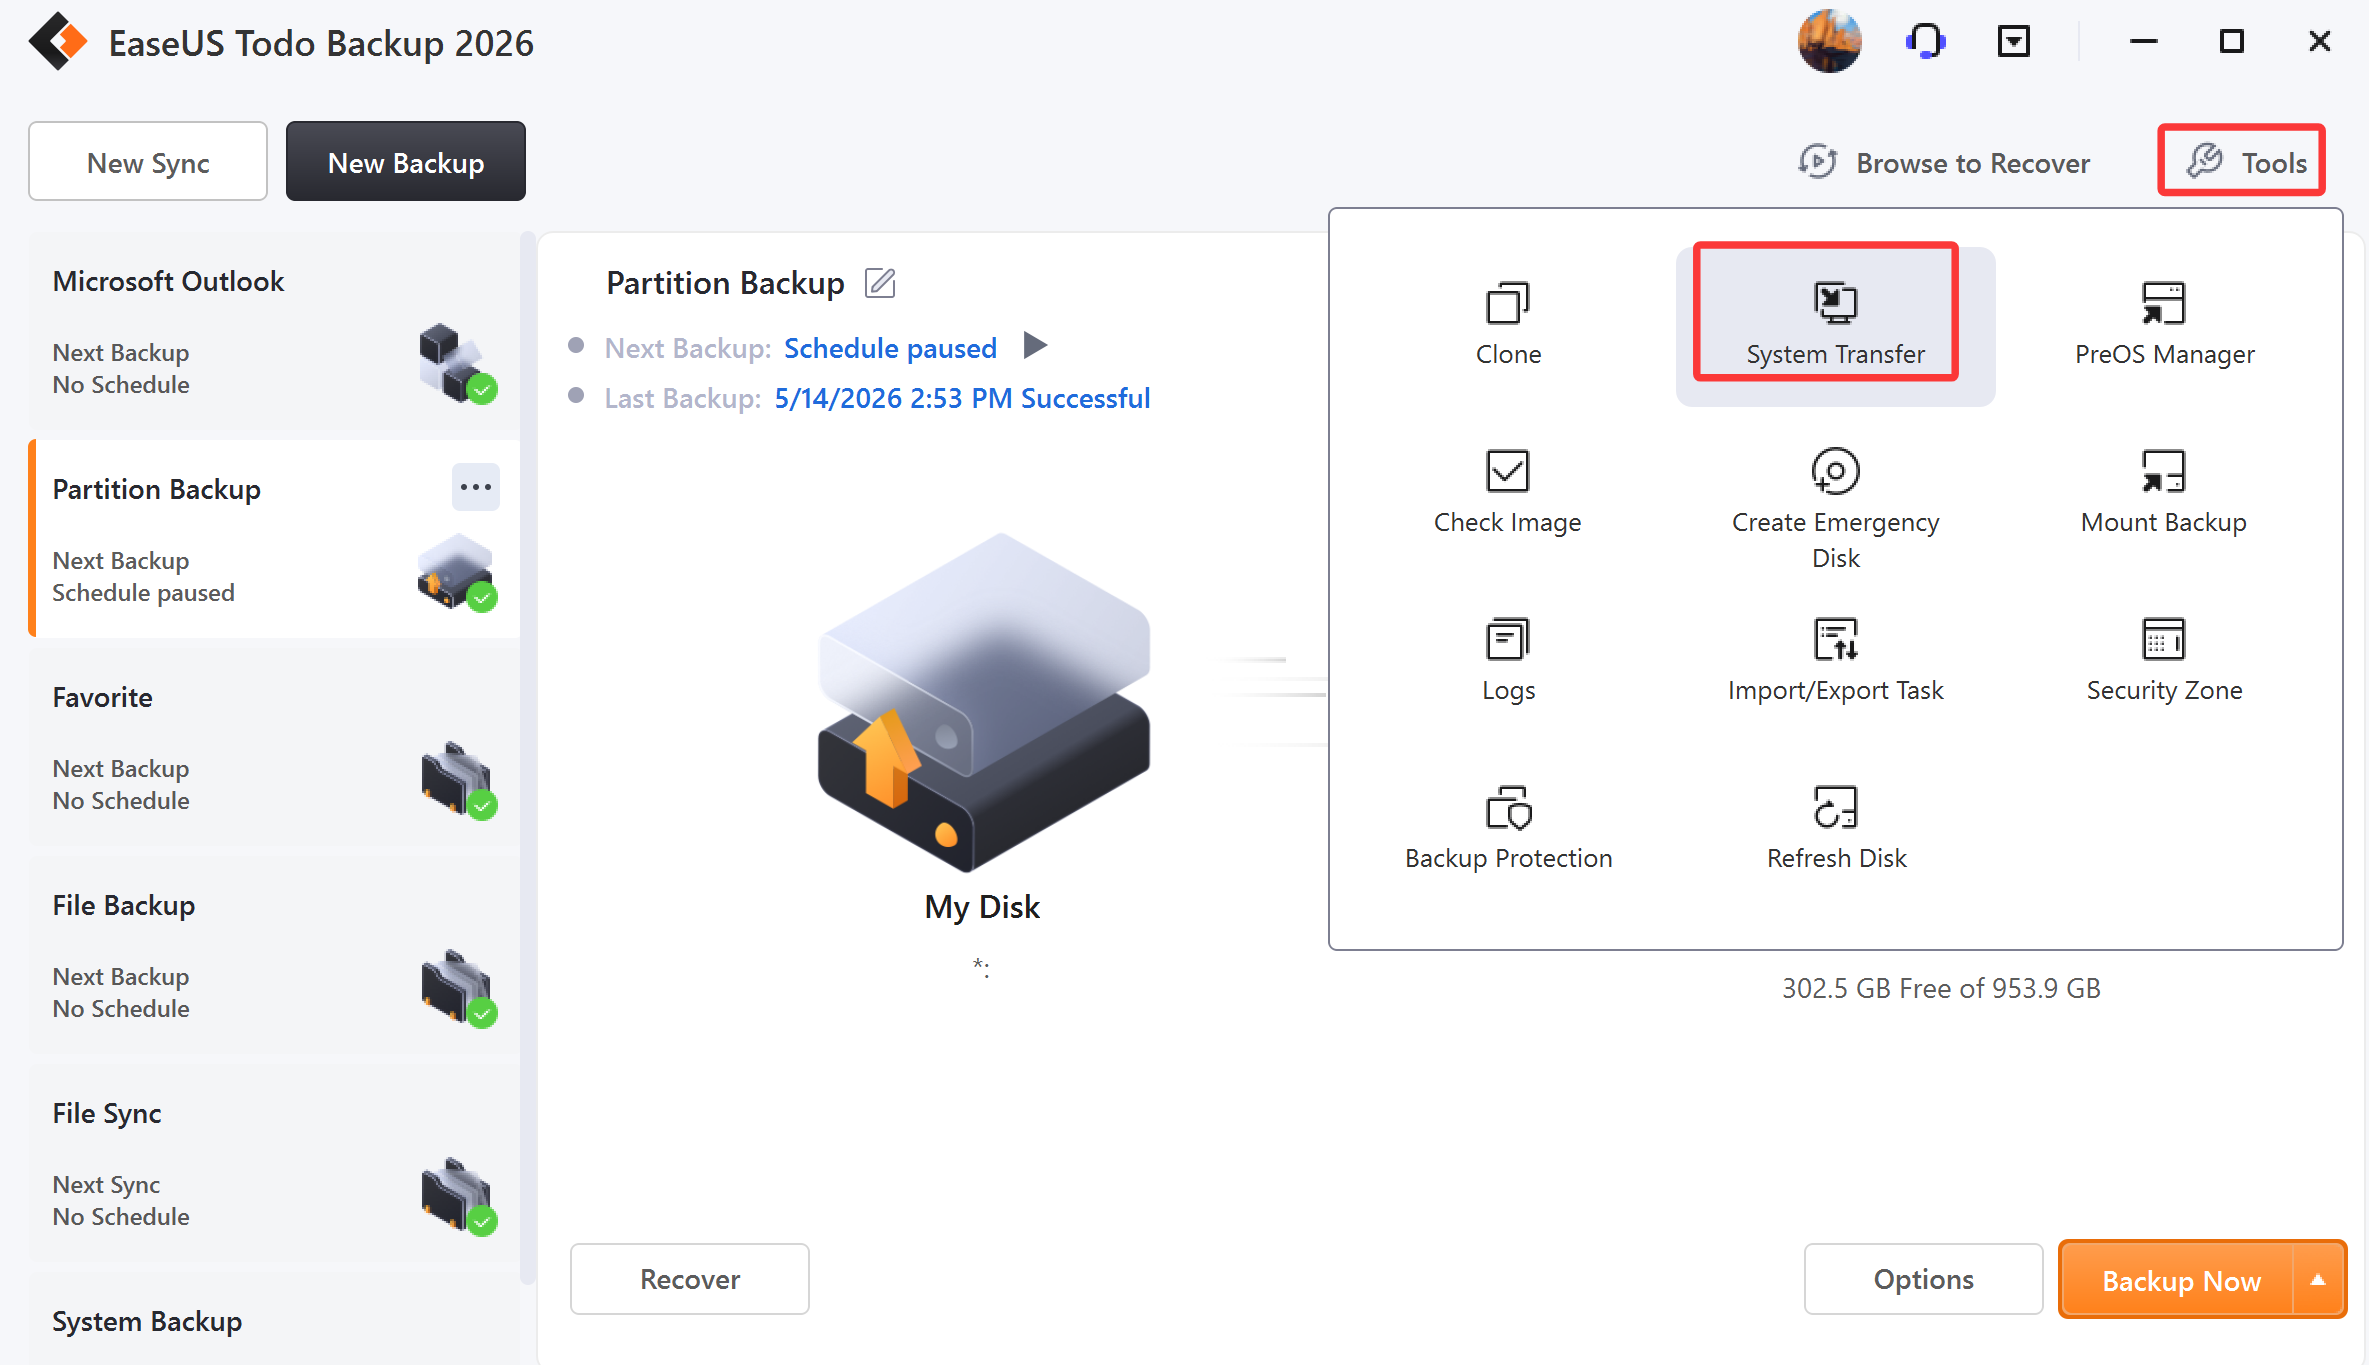
3. Browse and load the system image file, click OK.
4. Select the version you want to restore, confirm the content, and click Next.
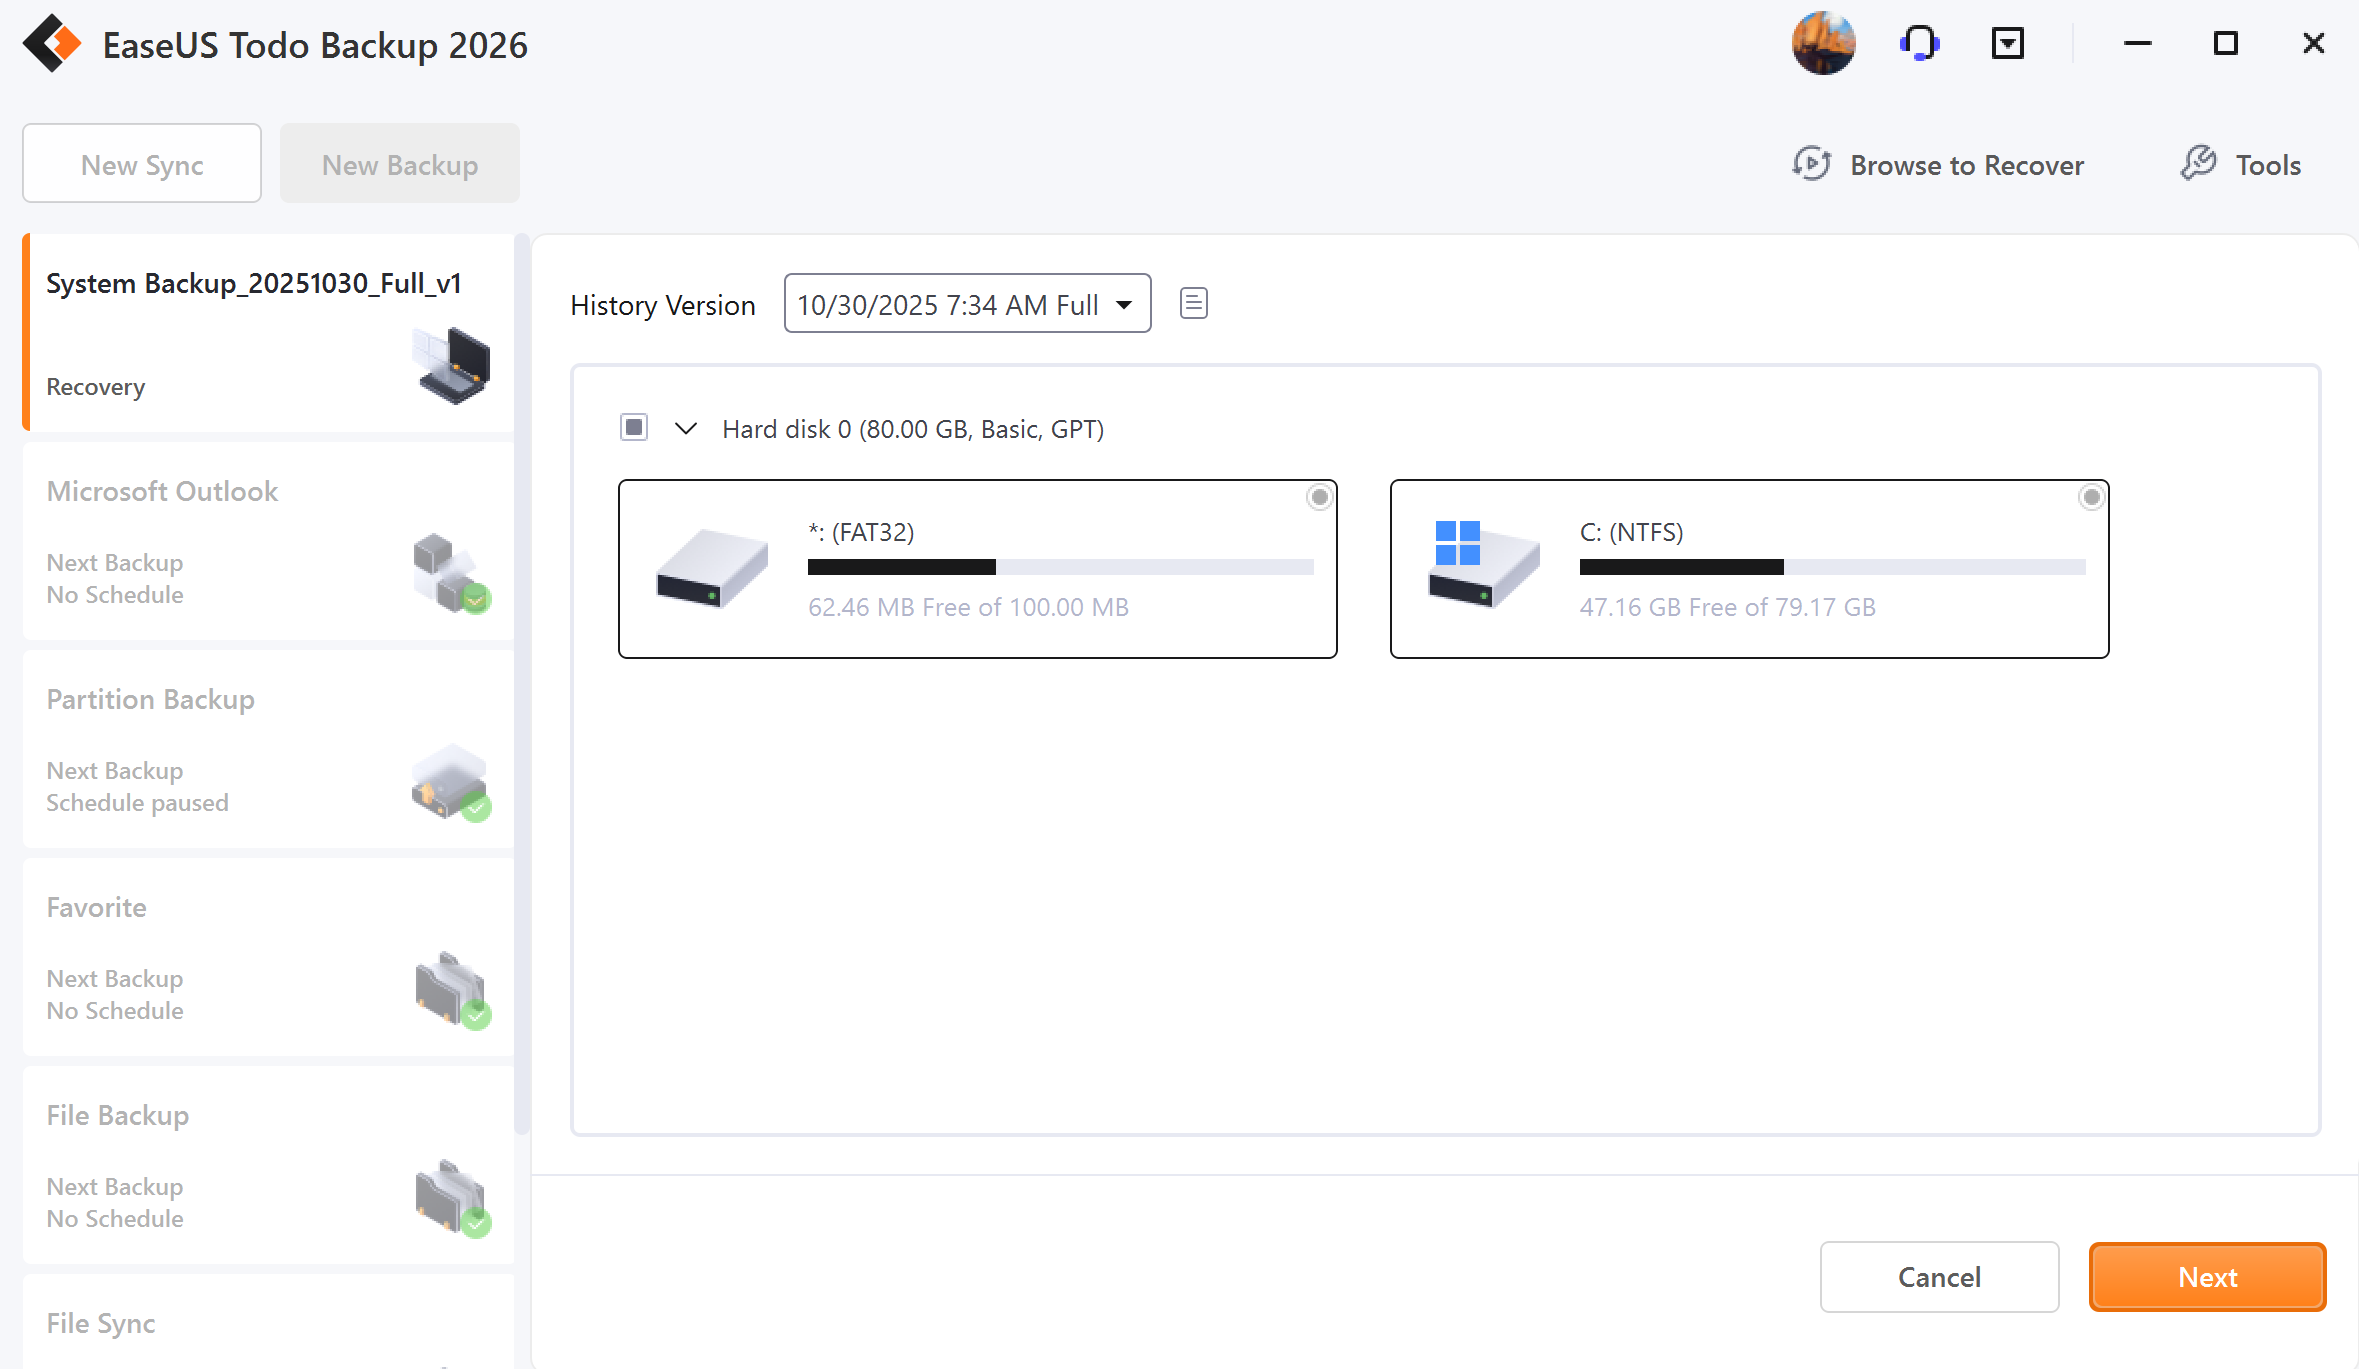
5. Select the target drive, and restore.
6. After system recovery finishes, you may get some prompted windows asking for the driver (.inf file) of a specific hardware. You can find the driver according to the listed hardware info, and add it to ensure you can load from the system normally after the entire system migration is done.
Note:
Sometimes, if you have some special hard drives, say, hardware RAID, or SCSI drive, they may be not listed by default in the WinPE environment. Then corresponding driver needs to be installed in order to make the drives available. For more info, you can read:
What to do if the drive cannot be listed by default.
Check Image
The Check Images feature in our product enables you to verify the validity of an image file. If any errors are detected during the checking process, it's likely that the image file is damaged and cannot be used for recovery purposes.
To check the images, simply click on Check Image and select a backup plan to verify all related image files. Alternatively, you can choose to check a specific image file by clicking on Browse located at the top right corner.
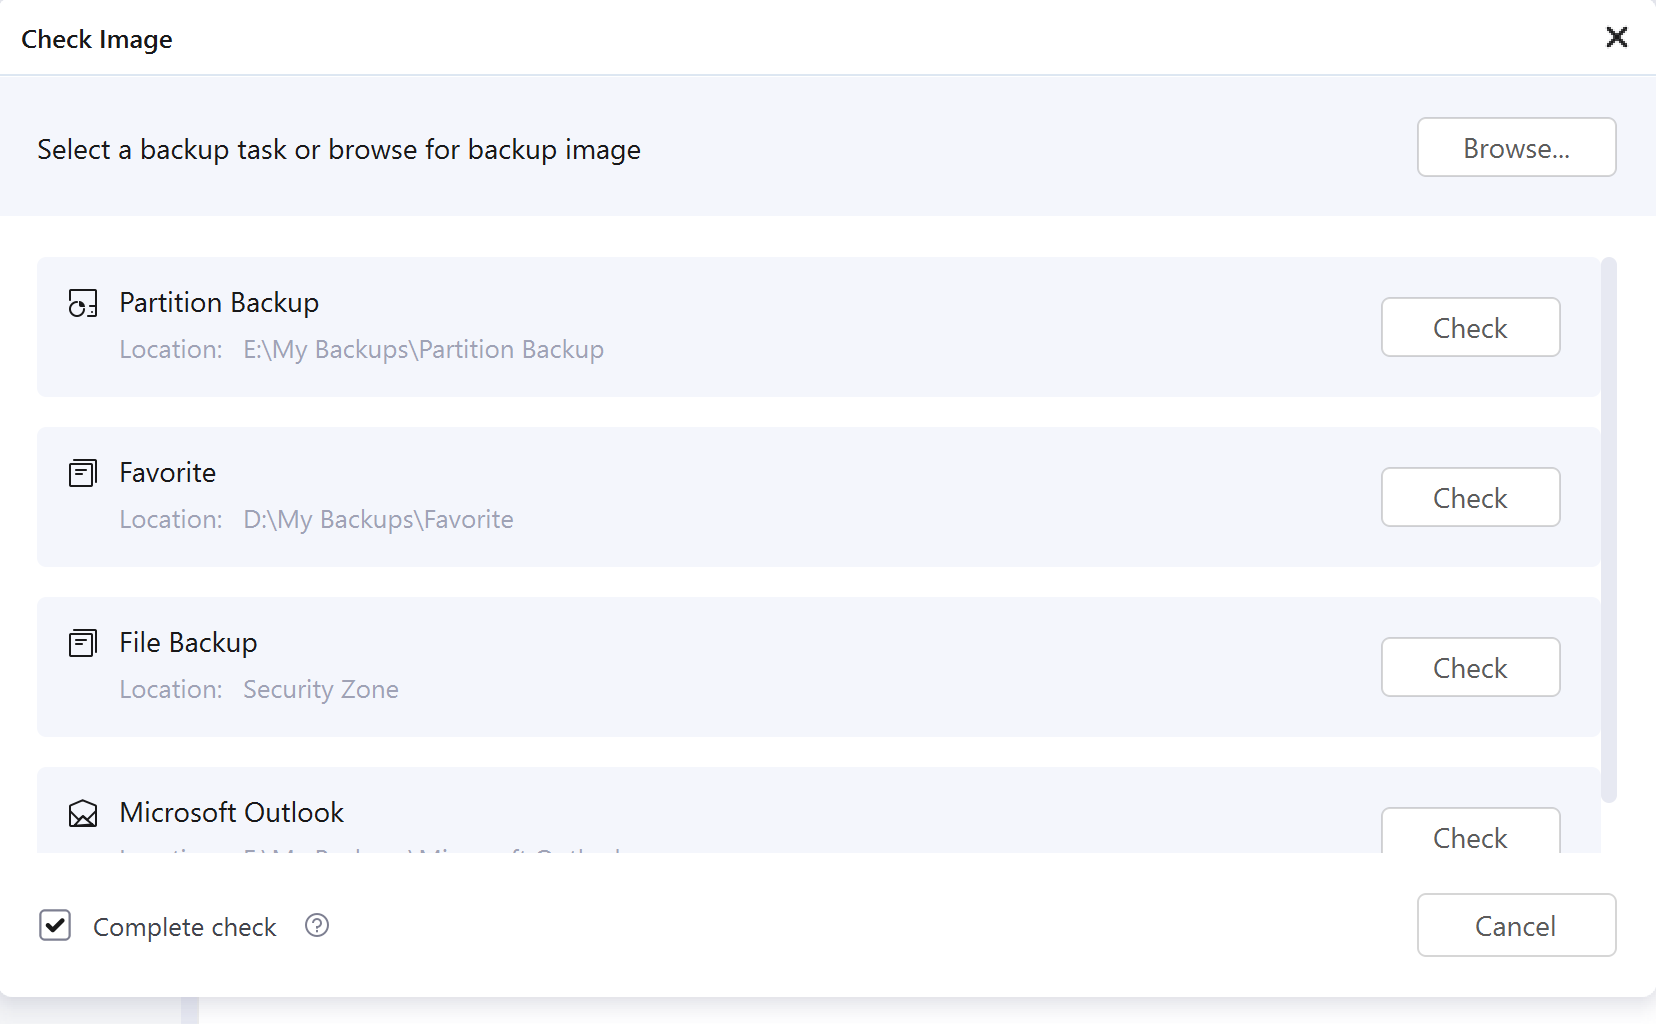
Note:
All the images under this backup plan will be checked. So it would take a long time if the backup plan had a large number of images.
Create Emergency Disk
EaseUS Todo Backup allows users to create an emergency USB disk or CD/DVD. It is indispensable when the Windows system fails to boot.
Steps
1. Click Tools->- Create Emergency Disk.
2. In this step, you can choose to export the ISO file and burn it to a USB flash drive or CD/DVD.
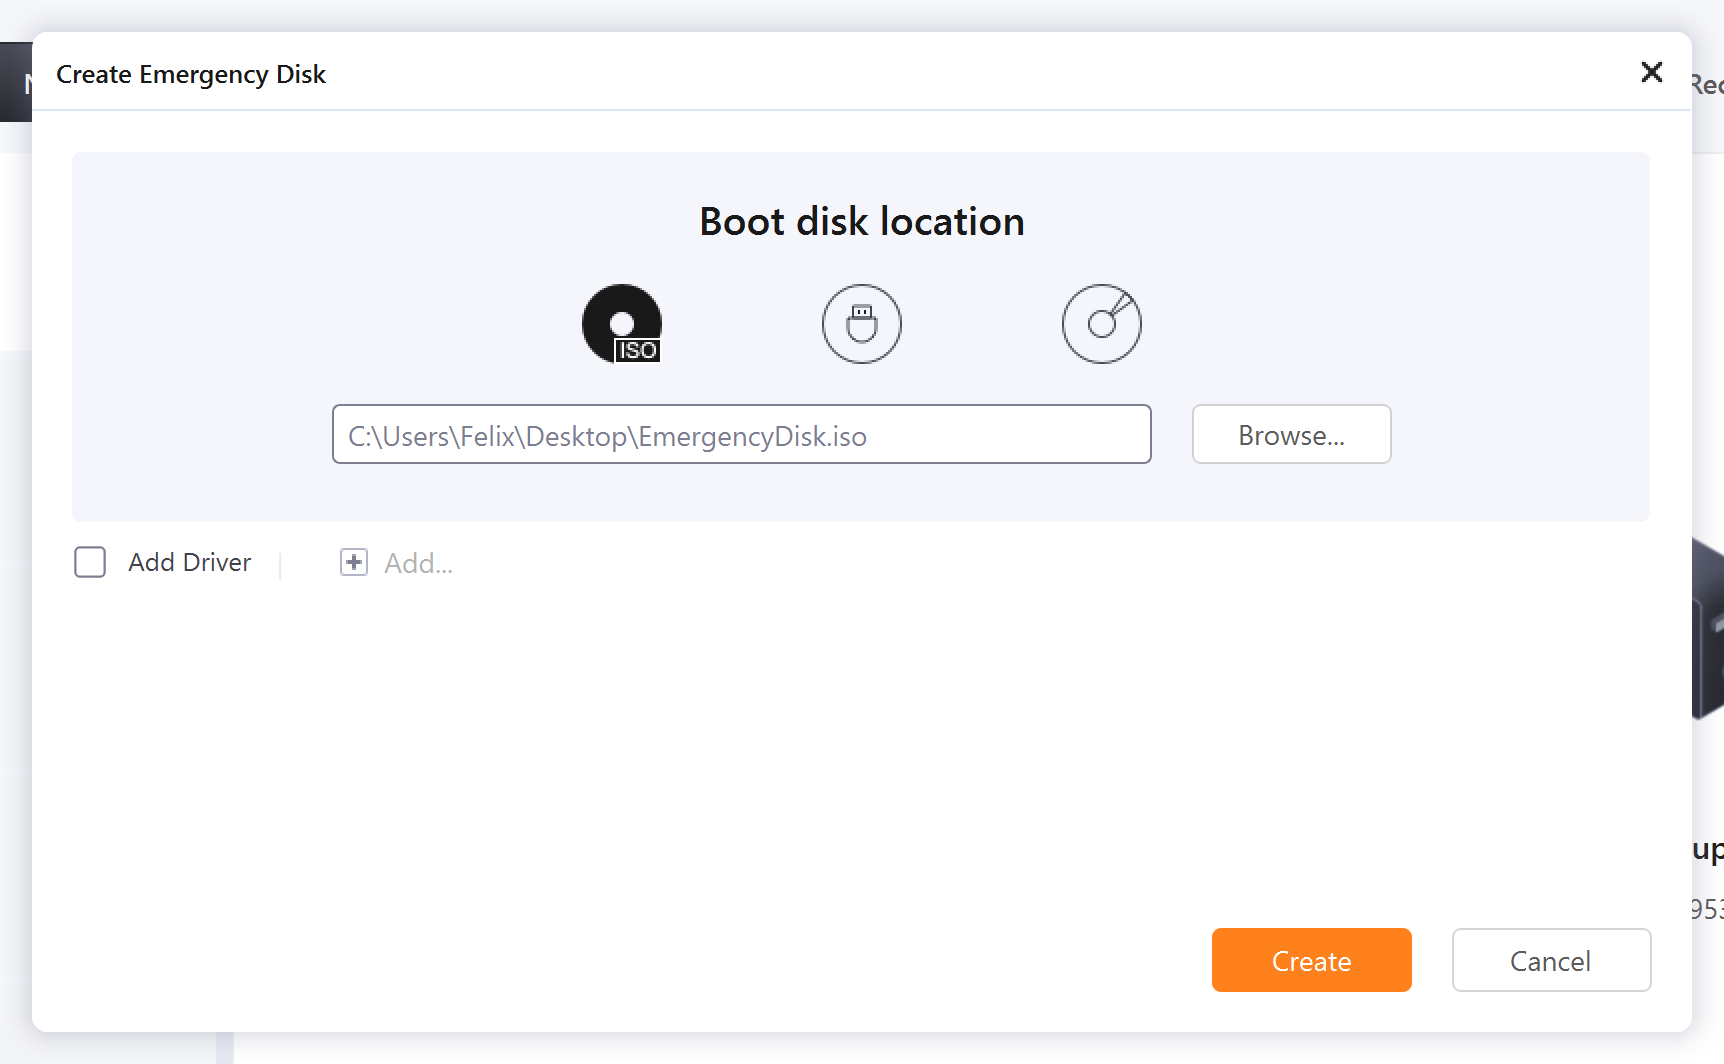
Check the Add Driver option then click the Add to add desired driver for your WinPE bootable disk. You are suggested to add a disk, RAID, and network card driver to avoid Todo backup having trouble recognizing your hard disk or network drive in the WinPE environment.
Note:
To learn more information about WinPE emergency disks, please click here.
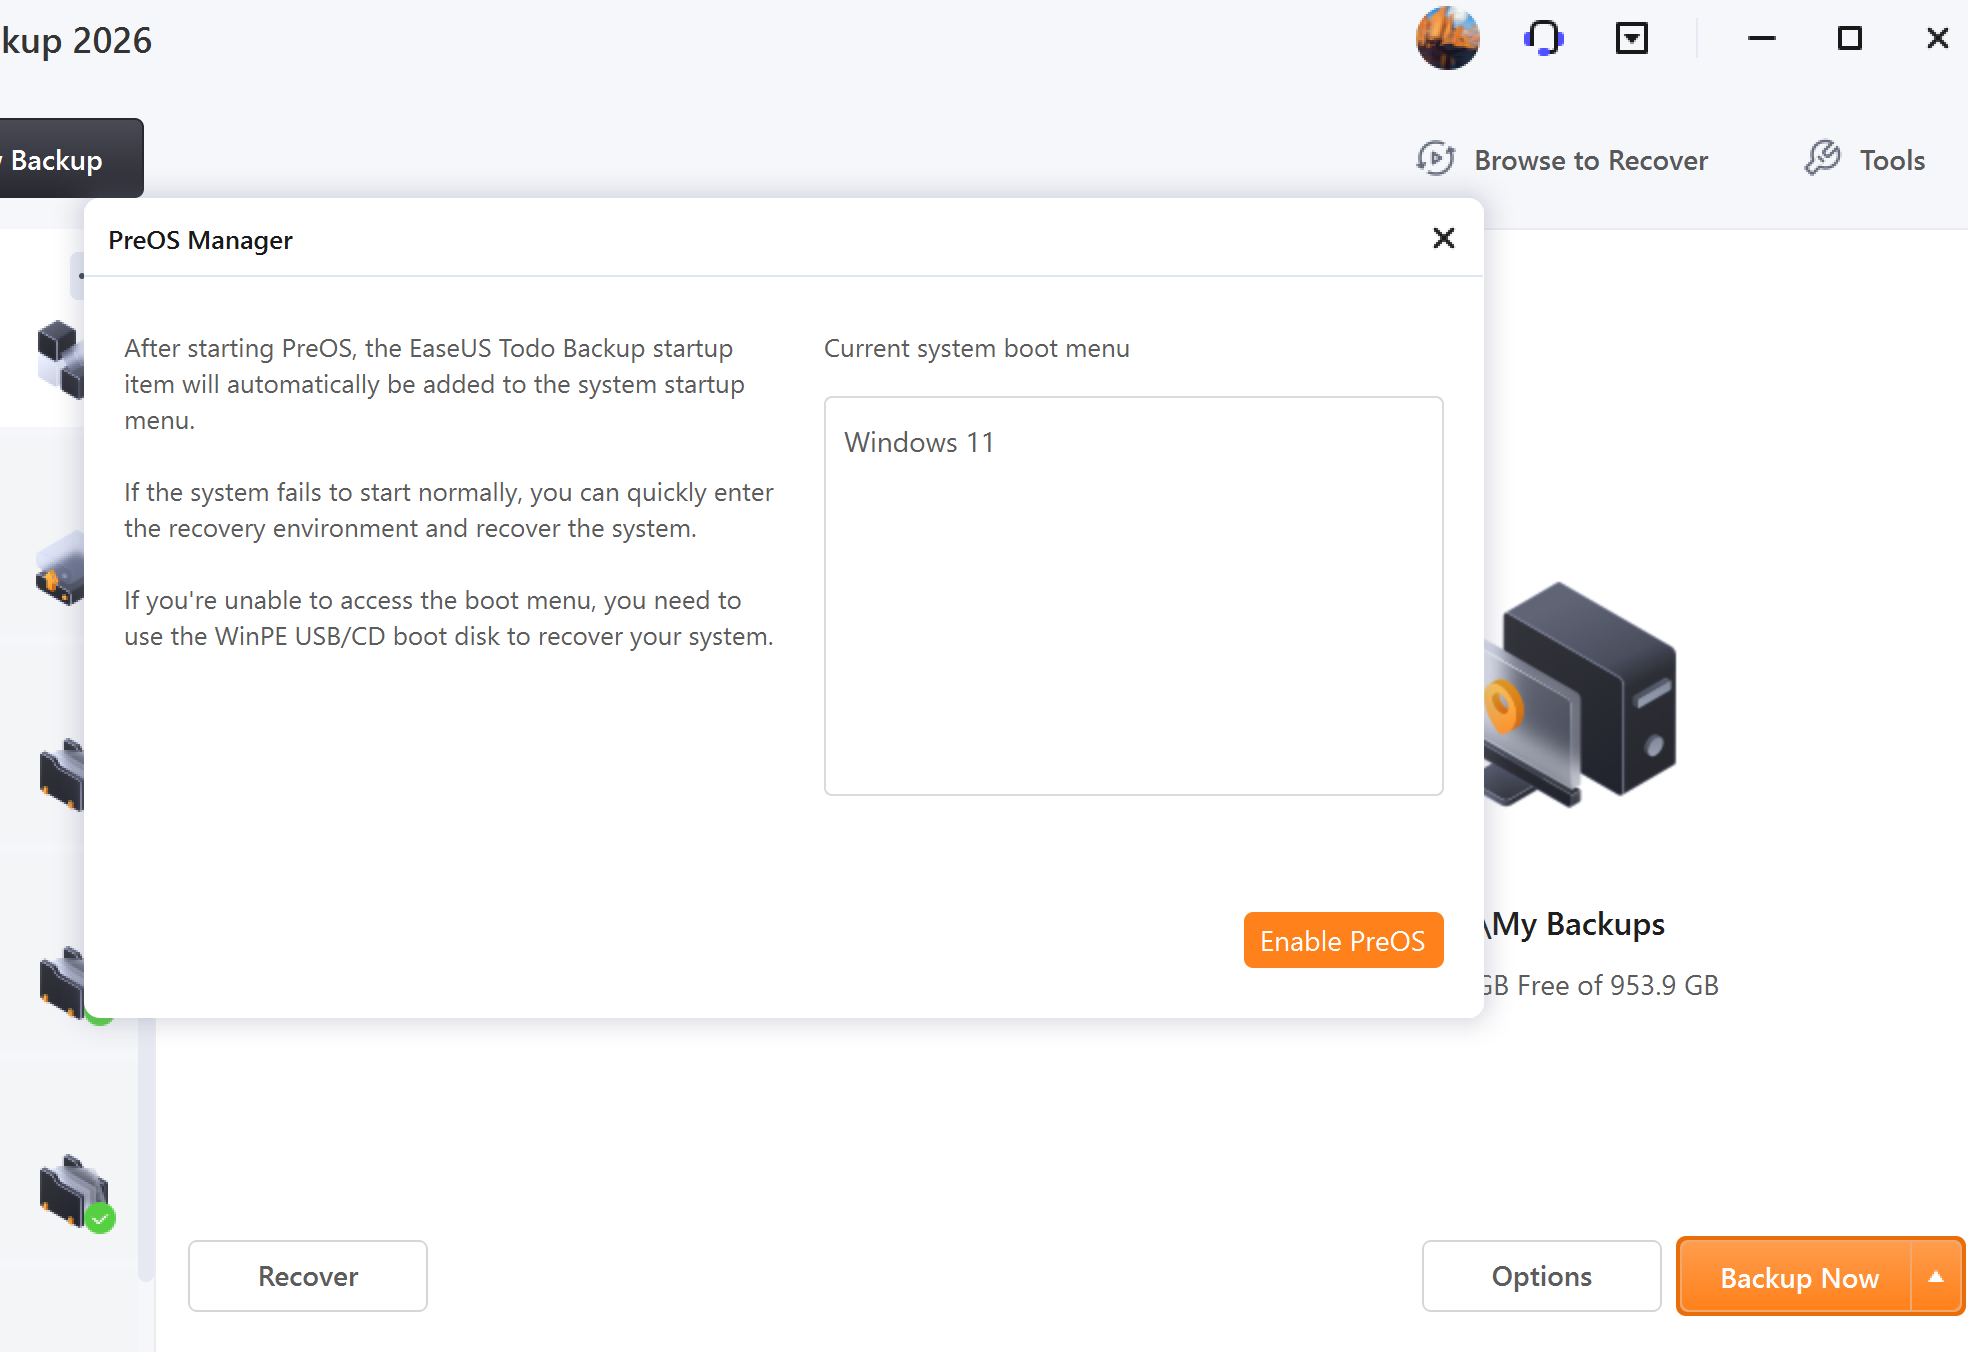
Enable/Disable Pre-OS
Pre-OS can be considered as an alternative to WinPE bootable disk. It can also help you recover the system when unexpected failure occurs.
Switch the status of Pre-OS between Enable and Disable.
The name of the button depends on the current status of Pre-OS. If Pre-OS is currently enabled, the button will be Disable Pre-OS.
Once the Pre-OS is enabled, you will get an EaseUS boot menu when the computer boots. After selecting it, you will get into EaseUS Todo Backup instead of the Windows.
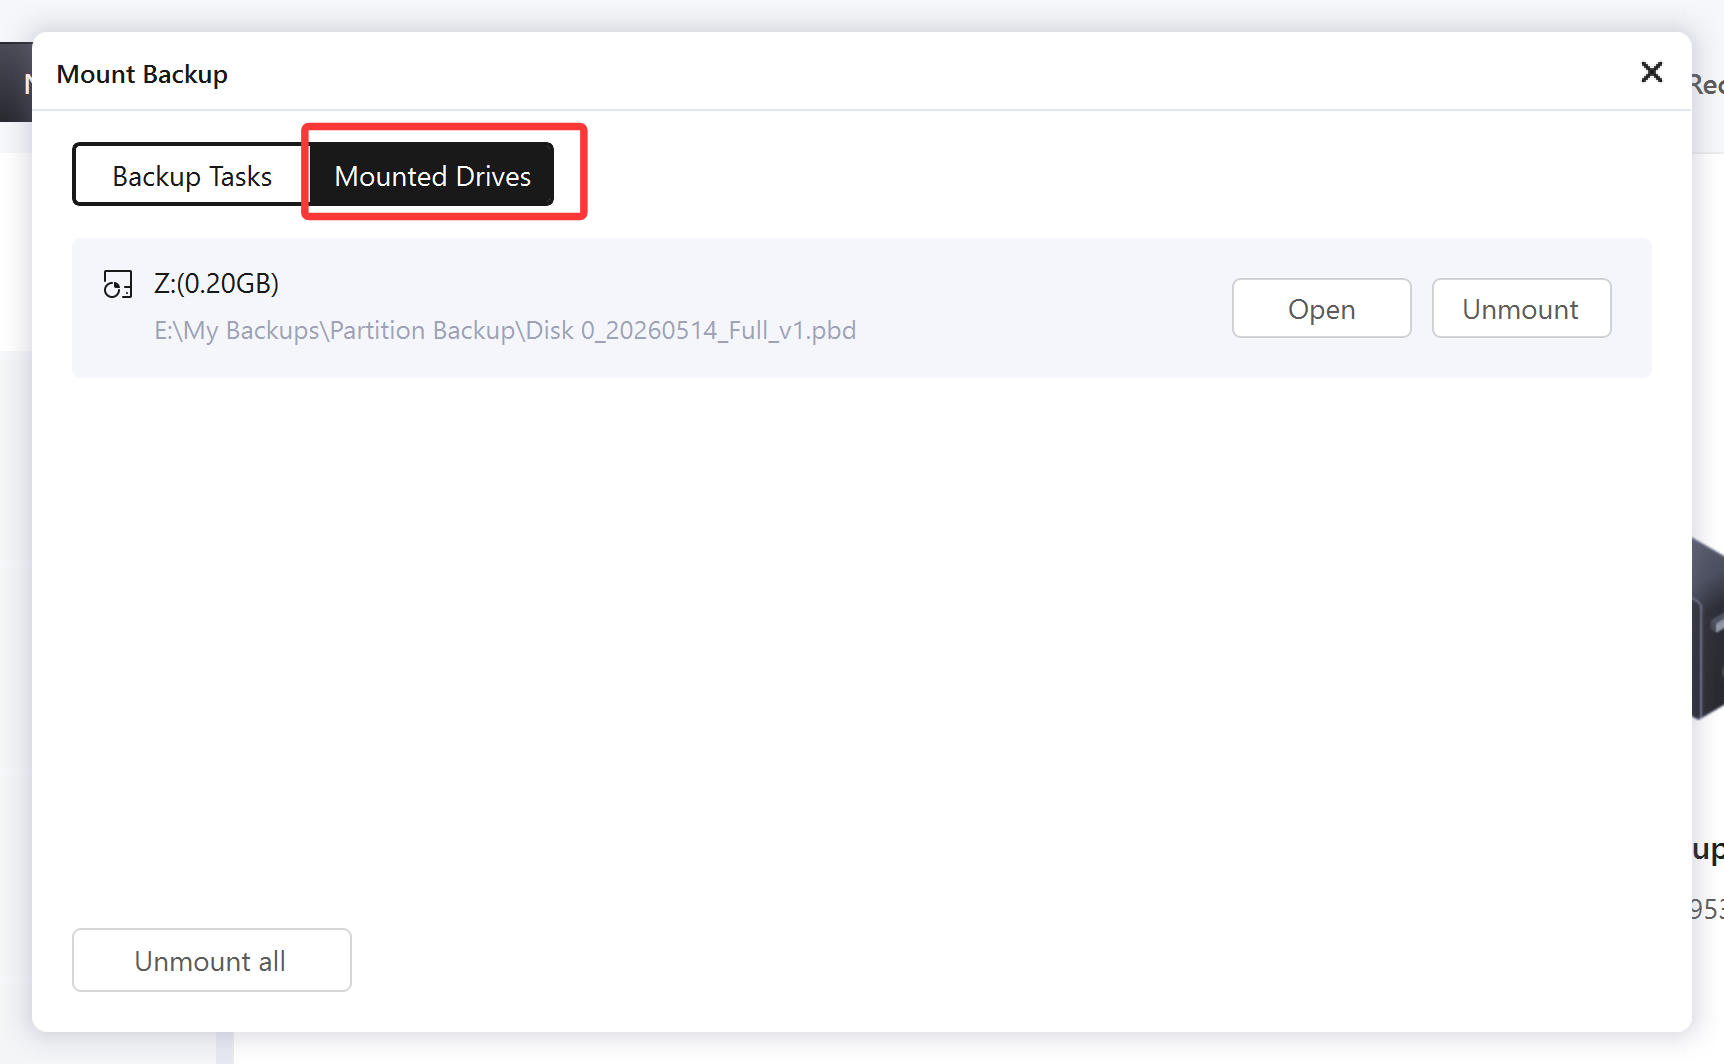
Mount Backup
Our product provides a convenient mount function that allows users to browse and confirm files and folders in a disk/partition image or system image (*.PBD file). With this feature, you can easily copy the needed files from the mounted drive without the need to restore the entire image. Additionally, the mount function is an effective way to check whether a created image is valid or not.
1. Click Tools->-Mount Backup, all available backups will be listed.
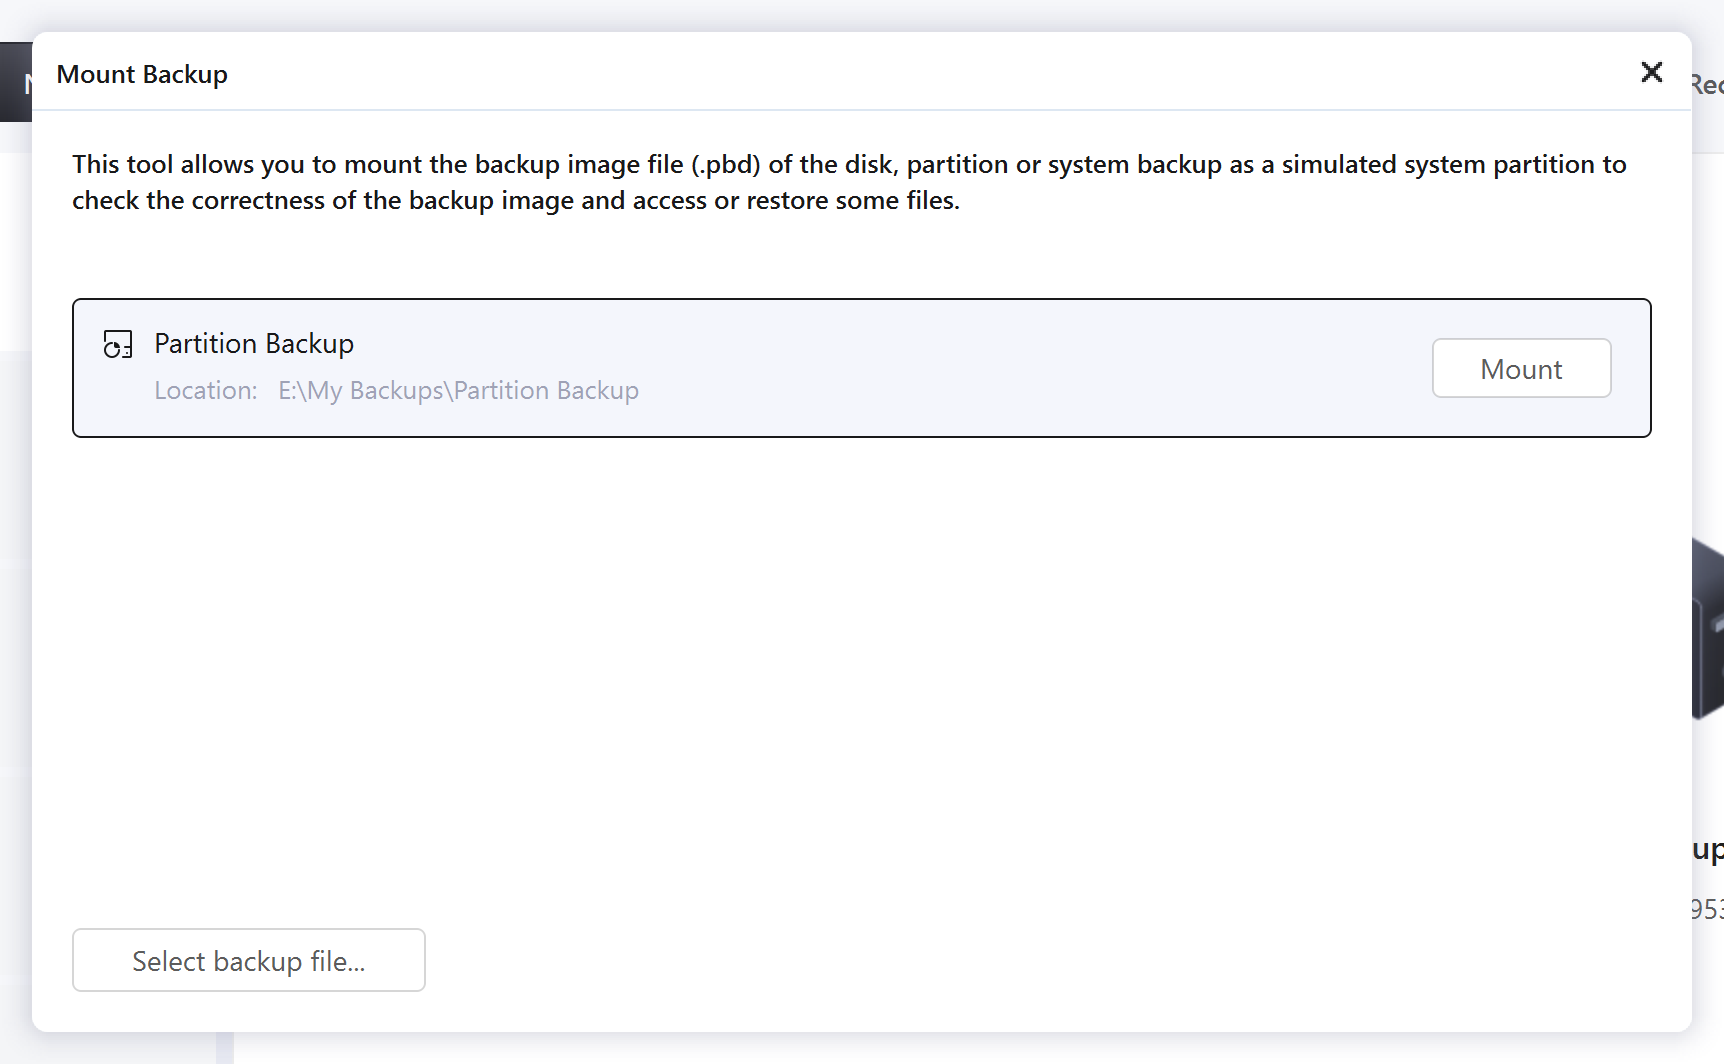
2. Select one backup and click Mount.

3. Select the Source and click Proceed to start the mount operation.
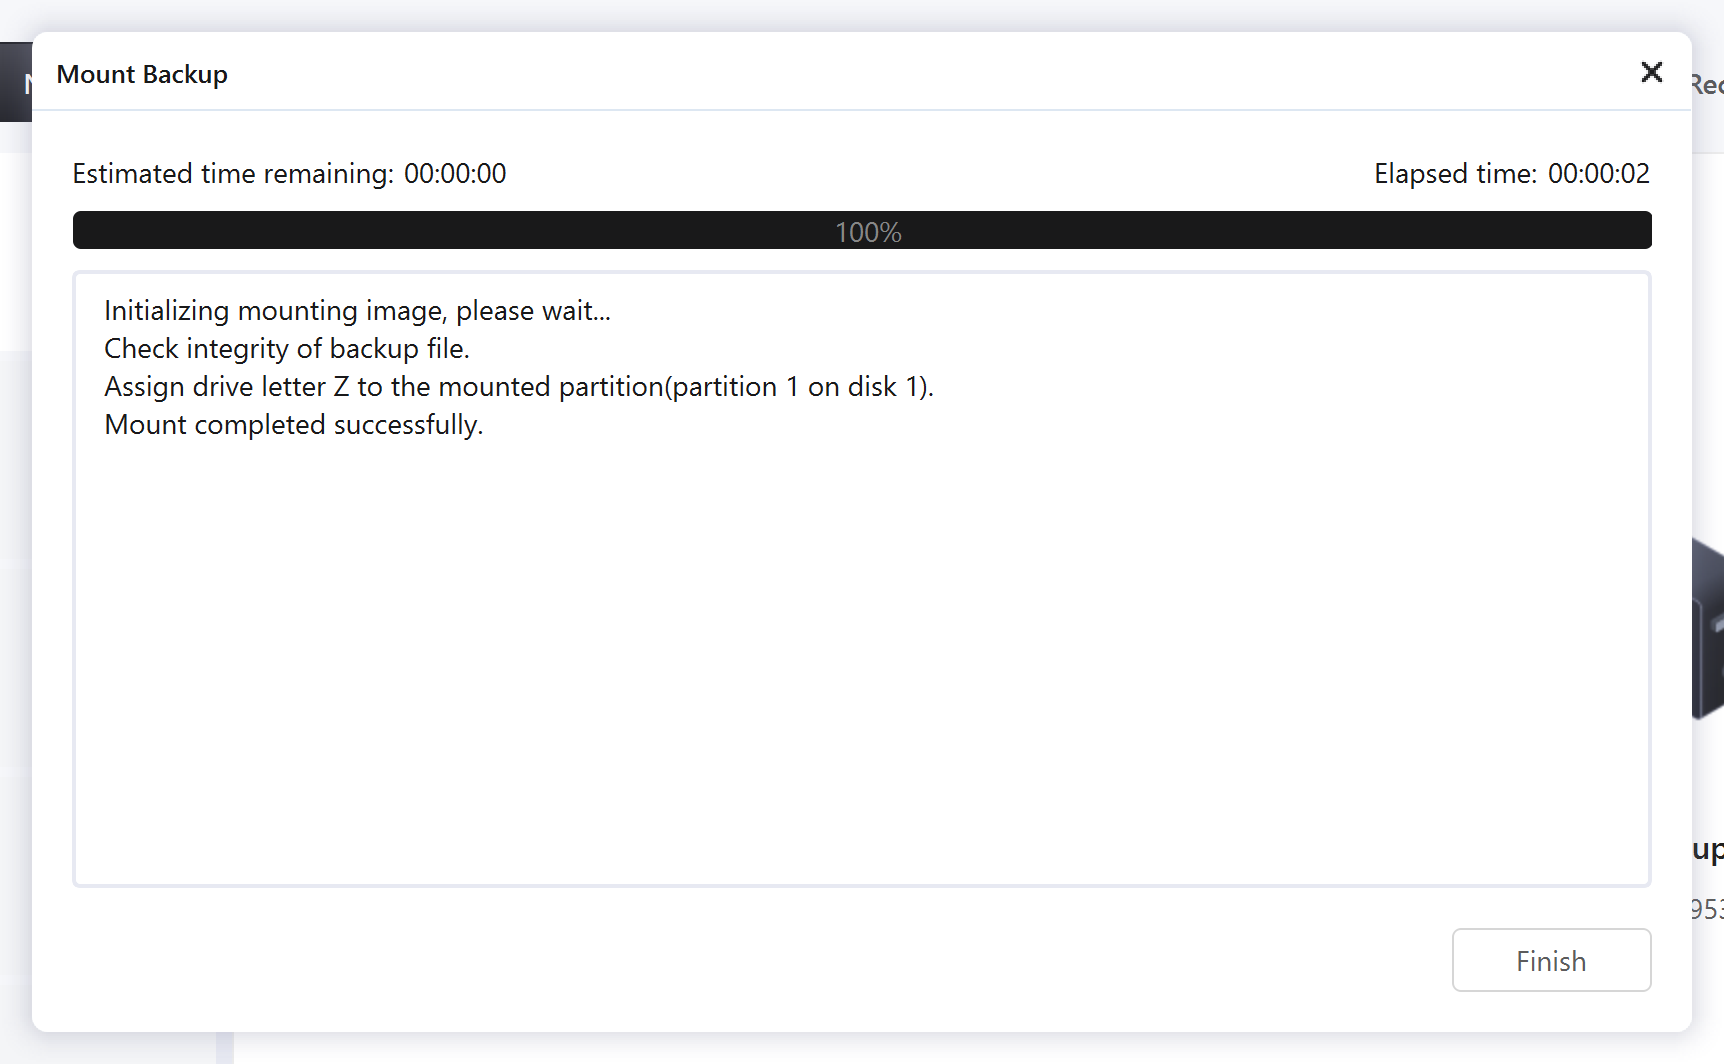
4. If you need to unmount the image, please click Mounted Drives.
Tips:
Disk/Volume backup and System backup images are supported only.
A password is necessary for an encrypted backup image.
To fully access the mounted virtual partition, please make sure the image is created and mounted in the same Windows account.
The Mounted drive will automatically disappear after the computer restarts.
Logs
All the backup operations and statuses are recorded in Logs.
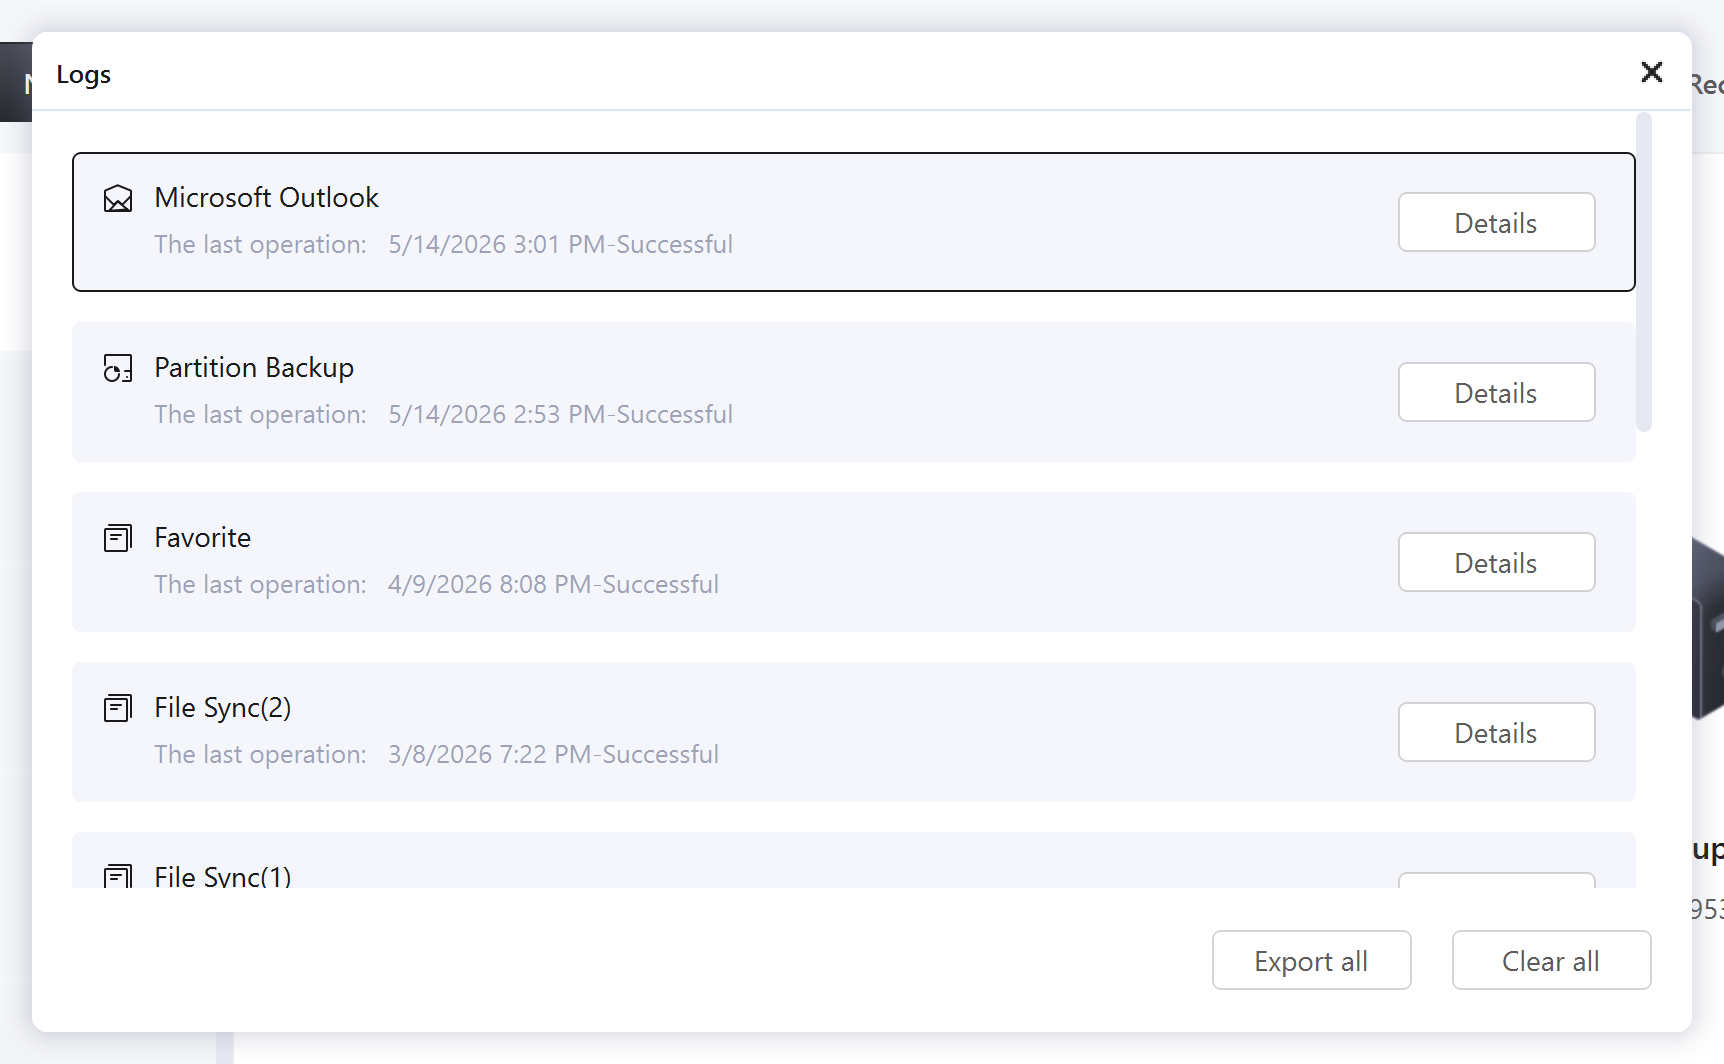
These operations can be performed:
Export all - Output all logs to a TXT or XLS file.
Clear all - Delete all logs.
Details - Show the detailed records of one backup plan.
Note:
Failed operations are marked in red.
Refresh Disk
Refresh Disk is used to load the latest status of local hard drives after a disk is updated or newly added when our product is still running. It is also necessary to use this option after adding the driver file of a disk in WinPE.
Security Zone
Security Zone is a secret partition used to safely store your backup image files. The security partition cannot be explored or modified on Windows once created, and it is able to protect your backup files from being destroyed either by malware or faulty operation.
Go to Tools=>Security Zone. Click Create Security Zone to start creating the security partition. Note that only one security partition can be created on one computer.

Select the partition with enough space to store your backup files, and adjust the size of the security zone based on your requirements.
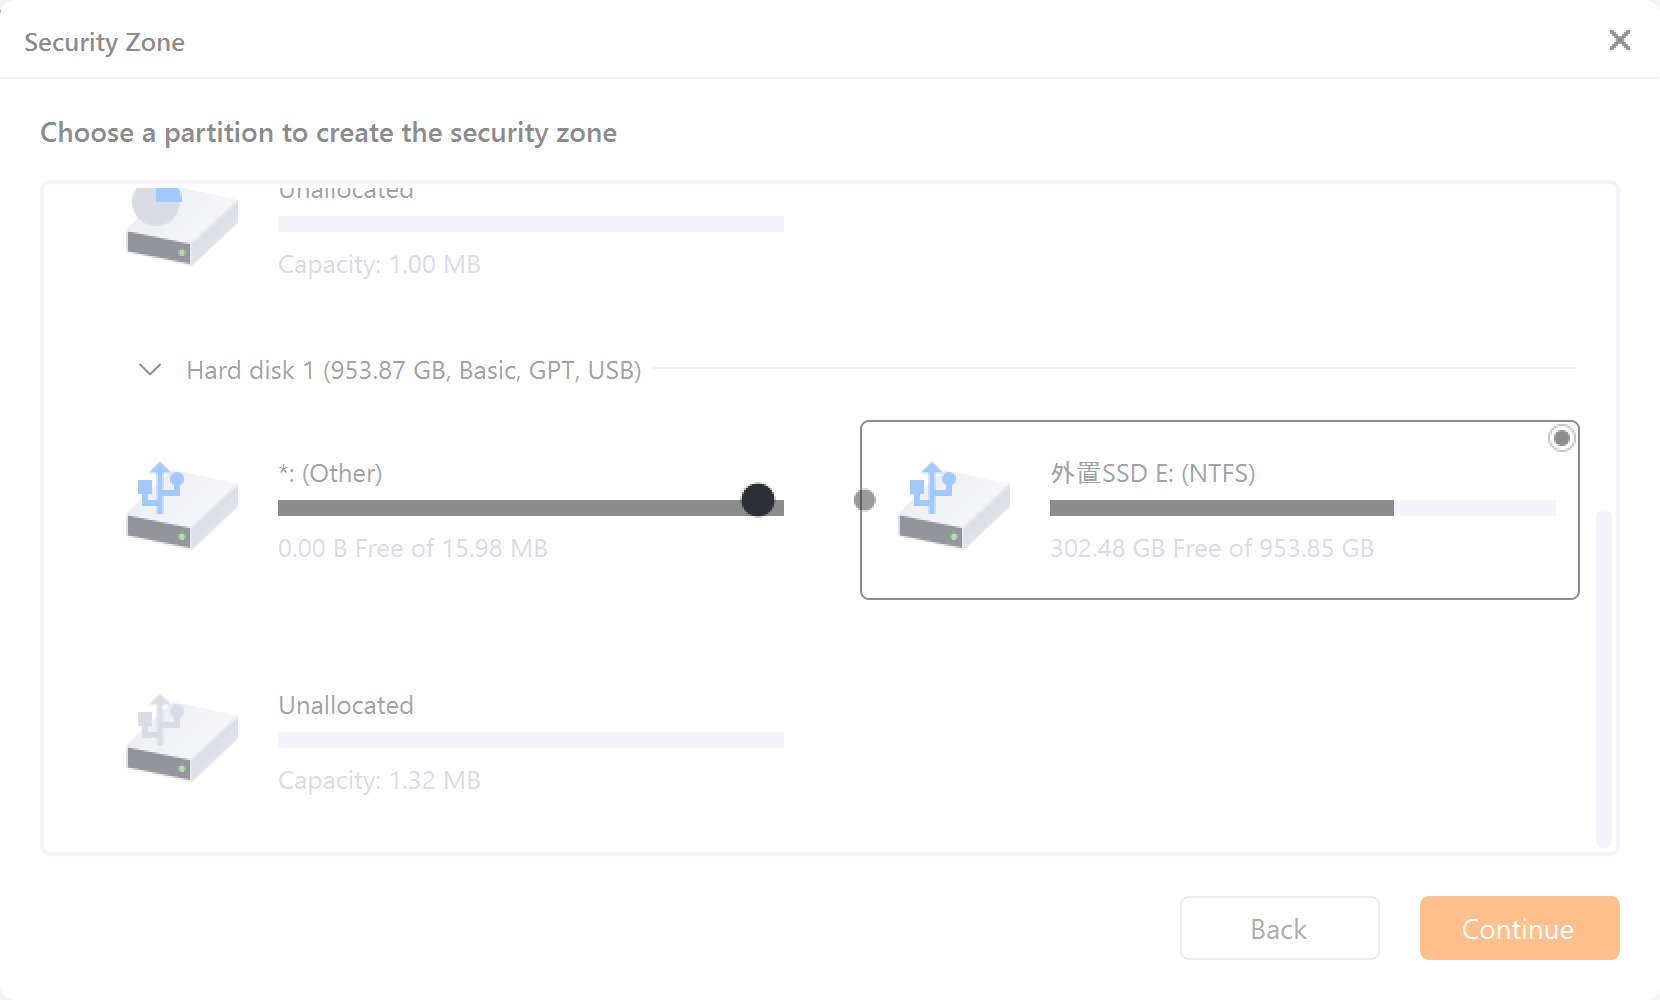

EaseUS Todo Backup will use the space you assign to create a security partition. This partition does not have a drive letter, and it cannot be viewed or opened in Windows Explorer.
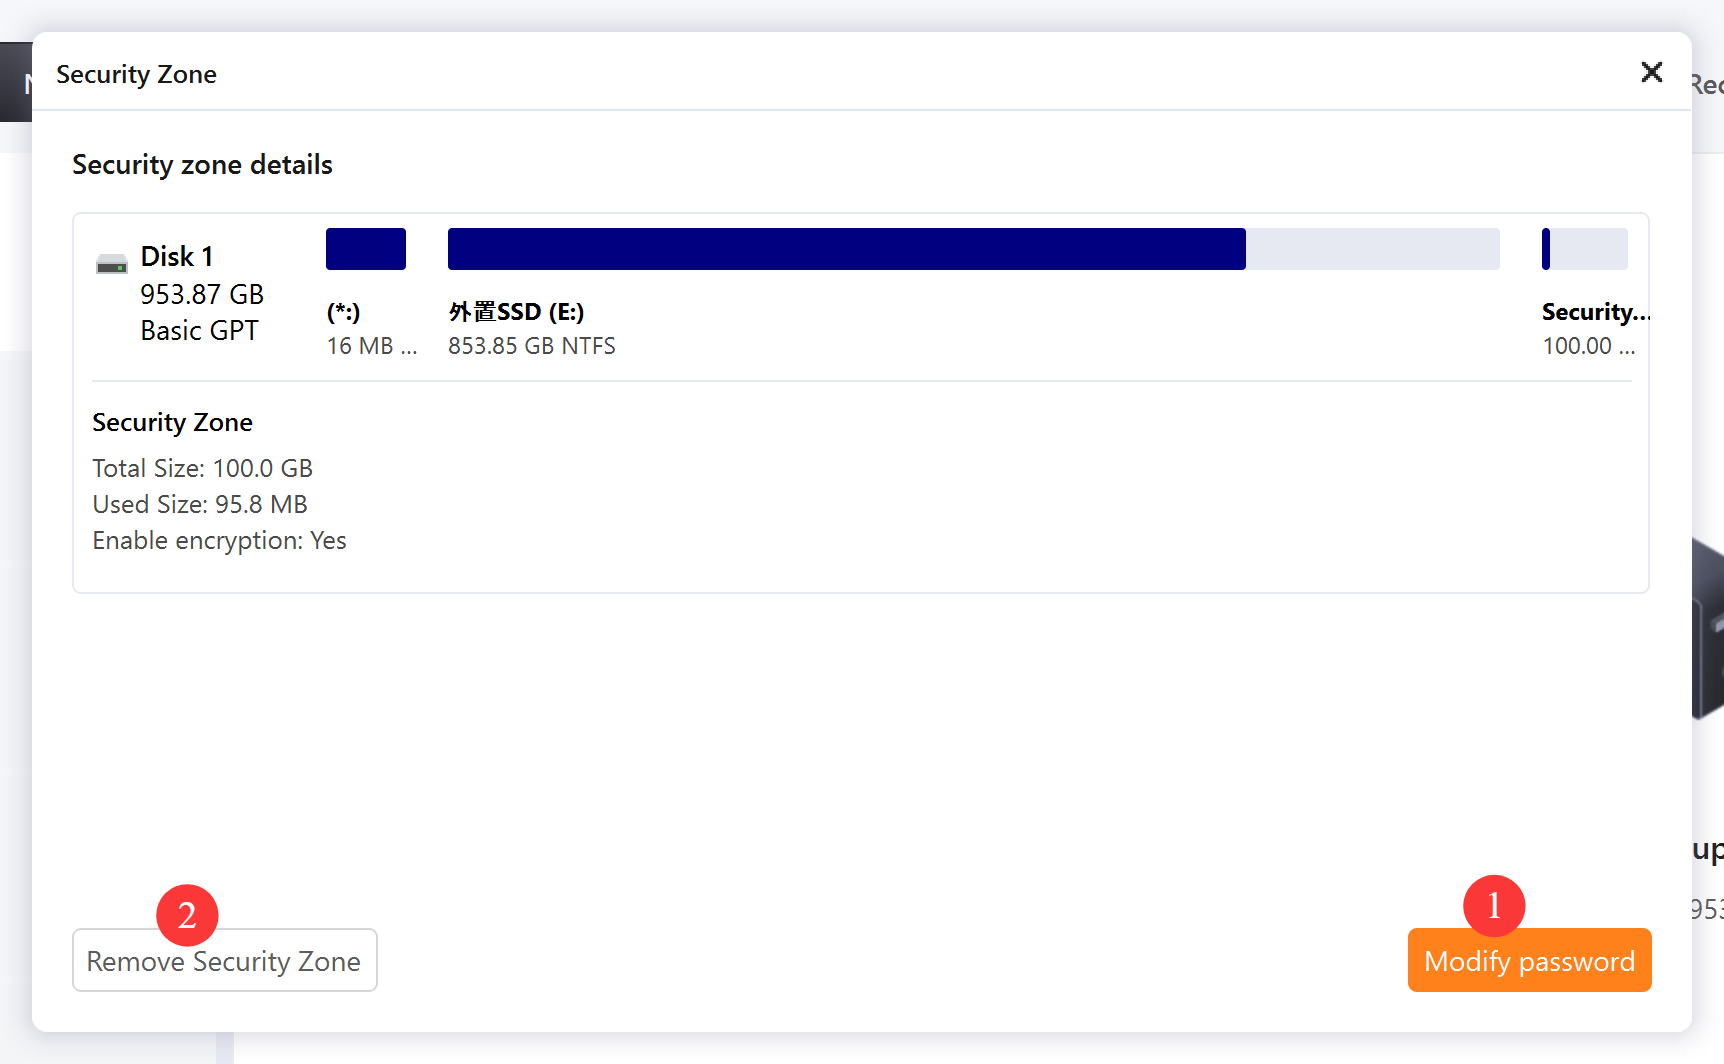
Click Set Password to create a password for the security partition. This password will be used when you remove the security zone.
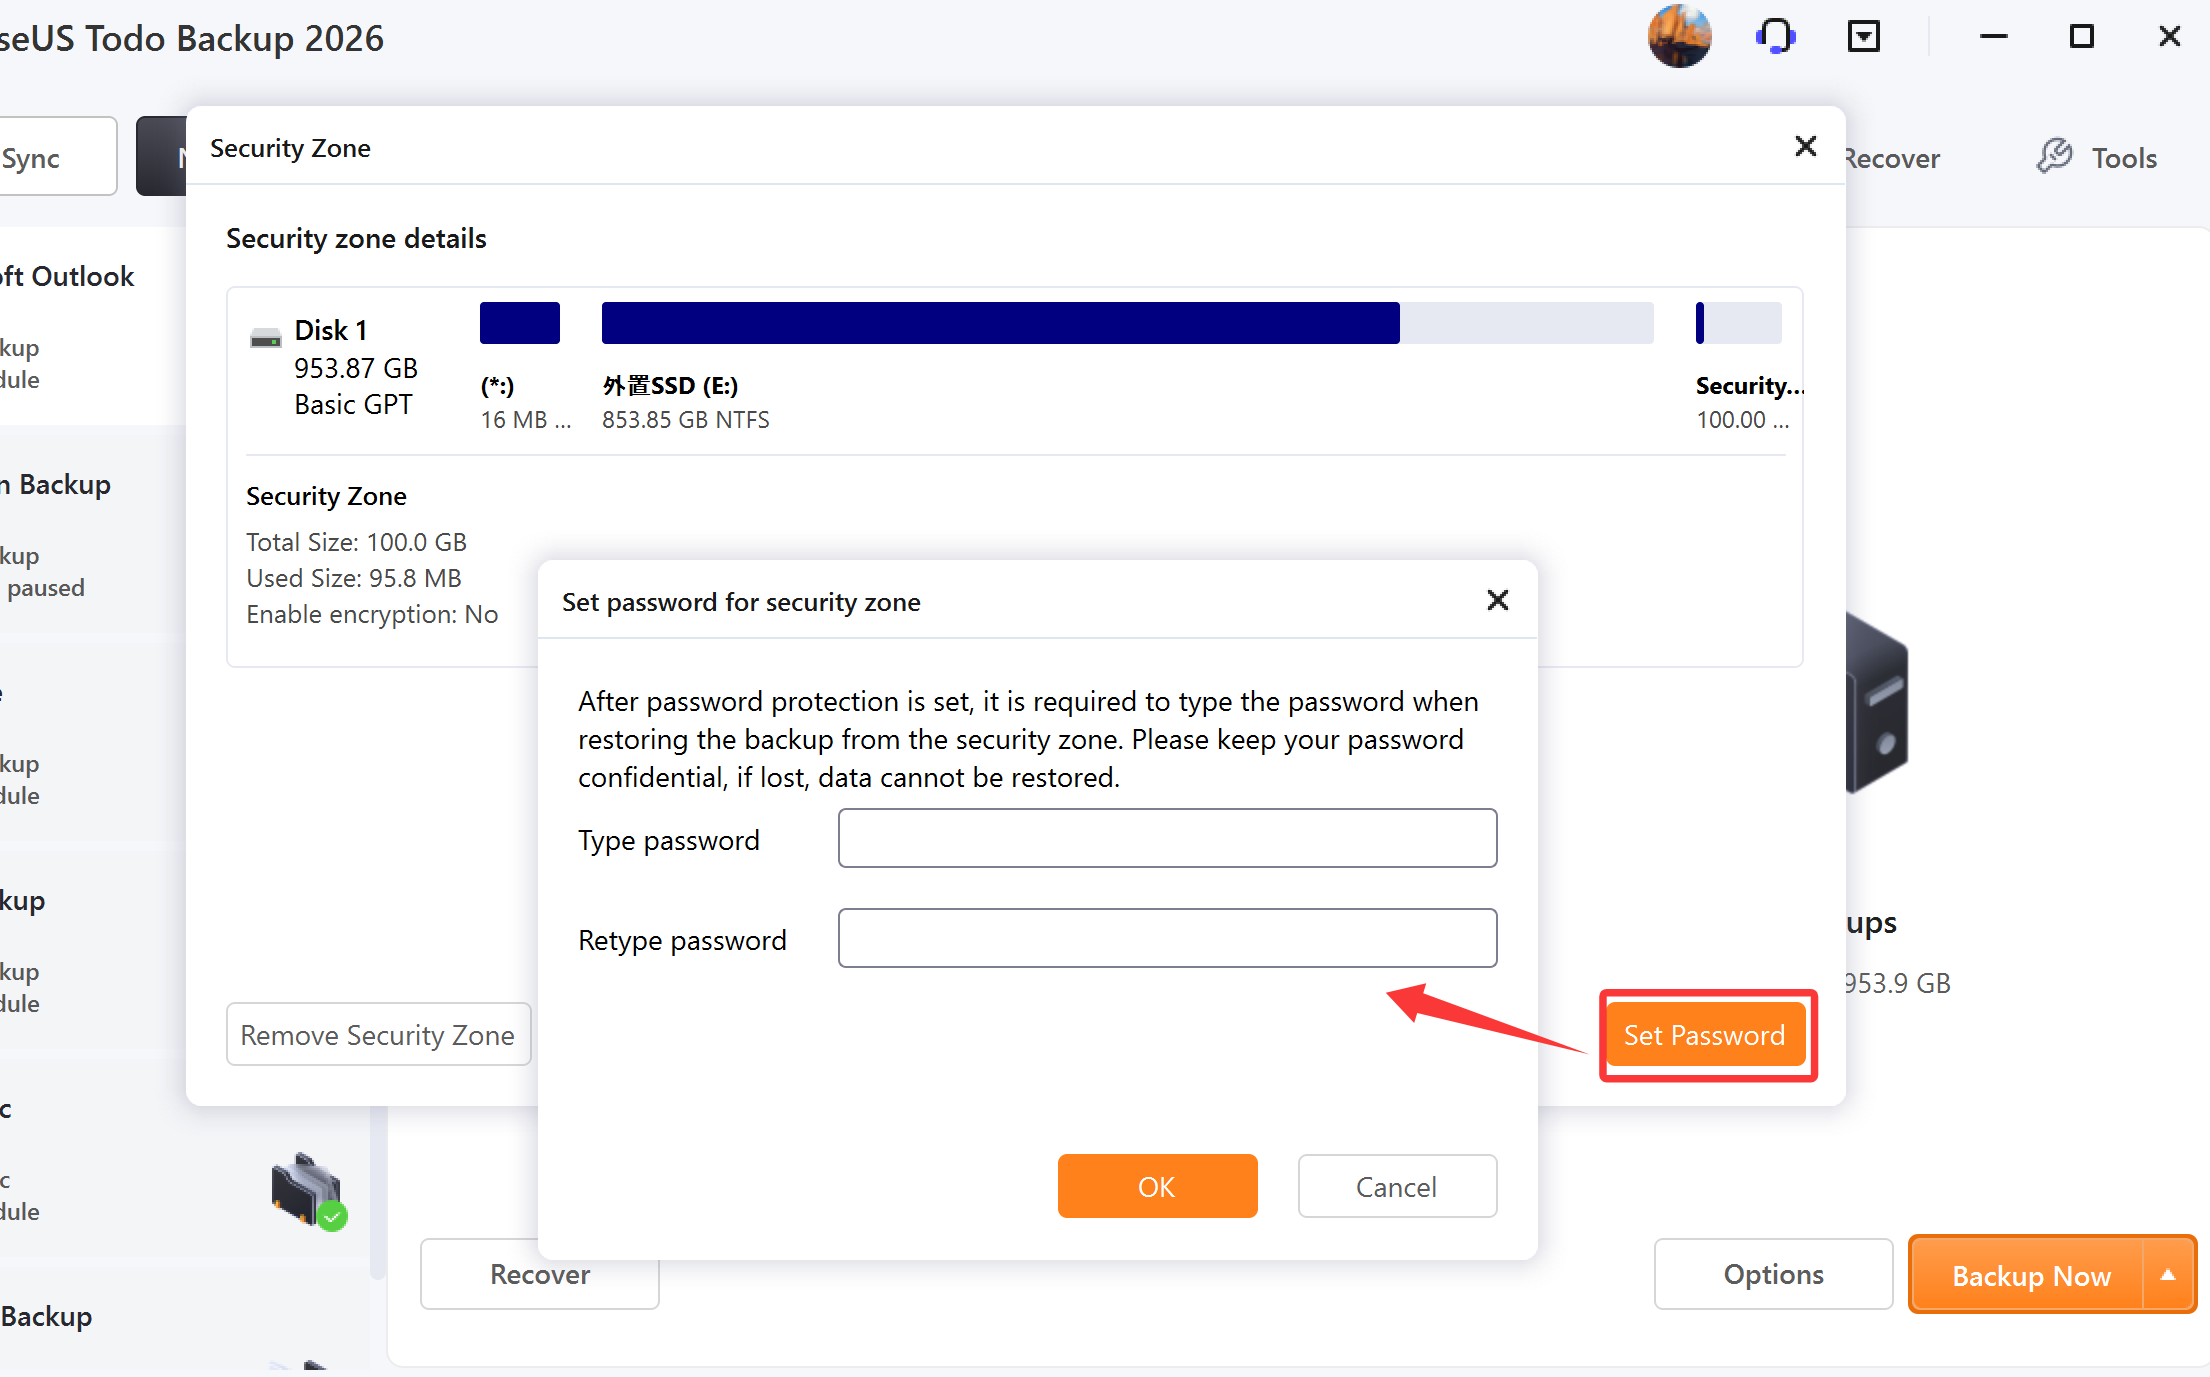
Once the security partition is created, you can also:
1. Modify the password for the partition.
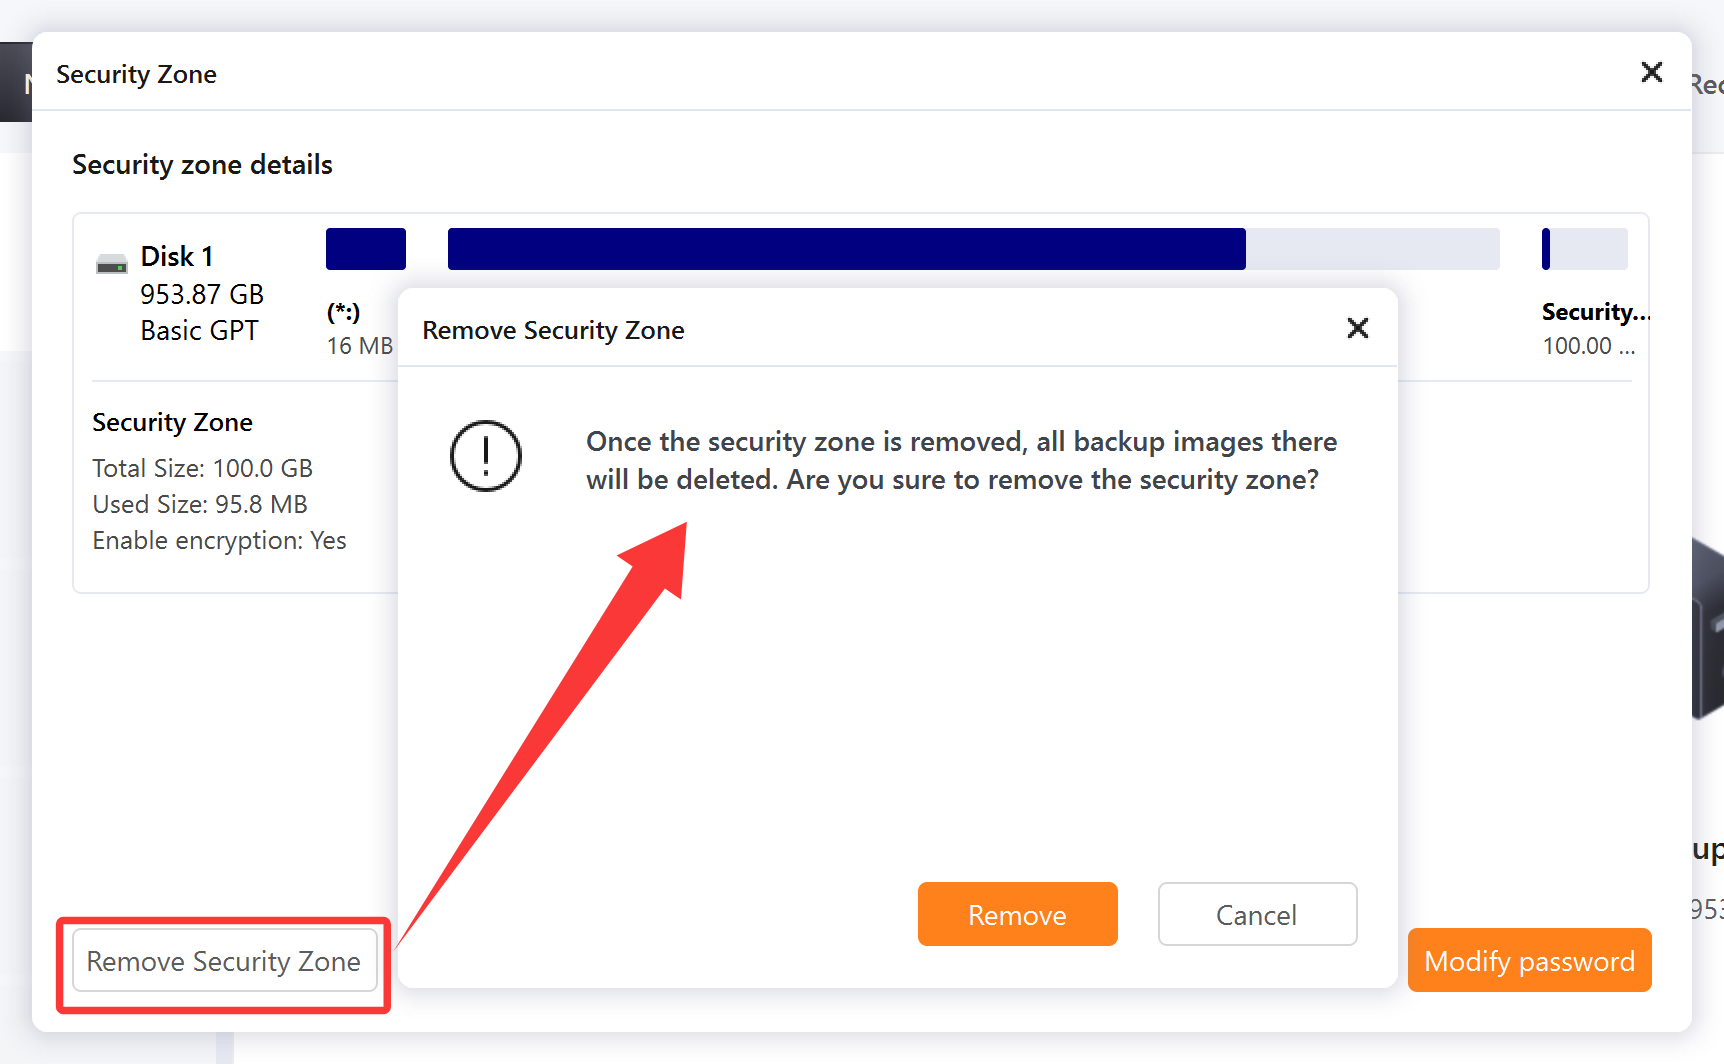
2. Remove the security zone.
When you set the destination for your backup task, if you have a security partition, you can find and select it from the list.
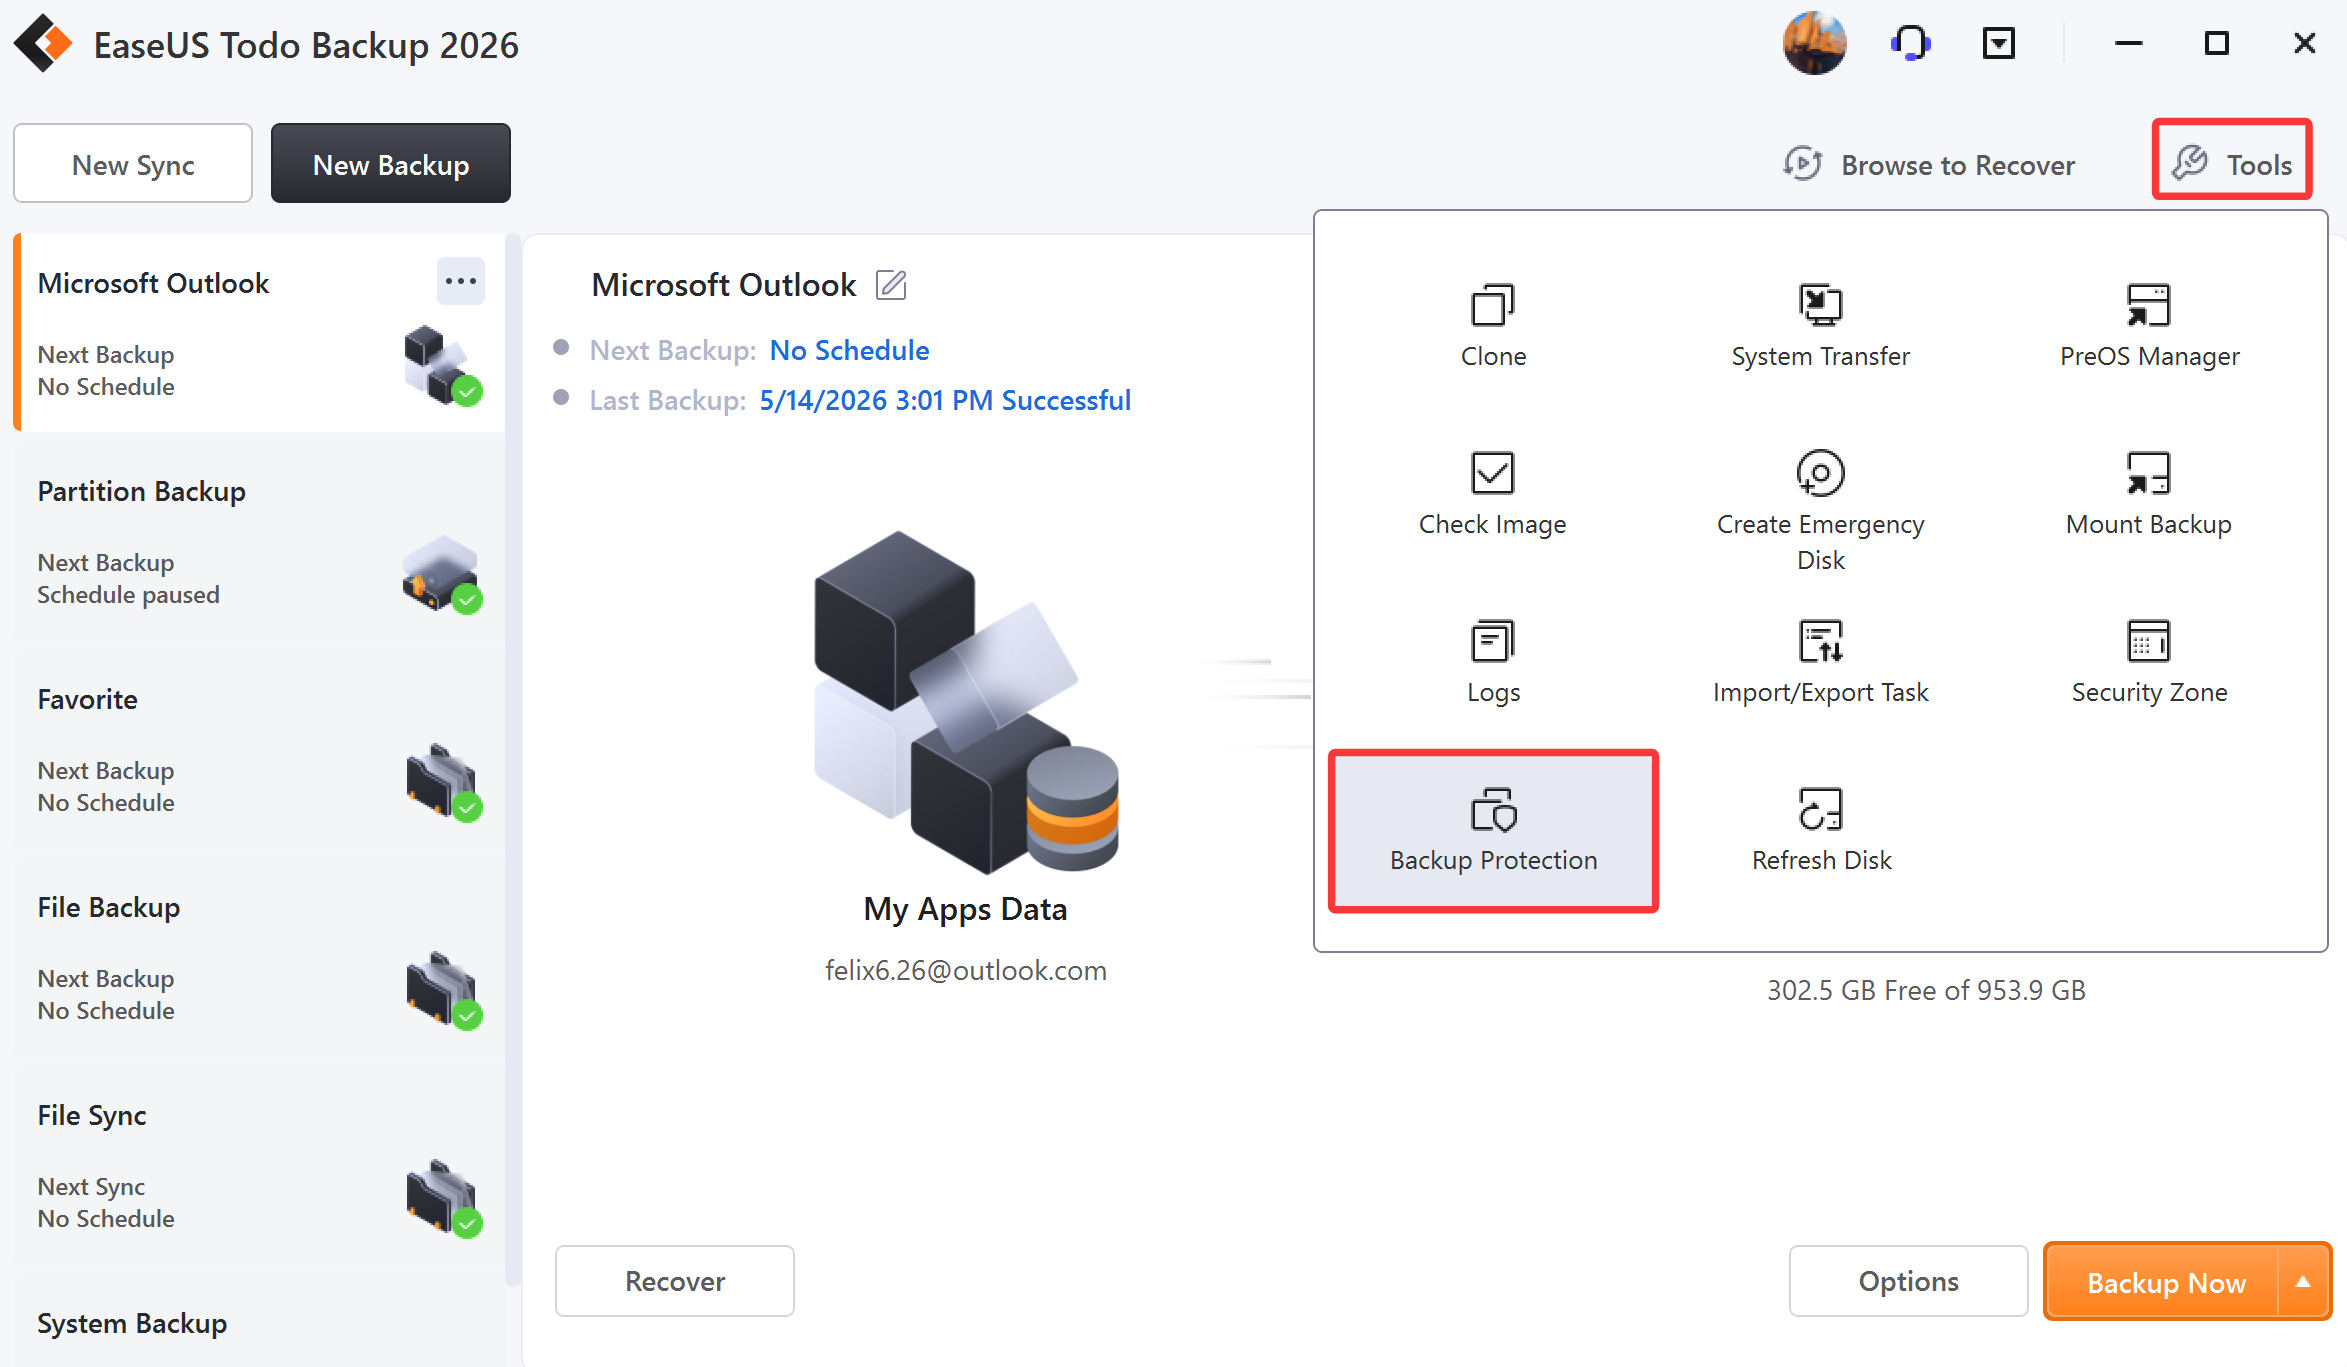
Backup Protection
Backup Protection gives you peace of mind by delivering outstanding multilayered threat protection. It uses a set of integrated technologies that protect your backup files from unauthorized modification by malware and viruses. With Backup Protection enabled your device and backups will be continuously safeguarded from the latest cyber threats.
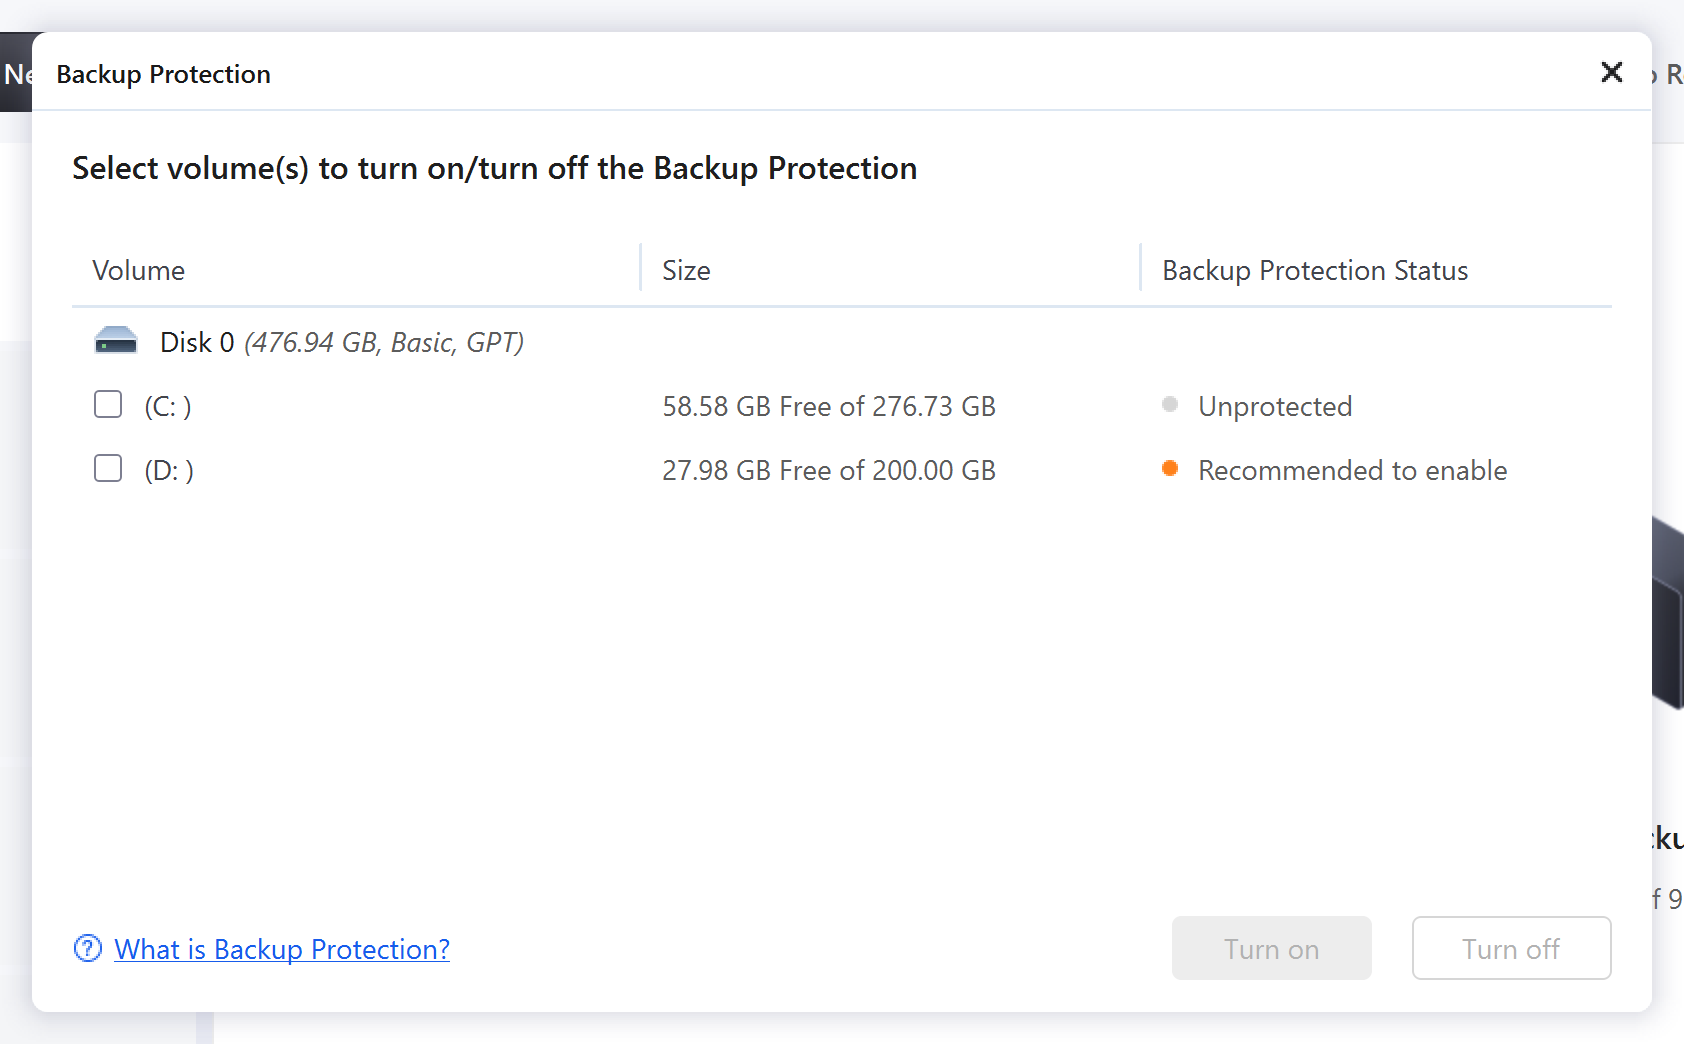
1. Click Tools, and choose Backup Protection.
2. Select volume(s) to turn on/off the Backup Protection.
Note:
1. Please first check whether the driver installation is intercepted by antivirus software if the Backup Protection does not take effect.
2. The OEM partitions, recovery partitions, and all USB devices will not be showing up in the Backup Protection interface.
3. You are allowed to copy the backup files from the protected partitions but you are not allowed to copy the backup files to the protected partitions.
4. Backup Protection only protects backup files from being modified. It cannot prevent the partition from being accessed with other operations, such as formatting, deleting, etc,
5. Modifying the drive letter will not invalidate the protection of the partitions.
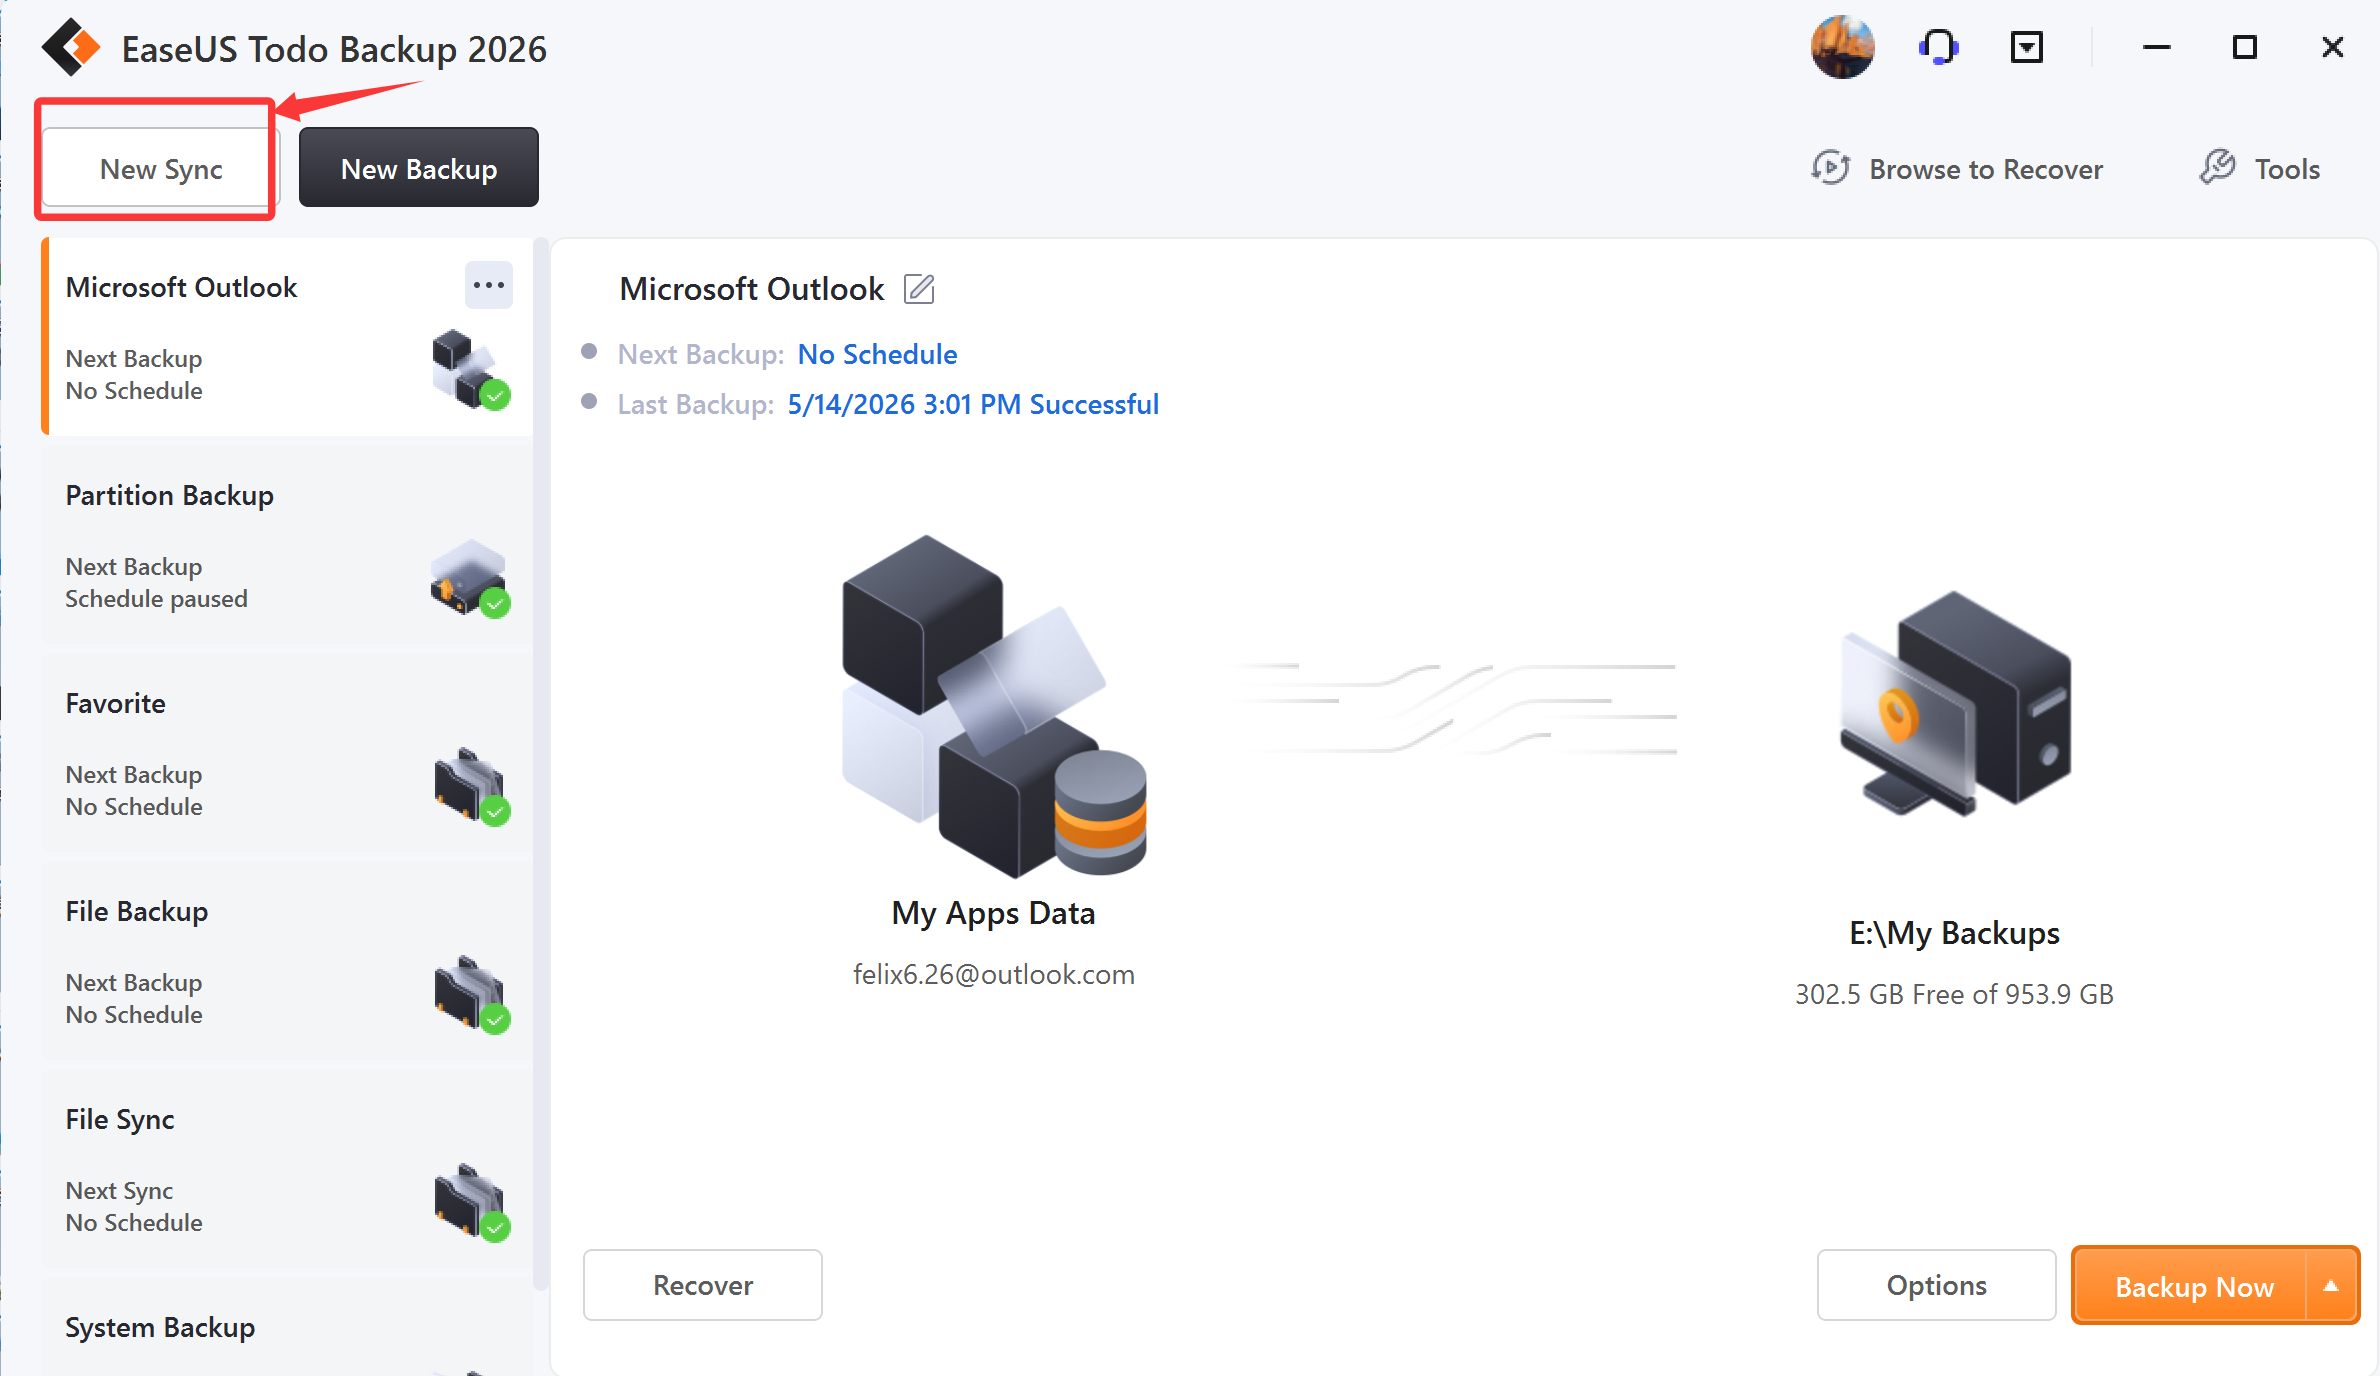
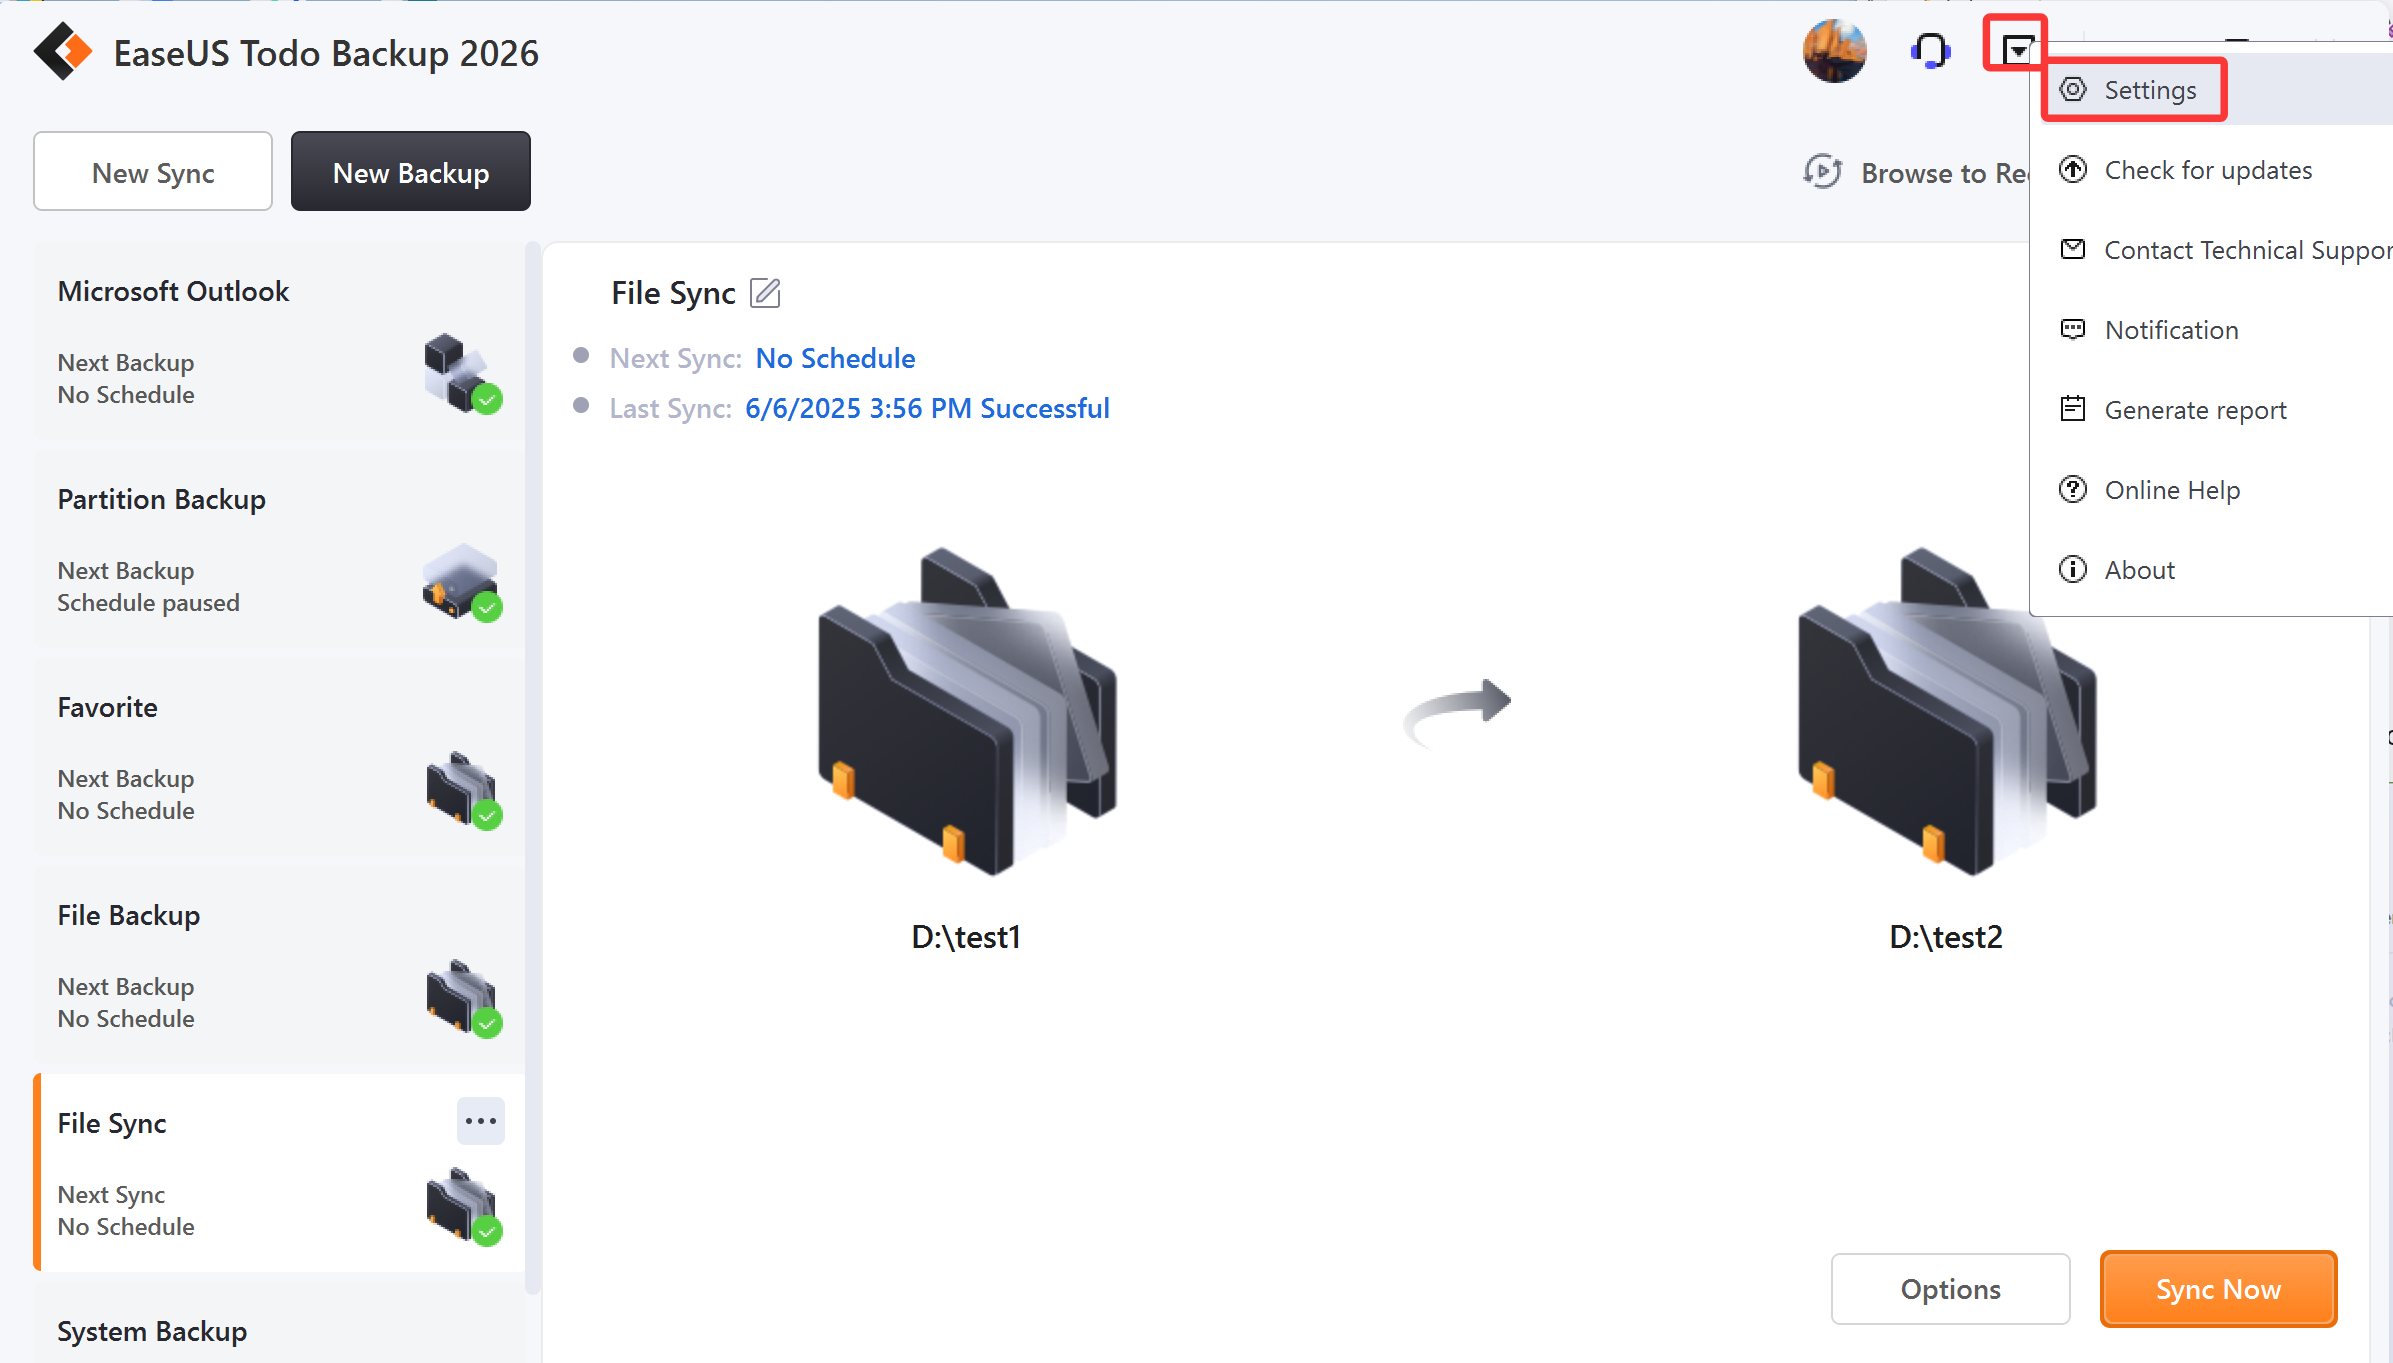
Sync
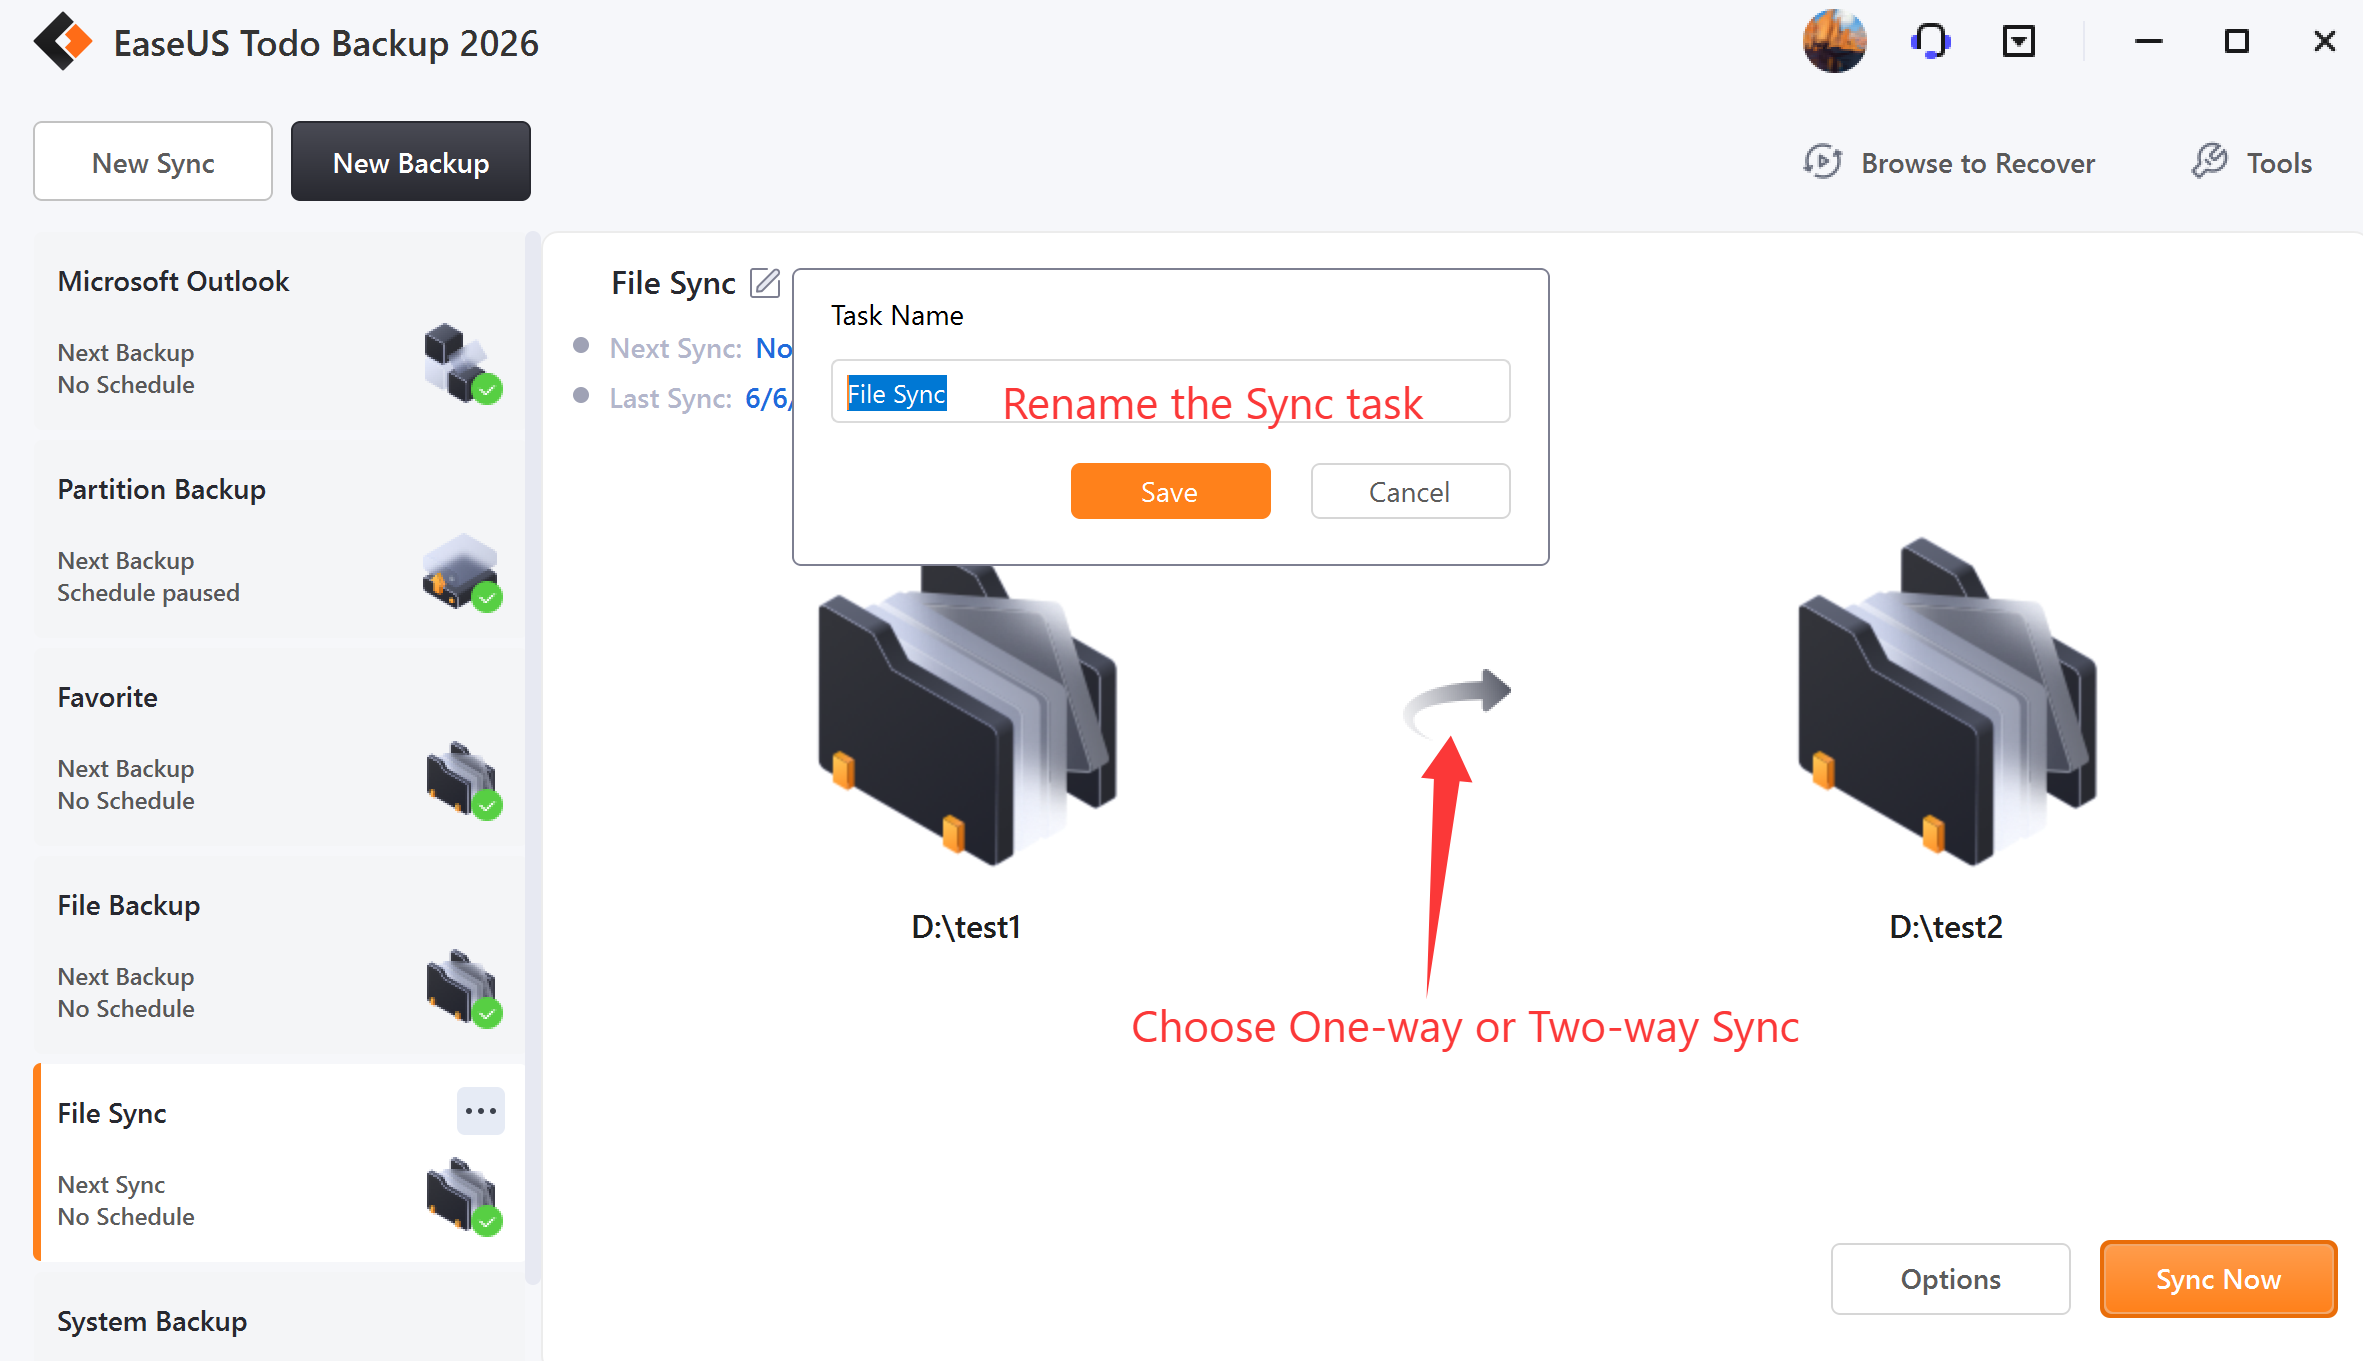
The sync function is to synchronize folders and files between two locations, ensuring they are identical. This feature is particularly useful when you want to sync valuable data to another location to prevent data loss or for other specific purposes.
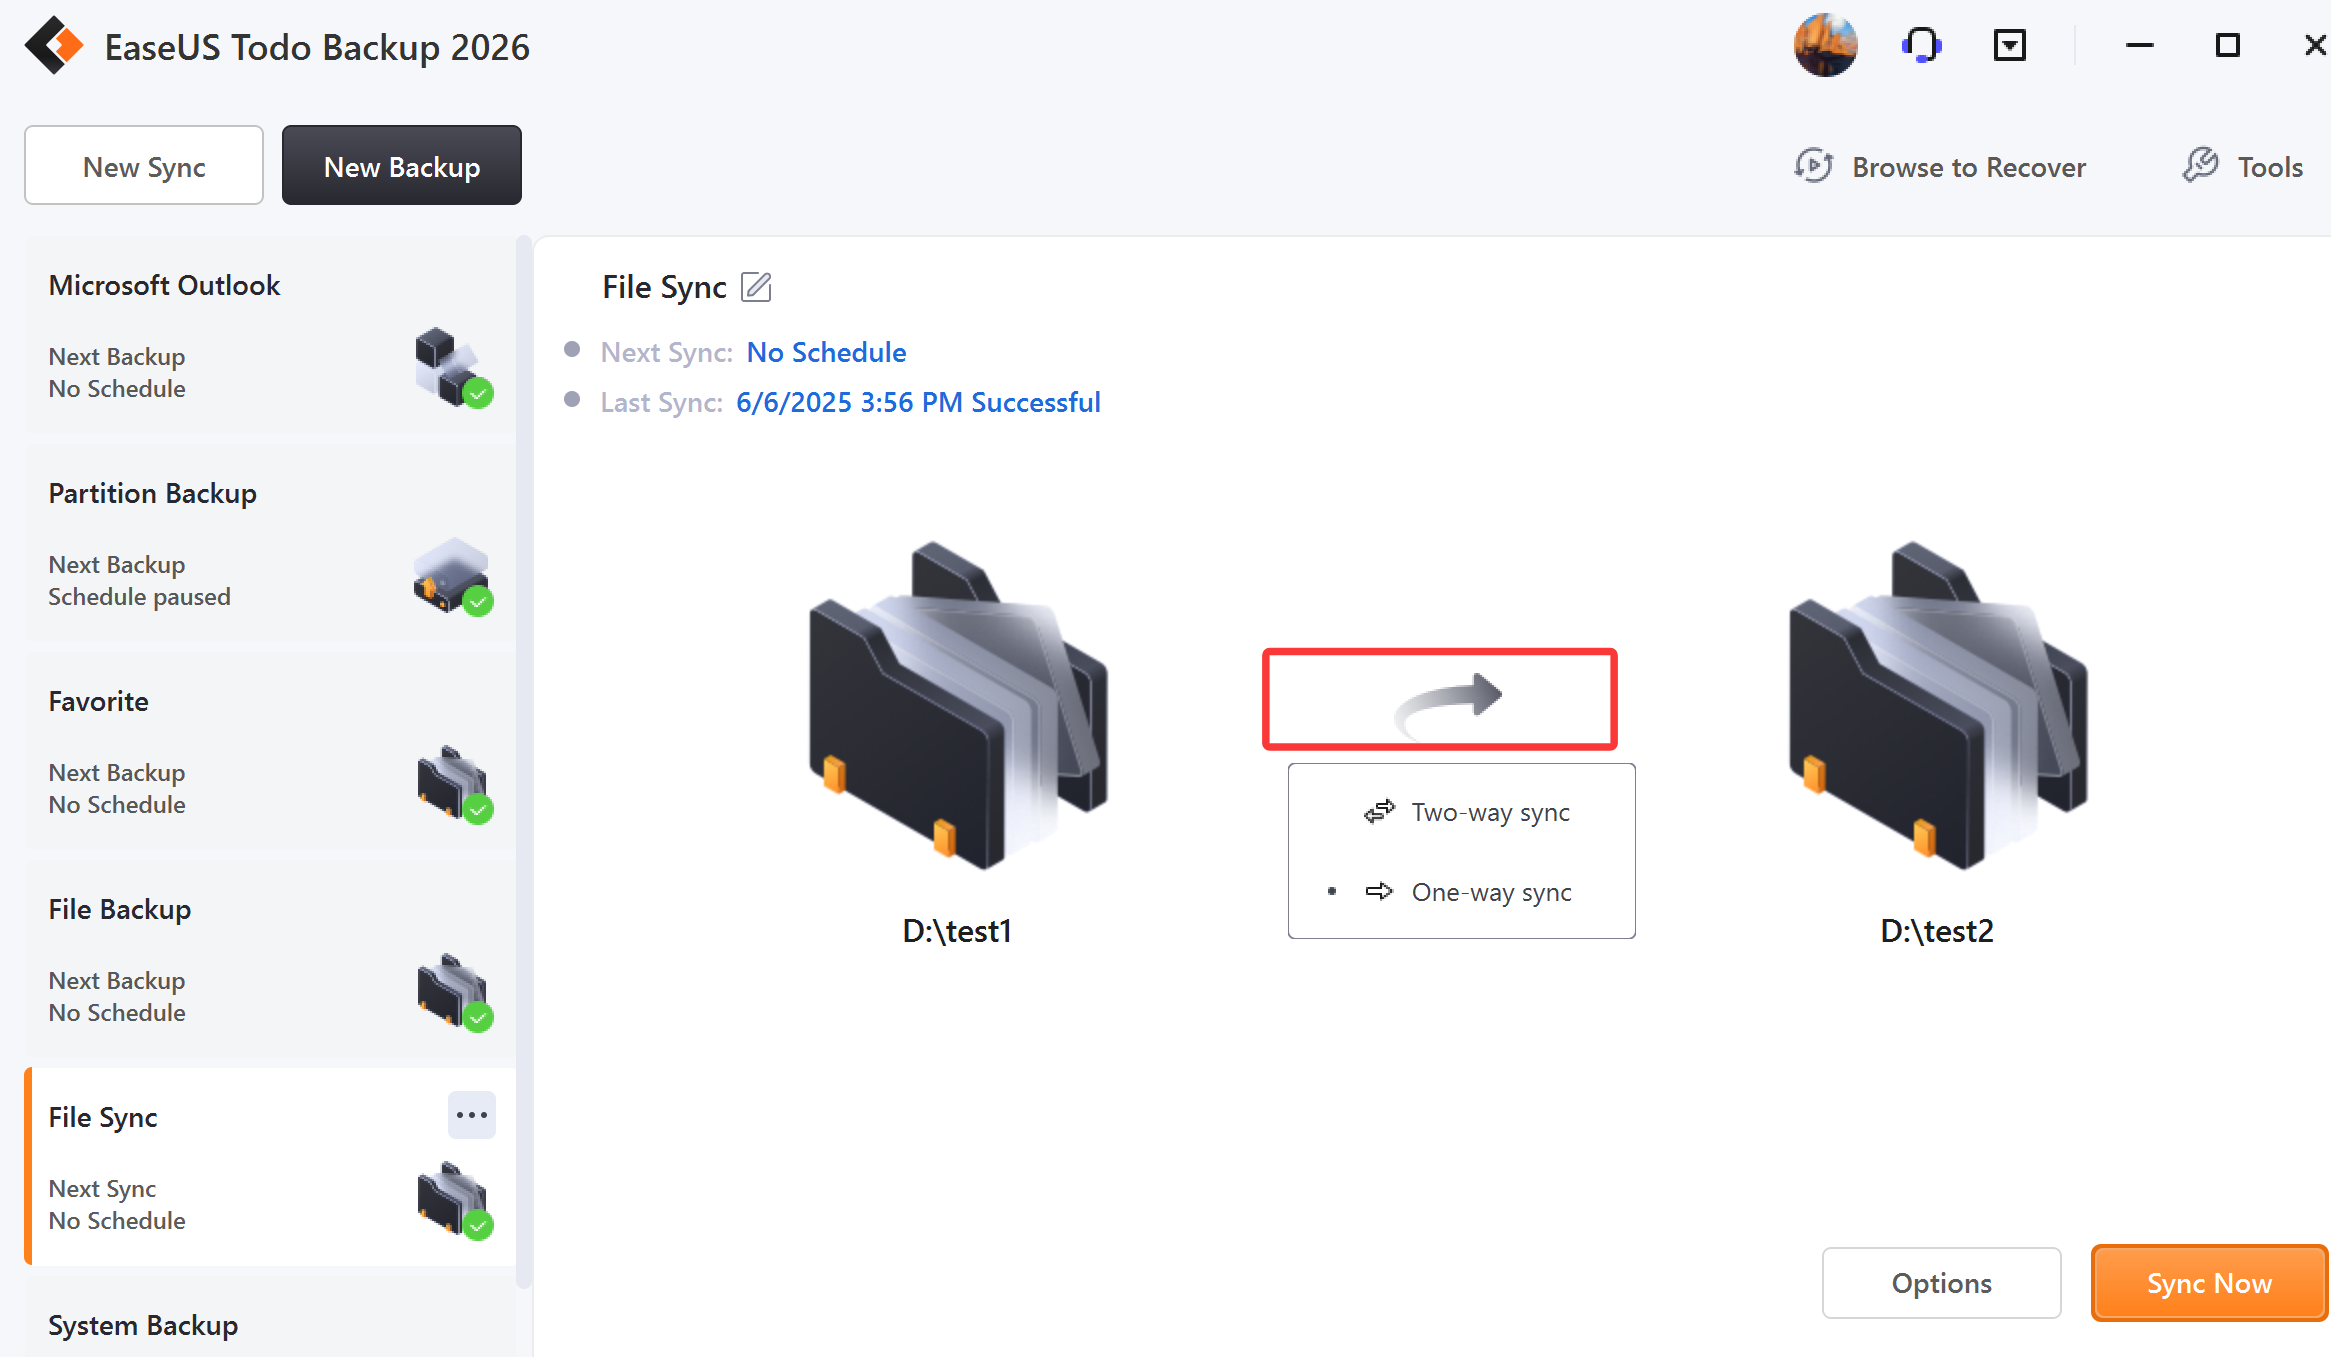
This feature is exclusively designed for files and folders. To get started, first click on New Sync located at the bottom-left corner of the screen. Next, choose the two destinations you want to synchronize your data with. Once you've made your selections, click on Sync Now to initiate the synchronization process. You can also customize the name of the sync plan in the left task column. Additionally, you have the option to choose between One-way sync or Two-way sync.
The sync Options, including Scheme and Filter, provide flexibility and automation for your synchronization tasks.
Scheme
This feature allows you to create an automatic synchronization plan. There are six types below.

One-time sync
It specifies a time to execute the sync task once.
Daily sync
The sync is to be automatically executed at the scheduled time every day, which may be either at a specific time point(s) or by time interval.
Time - Execute the plan at a specific time point(s). Click + to add new time points. Five-time points are limited to one day. To remove the time point, please click -.
Interval - Set start time, finish time, and interval time for the plan. Suppose the start time is at 6:00 am and the finish time is at 10:00 am with a 2-hour interval time. Sync tasks will be executed three times at different time points, 6:00 am, 8:00 am, and 10:00 am.
Weekly sync
The sync is to be automatically executed at the scheduled time every week.
Monthly sync
The sync is to be automatically executed at the scheduled time every month, which may be based on date or week. An exact time point on the exact day(s) to execute the sync is required.
Every - Schedule the time by week. You may choose the first, second, third, fourth, or last week of each month to execute the sync.
On - Schedule the time by date. You may choose any exact day(s) to execute the sync in each month.
Upon event
The sync is to be automatically executed in the event of:
System startup - sync runs automatically when system starts up.
System shutdown - sync runs automatically when system is shutdown.
User log on - sync runs automatically when user logs in.
User log off - sync runs automatically when user logs off.
USB device plugged in - sync runs automatically when USB device is plugged in provided that it is set to be the destination.
Once a day only
The event sync will be executed once a day only in any cases with Once a day only checked.
Specified date
The event sync will be executed on the exact date checked only. The event sync is to be executed every day with the Specified date unchecked.
Real-time
Upon choosing Real-time sync, the program will continuously monitor changes in the designated folder and will promptly synchronize any file modifications detected.
Note:
It is important to note that if the source is configured as FTP, Real-time monitoring will not be effective. In such cases, it is recommended to opt for scheduled or event-triggered syncing methods instead.
Filter
This feature is used to exclude certain file types and folders to prevent syncing unnecessary files. You can add files or folders to this list by inputting the file extension, path, or by browsing for them. To remove items from the filter list, simply click the delete icon.
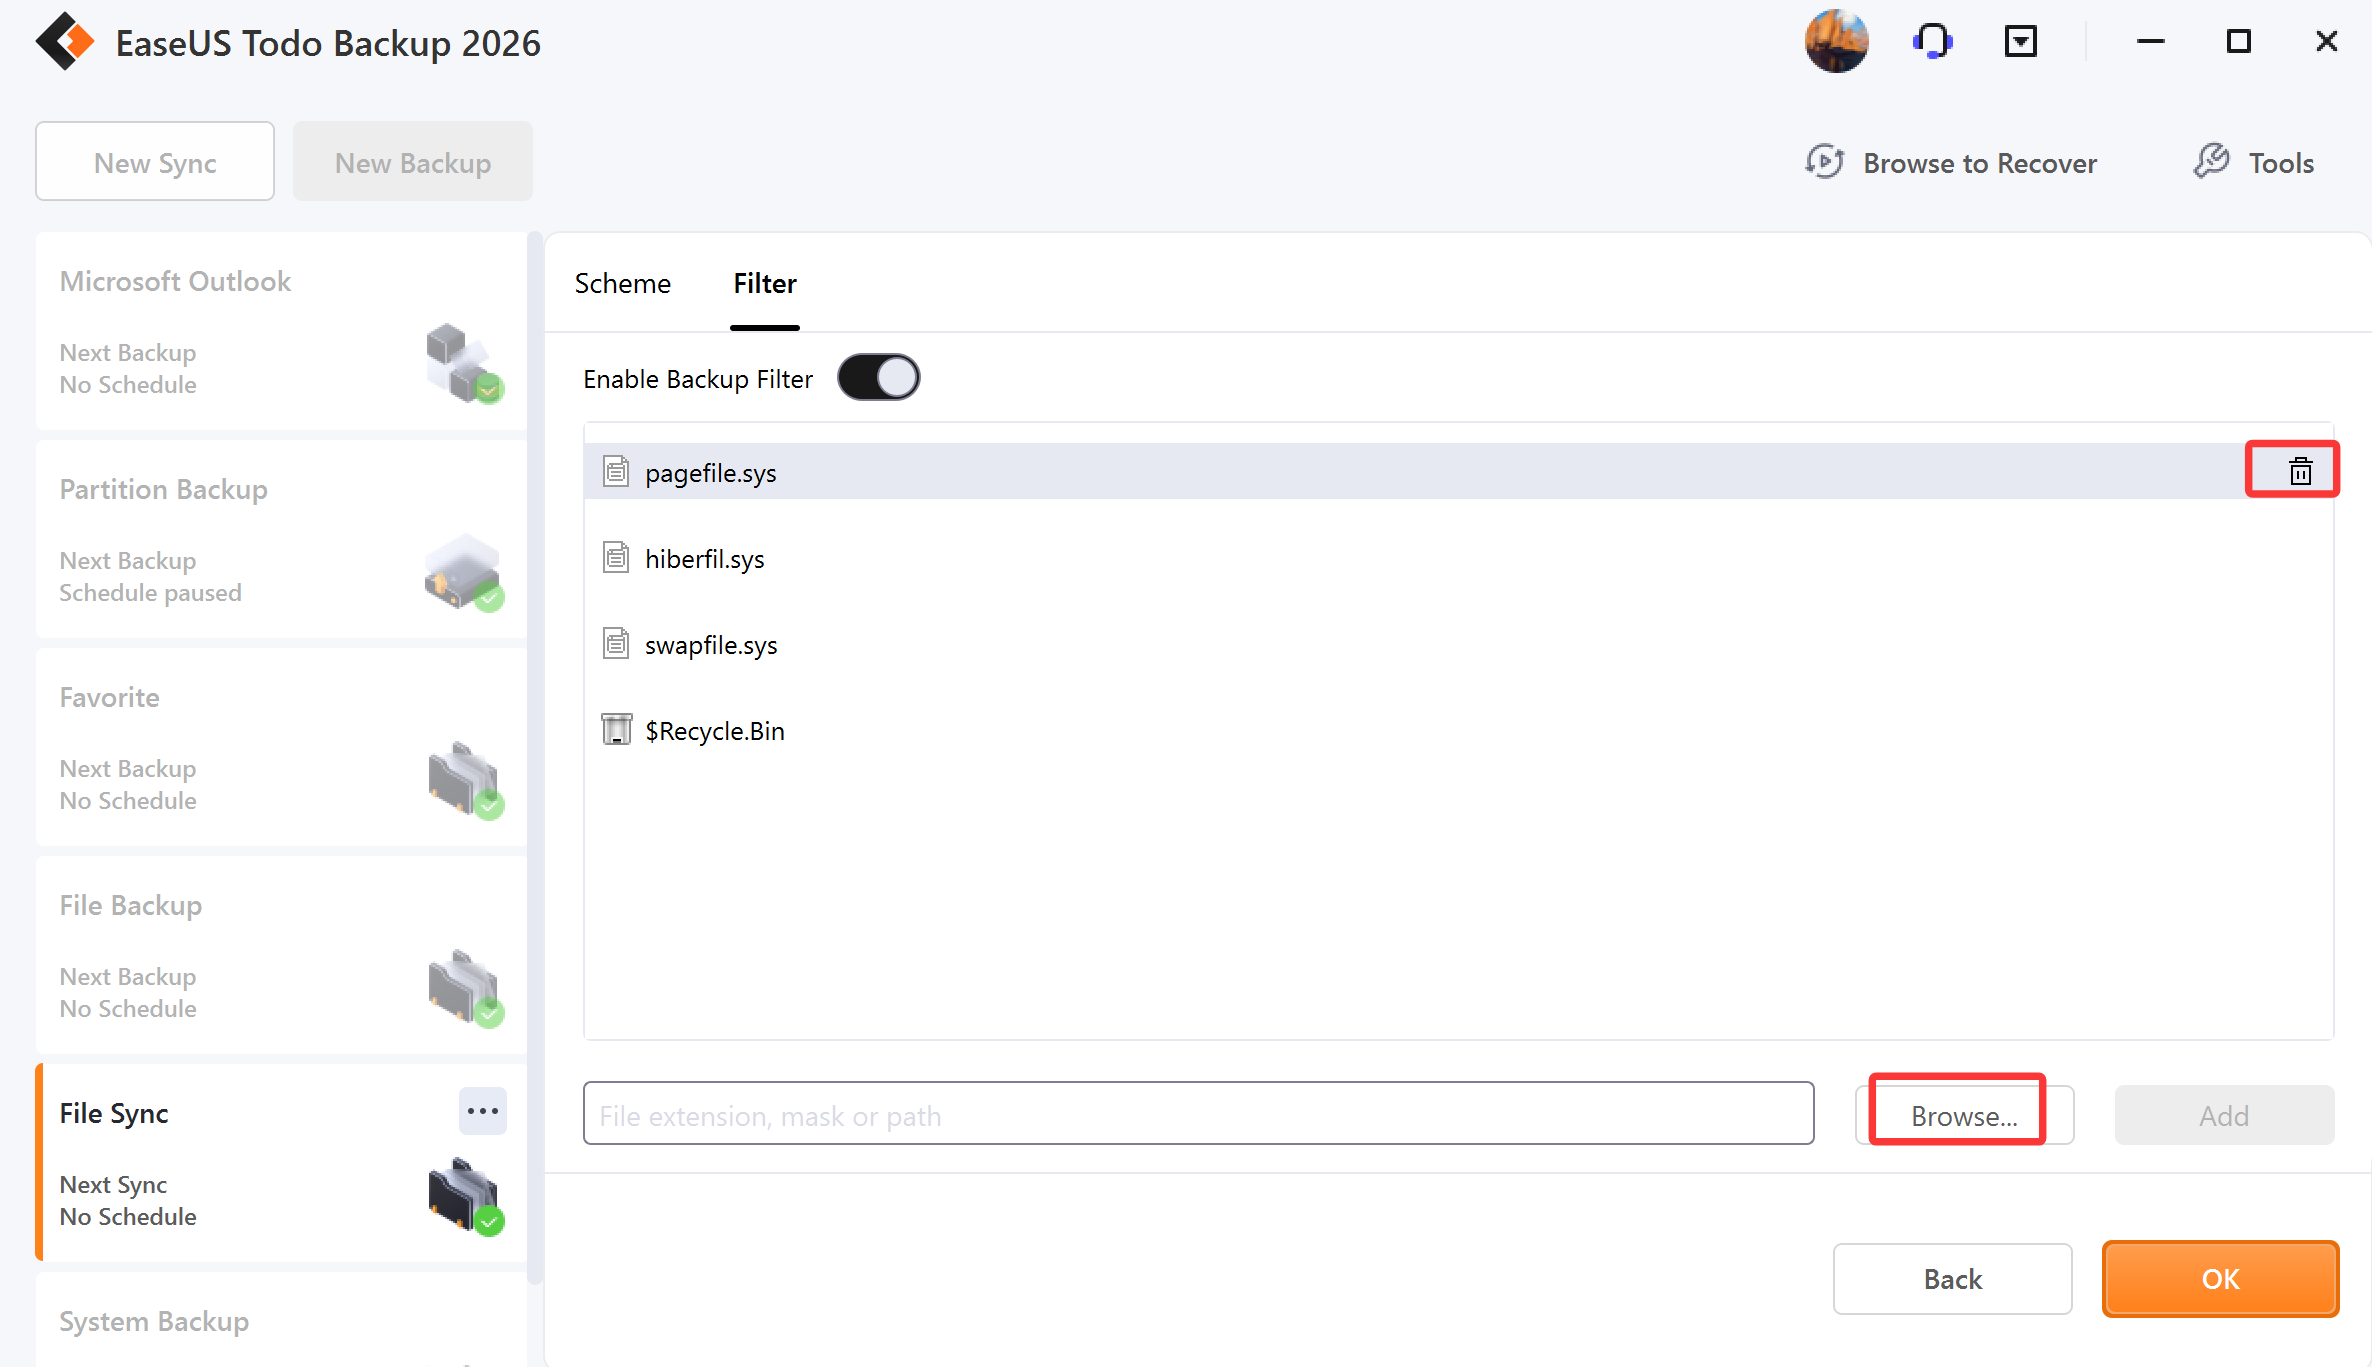
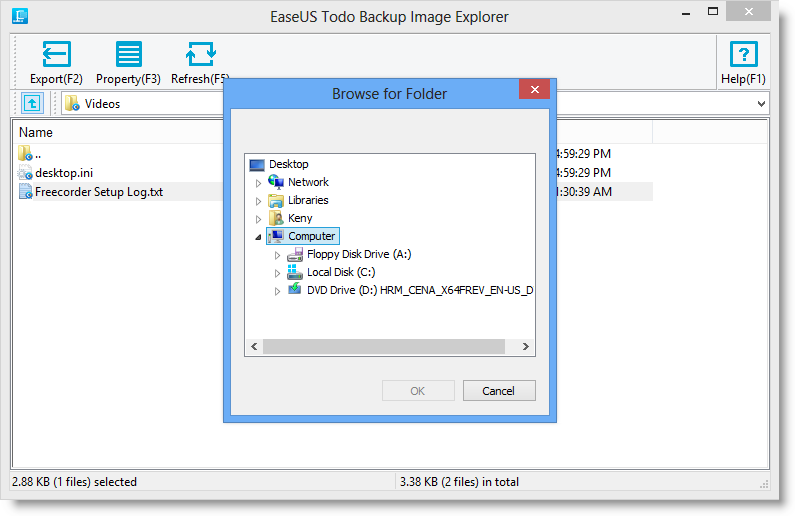
Image Tool
Thank you for using EaseUS Todo Backup Image Explorer. This software allows you to extract files and folders from a *.PBD image file without the need to install EaseUS Todo Backup. It is a simple and easy-to-use tool, with a file management system similar to Windows Explorer.
To extract files from a .pbd image file, follow these steps:
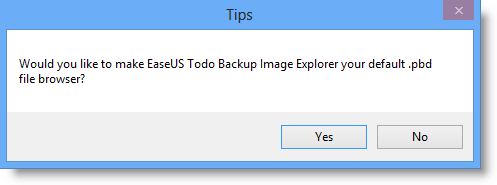
1. Download EaseUS Todo Backup Image Explorer then launch it. Tick Yes in the pop-up window below to build a connection between the *.pbd image file and Image Tool.
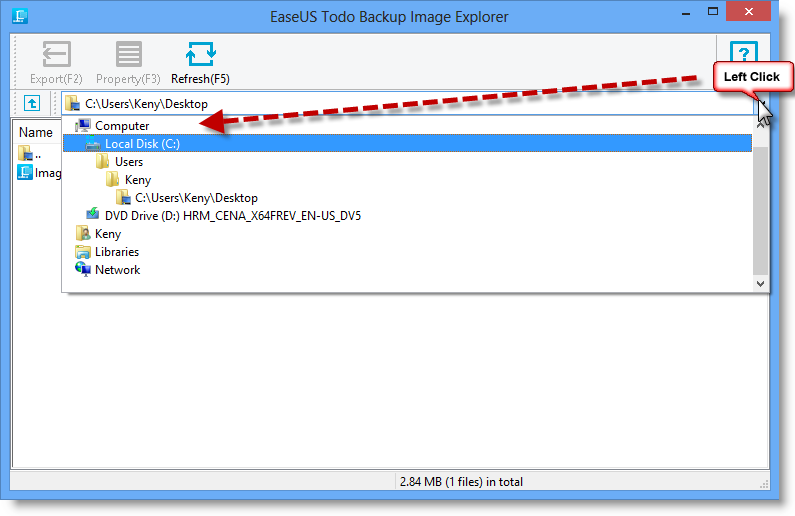
2. The desktop folder will be displayed automatically. Click the drop-down arrow to access other paths.
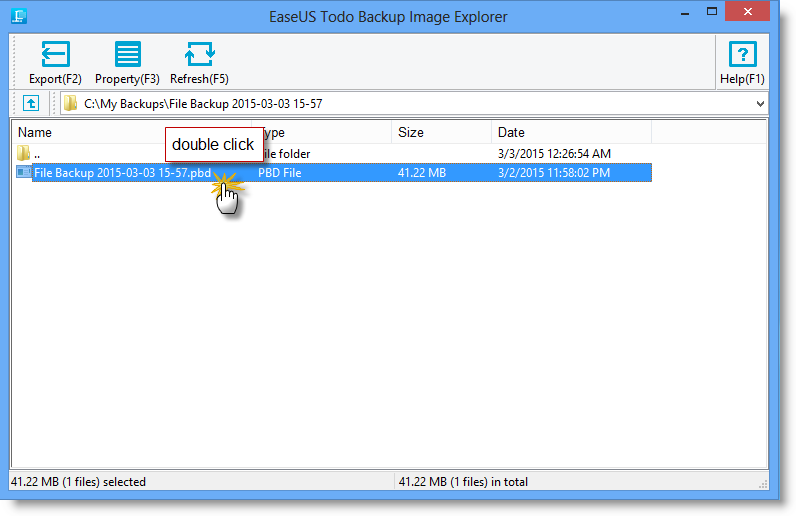
3. Locate the .pbd image file and double-click it.
4. All files and folders associated with the .pbd image file will be marked with the EaseUS logo. To view the contents, click Property (F3) or simply open the file/folder.
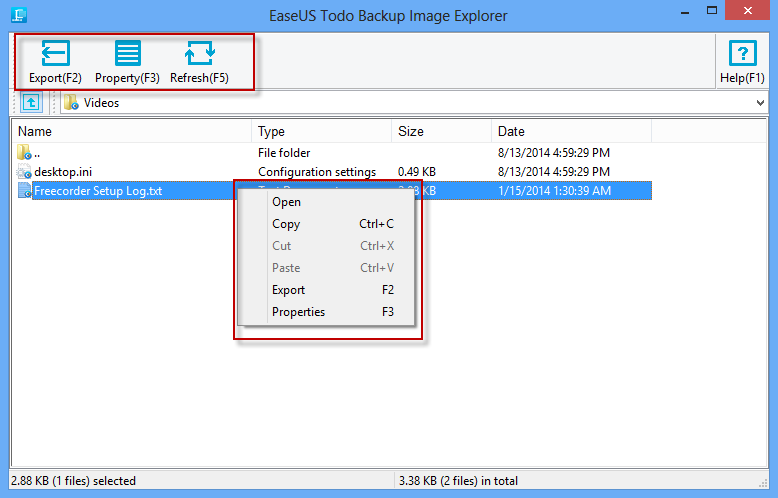
5. To extract the desired file/folder, please click Export (F2) or Copy in the right-click menu.
Tips:
An additional copy of Image Tool will be automatically created in "C:\Program Files\EASEUS\". To fully uninstall Image Tool, you will need to manually delete it after uninstalling the software.
Basic Settings
There is a drop-down menu at the top right corner, click it, and there will be an option Settings in the menu.
Clicking Settings will bring you the following configuration panel. You can switch among German, English, Spanish, French, Italian, Japanese, and Others in the Language box, or edit/modify the Default backup path.
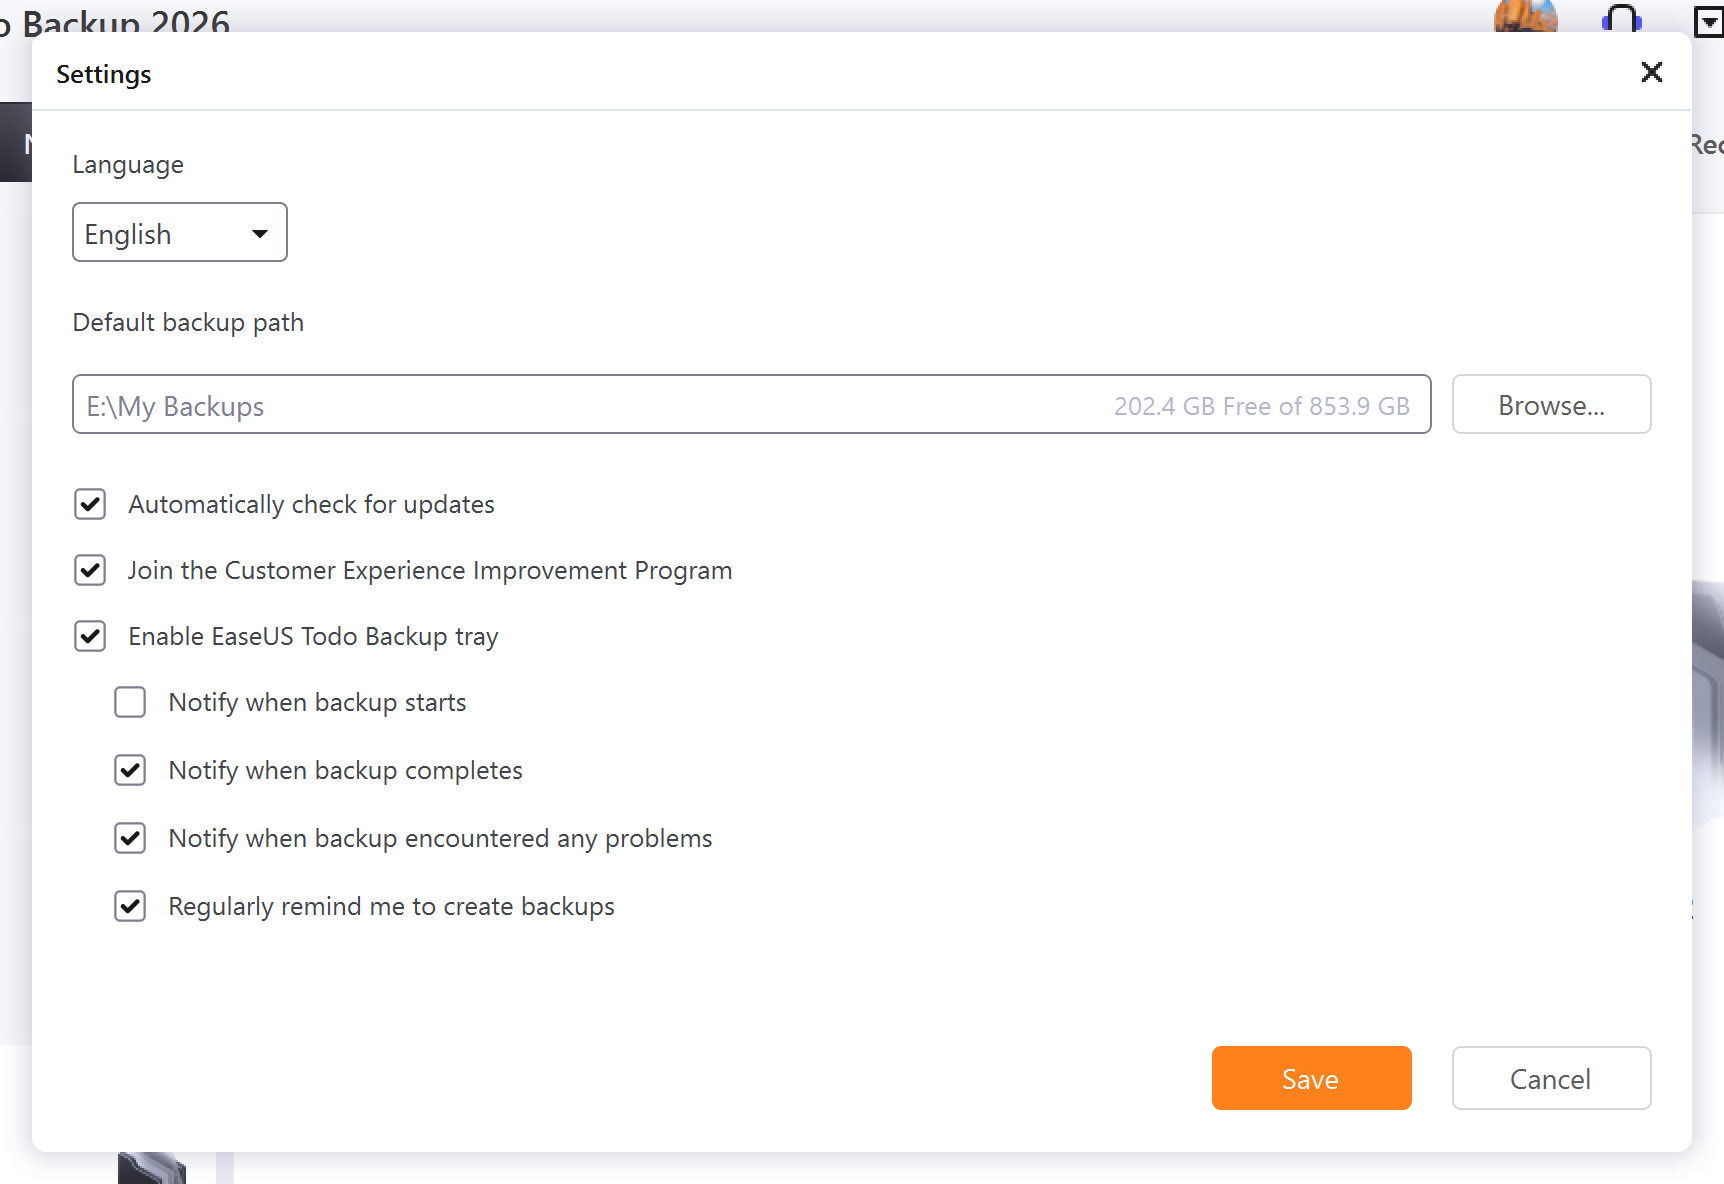
Automatically check for updates - uncheck it if you are satisfied with the current version and do not want to upgrade.
Join the Customer Experience Improvement Program - help us improve our product with the info from your daily operations with our product.
Enable EaseUS Todo Backup Tray - You can easily check the backup status, run a backup, edit the backup task, or launch EaseUS Todo Backup from the tray.
Support
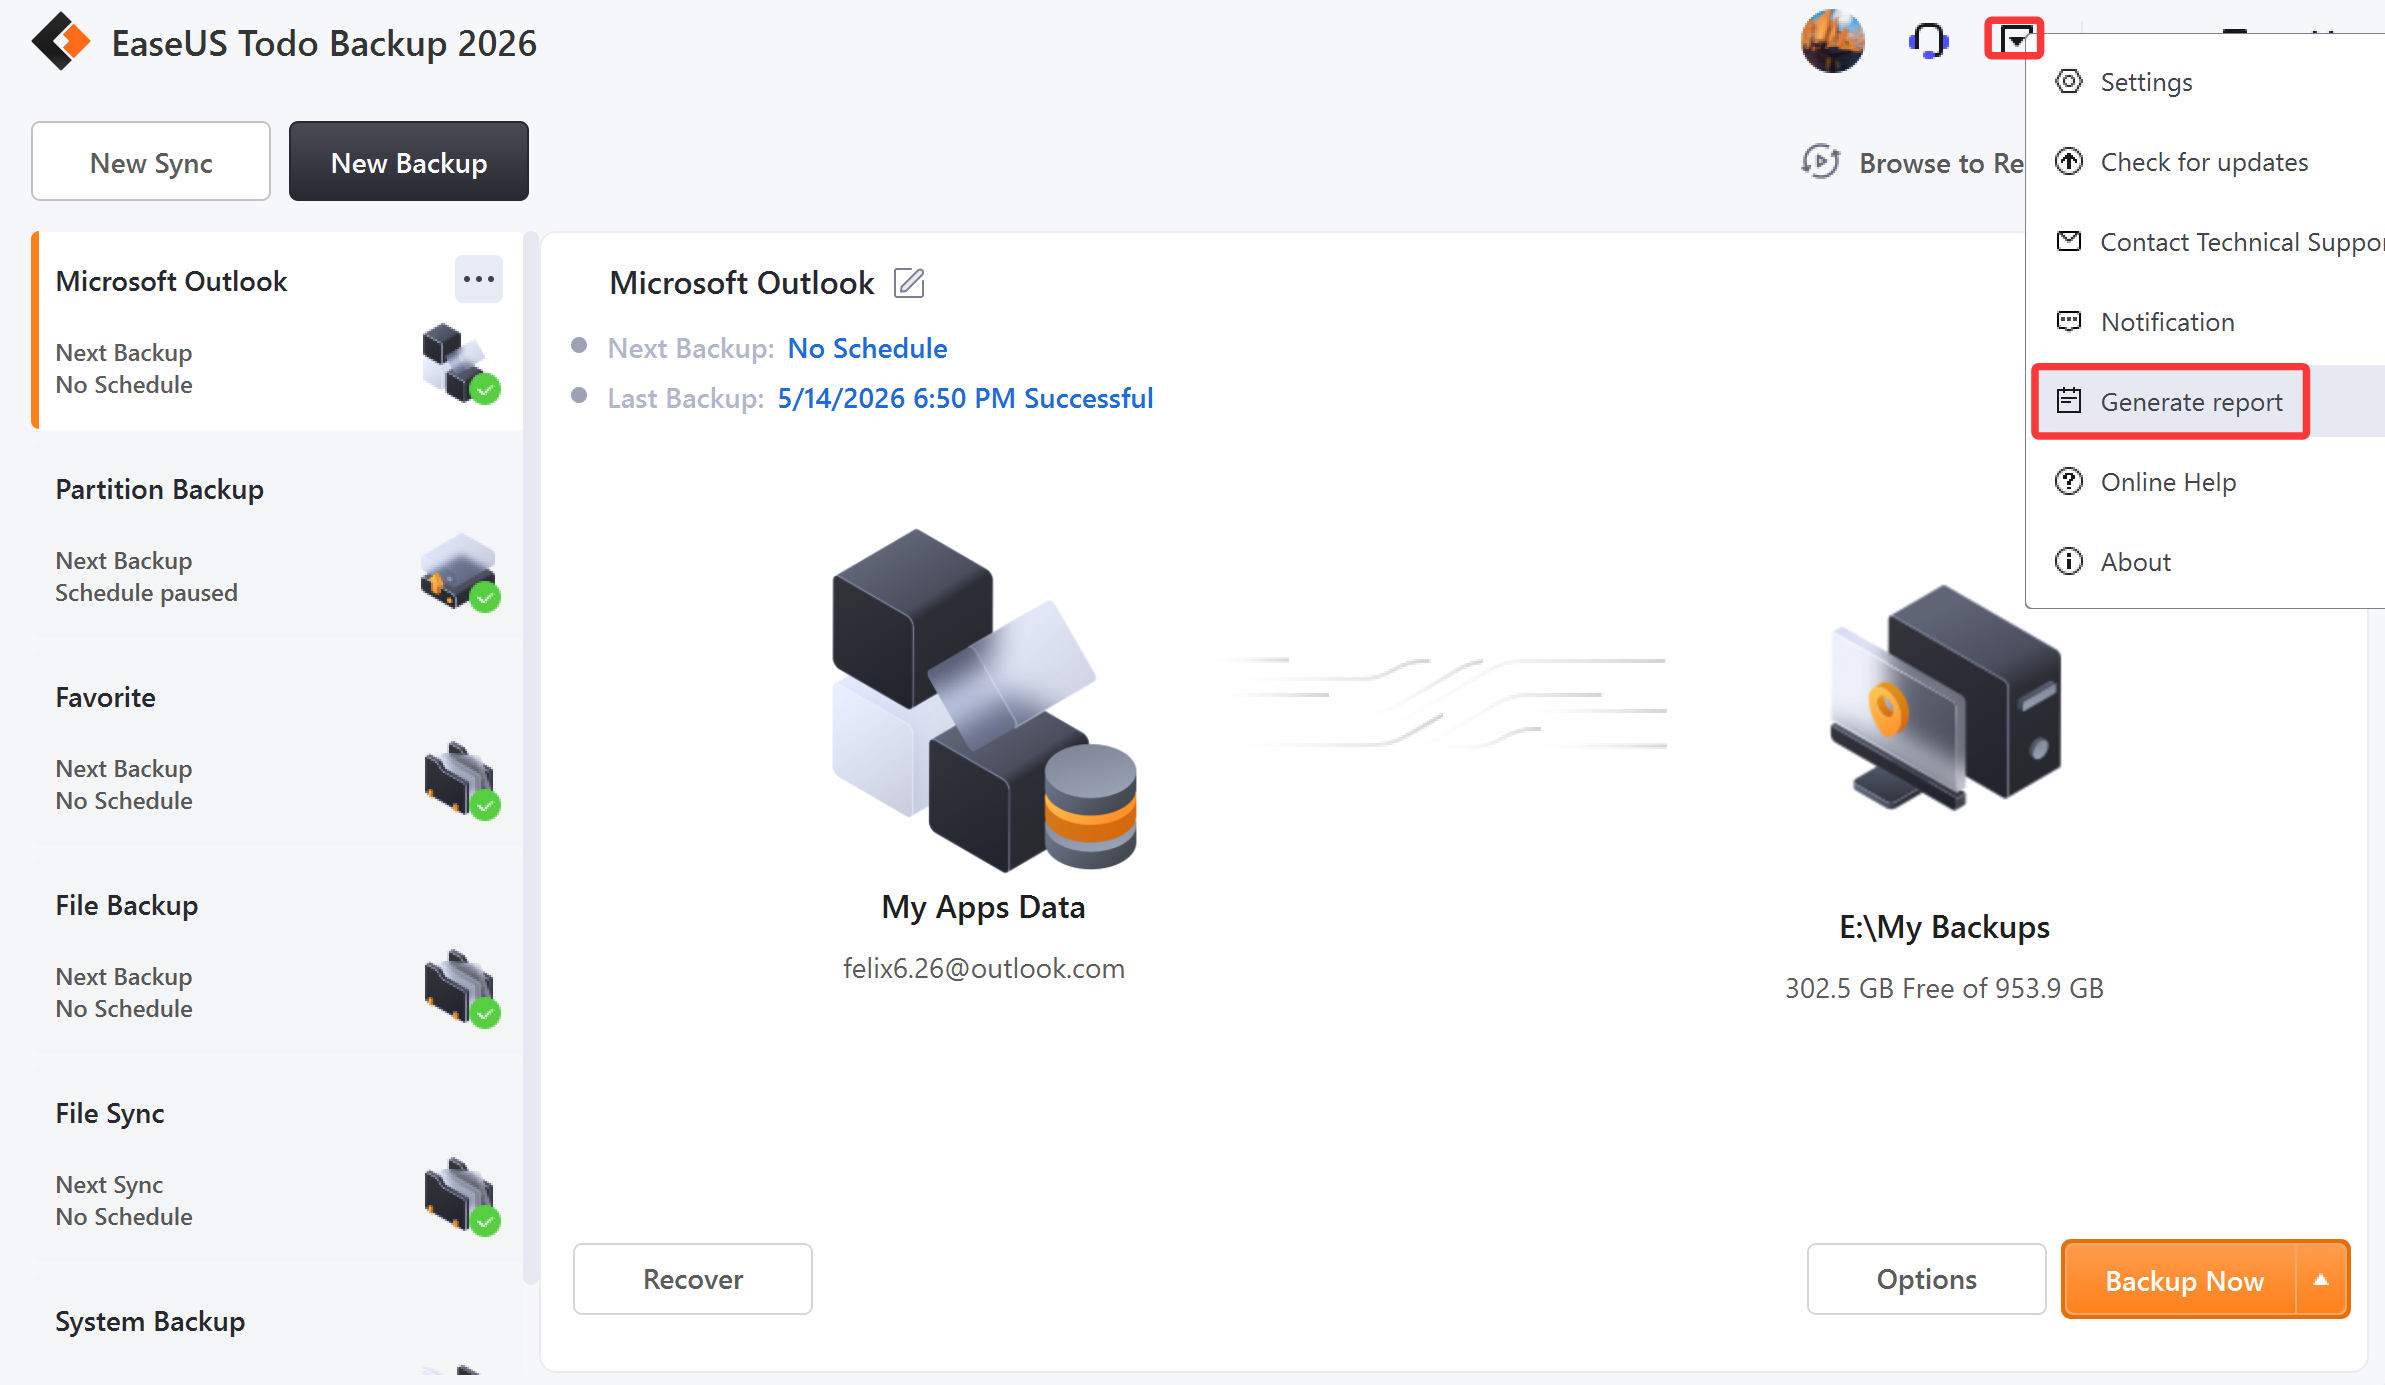
If you can't find the answer to your question in this help section, we recommend visiting our Knowledge Base. This database contains solutions for common issues and offers detailed guides on using EaseUS Todo Backup.
If you encounter an error or problem while using the software, please Generate report and send it to [email protected]. This will enable us to provide you with more efficient assistance.