
Content
Page Table of Contents
About the Author
Hot Topics
Want to create a bootable macOS 27 Golden Gate installer drive? A USB installer gives you a convenient way to install macOS without downloading the full installer again each time. It can also be useful for a clean installation, setting up multiple compatible Macs, or keeping an offline installer ready when your normal installation method is not working.
You can create a Golden Gate bootable USB manually with Apple's createinstallmedia command. But there is an easier option if you would rather avoid Terminal: EaseUS Partition Master for Mac includes a MacOS Installer Creator that can download a compatible macOS installer and turn a USB drive into bootable installation media with a guided interface.
This guide covers both methods, so you can choose the one that fits your experience. If you found it helpful, feel free to share this post to help more people.

Why Create a Bootable Golden Gate Installer Drive?
A bootable installer is more than just a USB copy of macOS. It contains the installation environment needed to start the Mac and install the operating system from external media. There are several situations where creating a macOS 27 Golden Gate USB installer makes sense.
1️⃣Install Golden Gate on Multiple Macs
If you need to install macOS on several compatible Macs, repeatedly downloading the full installer can be inconvenient, especially on a slower or limited Internet connection. With a bootable USB installer, you can reuse the same installation media on compatible Macs instead of downloading the installer from scratch every time.
2️⃣Perform a Clean Installation
A bootable installer can also be useful when you want to start with a clean macOS installation rather than simply upgrading the existing system. For example, you may want to erase the internal drive and install macOS 27 Golden Gate from scratch. A USB installer gives you another way to access the installation process.
3️⃣Keep an Offline macOS Installer
Internet Recovery is convenient, but it depends on a working network connection. A bootable USB keeps the macOS installation files locally available. That can be especially useful if you have a slow connection, need to reinstall macOS while troubleshooting, or simply want an installer on hand.
4️⃣Troubleshoot macOS Installation Problems
A bootable installer can provide an alternative when installing macOS through the normal Software Update, Finder, or Recovery process does not work as expected. Apple also identifies bootable installers as useful when normal installation methods are unsuccessful or when you need to install macOS on multiple Macs.
What You Need to Create a Golden Gate Bootable USB
Before you start, prepare the following:
- A compatible Mac (Check this guide to learn the hareware requirements of macOS 27 Golden Gate)
- A USB flash drive or external storage device
- At least 16 GB of available storage; a 32 GB drive gives you more room
- A stable Internet connection if the macOS installer still needs to be downloaded
- Administrator access on the Mac
- Most importantly, back up anything important on the USB drive first. Creating a bootable macOS installer will erase the target USB drive. Do not use a drive that contains files you still need.
How to Create a Bootable macOS 27 Golden Gate Installer Drive
In this part, you will get two methods to create a bootable USB drive for macOS 27 Golden Gate. Select the suitable method to follow and install Golden Gate on your Mac.
| Comparison | EaseUS Partition Master for Mac | Terminal |
|---|---|---|
| Difficulty |
Easy |
More technical |
| Interface |
|
Command line |
| Download installer | Built into the workflow | Download separately |
| USB preparation | Handled by the tool | Manual |
| Best for | Beginners and users who want a simpler workflow | Experienced Mac users |
Method 1. Create a Bootable Golden Gate Installer Drive with EaseUS Partition Master for Mac
If you do not want to deal with Terminal commands, EaseUS Partition Master for Mac provides a much more straightforward workflow.
Its MacOS Installer Creator is designed specifically for creating bootable macOS installation media. You can select a compatible macOS version, choose the target USB drive, and let the software handle the creation process. If the macOS version you need is not displayed, you can also use a compatible local .pkg installer.
Step 1. Connect a USB Drive to Your Mac
- Plug the USB flash drive or external drive into your Mac.
- Make sure it has enough free space and that you have backed up any files stored on it.
Step 2. Open EaseUS Partition Master for Mac
- Launch EaseUS Partition Master for Mac.
- From the main interface, find and select MacOS Installer Creator.
The tool will guide you through the installer creation process rather than requiring you to manually construct a Terminal command.
Step 3. Select macOS 27 Golden Gate
- Choose the macOS version you want (macOS 27 Golden Gate) to use for the installer.
If the version you need is not listed, EaseUS also provides a Use local pkg package option. This allows you to use a compatible macOS installation package that you already have on your Mac.
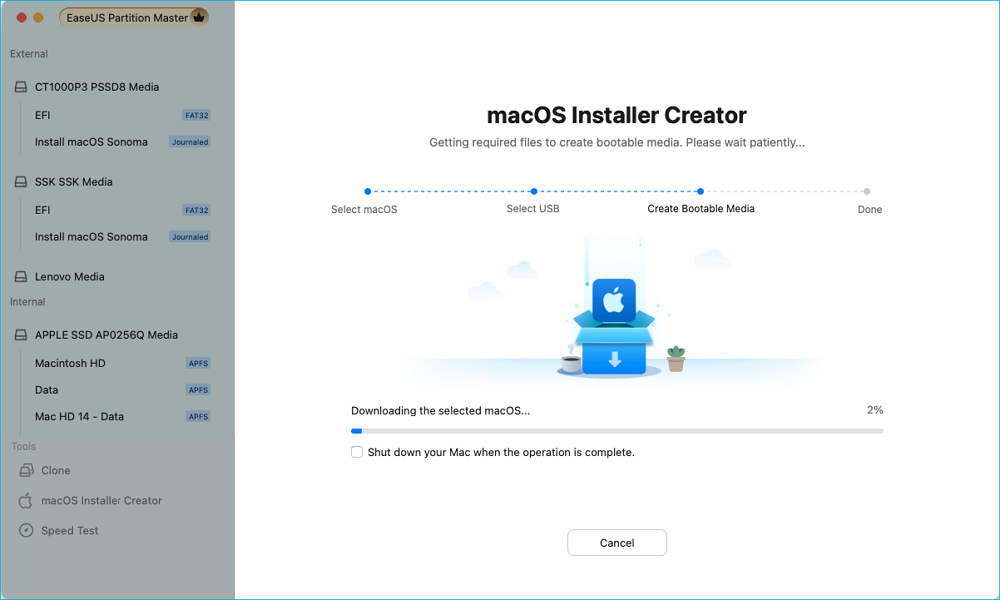
Step 4. Select the USB Drive
- Choose the USB drive that you want to turn into a Golden Gate installer.
🔴Be extremely careful here. The selected drive will be erased during the creation process. If the USB contains photos, documents, backups, or other important files, stop and back them up before proceeding.
Step 5. Create the Bootable Installer
- Start the creation process and let EaseUS Partition Master for Mac complete the required operations.
Depending on the installer size and USB speed, this may take some time. Do not disconnect the USB drive while the installer is being created.
Once the process finishes, the USB drive becomes your bootable macOS installer.
Step 6. Boot Your Mac from the USB Installer
Because macOS 27 Golden Gate supports Apple silicon Macs only, the startup procedure below applies to compatible Apple silicon Macs.
- Connect the Golden Gate bootable USB installer to your Mac.
- Shut down the Mac completely.
- Press and hold the Power button.
- Keep holding it until Loading startup options appears.
- Select the bootable Golden Gate installer.
- Click Continue.
Note: Intel-based Macs cannot install macOS 27 Golden Gate. If you have an Intel Mac, macOS 26 Tahoe is the latest major macOS version supported by Intel-based hardware.
Method 2. Create a Golden Gate Bootable Installer Using Terminal
Prefer Apple's built-in tools? You can create the installer manually with Terminal. This method uses the createinstallmedia utility included inside the macOS installer. It gives you more direct control, but it also involves more steps and leaves more room for typing or selecting the wrong drive.
Method 2. Create a Bootable Golden Gate Installer Using Terminal
If you prefer Apple’s built-in tools, you can create a bootable macOS 27 Golden Gate installer using Terminal and the createinstallmedia command. This method gives you more direct control over the installation media, but it requires a few manual steps.
Step 1. Download the Full macOS 27 Installer
- First, download the full macOS 27 Golden Gate installer.
- Once the download is complete, make sure the installer app is located in the Applications folder. Its name may vary depending on the release or beta version, such as: Install macOS 27 Golden Gate Beta.app
- For the final release, the installer name may be different. The important part is that you use the complete macOS installer application rather than a regular update package.
Step 2. Connect the USB Drive
- Connect a USB flash drive or other external storage device to your Mac.
- Back up any important files on the drive first. Creating the bootable installer will erase the USB drive.
Step 3. Format the USB Drive
- Open Applications > Utilities > Disk Utility.
- Select the USB drive and click Erase. Use the following settings:
- Format: Mac OS Extended (Journaled)
- Scheme: GUID Partition Map
- Name: MyVolume
- Click Erase and wait for Disk Utility to finish.
Step 4. Open Terminal
- Open Applications > Utilities > Terminal.
- The createinstallmedia utility is included inside the macOS installer package, under: Contents/Resources/
- You can type the command manually, or locate createinstallmedia inside the installer package and drag it into Terminal to insert its path automatically.
Step 5. Run the Createinstallmedia Command
The command follows this general structure:
sudo /Applications/Install\ macOS\ 27\ Golden\ Gate\ Beta.app/Contents/Resources/createinstallmedia --volume /Volumes/MyVolume
- The exact installer name may vary depending on the Golden Gate release or beta version. Replace the installer name and MyVolume with the actual names on your Mac if they are different.
- Press Return and enter your administrator password when prompted. Terminal will not display the characters as you type.
- Terminal will then warn you that the target volume will be erased. After confirming that you selected the correct USB drive, type Y and press Return to continue.
Step 6. Wait for the Installer to Finish
- Terminal will erase the USB drive and copy the macOS installation files to it.
- Do not disconnect or eject the USB drive while the process is running.
- Wait until Terminal confirms that the installation media is available. You should see a message similar to: Install media now available at "/Volumes/Install macOS 27 Beta"
- Once this message appears, the bootable Golden Gate installer is ready. You can quit Terminal, eject the USB drive, and use it to install macOS 27 Golden Gate on a compatible Apple Silicon Mac.
The manual process is documented in current Golden Gate USB installation guides and follows Apple's createinstallmedia approach. If you are comfortable with Terminal and want Apple's native workflow, createinstallmedia is perfectly valid. If you would rather select the macOS version and USB drive from a guided interface, EaseUS Partition Master for Mac is the simpler route.
Golden Gate Bootable USB Not Working? Try These Fixes
A USB installer can fail for several reasons. Before recreating it repeatedly, check the basics.
1. Check the USB Capacity
- Use a USB drive with at least 16 GB of storage. A 32 GB drive is a more comfortable choice, particularly for newer macOS installers.
2. Make Sure the USB Was Erased Correctly
- If you created the installer manually, check the USB's partition scheme and format.
- For the traditional createinstallmedia method, GUID Partition Map and Mac OS Extended (Journaled) are commonly used.
3. Make Sure You Have the Full Installer
- A small update package is not the same thing as the complete macOS installer.
- If Terminal cannot find createinstallmedia, check whether you actually downloaded the full Install macOS ... .app installer.
4. Check Mac Compatibility
- A bootable installer does not bypass Apple's hardware compatibility requirements.
- Before installing macOS 27 Golden Gate, confirm that your Mac is supported by the specific macOS release you downloaded.
5. Recreate the Installer
- If the creation process was interrupted, the USB was disconnected, or the installer file was incomplete, the resulting media may not work correctly.
- In that situation, erase the USB and create the installer again.
- With EaseUS Partition Master for Mac, you can return to MacOS Installer Creator, select the macOS installer again, choose the USB drive, and restart the creation process.
Frequently Asked Questions About Golden Gate Bootable Installers
1. Can I install macOS 27 Golden Gate on an Intel Mac?
No. macOS 27 Golden Gate does not support Intel-based Macs. Apple silicon is required to install Golden Gate. Intel Mac users can continue using macOS 26 Tahoe, which is the last major macOS release compatible with Intel-based Macs.
2. How much storage do I need for a Golden Gate bootable USB?
A 16 GB USB drive is generally the minimum starting point for a macOS bootable installer, while 32 GB or larger is a safer choice. Always check the storage requirement for the specific installer you are using.
3. Will creating a Golden Gate bootable USB erase the drive?
Yes. Creating bootable installation media erases the target USB drive. Back up anything important before starting.
4. Can I create a Golden Gate installer without Terminal?
Yes. EaseUS Partition Master for Mac provides a macOS Installer Creator with a graphical workflow. You select a compatible macOS version, select the target USB drive, and start the creation process. It can also use a local .pkg installer when the required version is not shown in the list.
5. Can I use the Golden Gate USB installer on multiple Macs?
Yes, as long as the Macs are compatible with the macOS version you are installing. A bootable installer is particularly useful when you need to install the same macOS version on multiple computers.
6. Do I need a bootable USB to install macOS 27 Golden Gate?
No. A bootable installer is not required for a normal macOS upgrade or reinstall.
It becomes useful when you want to perform a clean installation, install macOS on multiple Macs, keep an offline installer, or have an alternative when the normal installation process is unavailable.
7. Can I create a macOS bootable USB with a local installer package?
Yes. If the desired macOS version is not shown by EaseUS Partition Master for Mac, the MacOS Installer Creator supports using a local compatible .pkg installation package.
Final Thoughts
If your goal is simply to create a bootable macOS 27 Golden Gate installer drive, you do not need to make the process unnecessarily complicated.
The Terminal method works and gives you direct control over Apple's createinstallmedia utility. But it requires you to download the full installer, format the USB correctly, locate the installer, construct the command, and make sure you select the right volume. For a more straightforward workflow, EaseUS Partition Master for Mac puts the process behind a graphical macOS Installer Creator. Select the macOS version, choose the USB drive, and let the tool handle the installer creation. It can also work with a local .pkg installer when needed.
Once the bootable USB is ready, you can keep it as a reusable macOS installation drive for clean installs, troubleshooting, or installing Golden Gate on other compatible Macs.
How Can We Help You
About the Author

Sherly joined EaseUS in 2022 and she has always loved writing articles and enjoys the fun they bring. She receives professional training here, focusing on product performance and other relative knowledge. She has written over 200 articles to help people overcome computing issues.
Product Reviews
-
I love that the changes you make with EaseUS Partition Master Free aren't immediately applied to the disks. It makes it way easier to play out what will happen after you've made all the changes. I also think the overall look and feel of EaseUS Partition Master Free makes whatever you're doing with your computer's partitions easy.
Read More -
Partition Master Free can Resize, Move, Merge, Migrate, and Copy disks or partitions; convert to local, change label, defragment, check and explore partition; and much more. A premium upgrade adds free tech support and the ability to resize dynamic volumes.
Read More -
It won't hot image your drives or align them, but since it's coupled with a partition manager, it allows you do perform many tasks at once, instead of just cloning drives. You can move partitions around, resize them, defragment, and more, along with the other tools you'd expect from a cloning tool.
Read More
Related Articles
-
Nintendo Switch Not Reading SD Card? 10 Fixes Here!
![author icon]() Sherly/2026/09/23
Sherly/2026/09/23 -
[Answered] Is EaseUS Partition Master Safe?
![author icon]() Cici/2026/08/14
Cici/2026/08/14 -
Disk 1 Unknown Not Initialized on Windows 11 - 6 Solutions
![author icon]() Cici/2026/09/28
Cici/2026/09/28 -
How to Upgrade to Windows 11 25H2 from 24H2/23H2
![author icon]() Sherly/2026/06/29
Sherly/2026/06/29
 Cici/2026/08/14