





 About the Author
 Reviews and Awards
 Mac SD Card Recovery
Can You Recover Deleted Files on macOS Golden Gate
Yes, in many cases you can recover deleted files on macOS Golden Gate. The method really depends on how those files were deleted.
Normally, when you delete a file in Finder, it heads straight to the Mac Trash folder; you haven't actually lost it yet. You can just open the Trash, right-click, and hit "Put Back" to return the file where it came from. Time Machine is there for you if you've got backups. And if the files were in iCloud Drive, check iCloud's Recently Deleted area.
But if you've already emptied the Trash, the situation's trickier. Finder can't help anymore, and your success now depends on your storage: was it an SSD or a spinning hard drive? Has new data already been written since deletion? Every detail counts.
And keep in mind, there's a difference between "deleted" and "missing." Sometimes, after a system upgrade, files seem to disappear but aren't actually deleted. They might've moved somewhere else, synced to iCloud, or even ended up on another storage volume.
Here's the best order for your recovery attempts:
- Step 1. Check the Trash.
- Step 2. Look at your Time Machine or other backups.
- Step 3. Check iCloud Drive.
- Step 4. If you strike out, try data recovery software right away.
If the files are critical and you don't have backups, don't start formatting, partitioning, or "fixing" your Mac. Less tinkering, more rescuing.
How to Recover Deleted Files on macOS 27
You've got a few solid options, depending on where the lost file ended up. Don't skip these precautions before recovering deleted files on Mac:
- Stop adding new files to the drive where you lost your data.
- Avoid downloading or moving big files there.
- Don't install recovery software on the same drive if possible, pick another volume.
- Stay away from formatting.
- Never save recovered files back to the same spot you're recovering from.
- If these files are mission-critical, consider creating a backup or a disk image before you try extensive recovery.
Method 1. Use EaseUS Data Recovery Wizard for Mac
Lost your files for good by emptying the Trash, no backups, the works? EaseUS Data Recovery Wizard for Mac might be your best solution here. It can dig around your Mac or any connected drive for files that still have a fighting chance of recovery.
It works on all sorts of storage setups, including internal drives, USBs, SD cards, and reads APFS, HFS+, exFAT, NTFS, and FAT.
Here's also a video guide that can help you learn more about Mac data recovery with EaseUS Data Recovery Wizard:

Check the following written tutorial and find out the data recovery steps on macOS Golden Gate:
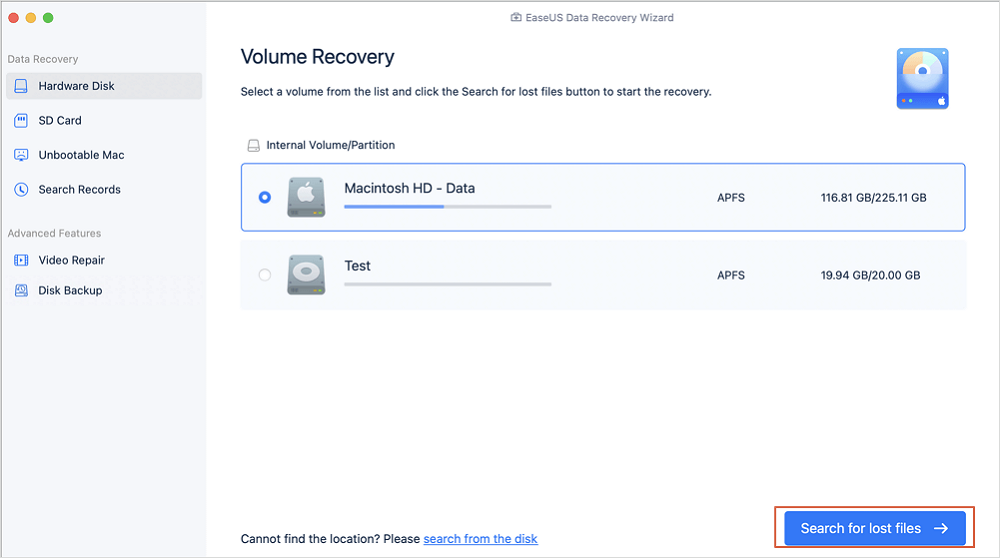
Step 1. Search for lost files
Select the disk location to search for lost files (it can be an internal HDD/SSD or a removable storage device) on macOS Sierra, High Sierra, Mojave, Catalina, Big Sur, Monterey, Ventura, and the latest Sonoma. Click the "Search for lost files" button.
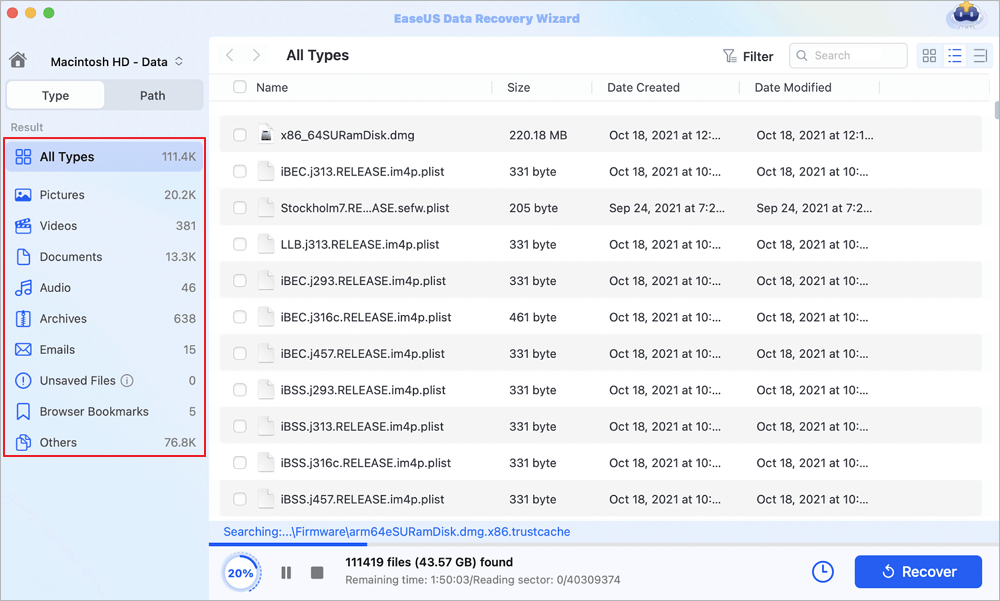
Step 2. Go through the scanning results
EaseUS Data Recovery Wizard for Mac will immediately scan your selected disk volume and display the scanning results.
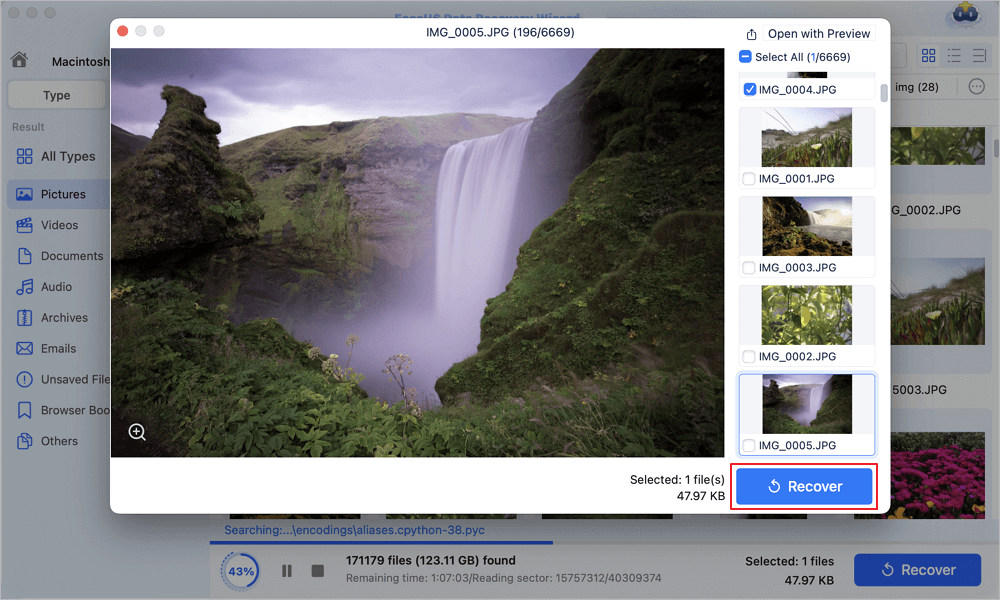
Step 3. Select the file(s) and recover
In the scan results, select the file(s) to preview and click the "Recover" button to have them back.
If you have other friends who encounter data loss on the new macOS, recommend this tutorial on social media and offer help!

Method 2. Recover Deleted Files from Trash
Did you just delete a file? Check the Trash. macOS sends most things there before vaporizing them. Open Trash, right-click what you want, and use "Put Back." It's that simple.
Step 1. Click the Trash icon in your Dock. Scroll through or use Finder's search to find your file faster.
Step 2. When you spot the file, select it (hold Command for more than one), right-click, and choose "Put Back." Your file pops right back to its old folder.

If it's not there, maybe macOS already auto-deleted it (it does this after 30 days sometimes), or someone emptied the Trash. In that case, try your backups or skip to a recovery tool to recover the emptied Trash.
Method 3. Recover Deleted Files from Time Machine
If you've kept Time Machine running, this is one of the safest recovery methods out there.
Step 1. Connect your Time Machine drive or make sure you're on the right network if it's a networked backup.
Step 2. Navigate in Finder to where the file used to live, Documents or Desktop.
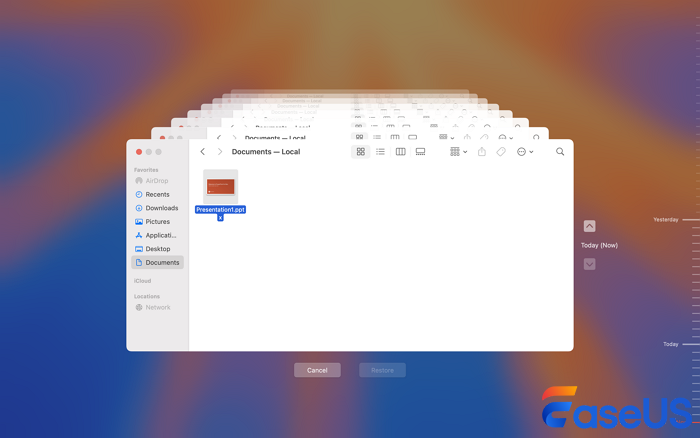
Step 3. Click the Time Machine icon (if you don't see it, add it through System Settings). Choose "Browse Time Machine Backups."
Step 4. Use the timeline or arrows to move through previous backups. Note when your file was still around you might need to check a few points if you're unsure.
Step 5. Click the file and hit "Restore." It'll return to its proper place.
If you don't see the file in any backup, then it's time to look elsewhere, like iCloud Drive or recovery software.
Method 4. Recover Deleted Files from iCloud Drive
Use iCloud Drive? You've got a 30-day window to restore recently deleted files.
Step 1. Visit the iCloud website in a browser and sign in with your Apple ID.
Step 2. Open iCloud Drive, and see if that stray file is still in its folder. If not, look in the "Recently Deleted" section.
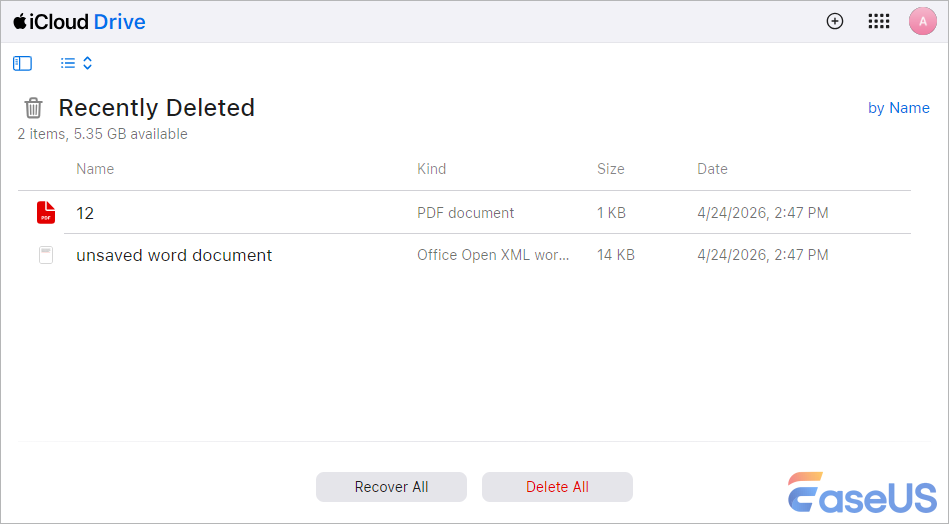
Step 3. Find the file, select it, and hit "Recover." That's it. Give your Mac a moment to sync, and check for your file in Finder's iCloud Drive folder.
If it isn't there, you've either passed the 30-day limit, or it's been permanently deleted.
Conclusion
Recovering deleted files on macOS Golden Gate usually comes down to how you lost the file. If the file only just disappeared, try the Trash or use "Put Back." Got Time Machine backed up? Browse your backups and restore the missing file from there. For iCloud users, peek at the Recently Deleted area on iCloud.com.
If you've emptied the Trash and have no backup, stop everything and turn to EaseUS Data Recovery Wizard for Mac (on a different drive if possible), and let it scan for what's left.
macOS Golden Gate Data Recovery FAQs
1. Where do deleted files go after the macOS Golden Gate update?
They hit the Trash first. They'll stay there until you empty the Trash or macOS removes them after 30 days. Files from iCloud Drive get a similar treatment.
2. How do I recover permanently deleted files on macOS 27?
Maybe. Professional recovery programs like EaseUS Data Recovery Wizard for Mac can bring some back, if they haven't been overwritten. But there's no guarantee, especially with SSDs.
3. Can I recover deleted files on macOS Golden Gate without Time Machine?
If you haven't enabled Time Machine, you can download professional Mac data recovery software to restore deleted files. Or you can check iCloud backup or other local backups to restore missing files.
Was This Page Helpful?

Dany is an editor of EaseUS who lives and works in Chengdu, China. She focuses on writing articles about data recovery on Mac devices and PCs. She is devoted to improving her writing skills and enriching her professional knowledge. Dany also enjoys reading detective novels in her spare time.
-
EaseUS Data Recovery Wizard is a powerful system recovery software, designed to enable you to recover files you’ve deleted accidentally, potentially lost to malware or an entire hard drive partition.
Read More -
EaseUS Data Recovery Wizard is the best we have seen. It's far from perfect, partly because today's advanced disk technology makes data-recovery more difficult than it was with the simpler technology of the past.
Read More -
EaseUS Data Recovery Wizard Pro has a reputation as one of the best data recovery software programs on the market. It comes with a selection of advanced features, including partition recovery, formatted drive restoration, and corrupted file repair.
Read More
Related Articles
-
How to Recover Deleted Files on Mac Without Software
![author icon]() Dany/Sep 20, 2026
Dany/Sep 20, 2026 -
8 módszer a törölt fájlok helyreállítására Macen 2026-ben
![author icon]() Cedric/Jul 23, 2026
Cedric/Jul 23, 2026 -
How to Find Recently Deleted Messages on MacBook: Recovery Guide
![author icon]() Jaden/Sep 20, 2026
Jaden/Sep 20, 2026 -
How to Recover Deleted System Files Mac [New Updated]
![author icon]() Jaden/Sep 20, 2026
Jaden/Sep 20, 2026
 Cedric/Jul 23, 2026
  Jaden/Sep 20, 2026

