The latest version of Apple's operating system, macOS Sequoia Beta, offers higher capacity, increased speed, and a refined system. It is an early test version, which gives users a sneak peek into new features to be incorporated into the system and their feedback before the actual release into the macOS terminals.
I got the installer and was able to target it at an external drive, but when I try to boot from it after the installer completes, I get an error. Does anyone know if this is possible? I'm on an Apple Silicon Mac. Possible to install Sequoia Beta on an external drive? Asked by a Mac user on Reddit.com
In this post, we will subsequently discuss the steps to install macOS Sequoia Beta on your Mac from a USB flash drive to facilitate a more refined and error-free installation. Whether you want more information about the new macOS or are a developer, we have made it simple for you to follow our detailed procedures. Let's discuss the steps to install macOS Sequoia USB in detail!
| Workable Solutions | Step-by-step Troubleshooting |
|---|---|
| Install macOS Sequoia Beta from USB with One Click | Do you know that some third-party tools can help you install the macOS Sequoia Beta version from USB without hassle...Full steps |
| Step 1. Choose a USB Device | Find a 16GB USB flash drive, ensuring ample space for the macOS Sequoia Beta installer...Full steps |
| Step 2. Download the macOS Sequoia Installer | Open Terminal by accessing Applications > Utilities, and use this command to list available installers...Full steps |
| Step 3. Create the macOS Sequoia USB Installer | Go to Applications. Right-click Install macOS 15 beta and choose Show Package Contents...Full steps |
| Step 4. Install macOS from the Bootable Installer | Plug in the USB drive, start your Mac, and hold the power button until you see the loading screen...Full steps |
How to Install macOS Sequoia Beta from USB with One Click
How to install macOS Sequoia or its beta version from a USB flash drive? The difficult part is creating a macOS Sequoia installer with a USB drive. You'll need to learn some command lines and Terminal knowledge if you don't use an automatic tool. If you are not familiar with downloading or installing macOS Sequoia or other macOS versions from a USB device, here's a convenient way!
Download EaseUS Data Recovery Wizard for Mac, which provides a free macOS installation feature, and you can install Sequoia Beta from USB without effort. It can also help you upgrade and downgrade macOS versions from USB drives without difficulty. Try this handy feature now for free!
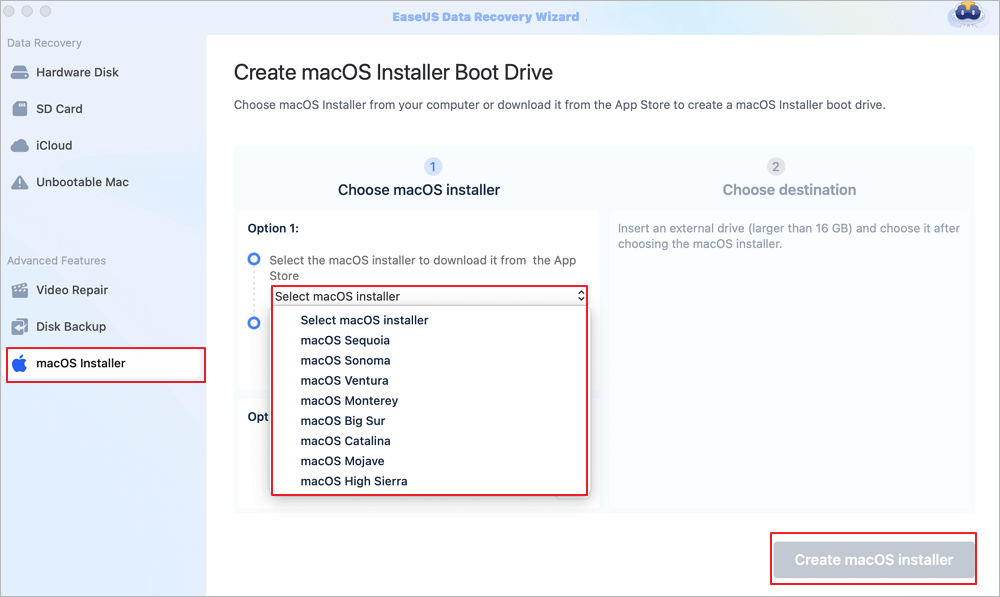
✨Step 1. Connect USB Flash Drive and Choose a macOS Version
Launch EaseUS recovery software, and choose "macOS Installer" from the Advanced Features. Insert a USB that has more than 16GB of free storage space.
- Option 1: Choose a macOS version you want to install, and a new windows will ask you to download macOS installer from App Store. After downloading the installer, click "Refresh".
- Option 2: If you have already downloaded macOS installer, choose "Add" and select the installer you have downloaded.
Finally, you can choose "Create macOS Installer" to start creating the bootable installer. You can select various macOS versions like macOS Tahoe, macOS Sequoia, Sonoma, Ventura, Monterey, Big Sur, and older versions.
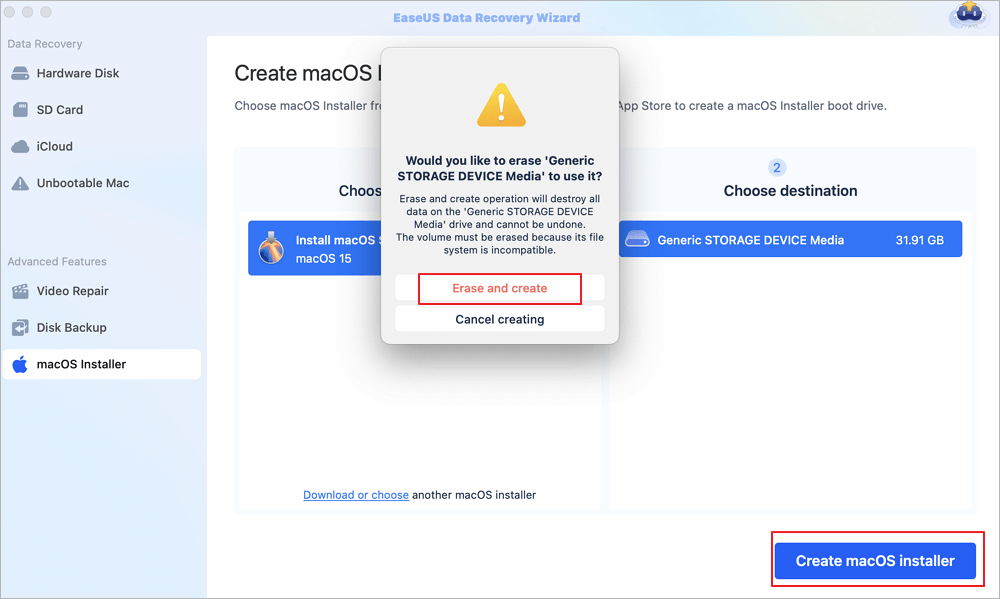
✨Step 2. Erase the USB and Create a macOS Installer
A notice window will appear to warn you this operation will remove everything on this USB. Make sure you have backed up data and nothing important is left on this USB, click the "Erase and create".
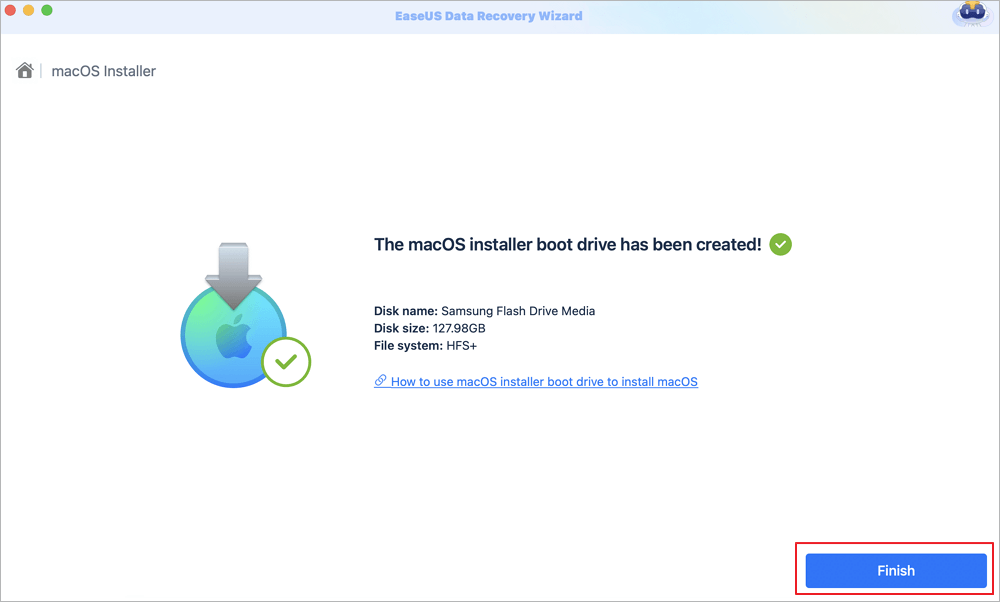
✨Step 3. Wait and Check How to Use macOS Installer
The software will automatically format the USB and download macOS installer files. After creating the bootable macOS installer, click the blue link on the interface to learn how to use the macOS Installer boot device to install macOS. Finally, click "Finish" to complete the whole process.
Please share this tutorial on social media to help more users who want to install macOS Sequoia Beta from USB!
Step 1. Choose a USB Device
Firstly, you'll need a USB drive as the installation destination. A USB flash drive with a minimum of 16GB storage is suitable. Opt for one that offers USB-C and USB-A connections for flexibility across devices. You can easily find a 16GB USB flash drive at an affordable price, ensuring ample space for the macOS Sequoia Beta installer. This setup allows you to install the new operating system on your Mac smoothly, accommodating various connection types for convenience and compatibility.
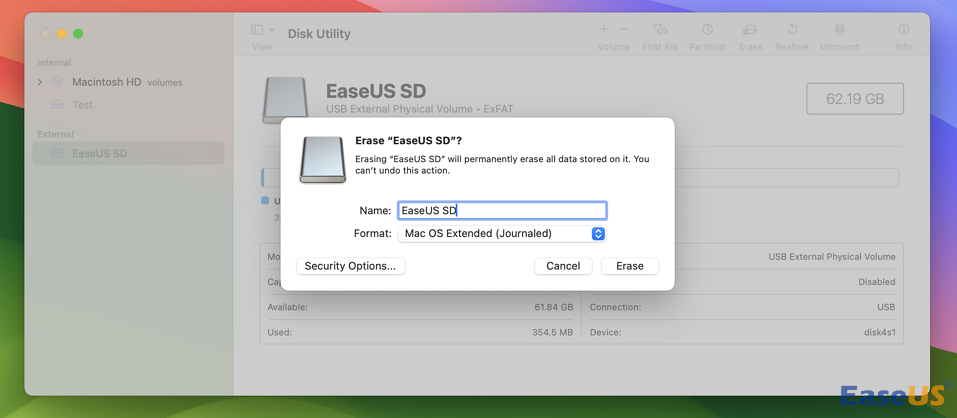
Before creating a macOS Sequoia bootable USB flash drive, you should format the USB device first via Disk Utility. Go to "Disk Utility", choose the USB device, and click on the "Erase" button at the top menu.
Step 2. Download the macOS Sequoia Installer
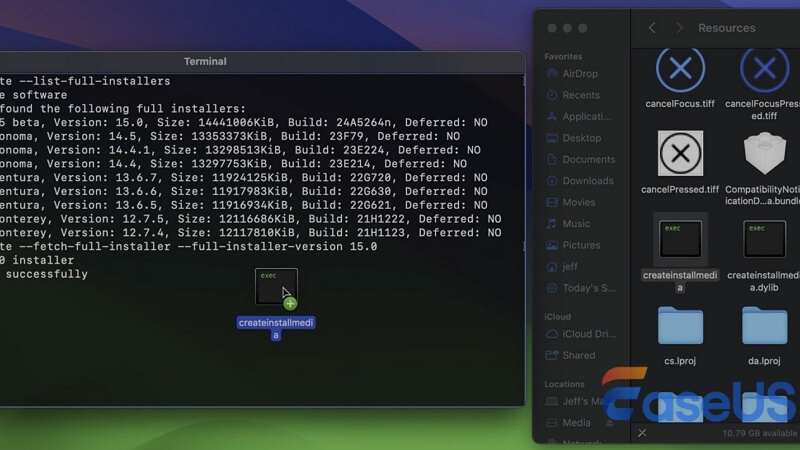
The next step is to download the macOS Sequoia Installer to proceed with the installation process. To download the macOS 15 Sequoia installer, open "Terminal" and use the softwareupdate command. Follow these steps:
Step 1. Open Terminal by accessing "Applications > Utilities".

Step 2. Use this command to list available installers, and hit "Return" to view the macOS 15 Sequoia installer.
softwareupdate --list-full-installers

Step 3. Next, download the installer to your Applications folder with this command, and press "Return" from the keyboard to begin the download.
softwareupdate --fetch-full-installer --full-installer-version 15.0
If you think this post is helpful, share it on SNS to help others learn how to install macOS Sequoia beta from a USB drive.
Step 3. Create the macOS Sequoia USB Installer
Creating a macOS USB installer allows you to install or upgrade your Mac's operating system conveniently. Follow these steps to prepare a bootable USB drive with the macOS Sequoia installer.
Step 1. Open "Finder" and go to "Applications". After right-clicking "Install macOS 15 beta", choose "Show Package Contents".
Step 2. Navigate to "Contents > Resources". Open Terminal and type sudo.

Step 3. Drag and drop the createinstallmedia file from the Resources folder into the Terminal window. Type --volume.
Step 4. Connect your USB Drive. Ensure it's empty, as all its contents will be deleted. Open Finder, access "Go > Go to Folder", type /Volumes, then press "Return" on the keyboard.
Step 5. Drag and drop your USB drive volume from Finder into the Terminal window. Press "Return". Enter your administrator password when prompted.
Step 6. Wait for the process to complete. Once done, eject the USB drive. These steps simplify the process of creating a macOS Sequoia USB installer.
Step 4. Install macOS from the Bootable Installer
To install macOS using a bootable installer, ensure you have successfully created the bootable installer by following the previous steps. Connect the bootable USB drive to your Mac to install MacOS Sequoia. Follow the steps below:
Step 1. Plug in the USB drive with MacOS Sequoia into your Mac.
Step 2. Start your Mac and press & hold the power button until the "Loading Startup Options" window displays your bootable volumes.
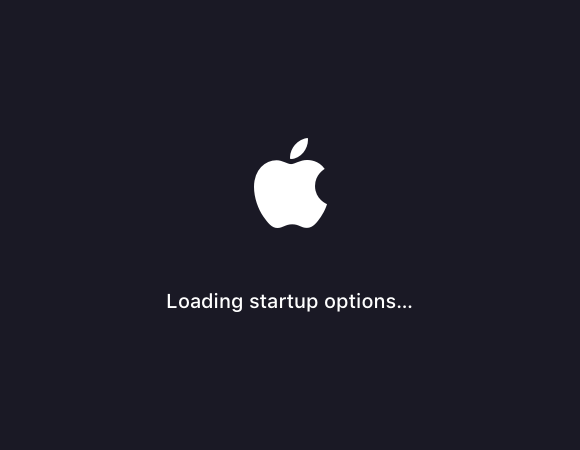
Step 3. Choose the volume with the bootable installer, then click "Continue". Follow the onscreen instructions in the macOS installer that opens.
If you can't install macOS Sequoia on your Mac, here's an article tutorial to fix this error.
How to Fix Can't Install macOS Sequoia? Try 9 Best Solutions
This article discusses 9 ways to fix the new macOS version, macOS Sequoai, can't install on a Mac issue. Read more >>
Bonus Tips: Back Up Your Data Before Updating to Avoid Data loss
Before upgrading your MacOS, always ensure that you have backed up your data to avoid data loss that could occur due to a failed installation, system crash, or other similar reasons. We recommend EaseUS Data Recovery Wizard for Mac to back up and recover your essential lost data.
Back Up Your Mac and Never Lose Data
Back up and restore your MacBook/iMac without Time Machine, iCloud, or external hard drives.
This professional USB data recovery software for Mac can help users recover data from hard drives as well as external drives such as USB, fusion drives, SSDs, and more. Moreover, users can even recover data from the emptied trash bin. With a recovery rate of 99.7%, this data recovery tool can retrieve photos, videos, music files, documents, and more with ease. Furthermore, it ensures data integrity with advanced encryption and secure storage practices.
Here are the steps to use EaseUS Data Recovery Wizard for Mac to back up your data:
Step 1. Click "Disk Backup" > "Create Backup" > "Next" in EaseUS Data Recovery Wizard for Mac's main interface. You can create a drive backup image file in case the data is overwritten.
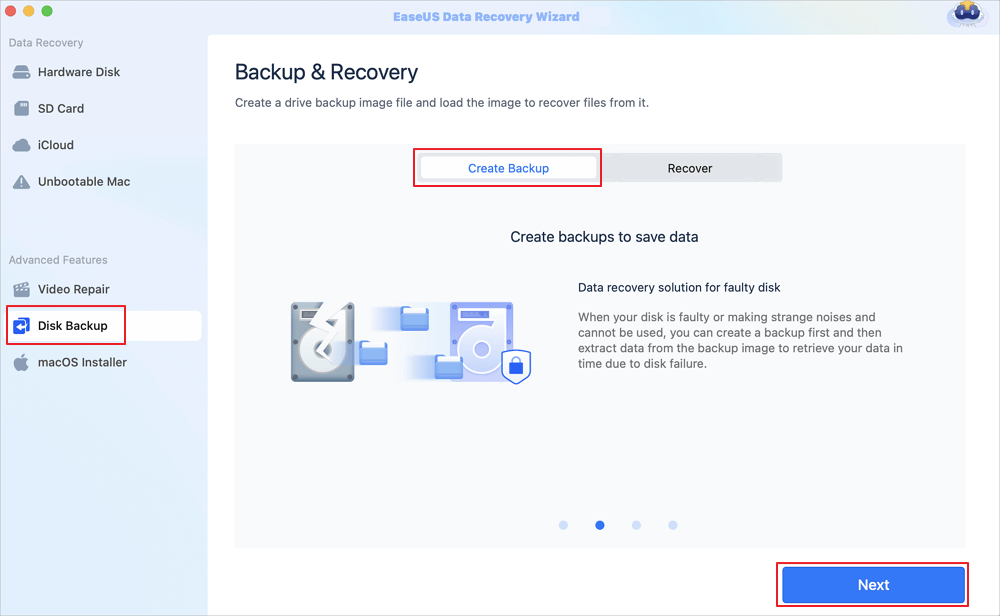
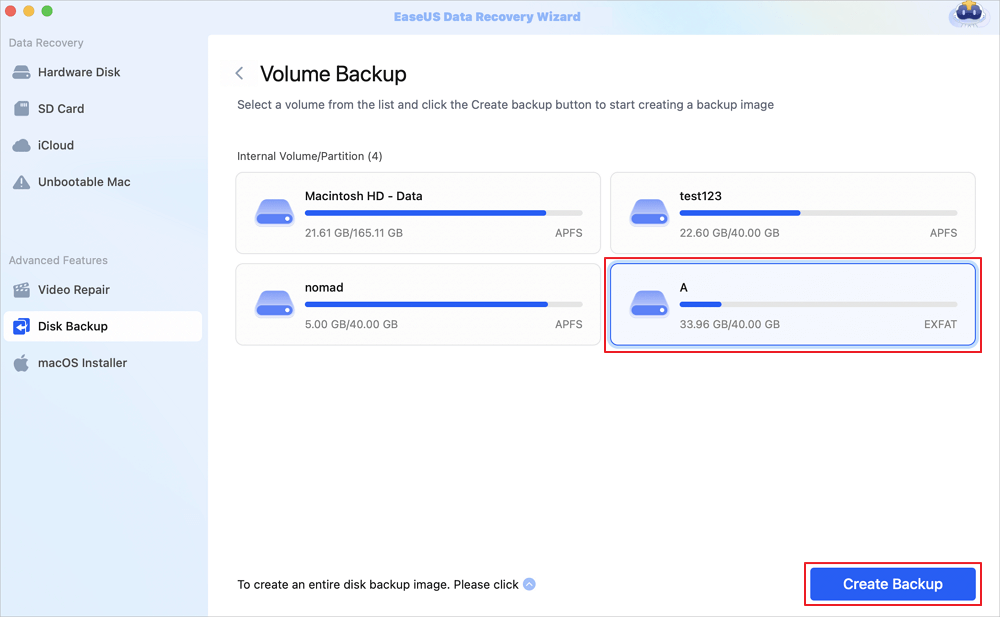
Step 2. Select an internal volume to back up, and click "Create Backup". If you want to create backups and recover data from an external hard drive, USB flash drive, or SD card, remember to connect the storage device to your Mac in advance.
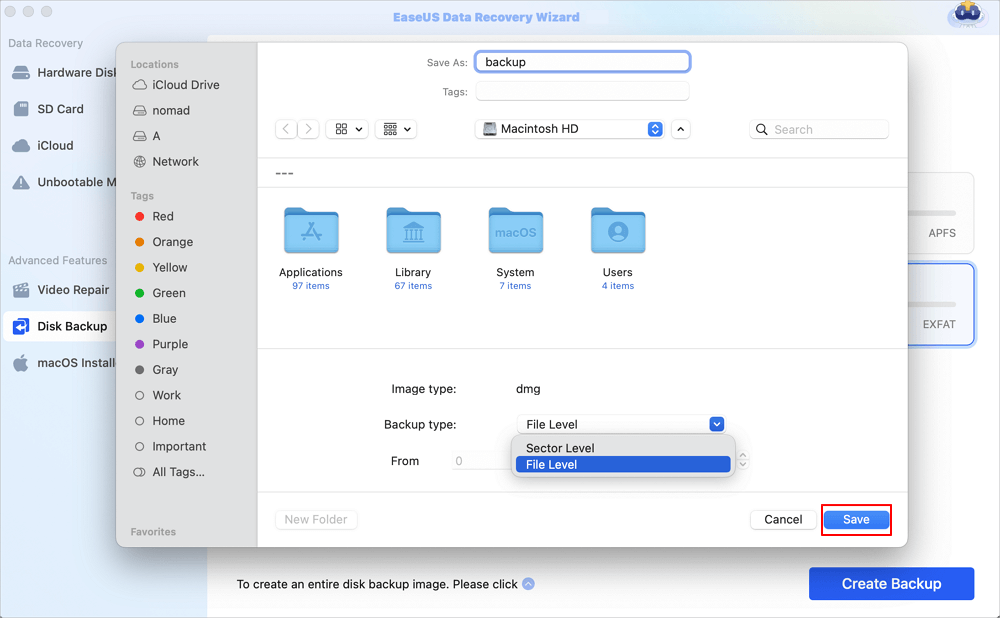
Step 3. Choose a place to save your backup files, and change the name of your backup file, then click "Save". It is not wise to save backups in the same storage device that you want to recover data from.
As with any OS installation, there is a risk of data loss; EaseUS Data Recovery Wizard for Mac helps users retrieve accidentally deleted files.
Conclusion
In conclusion, a clean install of macOS Sequoia Beta from a USB drive gives your Mac a new start, guaranteeing peak performance. It is recommended that Mac data be backed up before initiating the installation procedure. For those who have lost data while installing the MacOS 15, it is recommended that they utilize EaseUS Data Recovery Wizard for Mac to get the files back. This also provides mental satisfaction as you're going to test the latest macOS Sequoia Beta, knowing that your precious data is safe and easily retrievable.
Frequently Asked Questions
Now, let's explore some common queries related to this topic:
1. Can you install macOS from USB?
Yes, installing macOS from a USB drive is possible. This method is often used for clean installations or when upgrading MacOS with the terminal commands.
2. How to boot USB with macOS?
For macOS to boot from a USB drive:
- Attach the USB device with the bootable macOS to your Mac.
- Hold down the Option (Alt) key when the startup sounds when you restart your Mac.
- To start booting from the USB device and perform the macOS installation or troubleshooting procedure, select the USB drive from the startup screen.
Was This Page Helpful?
Brithny is a technology enthusiast, aiming to make readers' tech lives easy and enjoyable. She loves exploring new technologies and writing technical how-to tips. In her spare time, she loves sharing things about her game experience on Facebook or Twitter.
Related Articles
-
How to Cancel Windows 10 Updates Once Started
![author icon]() Jean/2025-07-04
Jean/2025-07-04 -
ESC Key Not Working Mac: with 5 Practical Ways to Fix Escape Key Not Working
![author icon]() Brithny/2025-09-17
Brithny/2025-09-17 -
Computer Freezes When Playing Games in Windows 10
![author icon]() Brithny/2025-07-04
Brithny/2025-07-04 -
How to Fix Active Partition Not Found in Windows [Full Guide]
![author icon]() Cici/2025-07-10
Cici/2025-07-10
EaseUS Data Recovery Services
EaseUS data recovery experts have uneaqualed expertise to repair disks/systems and salvage data from all devices like RAID, HDD, SSD, USB, etc.
