Overview
This instruction pertains to the EaseUS Partition Master user guide, which contains Welcome and Edition Comparison.
Welcome
Thank you for choosing EaseUS Partition Master.
EaseUS Partition Master is a reliable and intelligent tool that helps you manage your hard drive in various ways. With its help, you are able to easily organize and optimize your hard drive with Create, Delete, Resize and other dozens of powerful features.
The user-friendly interface with comprehensive wizards greatly simplifies even the most complex operations in managing your partitions and ensures every feature in this product can be easily found and navigated, making for a seamless experience.
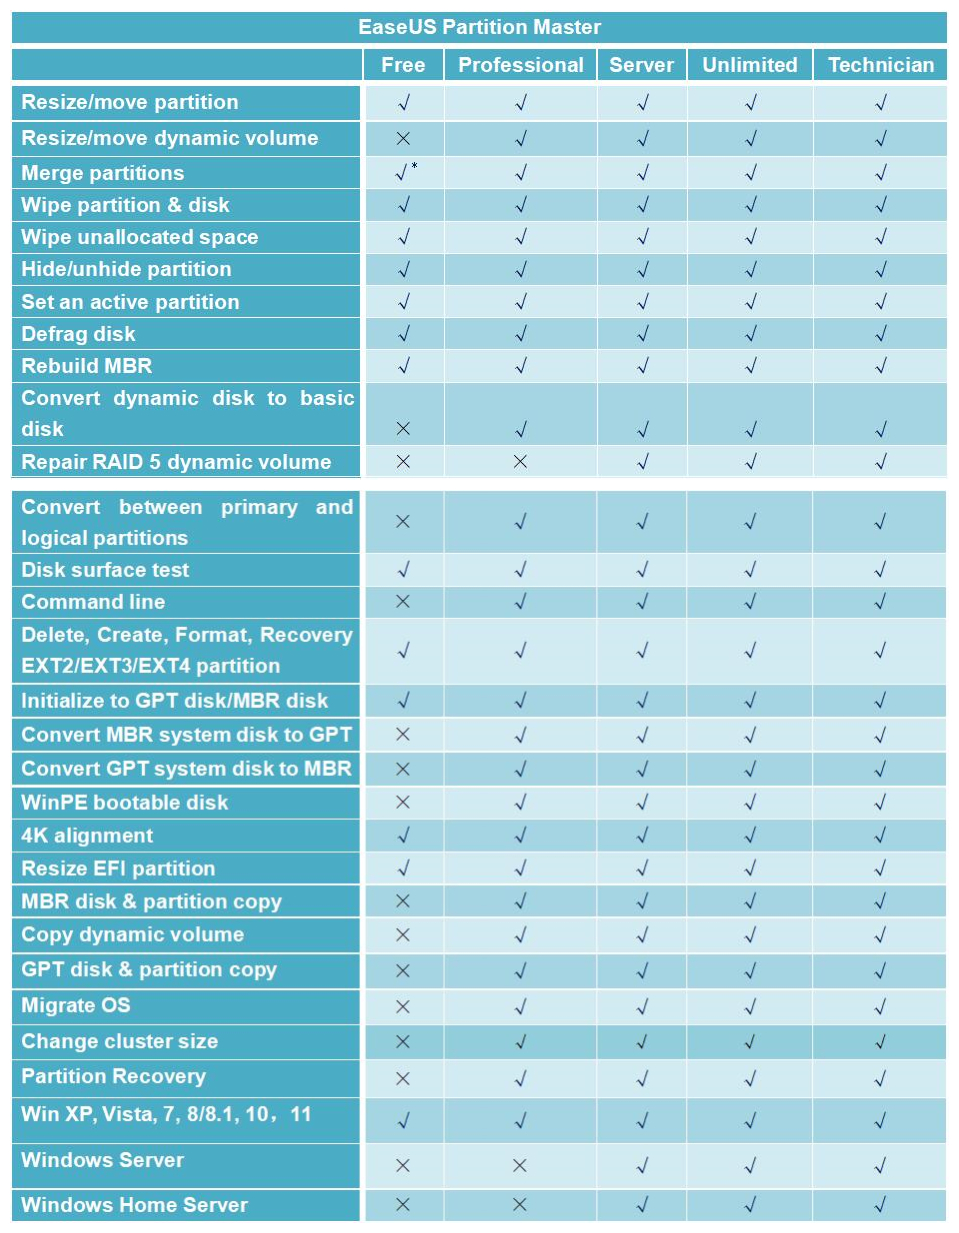
Edition Comparison
There are a total of 5 distinct versions of EaseUS Partition Master available.
Each version differs in terms of features and license authorization.
Free edition - free for home users and doesn't support Windows server operating system. Limited in some features.
Professional edition - commercial version for desktops and laptops end users.
Server edition - commercial version for Windows server users.
Unlimited Edition - commercial version for enterprise users. It allows unlimited usage within one company.
Technician edition - providing technical service with unlimited usage.
Detailed comparisons among different editions are in the table below.
Getting Started
This section outlines the necessary hardware/software prerequisites for utilizing EaseUS Partition Master, as well as the compatible devices. Additionally, the steps of install/uninstall are provided.
Hardware Requirements
EaseUS Partition Master requires the computer at least with X86 or compatible CPU with main frequency 500 MHz, a standard PC system with mouse, keyboard and color monitor, and the capability of the RAM memory equal or larger than 1.5GB.
Supported File Systems
• FAT12/FAT16/FAT32
• exFAT
• NTFS
• ReFS
• EXT2/EXT3/EXT4
Important consideration: Limited features are supported with EXT2/EXT3/EXT4 file systems, including Create, Delete, Copy (in Sector Mode only), Format, Resize.
Supported Storage Devices
IDE, SATA, SCSI, USB removable hard disk, Firewire Hard disk, USB flash drive, memory card, etc. Supported capability ranges from minimum 2 GB to maximum 16 TB.
Install and Uninstall
To install EaseUS Partition Master:
1. Double Click EaseUS Partition Master setup file to initiate the installation process. The Setup Wizard page will be launched. Click Next to continue.
2. Please carefully read the License Agreement, if you accept the terms, select I accept the agreement, otherwise, you will not be able to proceed with the installation.
3. Choose a location to install the software, install it to the default folder by clicking NEXT, or click Browse to select a specified location.
4. Set a location for the shortcut in Windows start menu.
5. Tick the corresponding option to create a shortcut on your desktop or Windows quick launch bar. Also, you can tick them both.
6. Click Install to confirm your previous selection and start the installation. The final page reports the end of the setup process. Click Finish to complete the wizard.
To Uninstall EaseUS Partition Master:
1. From the Windows Start menu, select Start > Settings > Control Panel (From the Windows Start menu, select Start > Control Panel in Windows 7/Vista)
2. Double-click Add/Remove Programs, and select Change or Remove Programs (Double-click Programs and Features in Windows 7/Vista).
3. Select EaseUS Partition Master, and click Remove to uninstall the related components (Select EaseUS Partition Master from the list and click Uninstall in Windows 7/Vista).
4. Or select Start > All Programs > EaseUS Partition Master > Uninstall EaseUS Partition Master. Then, follow the instructions of the uninstallation wizard.
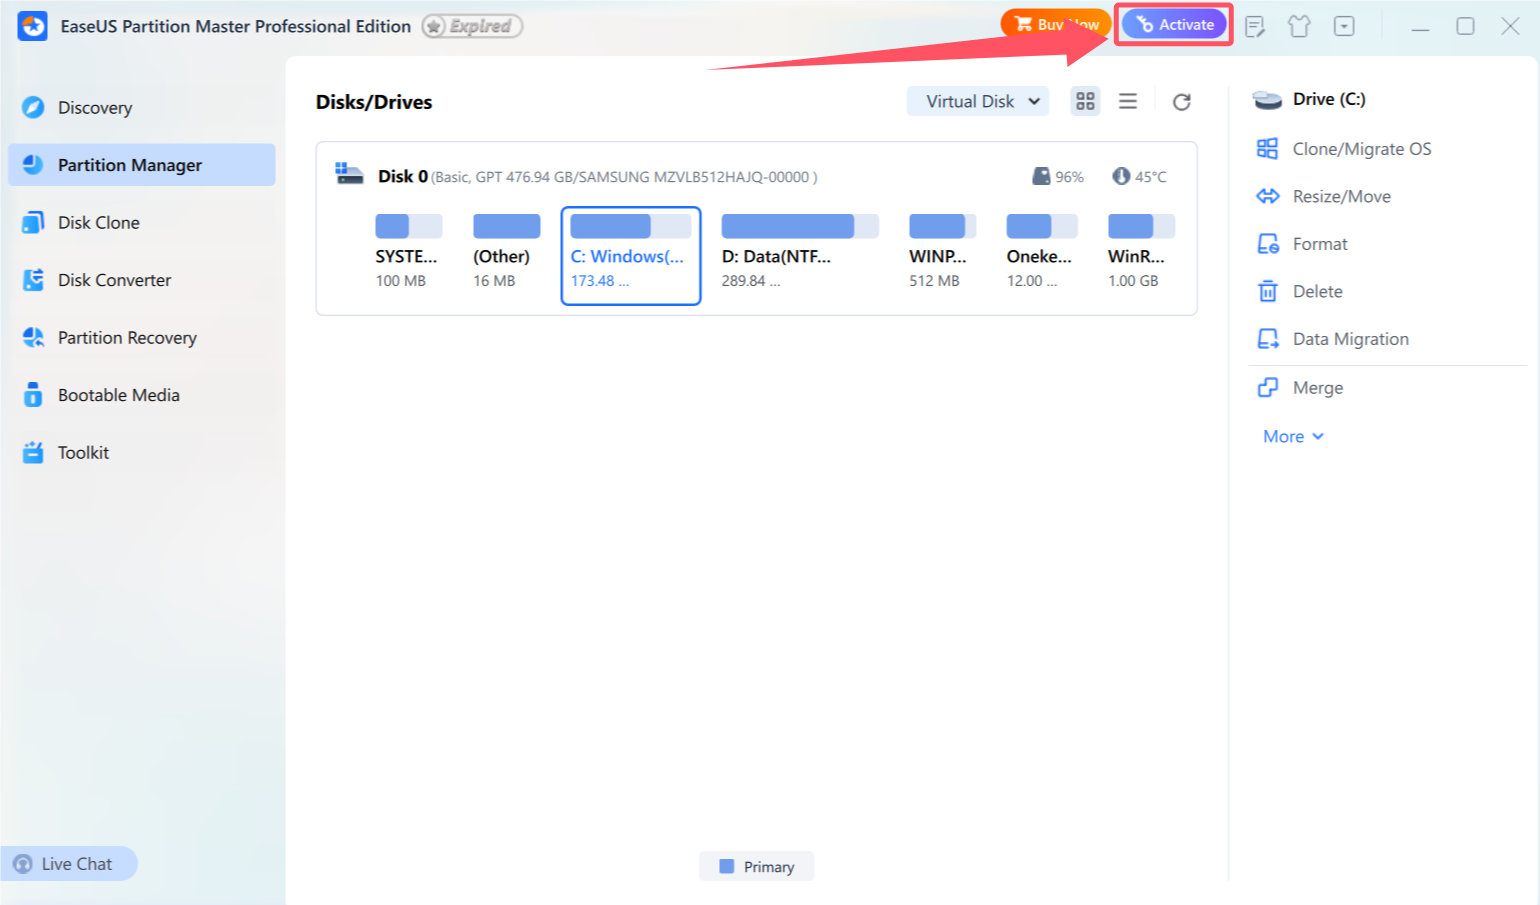
Activate
1. To activate Free or Trial edition, please click Activate/Upgrade button at the top-right corner.
2. Copy and paste your license code to the activation box and then click Activate.
Main Interface
After the installation is complete, kindly double-click on the program icon to begin. Upon starting the program, the main interface will be accessible to you.
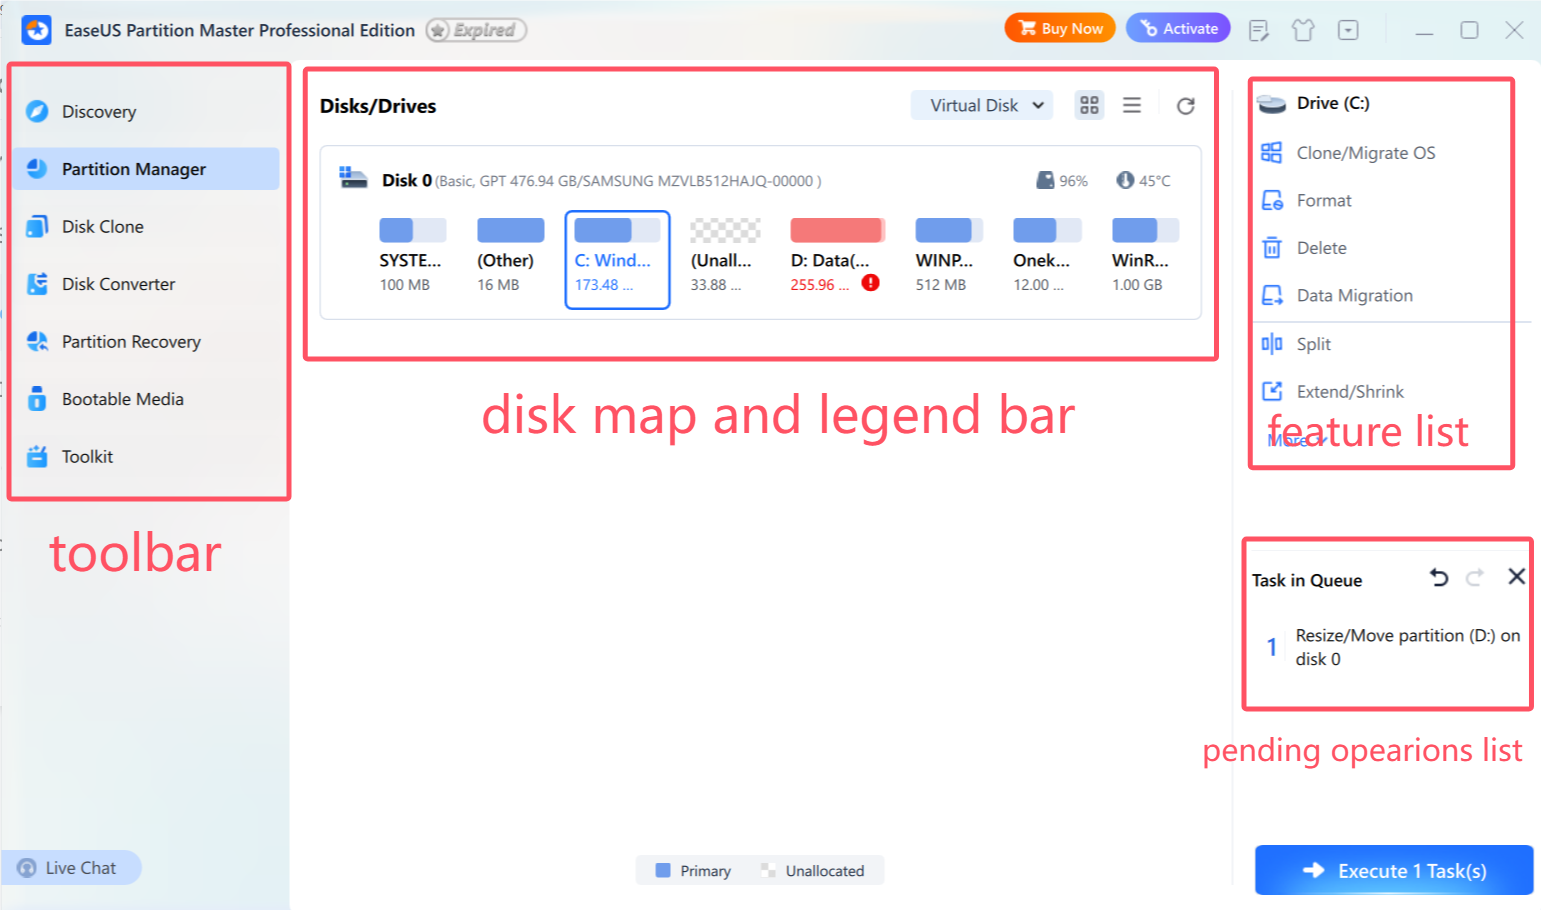
Toolbar - This bar consists of 7 main parts of Partition Master.
Disk Map and Legend Bar - This section exhibits the arrangement of all storage devices perceived on this computer in a graphic map. Every device is symbolized by a rectangle bar that comprises of small-sized bars, which signify partitions. Certain actions can be performed directly by right-clicking the chosen disk/partition.
Feature List - Here, you can find a comprehensive list of all the actions that can be carried out on the chosen drive/partition.
Pending Operation List - The area is designed to add all pending operations to a special list instead of executing them immediately. This feature ensures that you can carefully review all changes before confirming them, which prevents potential errors. Additionally, it saves you time and effort when executing multiple operations as you do not need to wait for each one to be completed before moving on to the next. You can either click Undo to cancel an operation or Apply to proceed with it.
Apply changes - execute all of the Pending operations
Undo the last change - cancel the last change from the list.
Redo the last change - relist the changes that are canceled by clicking Undo last change in the Pending operation.
Feature Introduction
Introduce the functions and features of EaseUS Partition Master in detail.
Create
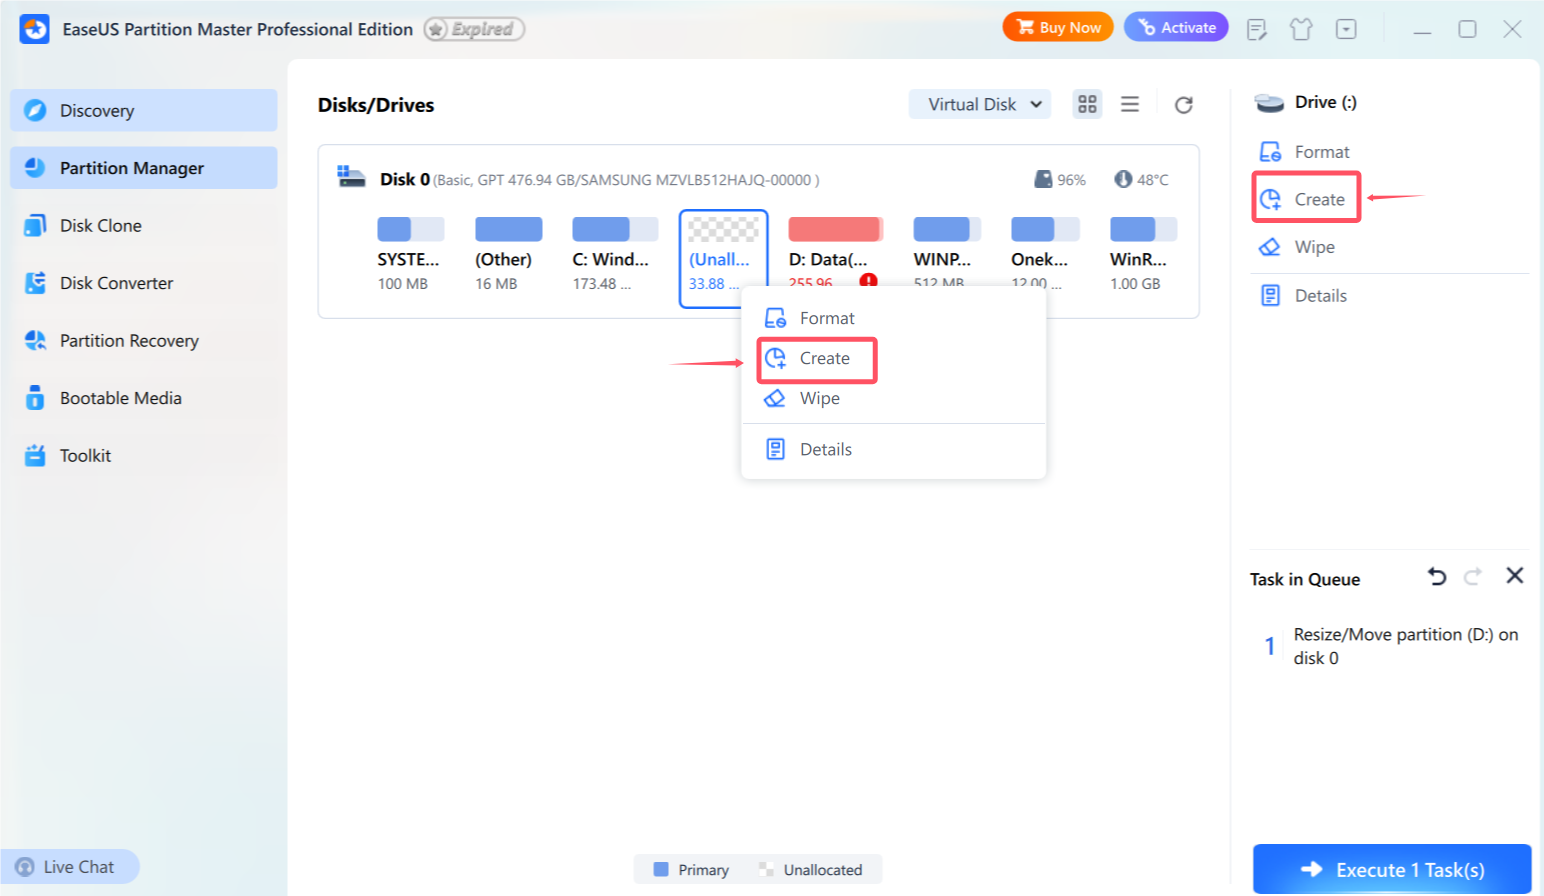
1. Please select the unallocated space on your hard drive, and then either click on Create from the Feature List, or right-click on the selected space. In order to create a partition or dynamic volume, you must first select the appropriate partition/volume type and add the necessary disk(s) to this volume before moving on to the next step.
2. Please enter a label for the partition to easily identify it later and select an available drive letter from the drop-down list to associate with this partition.
3. Choose the desired File System, Cluster Size, and whether to create this partition as Primary or Logical. Generally, Primary should be chosen if the partition is intended for use by the operating system. Otherwise, you may choose to keep the partition logical.
4. Please define the size and position of the partition by dragging and dropping the border of the light blue bar or filling in the appropriate dialog.
5. When you are ready, click OK. All changes to the disk's layout will be pending until they are applied in Pending Operation List.
Allocate Space
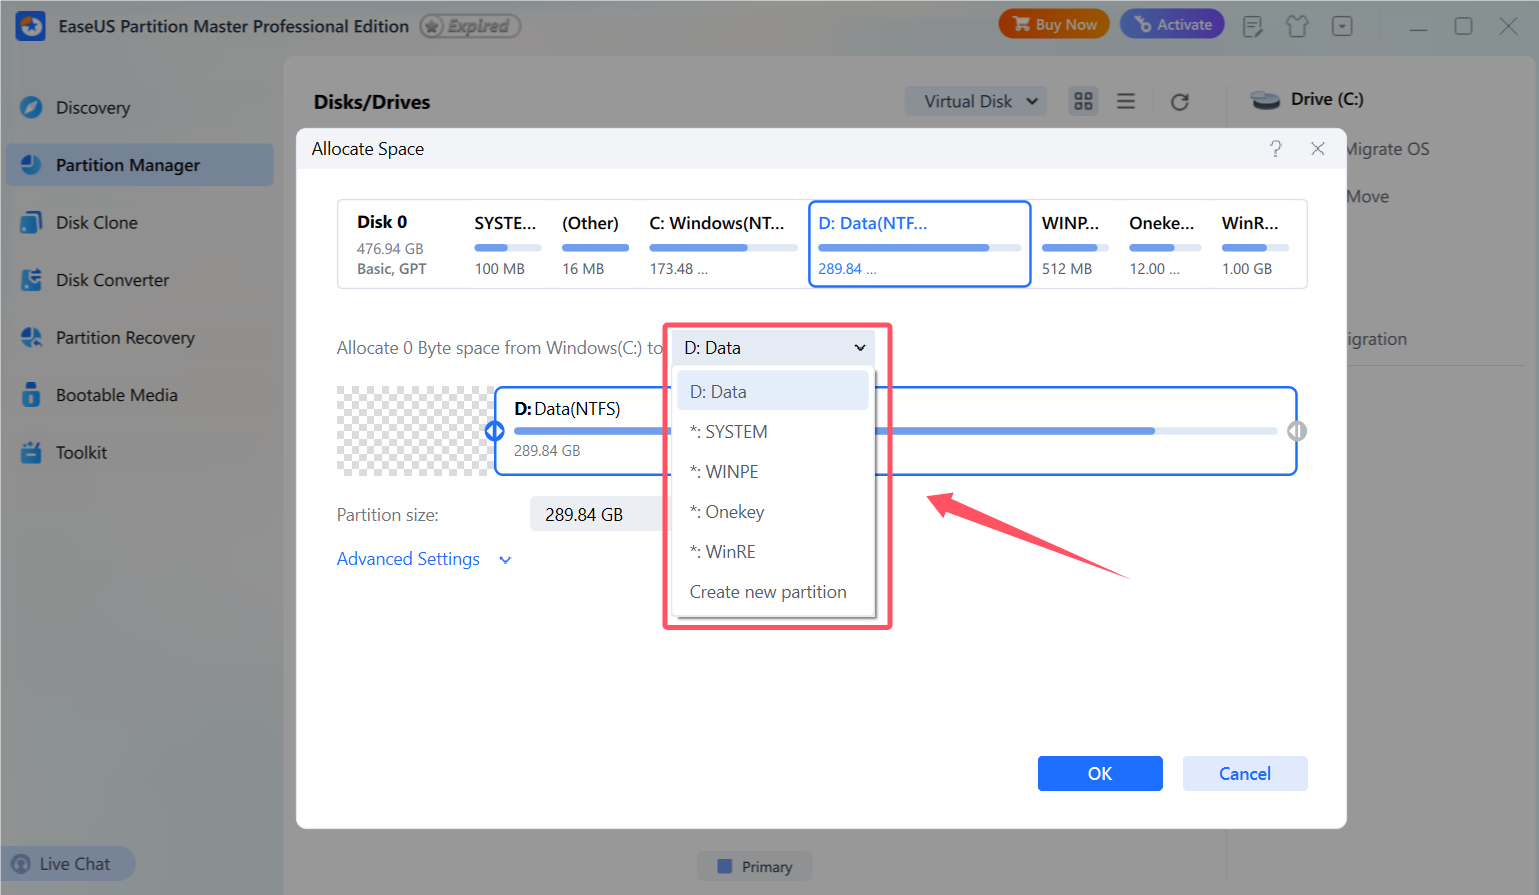
1. Please choose a partition on your hard drive and click on Allocate Space from the list of features.
2. In the new window, you have the option to allocate the unused space of the selected partition to another partition on the same disk or create a new partition using the available space.
3. To define the partition size and position, you can either drag and drop the border of the light blue bar or fill in the provided dialog boxes.
4. Click OK when you are ready. Any changes made to the disk layout will be temporarily saved in Pending Operation List until they are applied.
Extend/Shrink
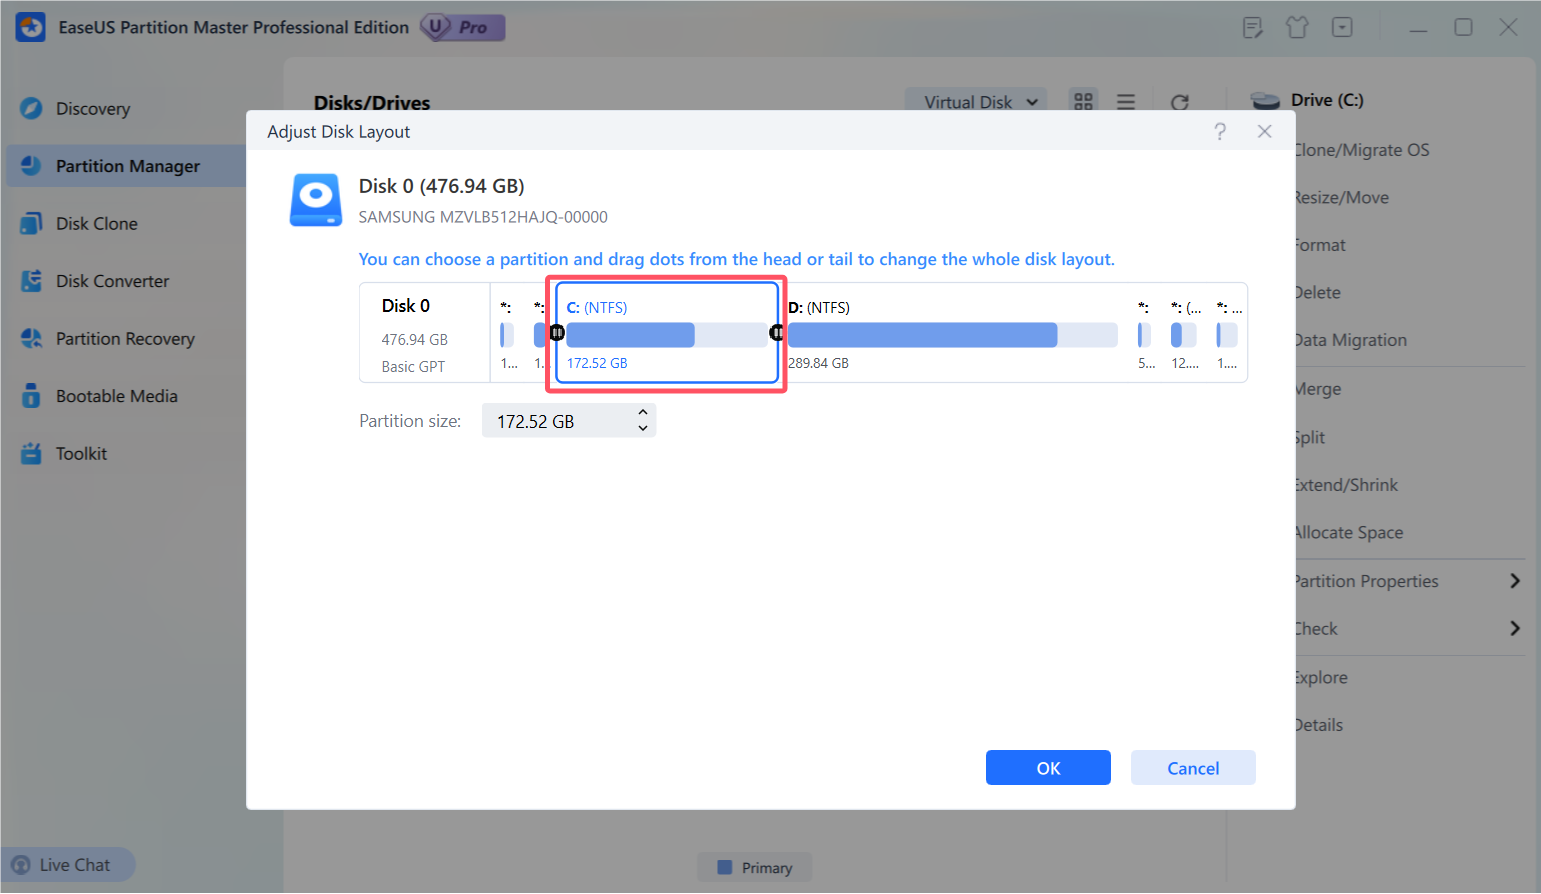
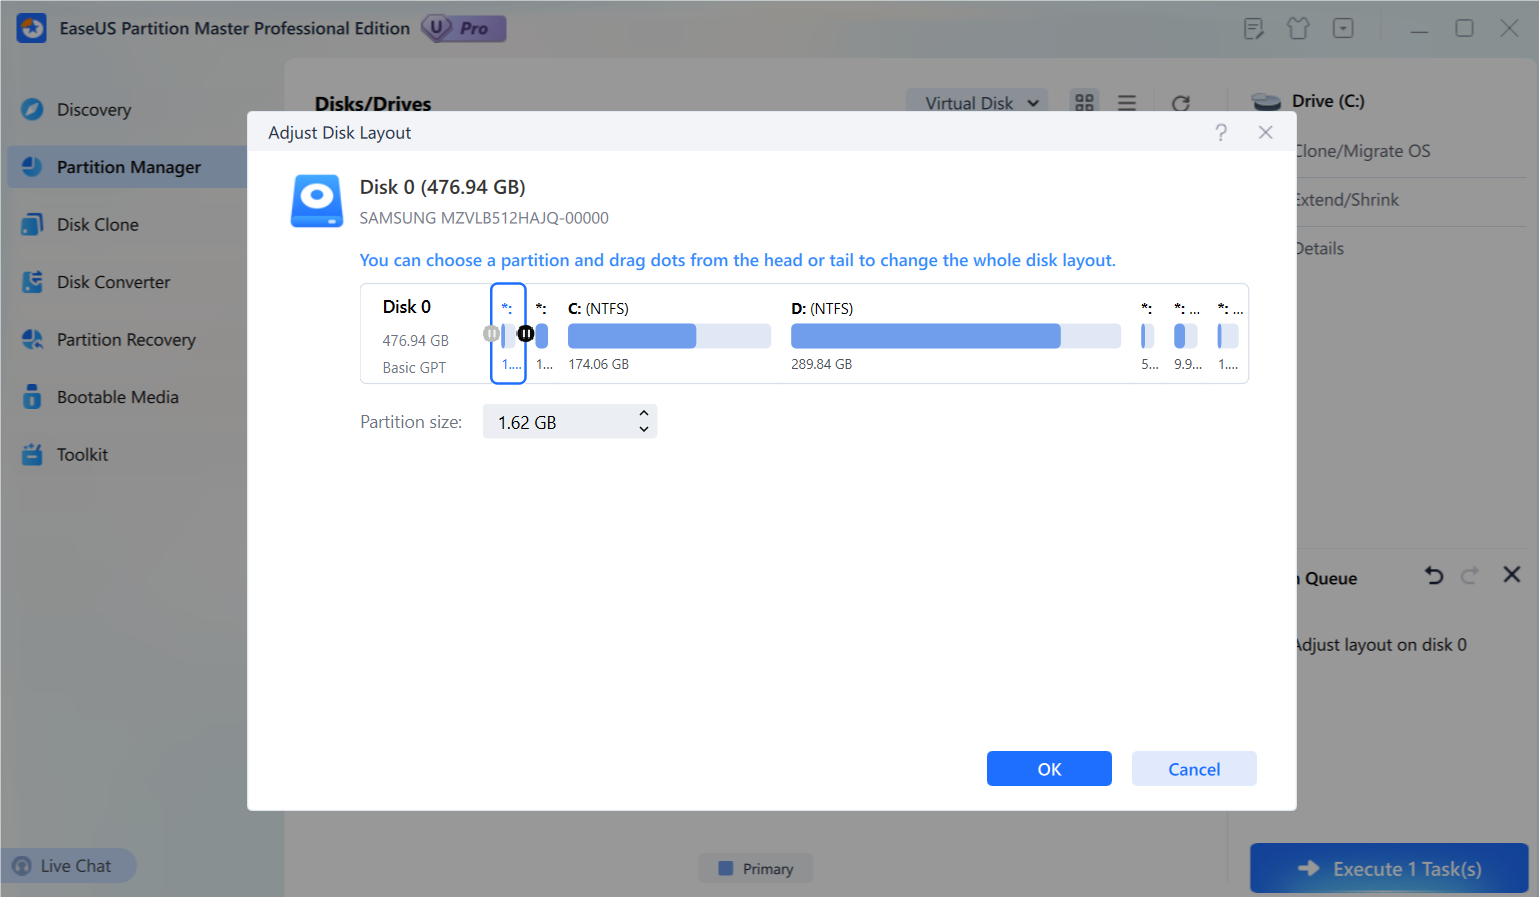
Extend/Shrink function is designed to facilitate the process of adjusting the partition size on your disk in a single step. With this function, you need not worry about the partition layout. Simply modify the partition border to the desired size, and the changes will be made accordingly. This function is equivalent to the Adjust Disk Layout function available in the previous version.
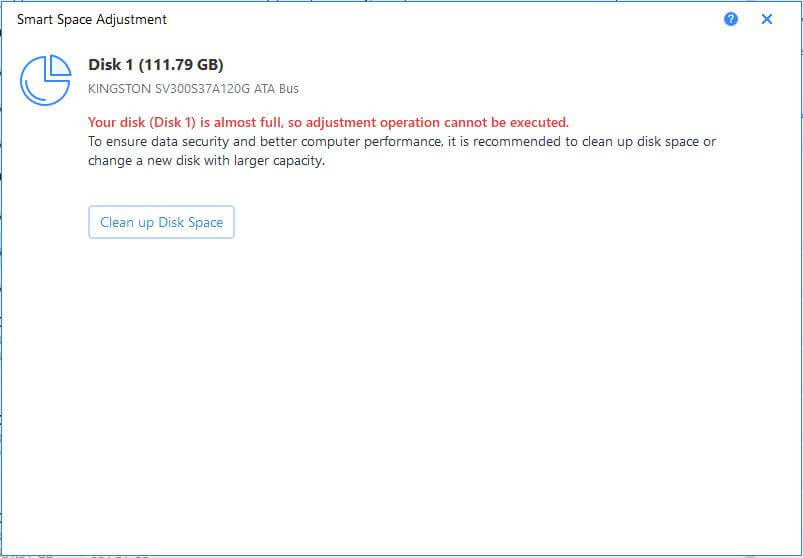
When the available space on your partition is insufficient, our product will prompt a low disk space alert.
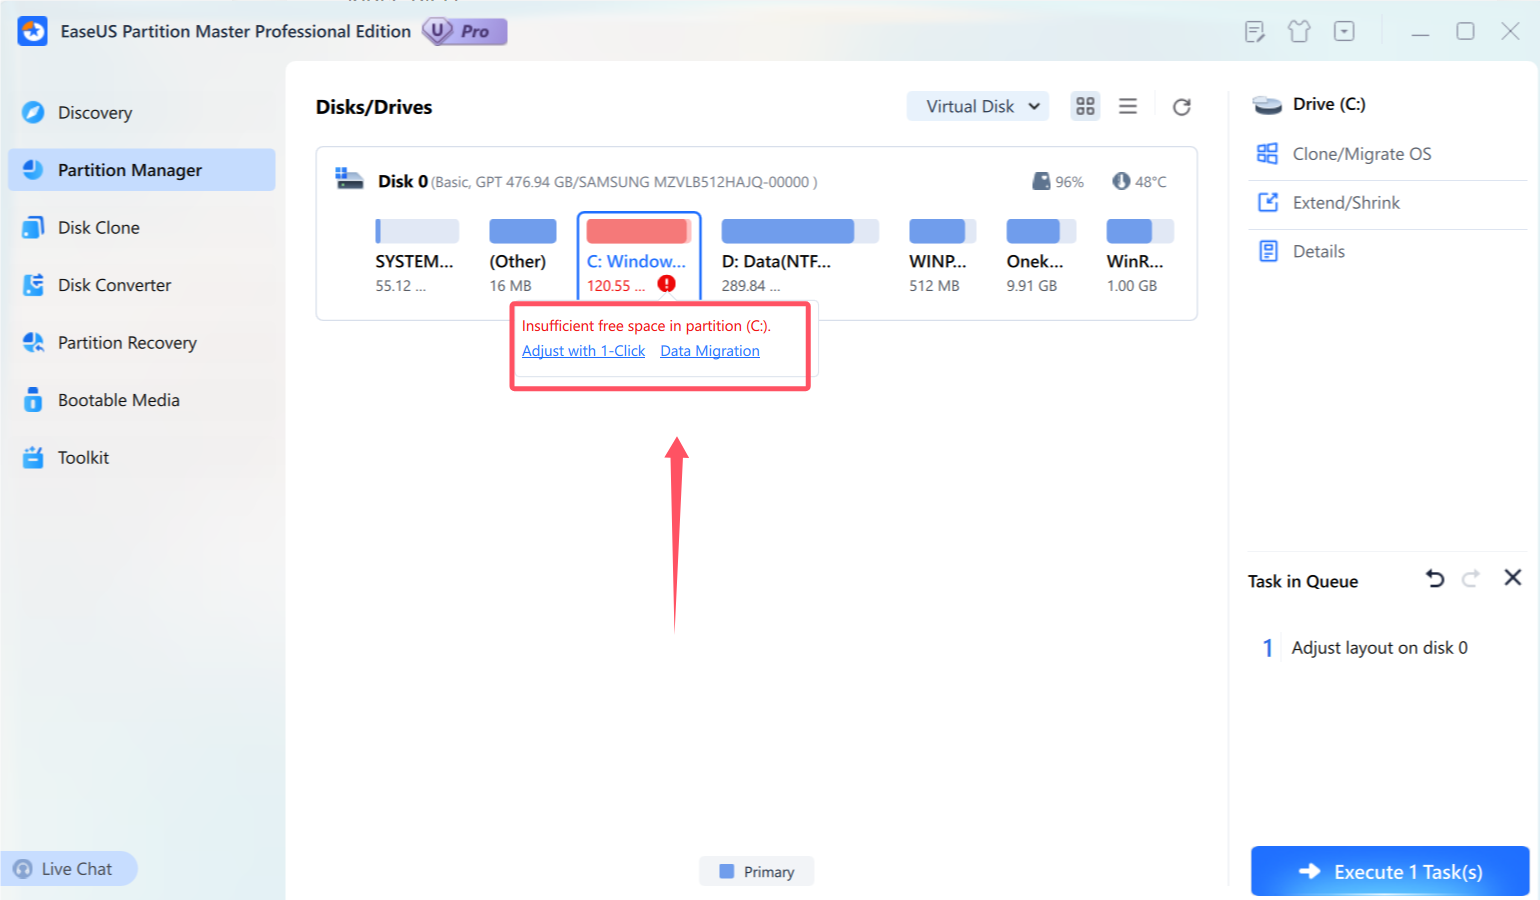
After clicking on Adjust with 1-Click, EaseUS Partition Master will intelligently adjust the partition size to resolve the low space issue. You will only need to click on Proceed to continue the process.
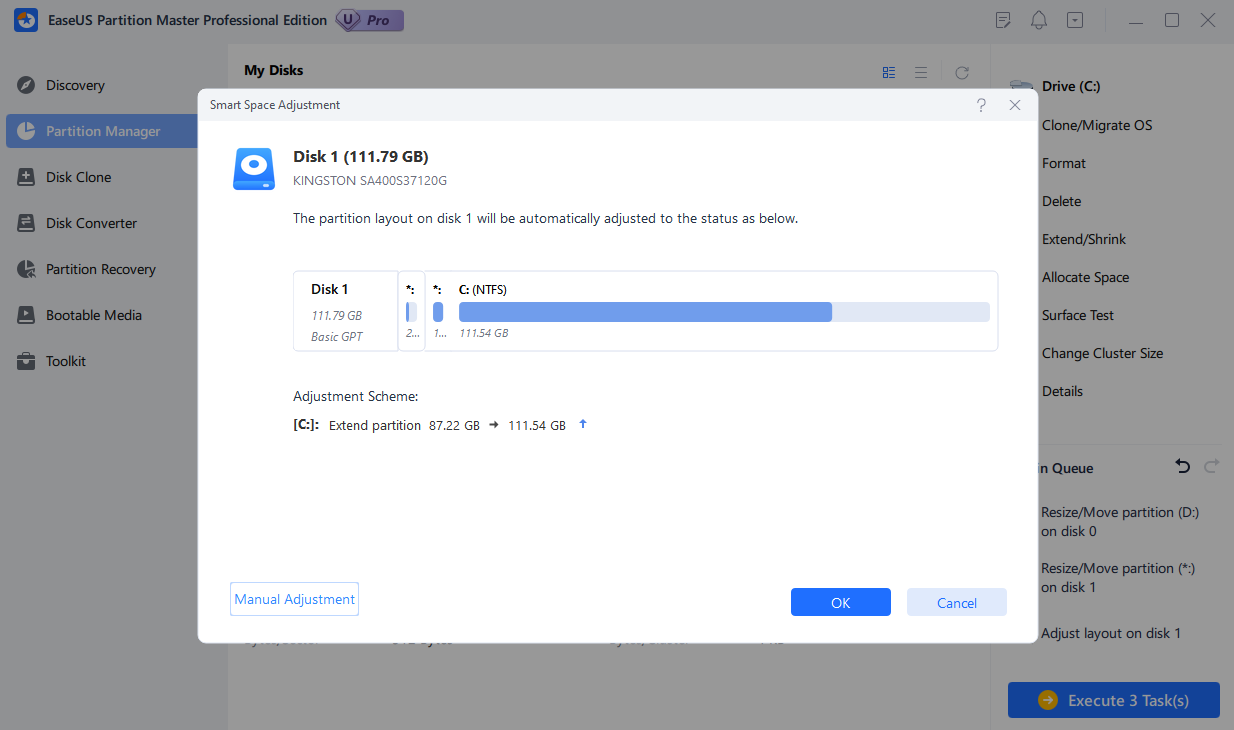
If the Smart Space Adjustment feature is not sufficient, you may also manually resize the item by clicking on Manual Adjustment.
If the disk is nearly full, your only options to free up space are to perform a disk cleanup or upgrade to a larger disk.
Move/Resize
Resize Basic Partition
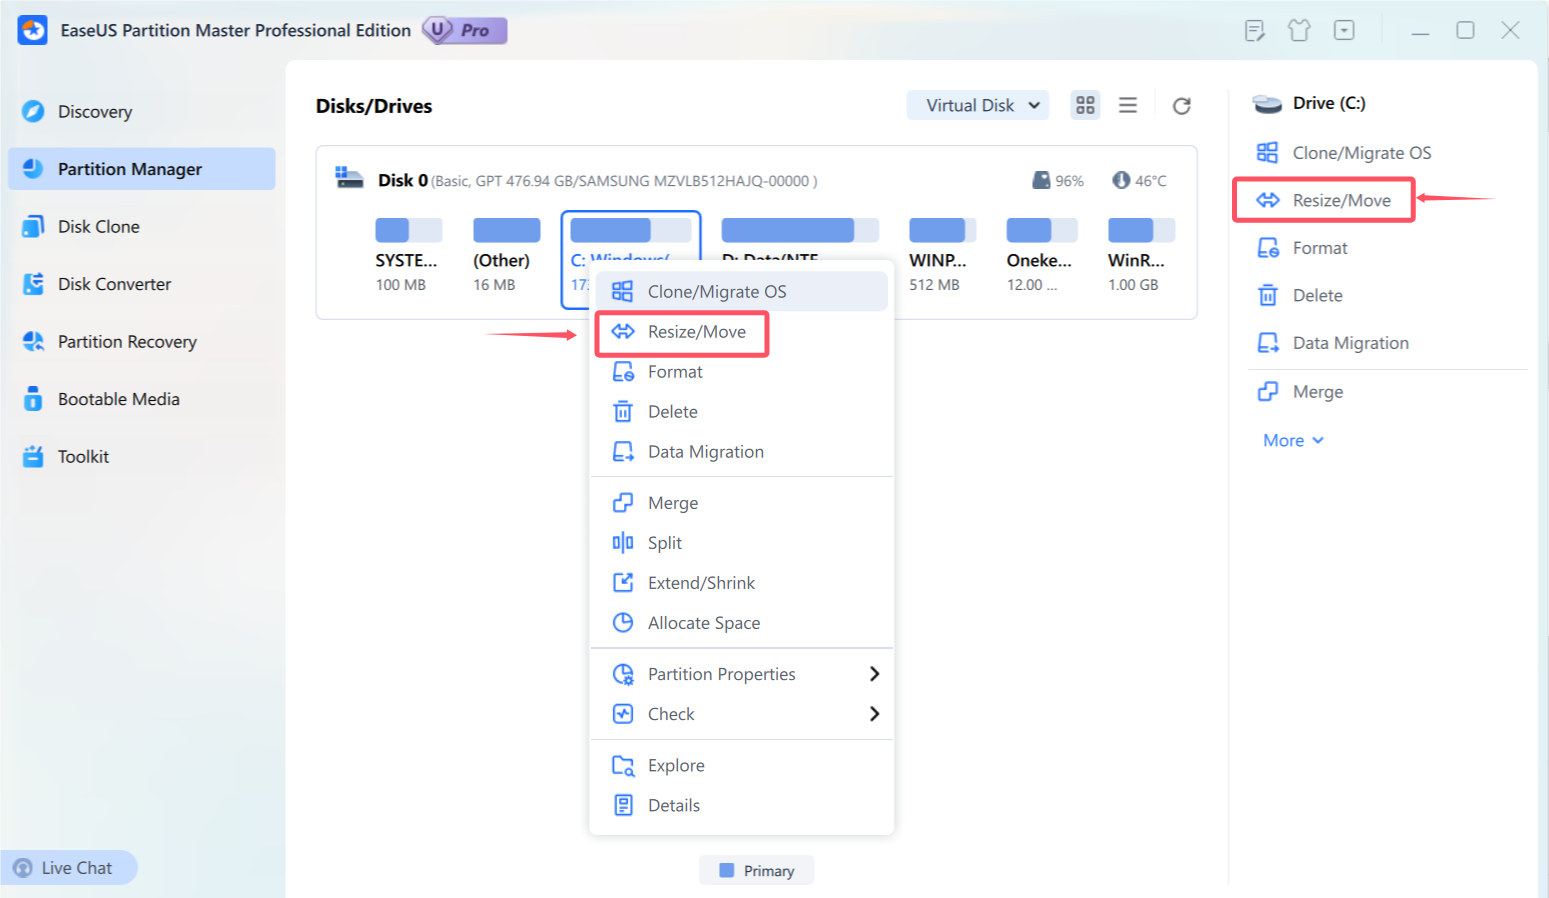
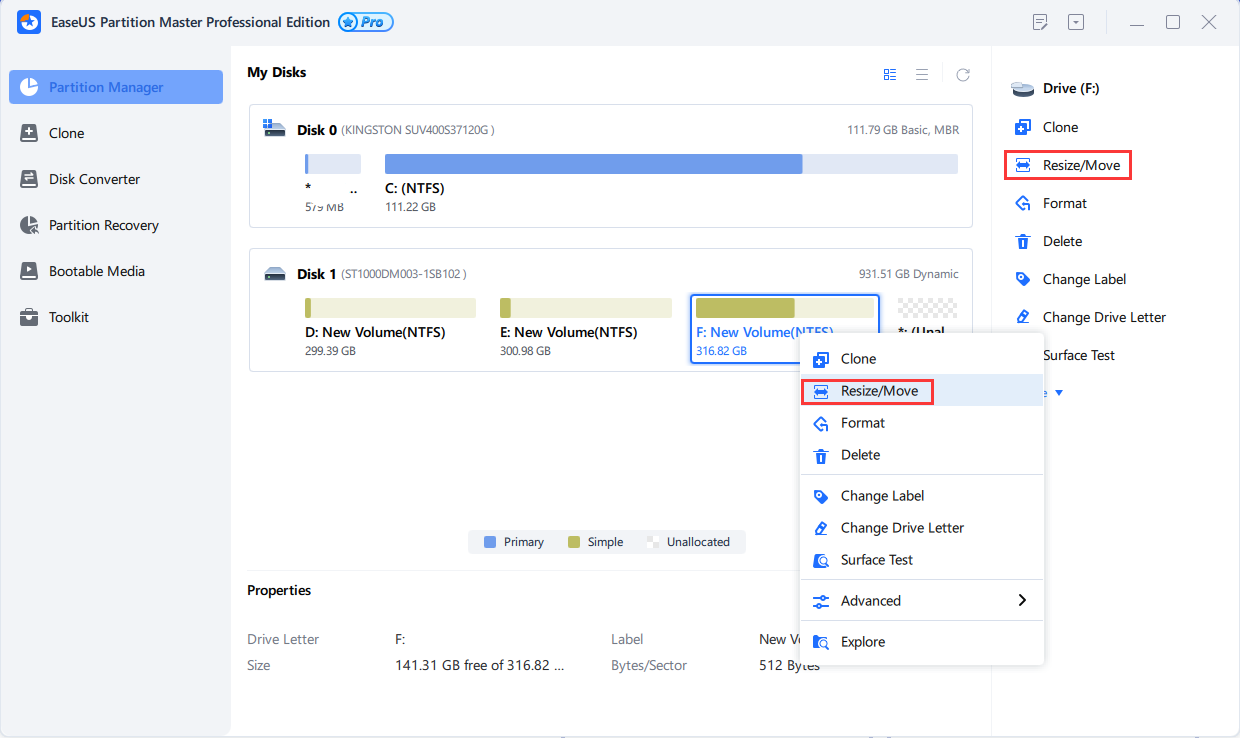
To resize/move a partition:
1. Select a partition, and click Move/Resize from the Feature List.
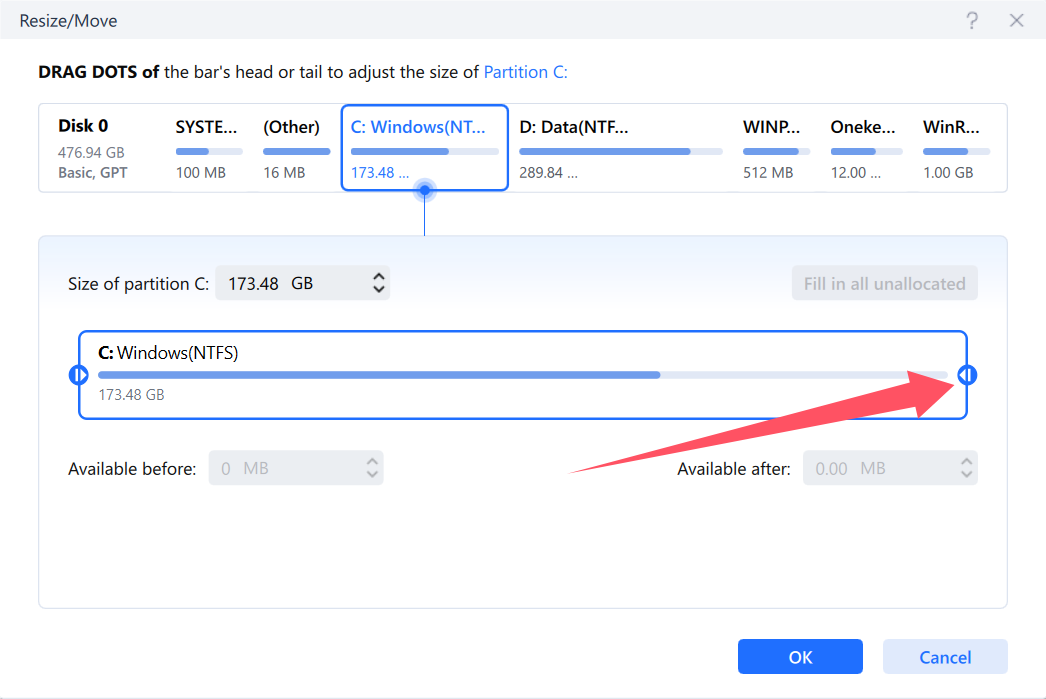
2. Drag the borders of the partition either left or right to specify its new size and position.
3. Click OK when finished. All changes made to the disk layout will be saved in the Pending Operation List until applied.
EaseUS Partition Master can effortlessly extend a partition by utilizing any non-continuous space within the same disk. The split line which is visible in the screenshot represents the boundary of the separate unallocated spaces.
Furthermore, Partition Master can conveniently acquire any unused space from other partitions present on the same disk to extend the preferred partition.
If your data disk has a disk size of over 2TB, but you are only able to utilize a maximum of 2TB due to MBR limitations, EaseUS Partition Master can assist in automatically converting your disk from MBR to GPT. This will enable you to utilize more than 2TB of space.
Tips:
◆ EaseUS Partition Master takes into account the inherent limitations of file systems and parameters provided. This means that you cannot expand a FAT16 partition beyond the maximum limit of 4GB.
◆ If you use the restore point feature while moving or resizing a partition, any restore points created by the System Restore feature may be lost.
◆ EaseUS Partition Master is capable of resizing partitions that have been encrypted using BitLocker, but only from the right border. We recommend decrypting the disk entirely before attempting to resize it.
Resize Dynamic Volume
EaseUS Partition Master is an efficient tool that enables the resizing of dynamic volumes, such as simple, mirrored, spanned, striped, and RAID 5 volumes. It is important to note that all dynamic volumes can only be resized from their right border.
It is not possible to reduce the size of volumes that have been assigned a Quota using EaseUS Partition Master. To remove the Quota, kindly right-click on the volume in Windows Explorer, select Properties, and disable the Quota for that specific volume.
For resizing a dynamic volume, kindly follow these three simple steps:
1. Select the volume you wish to resize, and click on Resize/Move from the Feature List.
2. Adjust the size and position of the volume by dragging the right borders.
3. Once done, click OK. Any changes made to the disk layout will be saved in the Pending Operation List until they are applied.
Tips:
◆ EaseUS Partition Master is capable of resizing volumes that were created on the same computer only.
◆ Increasing the simple volume space to multiple dynamic disks will cause it to change into a spanned volume.
◆ This spanned volume can then be changed back into a simple volume by shrinking it to a single dynamic disk. However, please note that this feature is not available for a striped volume.
◆ EaseUS Partition Master only supports resizing dynamic volumes of NTFS, ReFS, and FAT (FAT16/FAT32) file systems. It is important to note that all system dynamic volumes, except for NTFS volumes, on the other three file systems can only be extended with unallocated space that is adjacent to the right border of the volume on the same hard disk.
Move Partition or Volume
To move a partition or volume:
1. Select a partition/volume, and click Move/Resize from the Feature List.
2. Define the new location by dragging and dropping the partition/volume.
3. Click OK when ready. All modifications made to the disk layout will be saved in the Pending Operation List until they are applied.
Merge
The merge function allows you to combine the disk space from two separate partitions into one larger partition. It is important to note that only NTFS, ReFS, FAT12, FAT16, and FAT32 partitions are compatible with this feature. The order in which you select the two partitions is also crucial. To save time and energy, we recommend merging the partition with less data into the other partition.
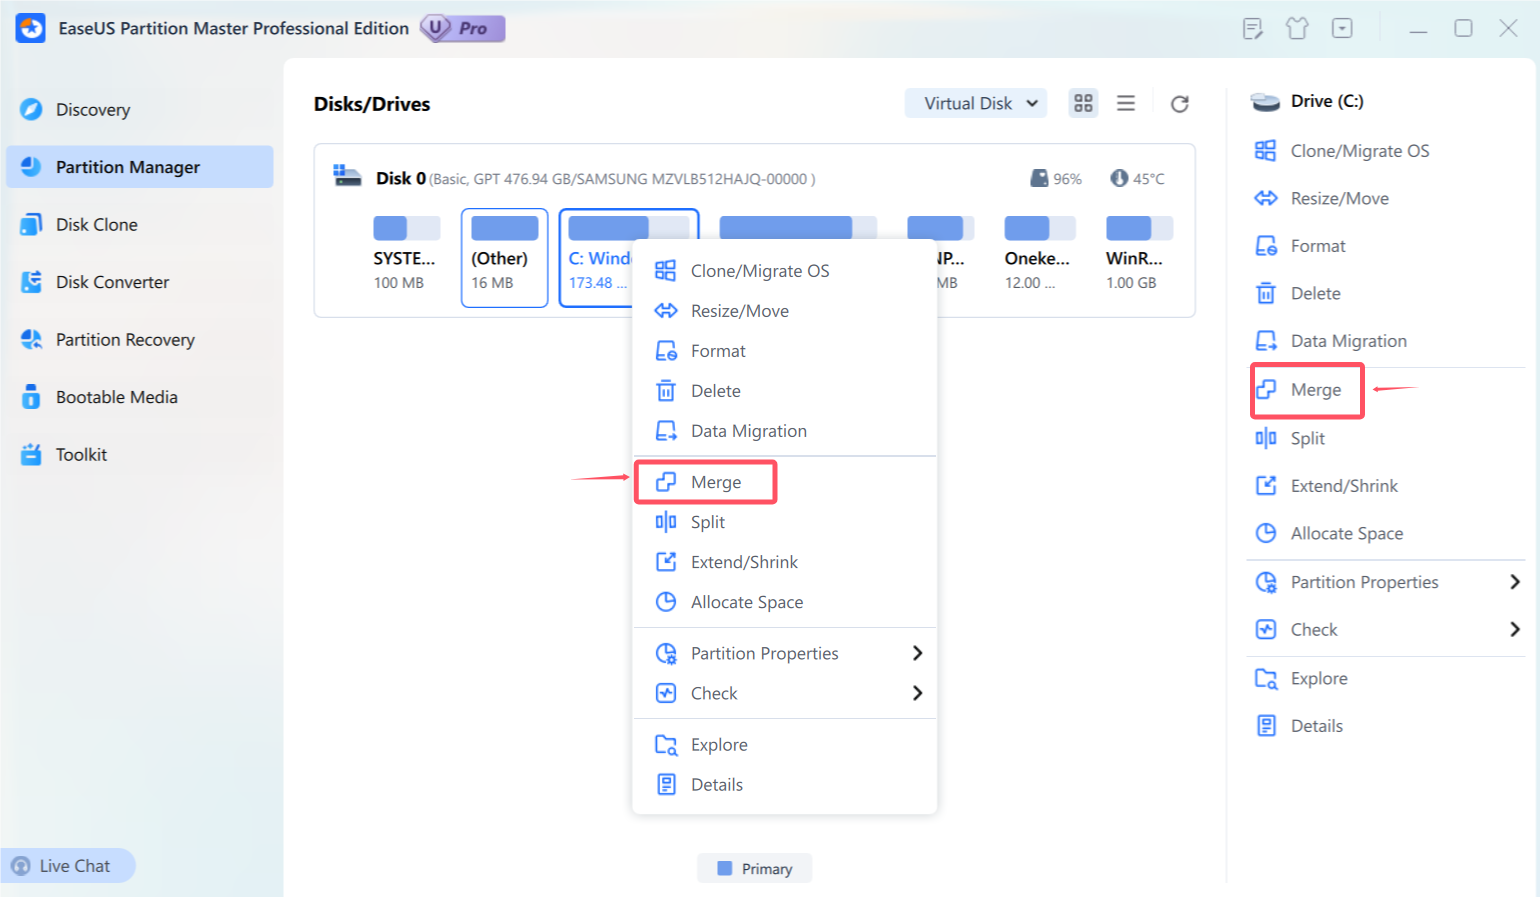
To merge partitions:
1. Select a partition and click Merge from the Feature List.
2. Select the partition that you want to merge with.
3. Decide which partition you want to merge the space to, from the 2 specified partitions. The data from the other partition will be moved to a folder on the newly created joint partition.
4. Click OK when ready. All changes to the disk layout will be saved as pending operations until they are applied in Pending Operation List.
Tips:
◆ EaseUS Partition Master can only merge partitions on basic disks, and cannot merge dynamic volumes.
◆ You can merge NTFS partitions with different cluster sizes using EaseUS Partition Master.
◆ Only the non-hidden partition can be merged.
◆ You cannot merge the boot partition, system partition, or the partition where EaseUS Partition Master is installed with any other partitions.
◆ Before merging partitions, ensure that the unused space of the operating partitions is more than 5% of the total partition space.
◆ If you merge a FAT16 partition and a FAT32 partition, or if both partitions have a FAT16 file system, the resulting joint partition will be automatically changed to FAT32.
◆ NTFS partitions cannot be merged into FAT partitions using EaseUS Partition Master.
Split Partition
The Split Partition feature allows for the division of a sizable partition into two partitions, by establishing a new partition without impacting the data on the initial partition. It is compatible solely with NTFS, FAT12, FAT16, and FAT32 partitions.
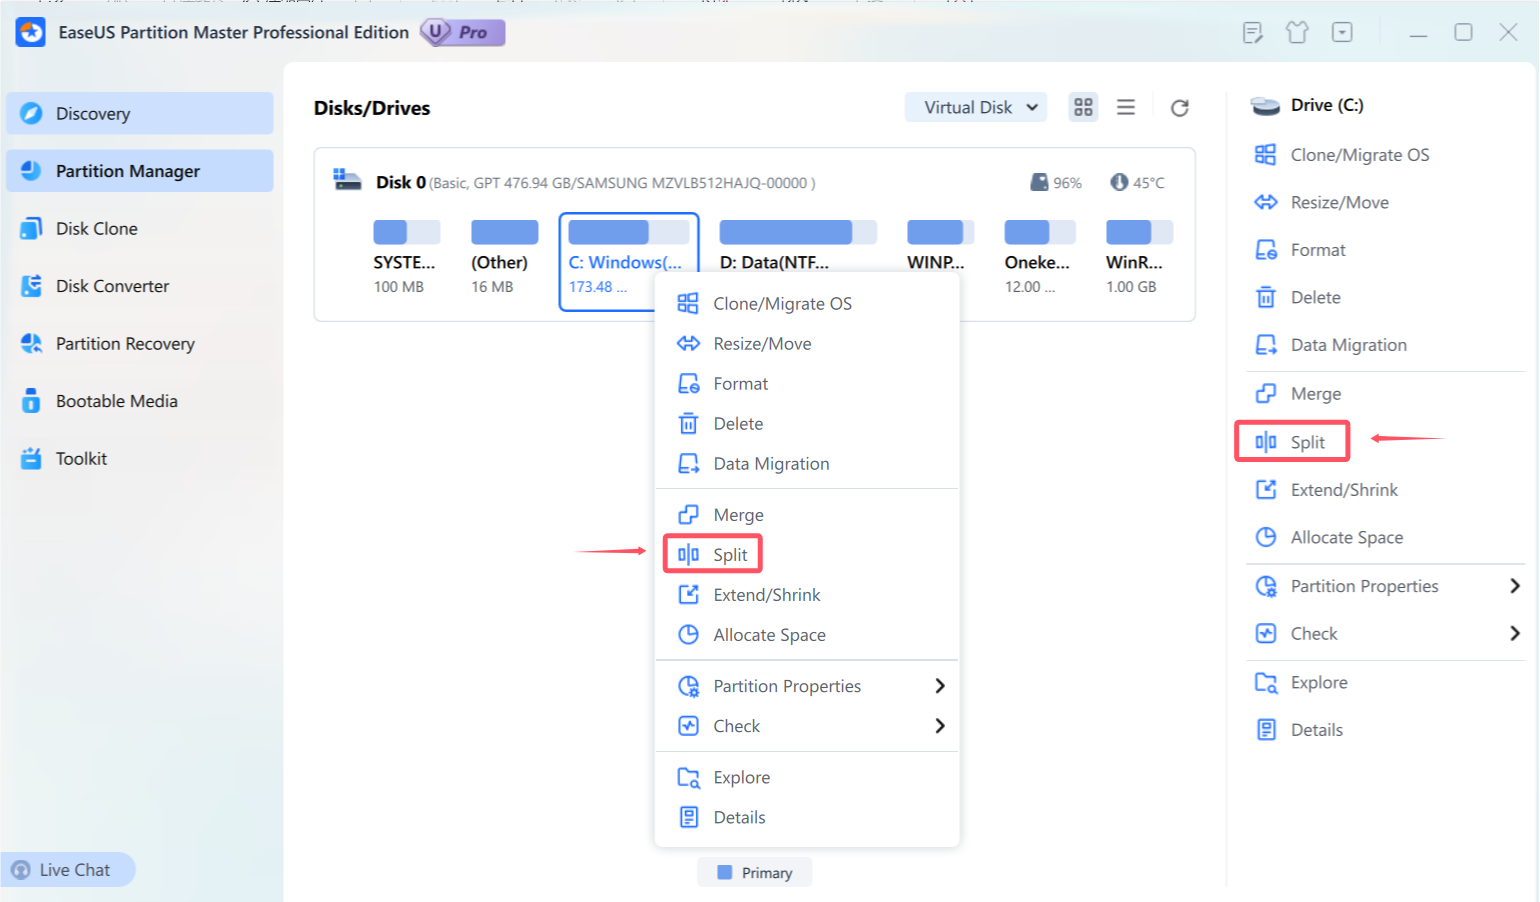
To split a partition:
1. Select a partition and click Split Partition from the Feature List.
2. Resize the size of the two split partitions if you need.
3. Click OK when ready. All the introduced changes to the disk layout will be pended until applied in the Pending Operation List.
Tips:
◆ The splitting of partitions is a functionality exclusively available for basic disks through the use of EaseUS Partition Master. Dynamic volumes cannot be split using this tool.
◆ Only non-hidden partitions can be subjected to Split operation.
◆ Before splitting partitions, ensure that the unused space of the operating partitions is more than 5% of the total partition space
Clone
Clone creates an exact copy for the disk, partition, or system.
Disk Clone
Disk clone involves copying all data (including the operating system and program) from one hard disk to another. To ensure a seamless and successful cloning, it is important to verify that the capacity of the target disk is larger than the used space of the source disk.
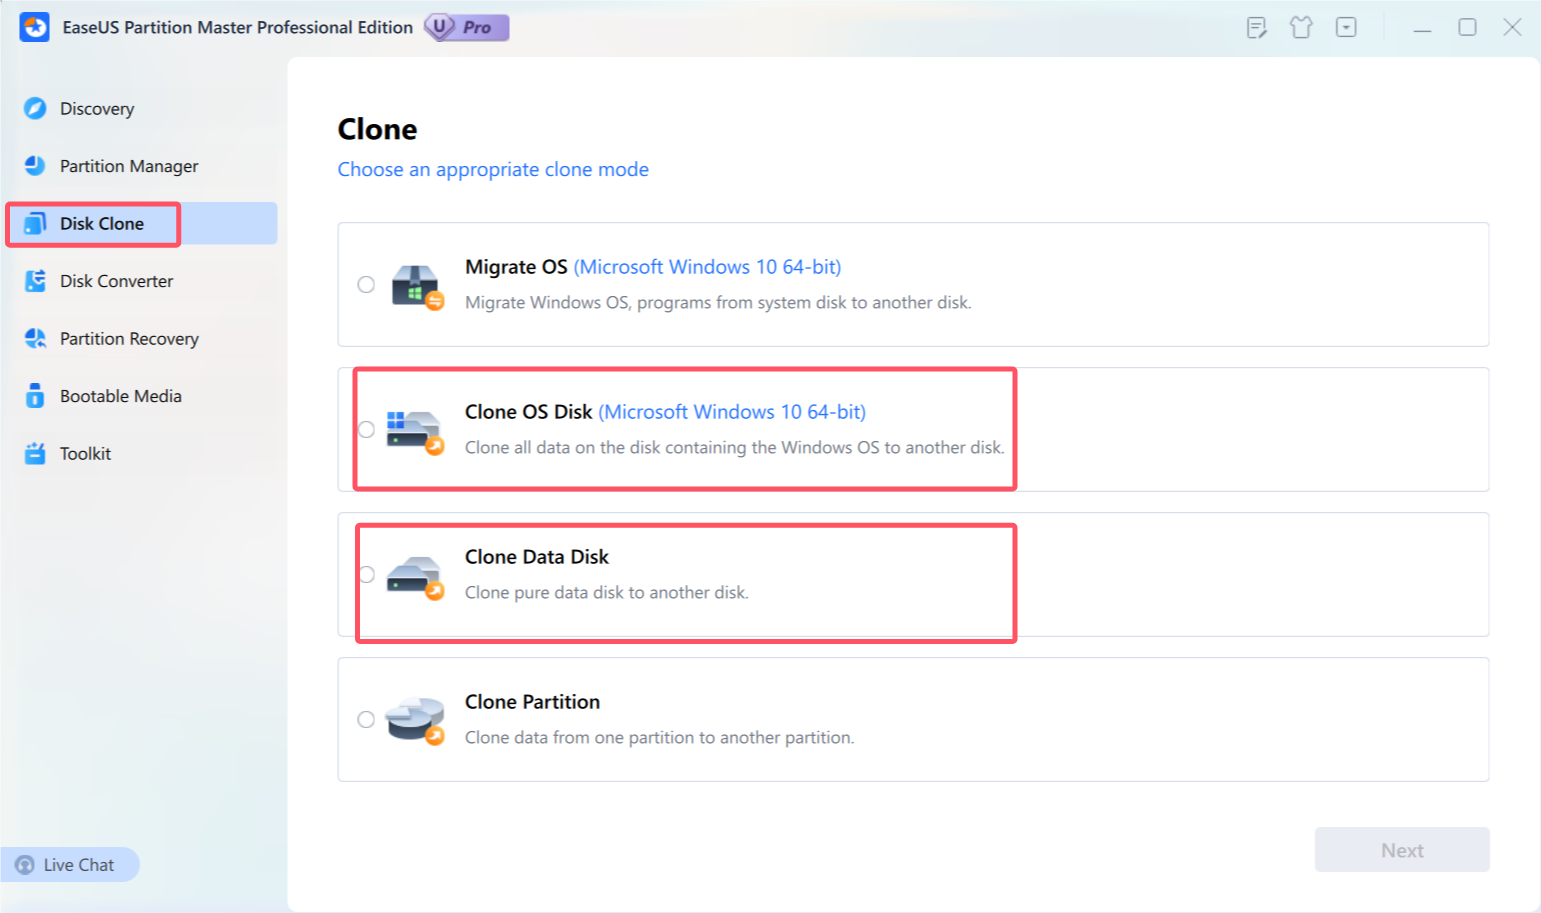
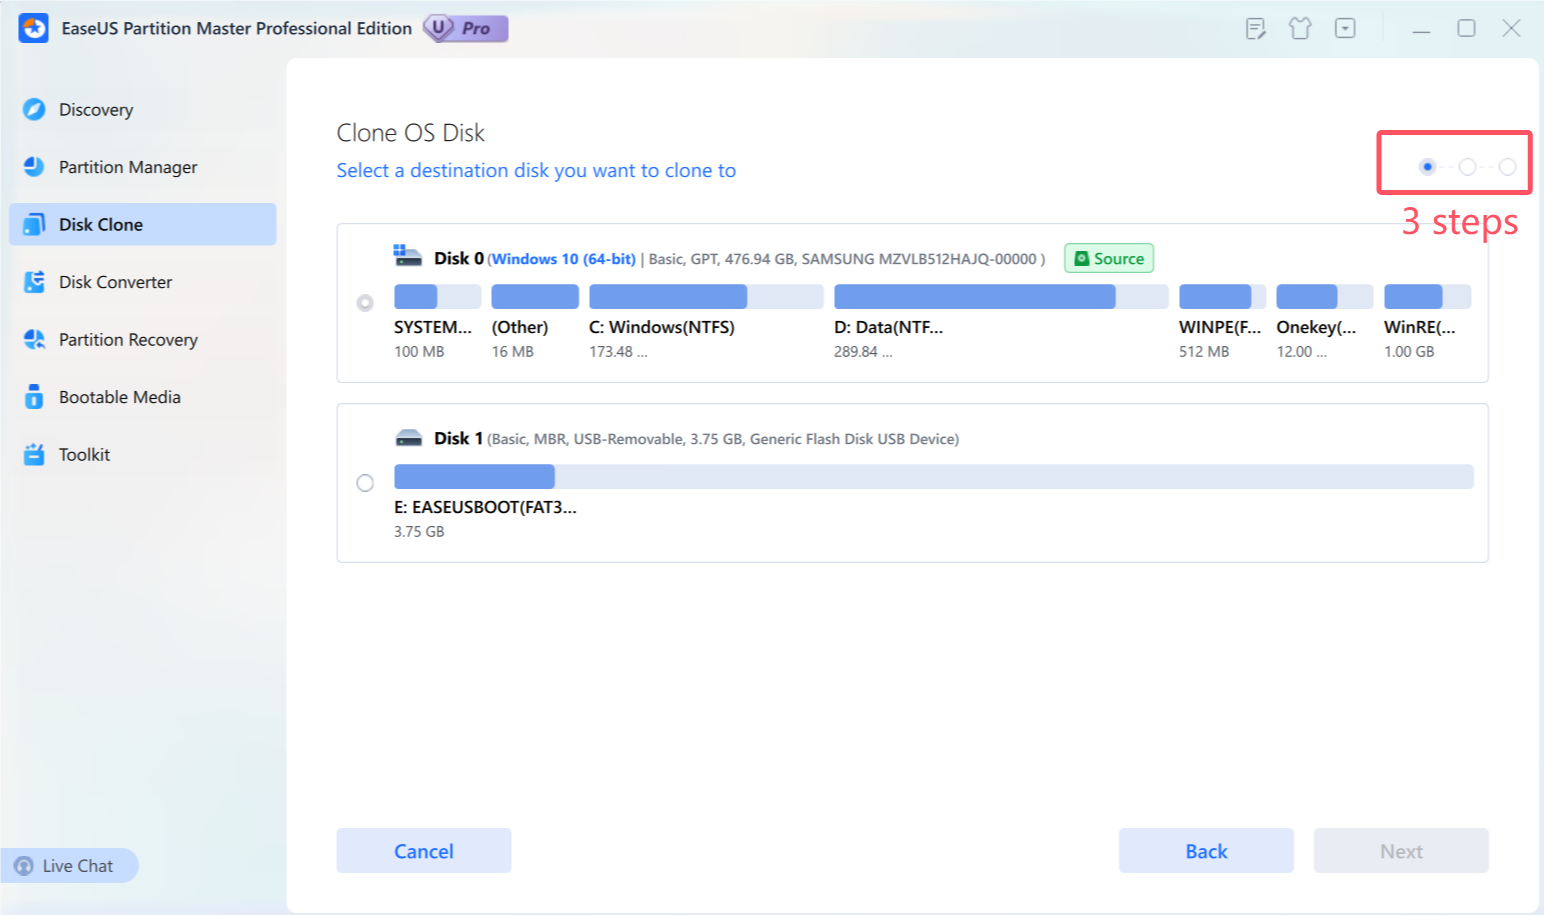
Below are the steps for disk clone:
1. Go to the left panel and select the Clone option.
2. Determine whether you want to Clone Data disk, or Clone OS disk.
3. Pick both the source and target disks.
4. Verify that you would like to delete the partitions and data on the target disk.
5. Adjust the partition size on the target disk, and then start the clone by clicking OK.
6. If other individuals are currently using the data on the target disk, Partition Master will begin the creation of a WinPE bootable disk, and restart your computer to continue the cloning process in the WinPE environment. However, if the destination disk is not being used, the cloning process can be completed in the Windows environment.
Tips:
◆ To ensure that the Windows Operating System is bootable on the target disk, please refrain from starting the computer directly from the target disk after completing the disk copy. Instead, kindly adhere to the following steps:
1). Once the disk copy is done, kindly remove the source disk and turn off your computer.
2). Then, connect the target disk to the same socket where the source disk was connected initially to enable booting from it.
◆ All partitions and data on the target disk will be overwritten.
Partition/Volume Clone
Cloning a single partition/volume to unallocated space is often used when copying a data partition/volume.
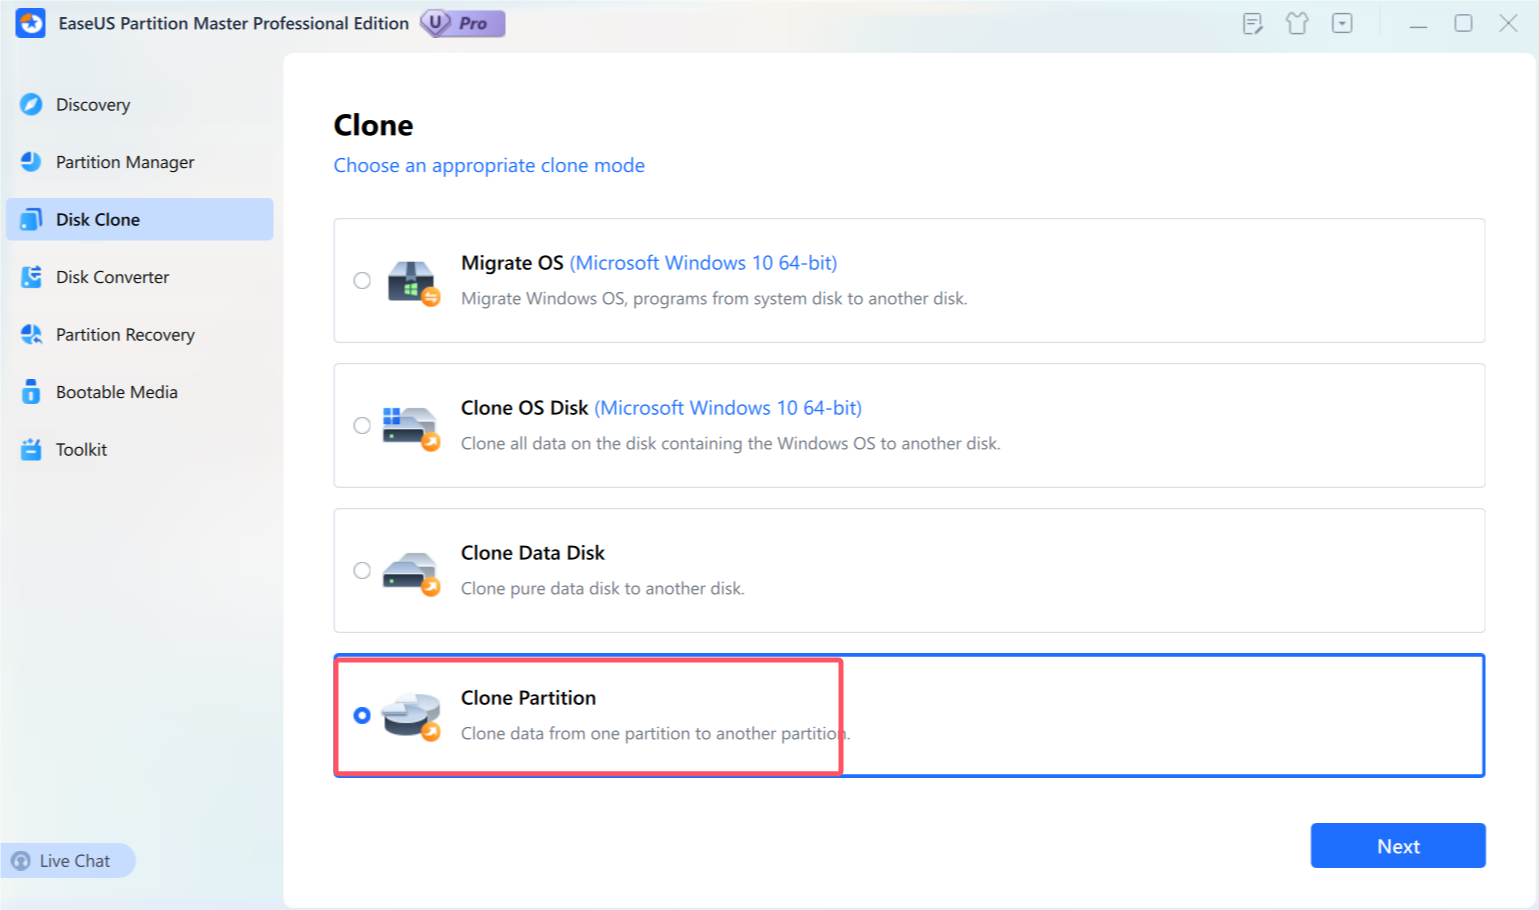
To duplicate a partition, follow these steps:
1. Click on the Clone option located on the left-hand side of the screen.
2. Choose the Clone Partition function.
3. Select the source partition or volume.
4. Choose the unallocated space as the target partition.
5. Adjust the target partition size as desired, then click OK to begin the cloning process.
Tips:
◆ This feature is not available for partitions that contain the operating system on a GPT disk.
◆ Dynamic volumes can only be duplicated to unallocated space on a basic disk.
Migrate OS
Migrate OS is a user-friendly tool that allows for the seamless transfer of your operating system to a new hard disk drive (HDD) or solid-state drive (SSD). The feature automatically selects the boot and system partitions to guarantee that the target disk can be properly booted following the migration process.
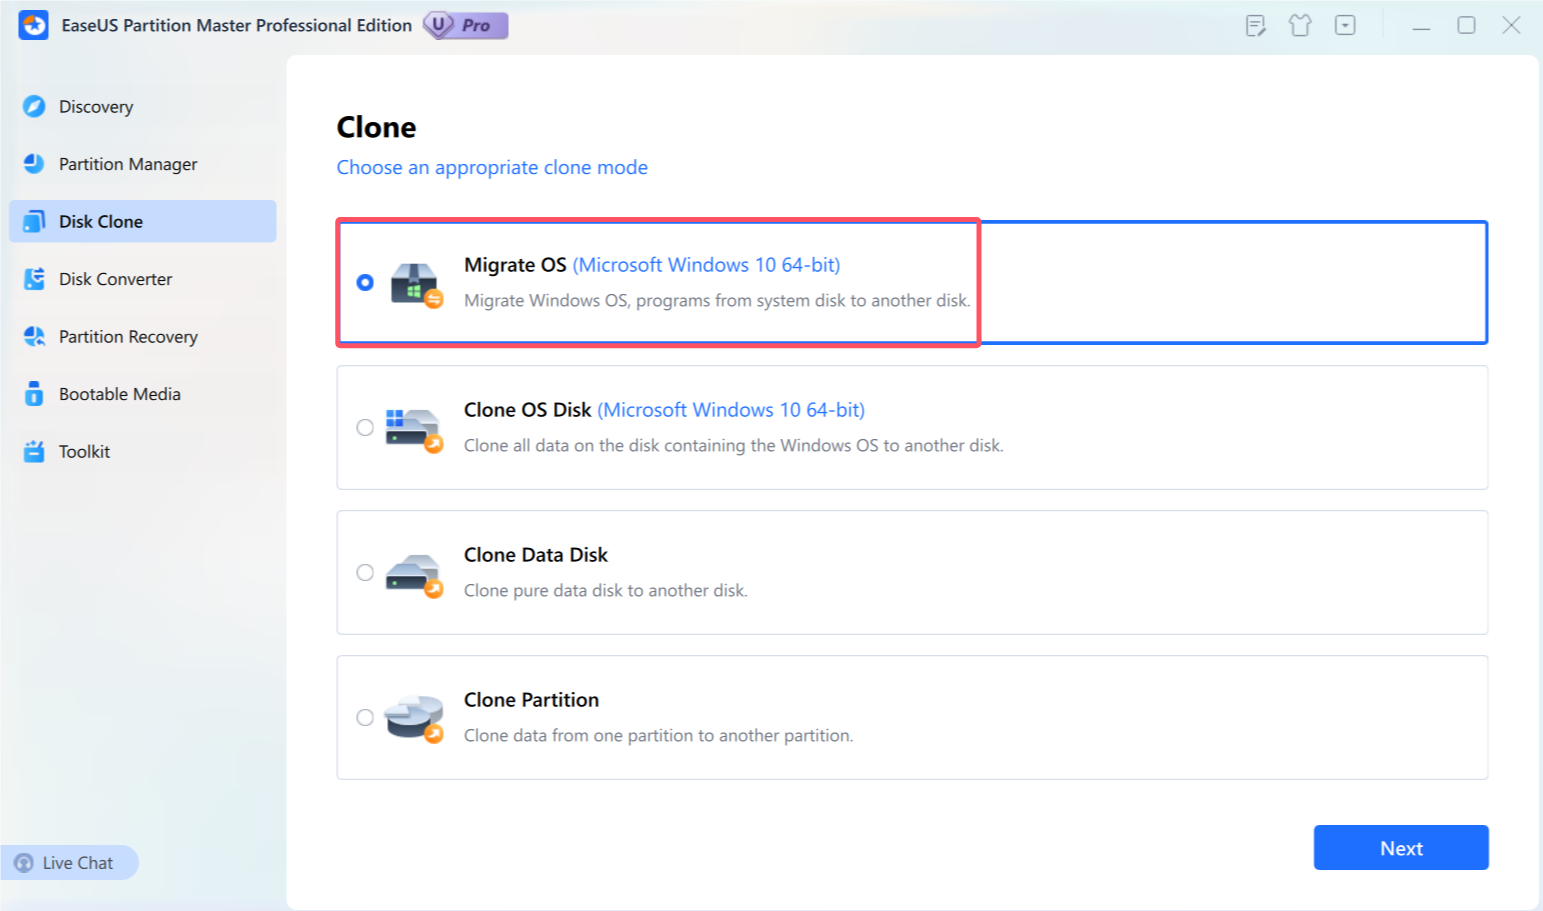
To migrate your operating system, kindly follow these steps:
1. Go to the Clone feature on the left-hand side and click on Migrate OS.
2. Select the target disk where you want to migrate the OS.
3. Edit the partition size on the target disk as per your requirement.
4. Click on OK to begin the cloning process.
5. If the data on the destination disk is currently in use, Partition Master will create a WinPE bootable disk and restart your computer to continue the cloning process in the WinPE environment. However, if the destination disk is free, the cloning process can be completed within the Windows environment.
Tips:
◆ This feature is not available in WinPE Emergency Disk.
Delete All
It is an easy-click option to delete all partitions on the selected hard drive. However, we kindly advise you to ensure that you do not have any important data stored on this disk before utilizing this feature.
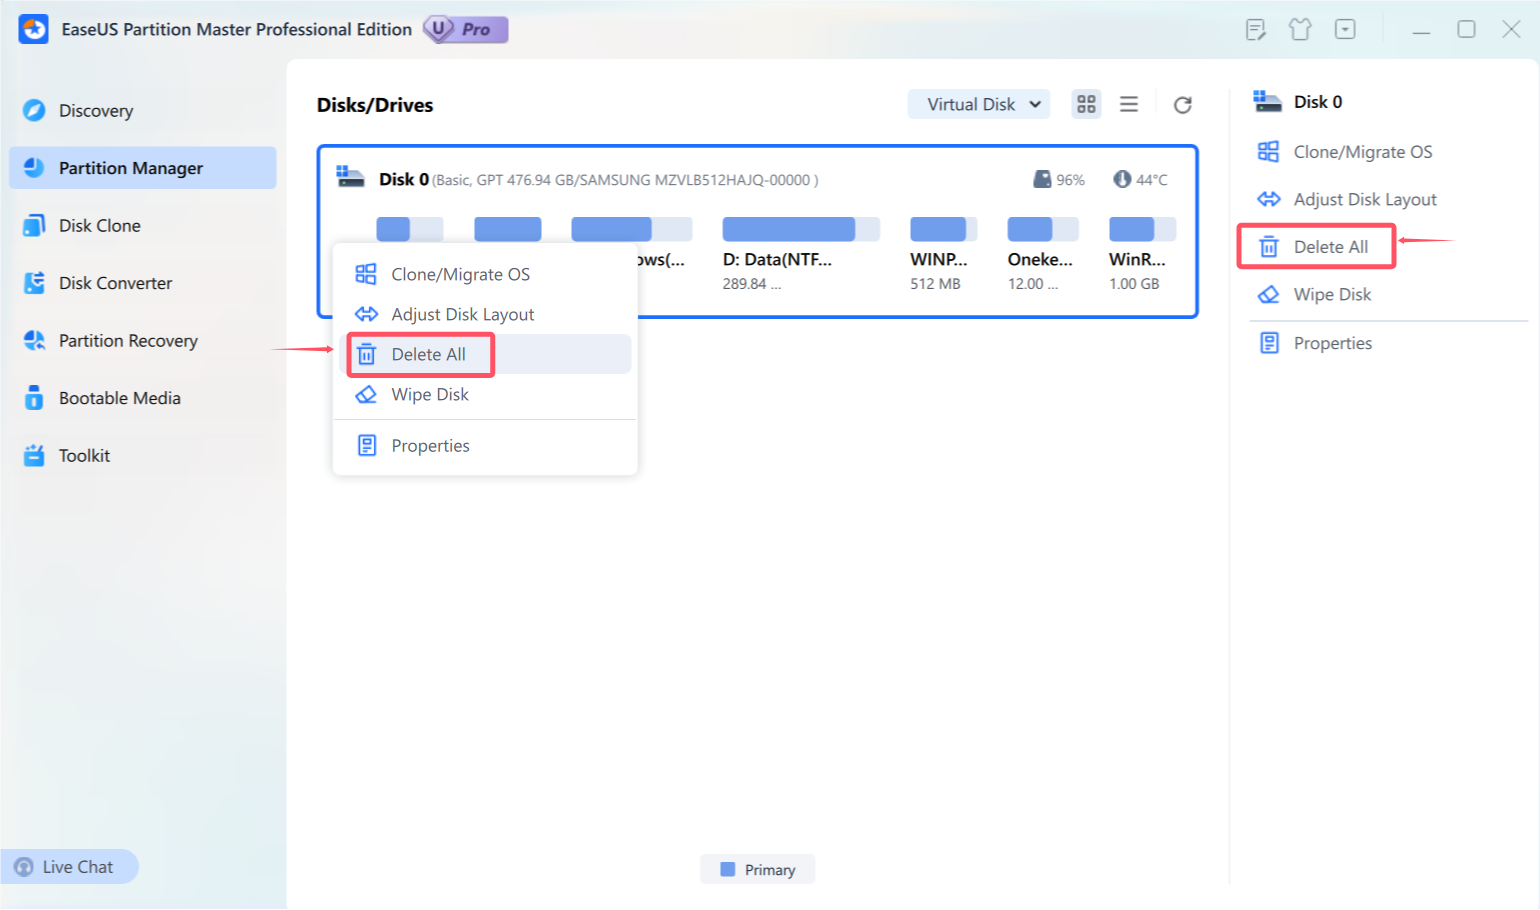
To delete all partitions:
1. Choose a hard drive.
2. Select Delete All option from the feature list.
3. The action will be queued in the pending operation list. Click Execute Task when you are prepared to proceed.
Delete Partition
This feature is used to delete the selected partition.
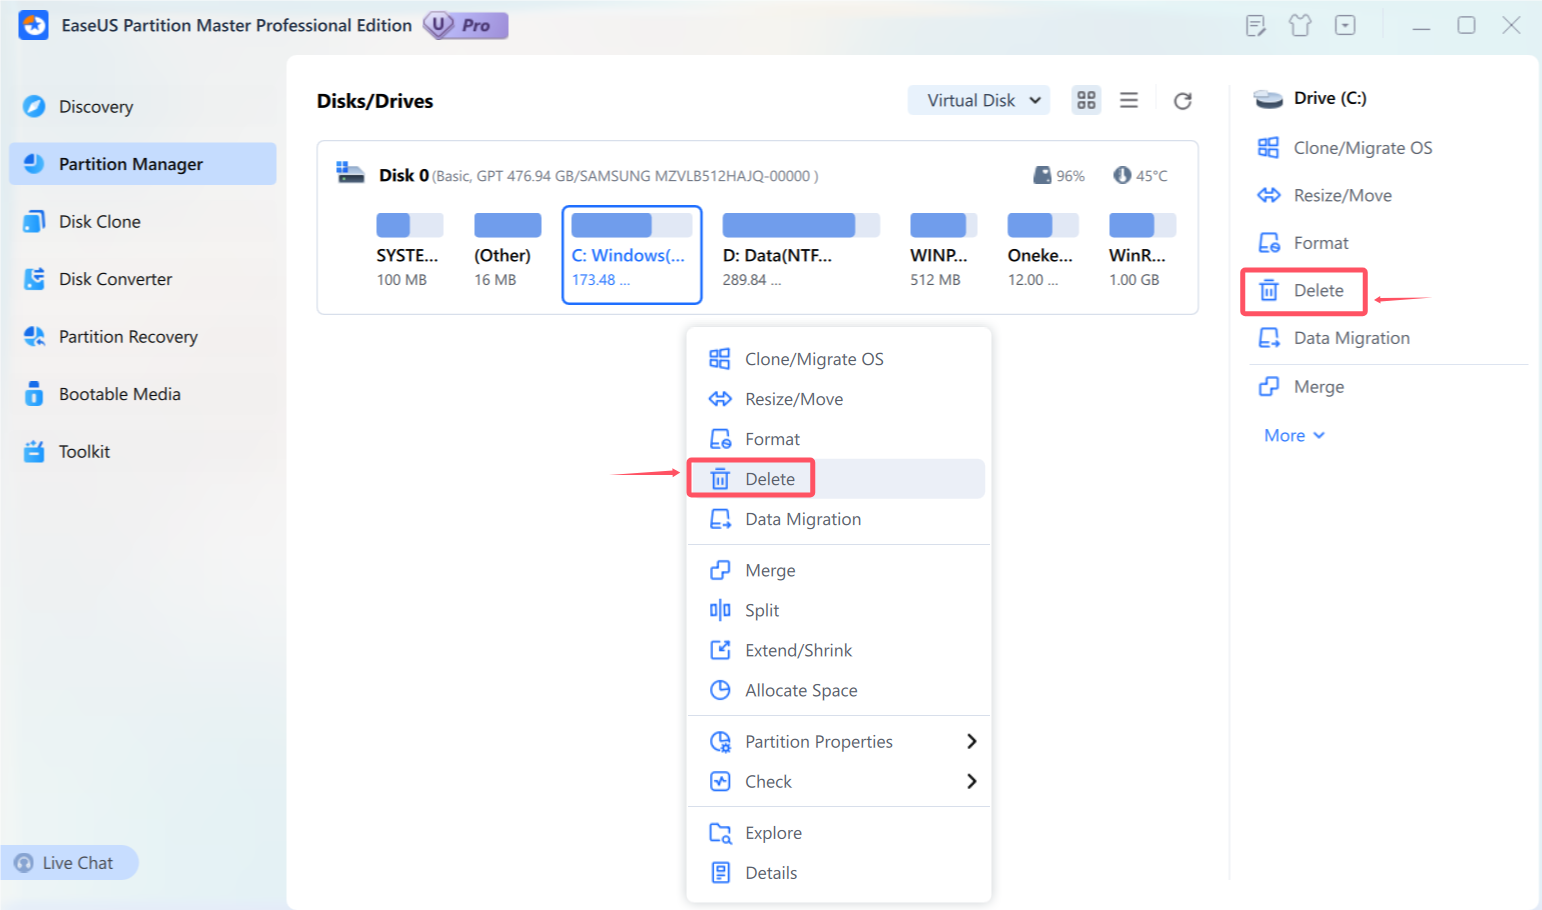
To delete a partition:
1. Select the partition you wish to delete.
2. Click the Delete in Feature List.
3. The deletion process will be pending until it is applied in the Pending Operation List. When you are ready to proceed, click on Execute Task.
Tips:
◆ System and boot partition cannot be deleted as this may cause the computer to be unable to boot.
◆ Once a partition is deleted, you will not be able to access any data that was stored on it, so be sure to back up any important information before deleting a partition.
Wipe Data
Wipe Data can erase all the data on the selected partition/disk/unallocated space. In most cases, the data cleaned with this feature are not able to be retrieved.
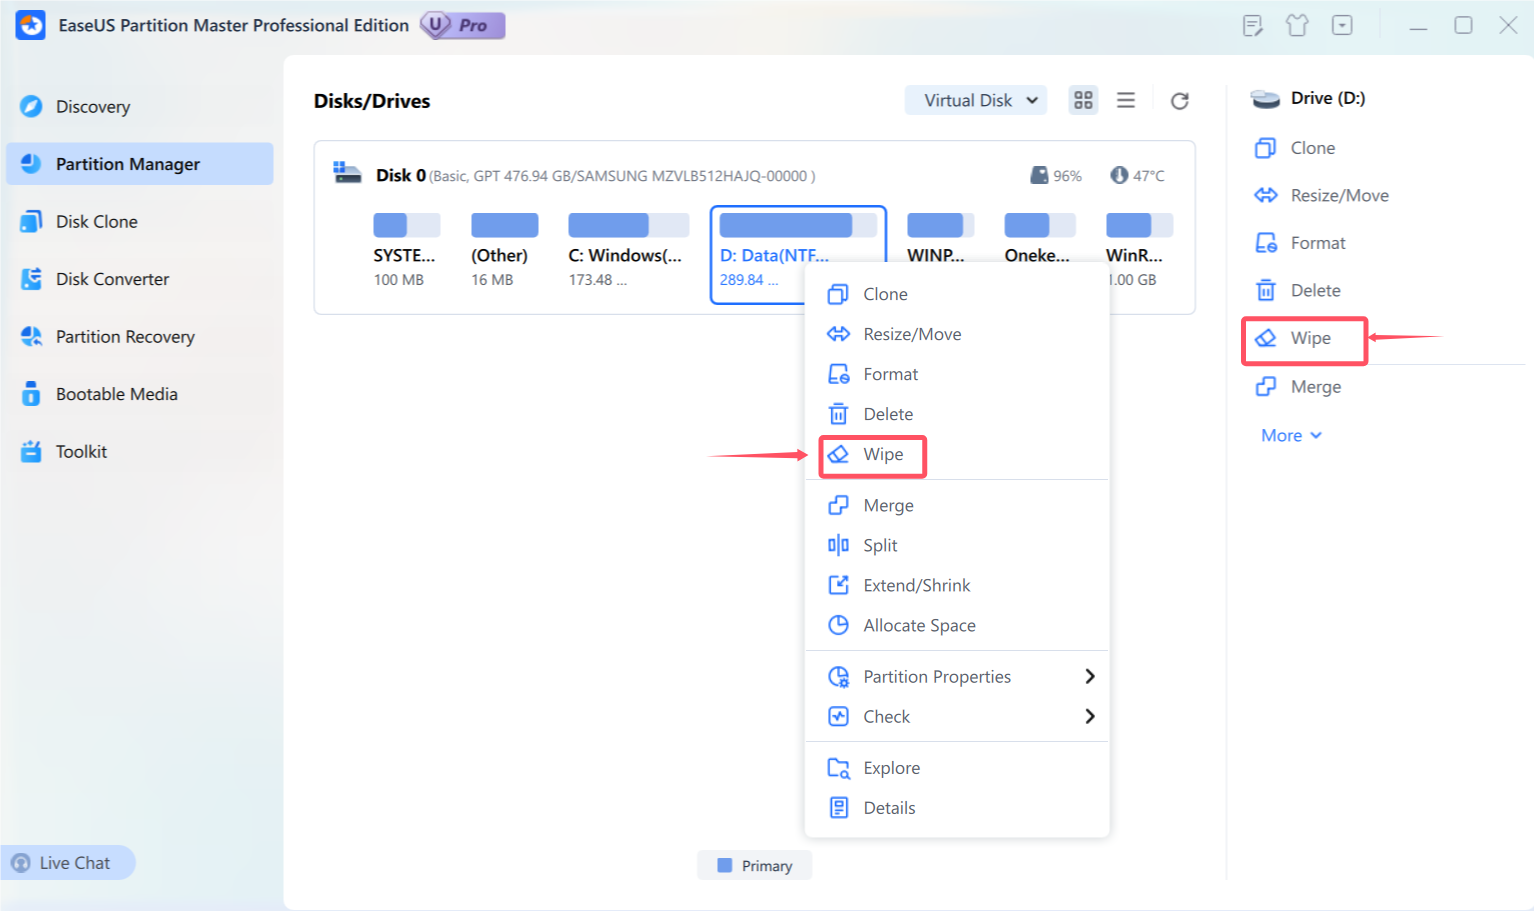
To wipe data:
1. Choose a disk, partition (volume), or unallocated space.
2. Right-click it and Select Wipe Data.
3. In the Wipe window, specify the number of times to overwrite the partition with a combination of 0x00 and random digits based on the wipe algorithm.
4. Click OK to confirm. All modifications to the disk layout will be saved in the Pending Operation List until applied.
Format
In order to store data on a partition, it must contain one or more specific file systems. Installing a file system onto a partition is known as formatting. This section provides instructions for formatting an existing partition.
The program provides the ability to format partitions into the following file systems:
FAT12
FAT16
FAT32
NTFS
ReFS
EXT2
EXT3
EXT4
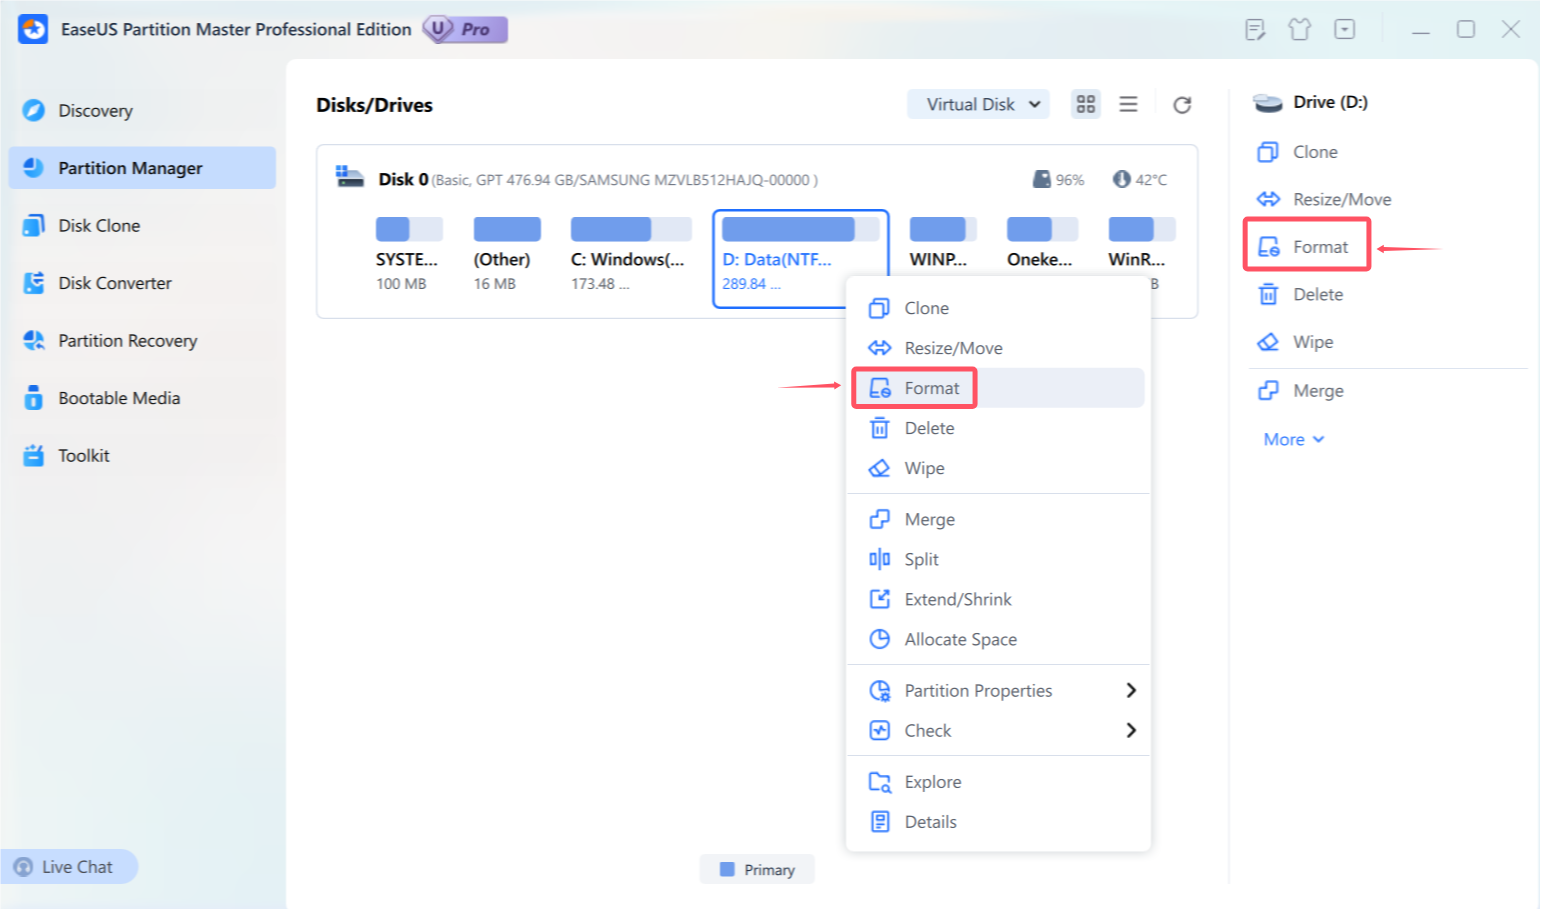
To format a partition:
1. Select a partition.
2. Right-click it and select Format.
3. Type the label you want in the Partition Label text box.
4. Select the file system type to be created from the Partition Type drop-down list. (FAT/FAT32, NTFS, ReFS and EXT2/EXT3/EXT4)
5. Choose the Cluster Size (512 byte,1,2,4…64KB) from the drop-down list.
6. Click OK when ready. All the introduced changes to the disk layout will be pended until applied in Pending Operation List.
Tips:
◆ A smaller cluster size results in less wasted disk space.
◆ Partition formatting will delete all data on it, including files and folders. Be cautious and take necessary precautions before initiating this operation.
Partition Recovery
Partition Recovery is a user-friendly tool designed to help you recover accidentally deleted or damaged partitions on a hard drive resulting from hardware or software failures.
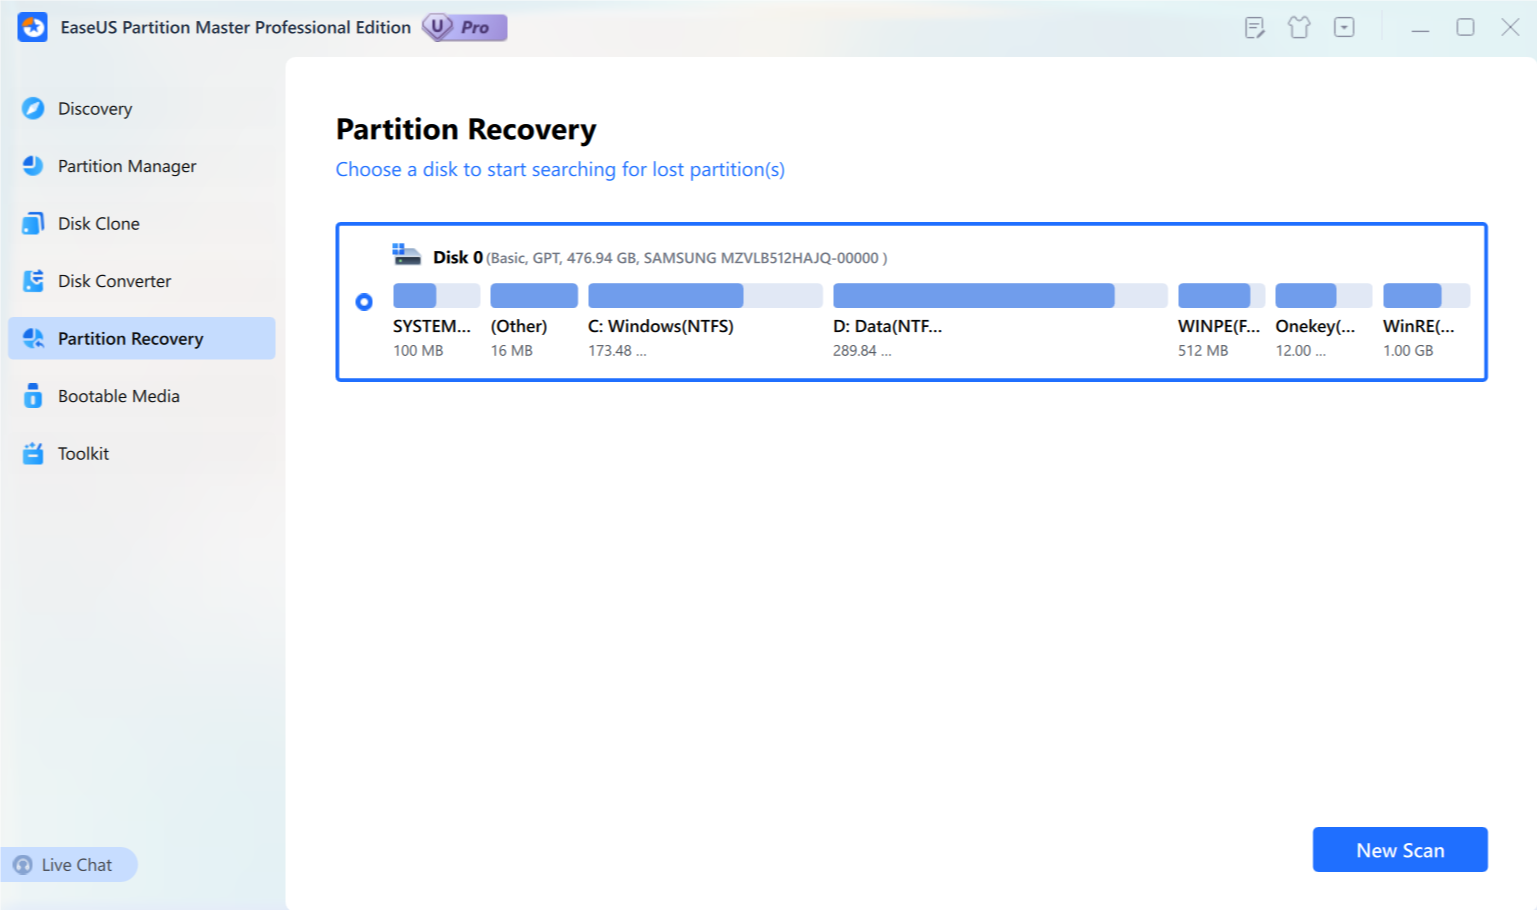
To run Partition Recovery
1. Click Partition Recovery on the left side.
2. Select a disk from which you lose the partition.
3. Click Scan to scan the hard drive.
4. All lost partitions will be listed after the scanning is finished.
5. Select your desired partition and click Proceed to recover.
6. The Recovered partition can be seen on your hard disk after the successful recovery.
Bootable Media
This program features a user-friendly wizard that simplifies the process of creating a WinPE Bootable Media on a USB drive, CD, DVD, or ISO file that can be burned to a storage device later on. The built-in interface provides users with the same experience as the Windows version, allowing them to manage their hard drive prior to installing an operating system.
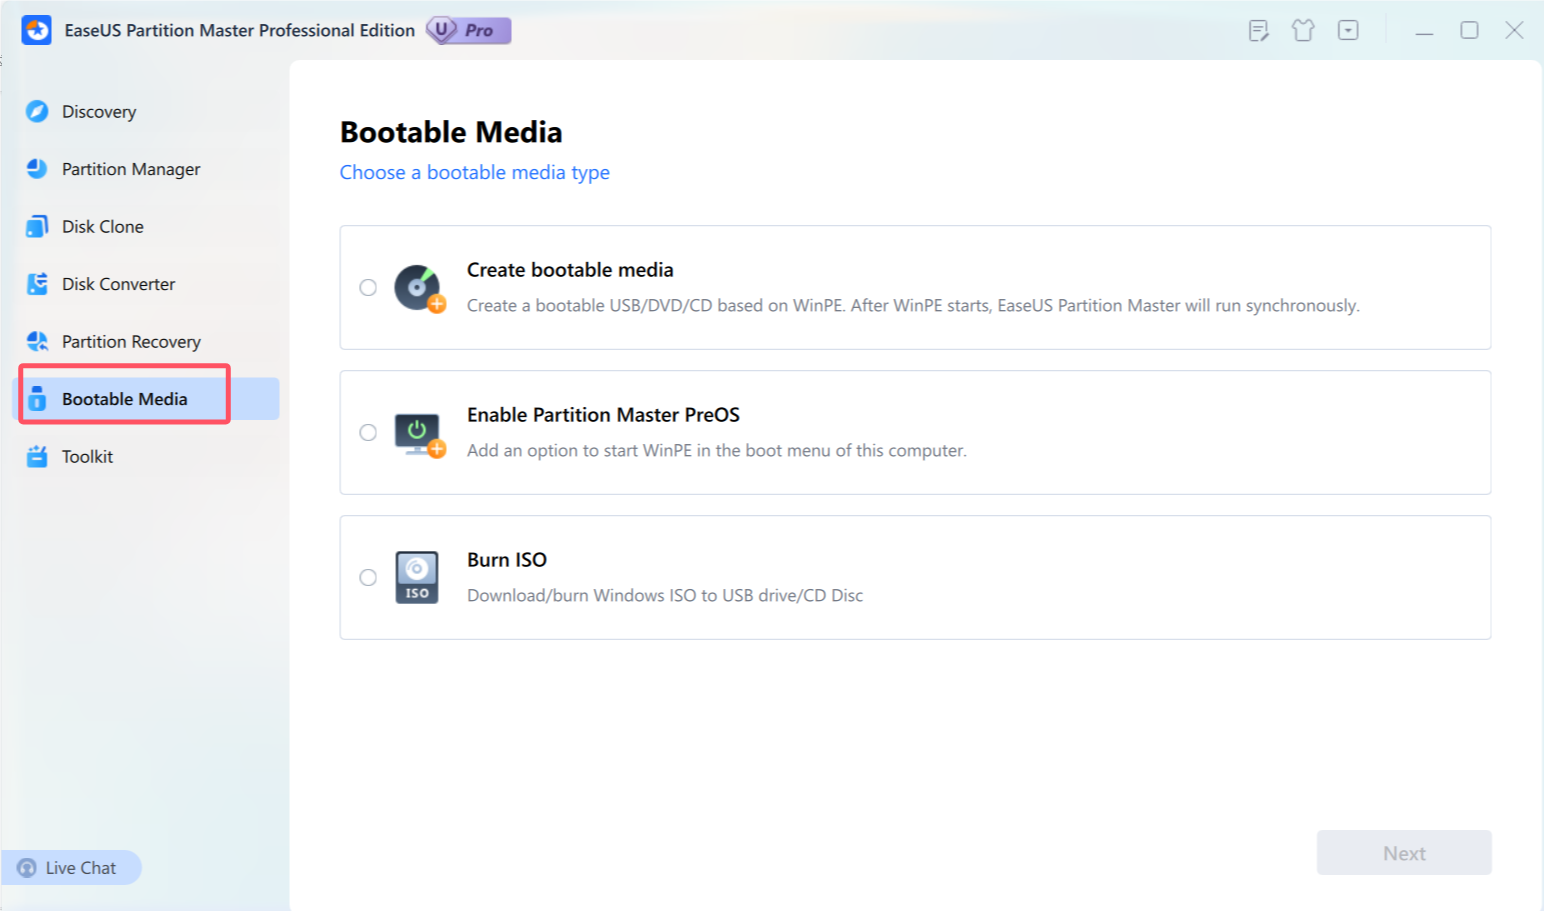
The paid edition of the software allows you to create a WinPE bootable disk. To create one, follow these steps:
1. Insert a CD/DVD or USB flash drive into your computer first.
2. Click Bootable Media on the left side.
3. Three options are available: to create a bootable media, enable Partition Master PreOS or burn ISO.
4. To create a bootable media, please choose the first option, click Next. Select whether you want to create a bootable CD/USB, then move to the next step to download the Microsoft WinPE component.
5. If the built-in burning component fails to create a bootable disk, you can export the ISO file and burn it using the third option Burn ISO.
After creating the WinPE bootable disk, you will be presented with the main interface, as shown below.
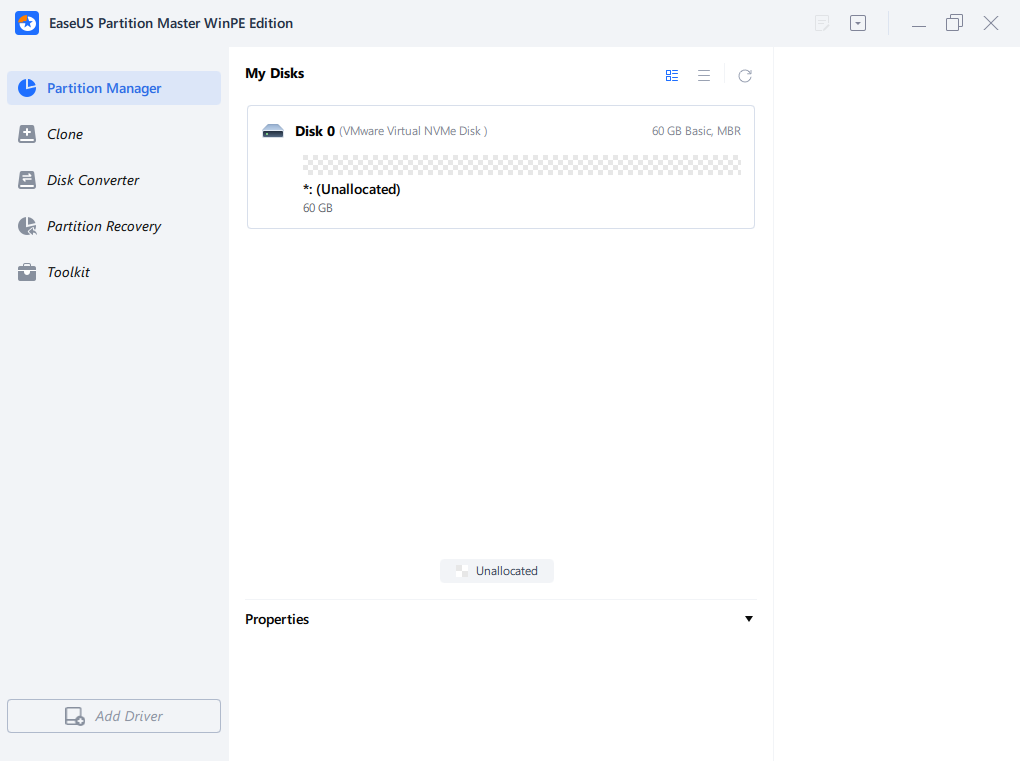
If your RAID drive or hard disk cannot be recognized by the WinPE bootable disk, it is recommended that you click on Add Driver to manually add the appropriate hardware driver.
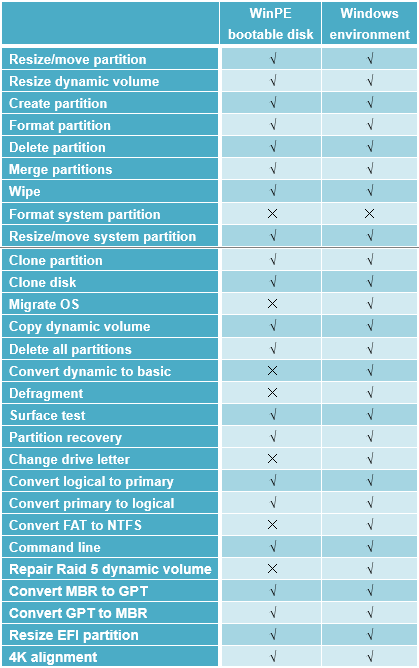
Feature comparison in a different environment
The detailed comparison between WinPE bootable disk and Windows environment:
Convert Operations
This section helps you convert the disk or partition properties with EaseUS Partition Master.
Convert to NTFS
With this feature, you can easily convert a FAT partition to NTFS, which is now the preferred file system for Microsoft's Windows Operating System. NTFS offers significant improvements over FAT.
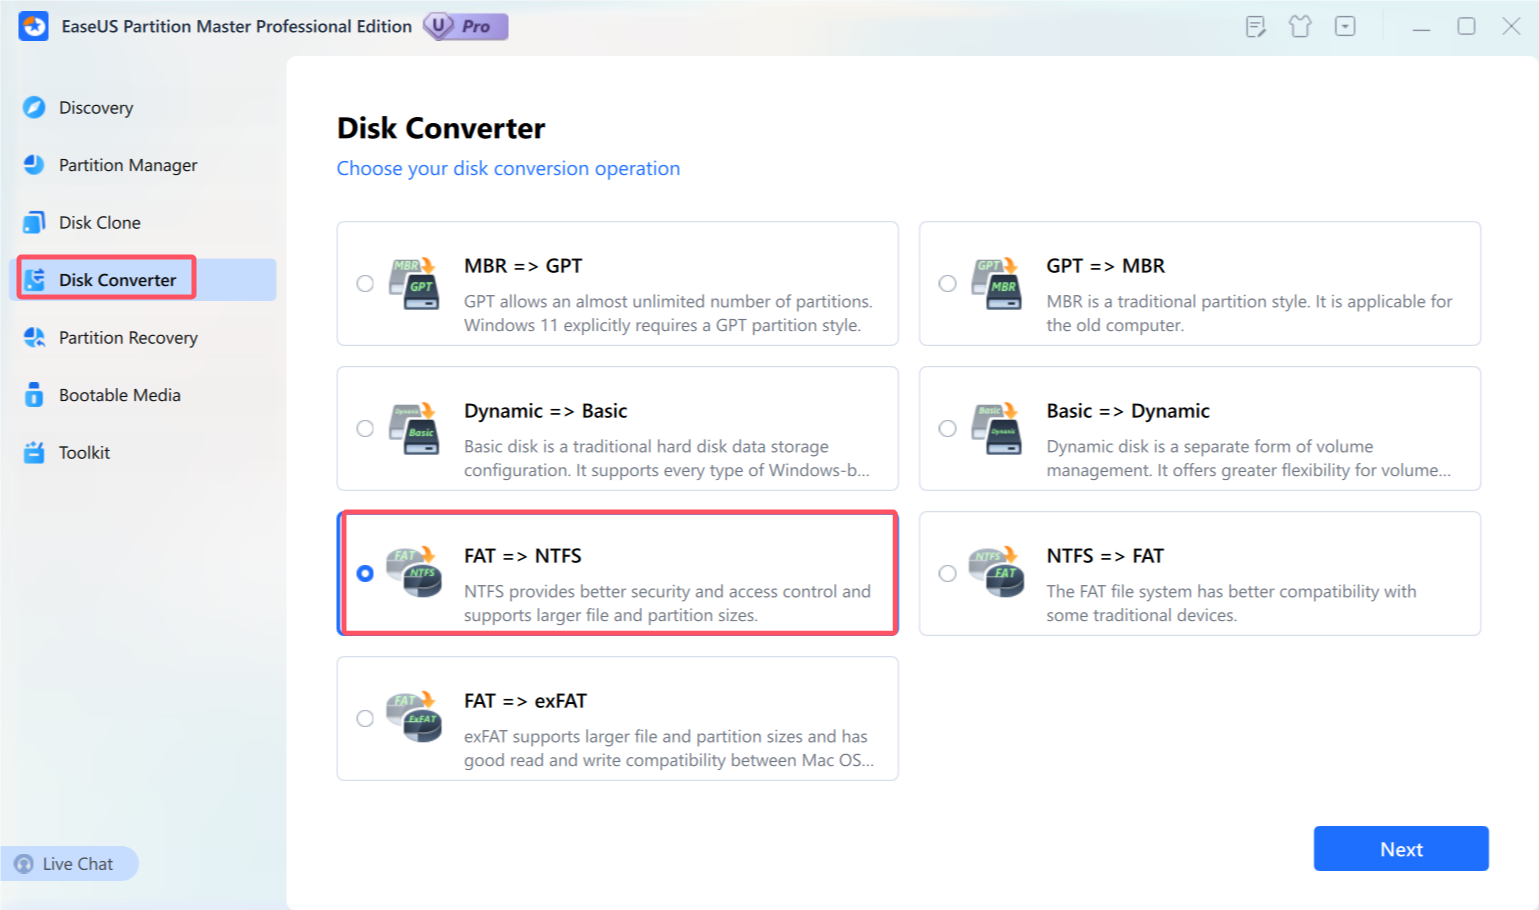
File system conversion steps:
1. Select a FAT12/16/32 partition
2. Click Advanced > FAT to NTFS
3. The pop-up dialog box will show the original and target file system, click OK to proceed.
Tips:
◆ The source file system should be either FAT12, FAT16, or FAT32 and the partition must not be hidden.
◆ Ensure that the target partition has at least 3% free space available.
Convert to FAT
With this feature, you have the ability to convert an NTFS partition to FAT32, which can be useful for specific purposes even if it is not the most widely used file system.
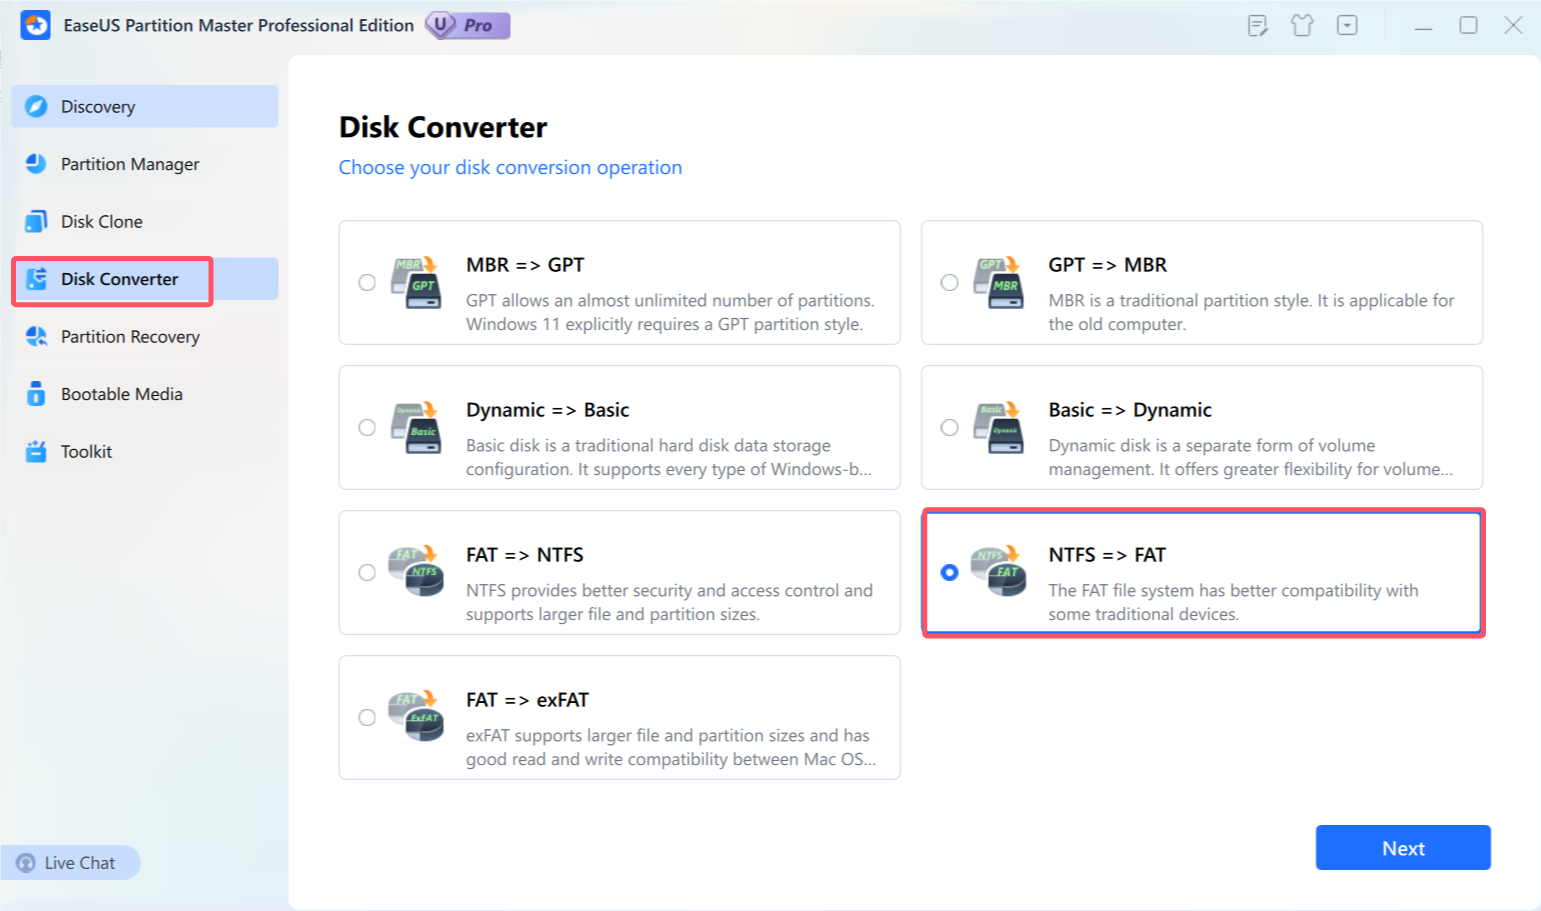
File system conversion steps:
1. Select an NTFS partition
2. Click Advanced > NTFS to FAT
3. The pop-up dialog box will show the original and target file system, click OK to proceed.
Tips:
◆ The source file system should be NTFS and the partition must not be hidden.
◆ Make sure the target partition has at least 3% free space available.
◆ The file encrypted in NTFS may not be available in FAT32.
◆ Only primary data stream files will be kept in FAT32.
◆ Symbolic links and Junctions won't be reserved.
◆ Files in Recycle Bin won't be reserved.
◆ The FAT file system doesn't support files large than 4GB, please remove the large files to another partition before converting it.
Convert Primary to Logical
An MBR disk can have a maximum of four primary partitions, or up to three primary partitions along with an unlimited number of logical partitions. If you want to create a fifth partition on a disk that already has four primary partitions, you will need to convert one of the primary partitions to a logical partition.
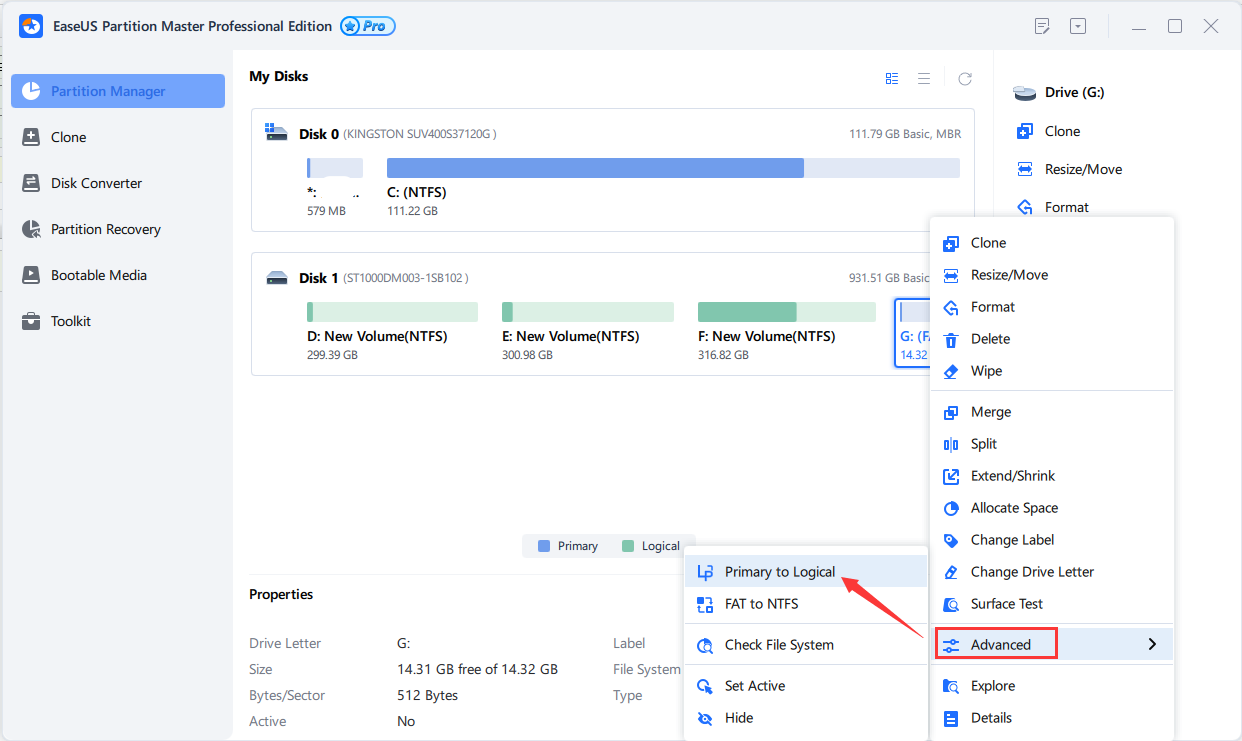
To convert a primary partition to logical:
1. Right-click the primary partition that you want to convert and choose Primary to Logical.
2. The operation will be pended until executed in the Pending Operation List. Click Execute Task when you are ready to proceed.
Tips:
◆ You cannot convert the boot or system partition to a logical partition as this may cause bootable issues for the computer.
◆ The size of the converted partition may differ slightly from the original primary partition due to the need to store additional information.
Convert Logical to Primary
To convert a logical partition to primary:
1. Right-click the logical partition that you want to convert to primary and then click Logical to Primary.
2. The operation will be pended until applied in the Pending Operation List. Click Execute Task when you are ready to proceed.
Tips:
◆ An MBR disk is limited to a maximum of four primary partitions or up to three primary partitions with additional logical partitions.
◆ If the disk contains multiple logical partitions, you can only convert a logical partition to a primary partition if there are two or fewer primary partitions on the disk.
Convert Dynamic Disk to Basic
This feature enables you to convert a dynamic disk that contains simple volumes or mirrored volumes into a basic disk while preserving its content.
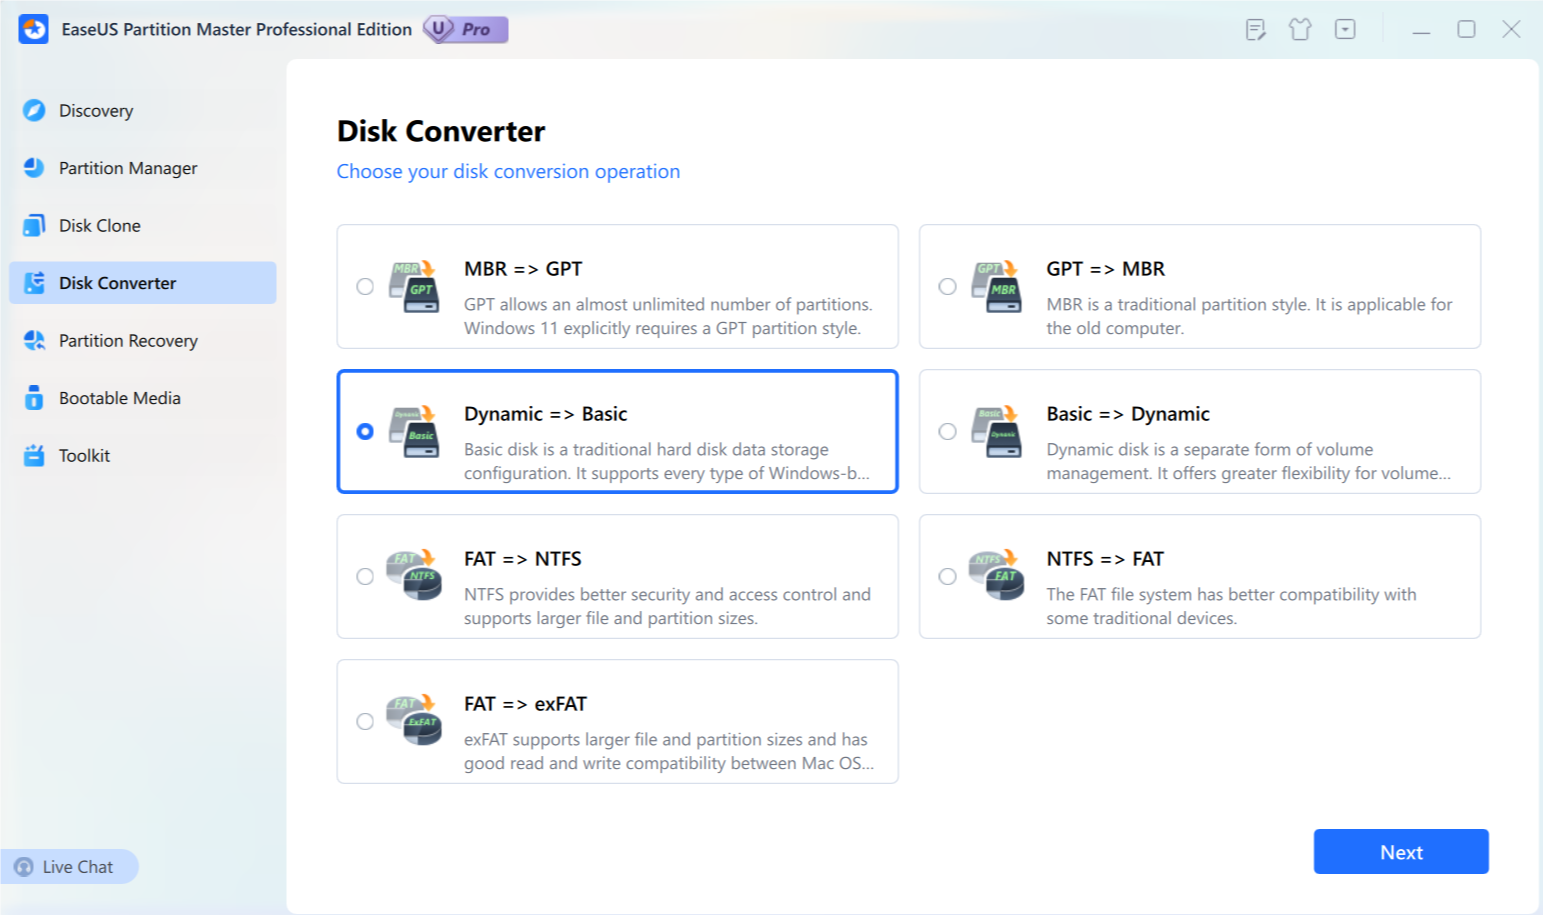
To convert a dynamic disk to basic:
1. Click Disk Converter on the left side.
2. Choose the third option Convert Dynamic to Basic, then select the disk you want to convert to continue.
Generally, after converting the dynamic disk, all of the dynamic volumes will be converted to logic partitions except the following situations:
- If there is not enough space for exchanging temporary data on the volume (less than 5% unused space in the volume and no adjacent unallocated space), this volume will be converted to primary partition. However, the MBR basic disk has the limitation that there can be 4 primary partitions at most, if the number of the volumes on a disk with less than 5% unused space and no adjacent unallocated space is over 4, the conversion operation cannot be implemented.
- If the file system of the volume is NOT FAT or NTFS, and there is no unallocated space next to the volume, it will be converted to primary partition. If the volumes which fit this situation are more than 4 volumes, the dynamic disk cannot be converted to basic disk.
Tips:
◆ This feature can only process dynamic disk with simple and mirrored volumes. The other types of dynamic disk like spanned volume, striped volume are not supported.
◆ To convert a dynamic disk containing mirrored volumes to a basic disk, please break the mirrored volumes before converting.
◆ It is forbidden to convert a GPT drive if any volume on it is labeled as Boot or System in Disk Management.
◆ We recommend you back up the disk before any operation!
Convert MBR to GPT
This feature allows you to convert an MBR disk to a GPT disk without losing any data. MBR disks can only utilize a maximum of 2TB of space on a hard drive. Converting an MBR drive to GPT can easily overcome this limitation.
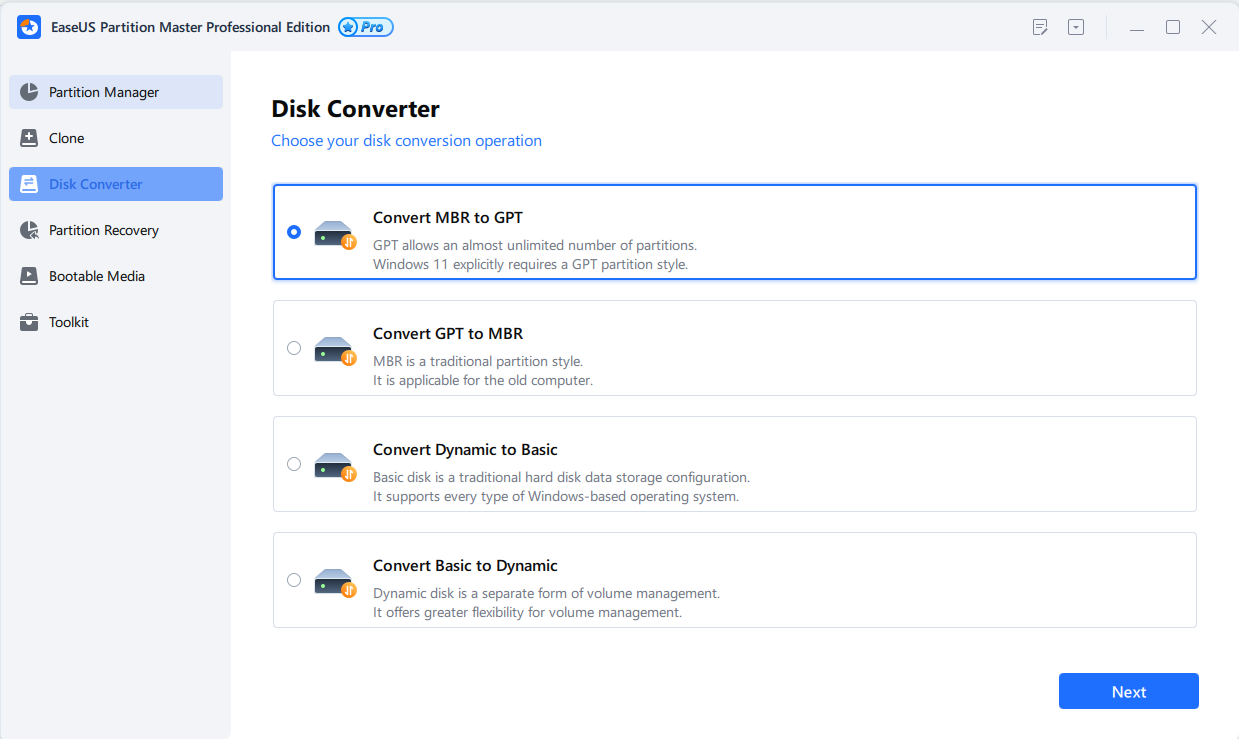
To convert an MBR disk to GPT:
1. Click Disk Converter on the left side.
2. Choose the first option Convert MBR to GPT, then select the disk you want to convert and continue.
Tips:
◆ This feature cannot be applied to dynamic disks. However, you can convert a dynamic disk to basic before converting it to GPT.
◆ A system GPT disk can only be booted from UEFI mode. Therefore, before converting the disk to GPT, ensure that your operating system and motherboard support booting from UEFI mode.
Convert GPT to MBR
This feature allows you to convert a GPT disk to MBR disk without data loss.
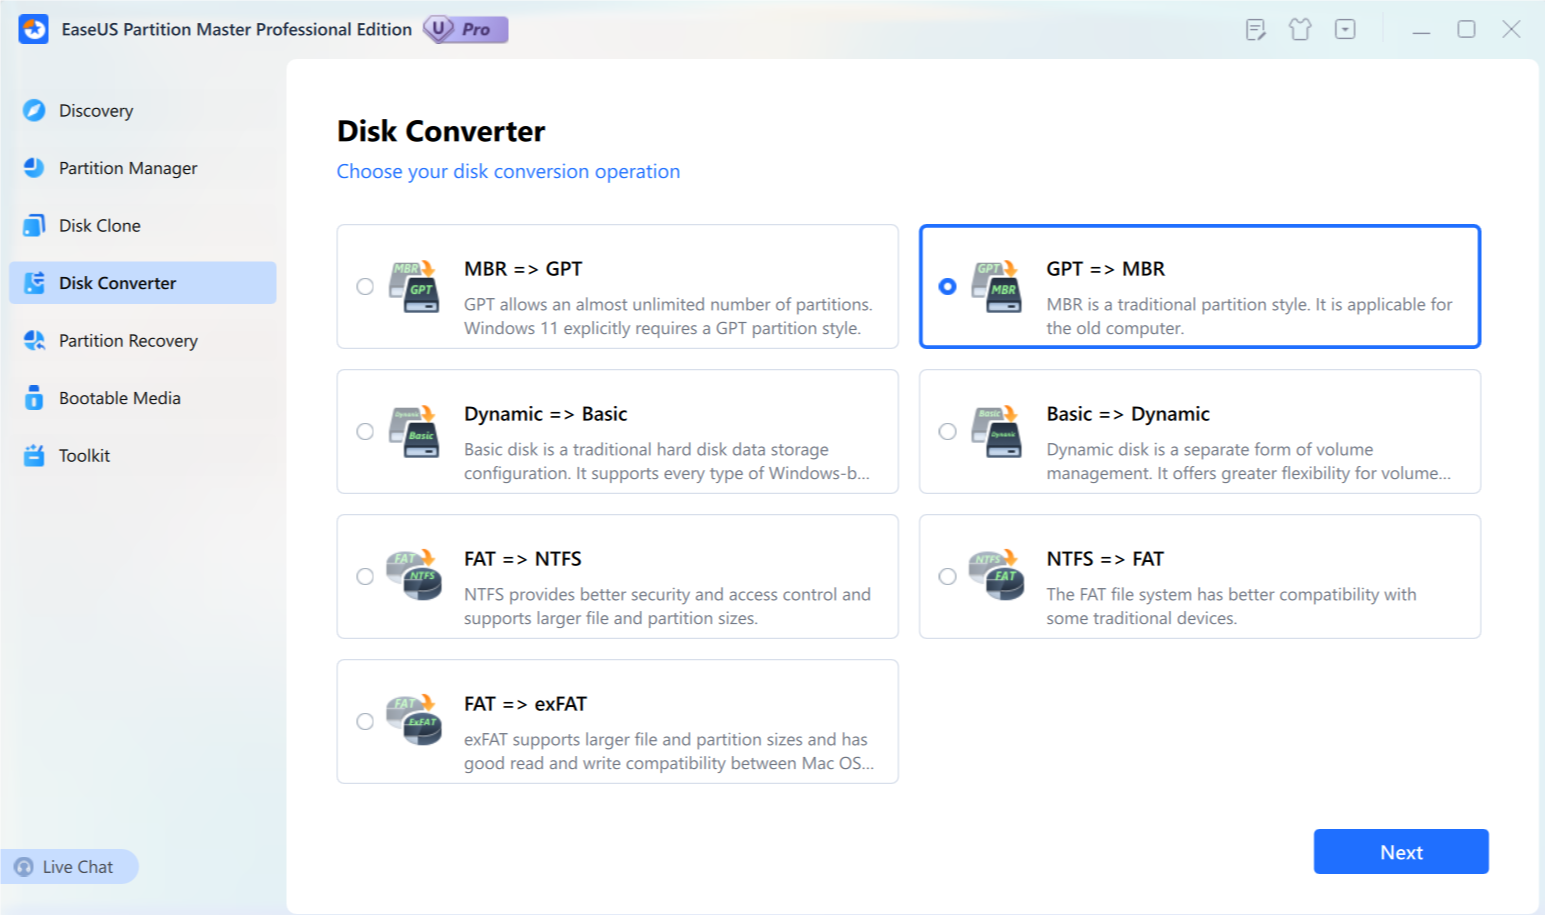
To convert the GPT disk to MBR:
1. Click Disk Converter on the left side.
2. Choose the second option Convert GPT to MBR, then select the disk you want to convert and continue.
Tips:
◆ This feature is not applicable for dynamic disks, but you can convert a dynamic disk to basic before converting it to MBR.
◆ If the disk you want to convert is the system disk, ensure that your motherboard supports booting from BIOS mode.
Other Operations
There are numerous beneficial features available for verifying the status of a disk or partition.
Data Migration
This feature allows you to migrate the applications and data on the C drive to other disks to make more running space for the C drive.
To migrate the data and apps:
1. Select Data Migration in the Toolkit Tab.
2. Select the data and apps once the scan is completed.
3. Click on Next to accomplish the task.
Rebuild MBR
Once the MBR (Master Boot Record) of the disk is damaged, the system cannot be booted. This feature will rewrite the Master Boot Record of the selected disk without destroying the disk partition table.
To Rebuild MBR:
1. Select an MBR disk to rebuild MBR
2. Right-click the disk and Select Rebuild MBR.
3. Set up the type of MBR to rebuild in Rebuild MBR window.
4. Click OK. The operation will be pended until applied in Pending Operation List. Click Execute Task when you are ready to proceed.
Bad Sector Scan
To examine the disk health and guide maintenance decisions.
To scan the bad sector:
1. Select Bad Sector Scan in the Toolkit Tab.
2. Select the disk you want to scan.
3. Click on Start and wait until it is finished.
Write Protection
This feature allows you to safely disable/enable write protection.
1. Select the disk.
2. Click on Disable/Enable.
Command Line
EaseUS Partition Master works with Windows Command Line. Using the command line gives you the ability to manage your hard drive without launching the program. Additionally, you can use it to add specific operations when creating a batch file.
How to start
To use our product in the command line, you need to:
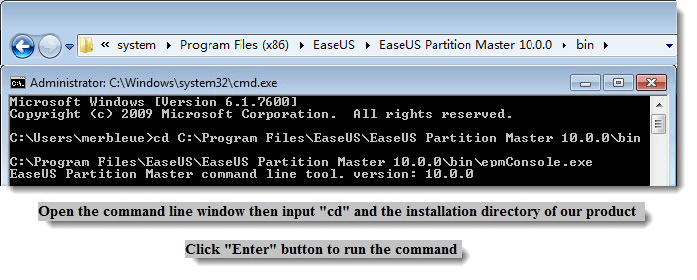
1. Run Windows CMD using your Administrator account.
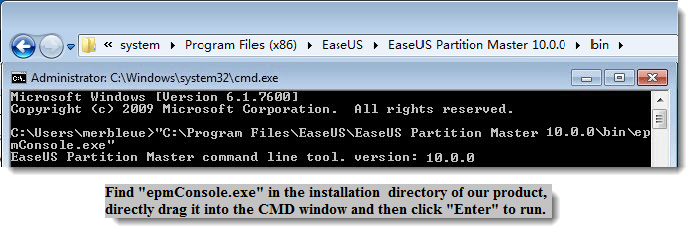
2. Drag the icon of "epmConsole.exe" from the product installation folder into CMD window or simply locate "epmConsole.exe" in CMD.
Method 1:
Method 2:
How to use
When successfully starting our product in CMD, all the available command and parameters for each command will be listed automatically (or you can input -h to get this guide information at any time). The commands can be written in full mode or abbreviation mode, for example.
In abbreviation mode, the command can be:
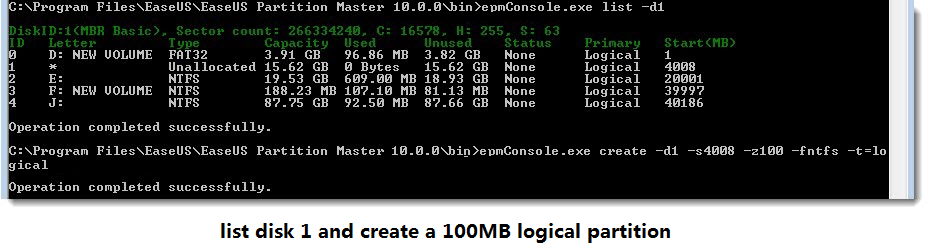
Input "epmconsole.exe list -d1" to list the information of Disk 1. And the following command is to create a new logical partition. You need to input "epmconsole.exe" at the front every time when you want to do any operation using the command line. "-d1"=select Disk 1, "-s4008"=create a partition from 4008MB space of the hard disk (you can also omit these arguments, and it will create a partition from the first unallocated space acquiescently), "-z100"=partition size is 100MB, "-fntfs"=file system is NTFS, "-t=logical"=create a logical partition.
In full mode, the command also can be:
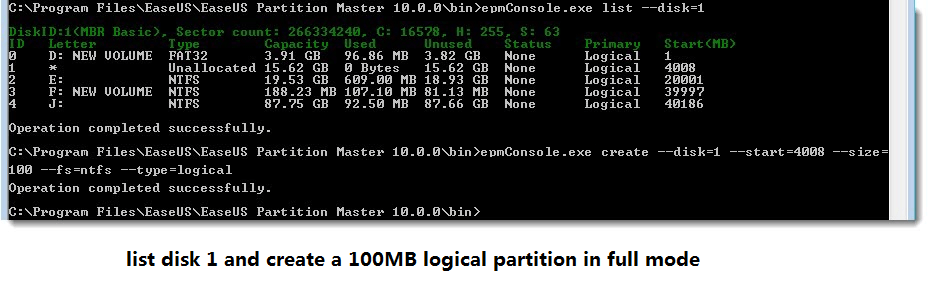
The difference between the full mode and abbreviation mode is that you need to input the full name of each command. And also, the "-" should be "--" instead. Besides, there need to be "=" between command and arguments, such as "-d1" should be "—disk=1".
What's more, here is a command to resize partition: "epmconsole.exe resize --disk=0 --volume=0 --start=0 --size=200". It means that our program will resize the first partition on Disk 0 to 200MB. "--start=0" means our program will not resize the partition from its left. If you set it as "--start=100", our program will shrink the selected partition 100MB from its left. And "--size=200" means the total partition size of the target partition after resizing.
4K Alignment
EaseUS Partition Master includes a 4K alignment function to optimize the performance of SSDs by aligning the 4K sectors. This feature can be found in the Toolkit.

Change Label/Drive Letter
To change the partition label:
1. Select a partition, Click the Change label in the feature list.
2. Enter a new label in the Partition label window.
3. Click OK. The operation will be pended until applied in Pending Operation List. Click Execute Task when you are ready to proceed.
To change the drive letter:
1. Select a disk and a partition.
2. Click Change drive letter.
3. Specify the drive letter you want to assign to the partition, in the new drive letter-drop-down list.
4. Click OK. The operation will be pended until applied in Pending Operation List. Click Execute Task when you are ready to proceed.
Tips:
◆ After creating a new partition, EaseUS Partition Master will display the updated partition structure in a graphical format within the main window.
◆ The Change drive letter function is available only in the Windows environment.
Change Cluster Size
To change Cluster Size:
1. Select a partition and click Change Cluster Size in the feature list.
2. Enter a new label in the Partition label window.
3. Click OK. The operation will be pended until applied in Pending Operation List. Click Execute Task when you are ready to proceed.
Check File System
EaseUS Partition Master enables you to check hard disk partitions for file system errors.
1. Select a partition.
2. Choose Advanced ->-Check File System.
3. In the Check File System window, there is an option Try to fix errors if found, the found errors will be fixed if you tick the option.
4. Click Start to check errors on your partition.
Hide Partition
EaseUS Partition Master allows you to hide a partition. It can be useful for protecting important information from unauthorized or casual access.
To hide a partition:
1. Select a partition.
2. Click Advanced ->-Hide.
3. Click OK. The operation will be pended until applied in Pending Operation List. Click Execute Task when you are ready to proceed.
Tips:
◆ To reveal a hidden partition, follow the same steps as before but select Unhide partition instead of Hide partition in step 2.
Explore Partition
This feature is used to browse a partition of the FAT/NTFS/ReFS/EXT2/EXT3/EXT4 file system. With this feature, you can check the following information:
◆ Total and free space of the entire partition.
◆ The File directory of all folders and files. There is Created/Modified/Accessed time information for each folder/file. Besides, the size information of a specific file is also available with this feature.
Explore partition as following steps:
1. Choose a FAT/NTFS/EXT2/EXT3/EXT4 partition.
2. Click More > Explore.
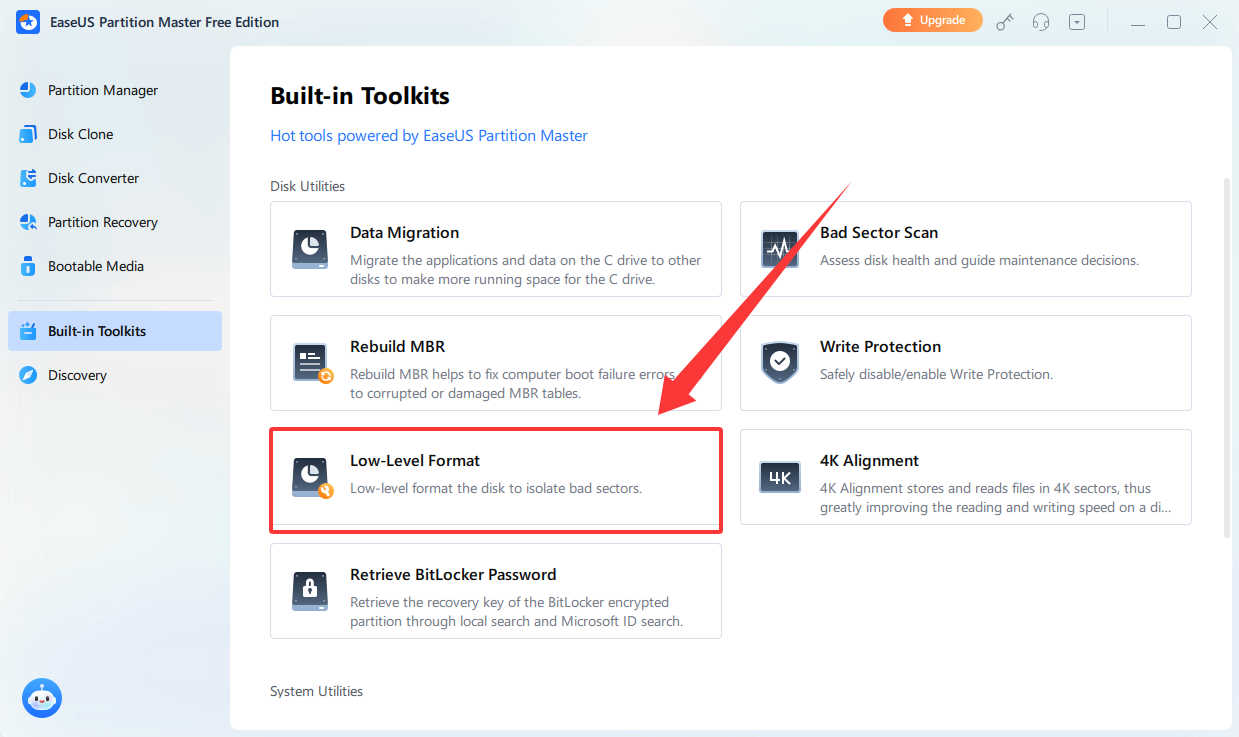
Low-Level Format
Low-level formatting (LLF), also known as physical formatting, is the process of preparing a storage device by setting up its physical structure. It defines the locations of tracks and sectors on the disk surface, creating the foundational layout that enables the system to locate, store, and manage data reliably. LLF ensures that the device is ready for data storage and retrieval at the physical level.
Key Characteristics of Low-Level Formatting:
1. Physical Structure Setup: LLF creates the basic physical layout on the disk—tracks, cylinders, and sectors.
2. Performed by Manufacturer: On modern hard drives, LLF is done at the factory. Users typically don't (and can't) do a true LLF on modern drives.
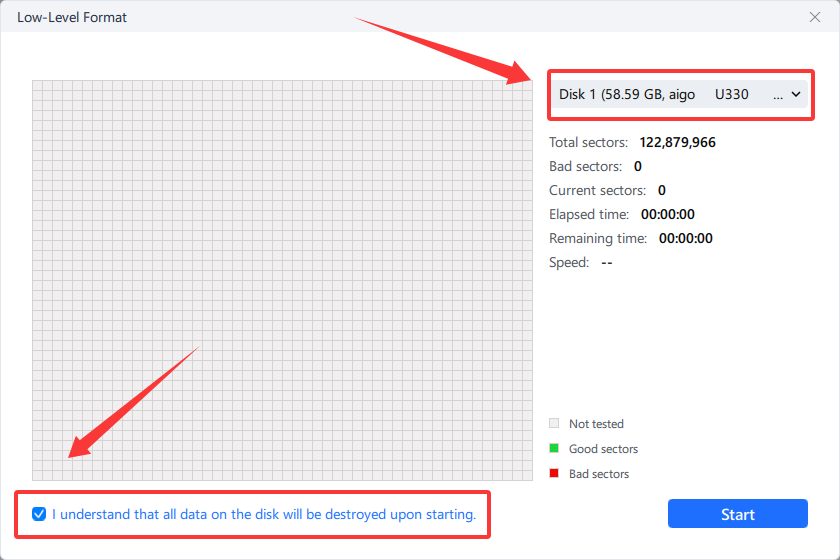
To perform a low-level format on your disk, please go to Built-in Toolkits > Low-Level Format.
Tips:
All data on the disk will be destoryed upon starting.
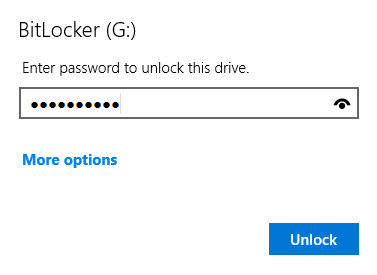
BitLocker
EaseUS Partition Master offers support for BitLocker partitions, allowing you to perform operations such as resizing, moving, copying, and more. If a BitLocker partition is locked, its status will be displayed in the software, and clicking the Unlock button will prompt you to enter a password to unlock it.
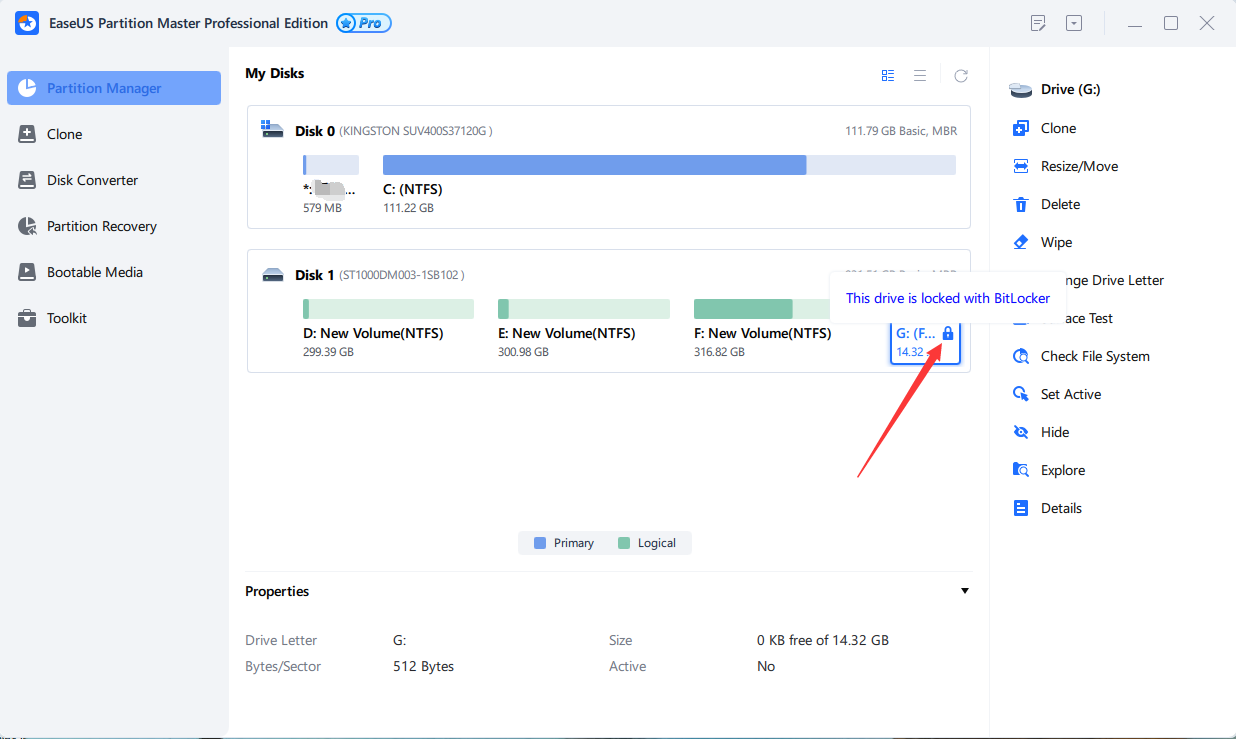
In most cases, a partition can be operated normally once it has been unlocked. However, if the partition is still impacted by BitLocker even when it's unlocked, you will need to turn off BitLocker completely to finish any operations.
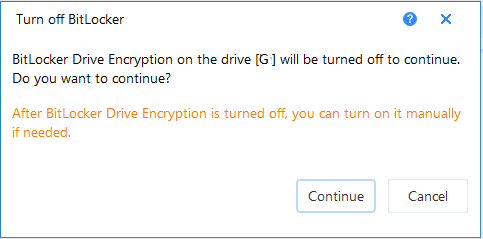
Once you have completed the necessary operations, you can manually turn BitLocker back on if necessary.
Feedback and Technical Support
We welcome your feedback on your experience using EaseUS Partition Master, and we are happy to answer any questions you may have. Please don't hesitate to contact us at [email protected]. We also offer an online Chat service, which can be accessed on our official website, www.easeus.com.
For more information about this product, please refer to Basic Technical FAQ For Using Partition Master.