Welcome
Thank you for choosing EaseUS Partition Master for Mac.
EaseUS Partition Master for Mac is a reliable and intelligent tool that helps you manage your hard drive in various ways. With its wide-ranging features, such as disk cloning, conversion, and BitLocker disabling, you can easily organize and optimize your disks.
The user-friendly interface simplifies partition management, ensuring that every feature is within easy reach and navigable, offering you a coherent and seamless experience.
Activation
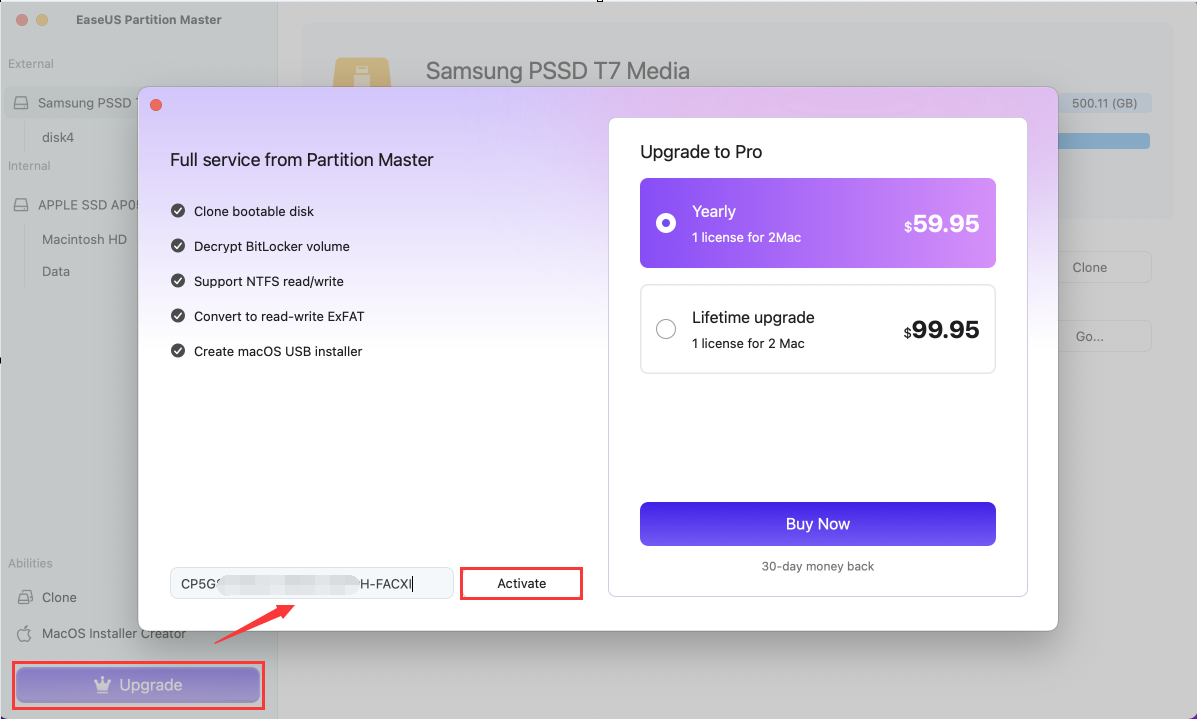
To activate your EaseUS Partition Master for Mac, please locate the Upgrade button situated in the lower left corner of the primary interface. Once clicked, an activation window will appear. Simply insert your 25-digit license code into the specified field and click Activate. On successful completion of this process, your software will transition from the demo version to the Professional edition.
Abilities
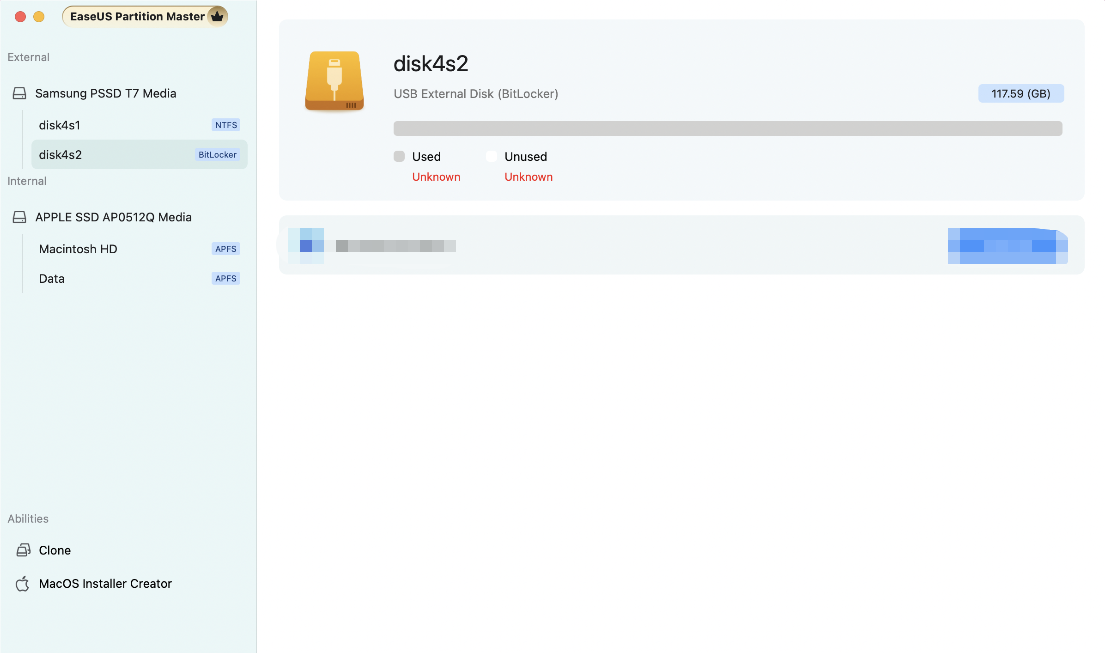
Upon launching the product, it will automatically identify the disks connected to your computer, displaying a comprehensive summary of the disk information, including the size, disk structure, file system, and BitLocker encryption status, among others. Following this, you will find a detailed explanation of the product’s features.
Clone
Disk cloning is the process of duplicating the content of one disk onto another, effectively creating two disks with identical data. This feature is designed to support both Mac's internal system drive and external disks. Remarkably, when the macOS internal disk is cloned, the target external disk also turns bootable.
Below are the steps for disk clone:
1. Go to the left-hand panel and select the Clone option.
2. Select a source disk and a target disk by clicking on the gray boxes.
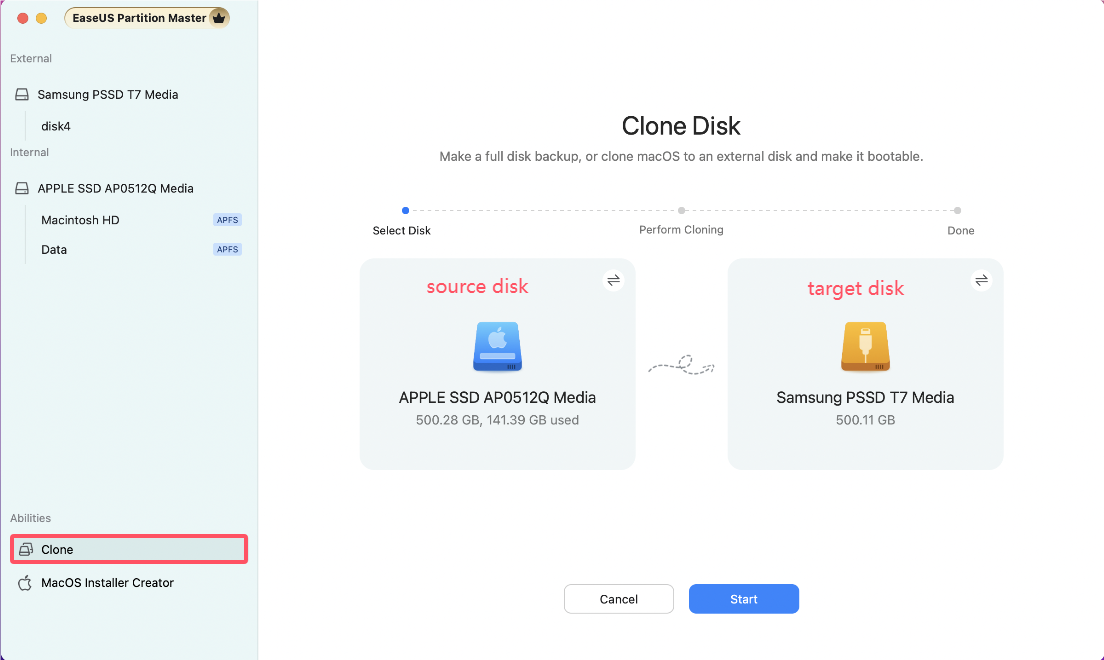
3. Click the Start button to initiate the cloning process.
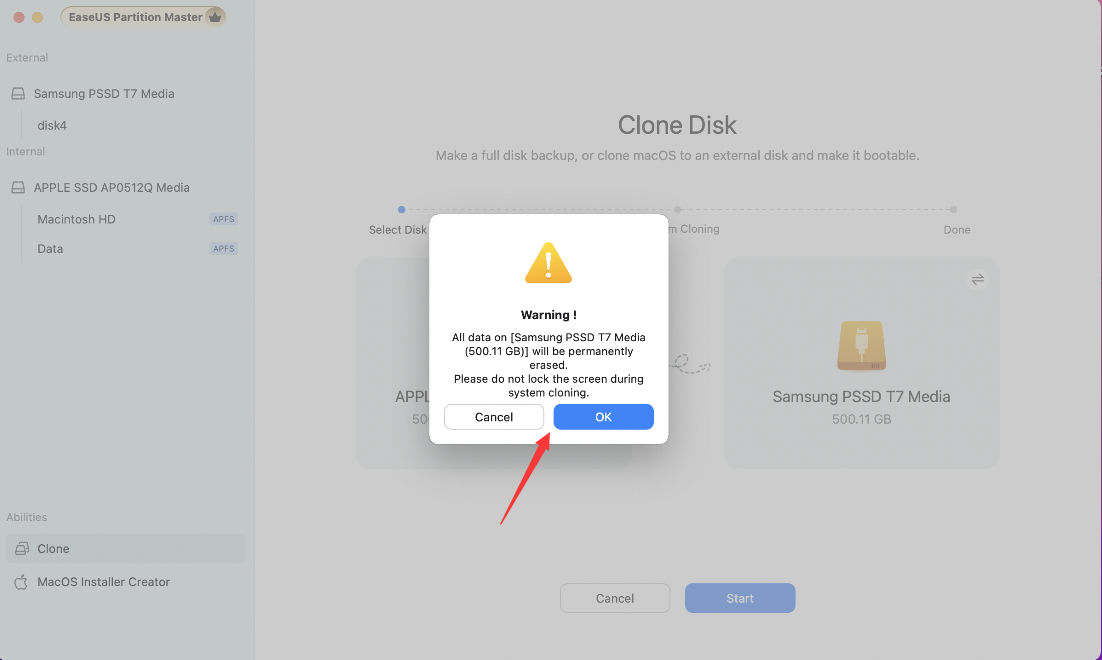
Please note that the cloning process will erase all data on the target disk, so choose carefully to avoid any mishaps. If needed, you can use the Cancel button to re-select the disks. To ensure a seamless cloning process, please avoid locking the screen during the operation. When you are ready to proceed, click OK to move ahead.
Typically, the cloning process requires some time, particularly for disks with a large volume of data. For your convenience, you can choose the option "Shut down your Mac when the operation is complete".
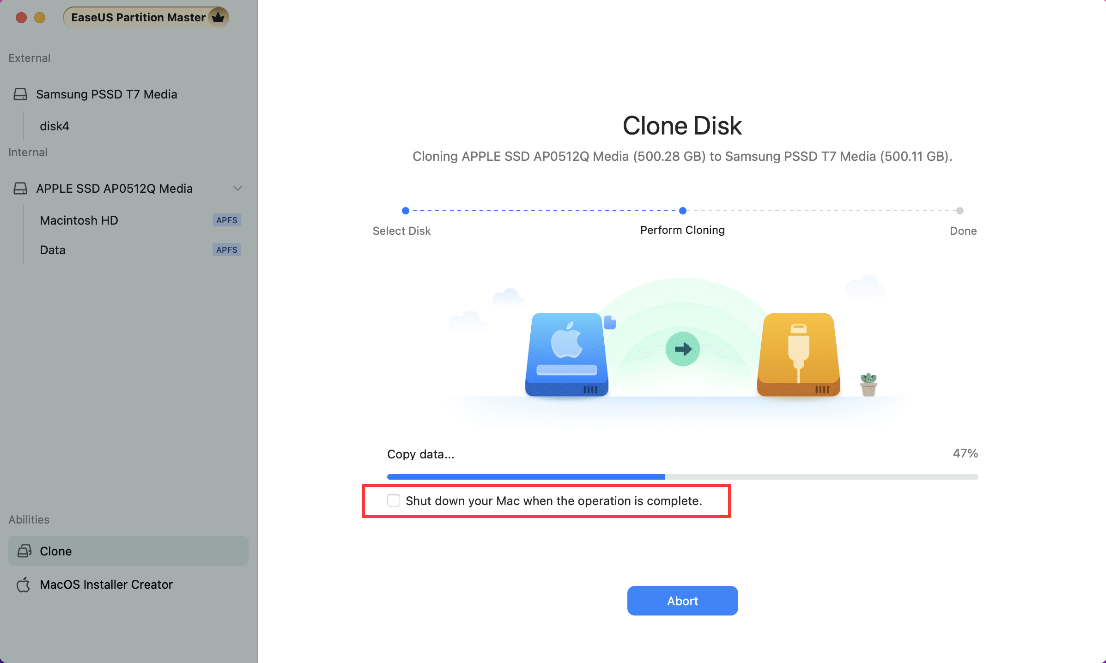
4. Finish the cloning.
MacOS Installer Creator
Utilizing a MacOS Installer Creator can be beneficial in various scenarios, such as setting up a new Mac, installing macOS on numerous machines without downloading the installer each time, or being unable to install a compatible macOS from the Finder or macOS Recovery. It's also a highly valuable asset for rapid system restoration in the event of computer crashes or hard drives fails.
Here is the guide on how to create one:
1. Connect a USB to your Mac.
2. Go to the left panel and select the MacOS Installer Creator option.
3. Select a macOS edition.
The software will display some macOS editions that are compatible with your computer. Please select one to proceed.
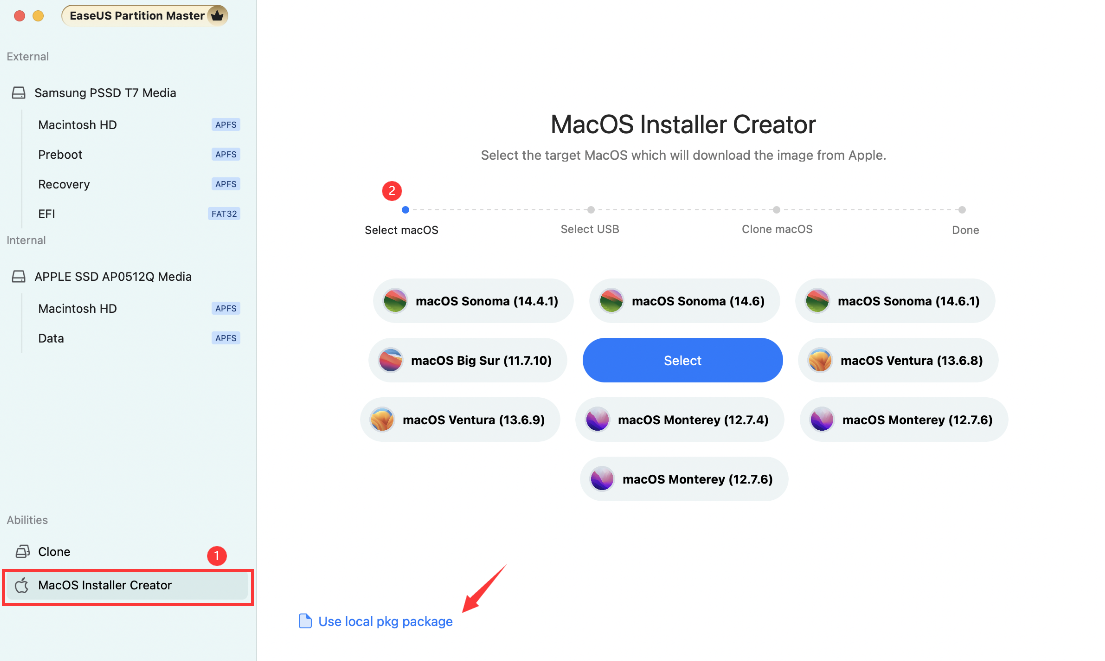
If your preferred macOS edition isn't listed, you have the option to download a pkg installation package from the App Store, alternatively, if you already possess a pkg macOS installation file, you can then choose the Use local pkg package option to upload it to the product directly.
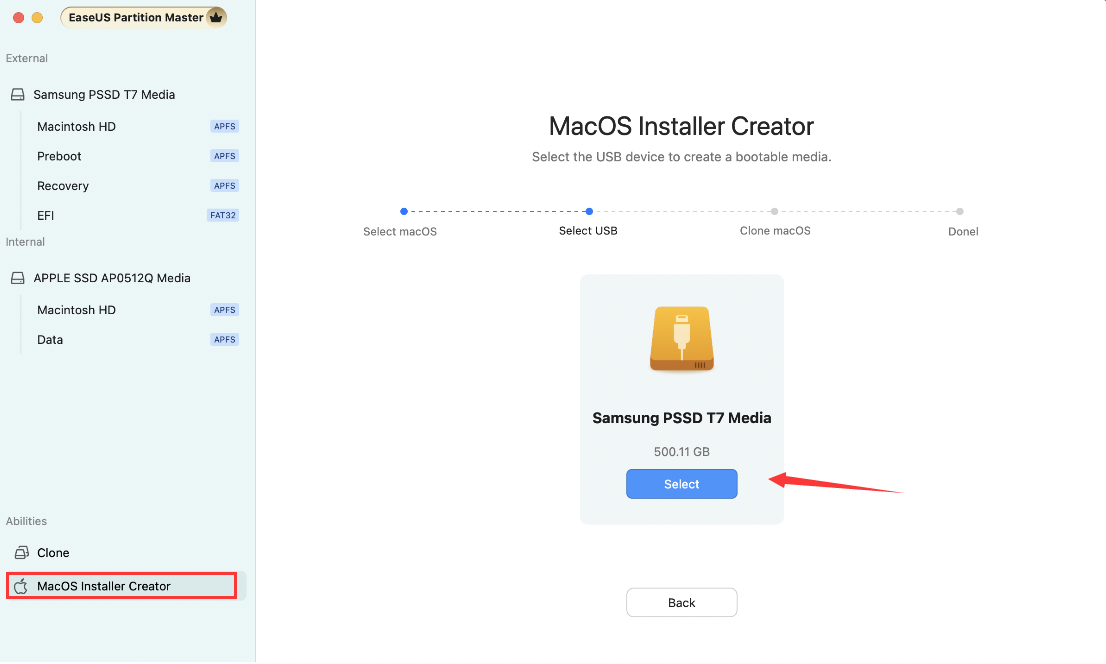
4. Select your USB devices to create a bootable media.
5. Execute the creation process.
Typically, the process may take some time, please wait patiently. You have the option to choose "Shut down your Mac when the operation is finished."
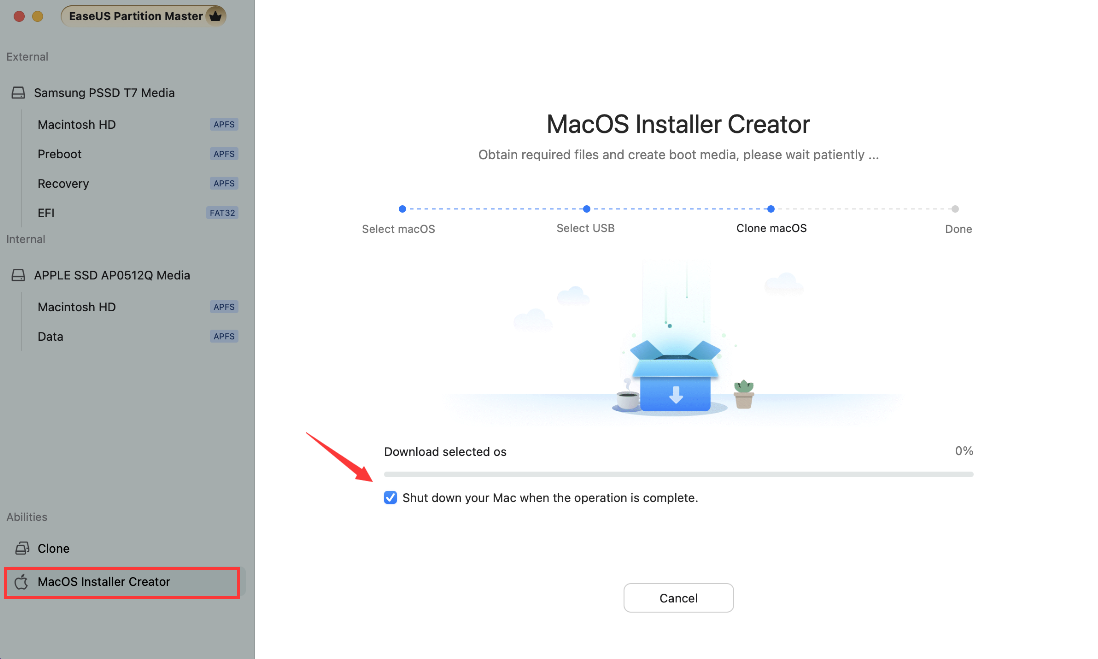
6. Finish the creation.
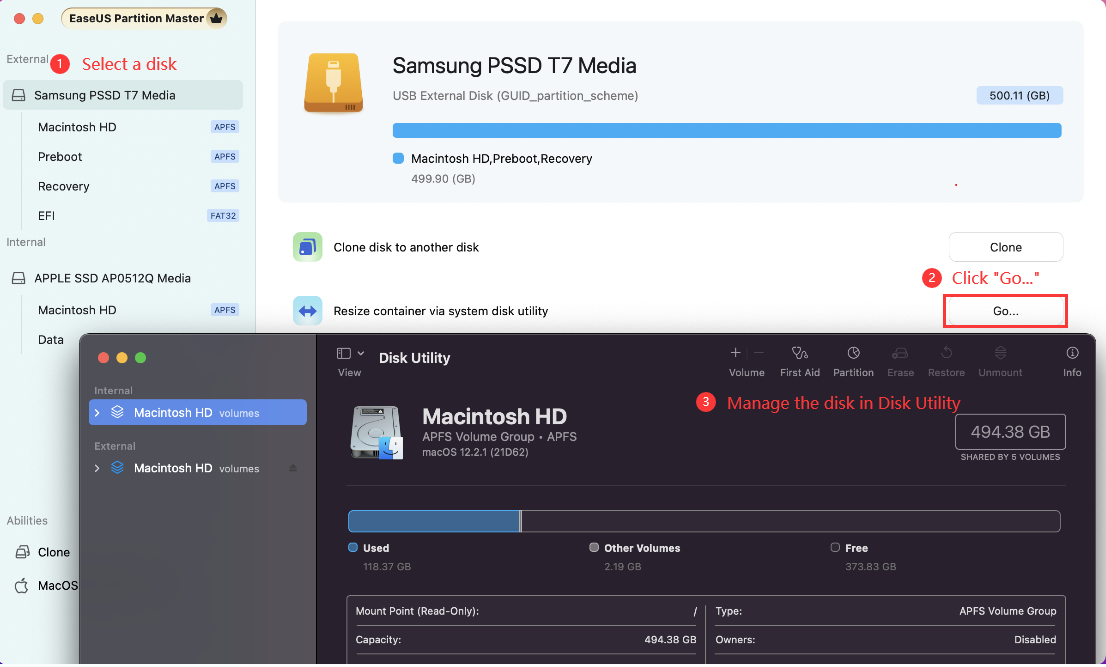
Partition Management
The product effortlessly integrates with Mac Disk Utility, enabling you to resize, repair, partition, and erase your volumes, etc. Simply select the disk and click Go... to access Disk Utility and efficiently manage your disk partitions there.
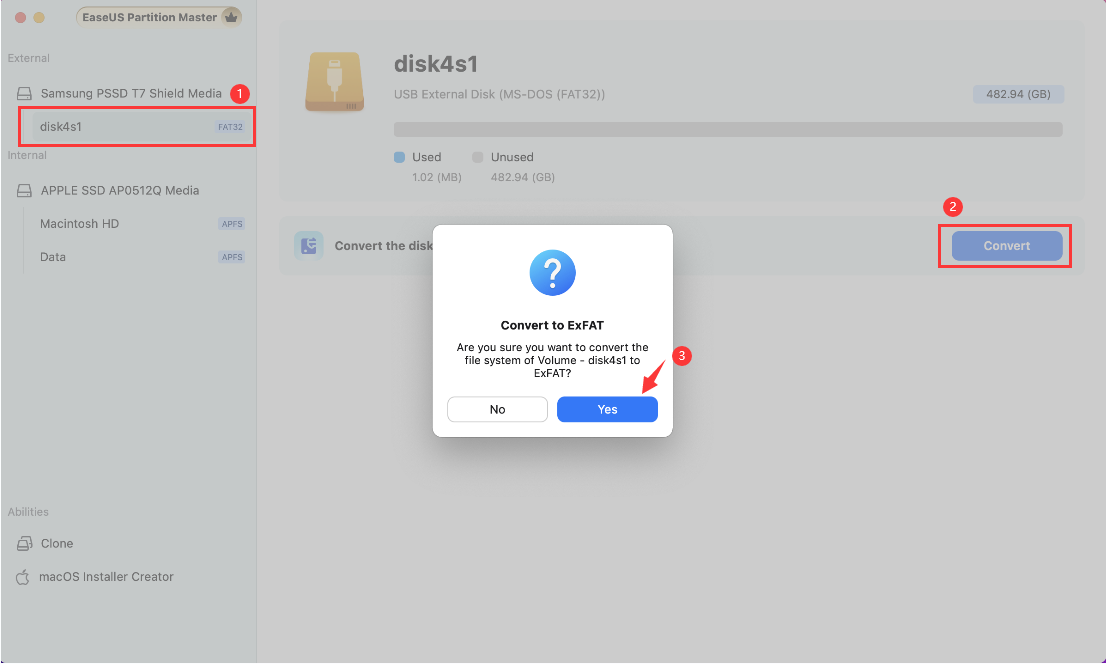
Convert FAT to exFAT
Converting from FAT to exFAT can be beneficial for users who need support for larger file sizes, larger partition sizes, and reduced file system overhead. With this feature, you can convert a FAT partition to exFAT, which can be useful for specific purposes.
1. Select a FAT12/16/32 partition
2. Click the Convert button
3. A confirmation pop-up window will appear, click Yes to confirm the operation and proceed.
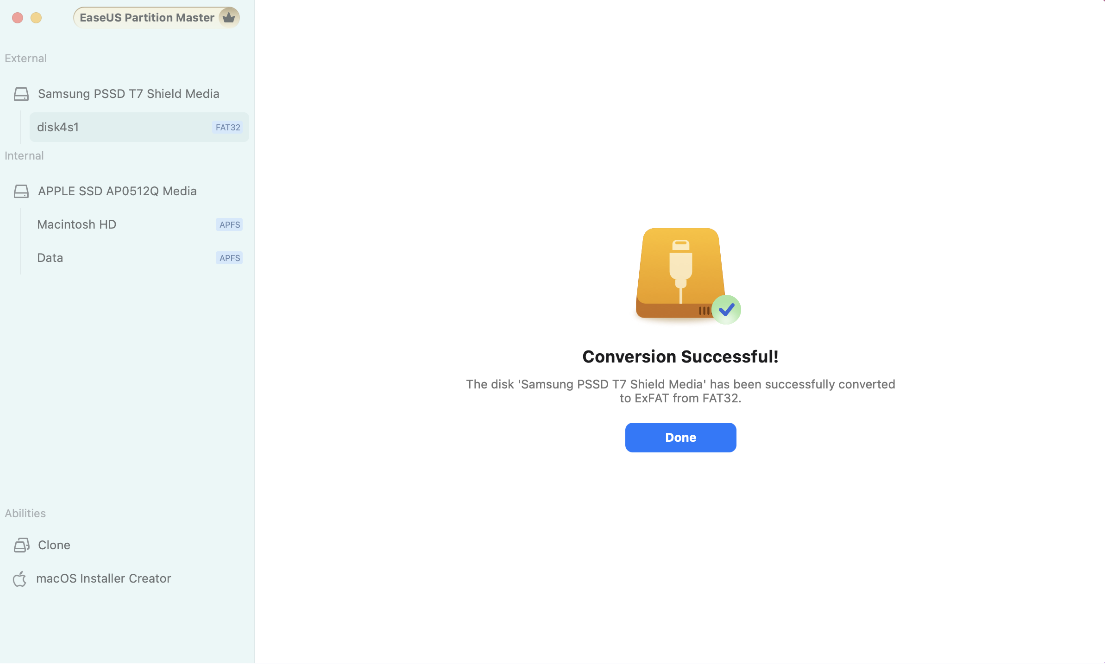
4. Complete the conversion.
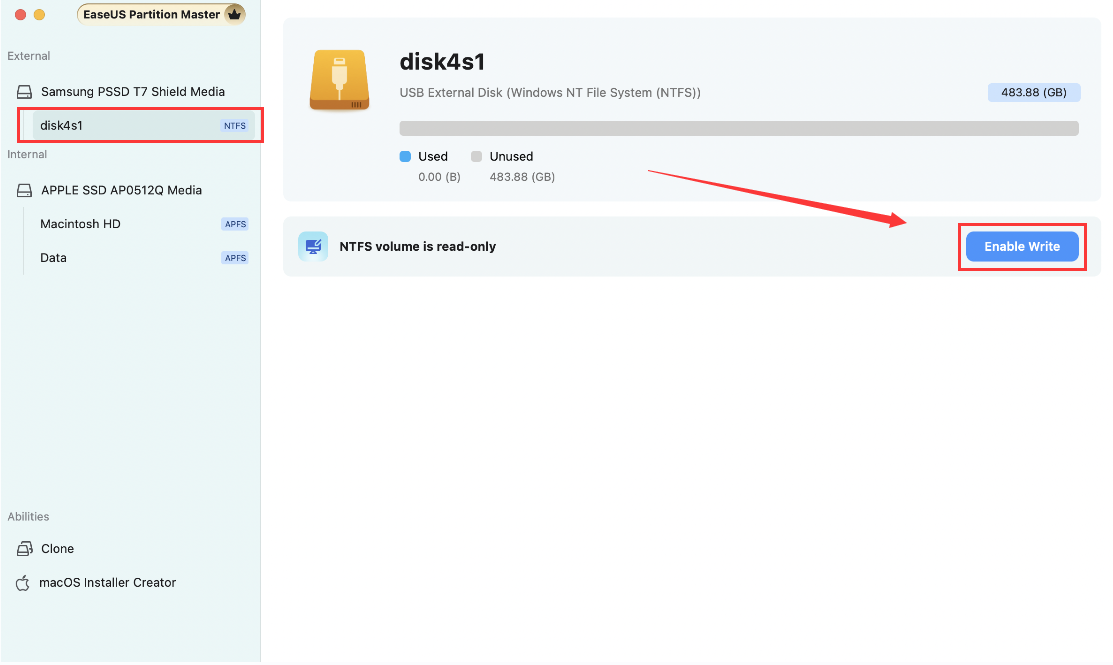
Enable Write on NTFS Drives
The NTFS file system is designed specifically for Windows operating systems, limiting access to disks with this format on Mac computers to read-only. This feature enables you to write to and modify partitions, overcoming this restriction and enhancing cross-platform compatibility.
1. Select the NTFS partition and click the Enable Write function.
2. Enabling write access for NTFS drives requires granting startup security permissions on your computer. Follow these steps to authorize access:
First, restart your computer and enter Recovery Mode by holding down the Power button.
Next, navigate to Startup Security Utilities and select "Allow user management kernel extension from identified developers".
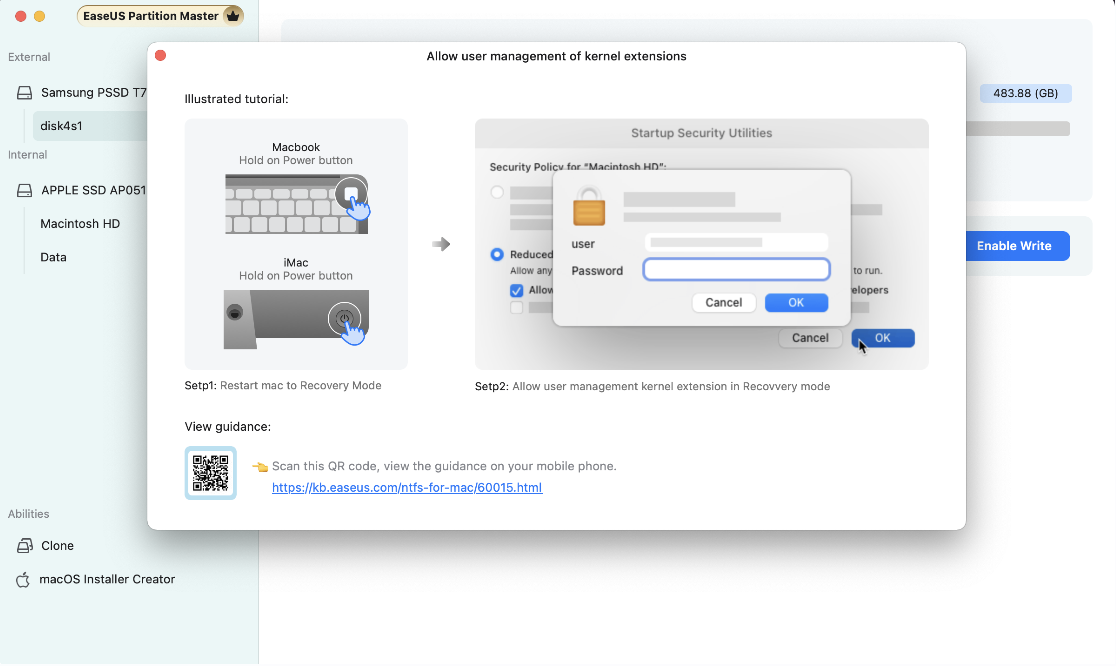
We provide a detailed tutorial for this process. Please check this page.
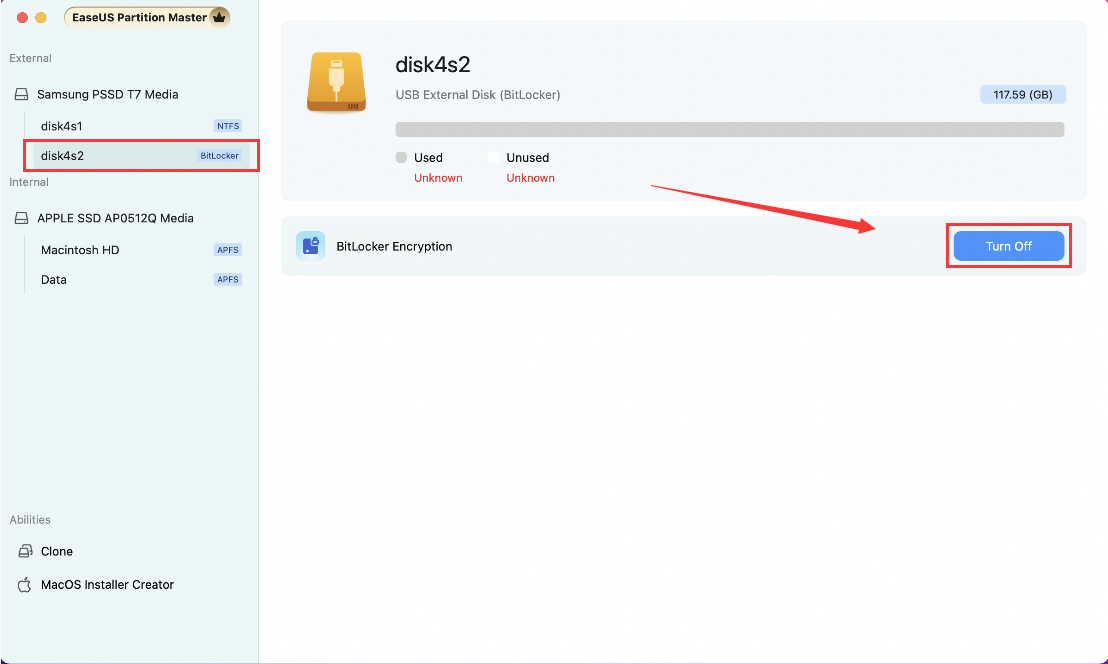
Turn off BitLocker Encryption
The choice to disable BitLocker Encryption is influenced by multiple factors, including system maintenance, troubleshooting, security configurations, encryption transitions, and data management considerations. Here is a comprehensive guide on how to disable BitLocker encryption effectively.
1. Select a BitLocker encryption partition and click the Turn off button.
2. Enter your BitLocker password or recovery key.
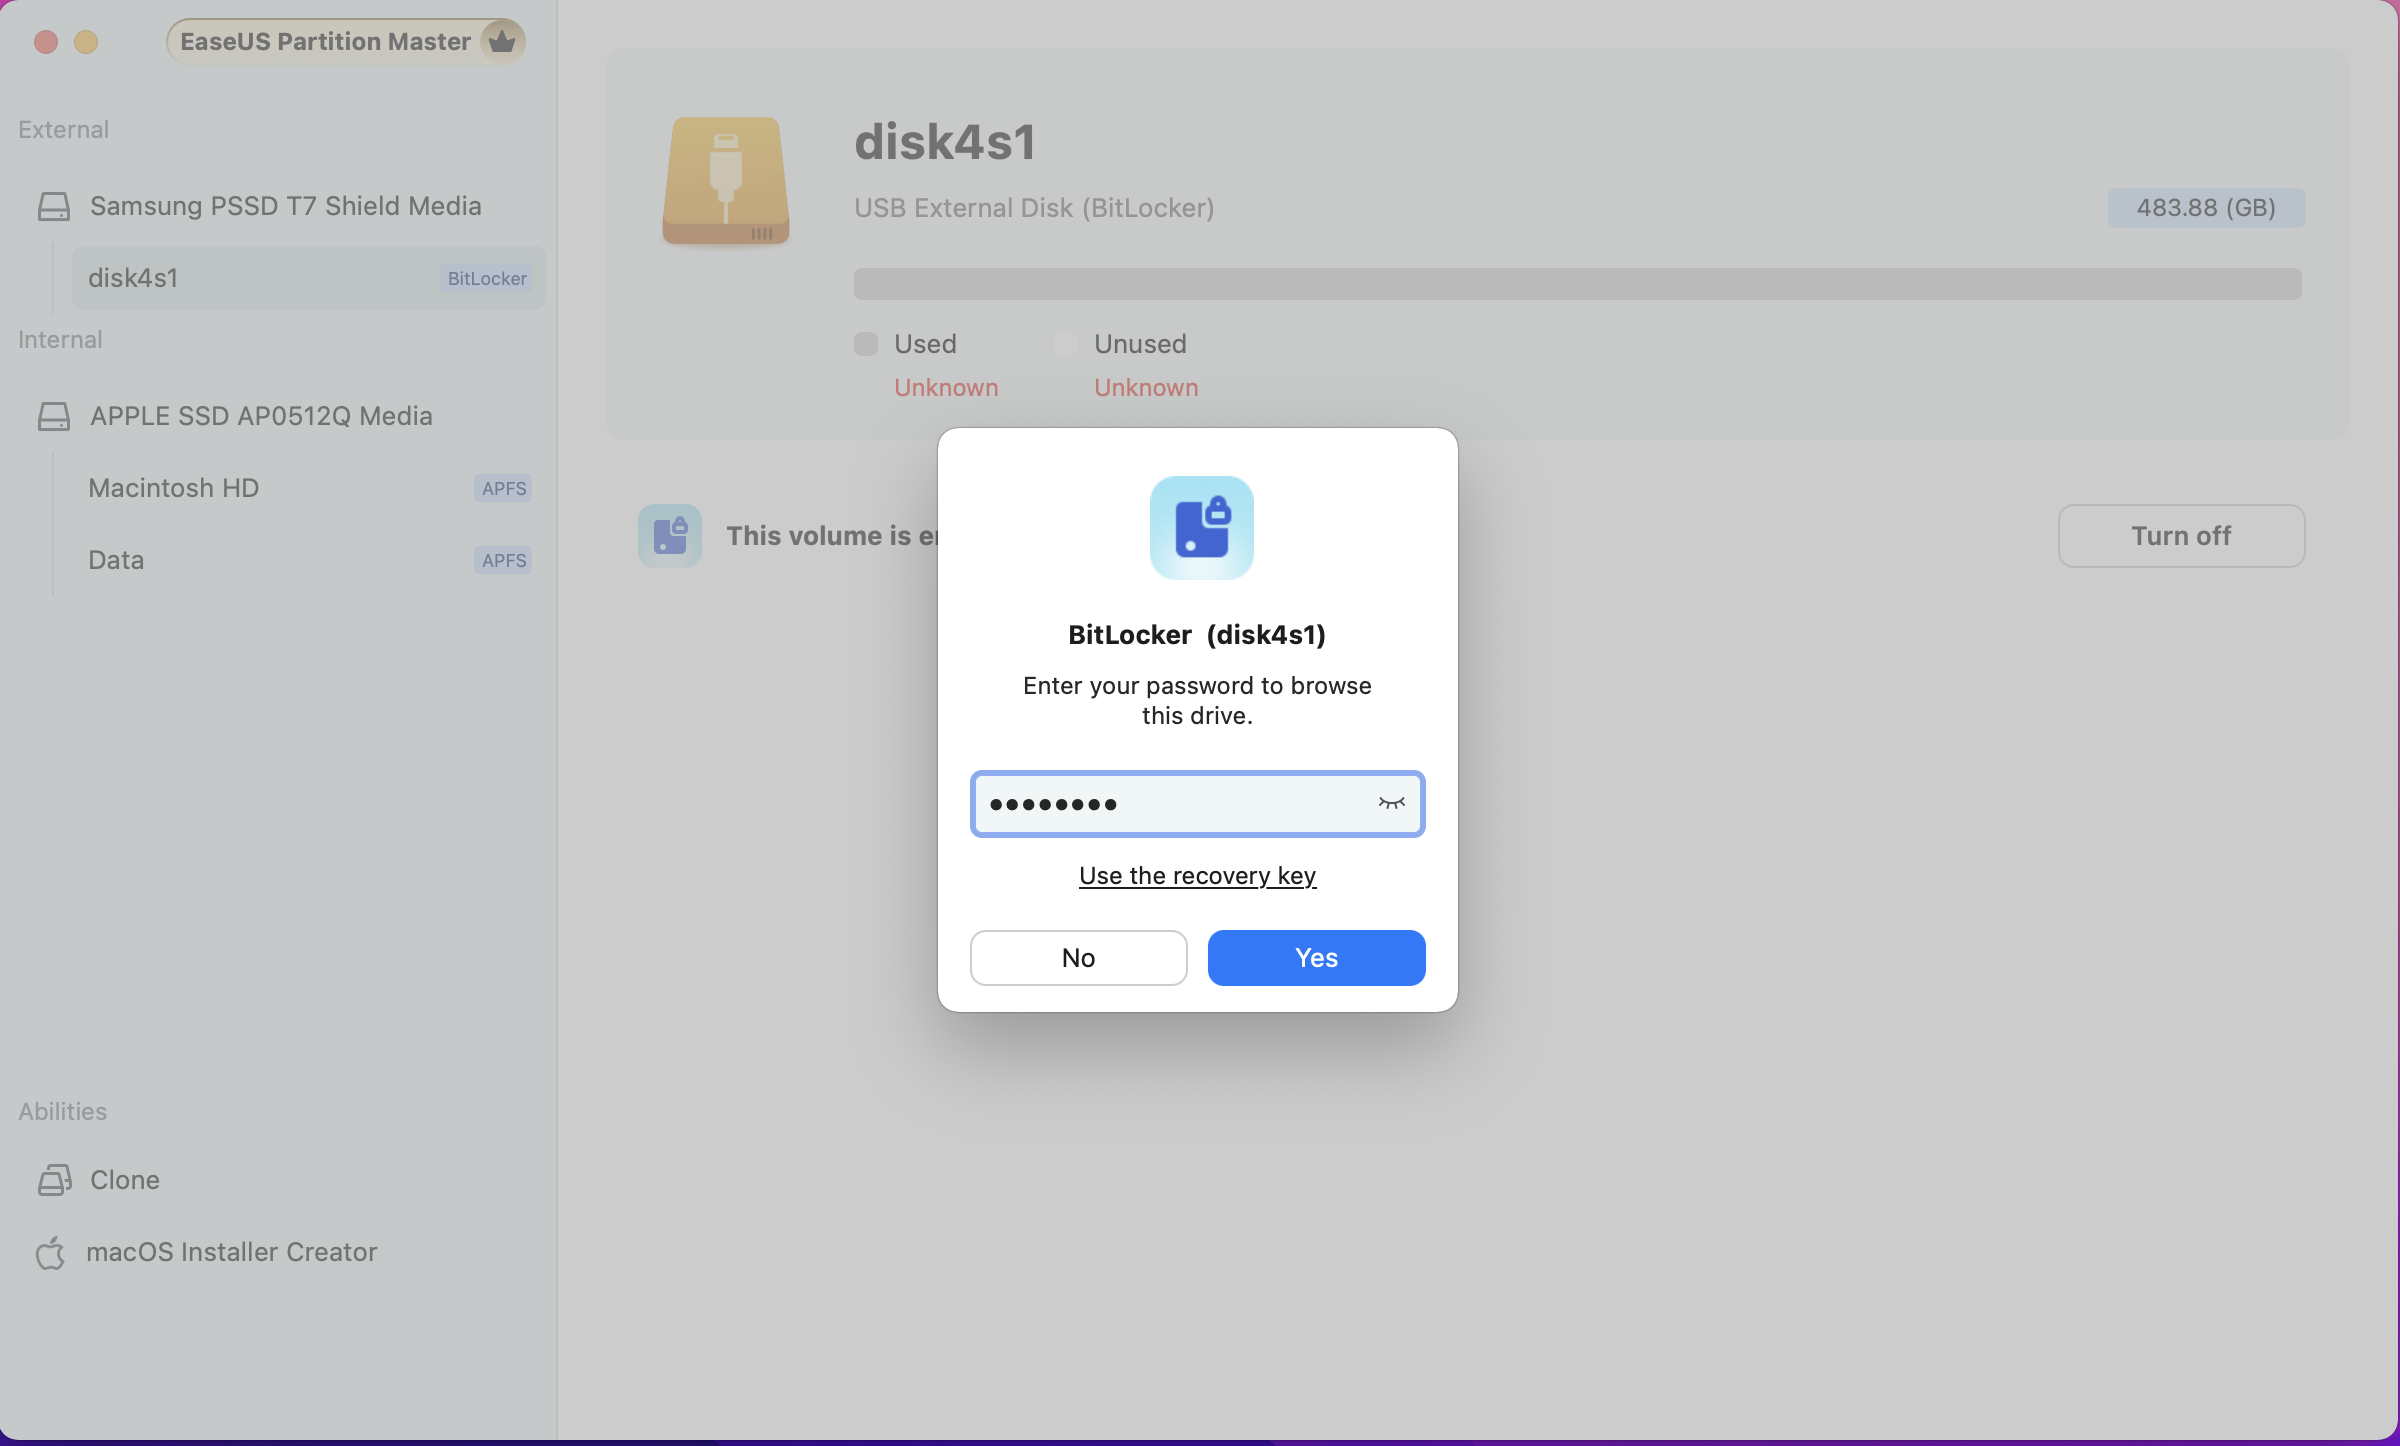
3. The process may take some time and should not be interrupted. Please wait patiently to avoid any potential data loss. When you are prepared, click Confirm to proceed.

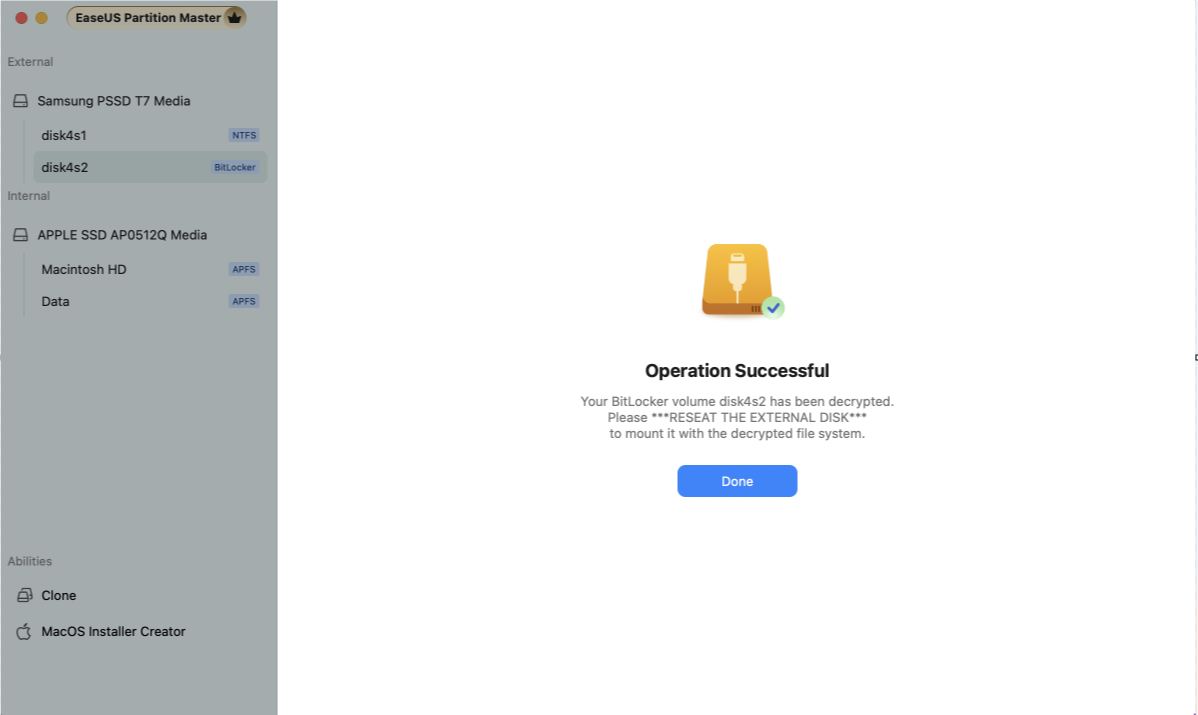
4. Please wait for the process to complete. After turning off BitLocker on the disk, please go to the disk utility to mount it for further use.
Feedback and Support
We invite your comments on how well EaseUS MobiUnlock performed, and we are also enthusiastic about replying to all your questions about using it. Please feel free to contact us at:
[email protected]
We also provide an online chat service and the Live Chat option can be located in the top navigation bar of EaseUS official website www.easeus.com.