Welcome
EaseUS Data Recovery Wizard is an easy-to-use data recovery software that allows you to easily recover lost data from a PC, laptop, hard drive, or USB drive. It has been endowed with a straightforward interface to ensure efficient and smooth use for common users.
This User Manual includes detailed instructions on how to use the program and all the features in this product. Any more questions or problems when using this product, please visit the Knowledge Base. Or contact our 24-hour Tech Support by emailing your issues to [email protected].
Getting Started
This part outlines basic parameters to use EaseUS Data Recovery Wizard. It is to help you acquire a general understanding before you get started.
Hardware Requirements
500 MHz processor or faster
A minimum of 2 GB RAM for Windows
A minimum of 100MB of available space on the hard disk
Keyboard, mouse and other compatible pointing devices
System Requirements
Make sure you are running any one of the listed operating systems:
- Windows XP®
- Windows Vista®
- Windows® 7
- Windows® 8
- Windows® 8.1
- Windows® 10
- Windows® 11
- Windows® Server 2000
- Windows® Server 2003
- Windows® Server 2008
- Windows® Server 2012
- Windows® Server 2016
- Windows® Server 2019
- Windows® Server 2022
- Windows® Server 2025
Supported File System
EaseUS Data Recovery Wizard supports these file systems:
FAT(FAT12,FAT16,FAT32)
ExFAT
NTFS
NTFS5
EXT2/EXT3/EXT4
HFS+
ReFS
Supported Devices
EaseUS Data Recovery Wizard supports the devices below:
Hard Drive
External Disk
SSD
USB Drive
Micro Card
Memory Card
Camcorder
Digital Camera
Music Player
Video Player
RAID
NAS
CF/SD Card
Zip Drive
Pen Drive
Supported File Types
EaseUS Data Recovery Wizard supports common recovery jobs of all file types. However, in some specific cases, the file system directories/indexes are damaged, which means the files can only be found from the content part of a partition. And files detected in this way are all known as RAW files.
Since not every file type shares the same file structure and identifier (which our product uses to locate a lost file and rebuild it as a RAW), only a certain group of common file types can be retrieved as RAW files.
In short, for a partition that contains badly damaged or corrupted file directories/indexes, some very unusual file types cannot be recovered by our product.
Activation
You can effortlessly find the "key" icon situated at the top right corner of the product's home page. Simply input your unique 25-character code, obtained upon purchase, then click the Activate button to transition your trial/ free version into the Pro version.
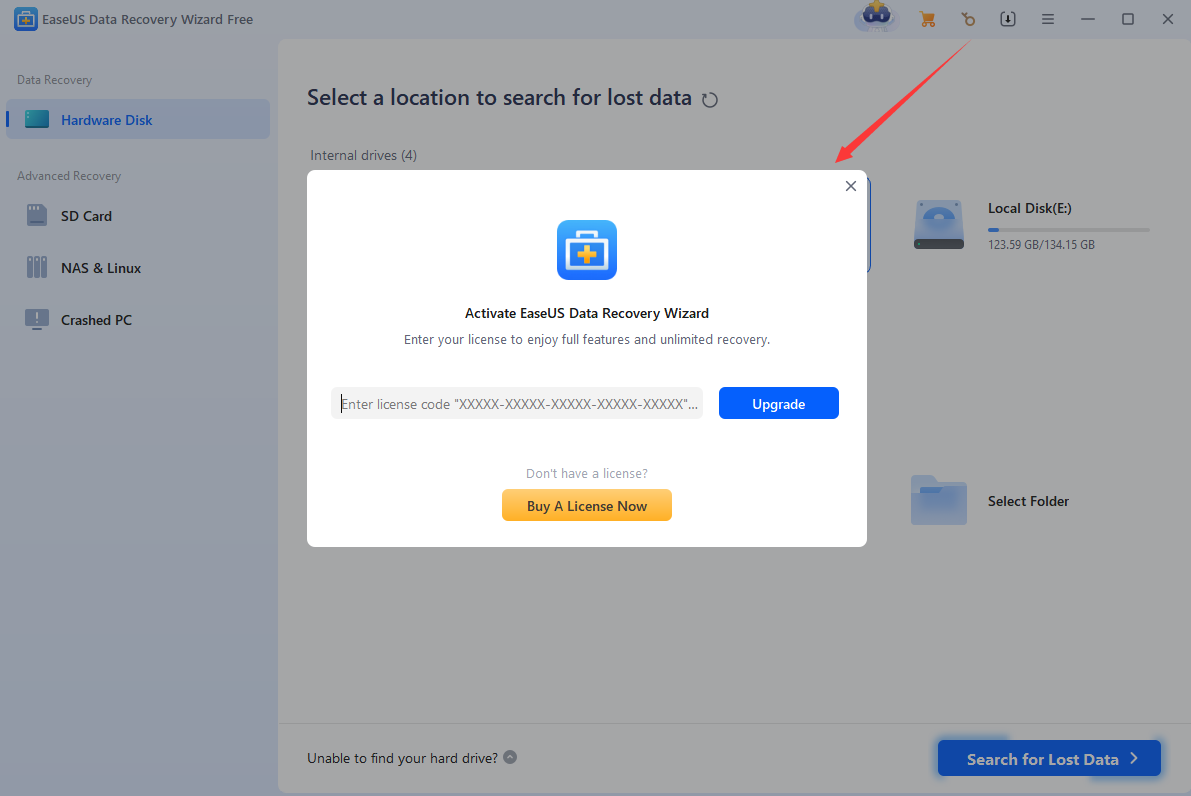
In case you don't possess a license code, you may click on the option for Buy A License Now or click the "shopping cart" icon to purchase one.
Choose Scan Target
The first step in Windows PC data recovery is to choose a device. EaseUS Data Recovery Wizard provides 4 options: Hardware Disk, SD Card, NAS & Linux, and Crashed PC recovery.
Hardware Disk Recovery
In Hardware Disk Recovery, the internal drives of your Windows machine and all external devices connected to it are displayed on the screen. Simply select the disk from which you need to recover data and click the Search for Lost Data button to start the scanning process.
However, if the files were lost due to partition loss or deletion, please locate a proper Lost Partition with a similar capacity to proceed.
If you know the precise location from which the files were lost, such as the Recycle Bin, Desktop, or a specific folder, you will make the data retrieval more efficient.

Here are some helpful tips during the recovery process:
1. Save time by loading previously saved sessions instead of re-scanning the device.
2. Refresh the list of hard drives to include any newly added devices, or if the partition you want to scan is not listed.
3. The Lost Partition area is only visible if you have lost or deleted partitions on the same computer before.
4. If the device from which you wish to recover data is not listed or you want to scan the entire disk, please click on "Unable to find your hard drive".

Tips:
If you are unable to locate the related partition or hard drive, we recommend checking Windows Disk Management to confirm whether Windows can recognize it or not.
It is crucial to ensure that the connection of the target partition or hard drive is stable to avoid the process from hanging up or the files found being 0KB in size.
In the case where the lost data is on the System partition, we advise disconnecting the system hard drive and connecting it to another computer for lost file recovery. Alternatively, you can use EaseUS Data Recovery Wizard Bootable Media to execute a recovery.
SD Card Recovery
For optimal data recovery of photos and videos from your camera devices (such as Canon, Nikon, Panasonic, GoPro, DJI, and more), we recommend selecting the SD Card Recovery option. This algorithm is specifically optimized to provide a higher quality of recovery.

Tips:
If the related partition or hard drive cannot be located during the recovery process, check if Windows OS recognizes it by navigating to Disk Management.
It's crucial to ensure that the connection of the target partition or hard drive is stable. Otherwise, the process may hang up, or the files found could be of zero size.
Scan Process
A complete scan of EaseUS Data Recovery Wizard is comprised of three segments: Local disk, File Path Lost, and Reconstructed.
Local disk - searched within the file system with a quick scan.
File Path Lost - files that were found with Advanced Scan, but the file path was fully or partially missing. Although the file path is incomplete, it's possible that they are the lost files you want to recover.
Reconstructed - there are some files whose original name cannot be retrieved, but they are likely to be the files you want to recover.
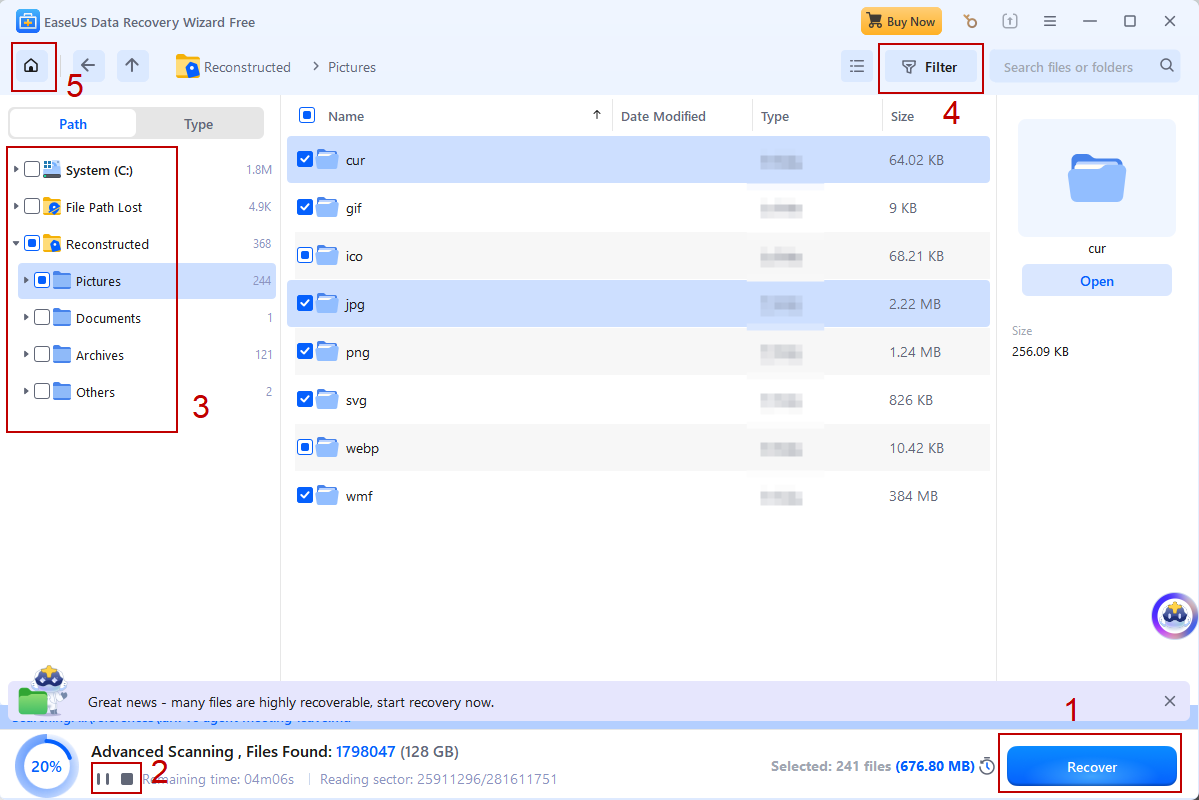
While it is recommended to wait patiently for the scan to finish, there are several options available to help ease the recovery process ahead of time.
1. Our product updates the scan result panel in real time, allowing you to save confirmed files even while the scan is still processing. The total number and size of selected files are displayed to facilitate proper device selection for saving files.
2. A Pause/Stop button enables you to suspend the scan process if you have other important tasks to attend to or if you have already found all the files you need.
3. You can fold and unfold file trees by clicking on the title bar, making it easier to find desired files in these folders.
4. Filter the scan results to pinpoint the desired files more accurately.
5. Click the Home button anytime to return to the Home window.
Search Lost Files
After completing a full scan, there may be thousands of files listed. Even though they are sorted into various categories, it can be a daunting task for users to locate the specific files they need among such a massive volume of files. Therefore, we recommend some effective techniques that can considerably reduce the number of files you need to search through.
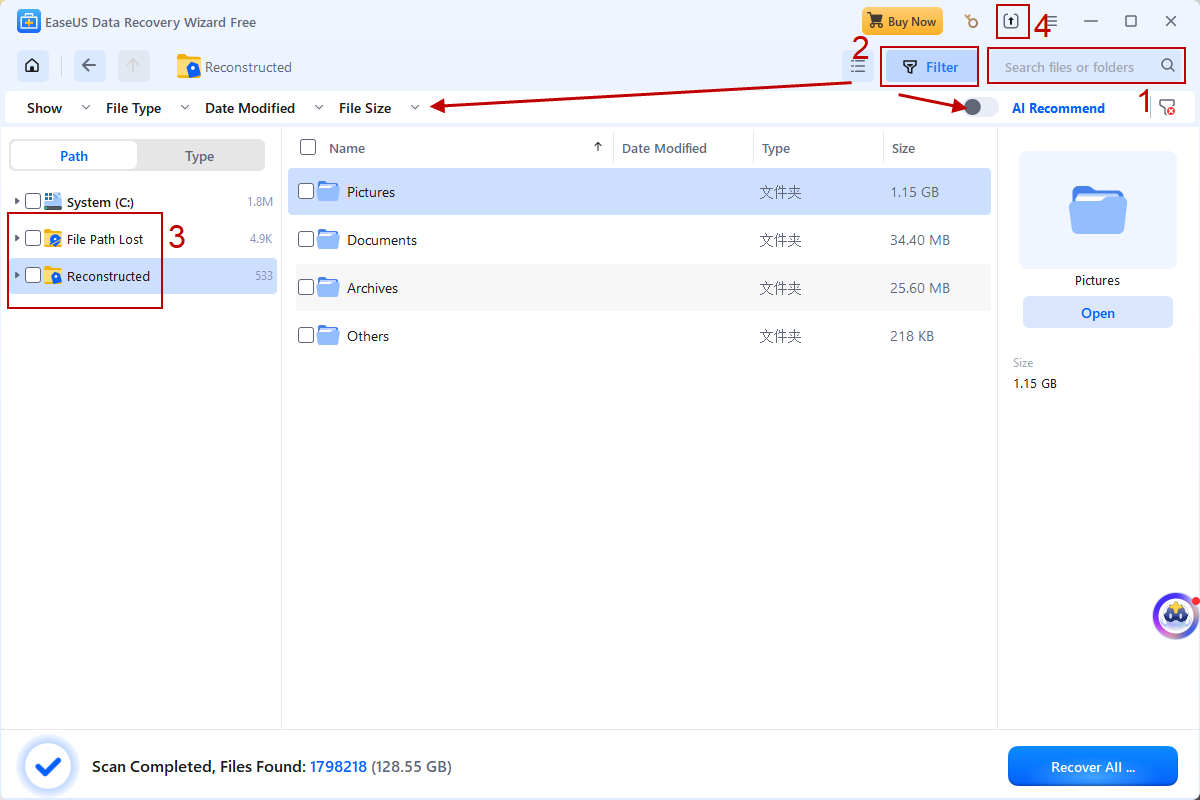
1. If you still remember part of the file name or need to search for a specific file extension, simply enter the keyword in the search box to display related files only.
2. For more precise results, you have the option to filter the scan results to show only specific file types, dates, sizes, etc, or activate the Lost Files Only feature to further refine your search.
3. The "File Path Lost" and "Reconstructed" folders contain a large number of RAW files that were recovered from the content part of a partition. Although they do not retain their original file names, sizes, paths, or timestamps, they are still worth reviewing.
4. If the amount of data found is too large to recover at once, you can use the Save Scan Session option to export the scan results and import them later, avoiding the need for a new scan.
Tips:
Certain files, such as Videos, Audio, Pictures, and Documents, can be previewed before being saved.
In cases where files are lost due to partition loss or becoming RAW, users must first recover all files in the partition before rebuilding the partition with the recovered files. Our product does not offer a direct way to rebuild the partition.
AI Assistant
EaseUS Data Recovery Wizard now features an AI Assistant floating ball that appears during the scanning process. Click on the floating ball to access intelligent AI-powered features that help you recover data more efficiently and accurately.
All AI processing runs entirely on your local computer: the AI Assistant never connects to the internet, never calls any external large language model, and never collects or uploads any of your data, so your privacy and files stay fully protected.
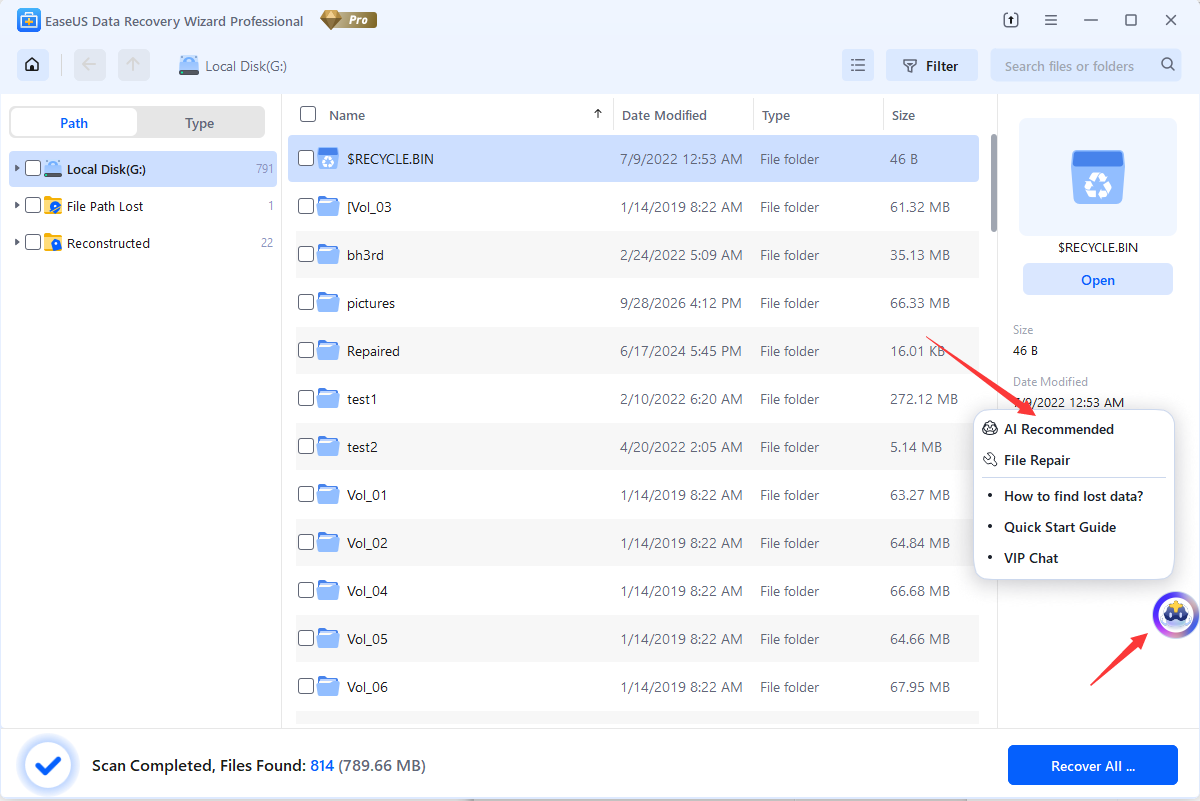
AI Recommended
AI Recommended provides intelligent file filtering and prioritization during scanning to help you quickly find the most valuable files to recover.
During the scan, AI Recommended displays the scanned areas in real time, giving you visibility into the scanning progress.
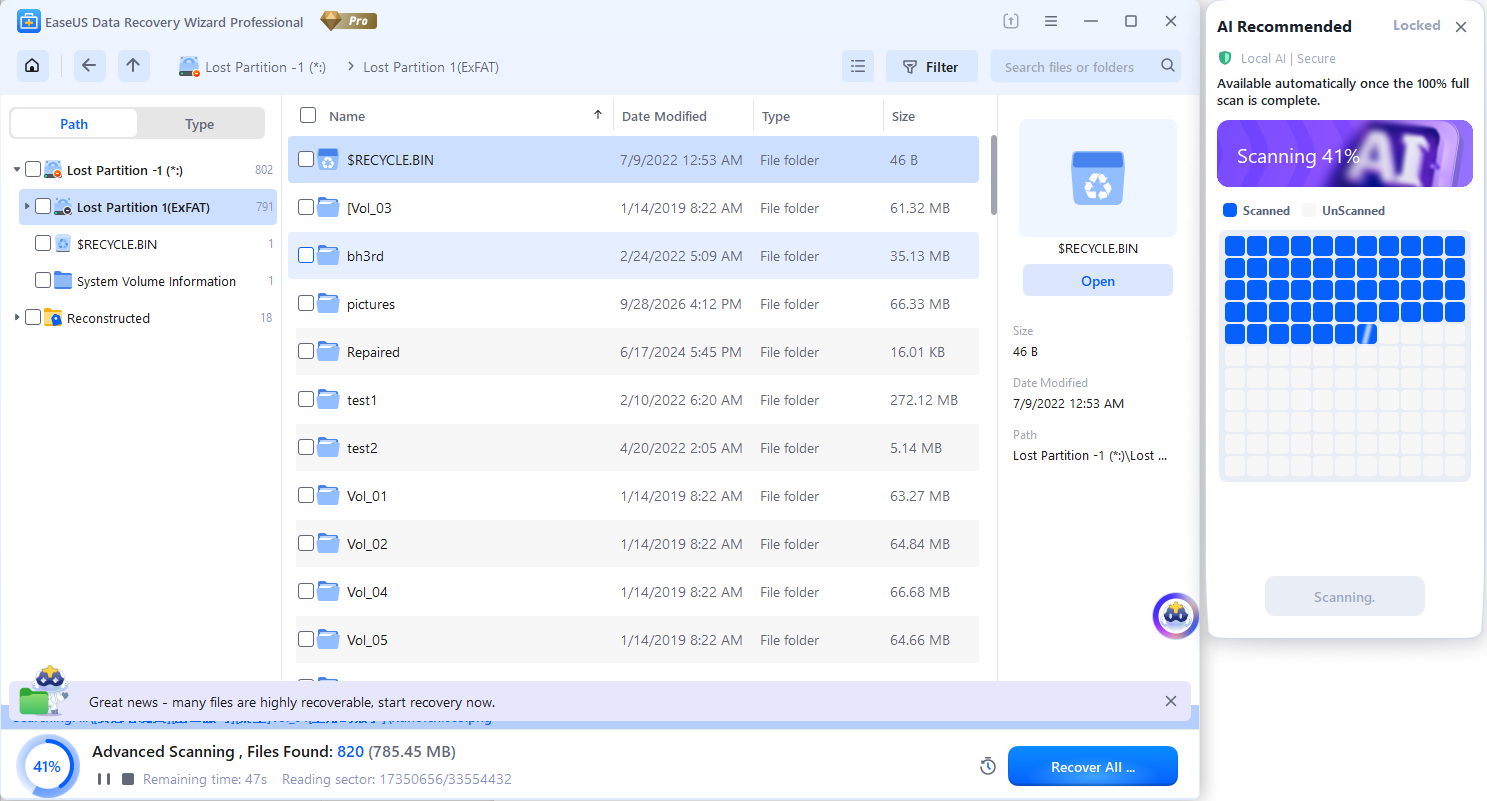
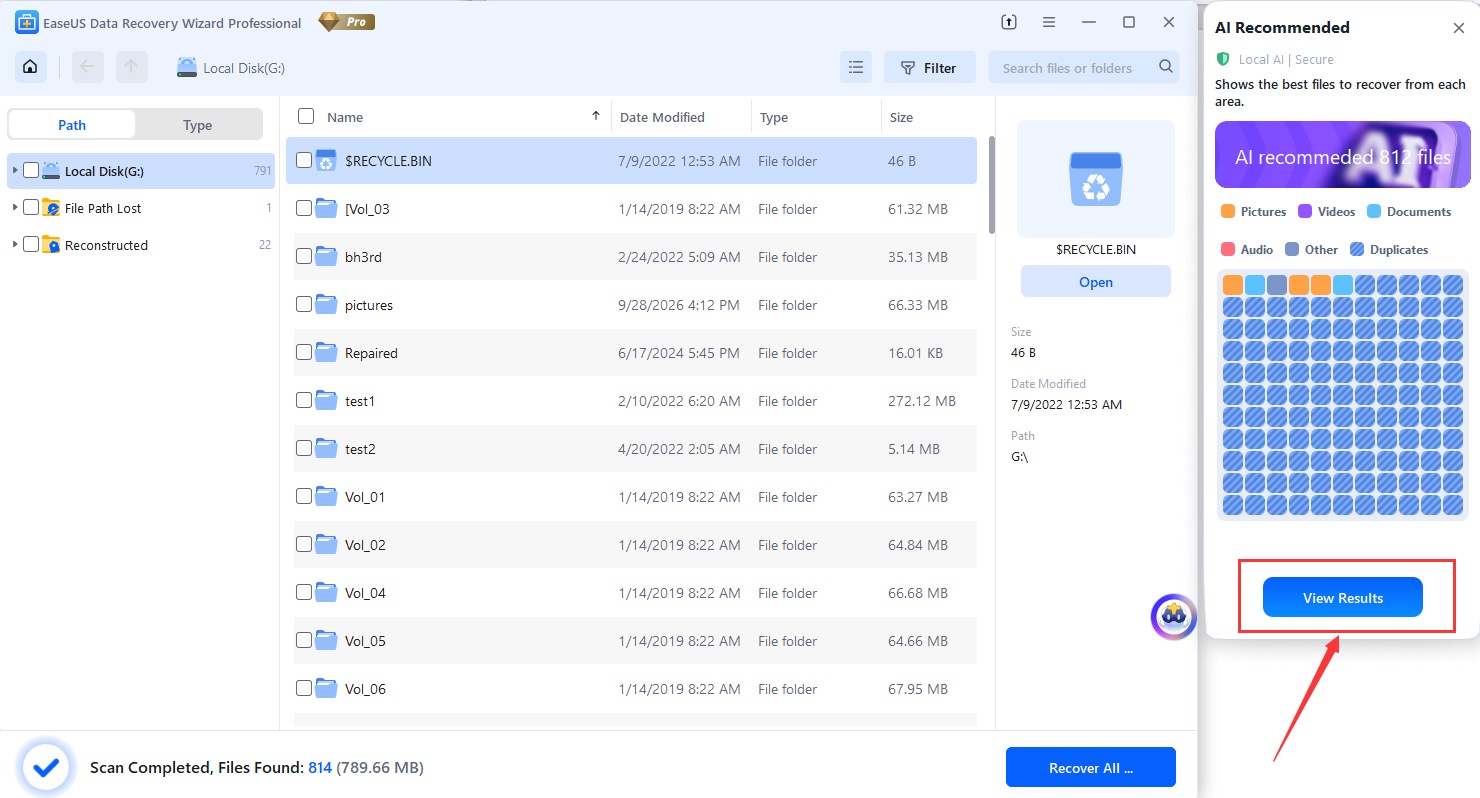
When scanning stops or completes, it automatically begins local analysis to evaluate each scanned area.
Highlights files most worth recovering in each scanned area, making it easier to prioritize important data.
By default, hides 0 KB files, system files, temporary files, and browser cache files to reduce noise.
Users can disable the filter at any time to view complete results if needed.
Smart Select
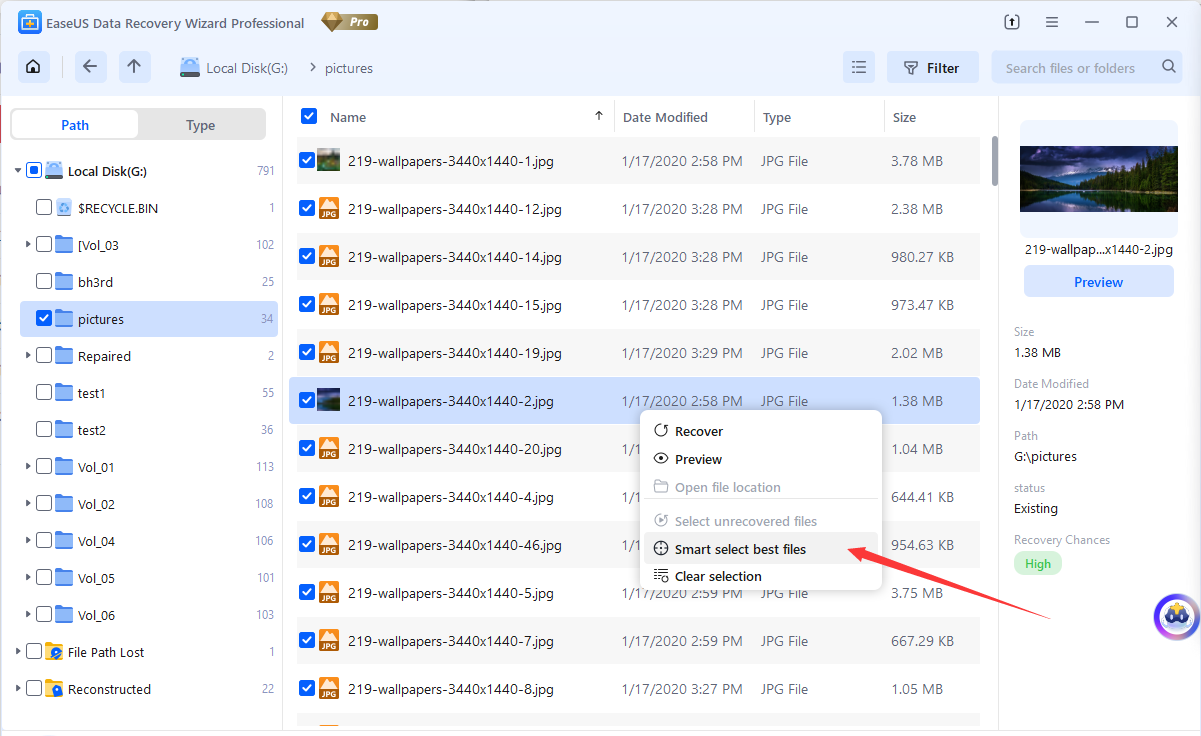
Smart Select is a convenience feature available in the right-click context menu, designed to reduce the time spent manually selecting files one by one.
It automatically selects files with higher recovery potential in the current area, based on AI analysis.
Usage Requirements:
Available only after AI Recommended analysis is complete for the current area.
"Good files" are primarily selected based on high recoverability scores determined by the AI engine.
Reduces the cost of checking files one by one and avoids the hassle of selecting duplicate results.
Partition Recover
When the AI Assistant detects a lost partition that has no conflicts and can be safely recovered, it will recommend recovering the partition directly.
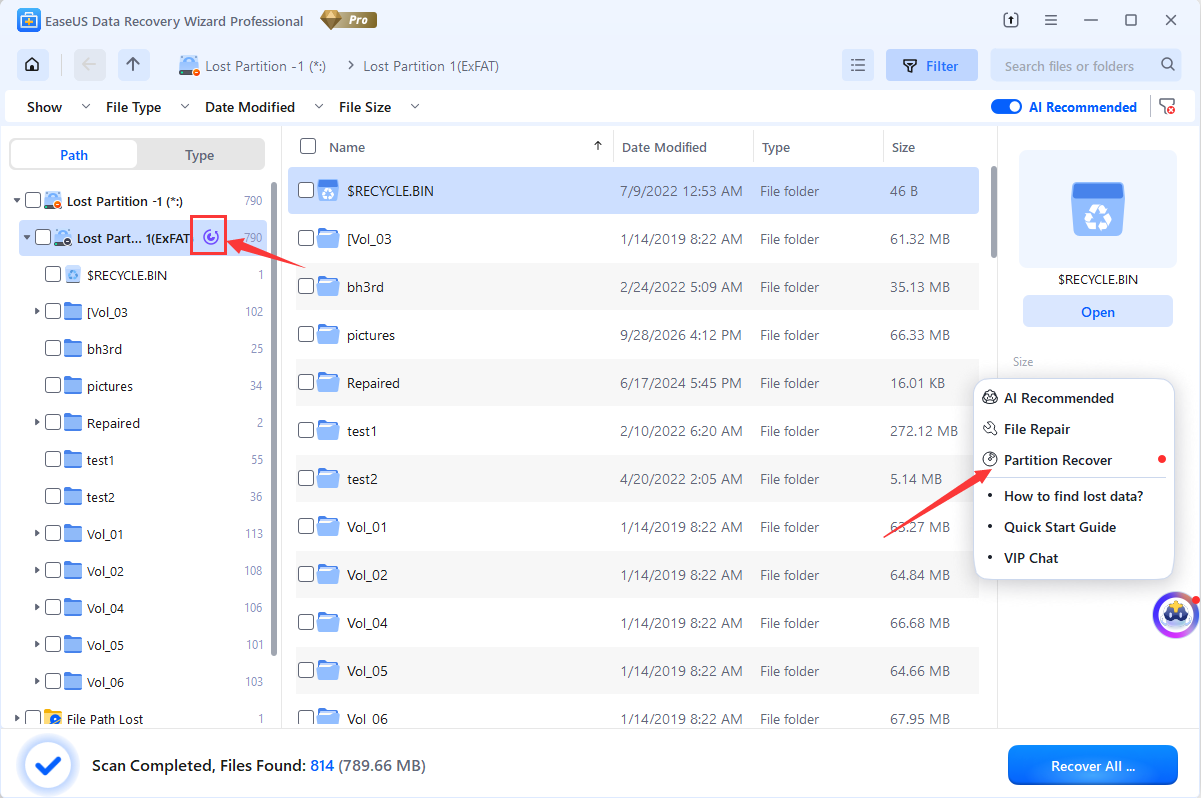
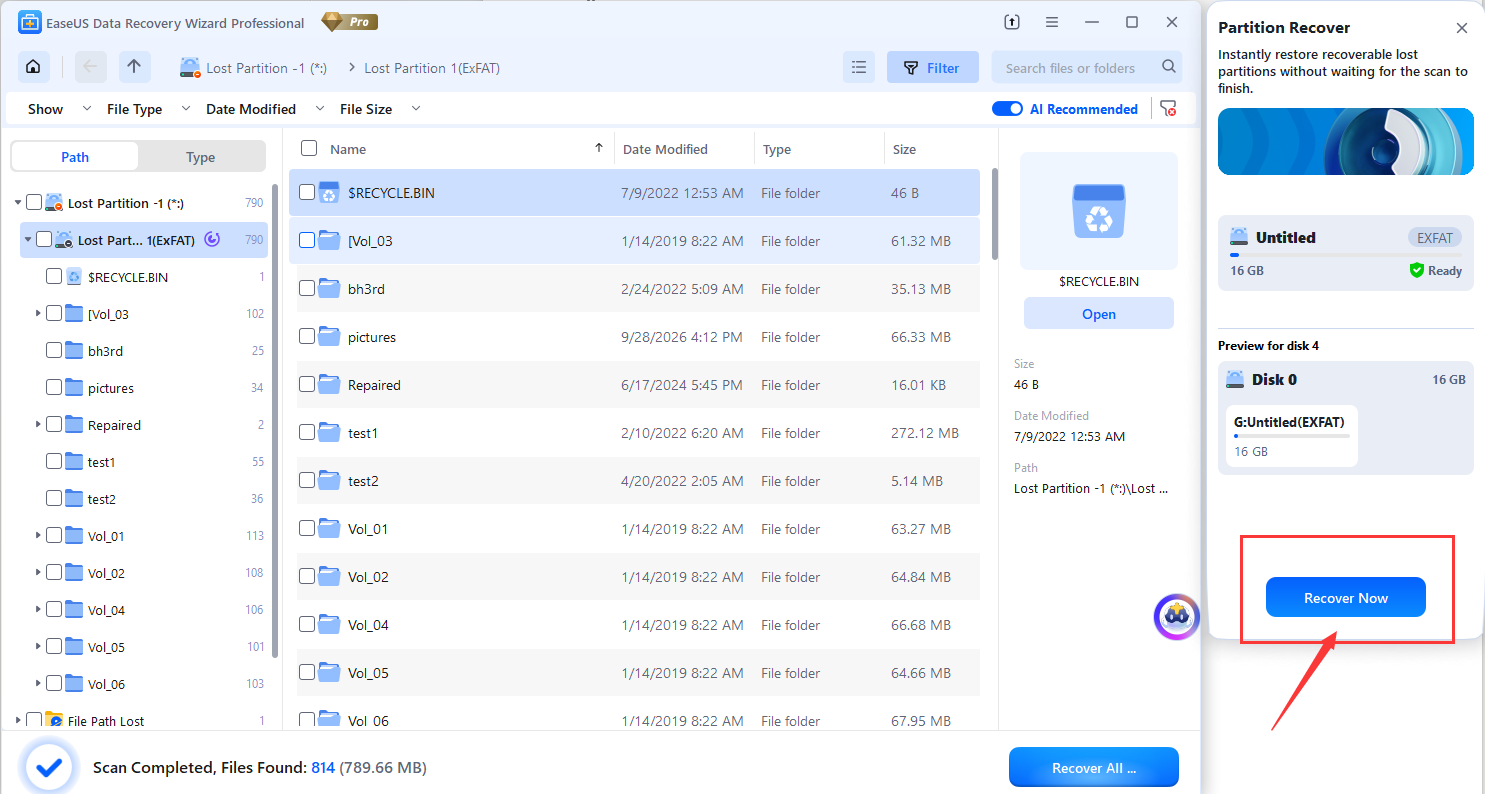
After the partition is recovered, it can be accessed immediately, allowing you to browse and select files for recovery with full path and folder structure intact.
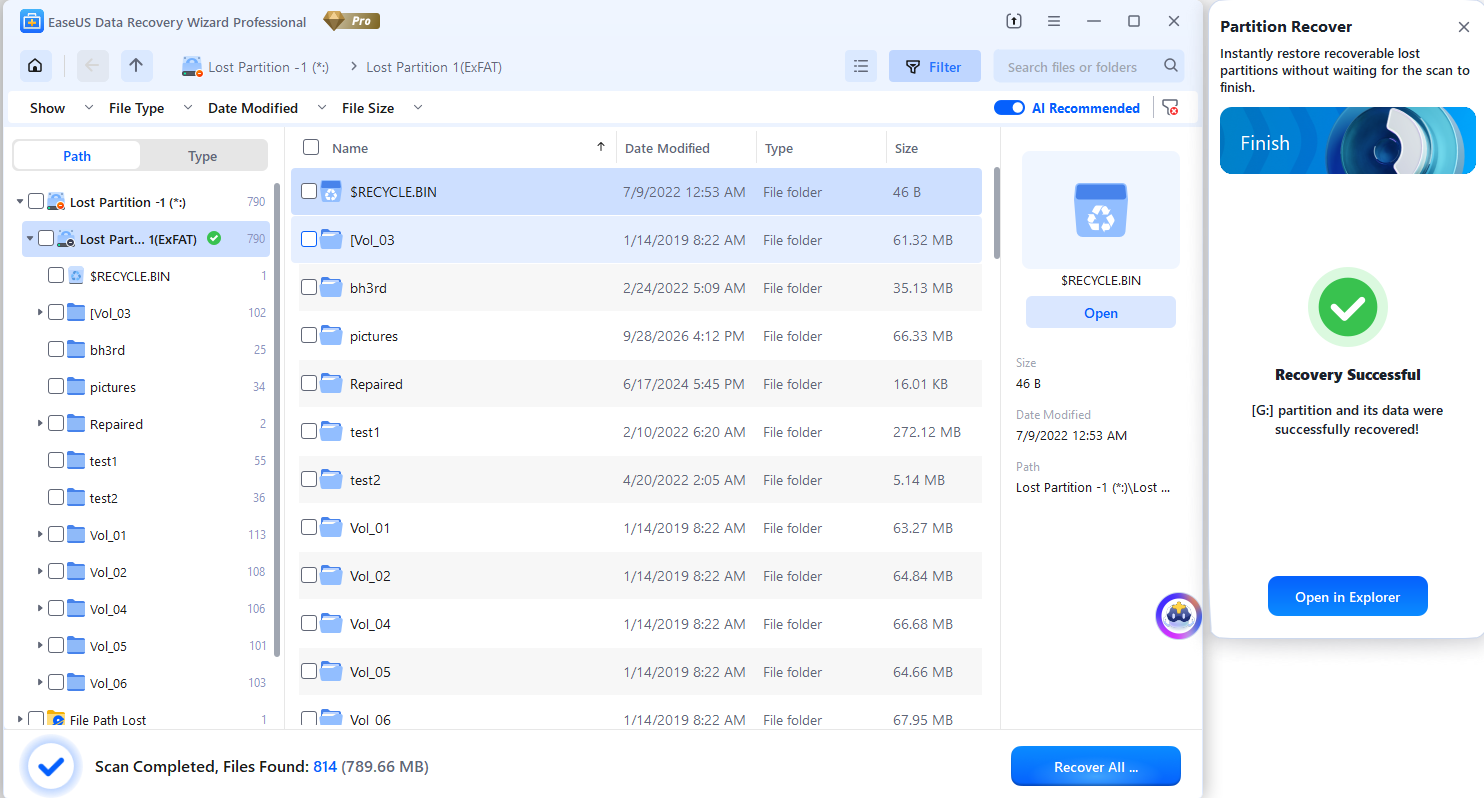
The AI Assistant evaluates the following before recommending partition recovery:
Detects lost partitions that are not currently visible in the file system.
Verifies that the partition has no conflicts with existing partitions on the disk.
Confirms that the partition can be safely recovered without risking data on other partitions.
Recommends direct recovery when all conditions are met, streamlining the partition recovery process.
File Repair
If a recovered file cannot be opened after recovery, you can use the File Repair option in the AI Assistant to repair it.
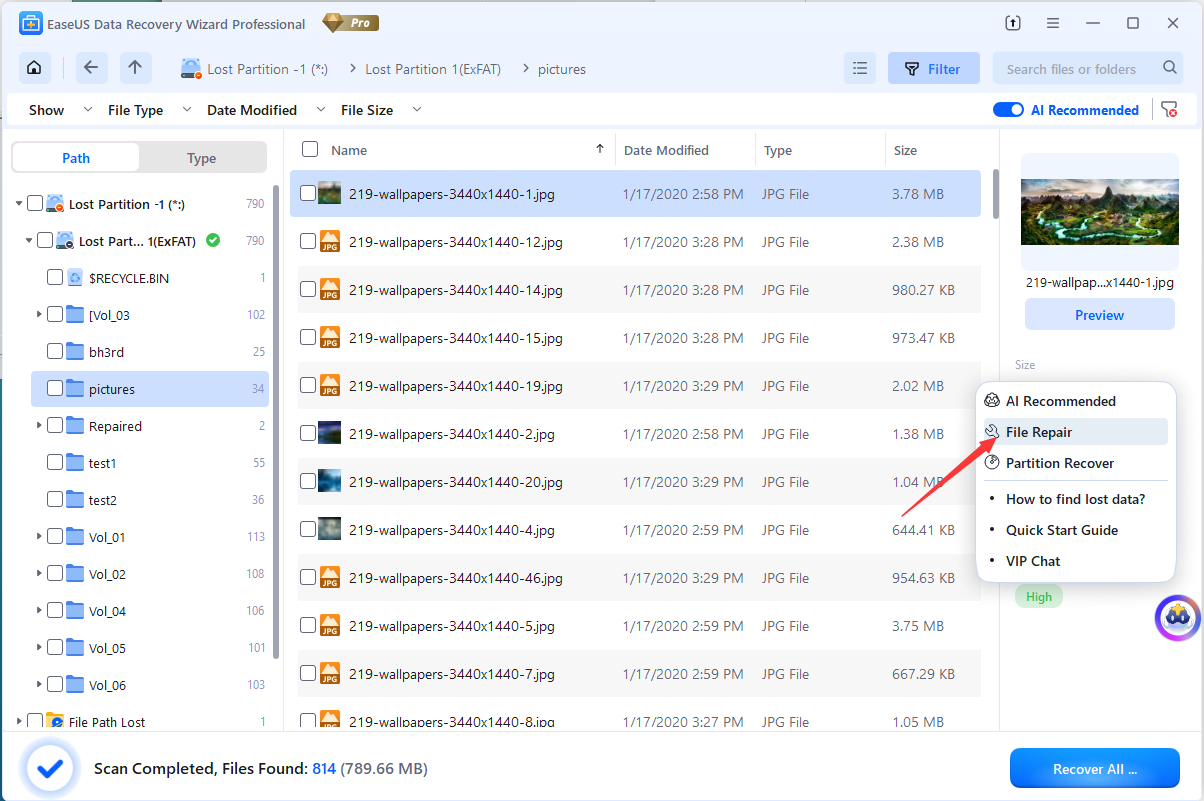
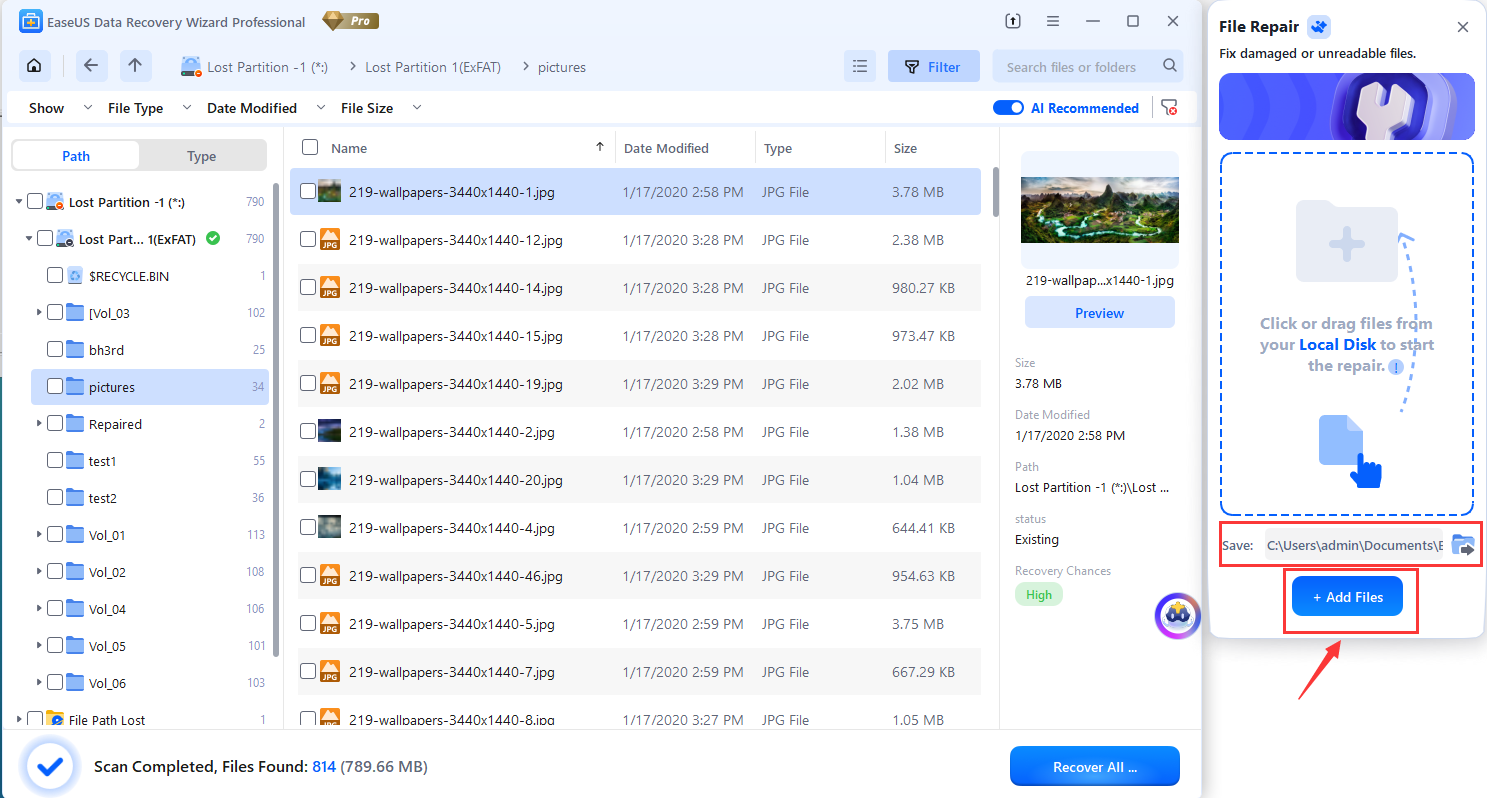
Click Add Files to add the files that cannot be opened into the repair list.
The save location automatically prioritizes drives other than the scanned source drive, so recovered data is never written back to the source disk and causes overwriting. You can also select the save location manually.
More Recovery Tools
Crashed PC Rescue
At times, the computer may experience a crash, rendering it impossible to install the Data Recovery Wizard for retrieval of its files. However, there is an alternative solution to this problem. You can opt to create a bootable USB drive, which will enable you to boot your computer from the USB drive and initiate data recovery. To create bootable media, follow the instructions below.
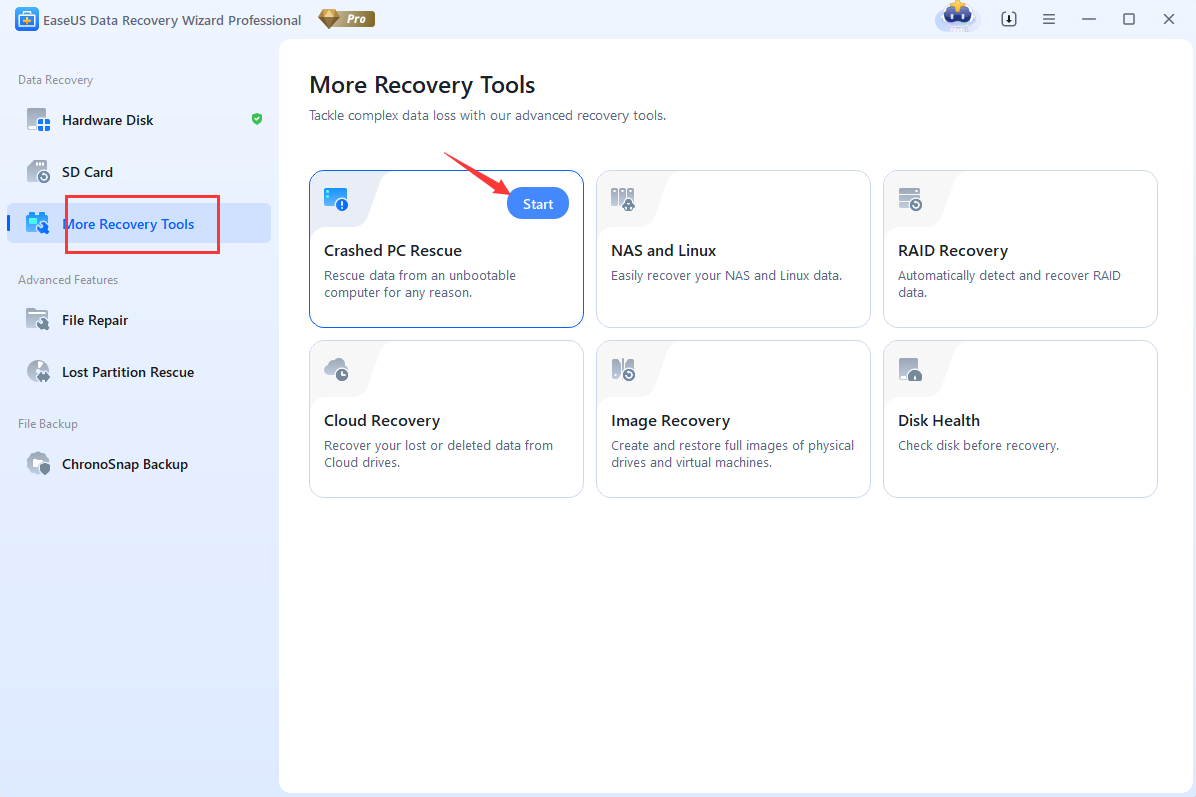
1. To initiate the creation of bootable media, please find Crashed PC Rescue in More Recovery Tools and click on Start.
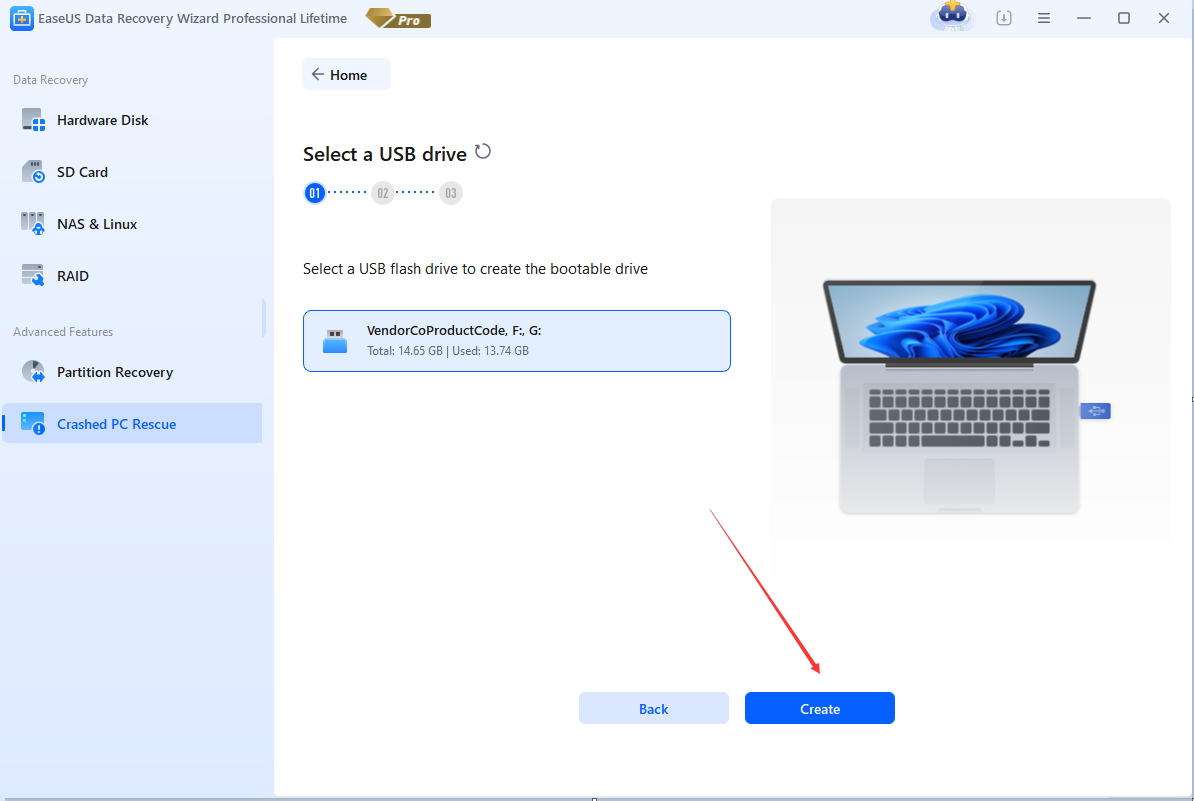
2. Please choose the USB drive and click on Create.
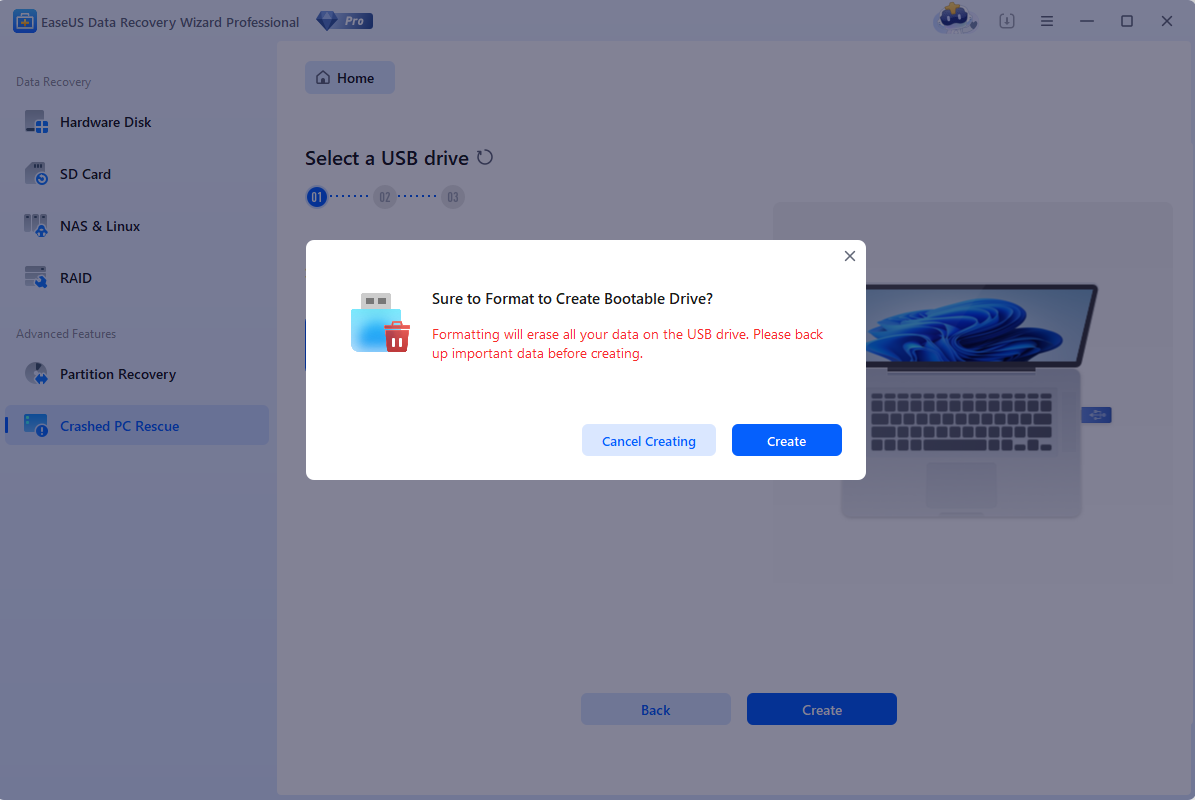
3. Please be informed that the process of creating bootable media will lead to the removal of all the data stored on this USB drive. Therefore, please back up all required files before proceeding, and when you are ready, click Create to confirm.
4. After creating the bootable drive, kindly boot the malfunctioning computer using the bootable USB drive, and proceed with the file recovery process.
NAS & Linux Recovery
Recovering lost files from your NAS and Linux is a breeze with EaseUS Data Recovery Wizard. No need to remove the disk, reconstruct RAID, or shut down the server, just simply select a recovery option to get started.
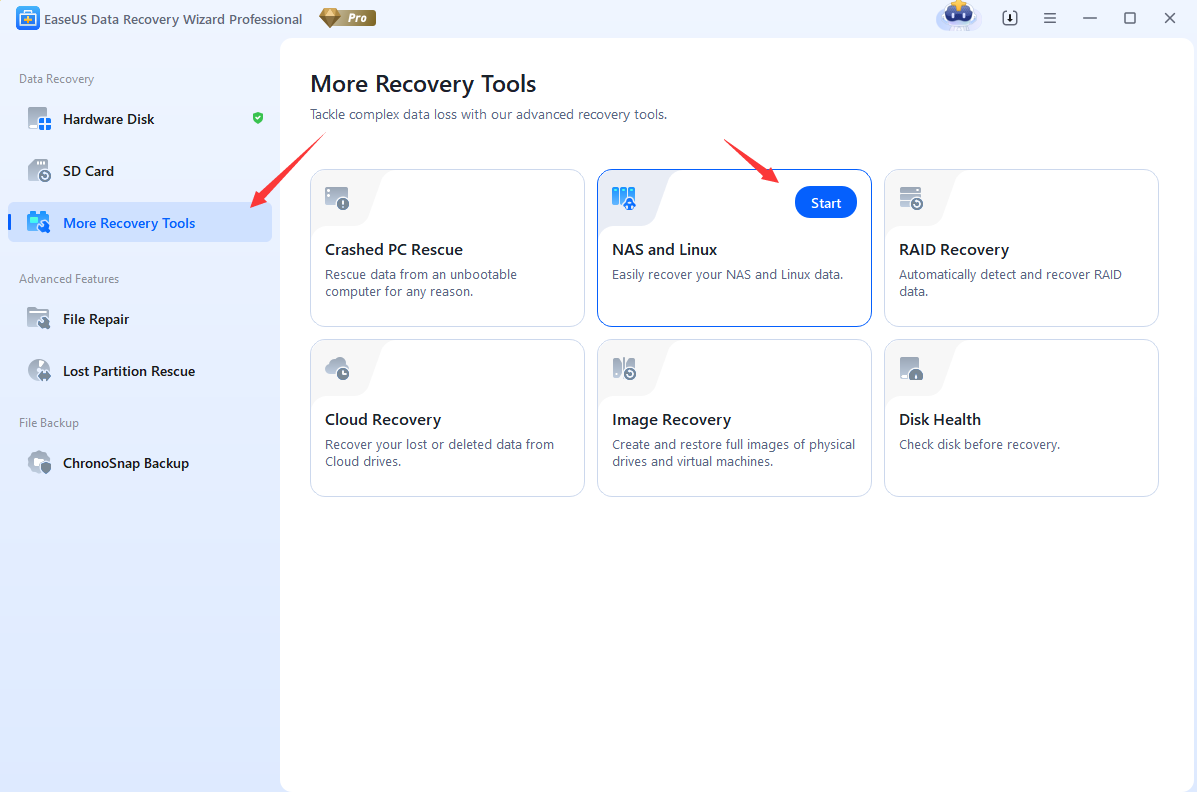
The software automatically detects and lists the NAS/Linux servers. Simply select the correct one and click Recover.
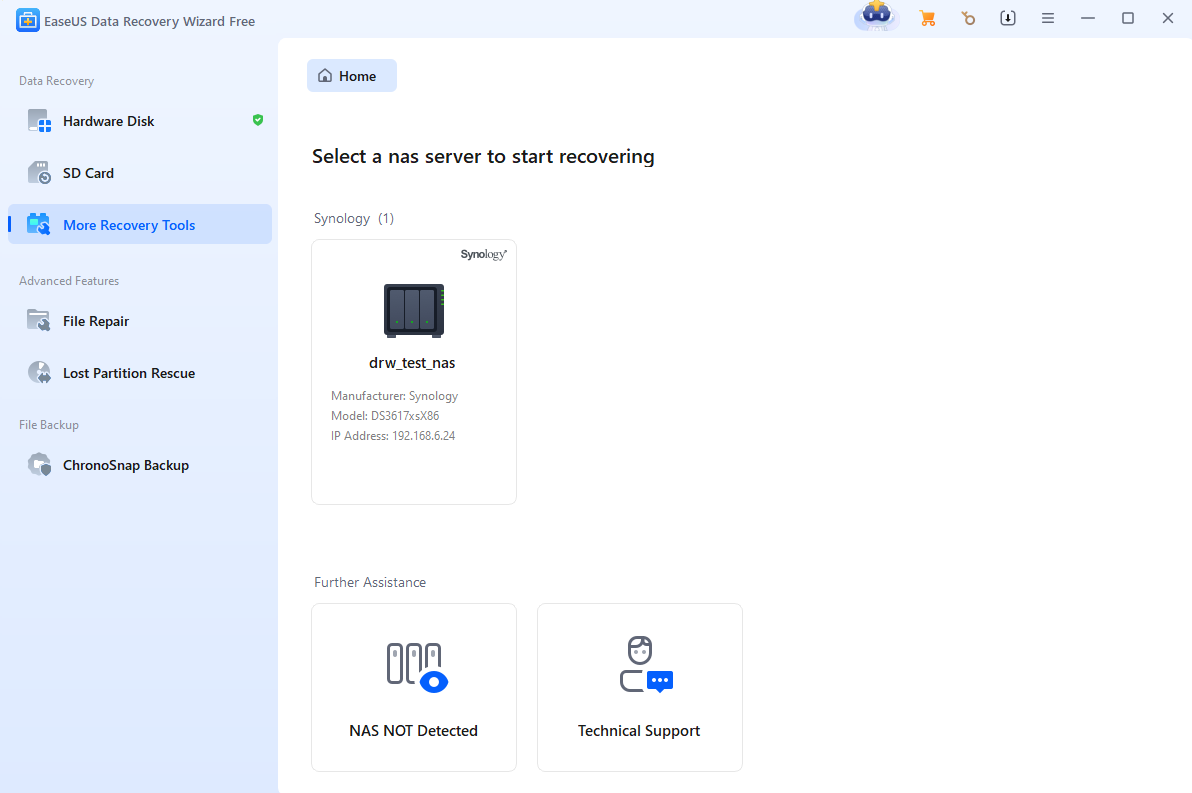
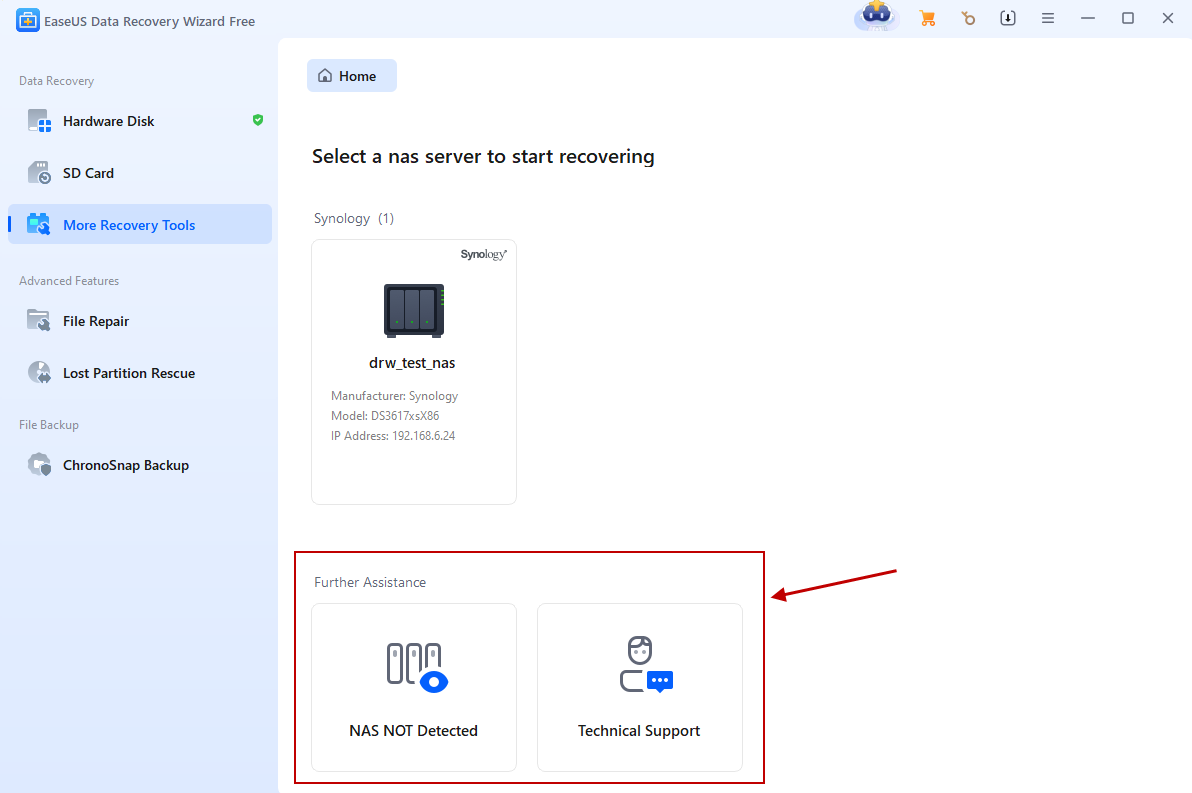
If your device is not listed here, go to Further Assistance->-NAS NOT Detected or contact Technical Support.
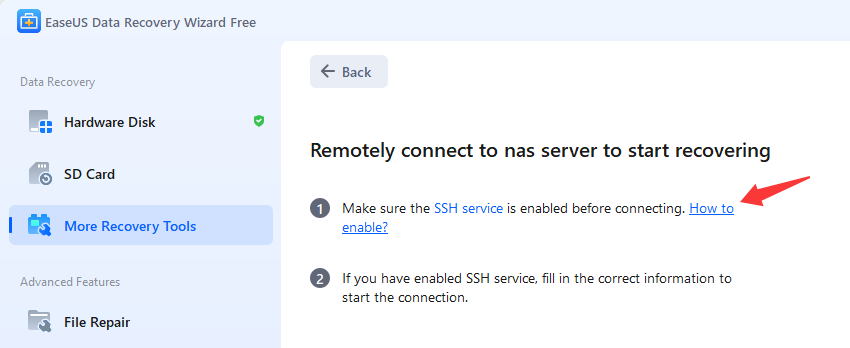
Click on How to enable? and follow the provided guidance to enable SSH or check the port on the server to see if the device will be detected successfully.
Enter the IP address, username, and password, and click Connect Now.
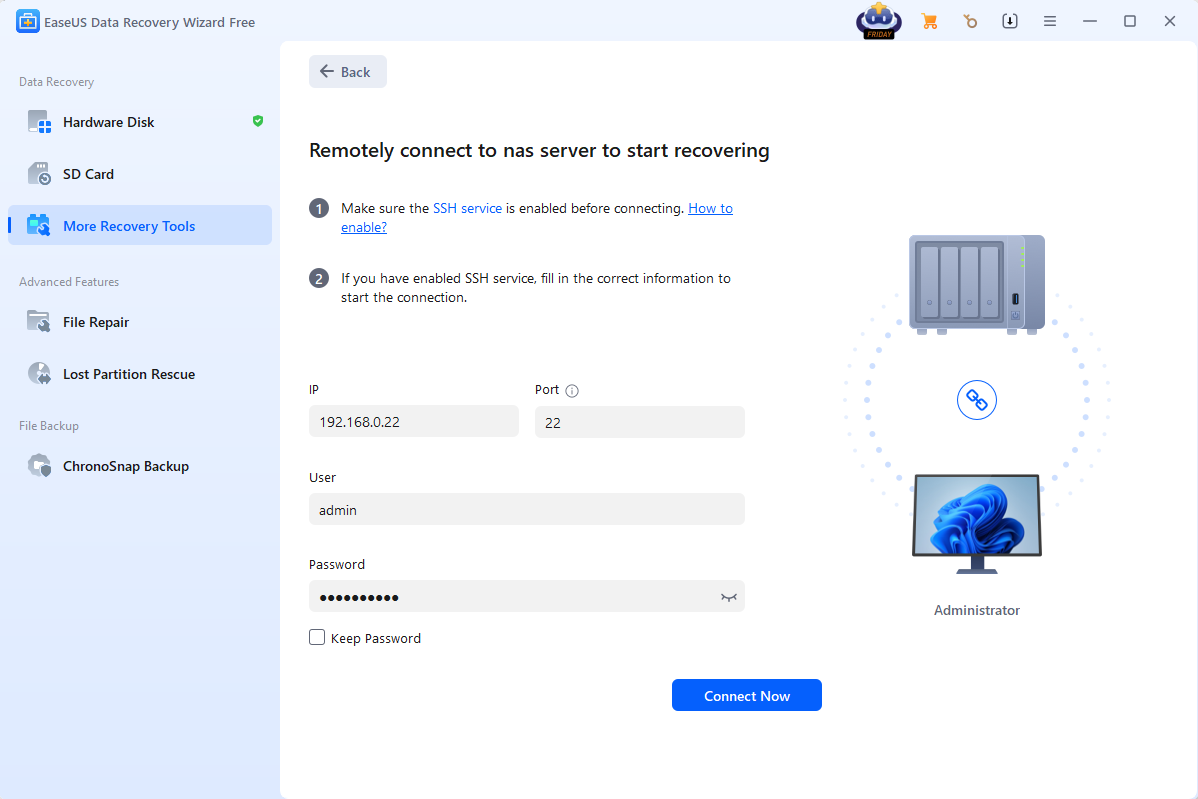
Note: when performing a Linux recovery, an IP address is not required to be filled in by default.
The software will download the necessary module, establish a connection with the NAS server, and start the scan automatically.
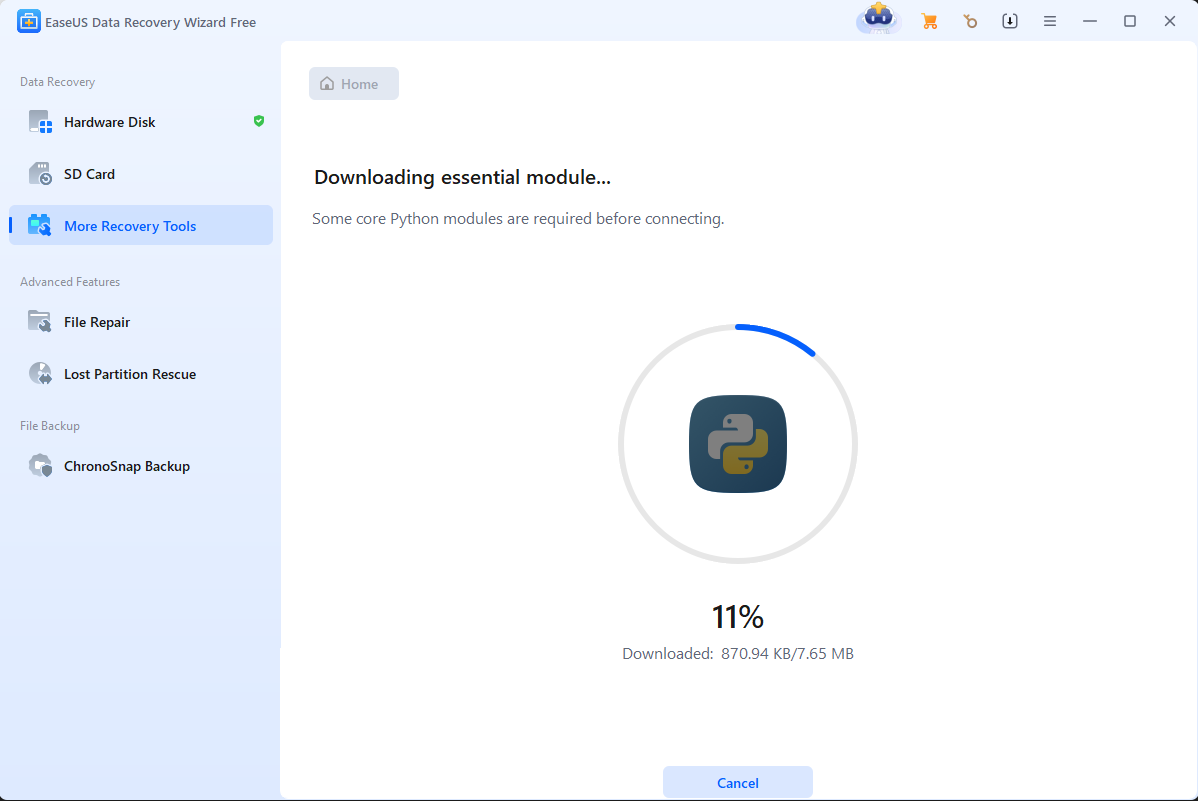
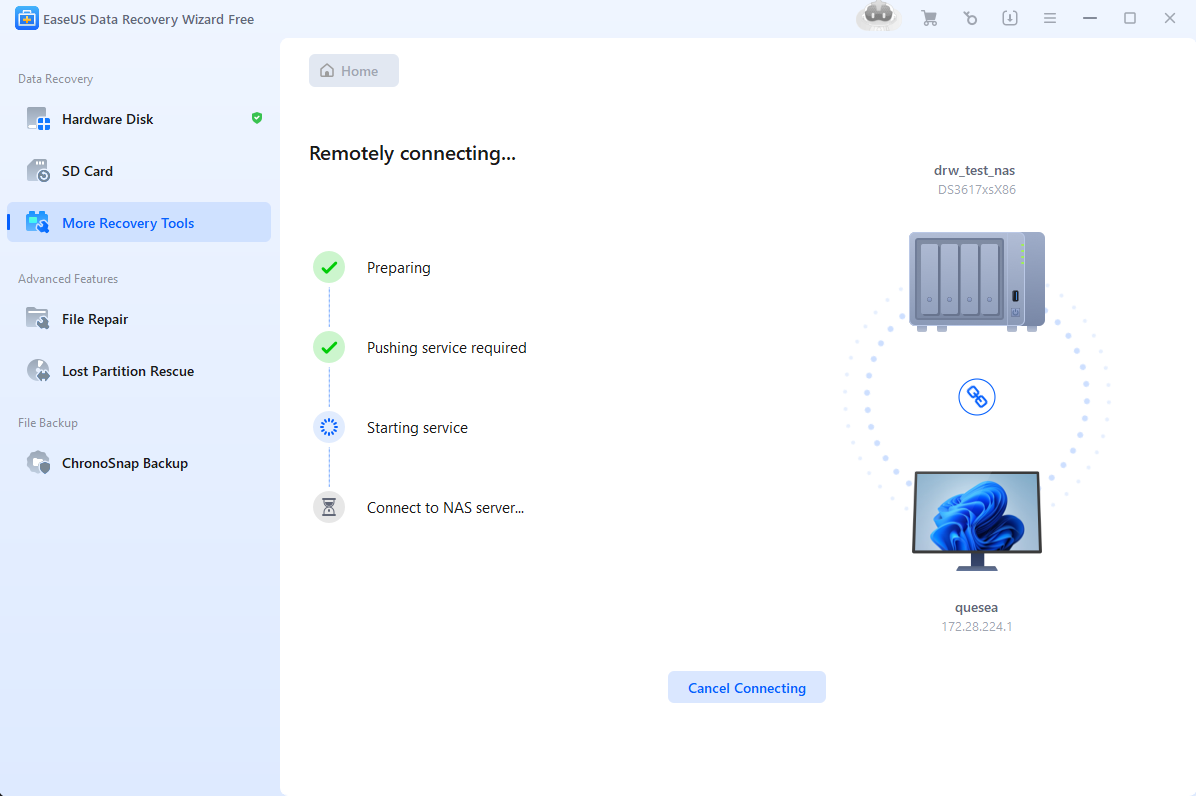
You are also given the option to recover lost data from a specific volume.
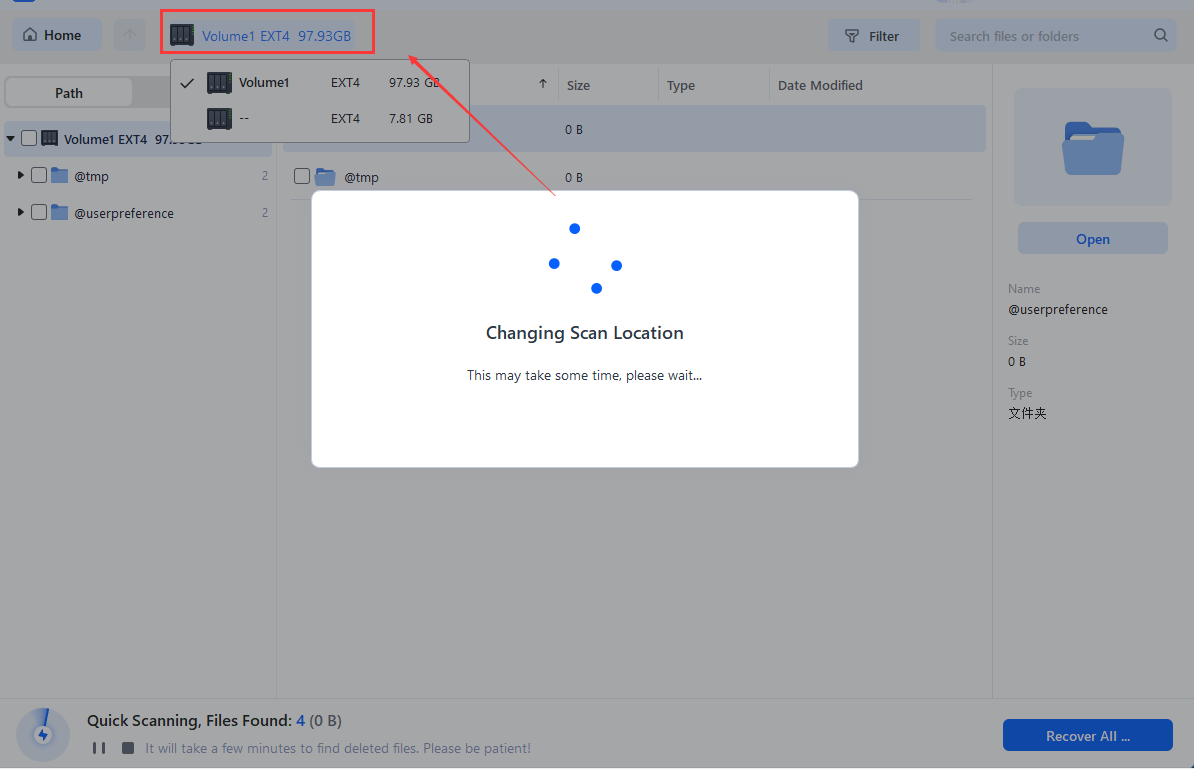
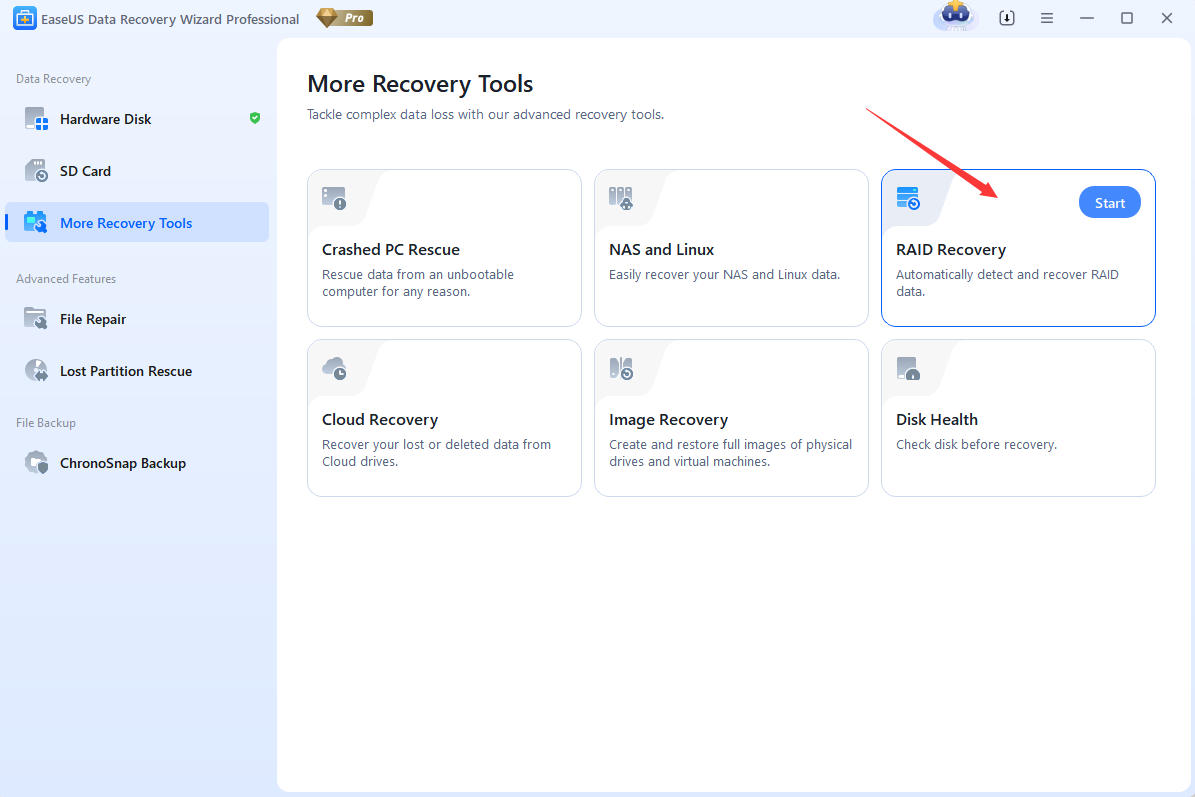
RAID Recovery
EaseUS Data Recovery Wizard makes recovering lost files from damaged RAID simple. If your RAID or NAS structure becomes corrupted, simply connect all the hard drives to your computer. The software will automatically rebuild the RAID structure, enabling you to easily recover your lost files.
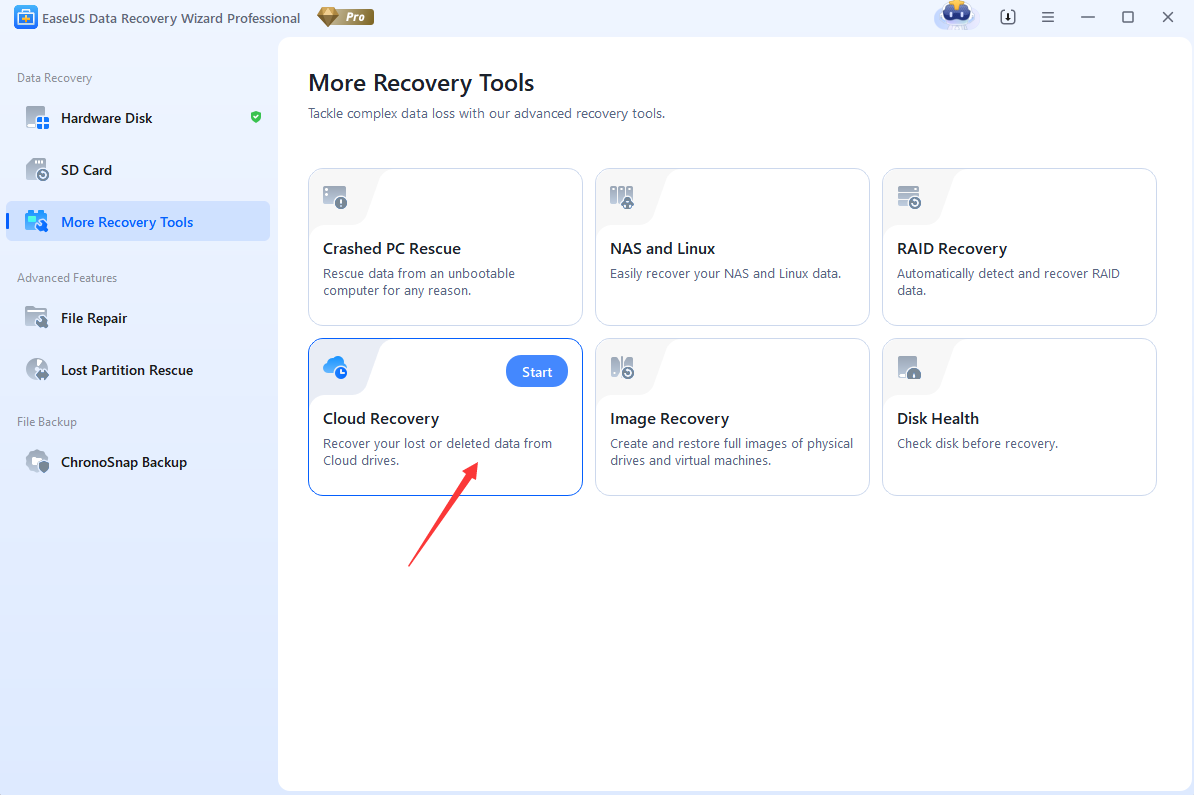
Cloud Recovery
EaseUS Data Recovery Wizard now supports recovering lost files directly from popular cloud storage services. Whether you’ve accidentally deleted important files, Cloud Recovery has you covered.
- Supports OneDrive, Dropbox, and iCloud login
- Simply select the cloud service you want to recover from and log in with your account credentials
- The software will scan your cloud storage and display all recoverable files
- Select the files you need and save them directly to your computer
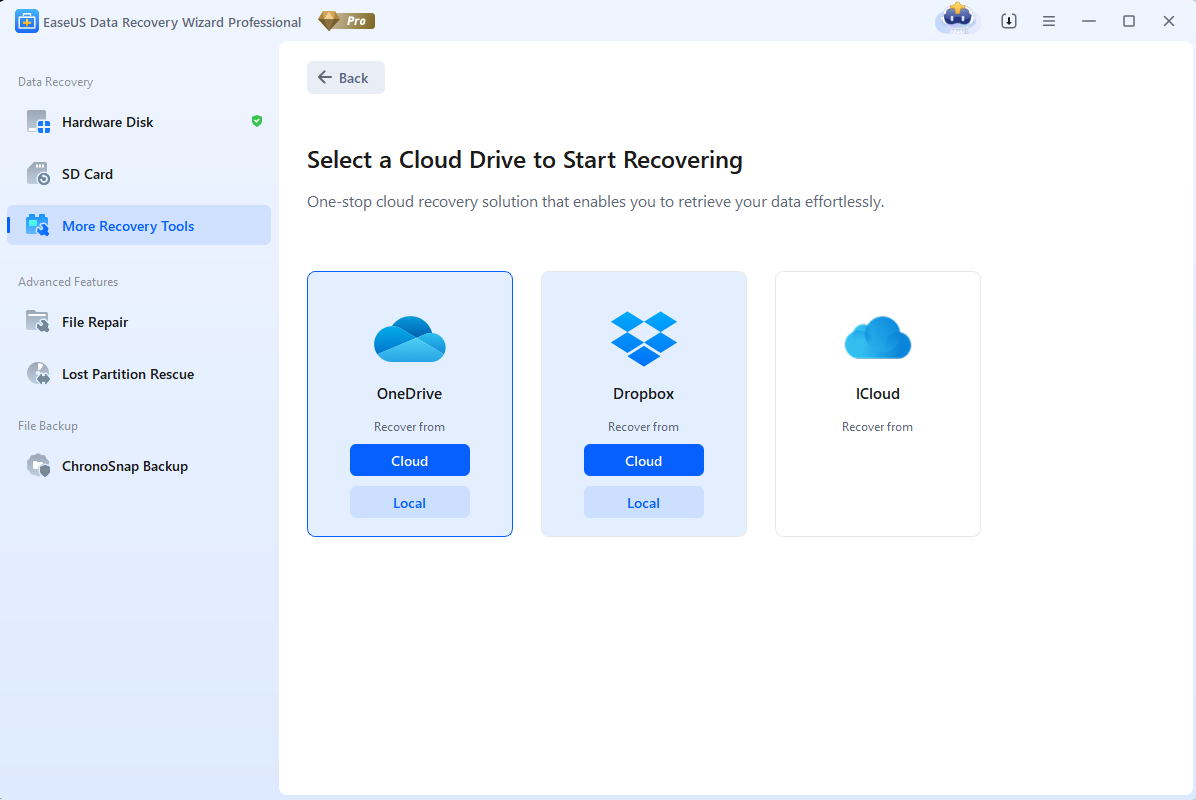
Image Recovery
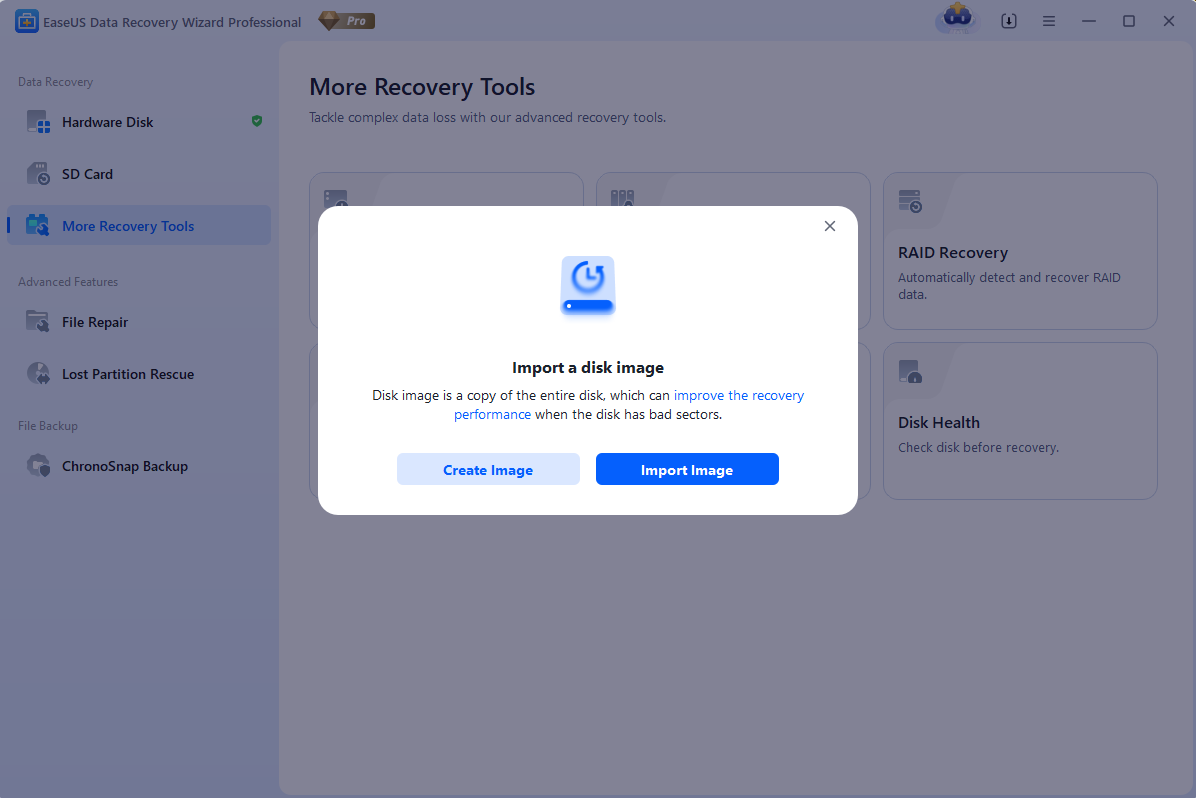
When your hard drive develops bad sectors, attempting to scan it directly can cause further damage. Image Recovery solves this problem by creating a complete clone image of the affected disk first, then scanning the image to recover your data — without writing anything to the damaged disk.
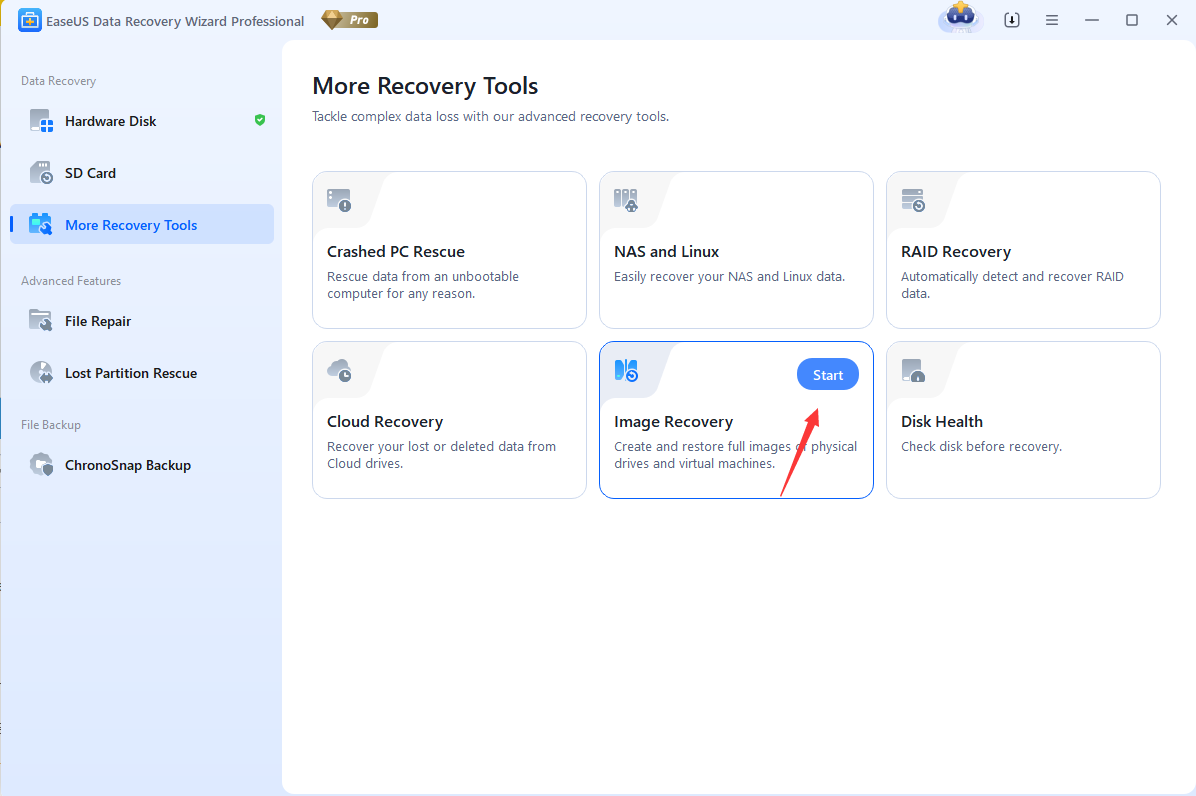
- Ideal for drives with bad sectors or physical degradation
- Creates a sector-by-sector clone image of the entire disk
- Scans the clone image instead of the original damaged disk
- Prevents further data loss caused by additional read/write operations
- Supports various image formats for maximum compatibility
Disk Health
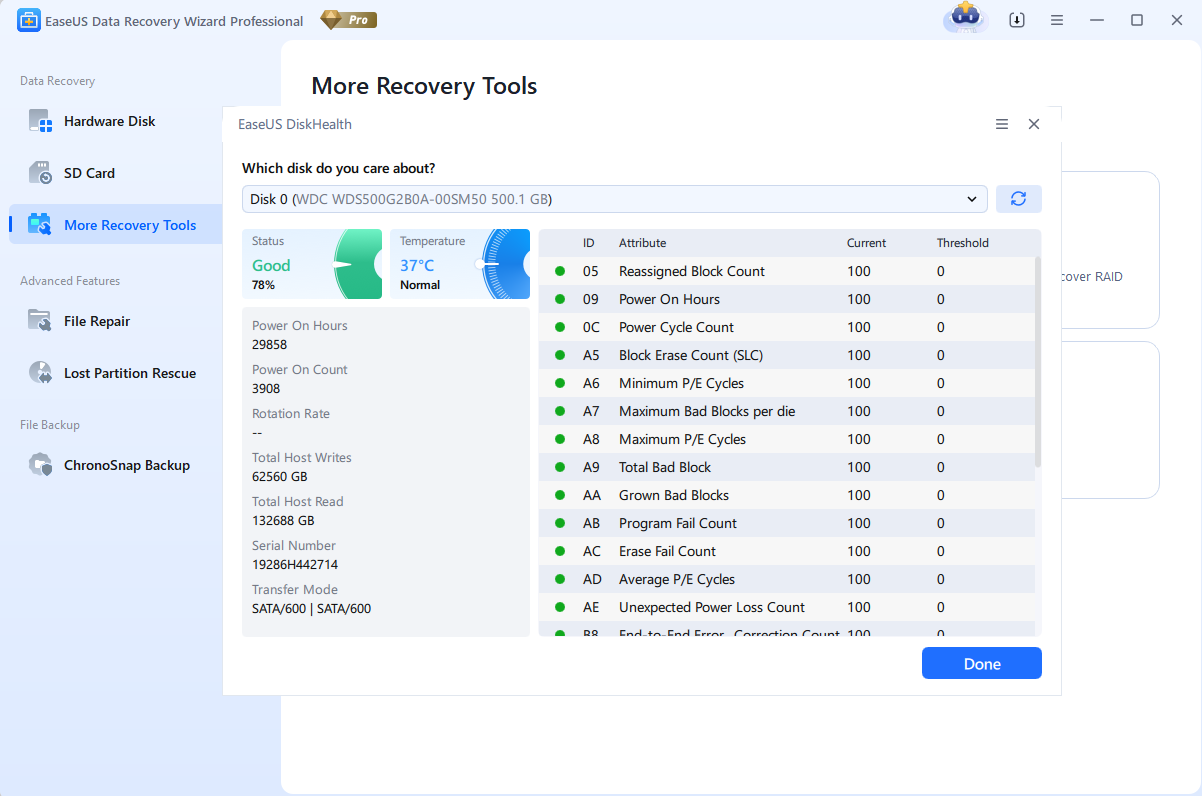
Know the health status of your hard drive before data loss occurs. Disk Health feature monitors your drive’s condition and provides early warnings about potential hardware failures.
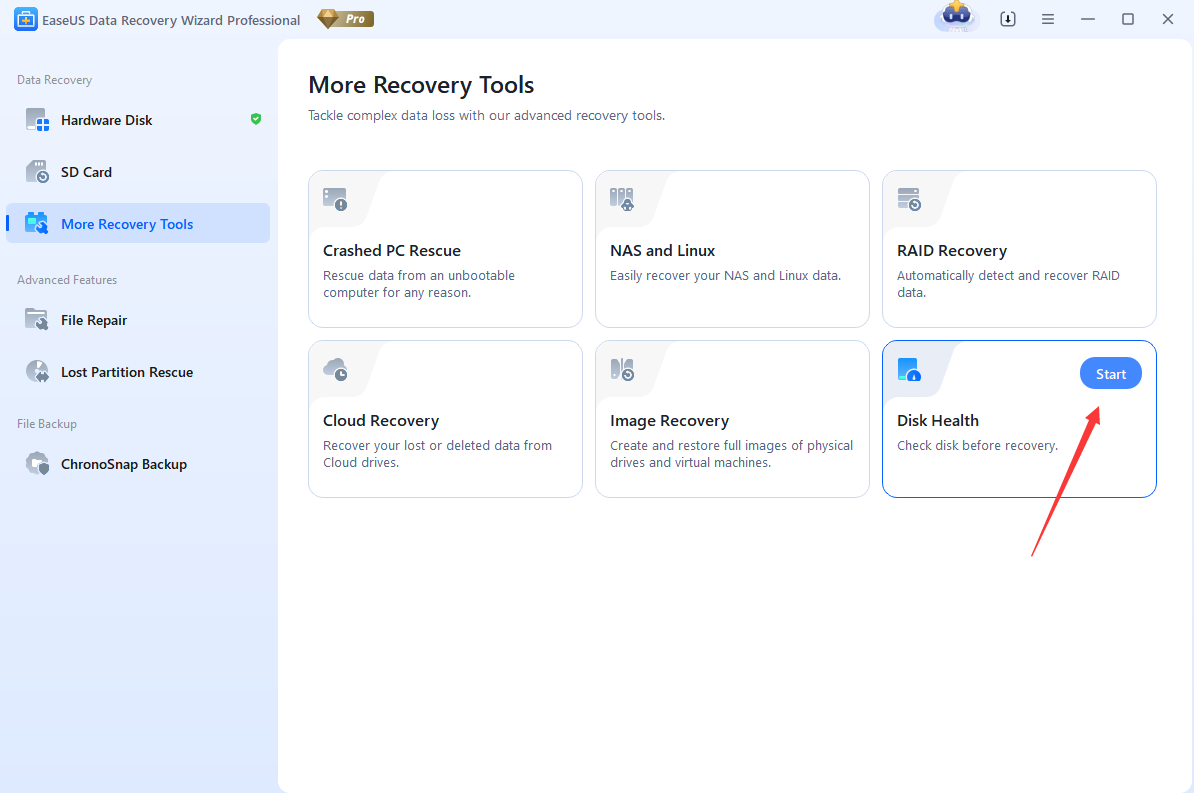
- Displays SMART (Self-Monitoring, Analysis and Reporting Technology) information for your drives
- Shows key health indicators including temperature, usage hours, error counts, and reallocated sectors
- Provides an overall health rating (Good, Caution, or Bad) for each detected drive
- Helps you proactively replace failing drives before catastrophic data loss occurs
- Recommended to run Disk Health checks regularly as part of your data maintenance routine
File Repair
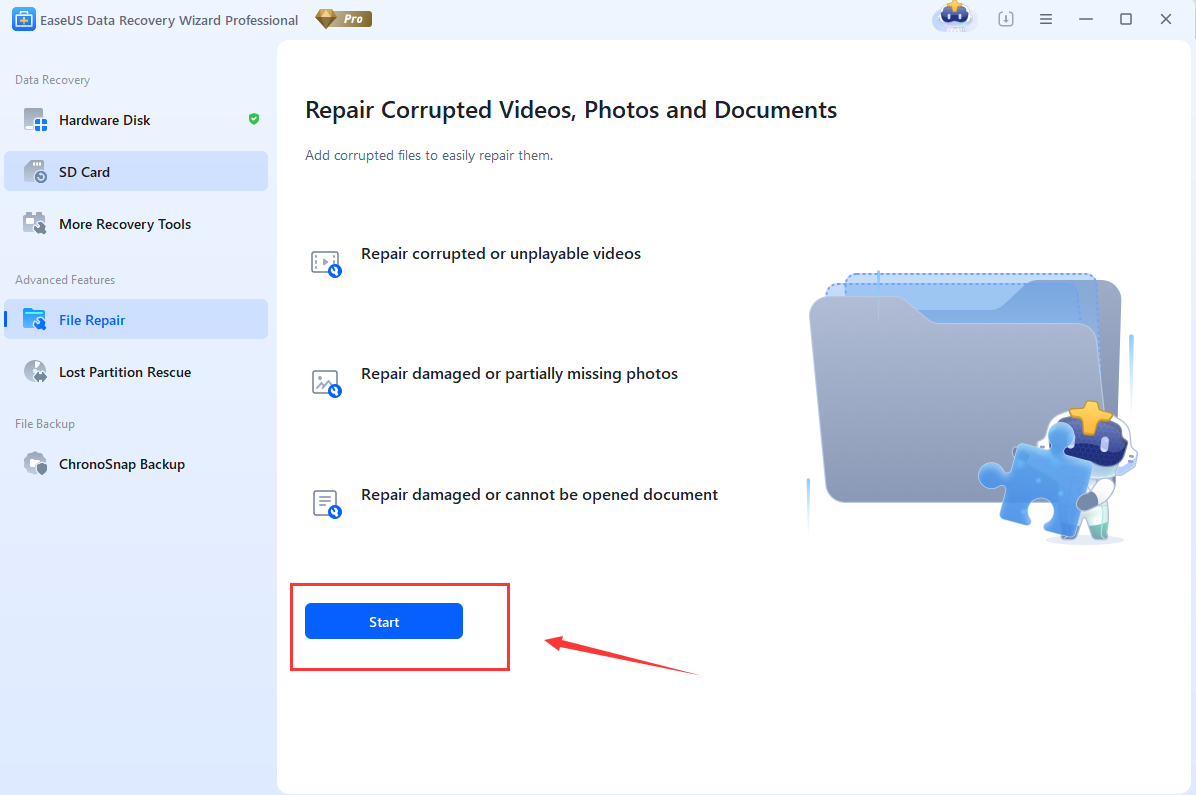
File Repair feature can help repair corrupted Videos, Photos and Document.
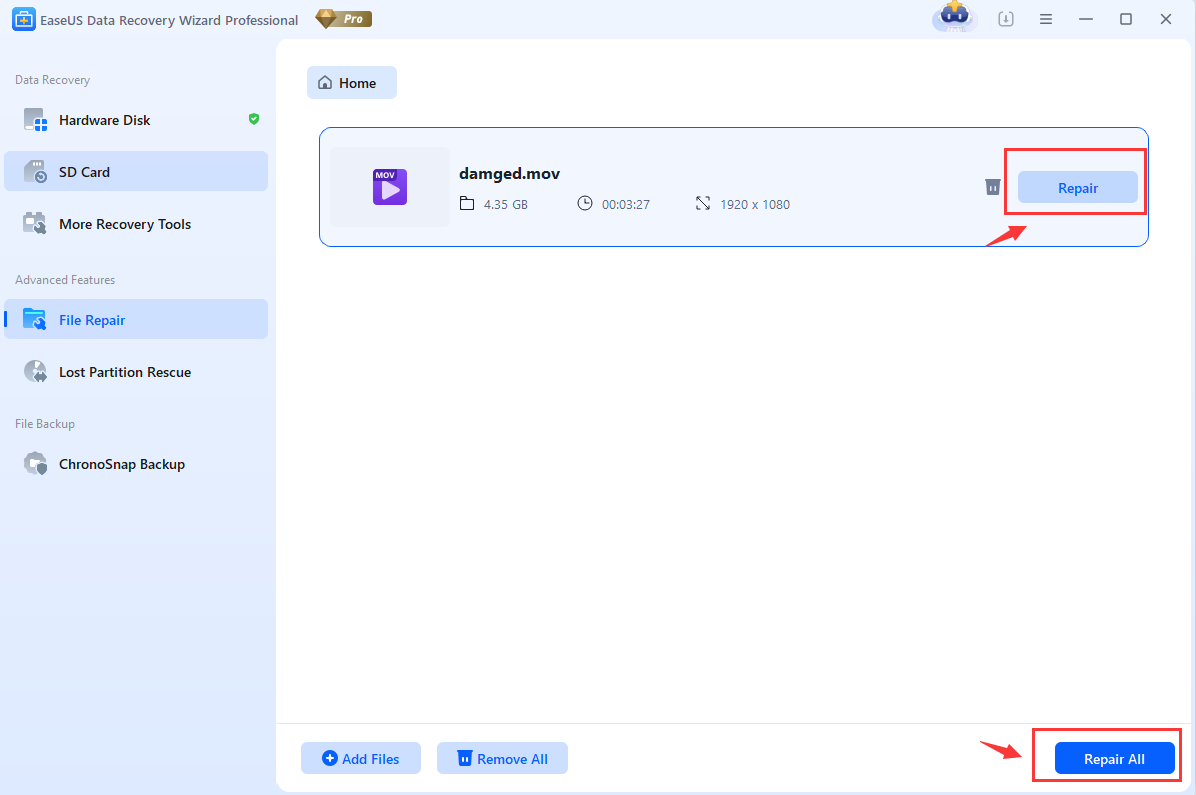
1. To repair the data, please click the Start button under the File Repair feature.
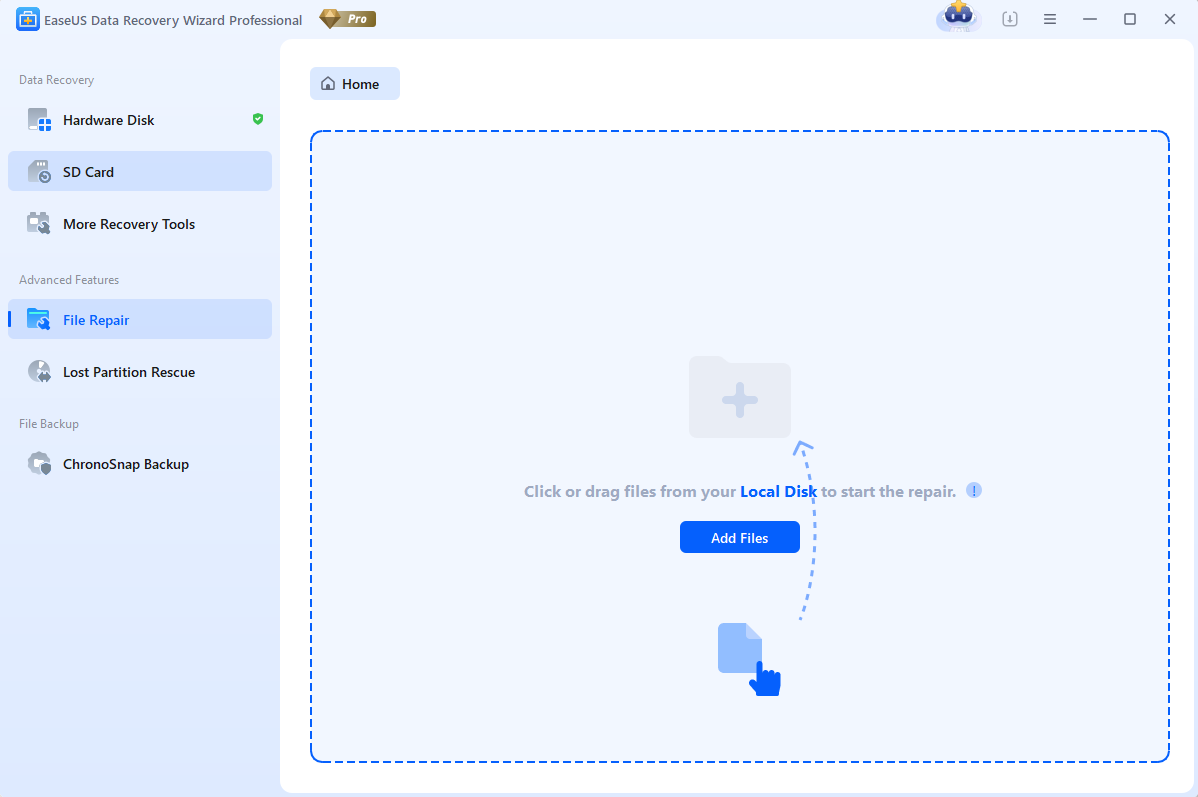
- Please click Add Files button to add the damaged files.
- Please click the Repair button to start the process.
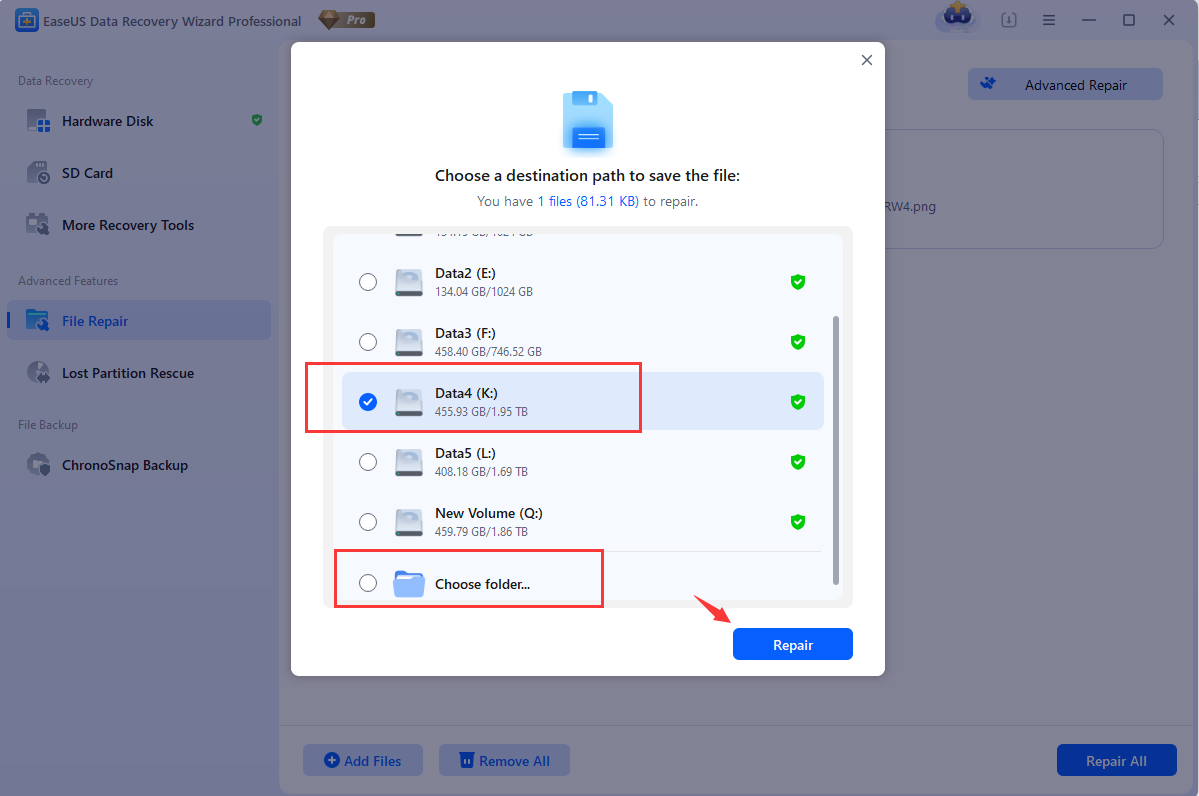
- After clicking Repair, Data Recovery Wizard will pop up a window to choose a drive or folder to save the file.
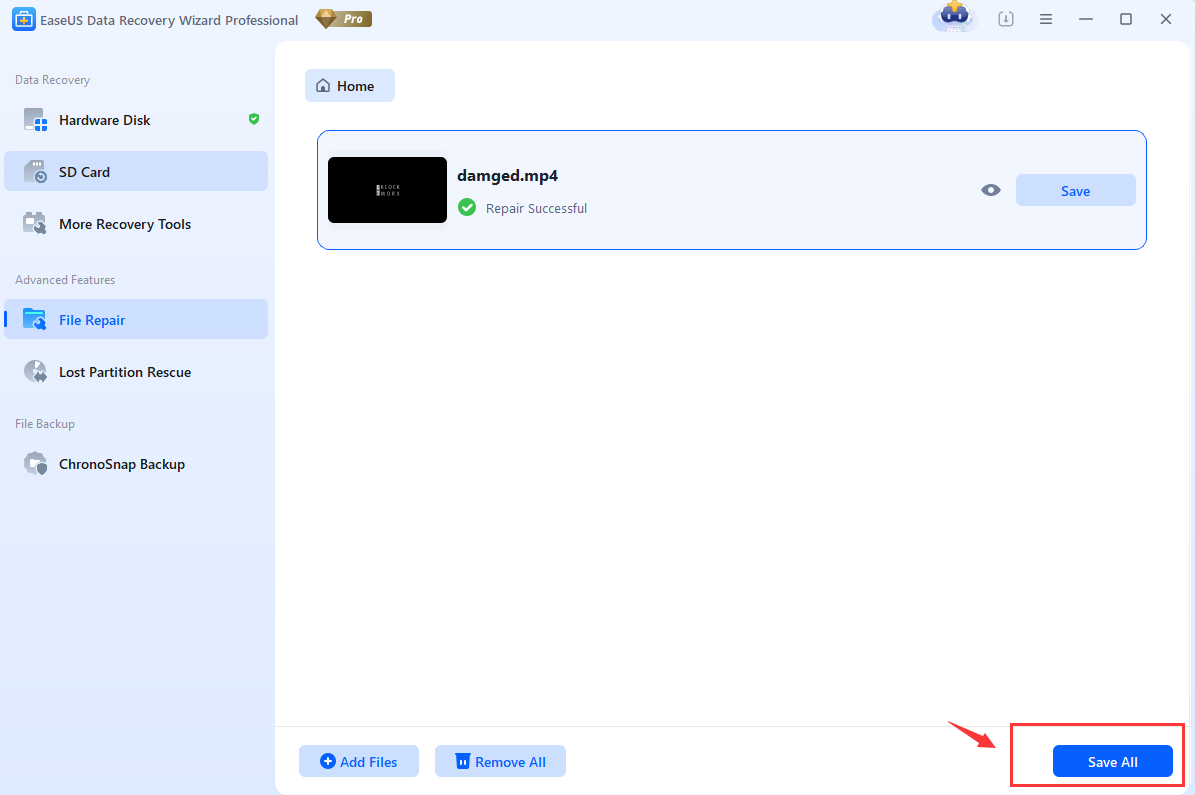
- Once the software completes the recovery, please click the Save button.
Lost Partition Rescue
Lost Partition Rescue is a user-friendly feature in EaseUS Data Recovery Wizard designed to help you recover lost partitions on a hard drive.
To recover the lost partition:
1. Select the disk that contains the lost partitions and click the Search for Lost Partition button to proceed with the scan.
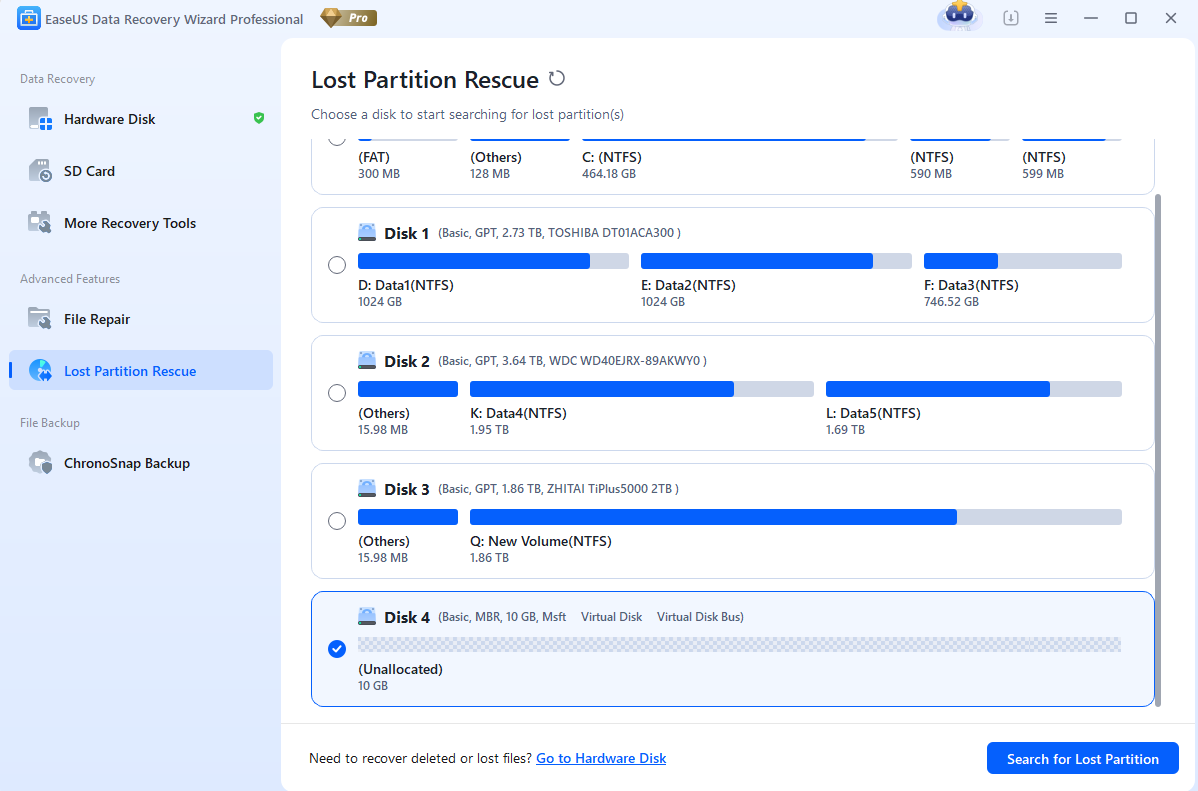
2. Once the scan is complete, all the lost partitions will be displayed. You can select your desired partition and double-click it to view the details within that partition.
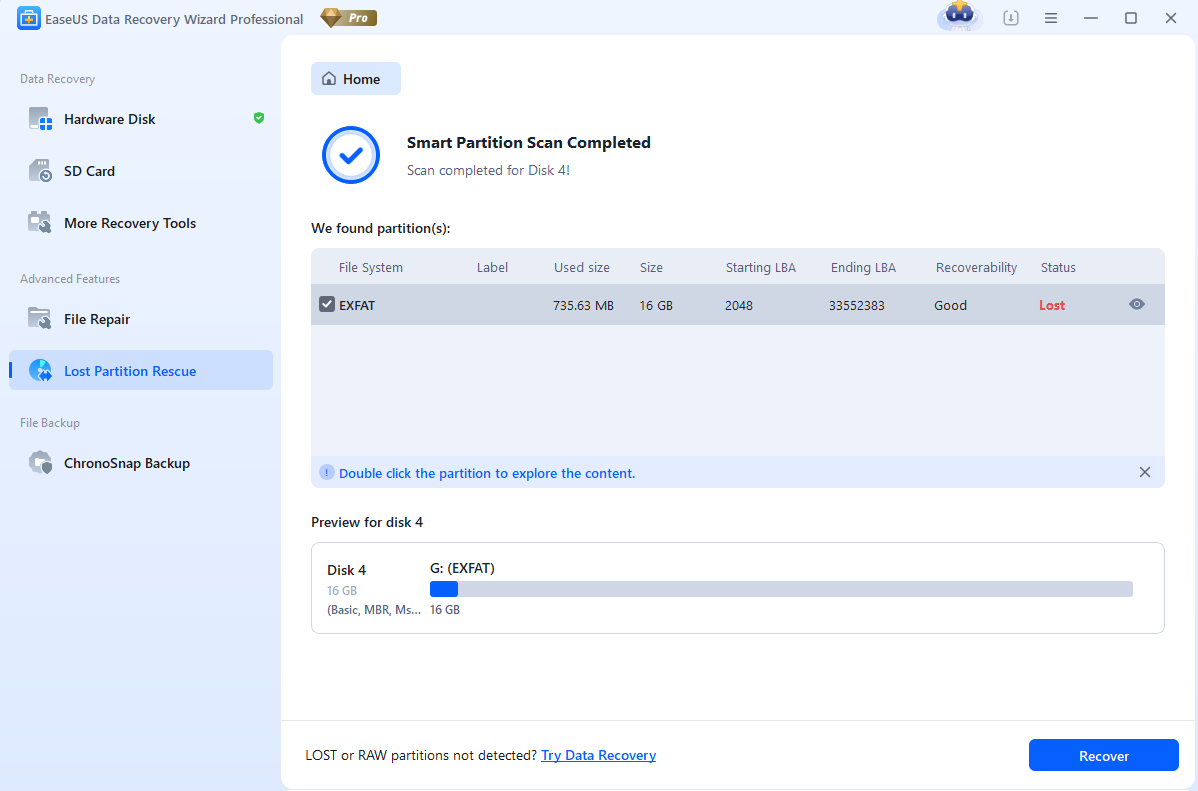
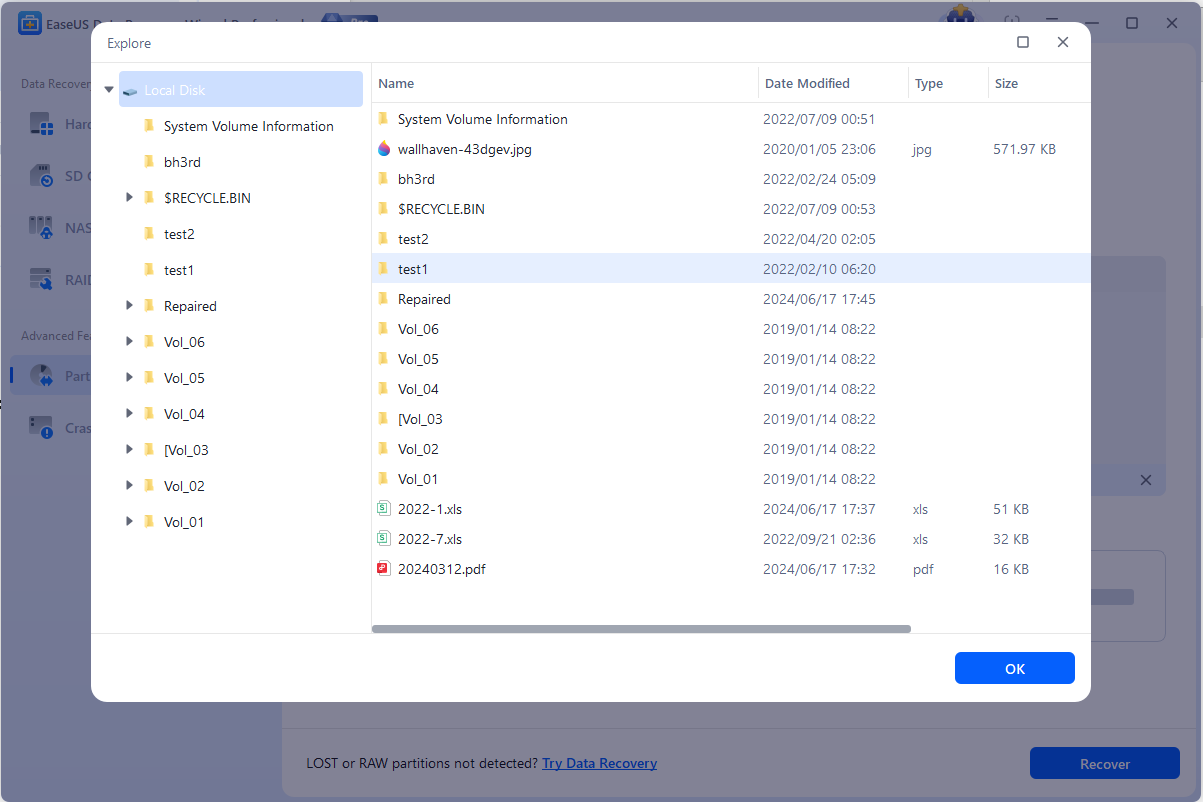
3. Select the partition you want to recover and click the Recover button to initiate the recovery process.
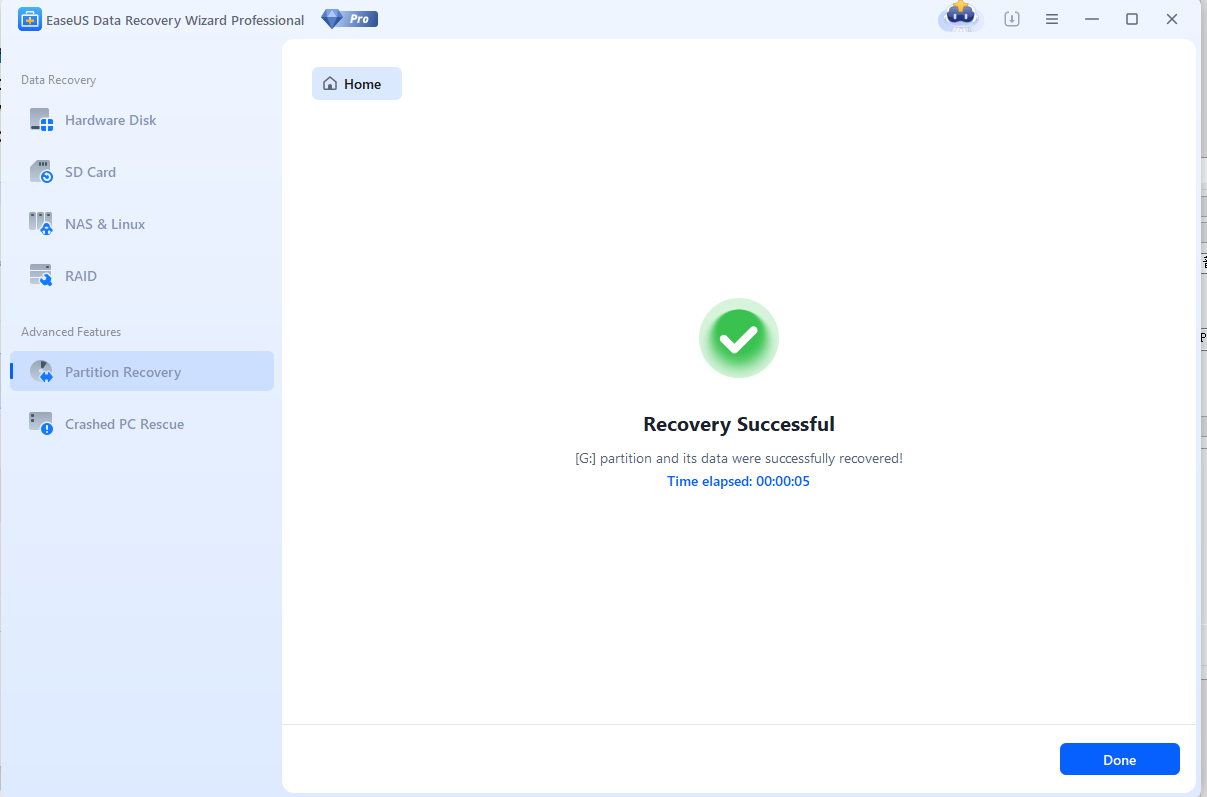
The recovered partition can be seen on your hard disk after the successful recovery.
Feedback and Support
We welcome your feedback on the performance of EaseUS Data Recovery Wizard and are eager to address any queries you may have regarding its usage. You may contact us at [email protected].
We also offer an online chat service which can be accessed through the Live Chat option located in the top navigation bar of our official website, www.easeus.com.