Backup Center Online Help
This is a dedicated online help to assist you understand our product easily and quickly, for any questions and concerns not addressed on this page, please do not hesitate to contact and we will always be happy to help.
Backup Center
- Software Requirements
- Hardware Requirements
- System Requirements
- Supported File Systems
- Supported Hard Disk Types
- License Management
- Activating the Admin Account
- Accessing the Management Portal
- Create Client Group(s)
- Create Backup Task(s)
- Create New Single Task
About EaseUS Backup Center
EaseUS Backup Center is a web-based portal working with EaseUS Todo Backup Enterprise, which enables IT administrators, and service providers to deliver the centralized management of the backup tasks to the client PCs.
EaseUS Backup Center needs to be installed on one of your machines as the server-side. Next, all the management is available through a web application called the Management Portal.
The management portal enables administrators to:
1. Add client PCs to the portal.
2. Manage and Group the client PCs.
3. Create multiple backup tasks with the intelligent backup scheme and cleanup strategy.
4. Remotely deploy and manage backup tasks to different clients/group
5. Monitor the backup tasks on the Client PCs.
Getting Started
Software and hardware requirement of EaseUS Backup Center, the file system and hard disk type this product can support, how to manage, purchase, add licenses, and some other preconditions for using EaseUS Backup Center can be all found in this section.
Software Requirements
Every single machine that needs to be managed by EaseUS Backup Center should have EaseUS Todo Backup installed (Paid or 30 days Trial Version).
In addition, the version number of EaseUS Todo Backup should be the same as that of EaseUS Backup Center. (e.g. EaseUS Backup Center 14.0 only supports managing EaseUS Todo Backup Workstation/Server/Advanced Server 14.0. Note, EaseUS Backup Center 5.0 supports EaseUS Todo Backup Workstation/Server/Advanced 8.6, 8.8, 8.9, 9.0)
LAN network connection is stable, and EaseUS Backup Center should be on the white list of all the security tools. For the WAN environment, as long as the client machine can be reached with the Windows PING command, EaseUS Backup Center can manage it as well.
Hardware Requirements
500 MHz processor or faster
At least 1 gigabytes (GB) RAM
At least 1 GB of available space on the hard disk
CD-R/RW, DVD-R/RW, DVD+R/RW or DVD+R DL drive
Keyboard and a Microsoft Mouse or some other compatible pointing device
System Requirements
Your computer must be running one of the following operating systems:
Windows Server 2003 x86/x64
Windows Server 2003 R2 x86/x64
Windows Small Business Server 2003
Windows Server 2008 x86/x64
Windows Small Business Server 2008
Windows Server 2008 R2
Windows Home Server 2011
Windows Small Business Server 2011
Windows Server 2012
Windows Server 2012 R2
Windows Server 2016
Windows Server 2019
Windows Vista x86/x64
Windows 7 x86/x64
Windows 8 x86/x64
Windows 8.1 x86/x64
Windows 10 x86/x64
Windows 11 x86/x64
Supported File Systems
EaseUS Backup Center can be installed on FAT12, FAT16, FAT32, and NTFS.
And these file systems are also supported by a deployed backup task. For the other file systems, like HFS, EXT. It might be also possible to include them in a backup package and send it to a client. But EaseUS Todo Backup on that client can only handle it in sector mode.
Supported Hard Disk Types
EaseUS Backup Center supports all IDE, EIDE, SATA, ESATA, ATA, SCSI, iSCSI, USB 1.1/2.0/3.0 disks, and Firewire disks. No matter how you manage the hard drive, Dynamic disk, MBR and GPT disks are all able to be used to install this tool.
But considering a long-run backup plan, it is better to install EaseUS Backup Center on a local internal hard drive.
License Management
30-days Full Functional Trial-After installing EaseUS Backup Center, it will provide a 30-days fully functional trial period. In the meantime, there will be no limitation on the numbers of EaseUS Todo Backup to be controlled by the EaseUS Backup Center.
After the Trial is expired, the management portal will be suspended until a license code is added. Click License to switch to the license management page.
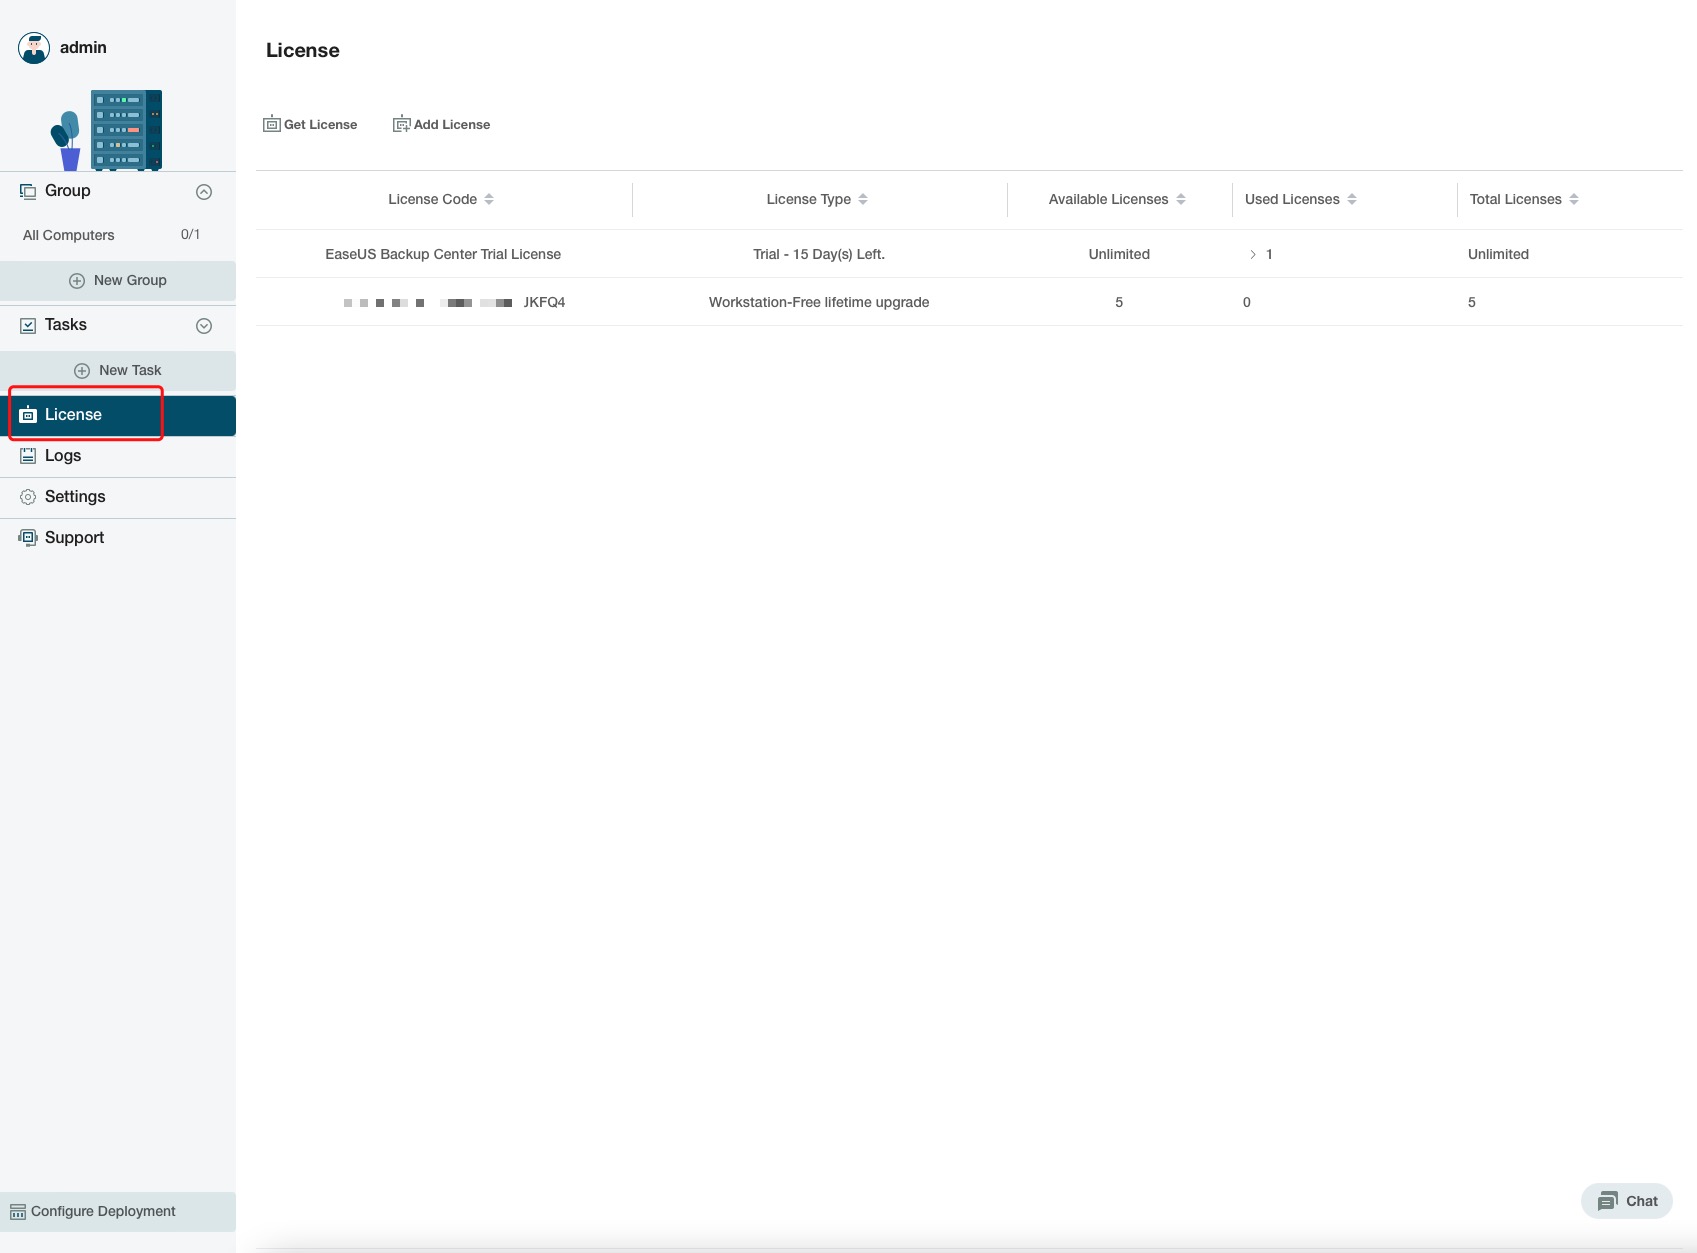
Get License - Redirect to the purchase page of EaseUS Backup Center.
Add License - Add the license code to EaseUS Backup Center.
All the license codes added are listed on this page, with their license type, available/used/used seats information.
License Type - includes Workstation, Server, and Advanced Server, separately for EaseUS Todo Backup Workstation, Server, and Advanced Server. It is also addressed here whether the license is entitled to a free lifetime upgrade.
Available/Used/Total Licenses - indicates how many client PCs this license code can manage and the used and available seats.
Note:
1. The license will be used immediately once a client is added to this product.
2. A Server/Advanced Server license will be also used if the Workstation license is used up when a personal OS machine is added.
Activating the Admin Account
After EaseUS Backup Center is properly installed on the server-side, launching the application will load a service login page using the default browser on the machine.
If this is the first time you launch EaseUS Backup Center, you will need to do some initial settings before accessing the management portal.

Administrator Account
Set up the admin account and password for your management portal. This account will be used to log into the portal from the other machines.
EBC Web Server Port
This port number is used when you access the web portal from the other machines. If the default port number 8081 is occupied, please assign a new port number. The Web Server Port cannot be modified once set.
Client Connection Port
This port number is used to authenticate the connection when you add a client PC with the EaseUS Todo Backup agent to the server. More will be explained in the Configure Deployment section. If the default number is occupied, please assign a new port number. The Client Connection Port cannot be modified once set.
Accessing the Management Portal
Users have 2 ways to go to the service login page of EaseUS Backup Center.
1. Simply launch the EaseUS Backup Center application. The service login page will be loaded automatically on the default browser on your machine.
2. To login to the management portal on the machine without EaseUS Backup Center installed, use the combination with the machine name/IP address/domain name of the server machine and the web server port.
The web server port can be found in Setting.

The correct format should be Machine name/IP address/domain name:Web server port. For instance, if the IP address of the server is 191.168.1.xxx, and the web server port is 8081, the correct way to login is: 191.168.1.xxx:8081
Then fill in your Admin account and password to log in to the Management Portal.
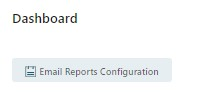
Dashboard
The dashboard provides a convenient way to easily access and view client and task information, as well as to configure email notifications.

Email Reports Configuration
Click the button in the picture to set up regular email reports. For more details about how to set an email notification, please click here.
Machine Status
Here, you can conveniently review the operational status of all clients, ensuring that they are functioning normally.

Backup Status
You can find the results of all backup task executions. Simply select the desired group and time period from the drop-down menu located at the top-right corner of the screen to view the information.
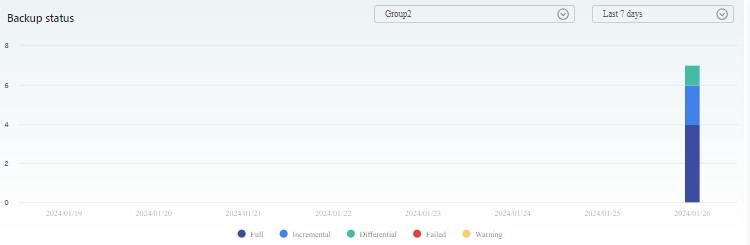
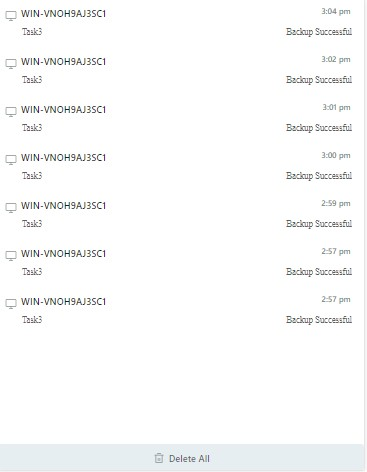
On the right side of the dashboard, you can find more comprehensive information for each backup task, such as the device name, task name, execution time, and the backup results.
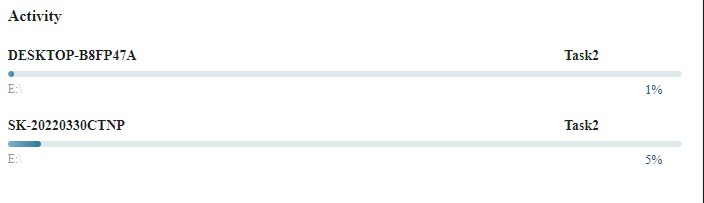
Activity
In the Activity section, you can keep track of the latest progress of ongoing backup tasks.
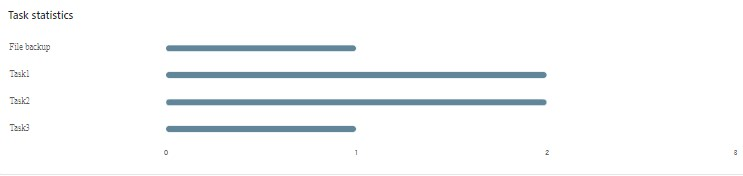
Task Statistics
You can check the frequency of each backup task execution, as well as the total number of failed backup attempts.
Configure Deployment
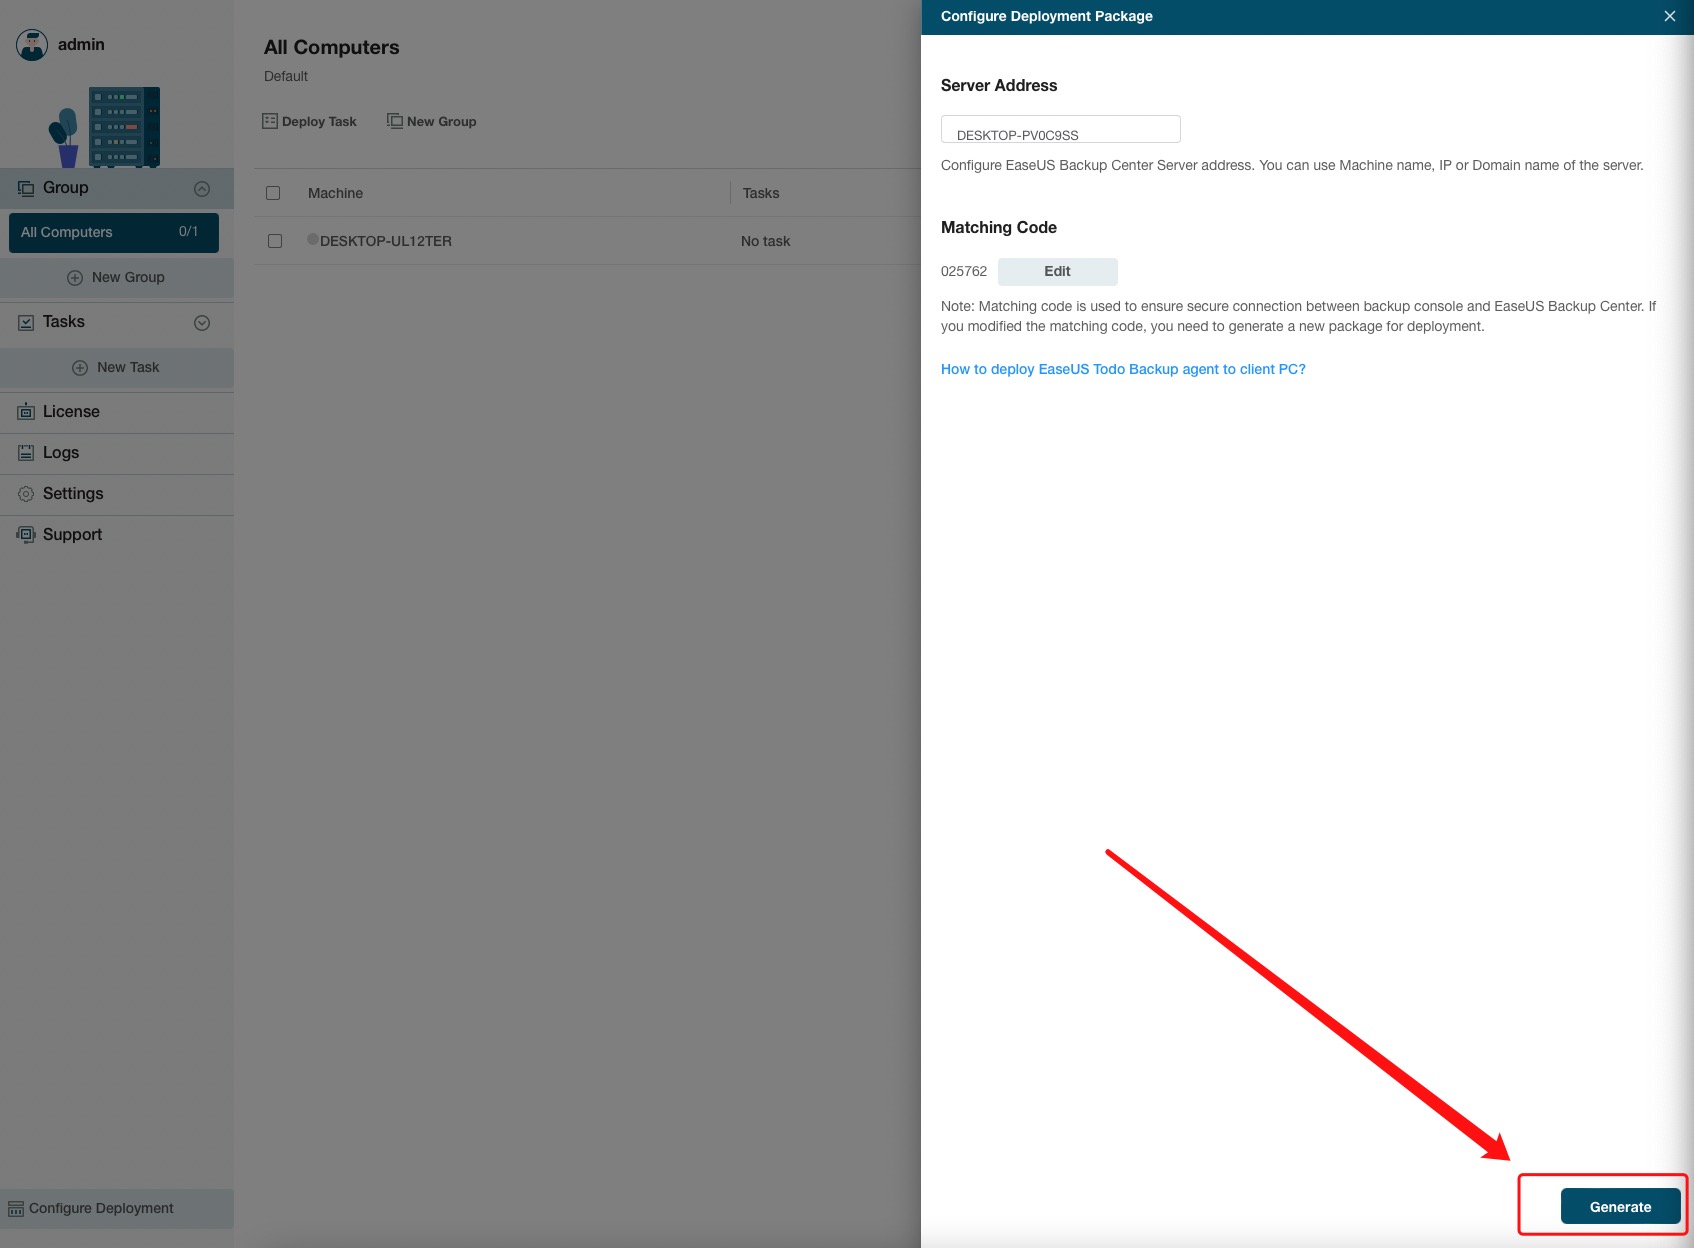
To add the client PC to the EaseUS Backup Center, you will need to have 3 authentication factors to be well configured in the installation process of the EaseUS Todo Backup agent on the client PC, the Server Address, Matching Code, and the Client Connection Port.
The Server address and Machine code can be located on Configure Deployment page, while the Client Connection Port can be viewed in Settings.
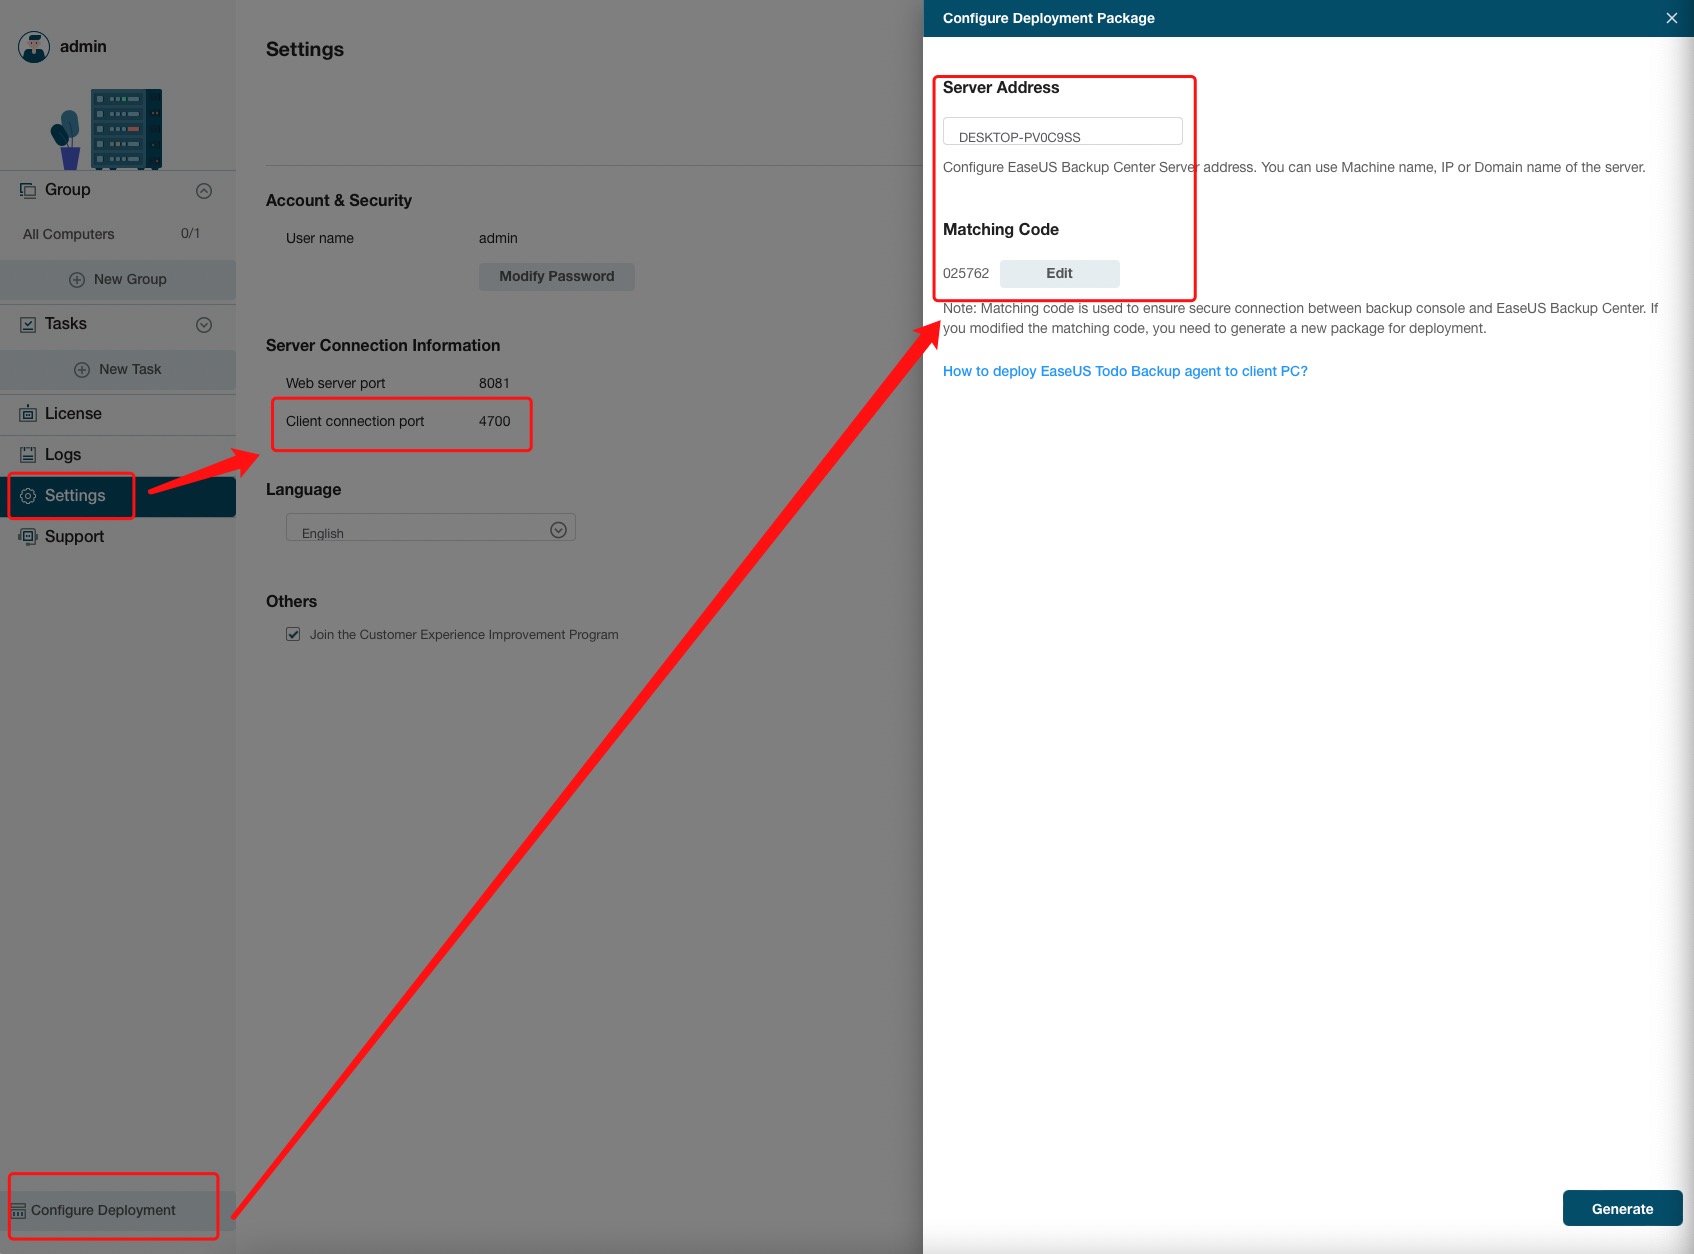
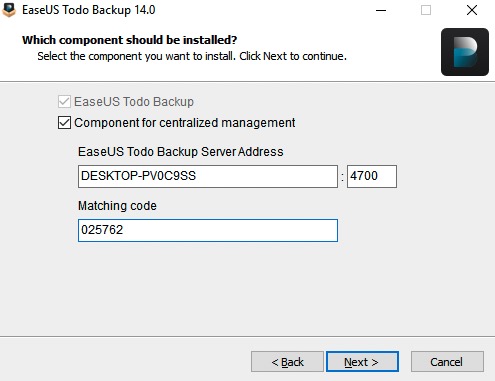
When installing EaseUS Todo Backup Enterprise on the client PC, Enabling Component for centralized management, fill in the Server Address, Client Connection Port and Matching Code.
After the installation is completed, this client PC will be added to the management portal automatically.

EaseUS Backup Center also provides an on-premise EaseUS Todo Backup MSI package with all the authentication factors pre-configured. Click Generate to obtain the package and install it on all the client PCs.
After the installation is completed, the client PC will be added to the management portal automatically.
Groups and Tasks
After all the client PCs are properly connected to EaseUS Backup Center, there are only 2 steps left before deploying a backup task, Create client group(s) and Create backup task(s).
Users could create multiple categories to manage the clients before deploying backup tasks.
Create Client Group
If you have dozens of computers that need to be managed, it is suggested to create several groups at your needs to better organize your clients.
Here are some basic rules for creating the group.
1. All added clients are listed in All Computers before they are sorted out.
2. No limitation on how many groups are allowed.
3. One client can appear in a different group.
4. A backup task can be deployed to a whole group or just part of it.
5. Users can delete/edit a created group at any time.
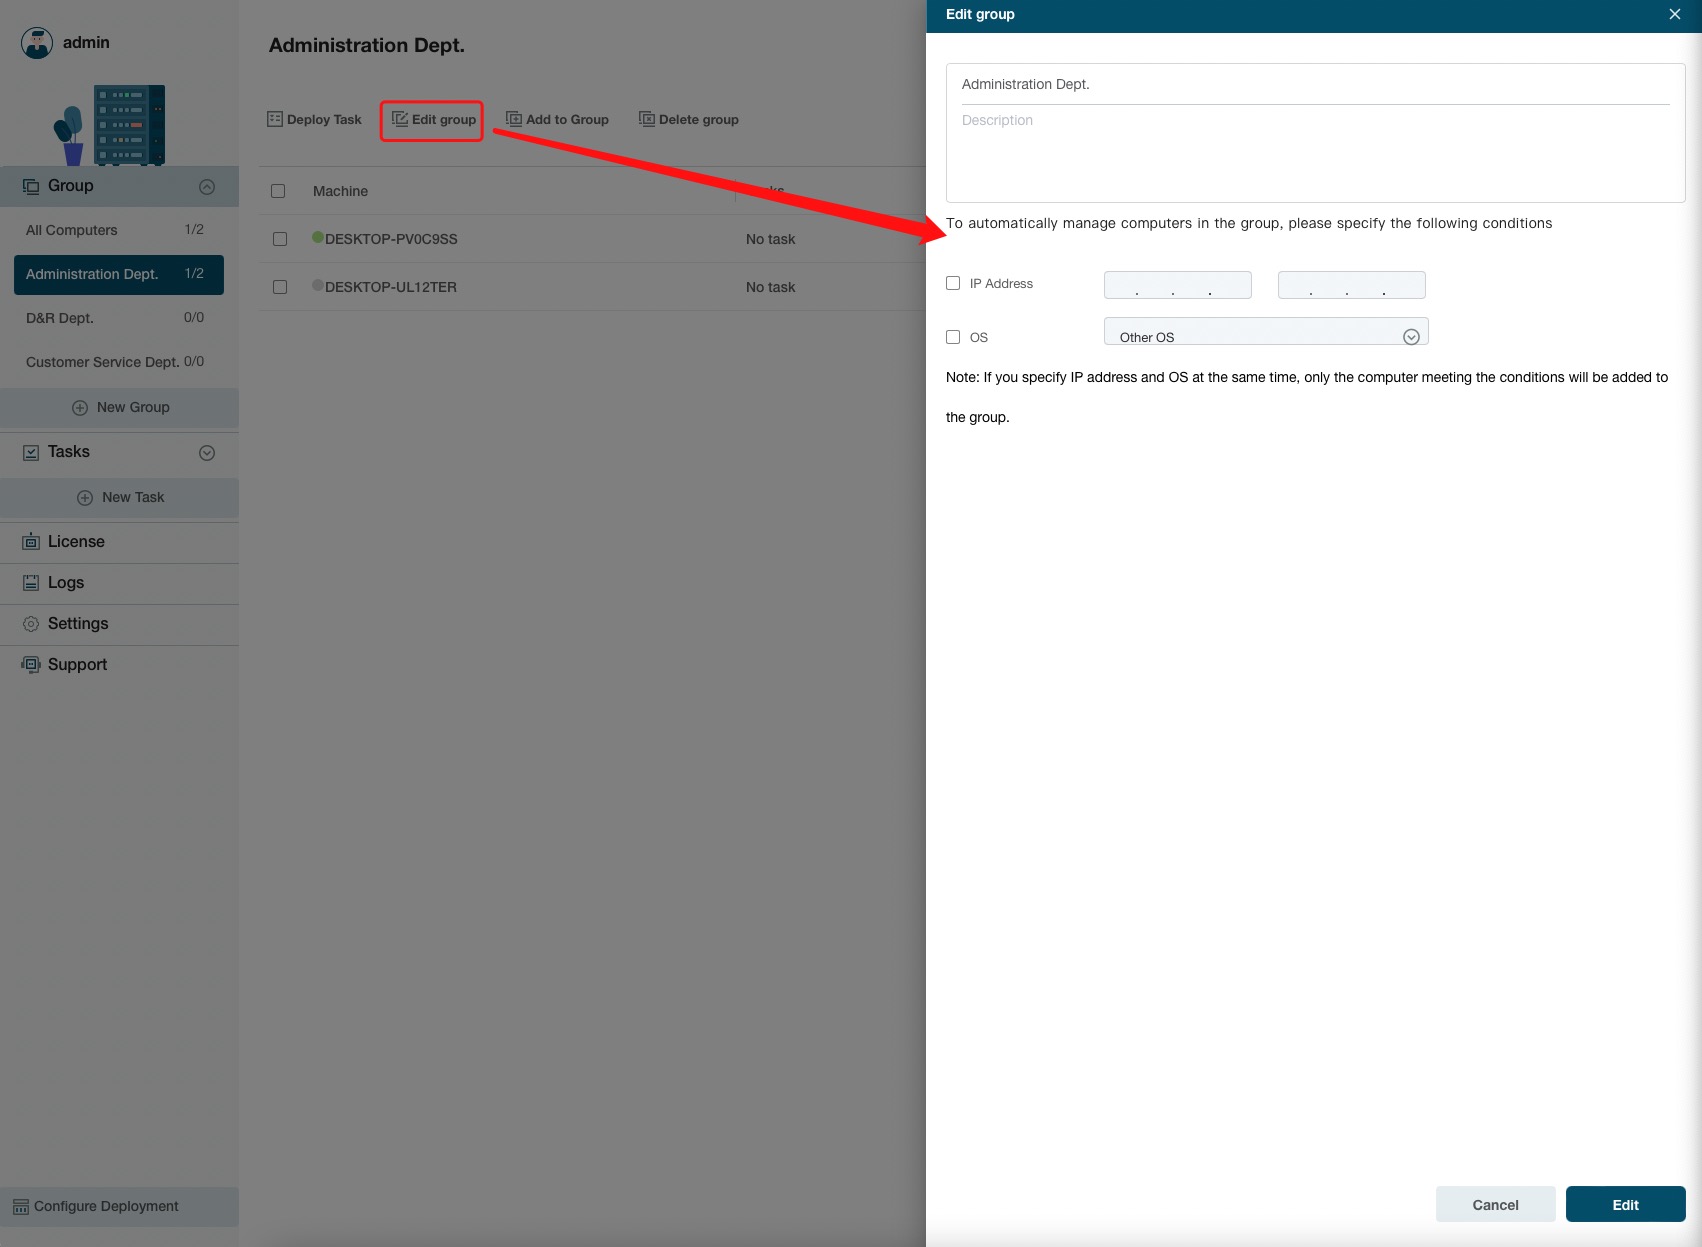
Static Group and Dynamic Group
Users can create a new group by just assigning a group name and description, it will be a static group, and all clients can be added to a static group without any limitation.
EaseUS Backup Center also allows for creating a dynamic group by specifying a certain range of IP addresses or OS versions. Only the clients in this range can be added to this group.
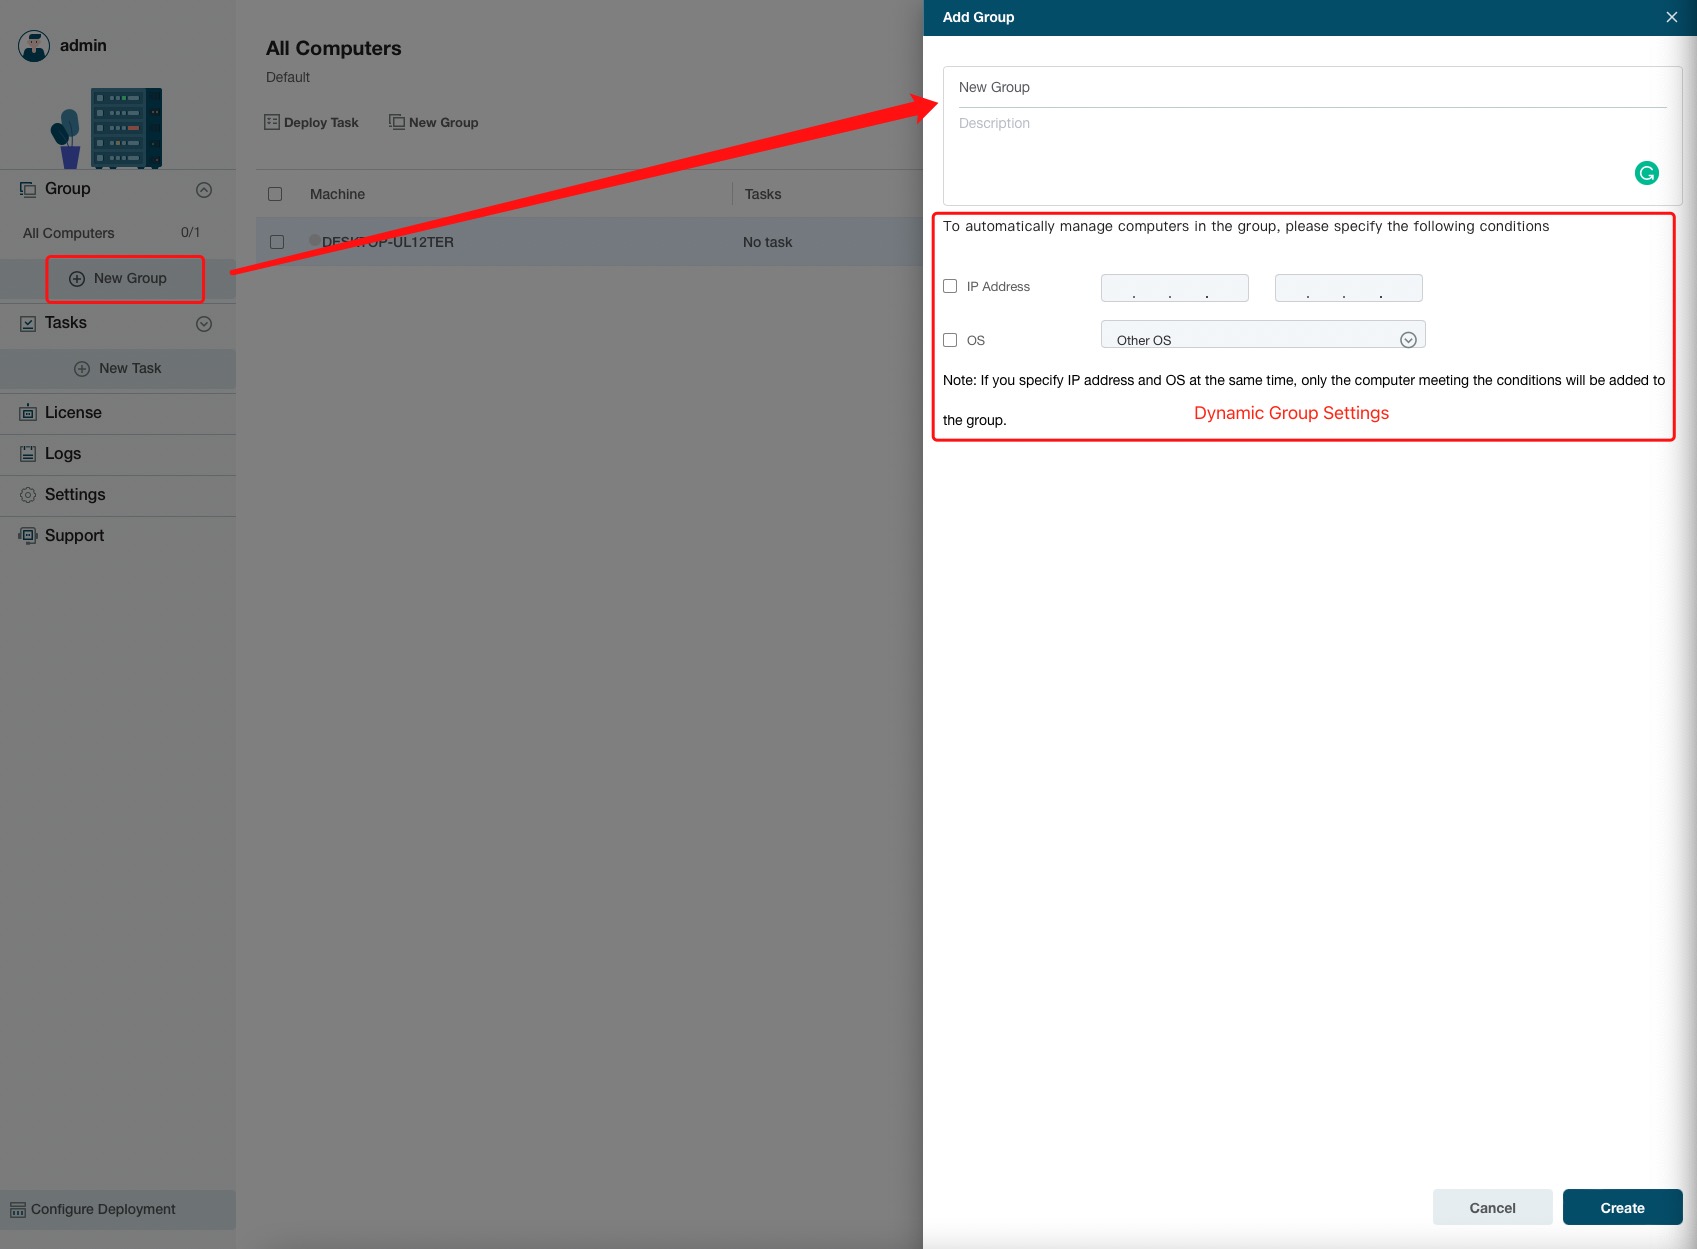
Click Edit Group on the Group page to edit the settings. A static group can also be converted to a dynamic group by adding the rules here.
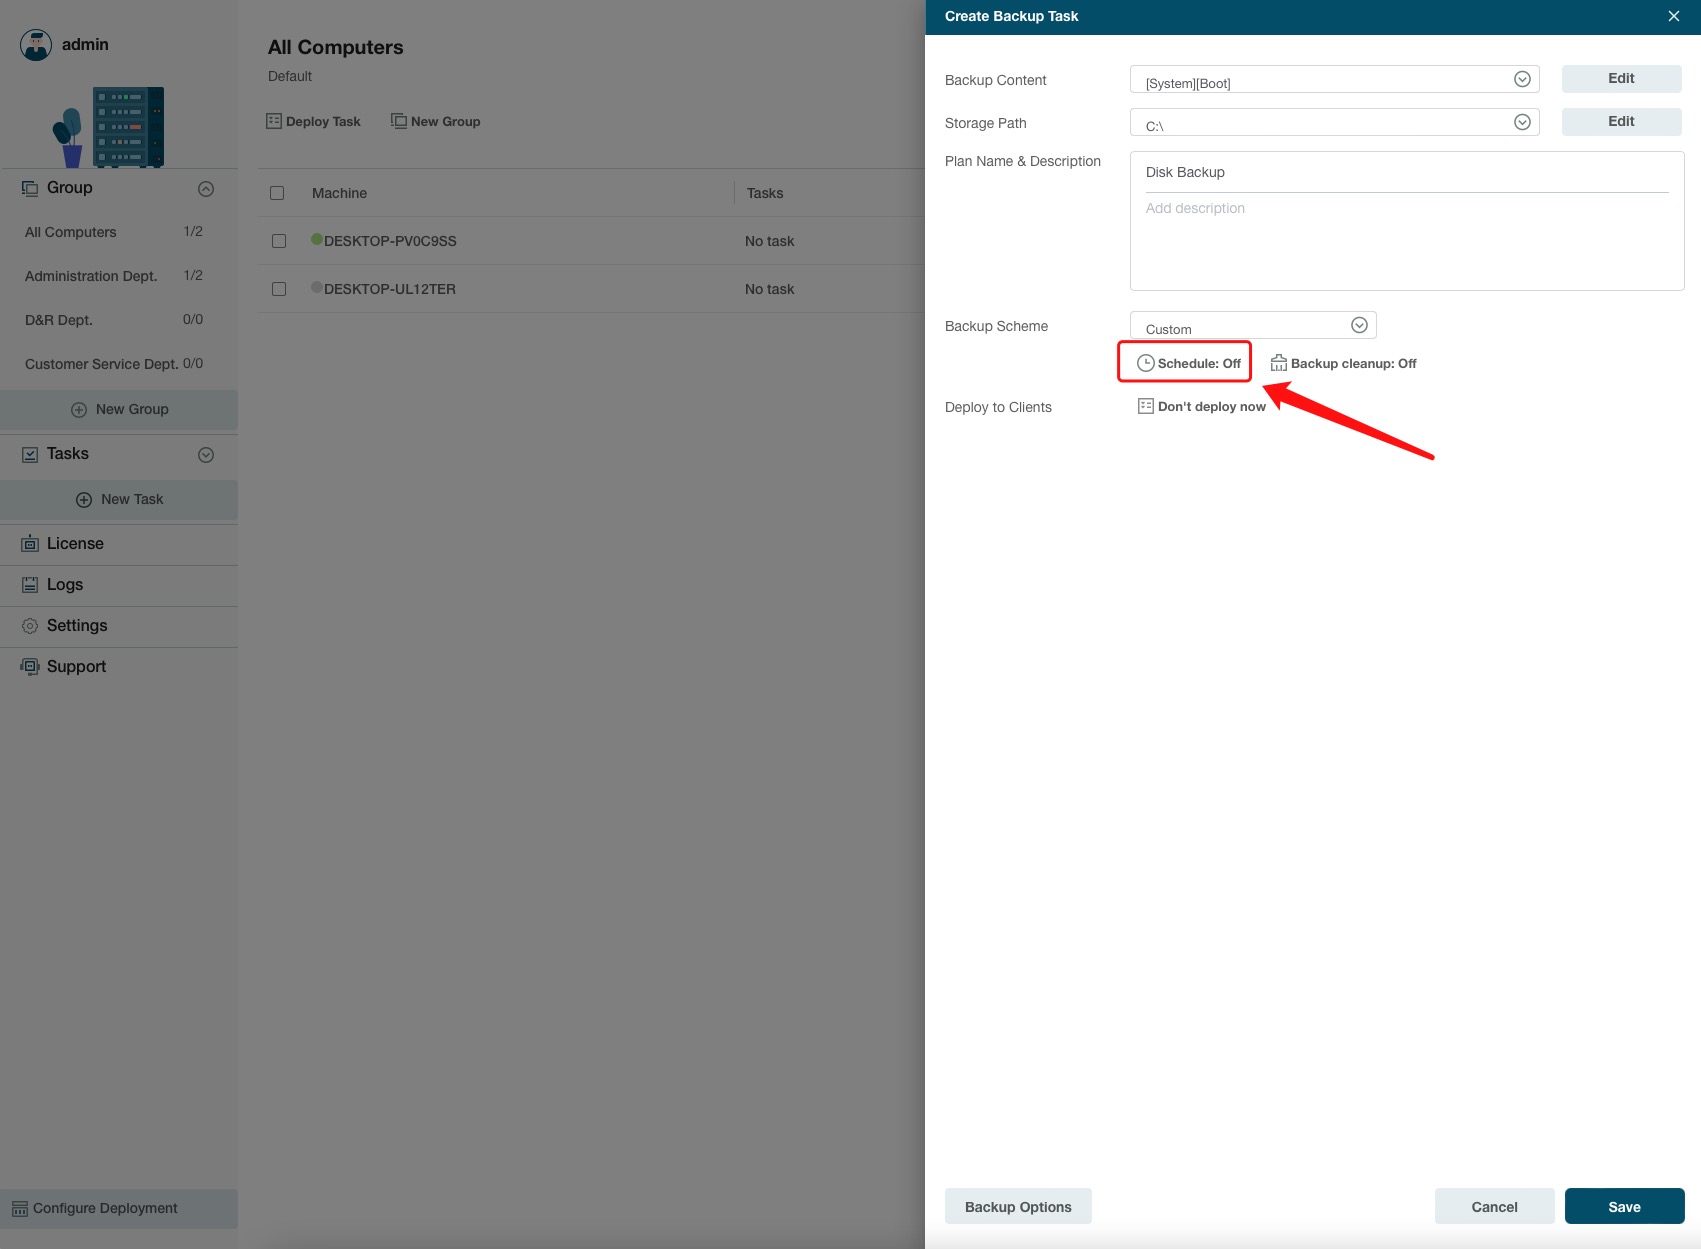
Create Backup Task
Click New Task to set up a backup task based on your requirements.
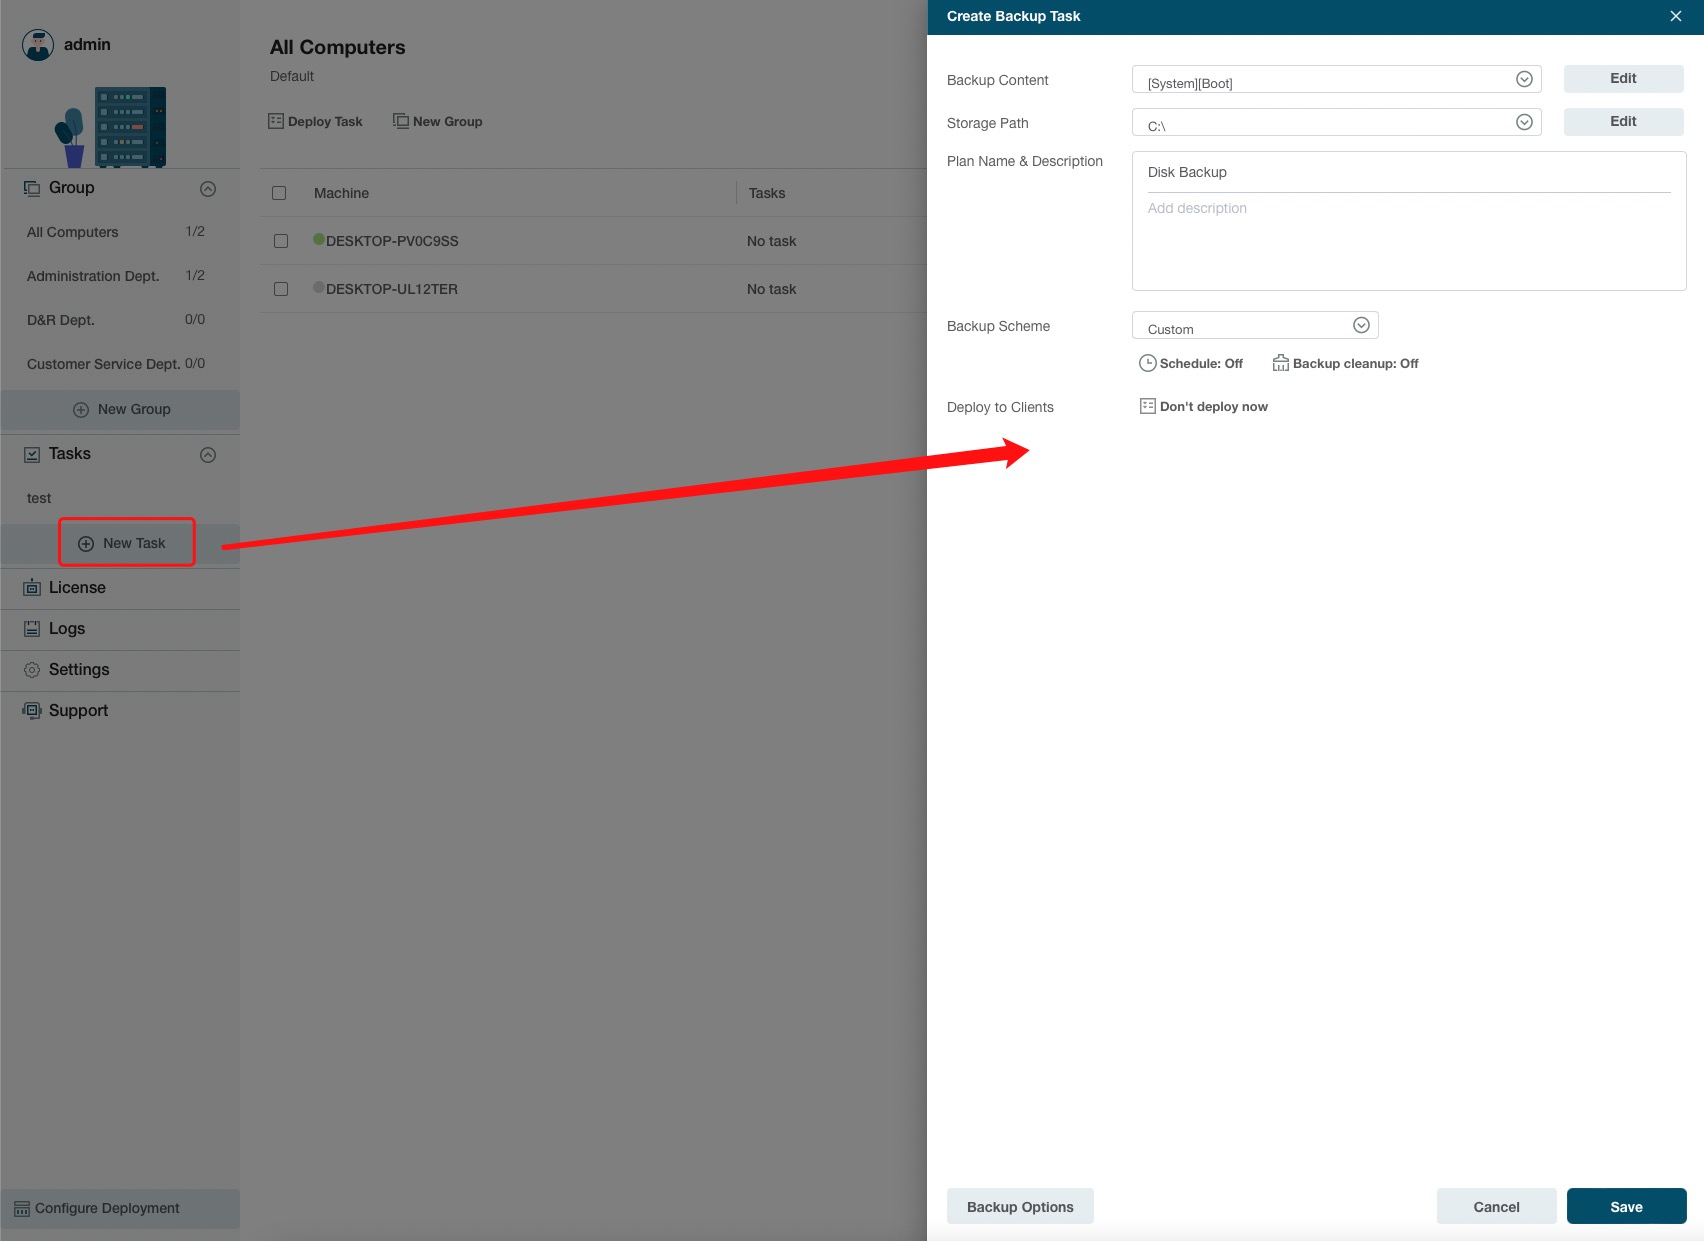
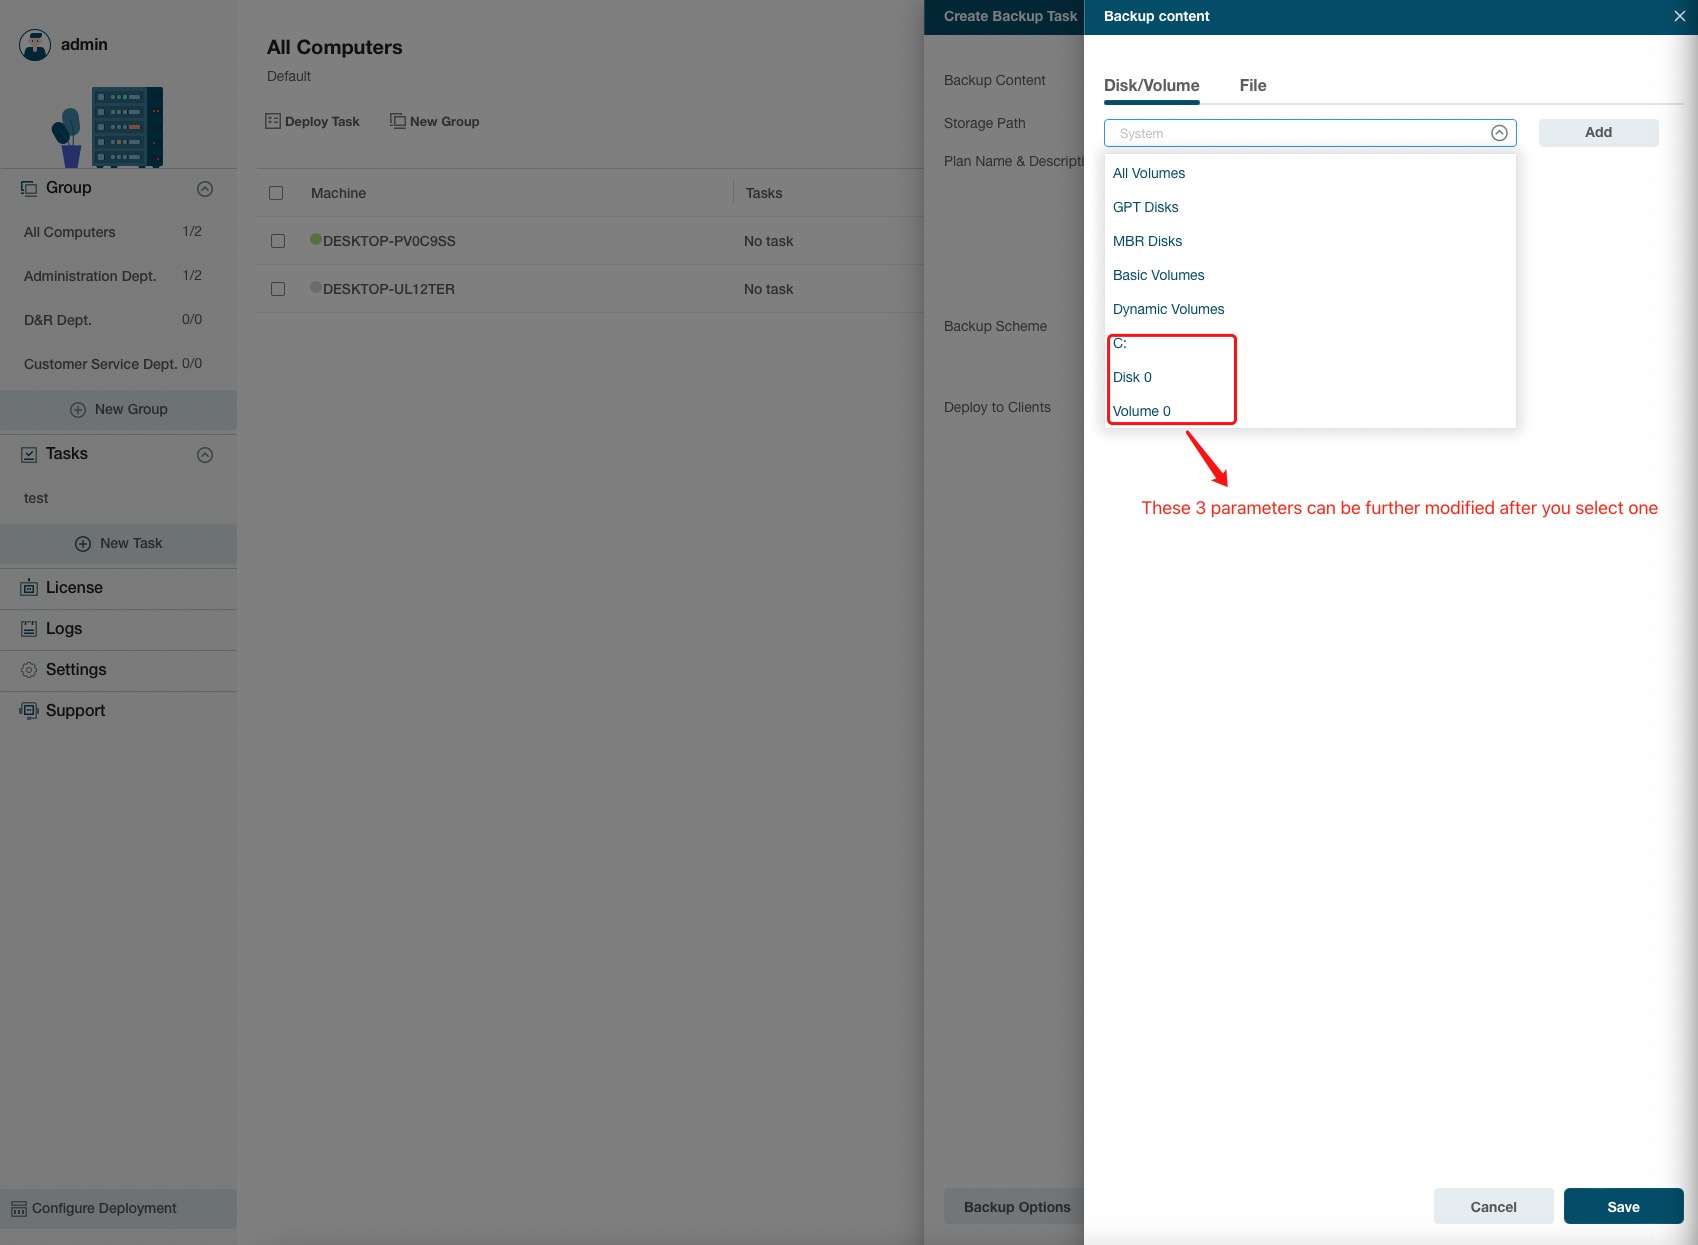
Backup content
Click Edit to select what you want to back up on the client's PC. EaseUS Backup Center provides you with several options to select. You can add more than 1 content to the same backup task.
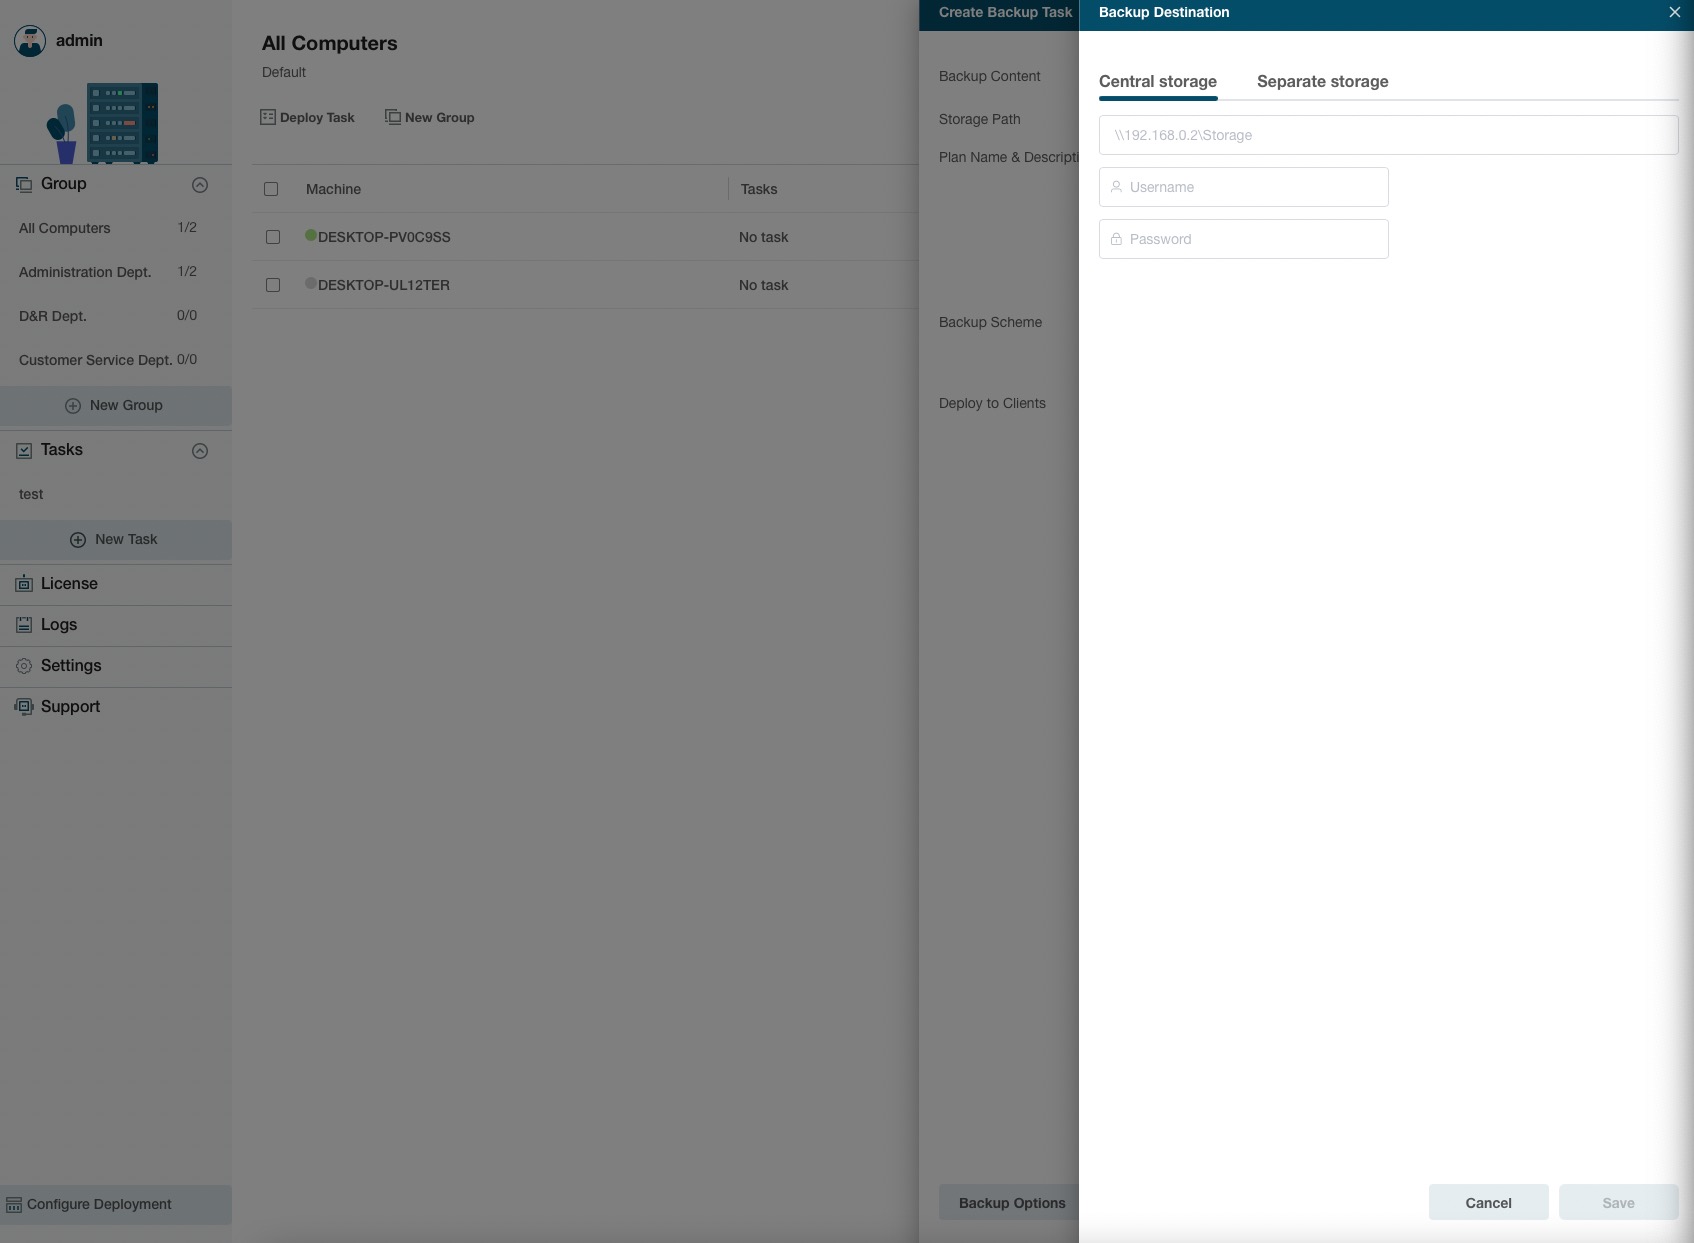
Storage Path
Click Edit to select where you want to store the backup files created in this task. This can be central storage, such as a NAS server, or the separate storage on each client PC.
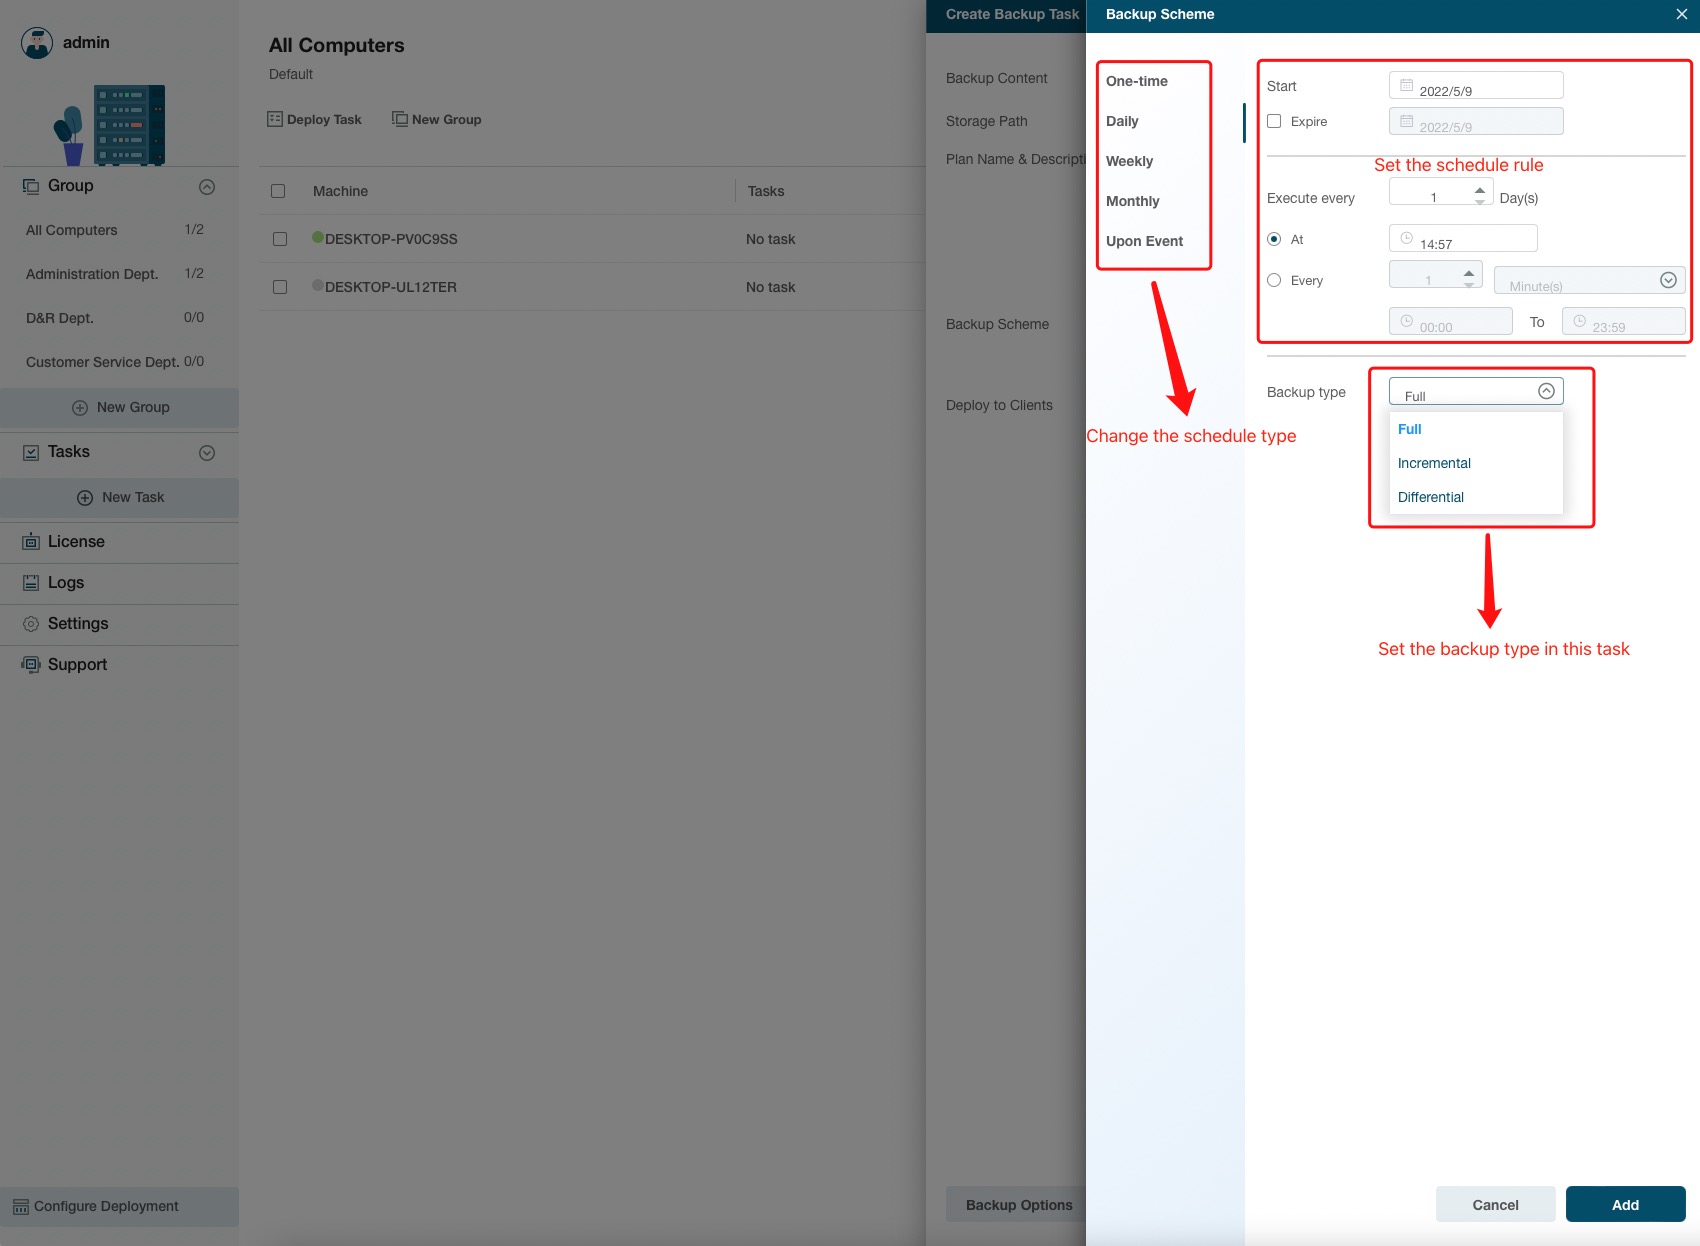
Backup Scheme
Click Schedule => New to enable the schedule setting page.
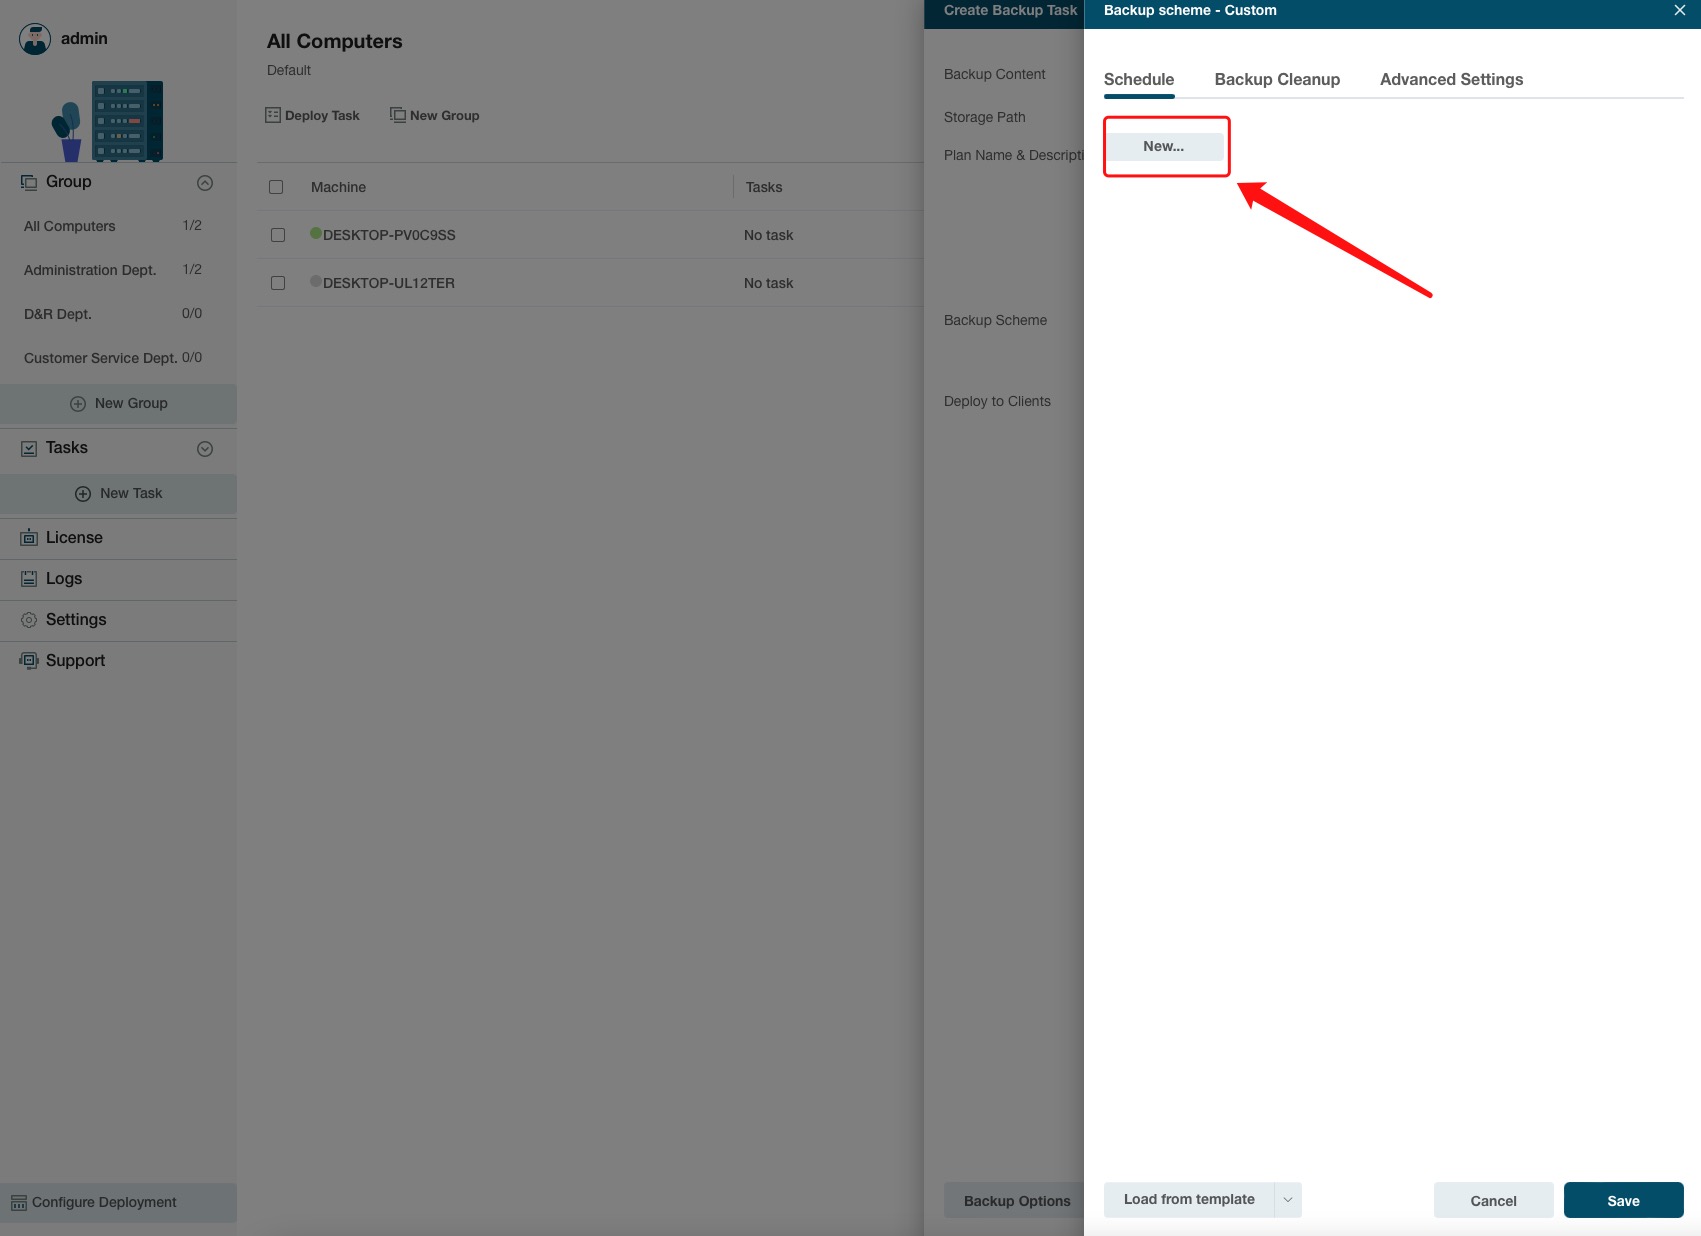
We offer 5 types of backup schedules, One-time backup, Daily, Weekly (running the backup at a specific time on a week day), Monthly (running the backup on which weekday in which week of a month), Upon Event (including System startup, System shutdown, User log on, User log off).
Incremental, differential, and full methods to use for this schedule can be also set here.
You can add more than 1 backup scheme to 1 task.
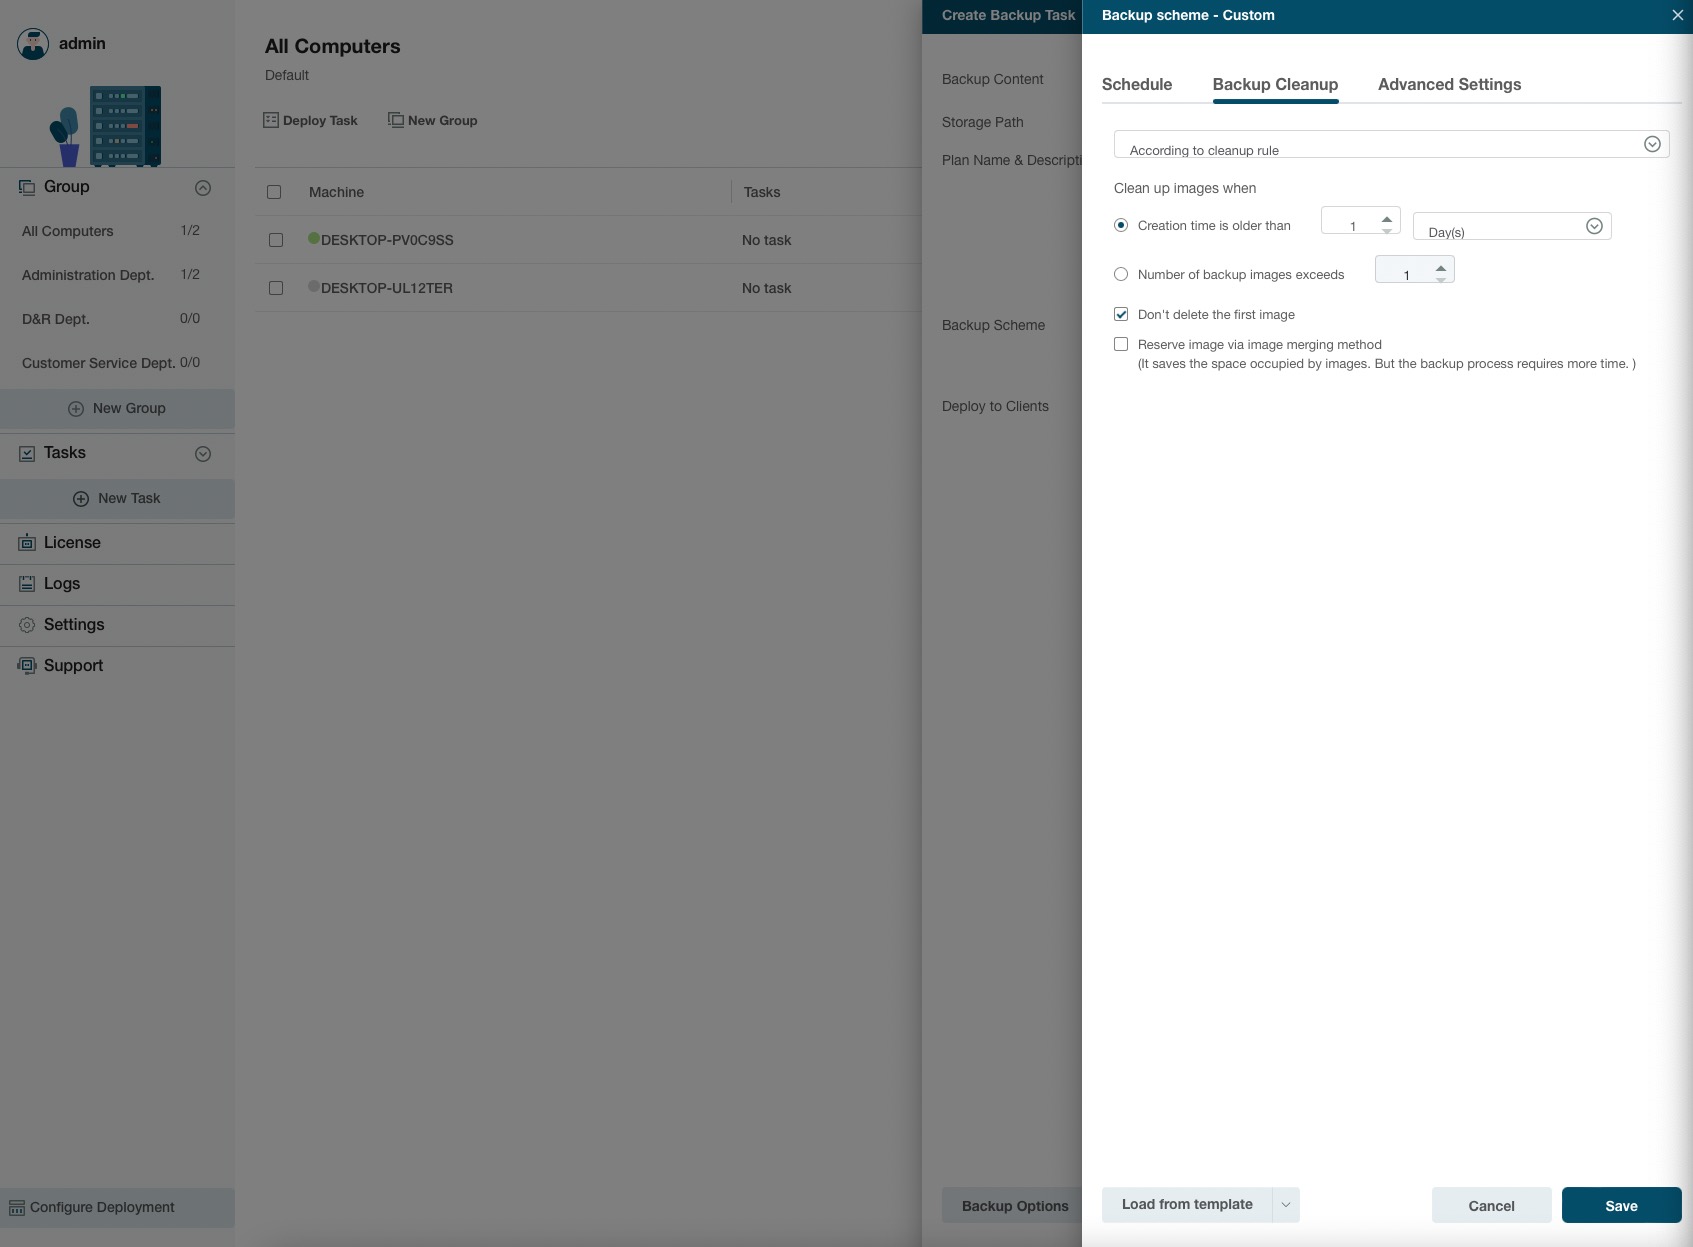
Backup Cleanup
The Backup Cleanup option can automatically delete old image files under a specified rule. You can select to delete the backup image files when:
1. the backup image files are older than a specific days, weeks, months, or years
2. the total image files exceed a certain number.
You can also select to reserve the images via the image merging method instead of deleting them by following the rule.
Backup Options
Some advanced parameters can be specified before the backup task is created. The section below has a detailed description of each parameter.
Performance
Performance includes Compression, Priority, Backup splitting, and Net transfer speed.
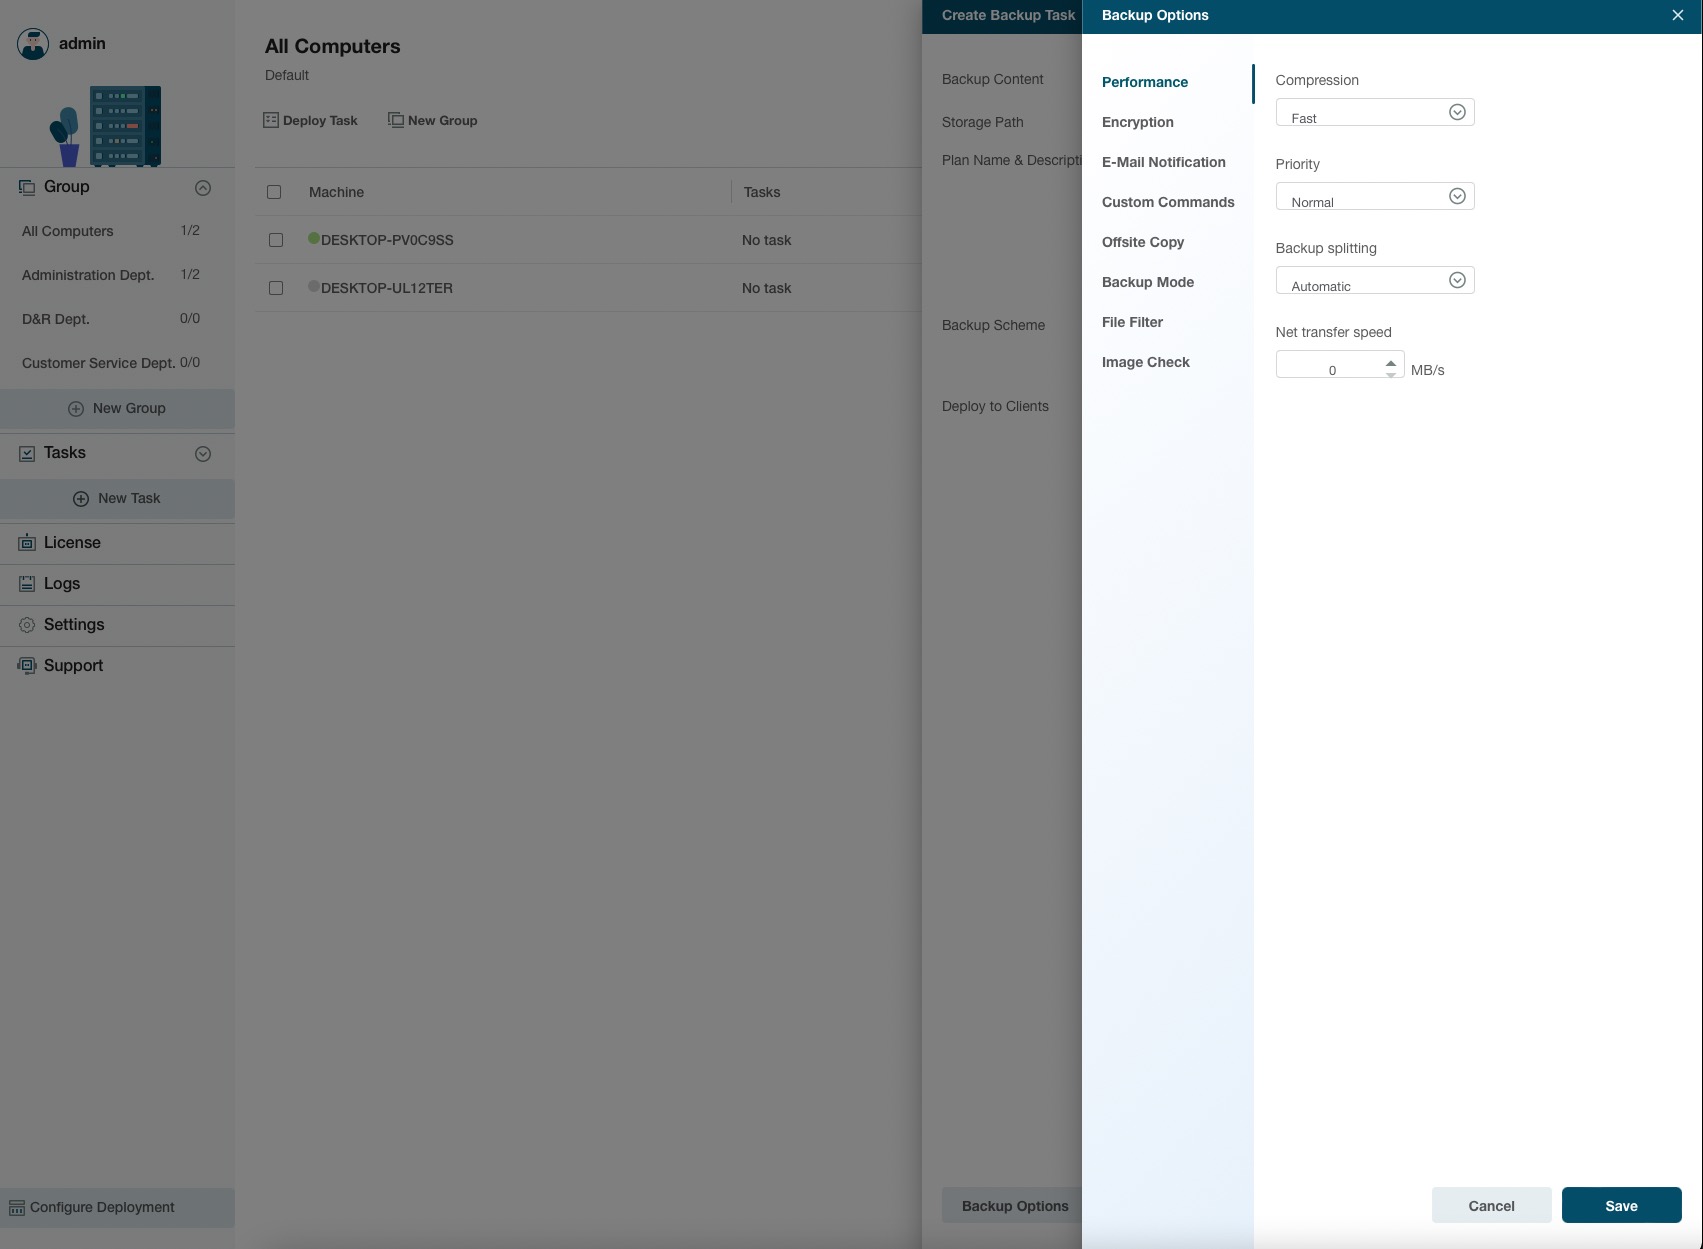
Compression
A backup file can be compressed. Unfold the option to determine the compression level. In most cases, images with High compression are in a smaller size than the ones with None or Normal compression.
Priority
Windows is a multitasking operating system that supports the simultaneous running of multiple applications. Backup runs faster with Priority checked.
Backup Splitting
To accommodate different storage mediums, images require to be split into small pieces with Backup Splitting.
Automatic - Image size is automatically split by file system type of destination storage device with Automatic checked.
Manual - Image size is manually split with Manual checked, which requires a minimum size of 50MB.
Network transfer speed
It is 0 Mbps by default. In this case, EaseUS Todo Backup is unlimited to utilize the network and disk I/O resource.
Tips:
A backup with a High compression level is not supposed to generate a small image. The reason is some files that have been compressed won't be repeatedly compressed anymore, such as .jpg, .pdf, and .mp3, etc.
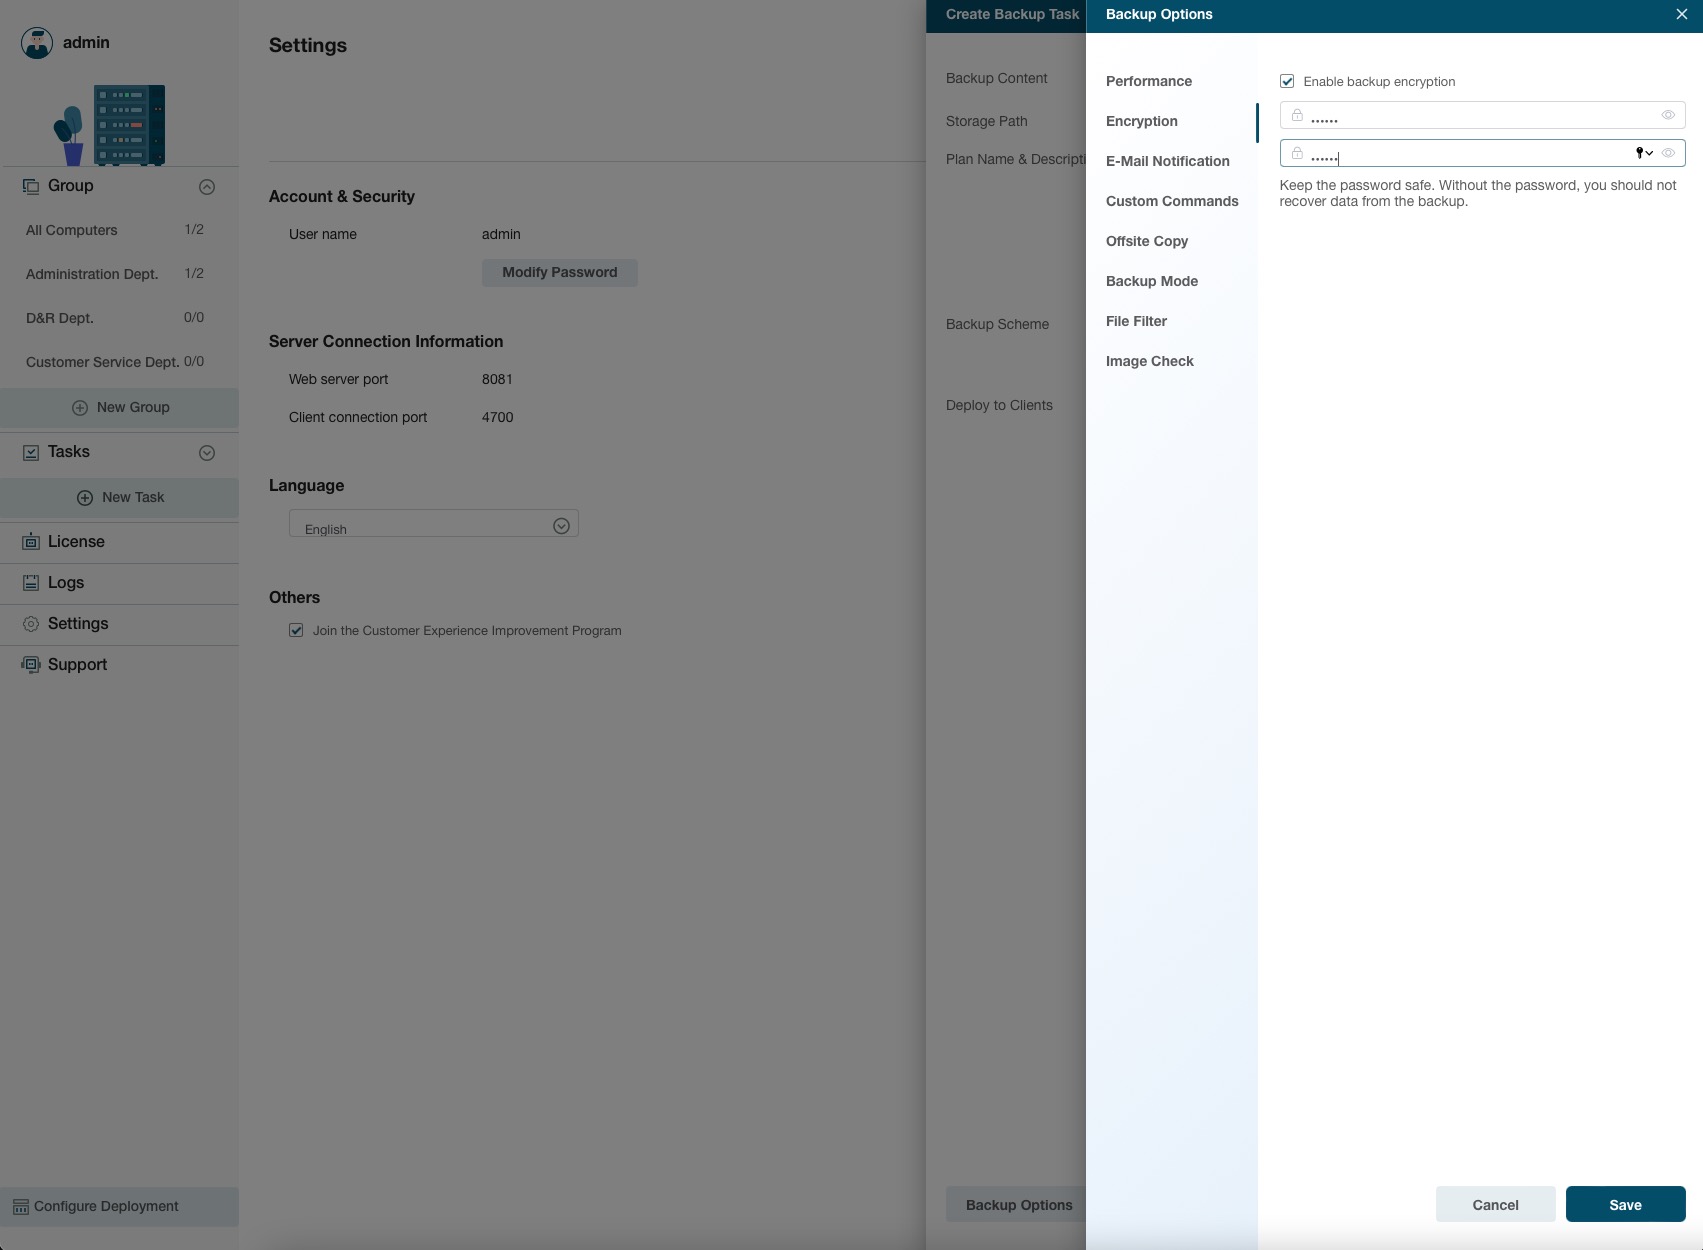
Encryption
To protect images with passwords, please check Enable Backup Encryption. The password adopts the AES256 algorithm, which should be less than 64 characters.
Make sure the password is properly saved. EaseUS is unable to get encrypted images decrypted.
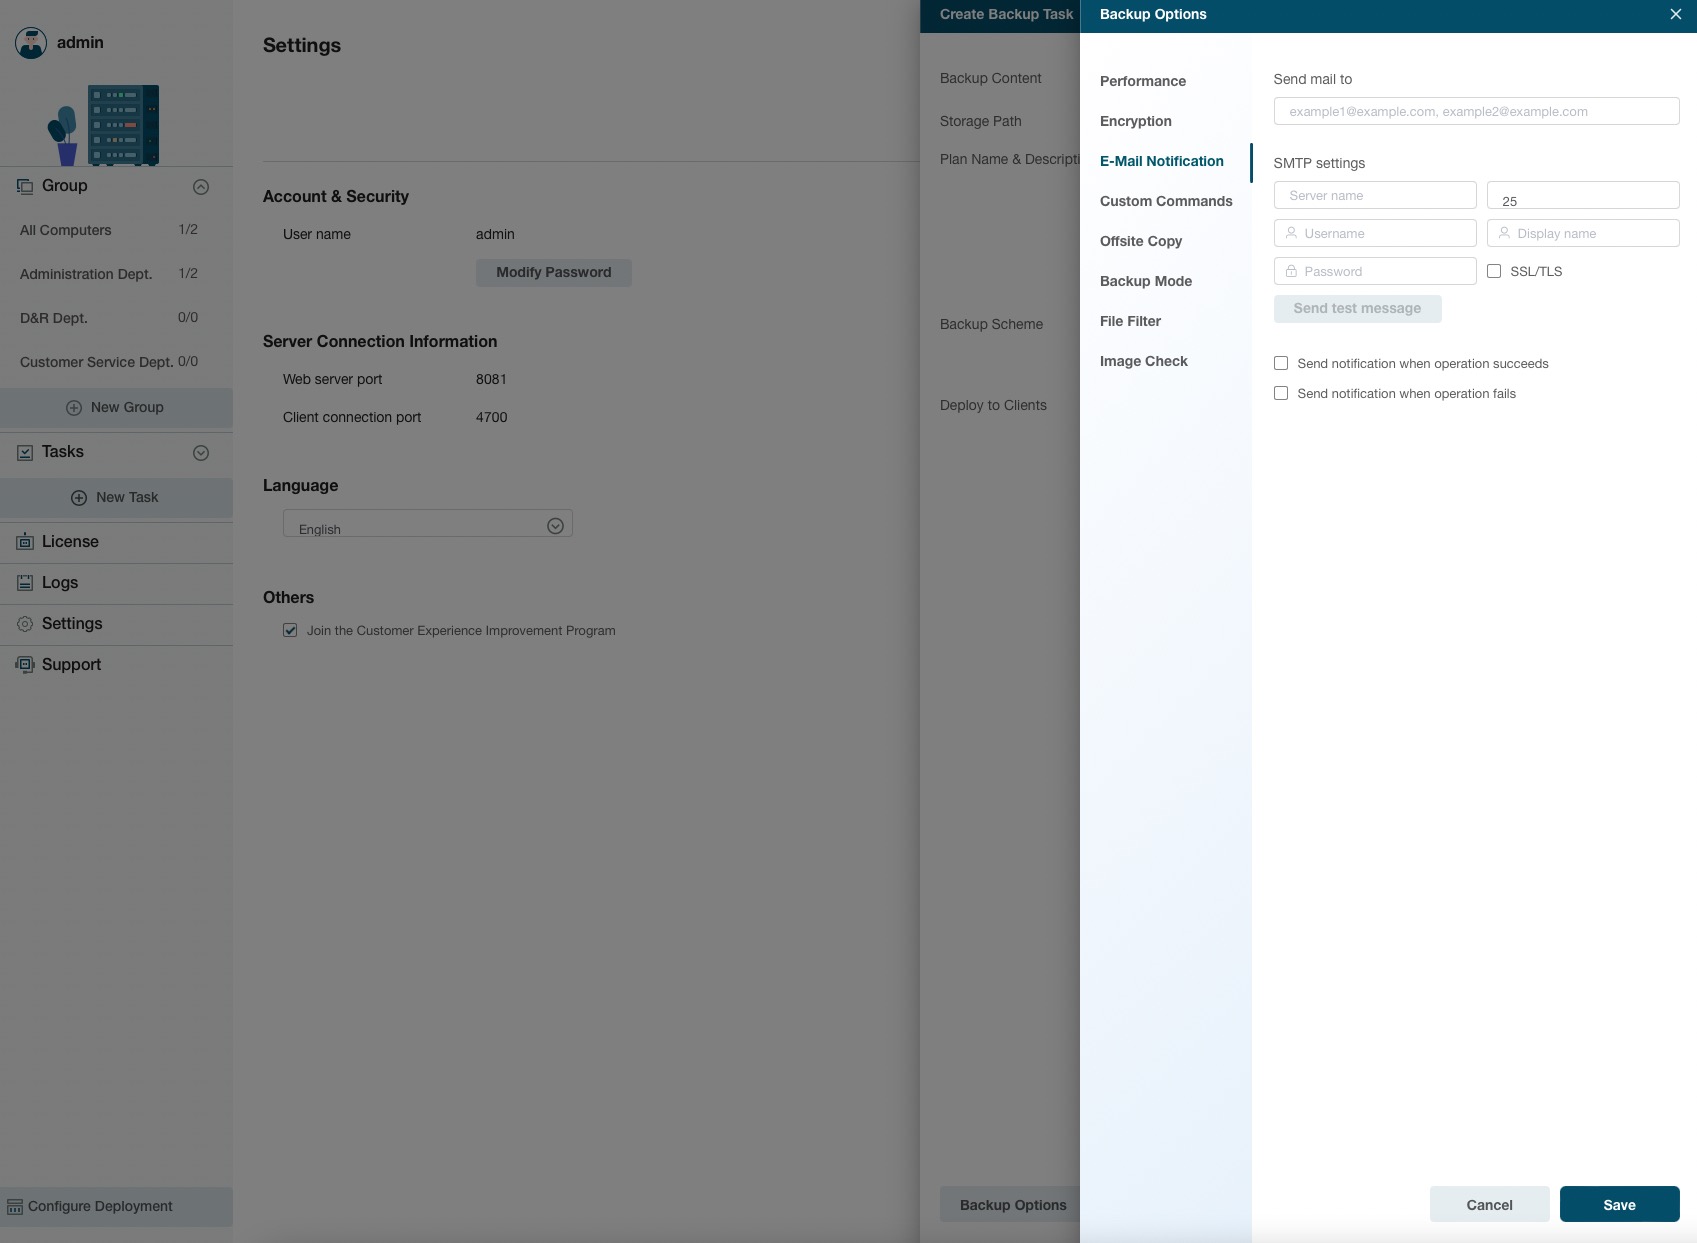
E-mail Notification
You may monitor the backup status with Logs and E-mail notifications. For more details, please click here.
Custom Commands
You may set any commands to be executed before or after a backup plan. For more details, please click here.
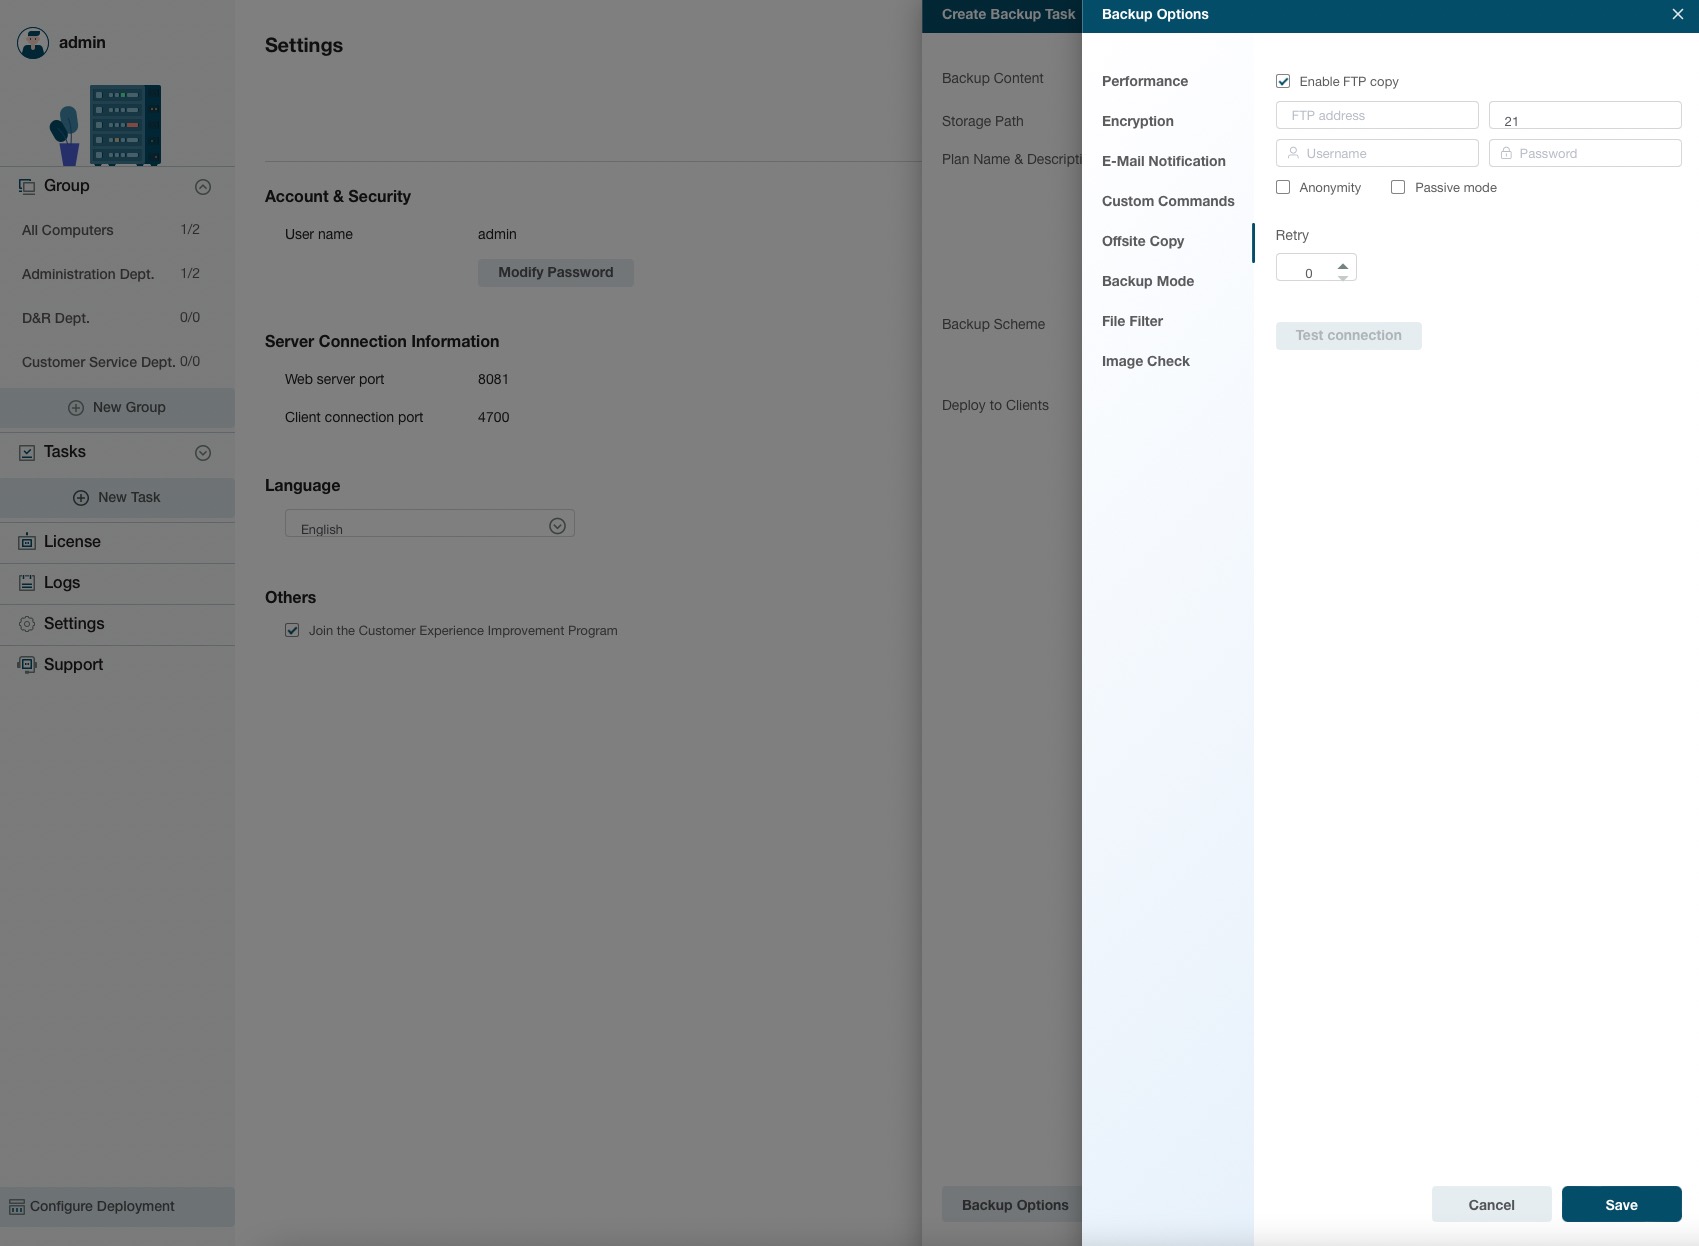
Offsite copy
To better protect images, you may set offsite copy. Images will be automatically duplicated to FTP with the completion of the backup.
Basic settings:
FTP address - Specify the FTP address with the subdirectory included.
Port - Specify a port number for the FTP connection.
Username and Password- Input the username and password to log in to the FTP.
Note:
Check Anonymity when there is no FTP password or user name or FTP is accessible to everyone.
Additional settings:
Retry- Set the retry times. EaseUS Todo Backup automatically retries to connect to the server as many times as it is specified in case of FTP connection failure.
Passive mode - FTP has two working modes, PORT and PASV. The default mode is PORT.
Test connection- Test parameters for FTP to make sure FTP is accessible before backup.
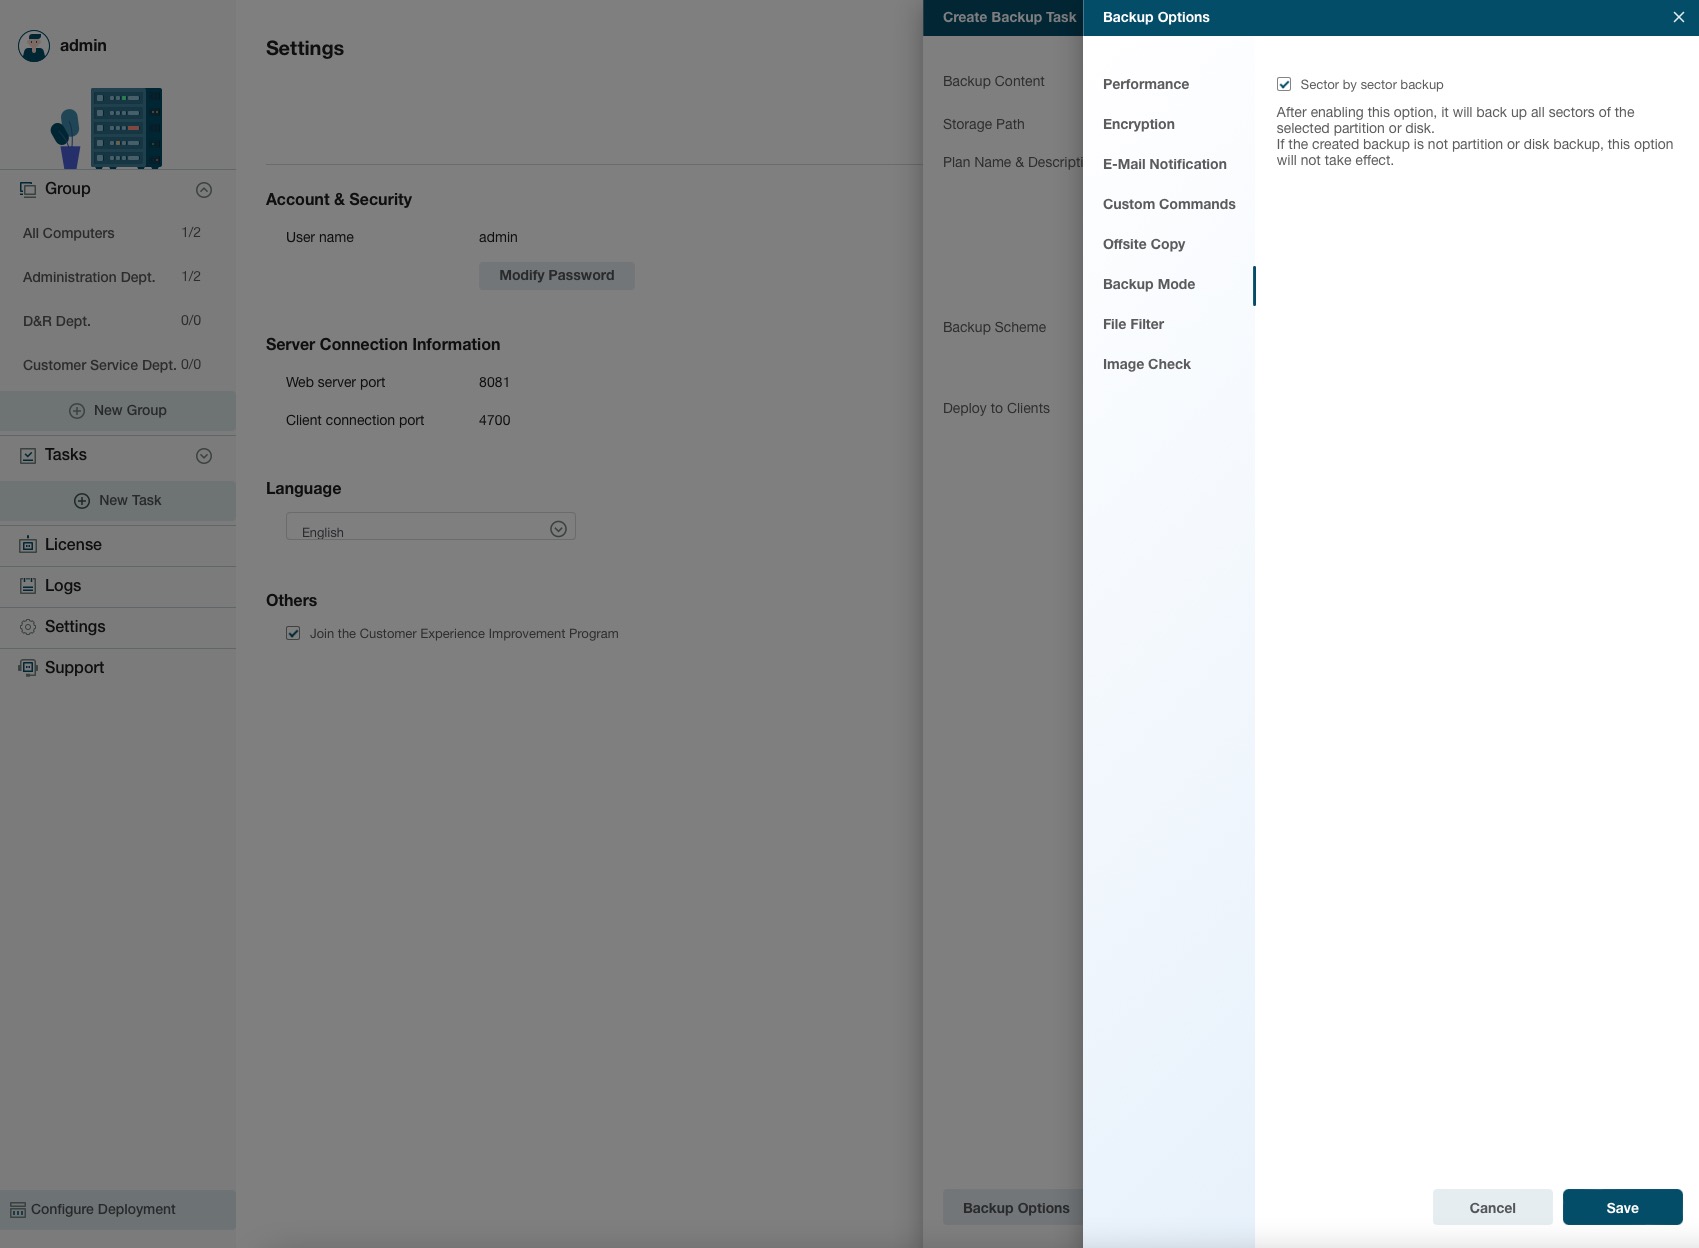
Backup Mode
Sector by sector backup - All the data sectors and blank ones are to be backed up with Sector by sector backup checked. It is useful when a file system error occurs. It slows down the backup speed with a relatively larger image compared with normal backup.
File Filter
File Filter is to exclude unnecessary files/folders or just back up added file types.
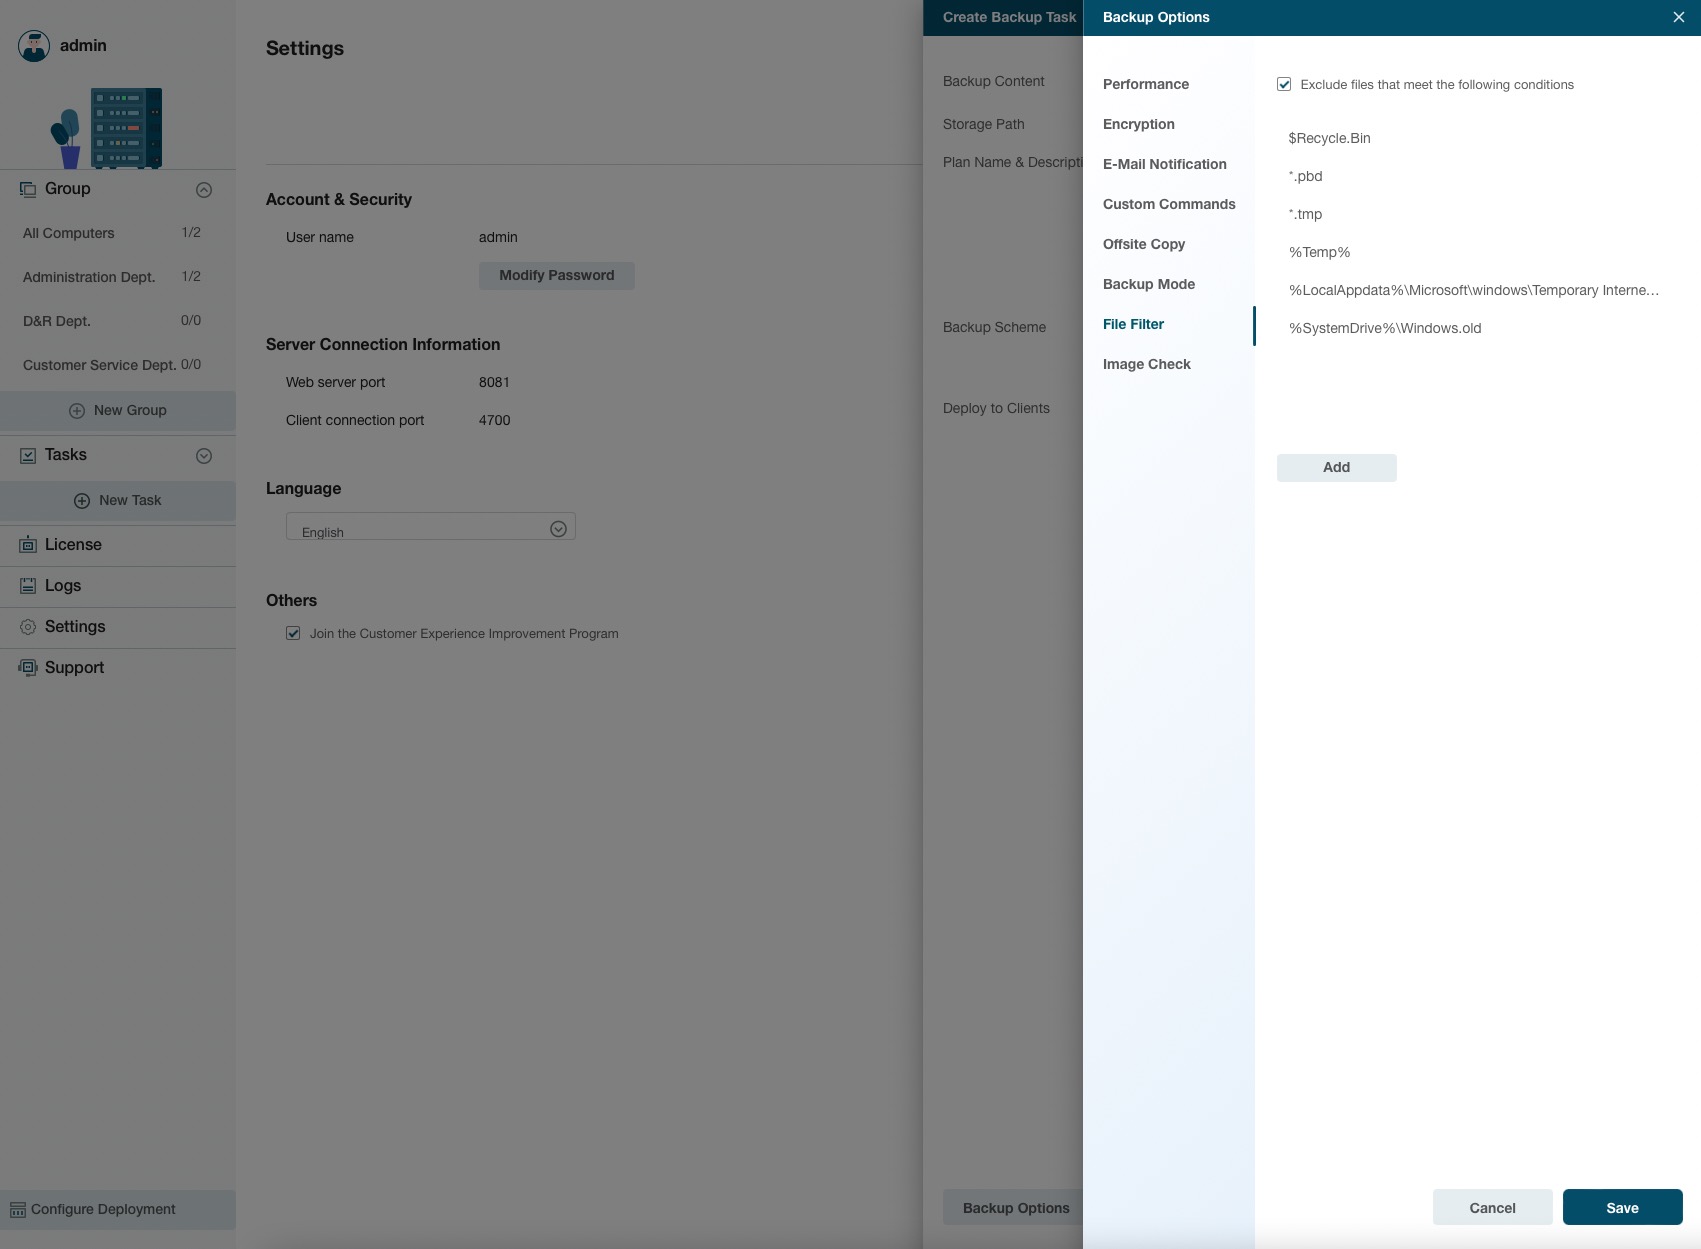
Exclude files that meet the following conditions
To add new files/folders to be excluded, please click ADD. To delete added files/folders to be excluded, please select the files/folder and click Delete.
Image Check
Image Check is to automatically check the new backup images and further ensure the created backup images can be restored.
Create New Single Task
Click New Single Task to remotely create a backup task/plan for the selected computer. This option is available for use after you select one online computer in the computer list. Disk/Volume Backup and File Backup are currently supported in this function.

Deploy Task
With clients added, groups created and backup tasks built, you can now deploy the task to the group/client PCs needed.
Select the task, and click Deploy Task, select a group or the client PCs and click Ok. The task will be deployed to the Todo Backup agent on the Client PCs.

You can also select the clients PC/groups and select to deploy a task to them.
After that, you can always check the backup status and results by accessing the management portal.
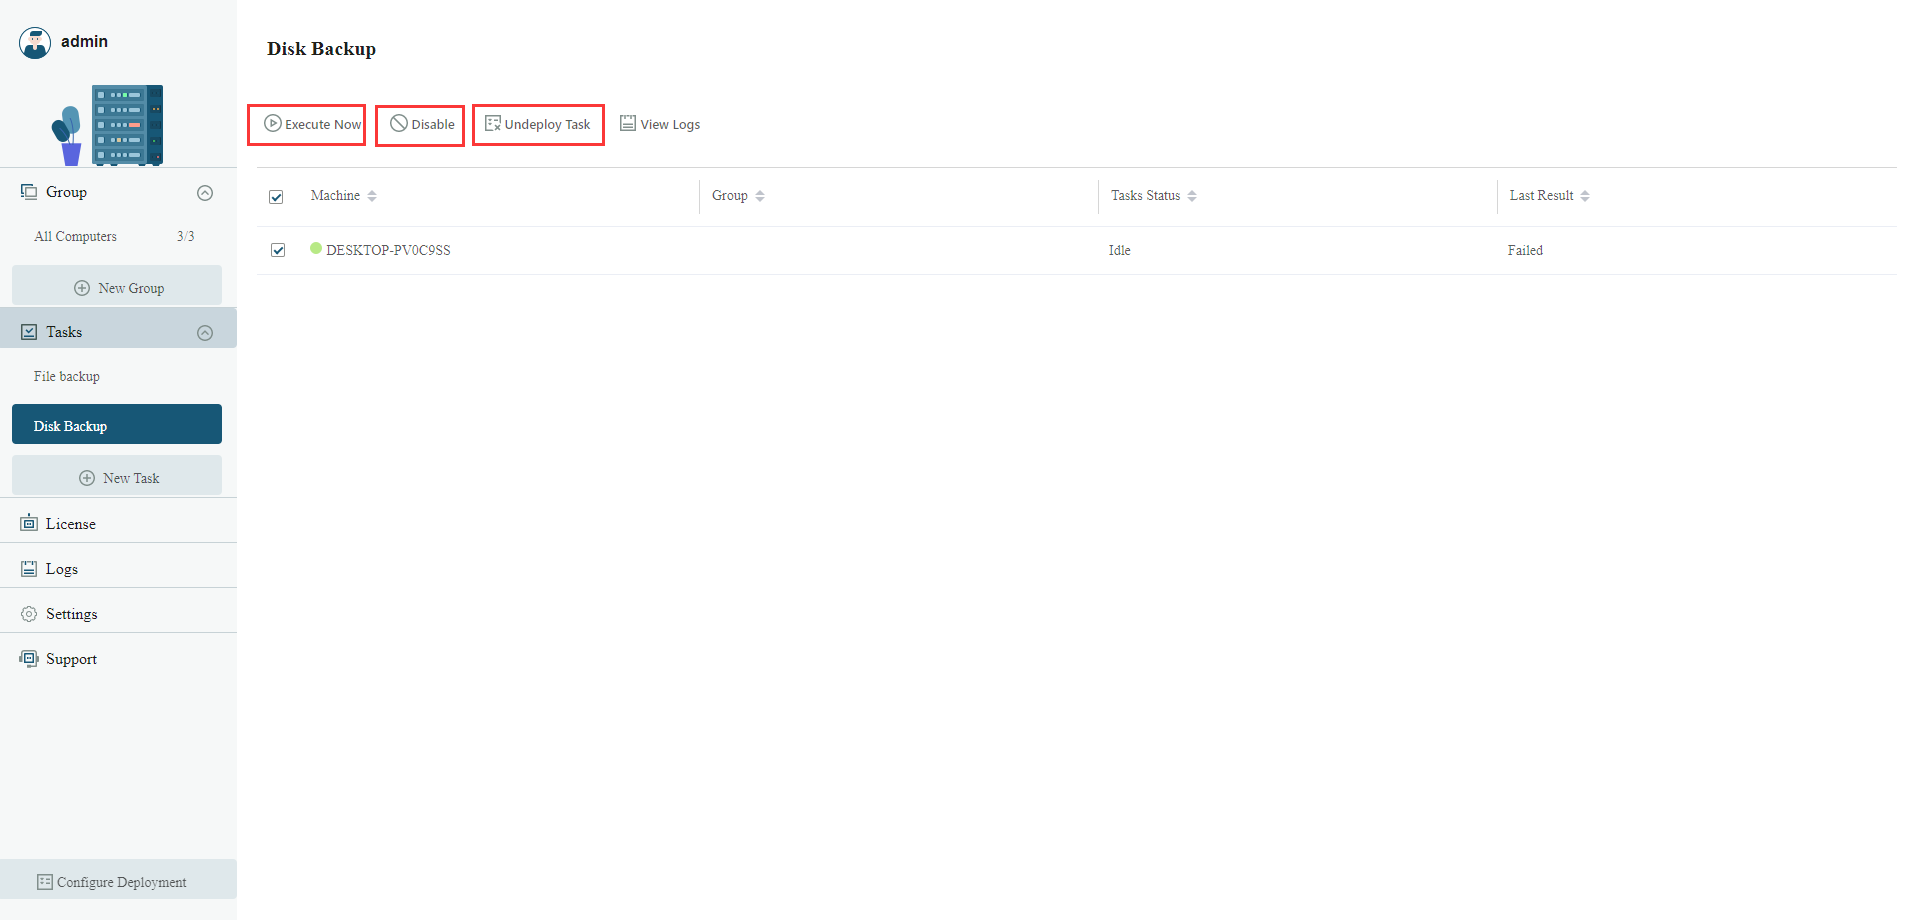
A deployed backup task can be paused/resumed with the option Disabled/Enabled. The other option Execute Now allows users to run a backup immediately out of scheduled time. You can also delete the backup tasks on client PCs using the Undeploy Task option.
Recovery
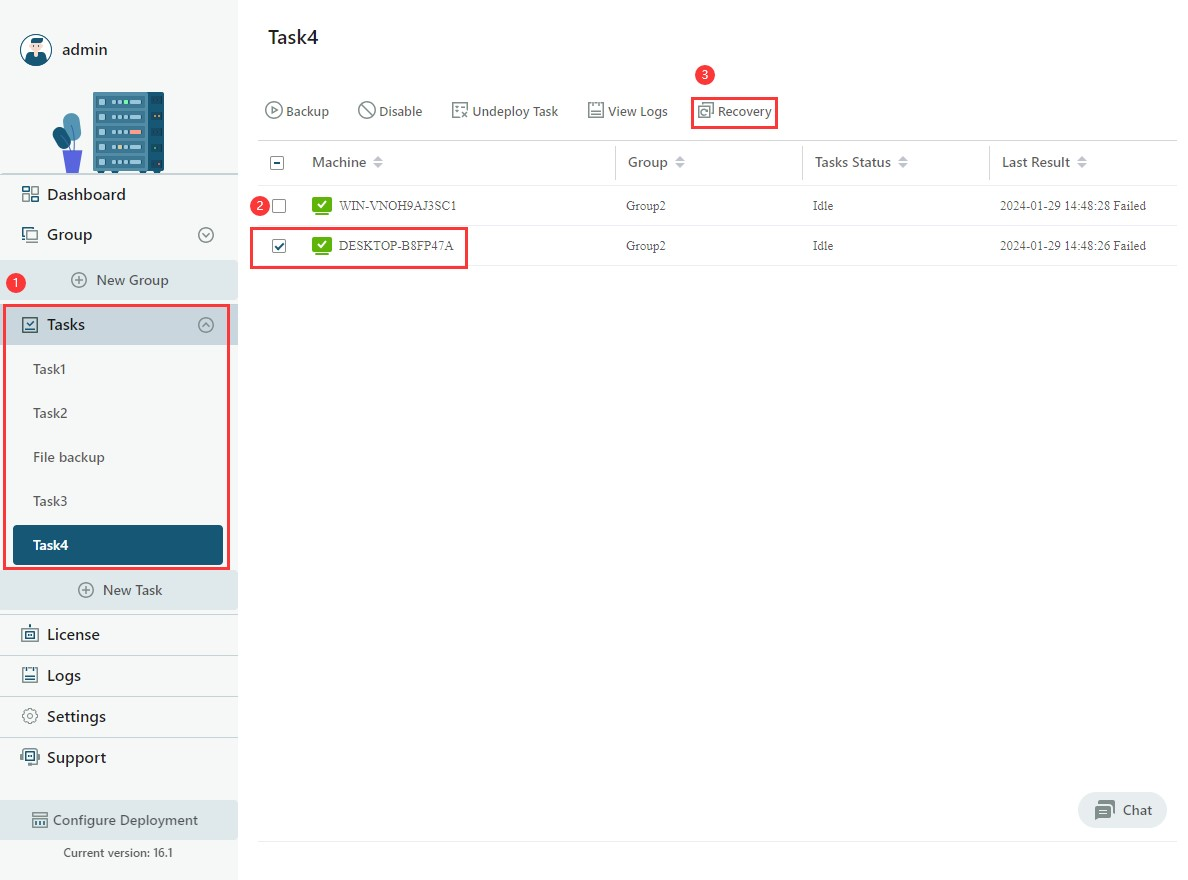
Once the backup is completed, you can specify a client from within the Task to execute the recovery.
Click Task in the left column, select the backup task you want to perform recovery to enter the corresponding interface, then click Recovery.
After a successful backup, you can specify a client to perform recovery within the Tasks section. Simply click on Tasks in the left column, select the desired backup task and machine(s), then click on Recovery.
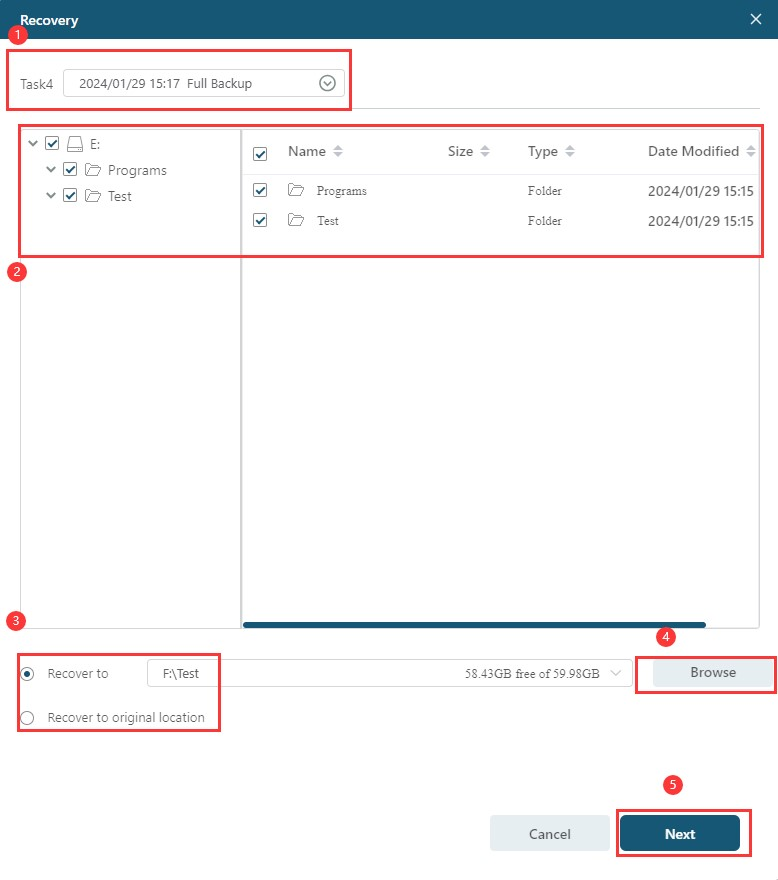
To begin, choose the backup version you wish to restore. Then, proceed to navigate through the browser below to select the content that you want to restore. Once you have made your selection, you can opt to restore it to either the original path or specify a custom path. If you prefer a custom path, simply click on Browse and set your desired location. Then click Next.
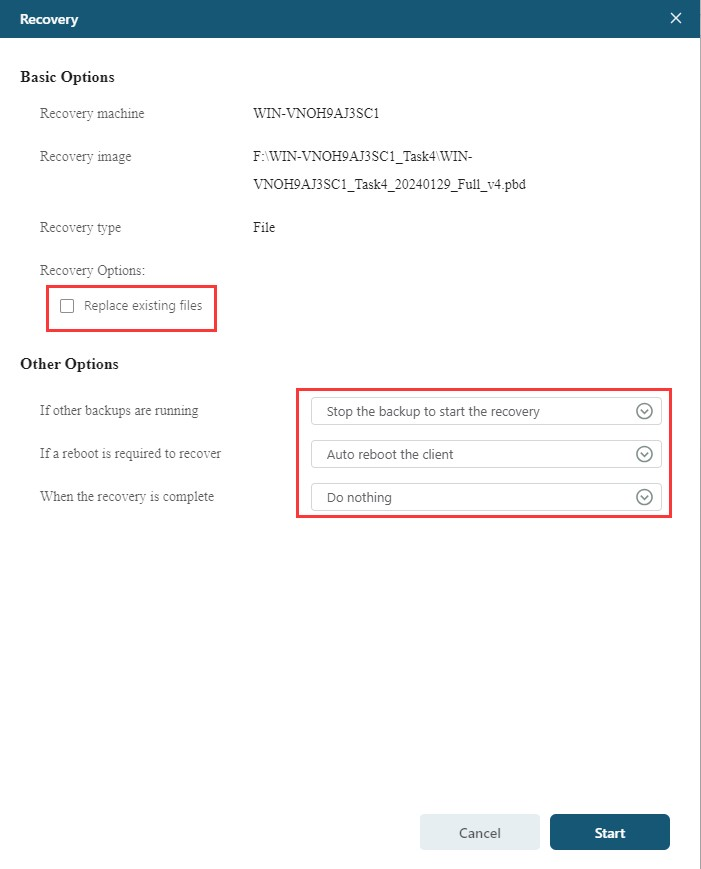
In the final step, you can review the essential details of the restore process. You will have the option to choose whether to replace existing files and make any necessary adjustments. If you have verified that the recovery settings are correct, simply click on Start to initiate the restore process.
Logs
All above-described user operations taken on a Console side will be recorded here in the Logs.
Users can select an individual log record to check the details, or export/delete it. Please note that the logs will be not removed unless you manually delete it.
Feedback and Support
We invite your comments on how well EaseUS Backup Center is performed, and we are also enthusiastic about replying to all your questions about using it. Please feel free to contact us at:
We also provide an online chat service and the Live Chat option can be located in the top navigation bar of EaseUS official website www.easeus.com.