Page Table of Contents

When your computer suddenly stops working, one of your biggest concerns may be losing important files, photos, documents, or work projects. You may wonder: Can I still access the files on a broken computer? What if Windows won't boot? Do I need to repair the computer before transferring my data?
The good news is that a broken computer doesn't necessarily mean your data is lost. In many cases, the problem is caused by a faulty motherboard, power supply, screen, or Windows system, while the internal HDD or SSD remains accessible.
You can often remove the hard drive from the broken computer, connect it to another working Windows PC, and copy your files. Depending on the problem, you can also use a WinPE bootable USB or clone the entire hard drive to another disk.
This guide explains how to identify the problem, choose the safest data transfer method, and troubleshoot common issues when accessing an old hard drive.
Can You Copy Data from a Broken Computer?
Yes. You can often copy data from a broken computer as long as its internal hard drive or SSD is still functional and the data is accessible.
The important thing is to distinguish between a computer failure and a hard drive failure. A computer consists of several components, including the motherboard, CPU, RAM, power supply, display, operating system, and storage drive. A problem with one component does not automatically mean the others have failed.
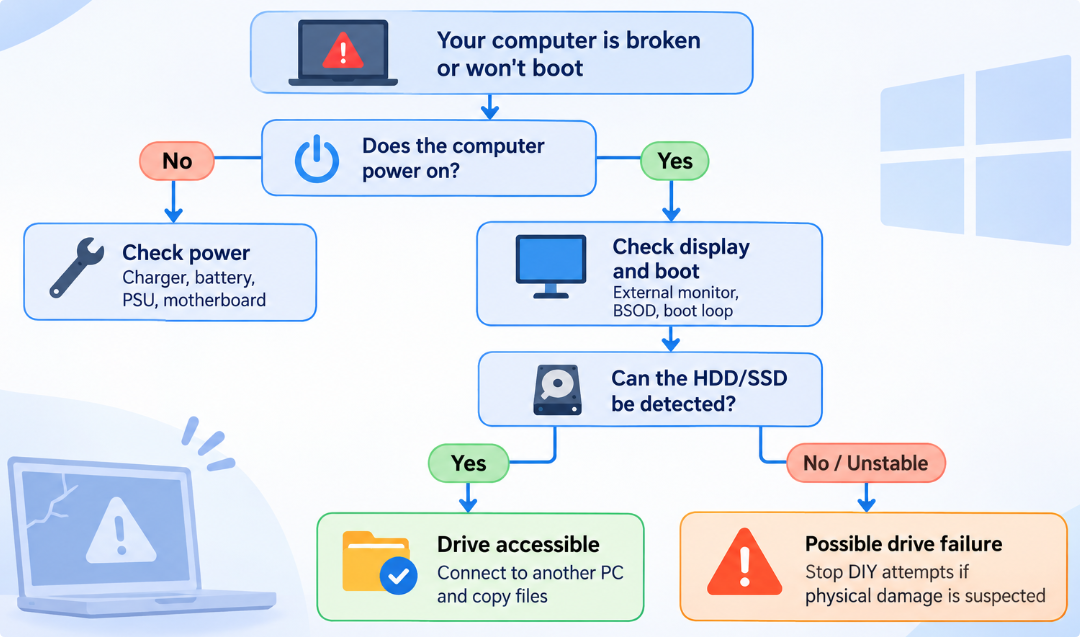
Important: Before attempting any repair, avoid formatting, initializing, or reinstalling Windows on the original drive if you still need its data. If you suspect physical drive failure, stop using it rather than repeatedly powering it on.
How to Identify What's Wrong with Your Broken Computer
Before removing the hard drive, identify the computer's symptoms. This helps you determine whether you can access the data directly, need to remove the drive, or should seek professional recovery. Here are some common computer problems and their possible causes.
| Symptom | Possible Cause | Data Risk | What to Do |
| Computer won't turn on at all | Power supply, battery, charging port, or motherboard failure | Usually low | Check the power connection or remove the drive |
| Computer turns on, but the screen is black | Display, display cable, or graphics card problem | Usually low | Try an external monitor |
| Blue Screen of Death (BSOD) | Windows, driver, RAM, or hardware problem | Depends on the drive's condition | Try accessing the drive from another PC |
| Stuck on the Windows logo or Automatic Repair | Boot files, Windows system, or storage problem | Moderate | Check whether the drive is detected |
| Computer keeps restarting | Windows corruption, memory, overheating, or drive problems | Depends on the cause | Avoid repeated forced restarts and check the drive |
| HDD/SSD is not detected in BIOS/UEFI | Connection, power, controller, firmware, or drive failure | Potentially high | Check connections; seek professional help if it remains undetected |
| HDD makes clicking or grinding noises | Possible mechanical failure | High | Stop using the drive and contact a recovery specialist |
Note that clicking and grinding noises are relevant to mechanical hard drives, not SSDs. If you suspect physical damage, stop using the drive. Repeatedly powering it on, scanning it, or attempting to clone it may make the situation worse. For important data, contact a professional data recovery service.
What to Prepare Before Copying Data from a Broken Computer
If the original HDD or SSD is still accessible, prepare the following items before starting.
- A working Windows 11/10 computer - to connect to and read the old drive
- SATA-to-USB adapter or external enclosure - to connect a removable SATA HDD/SSD
- M.2 SSD enclosure - to connect an M.2 SATA or NVMe SSD、
- External HDD or SSD - to store the copied files
- Screwdriver - to remove the internal drive if necessary
- BitLocker Recovery Key - to unlock an encrypted drive, if required
Different storage devices use different interfaces. Make sure your adapter or enclosure supports the old drive before purchasing one.
| Drive Type | Required Connection Device |
| 2.5-inch SATA HDD/SSD | SATA-to-USB adapter or SATA enclosure |
| 3.5-inch SATA HDD | SATA-to-USB dock or enclosure with an external power supply |
| M.2 SATA SSD | M.2 SATA-compatible enclosure |
| M.2 NVMe SSD | M.2 NVMe-compatible enclosure |
- ⚠️Notice
- M.2 describes the physical form factor, not necessarily the storage interface. M.2 SATA and M.2 NVMe SSDs are different, so check compatibility before buying an enclosure.
- Also, some newer laptops use soldered storage that cannot be removed like a standard SSD. If you are unfamiliar with laptop disassembly, consider asking a technician for help.
How to Copy Data from Hard Drive of Broken Computer
There are several ways to transfer data, depending on whether the broken computer can still power on and whether you want individual files or the entire disk.
Method 1. Remove the Hard Drive and Connect It to Another Windows PC
Best for: Computers with a damaged motherboard, power supply, or screen, provided the internal drive is still working. This is one of the most practical ways to copy data from a computer that won't turn on.
Step 1. Remove the Hard Drive from the Broken Computer
First, completely shut down the computer and disconnect its power source.
🖥️For a desktop:
- Unplug the power cable.
- Remove the side panel of the computer case.
- Locate the internal HDD or SSD.
- Disconnect the SATA data and power cables, or remove the M.2 SSD from its slot.
- Carefully remove the drive.
💻For a laptop:
- Turn off the laptop and disconnect the charger.
- Remove the battery if it is externally removable.
- Follow the manufacturer's instructions to remove the bottom cover.
- Locate the internal HDD or SSD.
- Disconnect the drive and remove its mounting screws if necessary.
- Carefully take out the storage device.
Avoid touching exposed circuit boards or connectors unnecessarily. If the laptop has a sealed design or soldered storage, professional assistance may be necessary.
Step 2. Connect the Old Drive to Another Windows Computer
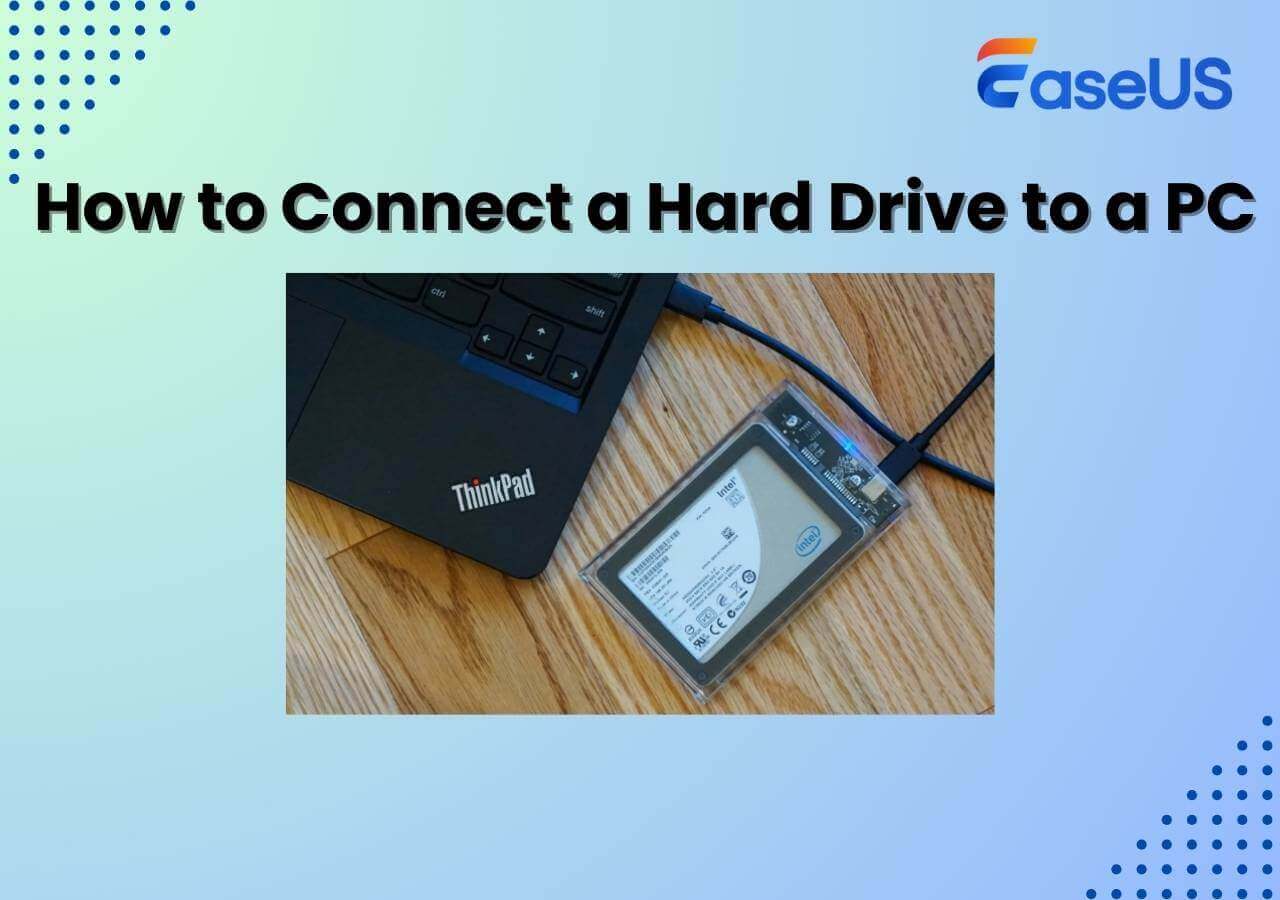
- Connect the removed HDD or SSD to a compatible SATA-to-USB adapter or external enclosure.
- Connect the adapter to a working Windows PC.
- Wait for Windows to detect the drive. If it appears in File Explorer, open it and check whether your old files are accessible.
- If Windows asks you to format or initialize the drive, click Cancel. Do not proceed if you need the existing data.
Step 3. Locate Your Important Files
Open the old Windows partition and navigate to: Users > YourOldUsername. You will usually find the following folders:
- Desktop - Files saved on the old desktop
- Documents - Word documents, PDFs, and work files
- Downloads - Downloaded files and installers
- Pictures - Photos and images
- Videos - Personal videos and recordings
- Music - Audio files
- AppData - Application settings and local data
Also, check for files stored in custom folders or on other partitions. Not all users save their data in the default Windows locations.
Step 4. Copy Your Files to Another Drive
Select the folders or files you want to keep, right-click, and select Copy. Open the destination external HDD or SSD, create a folder for the transferred data, and select Paste. For important files, copy the most valuable items first. After copying, open several files from the destination drive to confirm that they are readable.
Tip: If you only need personal files, manual copying is usually simpler than cloning the entire disk.
Method 2. Boot the Broken Computer from a WinPE USB
Best for: Computers with Windows boot problems, provided the motherboard, storage device, and USB boot process are functional. If the computer can still power on but Windows cannot start, you may be able to access its internal drive through a bootable Windows PE (WinPE) environment.
Step 1. Create a WinPE Bootable USB
On another working Windows computer, prepare a bootable WinPE USB using a trusted tool (like EaseUS Disk Copy) that supports creating WinPE USB. Make sure the USB drive has enough capacity and back up any existing files, because creating bootable media may erase its contents.
 Free Download
Windows 11/10/8/7
Download and install EaseUS Disk Copy on your Windows computer, launch it, and choose Emergency Disk.
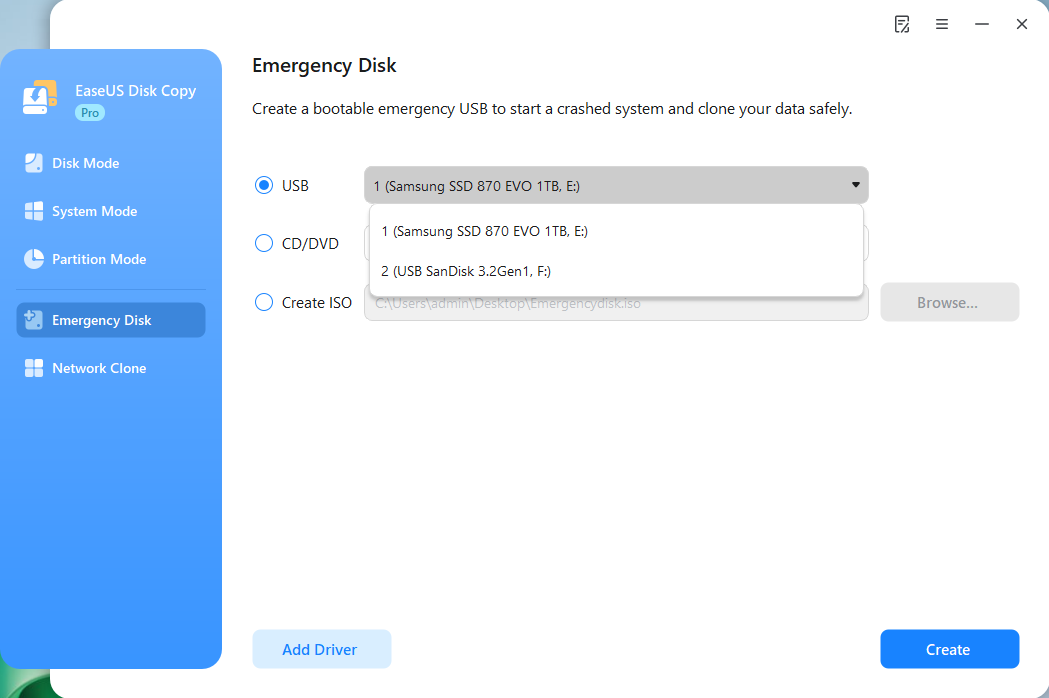
Choose the USB and click Create, wait for the process to complete, then you'll get a bootable USB.
Step 2. Boot the Broken Computer from the USB
Connect the bootable USB to the broken computer > Turn on the computer > Enter BIOS/UEFI or the boot menu using the manufacturer's designated key > Select the USB drive as the boot device > Wait for the WinPE environment to load.
*The exact boot key varies by computer manufacturer. If the computer cannot complete its power-on process or initialize the hardware, this method will not work.
Step 3. Connect an External Storage Device
Once WinPE loads, connect an external HDD or SSD to the computer. Make sure both the internal drive and external destination drive are detected. If the internal drive is encrypted with BitLocker, you will need the appropriate recovery key to access its contents.
Step 4. Copy Your Files
Use the file management tools available in the WinPE environment to locate your personal files. Navigate to the Windows user folders on the original drive, select the important data, and copy it to the external storage device.
Method 3. Clone the Entire Hard Drive to a New HDD or SSD
Best for: The original HDD or SSD is still readable, you want to migrate the entire disk rather than selected folders, you want to preserve the original partition structure, or you plan to use a new drive as a replacement.
If you want to transfer more than individual files, disk cloning may be a better option; it copies the source disk's partitions and data to another disk, including Windows OS, installed applications, personal files, and other partition contents. In this situation, EaseUS Disk Copy is an excellent disk-cloning tool you shouldn't miss. Its easy-to-use features make the process much easier.
Step 1. Connect the Old and New Drives
Remove the old disk from the broken computer and connect it to a working Windows computer. Then connect the new HDD or SSD that will receive the cloned data. Make sure the destination drive has enough capacity for the data and partitions you're cloning.
Step 2. Launch EaseUS Disk Copy
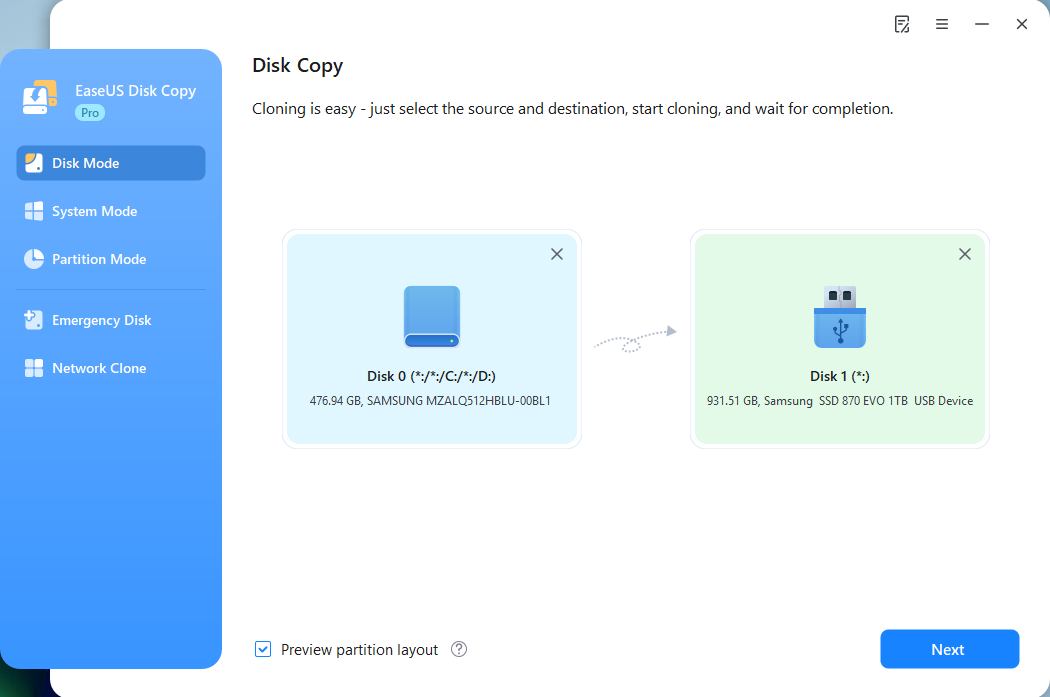
Install and open EaseUS Disk Copy on the working Windows computer. Select the Disk Mode function from the left panel.
Free Download
Windows 11/10/8/7
Step 3. Select the Source and Destination Disks
- Choose the old hard drive as the source disk.
- Select the new HDD or SSD as the destination disk.
Step 4. Adjust the Disk Layout
If the destination drive has a different capacity, review the available layout options and adjust the partition sizes when supported. For an SSD, enable 4K alignment if the option is available to optimize partition alignment.
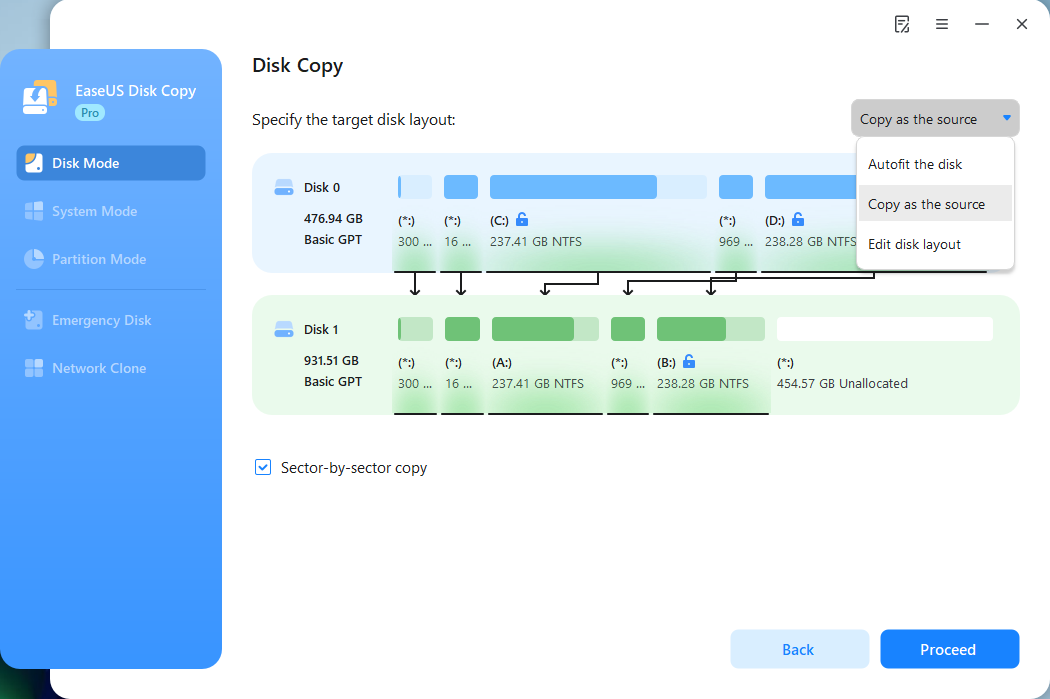
Step 5. Start the Cloning Process
Confirm the settings and start cloning. Wait for the process to finish. The time required depends on the amount of data, drive health, connection speed, and hardware performance. Once complete, check the destination drive to confirm that the expected partitions and files have been copied.
Note: Cloning does not repair a physically failing drive or guarantee that Windows will boot on different hardware. If the source drive shows signs of physical damage, prioritize professional recovery or a suitable data-preservation process instead of repeatedly attempting ordinary cloning.
You can also read this post to learn how to transfer data from the hard drive of a dead computer in 6 steps.
Method 4. Contact a Professional Data Recovery Service
If the hard drive itself is physically damaged or cannot be accessed through normal connections, professional recovery may be the safest option.
Consider professional assistance if:
- The HDD makes clicking, grinding, or repeated mechanical noises.
- The drive has been dropped or exposed to liquid.
- The drive is not detected by multiple compatible connections.
- Reading the drive causes repeated system freezes or serious I/O errors.
- The data is critical and you cannot risk further damage.
A professional recovery service can diagnose the storage device and determine whether specialized recovery procedures are necessary. Do not open a mechanical hard drive yourself. Its internal components require a controlled environment for certain repair and recovery procedures.
FAQs About Copying Data from a Broken Computer
1. Can I get files off a computer that won't turn on?
Yes, if the internal hard drive or SSD is still functional. You can remove the drive, connect it to another Windows computer using a compatible USB adapter or enclosure, and copy your files.
If the drive is soldered to the motherboard or physically damaged, you may need professional assistance.
2. Can I copy data from a broken computer without removing the hard drive?
If the computer can still power on, you can try connecting an external monitor if the screen is damaged. If Windows cannot boot but the hardware still works, you may be able to start a WinPE environment from a bootable USB and copy files to an external drive. However, if the computer cannot power on at all, removing the drive may be necessary.
3. How do I access files from an old hard drive with a different Windows account?
You may encounter an Access Denied message because the old user account has different permissions from your current Windows account.
If the drive is not encrypted, you can review the folder's Advanced Security Settings and change ownership or permissions when appropriate.
4. Should I repair the broken computer before copying my data?
Not necessarily. If the problem is related to the screen, power supply, motherboard, or Windows installation, you may be able to access the old hard drive from another computer without repairing the original device. However, if the storage device itself is damaged, avoid unnecessary repair attempts and consider professional data recovery first.
Final Thoughts
A broken Windows computer does not always mean your important files are gone. In many cases, the HDD or SSD remains functional even when the computer cannot turn on or Windows cannot boot.
The key is to identify the actual problem before choosing a data transfer method.
- If the computer has a power, motherboard, or display problem, try accessing the internal drive from another PC.
- If Windows cannot boot but the hardware works, consider a WinPE bootable USB.
- If you want to transfer the entire disk, use a disk cloning solution such as EaseUS Disk Copy.
- If the drive shows signs of physical damage, stop using it and seek professional recovery assistance.
Most importantly, avoid formatting, initializing, or writing new data to the original drive before securing the files you need. Once your important data has been copied, verify the transferred files and keep an additional backup to prevent future data loss.
Free Download
Windows 11/10/8/7
-
Updated by
![Larissa]()
Larissa
Larissa has rich experience in writing technical articles and is now a professional editor at EaseUS. She is good at writing articles about data recovery, disk cloning, disk partitioning, data backup, and other related knowledge. Her detailed and ultimate guides help users find effective solutions to their problems. She is fond of traveling, reading, and riding in her spare time.…Read full bio