Page Table of Contents

If you want to create a complete image of your hard drive for backup, migration, or disaster recovery, Clonezilla is a free and open-source tool worth considering. It allows you to save an entire disk as an image that can be stored on another drive or network location and restored when needed.
How to use Clonezilla to clone a disk to an image? The process involves booting from Clonezilla Live, selecting the disk imaging mode, choosing an image repository, and saving the source disk.
In this guide, we'll proceed the entire process, including how to restore a disk from a Clonezilla image. We'll also introduce an alternative way to create a disk image using EaseUS Disk Copy, especially if you prefer a more straightforward graphical interface.
What Does Clonezilla Disk-to-Image Mean?
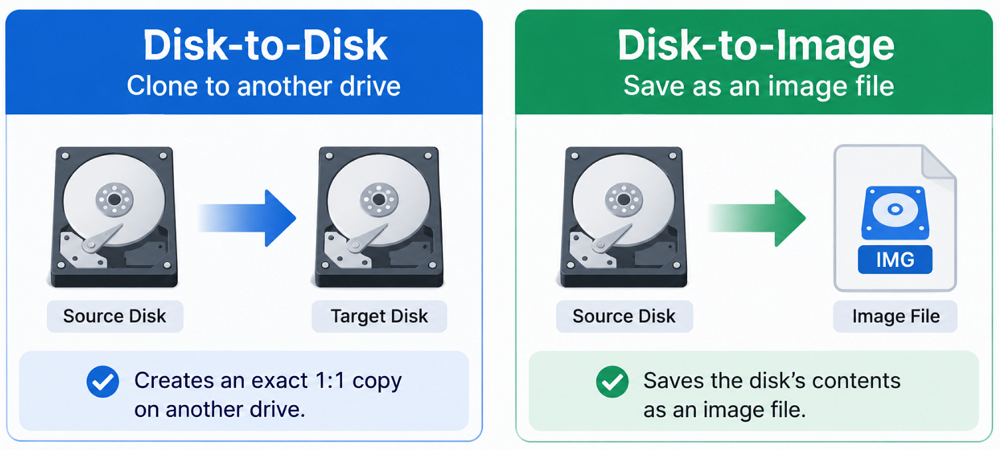
Clonezilla supports two main cloning operations: Disk-to-Disk and Disk-to-Image.
- Disk-to-Disk: Copies the contents of one hard drive directly to another drive, creating an exact 1-to-1 replica.
- Disk-to-Image: Saves the contents and partition structure of a source disk as an image file that can be stored for later restoration.
The Disk-to-Image operation is useful when you want to:
- Create a full disk backup before upgrading or replacing a hard drive.
- Preserve an existing operating system, applications, and files.
- Keep a disk image for disaster recovery.
- Deploy the same disk configuration to multiple computers.
- Restore a system to a previous state when necessary.
Unlike copying individual files, disk imaging preserves disk-level information, including partition layouts and data from the source drive.
What You Need Before Cloning a Disk to an Image with Clonezilla
Before starting, prepare the following:
- A Clonezilla Live bootable USB: Download Clonezilla Live and create a bootable USB drive.
- A source disk: The HDD or SSD you want to save as an image.
- A storage destination: An external hard drive, USB drive, or supported network storage location to hold the disk image.
- Enough storage space: Make sure the destination has sufficient free space for the resulting image. The required space depends on the amount of data and the compression settings.
- A stable power supply: Avoid interruptions during the imaging process.
- Note
- Shut down the operating system completely before booting into Clonezilla.
- Do not leave Windows in hibernation or Fast Startup mode.
- Double-check the source disk and destination device to avoid selecting the wrong drive.
How to Clone a Disk to an Image with Clonezilla
Clonezilla uses a text-based interface rather than a typical Windows graphical interface. Follow these steps to save your hard drive as an image.
Step 1. Boot Your Computer from Clonezilla Live USB
Connect the bootable Clonezilla USB drive to your computer and restart it.
Enter the BIOS/UEFI boot menu and select the USB drive as the boot device. The exact key varies by manufacturer; common options include F2, F12, Esc, and Del.
Once Clonezilla Live starts, select the default boot option and wait for the environment to load.

How to Create Clonezilla Bootable USB in Windows
In this post, we will see two methods to create bootable drives using USB for Windows. Read more >>
Step 2. Start Clonezilla and Select Device-Image Mode
After the system loads:
- Choose your preferred language.
- Select the keyboard layout or keep the default setting.
- Choose Start Clonezilla.
- Select device-image from the operation menu.
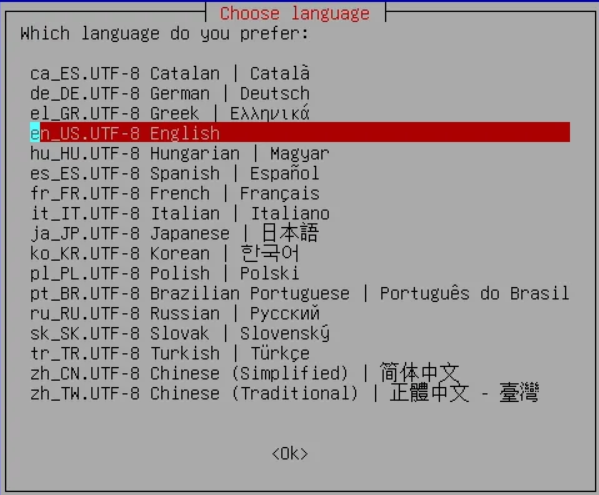
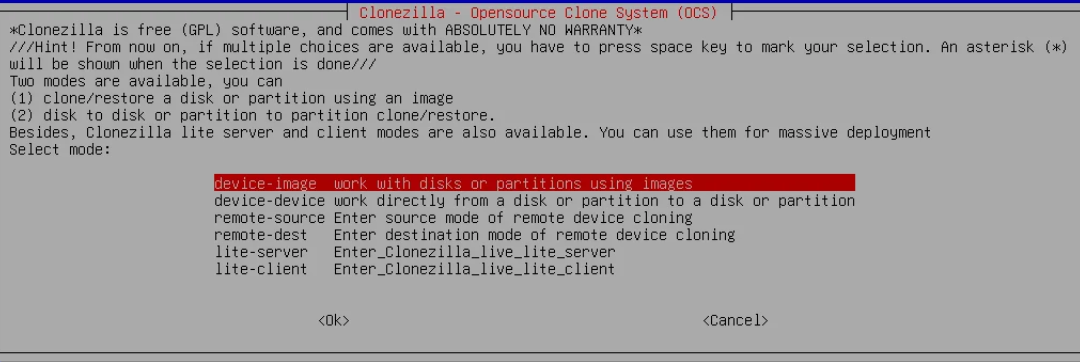
The device-image option is the key setting for this task. It allows you to save a disk or partition as an image instead of copying it directly to another disk.
Step 3. Select the Image Repository
Choose local_dev if you want to save the image to a locally connected external hard drive or USB storage device.
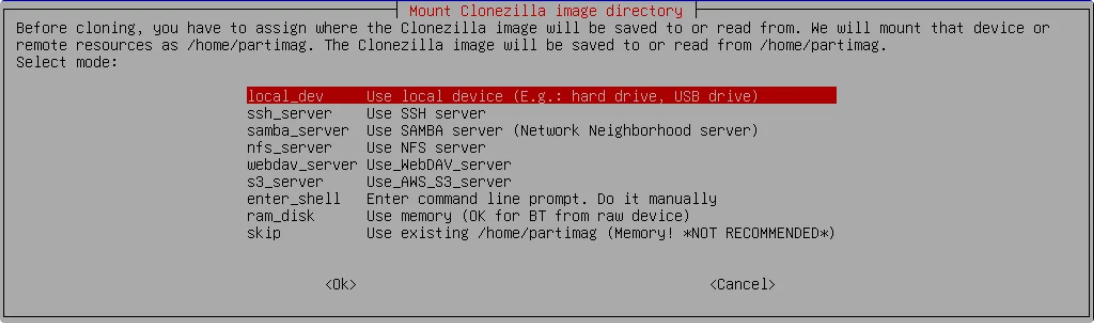
Connect your destination drive if you haven't already. Clonezilla will scan the available storage devices.
After the scan:
- Press Ctrl+C to stop the device scanning process.
- Select the partition where you want to store the disk image.
- Choose the directory that will serve as the image repository.
- Confirm the selected location and continue.
If you prefer network storage, Clonezilla also provides other repository options, including SSH, Samba, and NFS.
Step 4. Choose Beginner Mode and Savedisk
Select Beginner mode if you don't need to configure advanced imaging parameters.
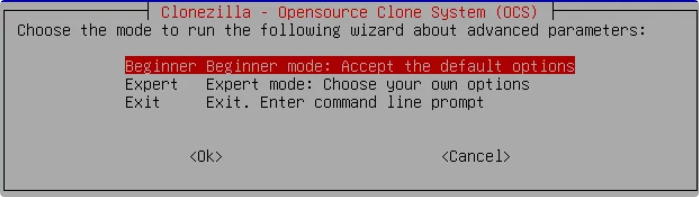
Next, choose savedisk.
Make sure you understand the available operations:
- savedisk: Saves an entire disk as an image.
- saveparts: Saves selected partitions as an image.
- restoredisk: Restores an entire disk from an existing image.
Since our goal is to clone the whole disk to an image, select savedisk.
Step 5. Name the Image and Select the Source Disk
Enter a name for the disk image. Clonezilla usually suggests a name based on the current date and time, but you can change it. Next, select the source disk you want to save.

Pay close attention to the device names. Clonezilla uses Linux device identifiers such as:
- /dev/sda
- /dev/sdb
- /dev/nvme0n1
Check the disk capacity and model information whenever available to make sure you select the correct source drive.
Step 6. Configure Compression and Image Verification
Clonezilla provides several options before creating the image.
You may be asked to:
- Select a compression method.
- Check or skip checking the source file system.
- Verify the saved image after the process.
- Enable image encryption.
For most users, the default settings are a reasonable starting point. However, verifying the saved image is recommended to help ensure that it can be used for restoration later.
If you enable encryption, keep the password in a safe place. You will need it to access the encrypted image.
Step 7. Confirm and Start the Disk Imaging Process
Review the source disk and image repository one more time.
Clonezilla will display a final confirmation before proceeding. Confirm the operation and wait while it saves the disk image.
The process may take some time depending on the source disk capacity, amount of used space, storage speed, and compression settings.
Once the operation finishes, allow Clonezilla to verify the image if you enabled that option. You can then shut down or restart the computer.
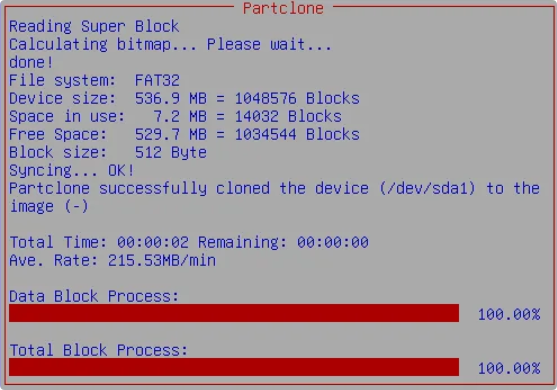
Your disk image is now saved in the selected repository.
How to Restore a Disk from a Clonezilla Image
Creating a disk image is only part of the process. You should also understand how to restore it when needed. To restore a disk from a Clonezilla image:
- Boot your computer from the Clonezilla Live USB.
- Select Start Clonezilla and choose device-image.
- Select the storage device or network location containing your saved image.
- Choose the image repository directory.
- Select Beginner mode.
- Choose restoredisk.
- Select the disk image you want to restore.
- Choose the destination disk.
- Review the operation and confirm the restoration.
Important: Restoring a disk image overwrites the destination disk. Back up any important data on the destination before proceeding.
Clonezilla Disk-to-Image: Things to Know
Clonezilla is a capable disk imaging tool, but its workflow may not suit everyone.
Clonezilla uses a text-based interface with keyboard navigation, which may be challenging for users unfamiliar with Linux disk identifiers, partitions, and boot settings. It also requires booting from external media into the Clonezilla Live environment, adding extra preparation steps compared with disk imaging tools that run directly in Windows.
Additionally, Clonezilla stores disk images in a repository containing multiple files and metadata rather than a single conventional backup file. When restoring an image, you must carefully select the correct destination disk, as the process can overwrite existing data. If you prefer a more straightforward imaging process through a familiar Windows interface, an alternative tool may be more convenient.
🎯You may be interested: Copy SD Card to Image: Save Photos, Games, and Videos
Clone Disk to Image Alternative: EaseUS Disk Copy
If you find Clonezilla's bootable environment and text-based menus difficult to navigate, EaseUS Disk Copy provides another way to create a disk image.
EaseUS Disk Copy supports both disk-to-disk cloning and saving a disk as a compressed image file. Instead of navigating multiple boot menus, you can select the source disk and choose the image-file option through its graphical interface.
This approach is useful when you want to:
- Create a disk image without navigating Clonezilla's text-based interface.
- Save a compressed disk image for future use.
- Manage disk imaging tasks through a Windows application.
How to Create a Disk Image with EaseUS Disk Copy
Follow these steps:
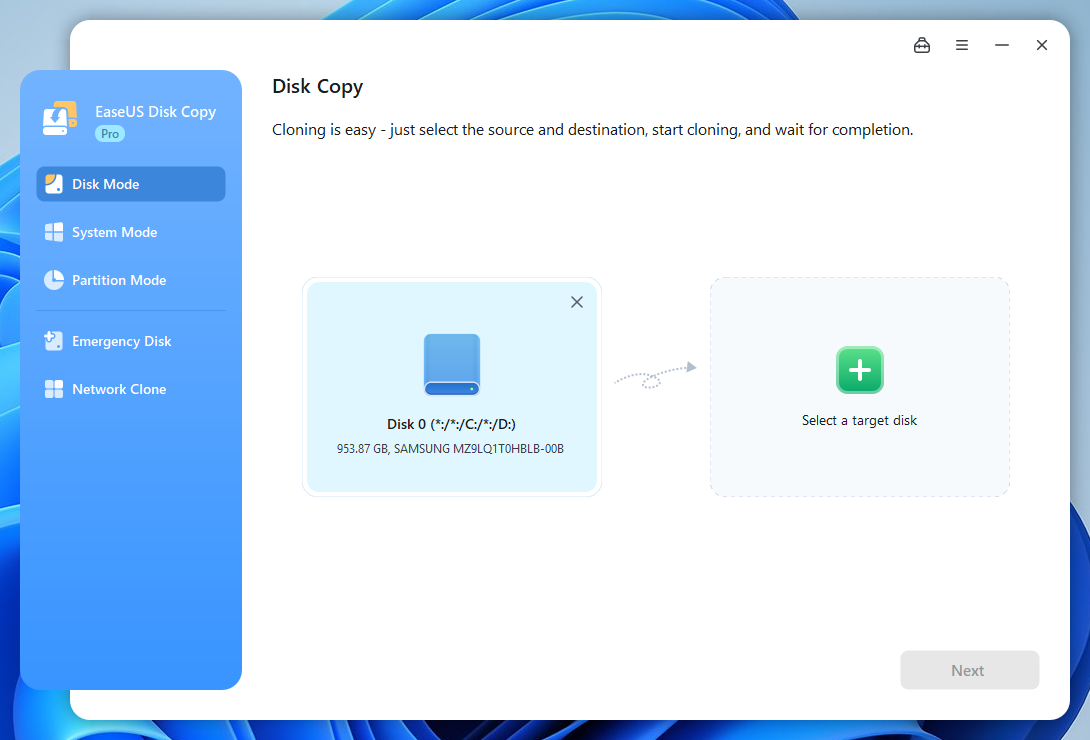
Step 1. Launch EaseUS Disk Copy and Select the Source Disk
Open EaseUS Disk Copy on your Windows computer. Choose Disk Mode and select the disk you want to save as an image. Click Next to continue.
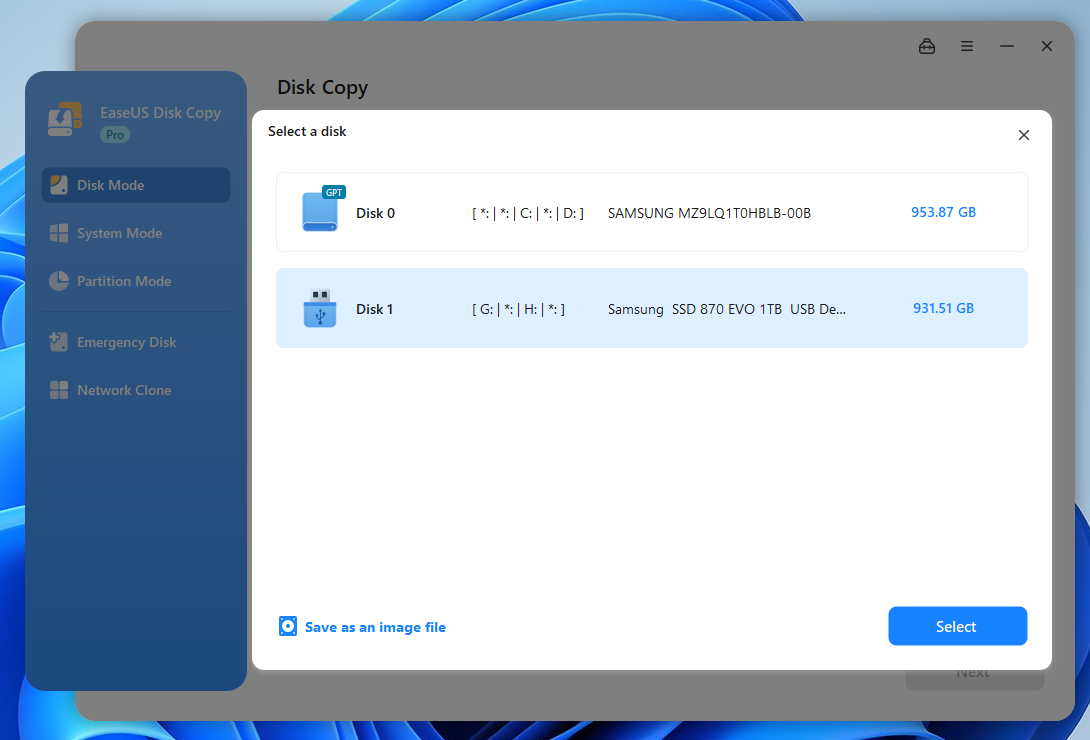
Step 2. Choose Save as an Image File
On the destination selection screen, click Save as an image file instead of selecting another physical disk. Choose a location where you want to store the image file. Make sure the destination has enough free space.
Step 3. Configure the Disk Image and Start
Review the selected source disk and image destination, then follow the on-screen instructions to proceed.
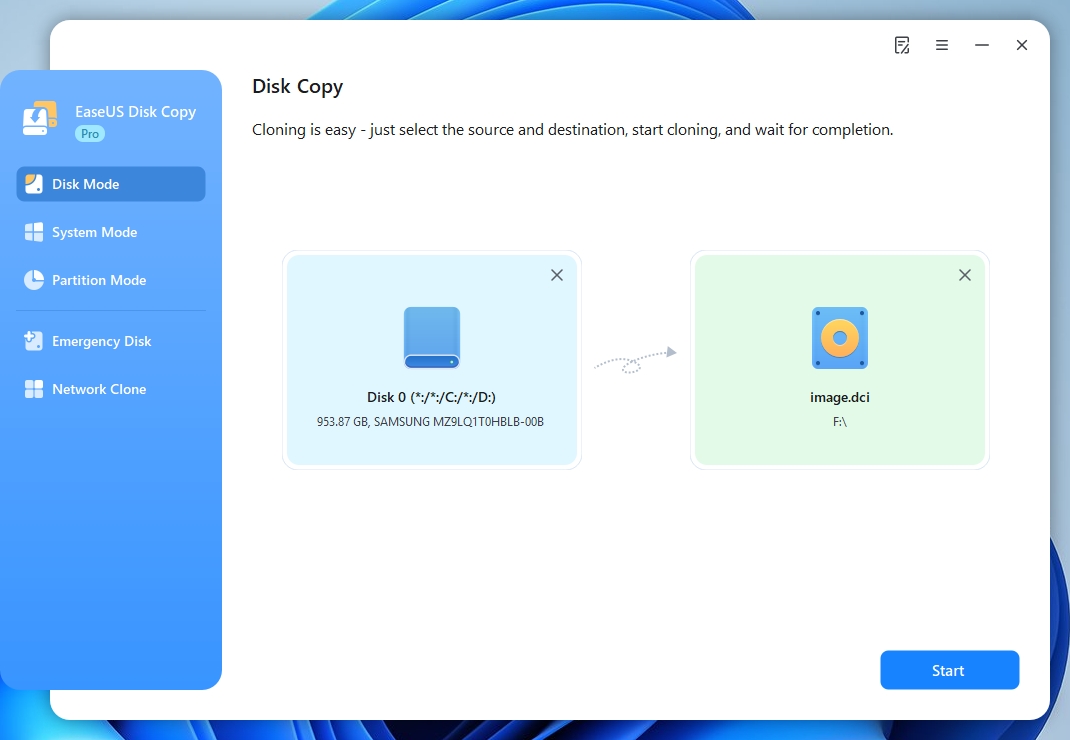
Wait for the imaging process to finish. Once completed, keep the image file in a safe location so you can use it when needed.
Note: The function is available since EaseUS Disk Copy 7.2.0 edition. Check the current product version before starting.
FAQs About Cloning a Disk to an Image with Clonezilla
1. What is the difference between savedisk and saveparts in Clonezilla?
Savedisk saves an entire disk, including its partition structure and data. Saveparts saves selected partitions rather than the entire disk.
2. Can I restore a Clonezilla image to a new hard drive?
Yes. Use the restoredisk option to restore a saved disk image to a destination drive. Make sure the target has sufficient capacity and remember that existing data on it will be overwritten.
3. Is Clonezilla disk imaging free?
Yes. Clonezilla is free and open-source software. It supports disk imaging and disk cloning without requiring a commercial license.
4. Can I create a disk image without using Clonezilla?
Yes. Disk imaging software such as EaseUS Disk Copy can also save a disk to an image file. EaseUS Disk Copy provides a graphical workflow that may be easier for Windows users who do not want to work through a bootable text-based environment.
Final Words
Clonezilla is a reliable free choice for users who want to clone hard drive to an image. By selecting device-image and savedisk, you can create a disk image and restore it later when necessary.
However, its bootable environment and text-based interface may take some time to learn. If you prefer a more straightforward way to create a disk image on Windows, EaseUS Disk Copy is another option worth considering.
 Free Download
Windows 11/10/8/7
-
Updated by
![Larissa]()
Larissa
Larissa has rich experience in writing technical articles and is now a professional editor at EaseUS. She is good at writing articles about data recovery, disk cloning, disk partitioning, data backup, and other related knowledge. Her detailed and ultimate guides help users find effective solutions to their problems. She is fond of traveling, reading, and riding in her spare time.…Read full bio