





In this guide
Clone Disk Feature
Running out of disk space, replacing an aging hard drive with slow response times, or upgrading to a faster SSD doesn't necessarily mean starting over. For many users, the real problem is not moving files; it is preserving everything that already works: Windows OS, installed programs, personal files, system settings, game libraries, and the configurations built up over years.
This is why disk cloning is commonly used when upgrading or replacing a system drive.
1. What Is Disk Cloning?
Disk cloning creates a copy of a source disk on a destination disk, including the disk's partitions and their contents. Unlike copying individual files, a disk clone preserves the structure Windows needs, including system, boot, recovery, and data partitions.
This makes disk cloning useful when you want to:
- Upgrade a full or slow drive without reinstalling Windows and your applications.
- Move Windows to a larger or faster SSD while keeping your existing files, apps, and settings.
- Replace an old HDD or SSD and continue using the same system environment.
- Migrate a game or workstation environment without downloading large libraries or rebuilding application configurations.
- Create a working copy of a disk before replacing hardware or making a major system change.
The destination drive does not always need to have the same capacity as the source. What matters is the relationship between total disk capacity, used space, and the selected clone mode.
For example, a 2TB source disk may be cloned to a 1TB destination when the data and partition layout can fit within the smaller drive. With sector-by-sector cloning, however, the destination must be at least as large as the source because it copies every sector.
Disk cloning can also become a data-preservation step when a drive starts showing signs of failure. You may encounter bad sectors, extremely slow reads, intermittent disconnections, or files that can no longer be opened. In these situations, the priority shifts from "How do I upgrade my drive?" to "How do I preserve as much of the existing disk as possible before it becomes inaccessible?"
EaseUS Disk Copy is designed to clone an entire disk or selected partitions to another disk, with options to preserve the source layout, resize partitions for a different-capacity destination, or perform a sector-level copy when an exact disk replica is required.
2. Why Do You Need to Clone a Disk?
- Upgrade a Full or Slow Drive — Move Windows and your applications to a larger or faster drive without starting over.
- Upgrade to a Larger SSD — Replace your current SSD while keeping your existing system and files.
- Clone to a Smaller Drive — Move a disk when the destination is smaller but has enough space for the actual data.
- Move OS to another drive — Keep your OS, applications, files, settings, and boot structure.
- Move to a New PC — Migrate an existing system while considering hardware, drivers, activation, and boot compatibility.
- Clone a Failing Drive — Preserve readable data from a drive showing signs of failure before attempting recovery.
3. EaseUS Disk Copy Clone Disk Options
EaseUS Disk Copy provides several options to control how a disk is cloned. Choose the appropriate option based on the source disk, destination disk, and your migration requirements.
| Option | What It Does | When to Use |
|---|---|---|
| Autofit the Disk | Automatically adjusts the destination layout to use available space | The cloning tool automatically adjusts the source disk's partitions based on their capacities and the size of the target disk, then clones them to the partition space on the target disk. |
| Copy as the Source | Keeps the destination layout based on the source | You want the destination disk to keep the same partition layout and sizes as the source disk. The remaining space is unallocated. |
| Edit Disk Layout | Manually adjusts destination partitions | The target disk is smaller than the source disk, and you want to manually resize, move, or adjust the destination partitions before cloning. |
| Sector by Sector Copy | Copies all valid sectors from the source disk directly | Need to create an exact copy of the source disk, including all valid sectors and unused space. Or, your source disk has bad sectors or clusters. |
| Auto-alignment to 4K | Automatically aligns partitions to 4K for optimized SSD performance | Improve SSD's read/write speed and maintain optimal performance. |
4. Advanced Clone Features
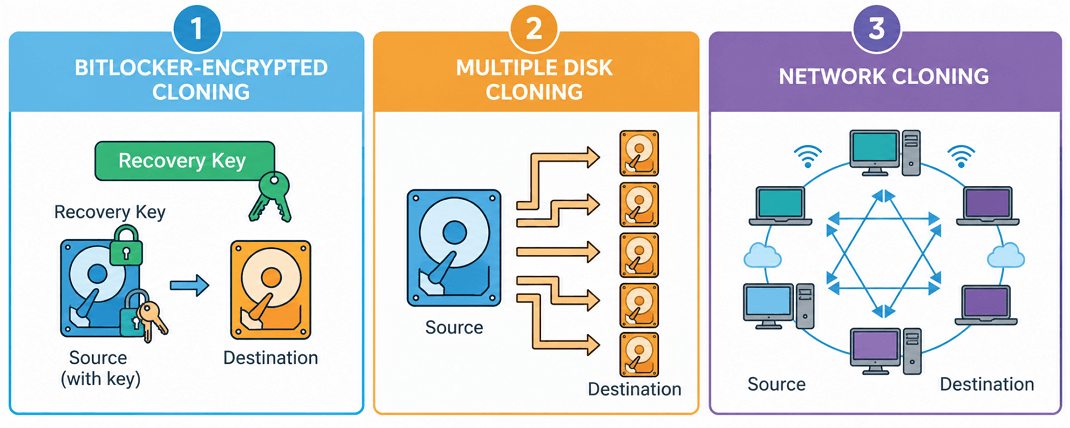
1. Clone a BitLocker-Encrypted Hard Drive
Supports cloning a hard drive that contains BitLocker-encrypted partitions, allowing users to migrate an encrypted Windows installation or data drive without first removing the encryption. Keep your BitLocker recovery key available before changing the storage configuration.
2. Clone to Multiple Disks
Allows the same source disk to be cloned to multiple destination disks, reducing repetitive work when preparing several identical drives.
3. Network Clone
Allows a source computer to clone its disk over a network to one or more connected client computers, without physically connecting the destination disks to the source computer.
How to Clone a Disk
Disk Copy follows a source → target → configuration → clone workflow.
Before You Start
Before opening the cloning wizard, prepare the source and target disks.
1. Clean the source drive
Check the source drive for bad sectors, file system errors, or SMART warnings. If the source disk contains bad sectors. EaseUS Disk Copy will skip these bad sectors during cloning.
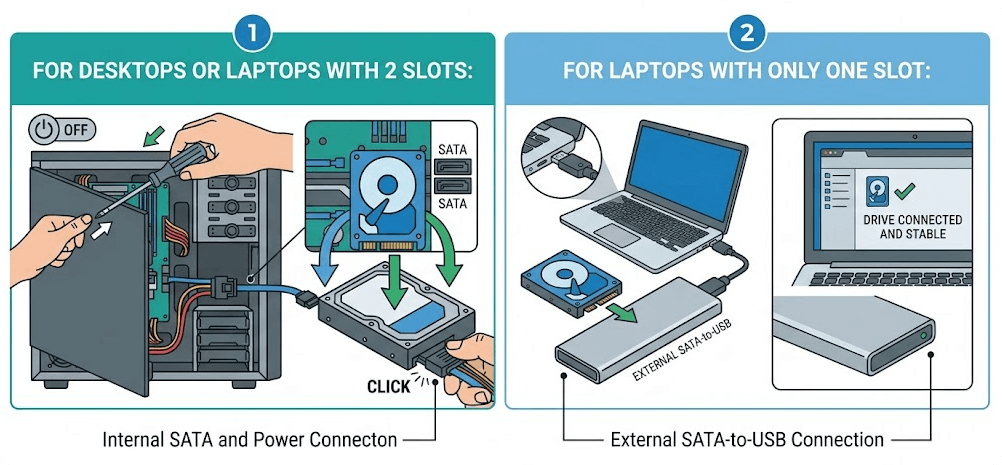
2. Connect the destination drive
For desktops or laptops with 2 slots:
- Power down your computer
- Open the casing with a screwdriver
- Install the new drive in an available SATA port
- Connect power cables securely
For laptops with only one slot:
- Use a SATA to USB adapter or an external drive enclosure
- Connect the new drive via USB
- Verify the connection is stable
*Both desktop and laptop computers can connect disks via USB, which does not affect data accuracy, the only difference is the speed.
Tip: EaseUS Disk Copy automatically preserves the system disk's partition style and boot data during cloning. For a standard drive replacement on the same PC, no manual GPT/MBR conversion or UEFI/Legacy switch is usually required. You may only need to select the cloned drive as the boot device.
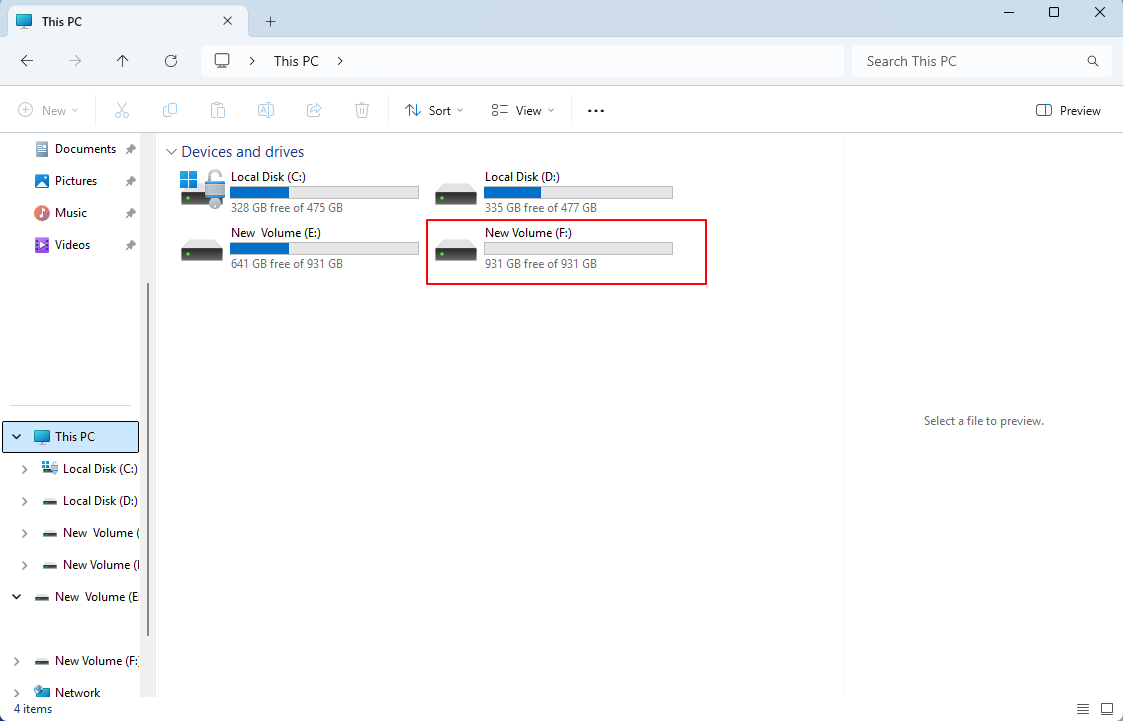
3. Verify the drive recognition
- Open Disk Management or File Explorer
- Confirm the drive is visible
- Note the drive letters and sizes
4. Confirm the destination drive capacity
The destination drive should have enough capacity to accommodate the actual data on the source drive. If you are cloning to a smaller drive, you don't need to resize or shrink the partitions on the source drive beforehand, as EaseUS Disk Copy will automatically adjust the target disk partitions to accomodate all data.
Warning: Disk cloning and system cloning will delete all data on the target disk, while partition cloning only deletes data on the target partition. Data on other partitions of the target disk will not be deleted. If the destination drive contains important data, back it up before cloning. Cloning will erase existing partitions and data on the destination drive.
You can use Windows built-in backup tools, such as Backup and Restore (Windows 7) and File History, or use professional backup software such as EaseUS Todo Backup.
How to Clone Your Disk with EaseUS Disk Copy
Step 1. Select the Source Disk
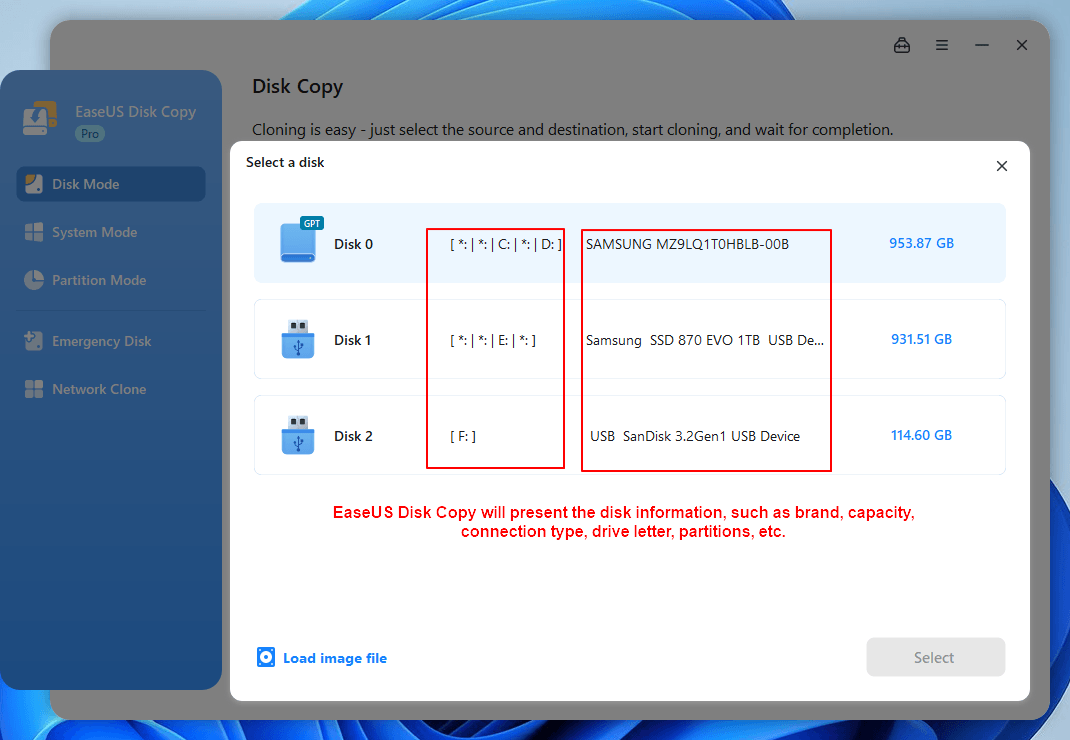
Open EaseUS Disk Copy and select Disk Mode. Choose the disk you want to clone.
Step 2. Select the Target Disk
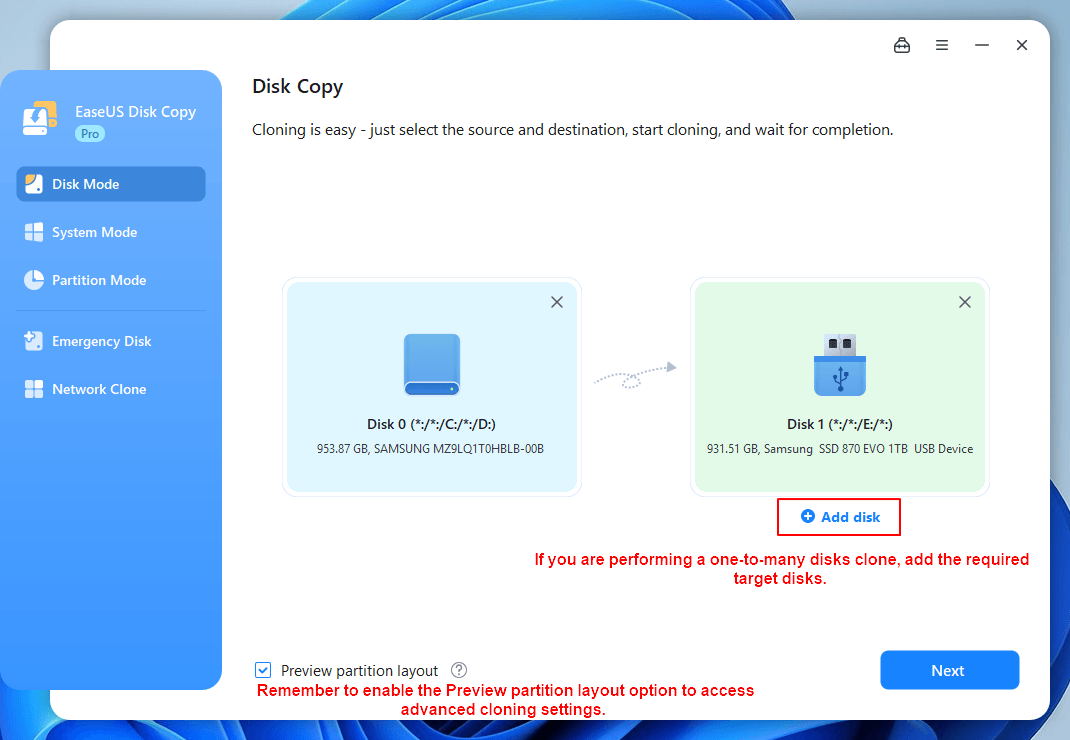
Select the destination disk you want to clone to.
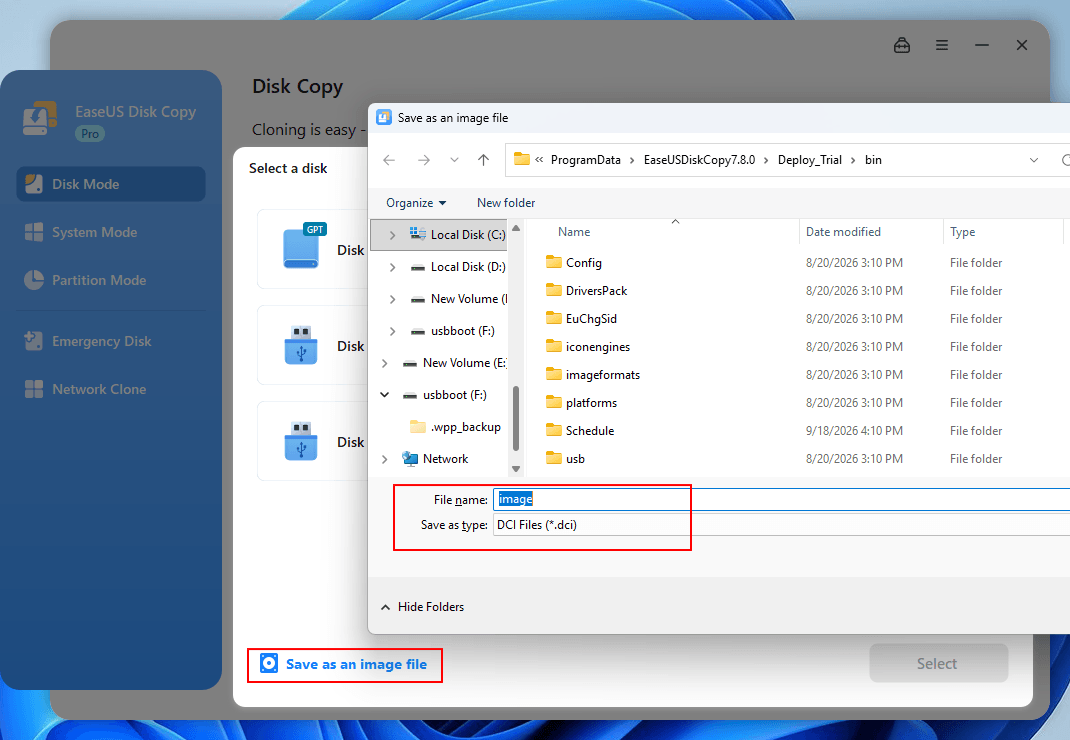
Disk Copy also lets you clone a disk to a compressed image file by clicking "Save as an image file." You can choose where to save the image file and then restore it without data loss.
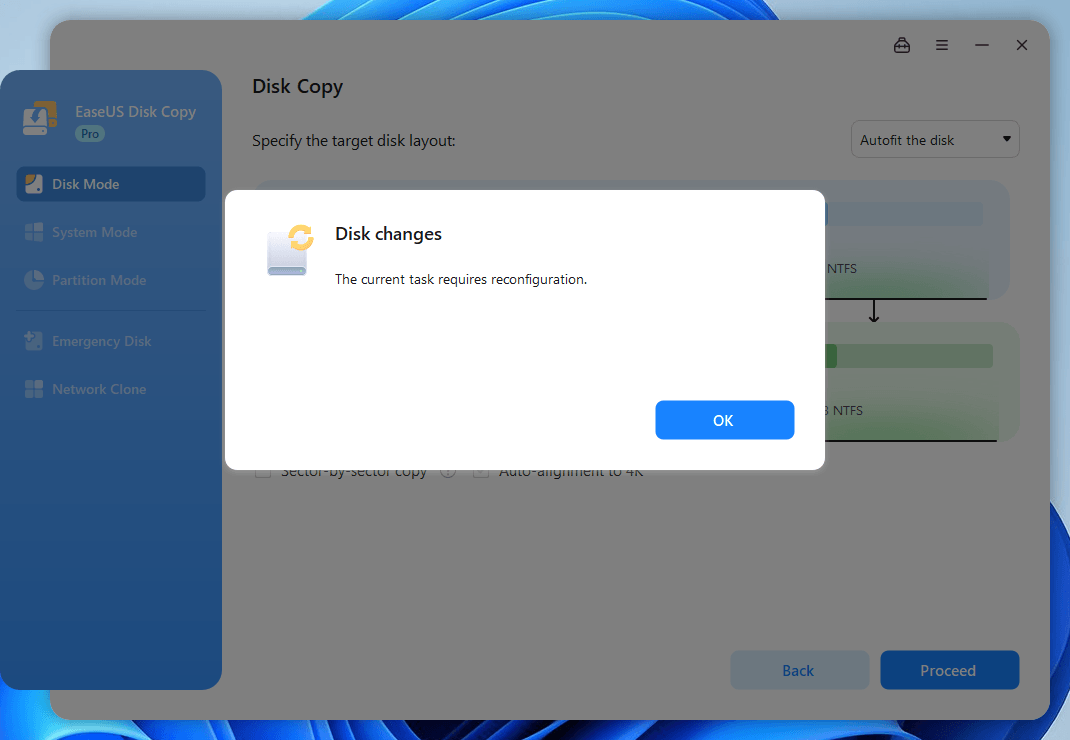
If the target disk has issues at this stage, such as being disconnected, Disk Copy will automatically detect it and inform you.
Step 3. Configure the Disk Layout
Choose the option that matches your migration goal, then click Proceed.
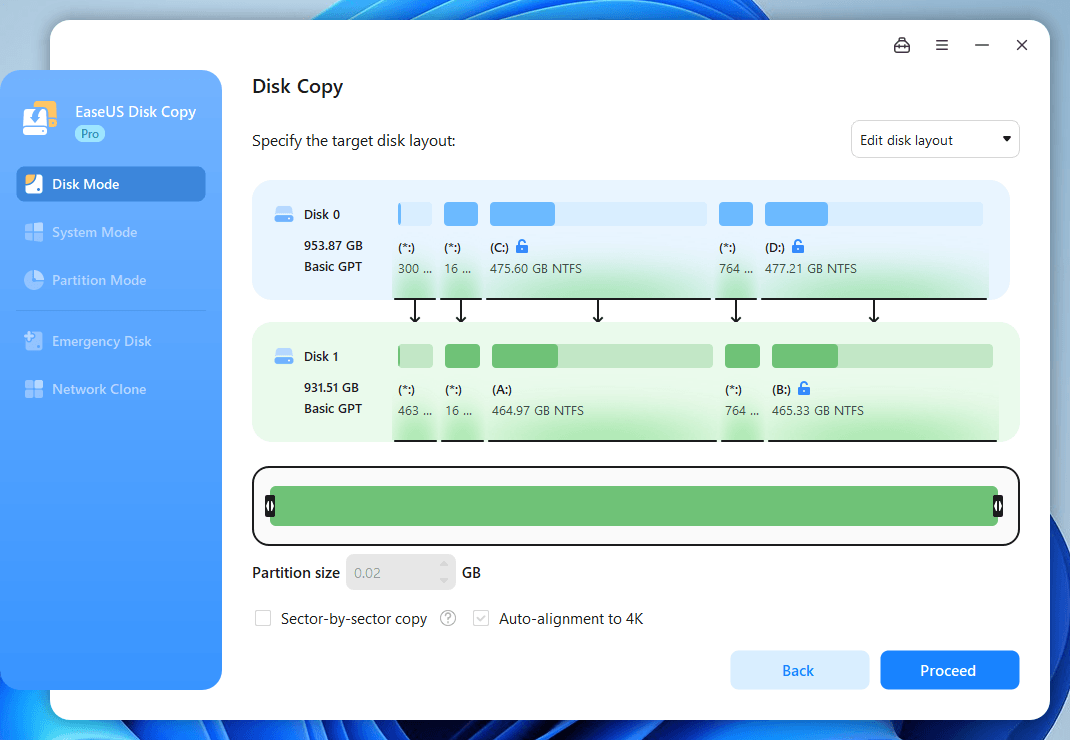
4K SSD Alignment is automatically enabled. For most normal disk migrations, use the standard disk cloning method rather than Sector-by-Sector Copy.
- Autofit the Disk - Automatically adjusts the target layout to use the available space.
- Copy as the Source - Preserves the source disk layout with unallocated Space. Choose this option if you want to use the Sector-by-Sector Copy or your source drive has bad sectors/clusters.
- Edit Disk Layout - You can manually adjust the size and position of applicable target disk partitions, even when the target disk is smaller than the source disk. If the source disk is a system disk, the EFI and Reserved partitions have minimum size requirements defined by Windows. These requirements vary depending on the Windows version and disk capacity. (The EFI and Reserved partitions can be repositioned, but their sizes cannot be manually adjusted.)
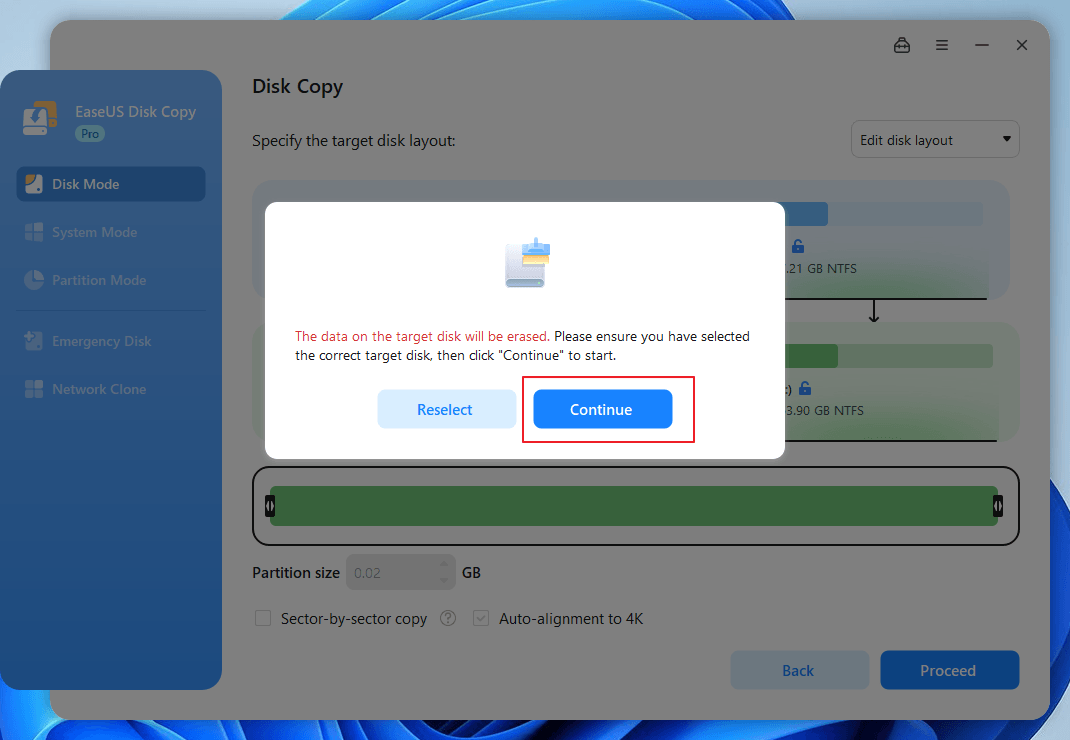
Disk Copy will notify you that the data on the target disk will be erased. Click Continue to confirm.
Step 6. Start Cloning
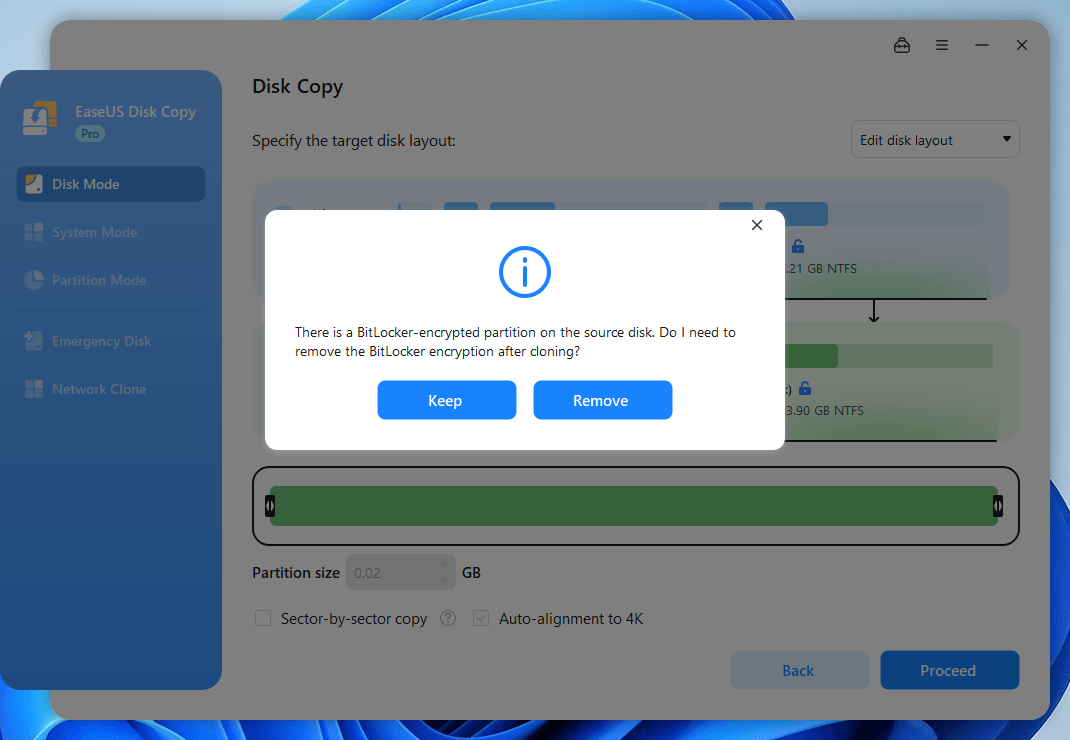
If your source disk is BitLocker-protected, Disk Copy will ask you whether to remove it on the target disk.
Once cloning starts:
- Do not disconnect either disk
- Do not shut down the computer unexpectedly
- Wait for the operation to complete
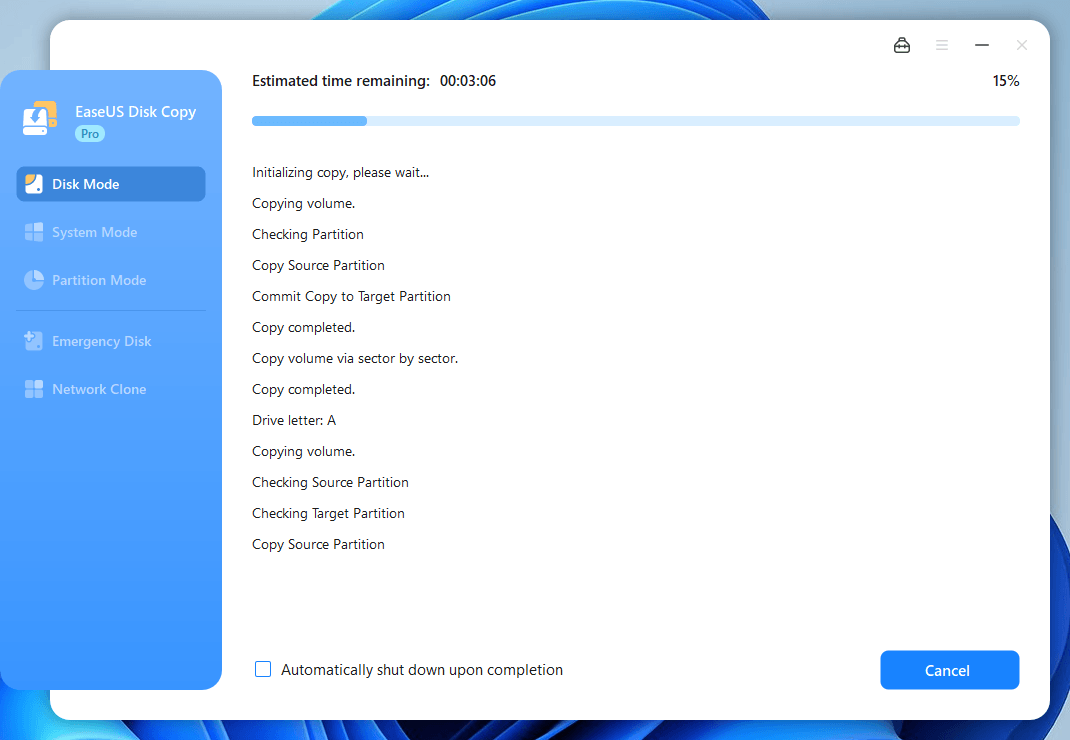
You can use your PC while Disk Copy clones your disk, as the cloning process runs in the background. However, for a smoother and more reliable cloning process, we recommend avoiding other activities on your PC until the cloning is complete.
During cloning, EaseUS Disk Copy displays the current cloning progress and status, such as:
- Overall cloning progress
- Estimated time left
You can also choose to automatically shut down your PC after cloning. The cloning time depends on the amount of data, disk performance, connection type, and disk condition.
What to Do After Cloning
Once cloning is complete, verify that the cloned drive works as expected before replacing or erasing the original drive. Follow the steps below to check the system, activation status, disk layout, and data.
If the target will replace the original system disk:
- 1. Shut down the computer.
- 2. Install the cloned drive.
- 3. Disconnect the original system disk when appropriate.
- 4. Start the computer.
- 5. Check BIOS/UEFI boot order.
- 6. Boot into Windows.
Disconnecting the original system disk during the first boot can help confirm the computer is starting from the cloned drive.
2. Verify Windows
After booting from the cloned drive, check that:
- Windows starts normally.
- Applications are available.
- User files are accessible.
- The cloned drive is recognized correctly.
3. Check Windows Activation
Make sure Windows is still activated. Cloning Windows to a new drive usually does not require reactivation. However, using the cloned drive on another PC may require reactivation depending on your Windows license and hardware configuration.
4. Verify the Disk Layout
Open Disk Management and check:
- Partition structure
- Partition sizes
- File systems
- Unallocated space
- Total disk capacity
5. Keep the Original Disk
Do not erase or format the source disk immediately. Keep the original drive until you have confirmed that:
- The cloned disk boots correctly
- Important files are available
- Applications work normally
- The new disk is stable in daily use
Review & Testing
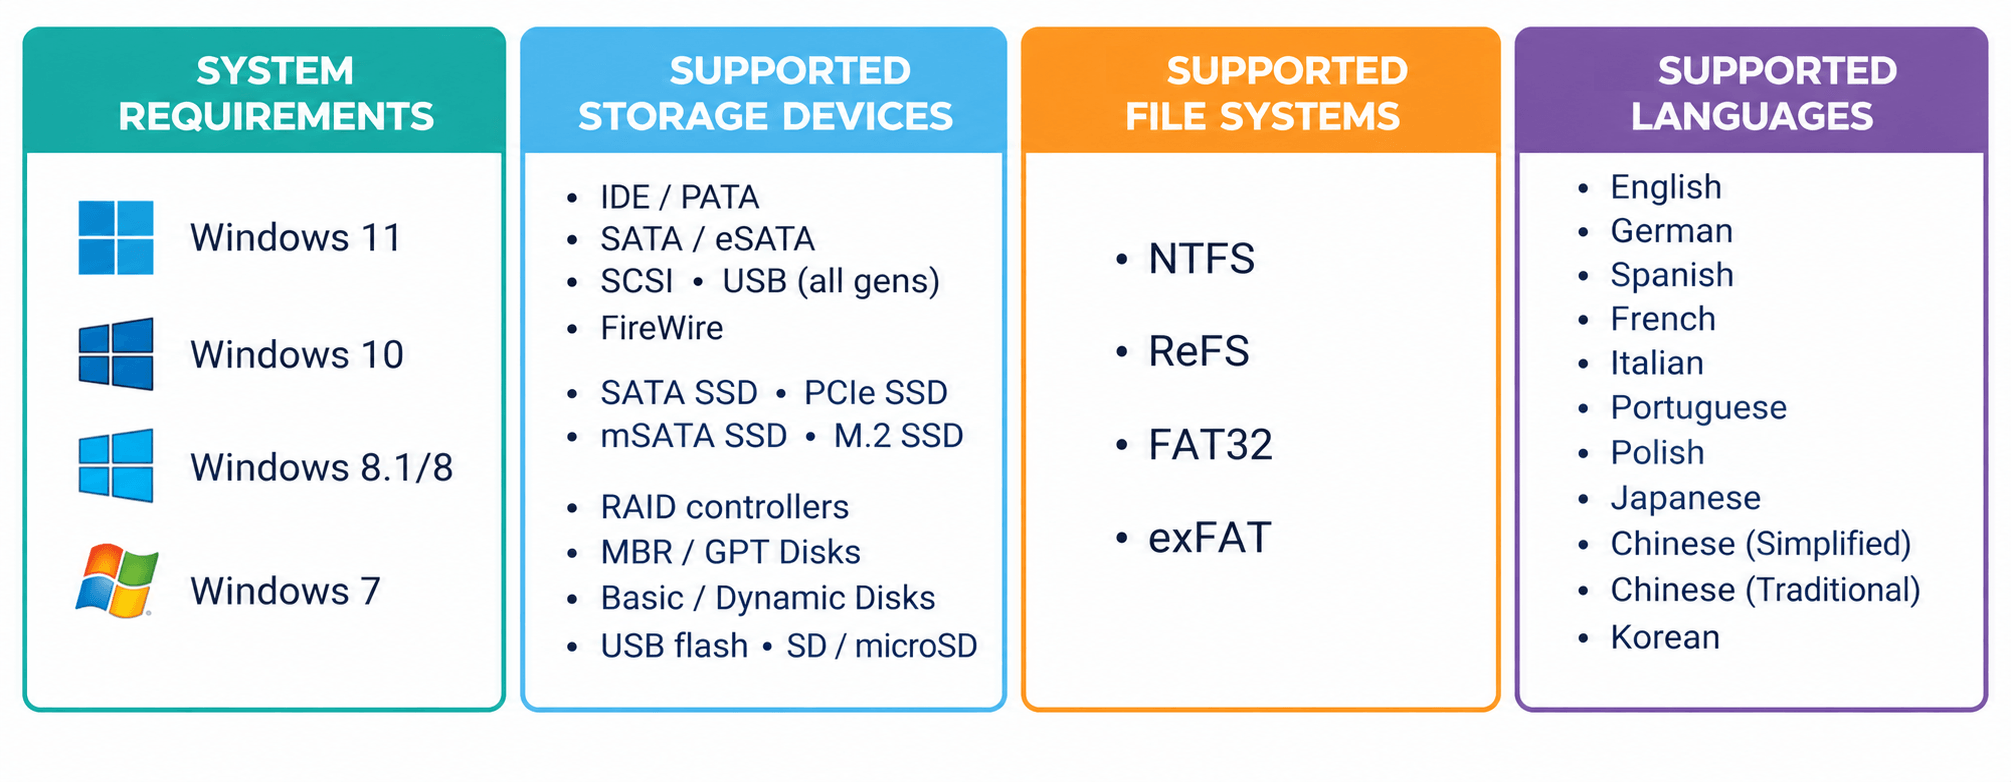
EaseUS Disk Copy is tested across performance, compatibility, stability, and post-clone reliability to evaluate how it performs in common disk cloning scenarios.
Our tests use the same source and target conditions wherever possible when comparing disk cloning software. Beyond transfer speed, we verify that the cloned disk can be correctly recognized, accessed, and booted after cloning.
Note: Actual cloning performance may vary depending on SSD/HDD models, interface speeds, disk health, file structure, operating system, and other hardware and software conditions.
1. How We Test
We use the same source and target conditions when comparing disk cloning software.
| Test Item | Configuration |
|---|---|
| Clone Scenario | NVMe SSD → NVMe SSD |
| Clone Data | 173 GB |
| Dataset | 100W files / 28W folders |
| Operating System | Windows |
| EaseUS Disk Copy | 6.6.0 |
| Competitors | 4DDiG Disk Copy 1.0.5; Macrium Reflect X 10.0.8576; DiskGenius 6.0.1.1645 |
Key metrics: Clone Time, Average Throughput, CPU Usage, Memory Usage, and Peak Clone Speed.
2. Performance Benchmark
| Software | Clone Time | Avg. Throughput* | CPU | Memory | Peak Speed |
|---|---|---|---|---|---|
| EaseUS Disk Copy | 235s | ~736 MB/s | 0.35% | 190 MB | 2,010 MB/s |
| 4DDiG Disk Copy | 248s | ~698 MB/s | 0.31% | 215 MB | 3,174 MB/s |
| Macrium Reflect X | 230s | ~752 MB/s | 2.31% | 181 MB | 3,099 MB/s |
| DiskGenius | 234s | ~739 MB/s | 0.64% | 63 MB | 883 MB/s |
* Average throughput is calculated from 173 GB ÷ clone time and is not a directly measured sustained transfer rate.
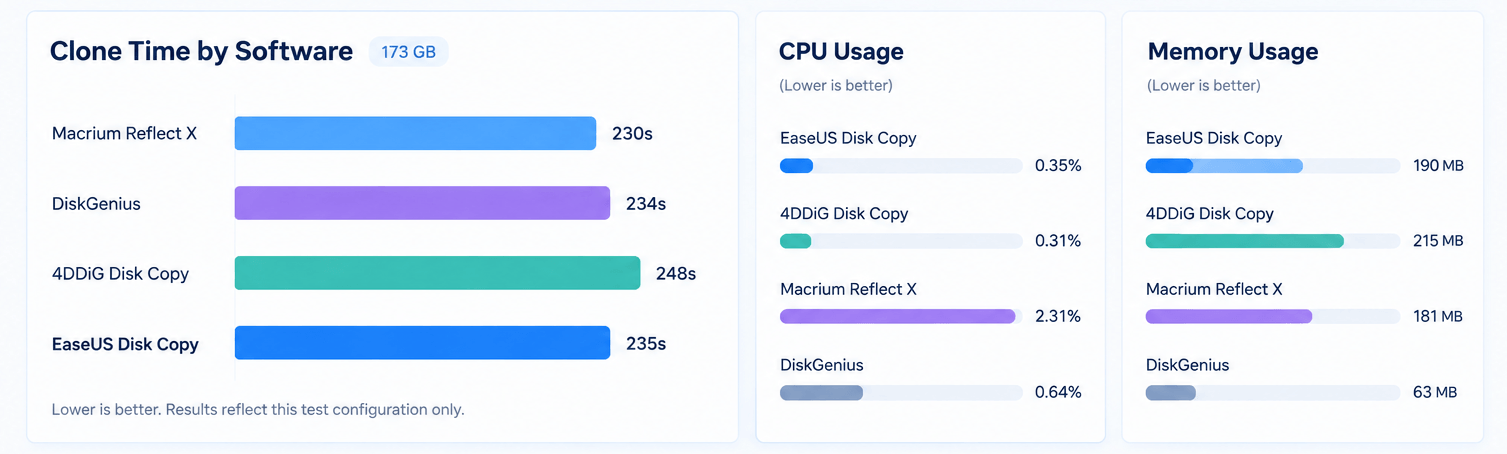
Results
EaseUS Disk Copy completed the 173 GB NVMe-to-NVMe clone in 235 seconds. Peak speed should not be considered equivalent to overall cloning performance, as total clone time also depends on the entire cloning process.
3. Compatibility & Stability
We test Clone Disk across common storage configurations and repeat selected cloning tasks to verify consistent operation.
| Test Area | Scenarios |
|---|---|
| Drive Compatibility | HDD → SSD; SATA SSD → SSD; NVMe → NVMe; HDD → NVMe |
| Disk Size | Smaller → Larger; Larger → Smaller |
| Disk Type | System Disk; Dynamic Disk |
| Advanced Cloning | Hot Clone; One-to-Many Clone |
| Stability | Repeated cloning(3 times); Large-data cloning; USB target |
For each test, we check whether the cloning process completes without errors and whether the target disk is correctly recognized after cloning. Selected cloning scenarios are repeated to check whether the process completes consistently without errors.
4. Post-Clone Verification
After cloning, we verify the target disk to confirm that the clone is usable.
| Verification | Check |
|---|---|
| Partition | Partition layout and capacity are the same as the source disk |
| Files | Files and folders can be accessed |
| Data | Key data is correctly copied |
| Boot | Cloned Windows system can boot when applicable |
Test Summary
Based on our testing, EaseUS Disk Copy successfully completed the tested disk cloning scenarios and passed the post-clone verification checks. The cloned drives were correctly recognized, accessible, and bootable where applicable.
Performance varied across the tested applications and configurations. Clone time and throughput can differ depending on the source and target drives, interface speeds, data structure, and system resources. The benchmark results should therefore be considered representative of our test environment, not universal performance figures.
For the full results, see the performance benchmark and compatibility tests above.
Troubleshooting
Hardware compatibility, disk health, partition configuration, encryption, or Windows boot settings can affect disk cloning. Here we cover common disk cloning problems that may occur before, during, or after using EaseUS Disk Copy.
When troubleshooting a disk clone, first identify when the problem occurs, then check the source disk, destination disk, connection, partition structure, and cloning settings.
1. Target Disk Not Detected
If the destination disk does not appear in EaseUS Disk Copy, Windows Disk Management, or BIOS/UEFI, the issue is usually related to the physical connection, disk initialization, controller, or driver.
How to Fix
- Check the disk connection and power supply.
- Try another SATA, USB, or NVMe slot where available.
- Check whether the drive appears in Disk Management and BIOS/UEFI.
- Initialize the disk if required. Do not format or initialize a disk that already contains important data without first confirming its contents.
- Update the relevant storage controller or chipset drivers if the disk remains undetected.
2. Destination Disk Is Too Small
A destination disk does not necessarily need to have the same nominal capacity as the source. For a standard disk clone, a smaller target may work if the source data fits within the destination and the selected partitions can be resized.
How to Fix
- Check the source disk's used space and partition sizes.
- Disable Sector-by-Sector Clone when an exact sector-level copy is not required.
- Use Edit Disk Layout to resize partitions where supported.
- Select a destination disk with sufficient capacity when the source layout cannot be reduced.
3. Clone Failed
A clone disk operation may fail because of bad sectors or file-system errors on the source disk, insufficient destination space, file-system problems, connection interruptions, encrypted configurations, or the selected cloning mode is not suitable for the disk configuration.
How to Fix
- Check the health of the source and destination disks.
- Run Windows disk-checking tools where appropriate.
- Verify that the destination has enough usable capacity.
- Check all physical connections before restarting the clone.
- Review the selected clone disk options, including Sector-by-Sector Clone and Disk Layout.
- For BitLocker-encrypted or dynamic disk configurations, verify the disk configuration before attempting the migration again.
Note: If the source disk shows signs of physical failure, minimize unnecessary read/write operations and make sure important data is backed up before repeatedly attempting a clone.
4. Clone Stuck
A clone may appear to stop progressing at a particular percentage or remain at the same transfer speed for an extended period. This can happen because the source disk contains bad or hard-to-read sectors, the destination disk is experiencing write delays, or background applications are accessing the source or destination disk.
How to Fix
- Check whether the disk activity indicator is still showing read/write activity.
- Monitor the source and destination disks in Windows Task Manager.
- Check disk health if the process repeatedly stalls at the same location.
- Avoid disconnecting the drives while the disk clone operation is still running.
- If the source disk contains problematic sectors, consider whether a sector-level cloning method is appropriate for the recovery objective.
5. Clone Disk Is Too Slow
Clone speed depends on more than the advertised read/write speed of the SSD or HDD. The actual throughput depends on the source disk, destination disk, interface, amount and type of data, disk health, and selected clone mode.
How to Improve Performance
- Use a direct SATA or PCIe connection where possible.
- Avoid slow USB adapters or hubs for high-volume disk cloning.
- Close applications that continuously access the source or target disk.
- Use standard disk clone mode when a sector-level copy is not required.
- Check the health and performance of both drives.
6. Cloned Disk Won't Boot
A disk clone can complete successfully while the cloned Windows installation still fails to boot. This usually indicates a boot configuration, partition, or firmware issue rather than a failure to copy the data itself.
How to Troubleshoot
- Shut down the computer and disconnect the original system disk.
- Connect the cloned disk as the primary internal drive.
- Check the BIOS/UEFI boot order and select the cloned disk.
- Confirm that the EFI/System Reserved and Windows partitions are present.
- If Windows still cannot boot, use Windows recovery tools to repair the boot configuration.
Note: Always test a cloned system disk as an independent boot drive before treating the migration as complete.
7. Cloned Disk Shows the Wrong Capacity
A cloned disk may appear to have less usable space than its advertised capacity or may contain unallocated space after cloning.
How to Fix
- Open Disk Management and inspect the destination disk.
- Check whether unallocated space remains after the cloned partitions.
- Use Edit Disk Layout to expand the appropriate partition.
- Confirm the physical capacity of the destination disk.
A 1 TB drive does not normally appear as exactly 1,000 GB of usable capacity in Windows because manufacturers and operating systems use different capacity calculations.
8. Missing Partitions After Clone Disk
If one or more partitions are missing from the destination after a disk clone, first compare the source and destination disk layouts. This may be caused by a partition not being selected for cloning, the destination disk having a different partition layout, or hidden, system, EFI, or recovery partitions not being immediately visible in File Explorer.
How to Troubleshoot
- Open Windows Disk Management and compare the source and destination.
- Check whether the partition exists but has no drive letter.
- Verify EFI, Recovery, and other system partitions separately from normal data partitions.
- Review the selected Disk Layout options and repeat the clone if necessary.
9. EaseUS Disk Copy Cloning Is Stuck or Taking Too Long
If EaseUS Disk Copy stops during the cloning or takes a long time to complete, it can be caused by bad sectors, file system errors, high disk usage, an unstable connection, or an unsuitable cloning mode.
How to Fix
- Run chkdsk X: /f /r as an administrator, replacing X: with the source drive letter.
- Close antivirus software, cloud-sync tools, and other disk-intensive applications.
- Check the USB or SATA connection, replace the cable if necessary, and avoid USB hubs.
- Use System Clone for Windows migration or Disk Clone for copying the entire disk.
- Avoid Sector-by-Sector Clone unless required, as it copies every sector and may take longer.
- Update EaseUS Disk Copy to the latest version.
10. Failed to Read/Write Sector Error
If the tool cannot read or write sectors on disk, it may be caused by bad sectors, disk failure, loose cables, insufficient target capacity, or software and driver issues.
How to Fix
- Check both disks with a SMART monitoring tool and run chkdsk X: /f /r on the affected drive.
- Reconnect the disks, replace the cable, and try another USB or SATA port.
- Confirm that the target disk is detected and has enough capacity.
- Close unnecessary applications and update EaseUS Disk Copy, storage drivers, and firmware.
Note: If the source disk is failing, back up important data immediately. You may enable the sector-by-sector copy option to skip bad sectors, but data stored in unreadable sectors may not be copied.


