-
![]() How to Find Older Restore Points Windows 11 | Tried-And-True Methods
How to Find Older Restore Points Windows 11 | Tried-And-True Methods October 14,2026
 6 min read
 -
![]()
-
![]() Free Toshiba HDD Recovery: Perform Toshiba Hard Drive Recovery for FreeOctober 14,20266 min read
Free Toshiba HDD Recovery: Perform Toshiba Hard Drive Recovery for FreeOctober 14,20266 min read -
![]()
-
![]()
-
![]() Genshin Impact Progress Lost : Restore Lost Genshin Data [Quick & Easy]October 14,20266 min read
Genshin Impact Progress Lost : Restore Lost Genshin Data [Quick & Easy]October 14,20266 min read -
![]() Restarted My Computer and Everything Is Gone Windows 11/10/8/7October 14,20266 min read
Restarted My Computer and Everything Is Gone Windows 11/10/8/7October 14,20266 min read -
![]()
-
![]()
-
![]()
Page Table of Contents
PAGE CONTENT:
Are you trying to track down the USB Selective Suspend setting in Windows 11 to fix random disconnects, only to find the "USB Settings" option missing from your Power Options menu? You're certainly not alone. This is a common frustration for users, whether they are trying to improve a Virtual Reality experience with an Oculus Link, stop a USB headset from constantly beeping, or prevent external drives from disconnecting during file transfers . This hunt can easily turn into a multi-hour problem if you don't know where to look.
When the option isn't showing up, it's often simply hidden in the advanced power settings. This guide will show you how to force it to appear or use alternative methods to disable the power-saving feature that's likely causing your USB troubles.
Why Does the USB Selective Suspend Setting Disappear
Windows uses a feature called USB Selective Suspend to save power by automatically turning off idle USB devices. While this is useful for laptops, it can cause devices like external drives, VR headsets, or audio interfaces to disconnect or behave erratically.
The setting is usually found in the Control Panel under Power Options > Change plan settings > Change advanced power settings > USB settings. However, as many have discovered, the entire "USB settings" folder can be absent, especially on some laptops like the Asus ROG Flow X13. This is often due to manufacturer-specific power plans or Windows updates that hide these advanced options to simplify the user interface.
Recover Data from the USB Before Troubleshooting
Before you dive into fixing the missing USB Selective Suspend Setting or tweaking power management options, it's crucial to pause and think about your data first. If your USB drive has been disconnecting randomly, there's a real chance of file corruption, especially if it loses power mid-transfer. Don't rush to change settings, update drivers, or disable power features until you've secured your important files.
Jumping straight into troubleshooting—especially repeatedly plugging and unplugging the drive or running repair commands like CHKDSK—can sometimes make data recovery much harder later if the file system is already damaged.
That's where a reliable data recovery tool comes in. EaseUS Data Recovery Wizard is one of the simplest and most effective tools for retrieving files from USB drives affected by sudden disconnections, power interruptions, or file system errors. It supports all types of removable storage, including USB flash drives, external hard drives, SSDs, and memory cards, so you're covered no matter what device you're using.
Here is how you can recover data from USB with this data recovery tool:
Step 1. Run USB Data Recovery Software
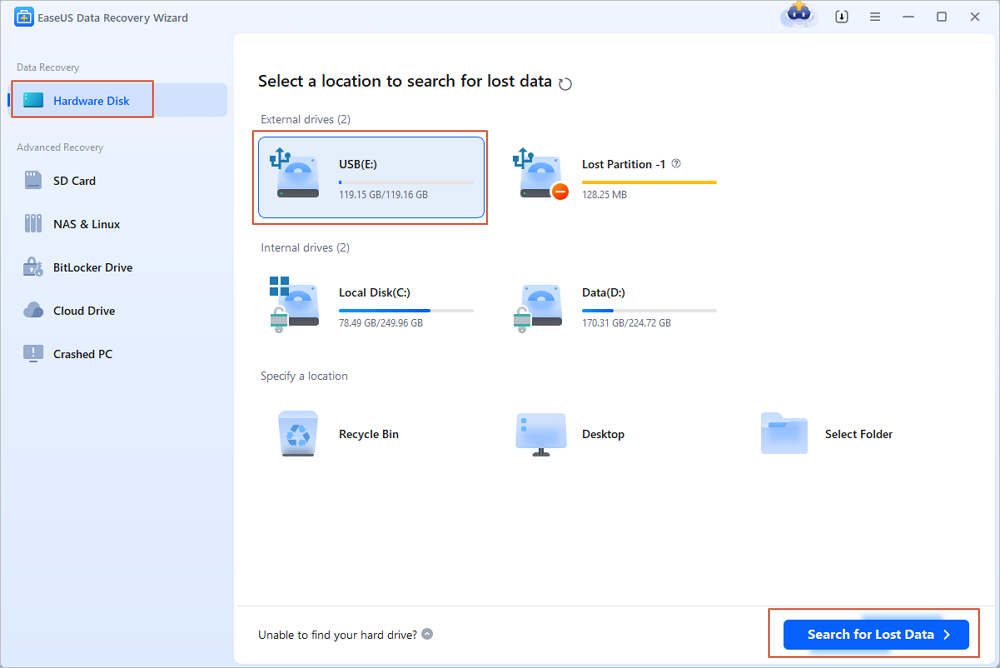
Connect the USB drive or pen drive to your computer and launch EaseUS USB data recovery software on your PC. Select the drive which is labeled as a External drives, and click "Scan for lost data" to start looking for lost files.
Step 2. Scan and Search Lost Files on a USB Drive
EaseUS Data Recovery Wizard will thoroughly scan your USB flash drive/pen drive and find all your lost data on it. When the scan process completes, use the Filter feature to find wanted files.

Step 3. Restore All Lost Files from USB
A double-click will allow you to preview the files. Select the target files to restore and click "Recover" to save them to a secure location on your PC or other external storage devices.

How to Fix "USB Selective Suspend Setting Not Found"
If you can't find the option, don't worry. There are several effective ways to bypass this issue and disable the problematic power-saving feature.
Fix 1. The Direct Registry Unhide Method
The most reliable way to make the "USB Selective Suspend Setting" appear is to use the Command Prompt or Registry Editor. This method is recommended by Microsoft MVPs and technical experts.
Here's the simplest way, using a single command:
Step 1. Right-click on the Start button and select Terminal (Admin) or Command Prompt (Admin).
Step 2. Copy and paste the following command and press Enter:
powercfg -attributes 2a737441-1930-4402-8d77-b2bebba308a3 48e6b7a6-50f5-4782-a5d4-53bb8f07e226 -ATTRIB_HIDE
Step 3. Now, go back to the Power Options menu. You should now see "USB settings" in the list.
Fix 2. The Reliable Fallback - Using Device Manager
If you don't want to mess with the registry, or if you try it and the option still doesn't appear, you can completely bypass the Power Options menu. Disabling power management for your USB hubs in Device Manager is an effective workaround often suggested by support teams.
Step 1. Right-click on the Start button and select Device Manager.
Step 2. Expand the Universal Serial Bus controllers section.
Step 3. You will see a list of entries like USB Root Hub and Generic USB Hub. You'll need to repeat the following step for each one .
Step 4. Right-click on a hub entry and select Properties.
Step 5. Go to the Power Management tab.
Step 6. Uncheck the box that says "Allow the computer to turn off this device to save power."
Step 7. Click OK and repeat this process for all other USB hubs in the list.
This achieves the same result as disabling USB Selective Suspend, preventing Windows from powering down your ports and hubs and resolving most random disconnection issues.
Still Having Problems
If you've followed these steps but your USB device still disconnects, the issue might be something else:
-
Faulty Hardware: Try a different USB port or cable. A damaged cable can cause intermittent power and data loss.
-
Outdated Drivers: Update your USB and chipset drivers from your motherboard or PC manufacturer's website.
Conclusion
Dealing with a hidden USB Selective Suspend setting is more common than you might think, but it doesn't have to be a dead end. By using the registry command to unhide the setting or by disabling power management directly in Device Manager, you can effectively stop Windows from turning off your USB devices to save power. This should end the disconnections, whether you're deep in a VR game, transferring important files, or just trying to work without interruptions.
Was this page helpful?






 Why Trust EaseUS
 Editor Reviews