





 About the Author
 Reviews and Awards
 Mac SD Card Recovery
After installing macOS Golden Gate, system background services such as Spotlight indexing, Photos library re-parsing, and iCloud synchronization consume significant processing power during the first twenty-four to forty-eight hours. If performance issues persist, users can optimize their system by managing login items, clearing system caches, or executing NVRAM and SMC resets on Intel hardware.
A major macOS update like Golden Gate gives your Mac a fresh look, better security, and new features. But many users find their Mac runs slower right after the upgrade. Your cursor might freeze, the fan might get loud, menus might lag, and heavy apps like photo or video editors may take much longer to open.
macOS Golden Gate running slowly is very common. It happens on both older Intel Macs and newer Apple Silicon models. This doesn't mean your hardware is broken. The slowdown is usually temporary, caused by unfinished background tasks, outdated startup programs, or damaged system cache files.
Causes for macOS Golden Gate Runs Slowly
When an operating system gets a major update, the way it stores files and manages background data changes a lot. Knowing how this works helps explain why your Mac runs slowly after an update.
- Background Spotlight Indexing: Background processes scan your entire drive to rebuild Spotlight and Finder search indexes.
- Photos Library Re-indexing: The system re-analyzes all your photos to recognize faces, objects, and other visual details.
- Incompatible Startup Extensions: Third-party menu bar apps, startup agents, and antivirus tools made for older macOS versions may use too much CPU on the new system.
- System Cache Misalignment: Old system caches and app preference files can conflict with your user session.
- Insufficient Storage Space: Major updates need free drive space for temporary swap files. If your drive is nearly full, it slows down disk writes and overall performance.
How to Avoid File Loss After macOS 27 Update
System optimization, clearing system caches, or removing startup programs all involve modifying system folders. If something goes wrong or your Mac crashes while clearing caches, you can lose files if they aren't backed up.
To avoid losing files after a macOS update, photographers, video editors, and business users need a recovery plan. EaseUS Data Recovery Wizard for Mac provides a safety net. Whether a cleanup tool accidentally deletes your project files or a crash damages your drive, EaseUS Data Recovery Wizard scans your drive to find lost photos, videos, and documents.
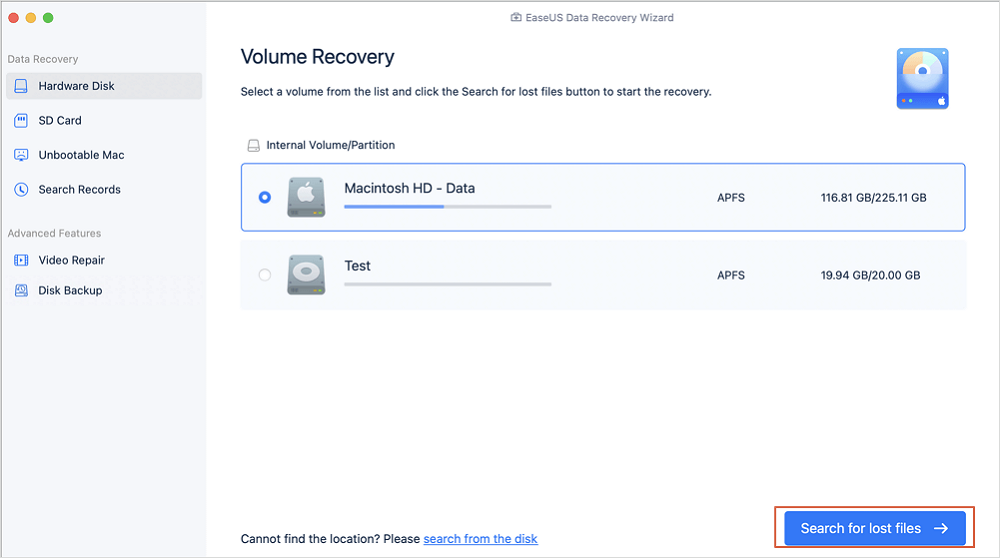
Step 1. Select the location
Select the disk where you lost data after updating to macOS Sonoma/Ventura/Monterey/Big Sur. Then, click "Search for lost files".
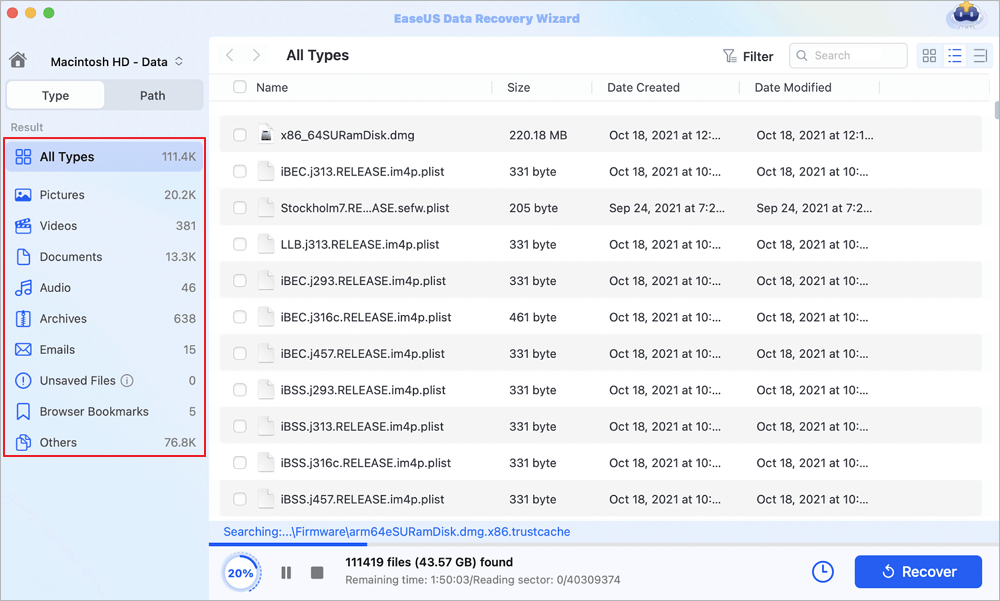
Step 2. Find lost data after the scan
EaseUS Data Recovery Wizard for Mac will immediately scan your selected disk volume and display the scanning results on the left pane. Use the file type and file path to find wanted data on Mac.
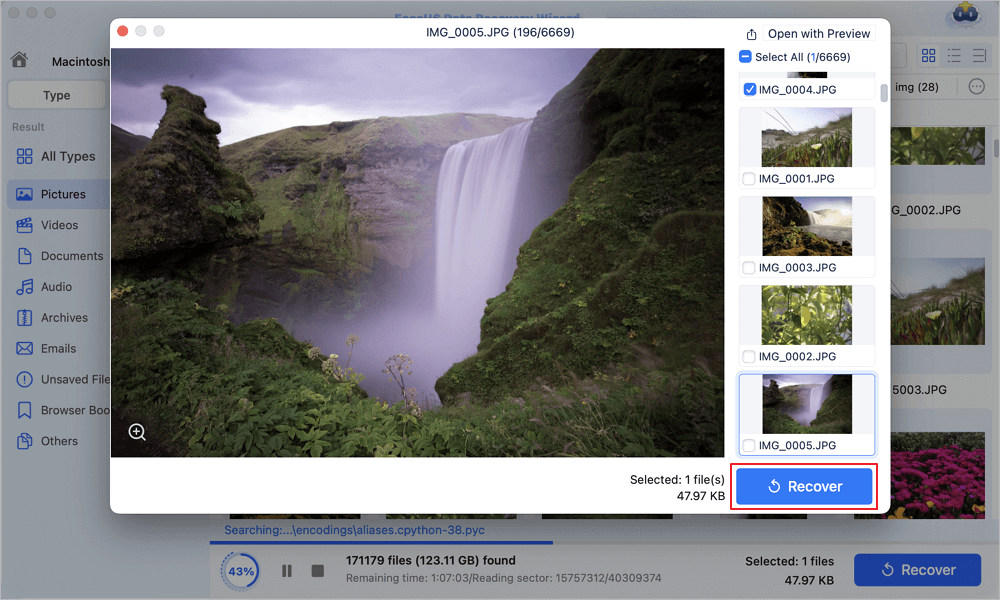
Step 3. Recover data after macOS update
Select the target files that were unknowingly lost during or after the update and click the "Recover" button to get them all back.
If you find this information helpful, please share it with others on social media to assist them in overcoming this common challenge.
How to Fix macOS Golden Gate Running Slow in 4 Ways
Sluggish performance, high CPU usage, and application delays following a major operating system upgrade usually stem from background indexing, incompatible startup items, or low storage headroom.
Method 1. Monitor Activity Monitor for Heavy Resource Allocation
Before changing settings, identify which processes are overloading your CPU cores or unified memory.
- Open "Finder", navigate to "Applications", open "Utilities", and launch "Activity Monitor".
- Click the CPU tab at the top of the interface, then click the "% CPU" column to sort processes by usage.
- Look for system processes like mds_stores, photoanalysisd, or cloudd. If these processes occupy high CPU percentages, your Mac is executing normal post-install background indexing. Leave your machine connected to power overnight to let these tasks finish.
- If a third-party application shows an abnormally high CPU percentage above 100%, highlight the process, click the Stop icon at the top of the window, and choose "Force Quit".
Method 2. Disable Unnecessary Login Items and Launch Daemons
Legacy startup apps designed for older macOS versions can trigger processing loops in macOS Golden Gate, causing startup delays and input lag.
- Open "System Settings" and click "General" in the left sidebar.
- Select "Login Items and Extensions" on the right-hand panel.
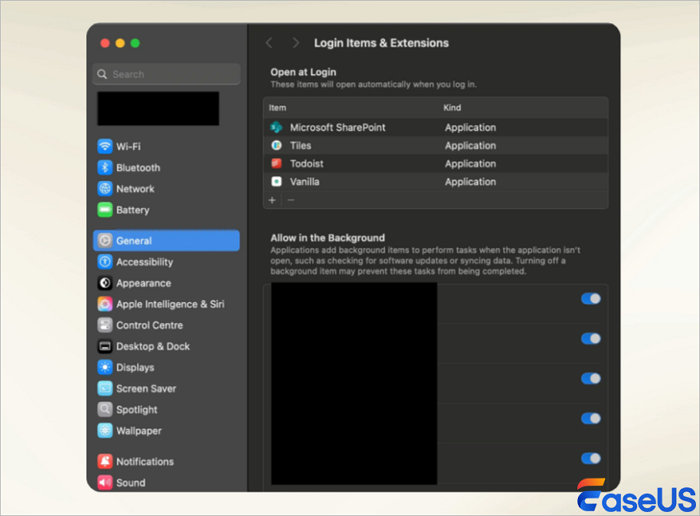
- Examine the "Open at Login" list. Select non-essential background applications and click the minus button beneath the list to remove them.
- Scroll down to the Allow in Background section. Toggle off background privileges for legacy software utilities, outdated cloud sync clients, and unneeded helper tools.
- Restart your Mac to apply the streamlined startup parameters.
Method 3. Reset SMC and NVRAM on Intel Mac Computers
For Intel-based Mac computers, clearing hardware controller logs restores normal fan control schedules, power allocation routines, and display performance after an operating system upgrade.
Resetting the NVRAM or PRAM:
- Shut down your Mac completely.
- Press the Power button, then immediately press and hold Option, Command, P, and R.
- Keep holding the keys for roughly twenty seconds until your Mac restarts and completes its secondary startup chime or displays the Apple logo a second time.
- Release the keys and allow your system to boot normally into the desktop session.
Resetting the System Management Controller SMC:
- Shut down your Intel laptop.
- Press and hold Shift, Control, and Option on the left side of your built-in keyboard while holding down the Power button.
- Hold all four keys for ten seconds, then release them at the same time.
- Press the Power button to turn your Mac back on with reset SMC parameters.
LEARN MORE
Still curious? Click here to learn about How to Fix macOS Golden Gate Not Showing Up.
Conclusion
Encountering a slow Mac after upgrading to macOS Golden Gate can interrupt creative workflows, but it is rarely a sign of permanent hardware failure. By letting background indexing finish, managing background login extensions, clearing stale application caches, and resetting hardware controllers, you can return your workstation to optimal performance. Always safeguard your valuable photo libraries and creative documents with EaseUS Data Recovery Wizard, ensuring your data stays safe and fully recoverable as you optimize your operating system.
macOS Golden Gate Running Slow FAQs
Post-upgrade performance drops often raise questions about hardware health, software compatibility, and safety. Here are answers to common queries.
1. How long should a Mac run slowly after installing macOS Golden Gate?
Initial slowdowns usually last between twelve and forty-eight hours after completing an upgrade. Speed returns once Spotlight finishes indexing drive contents and the Photos app completes face recognition indexing. If performance remains degraded after three days of normal use, you'll need to perform manual optimization steps.
2. Will downgrading to a previous macOS version erase my stored personal files?
Yes, downgrading to an earlier macOS release requires wiping your primary internal storage partition completely. You must back up your files or extract them with dedicated recovery utilities before rolling back the system.
3. Can low storage space cause my Mac to freeze after an update?
Yes, modern macOS releases rely heavily on free SSD space to manage dynamic RAM swapping and temporary dynamic buffer files. Running your primary SSD with less than fifteen gigabytes of free space severely degrades operating system responsiveness.
4. Is it safe to clear system cache folders manually?
Clearing user cache folders located inside ~/Library/Caches is generally safe because applications recreate needed cache files upon startup. However, taking precautions to avoid file loss after macOS 27 update tweaks by utilizing EaseUS Data Recovery Wizard provides essential security if critical project files are deleted by mistake.
Was This Page Helpful?

Jaden is one of the editors of EaseUS, who focuses on topics concerning PCs and Mac data recovery. Jaden is committed to enhancing professional IT knowledge and writing abilities. She is always keen on new and intelligent products.
-
EaseUS Data Recovery Wizard is a powerful system recovery software, designed to enable you to recover files you’ve deleted accidentally, potentially lost to malware or an entire hard drive partition.
Read More -
EaseUS Data Recovery Wizard is the best we have seen. It's far from perfect, partly because today's advanced disk technology makes data-recovery more difficult than it was with the simpler technology of the past.
Read More -
EaseUS Data Recovery Wizard Pro has a reputation as one of the best data recovery software programs on the market. It comes with a selection of advanced features, including partition recovery, formatted drive restoration, and corrupted file repair.
Read More
Related Articles
-
How to Fix Failed to Create macOS Installer OpenCore on Mac
![author icon]() Dany/Sep 20, 2026
Dany/Sep 20, 2026 -
Solved: SSD Slow Read Write Speed on Mac | Causes & Fixes
![author icon]() Sherly/Jun 17, 2026
Sherly/Jun 17, 2026 -
macOS Golden Gate Keeps Crashing: How to Fix Mac Crashes
![author icon]() Dany/Sep 21, 2026
Dany/Sep 21, 2026 -
Why Your Mac is Running Slow and How to Fix It
![author icon]() Jean/Sep 20, 2026
Jean/Sep 20, 2026
 Dany/Sep 20, 2026
  Sherly/Jun 17, 2026
  Jean/Sep 20, 2026

