





 About the Author
 Reviews and Awards
 Mac SD Card Recovery
When the macOS Golden Gate upgrade fails to appear in System Settings or the Mac App Store, the root cause is usually hardware incompatibility, delayed Apple rollout cycles, corrupted local software update cache files, or restrictive Beta profile settings. Users can resolve this by verifying Mac model identifiers, flushing local cache files via Terminal commands, or enrolling in Apple Developer or Public Beta channels.
- Why macOS Golden Gate Is Missing
- Recover Your Mac Before Troubleshooting System Updates
- Method 1. Verify Hardware Compatibility with macOS Golden Gate
- Method 2. Refresh the Software Update Daemon via Terminal
- Method 3. Remove Stale Software Update Preference Caches
When macOS Golden Gate is not showing up on your Mac, several technical factors could be hiding the installer package from your local system settings. These range from official hardware deprecation and regional server delays to network configuration errors and corrupted local update metadata.
Reasons: Why macOS Golden Gate Is Missing
Understanding why an operating system upgrade does not populate automatically requires examining both local computer states and remote software distribution networks. Operating system upgrades follow strict hardware and network validation routines before rendering an installer visible to the end user.
- Hardware Support Deprecation: Apple stops supporting some older Intel Mac computers periodically. These old devices will no longer find new macOS updates directly.
- Staggered Server Distribution: Apple's global servers push out updates slowly over hours or days. This setup prevents heavy server traffic for users worldwide.
- Corrupted Software Update Caches: Saved local update files on your Mac can go outdated or get damaged. Your system will incorrectly show that no new software updates are available.
- Beta Profile Mismatches: If you leave an active Developer or Public Beta profile installed, your Mac may only check old beta test channels instead of searching for official public system releases.
- Network and Firewall Restrictions: Security tools, running VPN services, or strict router firewall rules can block your Mac from reaching Apple’s update servers.

How to Install macOS 27 on Unsupported Mac
Thanks to OCLP, you can install macOS Golden Gate on unsupported Mac hardware with relatively straightforward steps.

Safety: Recover Your Mac Before Troubleshooting System Updates
Creating a complete Time Machine backup to an external drive is mandatory before running software update fixes. If an unexpected update error leaves your drive unbootable or causes personal files to go missing, EaseUS Data Recovery Wizard for Mac provides a reliable recovery path.
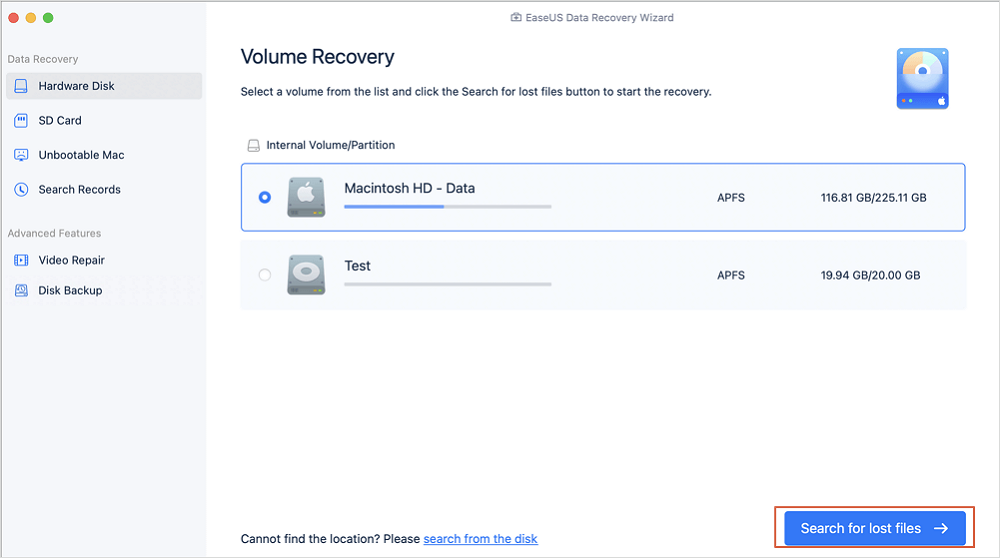
Step 1. Select the location
Select the disk where you lost data after updating to macOS Sonoma/Ventura/Monterey/Big Sur. Then, click "Search for lost files".
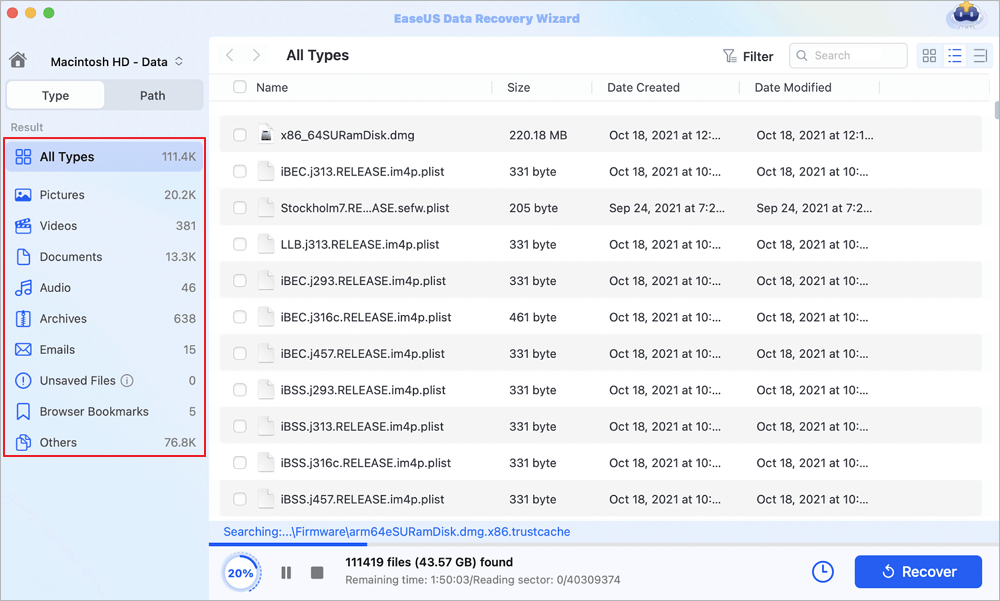
Step 2. Find lost data after the scan
EaseUS Data Recovery Wizard for Mac will immediately scan your selected disk volume and display the scanning results on the left pane. Use the file type and file path to find wanted data on Mac.
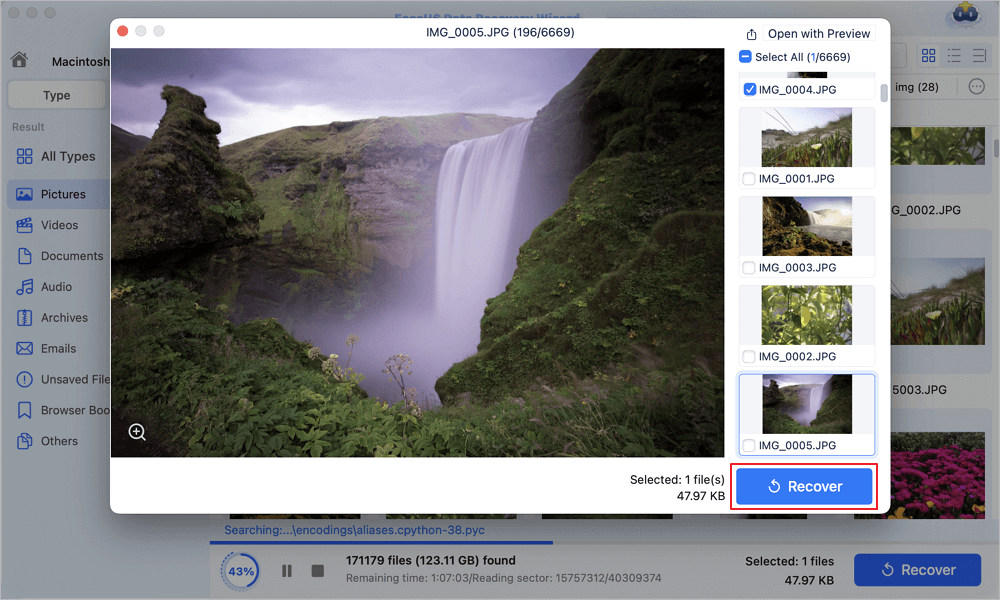
Step 3. Recover data after macOS update
Select the target files that were unknowingly lost during or after the update and click the "Recover" button to get them all back.
If you find this information helpful, share it with others on social media to help them overcome this common challenge.
Method 1. Verify Hardware Compatibility with macOS Golden Gate
The most common reason macOS Golden Gate fails to appear in your software catalog is that Apple has officially excluded your specific Mac model identifier from the native support list. Modern macOS releases require specific hardware features such as Metal 3 graphics capabilities and Apple Silicon or recent Intel processor instruction sets.
Check the compatibility reference matrix below to confirm whether your system natively supports macOS Golden Gate:
| Mac Product Family | Natively Supported Models | Unsupported Legacy Models | Required Workaround |
| MacBook Pro | 2021 Apple Silicon and Select Recent Intel Models | 2017 and Older Touch Bar Models | Requires OpenCore Legacy Patcher to bypass native checks |
| MacBook Air | M1, M2, M3, and Modern Intel Models | 2017 and Older Ultraportable Models | Requires custom EFI bootloader patching for installation |
| iMac | 24-inch Apple Silicon and Late Intel Models | 2017 and Older Slim Unibody Models | Requires patcher utilities for legacy graphics acceleration |
| Mac Mini / Mac Studio | M1, M2, M3, and Late Intel Minis | 2014 and Older Desktop Units | Requires secondary storage upgrades and custom boot paths |
To check your exact model identifier, click the Apple icon in the top left corner of your screen, select About This Mac, and note the model name and manufacture year displayed in the overview panel.
Method 2. Refresh the Software Update via Terminal
If your Mac is fully compatible but the update remains invisible, the background software update daemon process may have stalled. You can force macOS to flush its current catalog cache and query Apple update servers directly using Terminal commands.
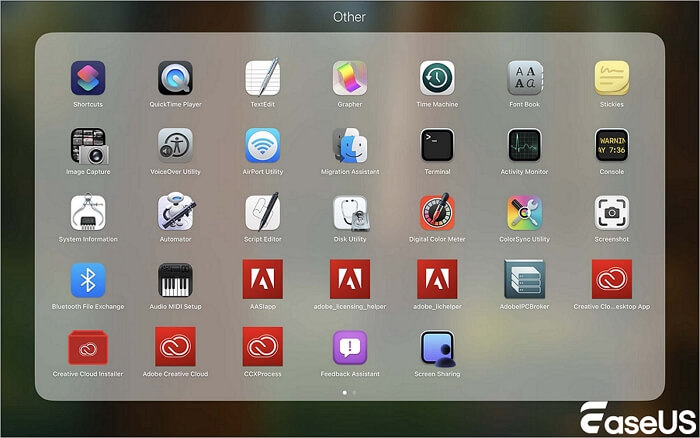
- Open Finder, go to Applications, open Utilities, and launch "Terminal".
![open-terminal]()
- Type the following command to reset the software update catalog reset flag: sudo softwareupdate --reset-ignored
- Press Enter, then enter your local administrator password when prompted.
- Execute this command to force a fresh online scan across official software catalogs: softwareupdate -l
- Examine the terminal log output. If macOS Golden Gate appears in the returned list, open System Settings, navigate to General, and select Software Update to start the download.
Method 3. Remove Stale Software Update Preference Caches
Corrupted local preference files can prevent the System Settings graphical interface from fetching updated system images. Deleting these cached property list files forces macOS to reconstruct its software catalog indexes from scratch.
- Open System Settings, go to General, select Software Update, and temporarily toggle off automatic update checks.
- Open Finder, click Go in the top menu bar, choose Go to Folder, and enter this directory path: /Library/Preferences/com.apple.SoftwareUpdate.plist
- Move the target plist file to the Trash.
- Open Go to Folder again and navigate to the user cache folders by entering this path: ~/Library/Caches/
- Locate folders associated with software update processes, such as com.apple.SoftwareUpdate, and move them to the Trash.
- Restart your Mac, return to System Settings, and check for the macOS Golden Gate update once again.
LEARN MORE
Still curious? Click here to learn about "Is It Safe to Delete Cache Files on Mac?"
Conclusion
Fixing the macOS Golden Gate not showing up error relies on systematically diagnosing hardware eligibility, network stability, and local cache states. By verifying hardware compatibility, flushing local software update daemons in Terminal, and clearing corrupted preference files, users can reliably reveal and download the official operating system installer. Always keep tools like EaseUS Data Recovery Wizard on hand, so your media libraries and valuable project assets stay secure throughout your macOS Golden Gate installation journey.
macOS Golden Gate Not Showing Up FAQ
Resolving software update visibility issues often raises operational questions regarding network settings, installer links, and hardware compatibility. Below are clear expert answers to the most common queries.
1. Why is macOS Golden Gate showing up on one of my Macs but missing on another?
Different Mac computers display updates at different times based on hardware compatibility status, active beta profiles, and geographic server routing. If one Mac is an unsupported older model and the other is a supported Apple Silicon machine, the older machine will automatically hide the upgrade package until you use custom patcher tools.
2. Can I force my Mac to download macOS Golden Gate if it is officially unsupported?
Yes, you can install macOS Golden Gate on officially unsupported Mac hardware by utilizing third-party utilities such as OpenCore Legacy Patcher. These tools inject missing driver extensions and emulate supported board identifiers, allowing the full macOS Golden Gate installer to download and execute smoothly on legacy systems.
3. Will clearing my software update cache delete any personal files?
No, clearing software update preference cache files only removes temporary system catalog logs and configuration plists used by System Settings. It does not affect your personal documents, photos, user applications, or desktop files.
Was This Page Helpful?

Jaden is one of the editors of EaseUS, who focuses on topics concerning PCs and Mac data recovery. Jaden is committed to enhancing professional IT knowledge and writing abilities. She is always keen on new and intelligent products.
-
EaseUS Data Recovery Wizard is a powerful system recovery software, designed to enable you to recover files you’ve deleted accidentally, potentially lost to malware or an entire hard drive partition.
Read More -
EaseUS Data Recovery Wizard is the best we have seen. It's far from perfect, partly because today's advanced disk technology makes data-recovery more difficult than it was with the simpler technology of the past.
Read More -
EaseUS Data Recovery Wizard Pro has a reputation as one of the best data recovery software programs on the market. It comes with a selection of advanced features, including partition recovery, formatted drive restoration, and corrupted file repair.
Read More
Related Articles
-
Toshiba External Hard Drive not Showing Up on Mac? How to Fix
![author icon]() Jaden/Sep 20, 2026
Jaden/Sep 20, 2026 -
How to Install macOS 27 on Unsupported Mac
![author icon]() Jaden/Sep 21, 2026
Jaden/Sep 21, 2026 -
How to Solve G-Drive Not Showing up on Mac
![author icon]() Jaden/Sep 20, 2026
Jaden/Sep 20, 2026 -
Full Disk Access: How to Enable & Fix Full Disk Access Failing
![author icon]() Brithny/Sep 20, 2026
Brithny/Sep 20, 2026
 Brithny/Sep 20, 2026

