





 About the Author
 Reviews and Awards
 Mac SD Card Recovery
What Is a macOS 27 Bootable USB
A bootable USB for macOS 27 comes in handy if you need to reinstall the system, solve startup problems, or set up multiple Macs with the same installer without downloading it over and over. This isn't just any ordinary flash drive; it holds all the files and startup tools you need to launch the macOS installer environment directly from the USB.
Think of it as a portable macOS installer. Plug it in, start your Mac, and you can boot straight into the macOS installation tools, regardless of what's going on with your computer's main drive.
With a macOS 27 bootable USB, you can:
- Install macOS from USB on your Mac.
- Troubleshoot tricky startup or installation issues.
- Avoid downloading the installer each time you need it.
- Prep multiple Macs with one easy drive.
- Use installation tools when your system won't boot.
- Install macOS 27 on unsupported Macs.
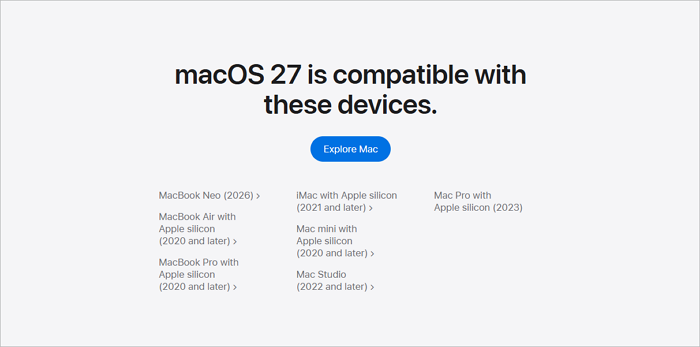
Just make sure the Mac you're working with supports macOS 27. Apple also suggests keeping the Mac online during installation for firmware updates and other model-specific items.
What You Need Before Creating a macOS 27 Bootable USB
Before you jump in, it's important to get your USB drive and Mac ready, so you don't find out midway that your USB stick's too small or your Mac can't run the version you want.
A Compatible Mac
Start with a Mac that actually supports macOS 27. If possible, download the full installer on it.
Also, figure out if your Mac runs on Apple silicon or an Intel chip. The startup steps are different, and you'll need admin access and a stable internet connection.
If your Mac won't start, try making the installer on a different, compatible Mac.
A USB Flash Drive
You need a decent USB flash drive, something you trust, with enough space for the installer. Apple says a 32GB stick is enough. Double-check you don't have your only copy of important files on there because this process wipes everything.
If the USB has important data, do this before starting:
- Back up files somewhere safe.
- Open and check a few of those files to make sure they're readable.
- Eject your backup drive properly.
- Plug the USB directly into your Mac.
- Double-check you've got the right USB selected.
The Full macOS 27 Installer
You need the large, full installer, not a small update file. Get it from the App Store, Apple's website, or Terminal. If it launches automatically after download, just quit the installer. You should find the installer in your Applications folder, with a name like `Install macOS [Version Name].app`.
Right before you get started:
- Download the full macOS 27 installer (not just an update).
- Check your Applications folder for the installer app.
- Make sure you've got the complete file (don't use .dmg or .pkg extensions for Terminal unless you've fully run them).
- Quit the installer if it opens right away.
- Leave the file in Applications for easy access.
How to Create macOS 27 Bootable USB
There are two main ways you can do this: with a simple, guided tool like EaseUS, or by using Apple's official Terminal method. Choose whichever matches your comfort level.
Method 1. Create a macOS 27 Bootable USB with EaseUS
If you don't want to type Terminal commands or risk mistakes, this is the simpler path. EaseUS Data Recovery Wizard for Mac has a bootable-media feature that walks you through making the USB.
It's also useful if you lose files during the process (maybe you formatted the USB by mistake). EaseUS can help you recover a formatted USB drive on a Mac, as long as you haven't overwritten the data.
If you formatted or deleted files on your USB by accident, stop using it right away (new data can overwrite lost files).
Check how to create a macOS 27 bootable installer:
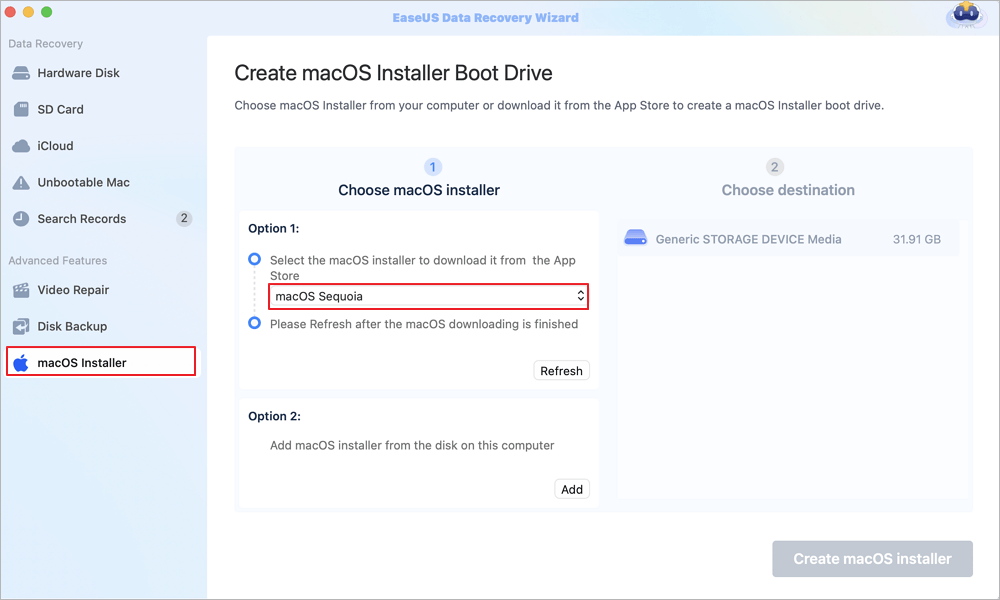
Step 1. Select a macOS version
Select a macOS version from the list, or click the "Refresh" option to get the downloaded macOS version. Or you can add a macOS installer from your disk by clicking the "Add" button. Insert a USB flash drive larger than 16 GB to save the macOS installer.
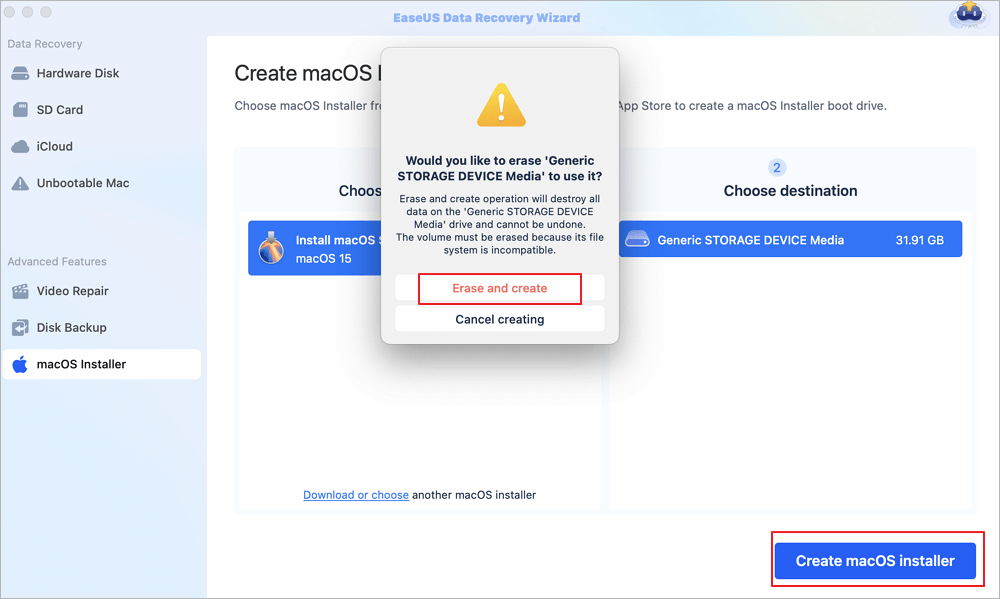
Step 2. Erase the USB flash drive
After choosing the USB flash drive, click the "Erase and create" option in the pop-up window to format your USB flash drive quickly, and then click the "Create macOS installer" button to continue.
- Note: This operation will delete all data on your USB flash drive, please back up important data in advance, or use EaseUS data recovery software to recover your data.
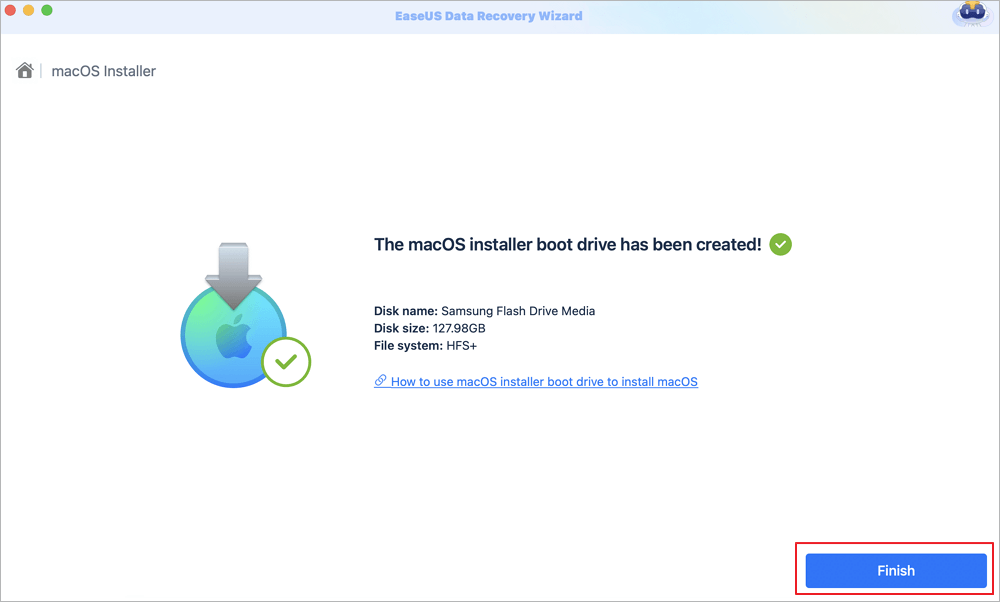
Step 3. Create the macOS installer boot drive
Wait for the process to complete, and click the "Finish" button. Your macOS installer boot drive has been successfully created!
Share this guide on social media and help more Mac users!

Method 2. Create a macOS 27 Bootable USB Using Terminal
If you don't mind some command-line work, this is Apple's approved method. You'll use the `createinstallmedia` tool that comes with the macOS installer app.
The USB will get wiped as part of this, so don't skip the backup.
Step 1. Connect your USB to the Mac.
Step 2. Open Disk Utility (Applications > Utilities).
Step 3. Erase your USB with the right format if needed (though the Terminal command will erase it anyway).
Step 4. Rename the USB as `MyVolume` (matches Apple's default command).
Step 5. Check that your full macOS 27 installer is in the Applications folder, look for `Install macOS [Version Name].app`.
Step 6. Fire up Terminal (Applications > Utilities > Terminal).
Step 7. Enter the right `createinstallmedia` command. For example:
sudo /Applications/Install\ macOS\ [macOS\ 27\ Name].app/Contents/Resources/createinstallmedia --volume /Volumes/MyVolume
Be precise with the installer name, or the command won't work.
Step 8. Hit Return to run the command. Enter your Mac admin password when prompted. (Terminal won't show the characters.)
Step 9. Type `Y` when asked if you really want to erase the USB.
Let the Mac do its thing, and don't disconnect the USB. When Terminal says your install media is ready, you're done.
Quit Terminal and safely eject your USB before unplugging.
If you run into trouble, like Terminal says the installer isn't valid—double-check you got the full installer and it's still in the Applications folder.
How to Boot a Mac from the macOS 27 USB
Once your bootable USB is ready, you have to start installing macOS from your USB. The steps change a little depending on your Mac's processor.
For Apple Silicon Macs:
- Shut down the Mac completely.
- Plug in the bootable USB.
- Press and hold the power button until you see startup options.
- Pick the USB installer from the screen.
- Click Continue and follow the installation steps.
You'll need internet for updates or model-specific files.
For Intel Macs:
- Shut your Mac down.
- Plug in the USB.
- Turn on your Mac and immediately hold down the Option (Alt) key.
- When you see the startup manager, let go.
- Pick the USB installer, then hit Return or select the arrow.
- Follow the installer steps.
Some Intel Macs with the T2 chip might block external booting. If the USB isn't showing up, check your security settings.
Conclusion
Making a macOS 27 bootable USB is the go-to move when Recovery Mode or regular installations aren't working for you. It's also a great way to set up multiple Macs quickly.
If you like the command line, use Apple's method with `createinstallmedia`. Just have the full installer and a USB ready and pay close attention to the exact file names.
If you want things simpler (or you need file recovery options), go with EaseUS Data Recovery Wizard for Mac. This software can also help you recover missing data on a USB drive.
macOS Golden Gate Bootable Installer FAQs
1. What is a macOS 27 bootable USB?
It's a USB drive loaded with the macOS 27 installer you can boot from to install or reinstall macOS on compatible Macs.
2. How do I create a macOS 27 bootable USB automatically?
Using a bootable media tool is the straightforward way to create a macOS Golden Gate bootable installer automatically. EaseUS Data Recovery Wizard for Mac has a free feature that can help users create a macOS installer.
3. Why isn't my Mac recognizing the bootable USB?
Common problems are an incompatible Mac, a broken or wrongly created USB, an incomplete installer, or startup security settings. Try a different USB and check compatibility before restarting.
Was This Page Helpful?

Dany is an editor of EaseUS who lives and works in Chengdu, China. She focuses on writing articles about data recovery on Mac devices and PCs. She is devoted to improving her writing skills and enriching her professional knowledge. Dany also enjoys reading detective novels in her spare time.
-
EaseUS Data Recovery Wizard is a powerful system recovery software, designed to enable you to recover files you’ve deleted accidentally, potentially lost to malware or an entire hard drive partition.
Read More -
EaseUS Data Recovery Wizard is the best we have seen. It's far from perfect, partly because today's advanced disk technology makes data-recovery more difficult than it was with the simpler technology of the past.
Read More -
EaseUS Data Recovery Wizard Pro has a reputation as one of the best data recovery software programs on the market. It comes with a selection of advanced features, including partition recovery, formatted drive restoration, and corrupted file repair.
Read More
Related Articles
-
Files Not Showing Up on Flash Drive Mac | How to Fix
![author icon]() Dany/Sep 20, 2026
Dany/Sep 20, 2026 -
How to Fix Failed to Create macOS Installer OpenCore on Mac
![author icon]() Dany/Sep 20, 2026
Dany/Sep 20, 2026 -
Install macOS from USB: A Complete Guide for Beginners
![author icon]() Jean/Sep 20, 2026
Jean/Sep 20, 2026 -
Create macOS Tahoe Bootable Installer and Get macOS 26 Beta
![author icon]() Dany/Sep 20, 2026
Dany/Sep 20, 2026
 Jean/Sep 20, 2026

