Videos not only take a large portion of your iPhone storage but also have the potential to make your iOS device slow. And that's not the only reason why you need to transfer videos from your iPhone to a PC running Windows 10 or Windows 11. Actually, videos are quite important to us because they carry precious memories or information. To make a backup of them, it is also necessary to download videos from your iPhone to Windows 10 or Windows 11.
However, unlike the data transfer between an iPhone and a Mac computer, there are not so many Apple features for you to apply between an iOS device and a PC. Then how can you transfer videos from an iPhone to a PC in Windows 10 or Windows 11? Read on to get the answers.
How to Transfer Videos from iPhone to PC in Windows 10/11 Quickly
Also supports photos, music, ringtones, contacts, books, and more.
To take more control over your iPhone data, it's advisable to use an iPhone transfer software tool - EaseUS MobiMover. It has advanced data management features that allow you to connect phone to computer and:
Transferring videos from an iPhone to a PC can be easily done either with or without EaseUS MobiMover. But when it comes to transferring files from a Windows PC to an iDevice or transferring other types of content on an iPhone, using such a tool is necessary.
To transfer videos from an iPhone to a PC in Windows 10/11:
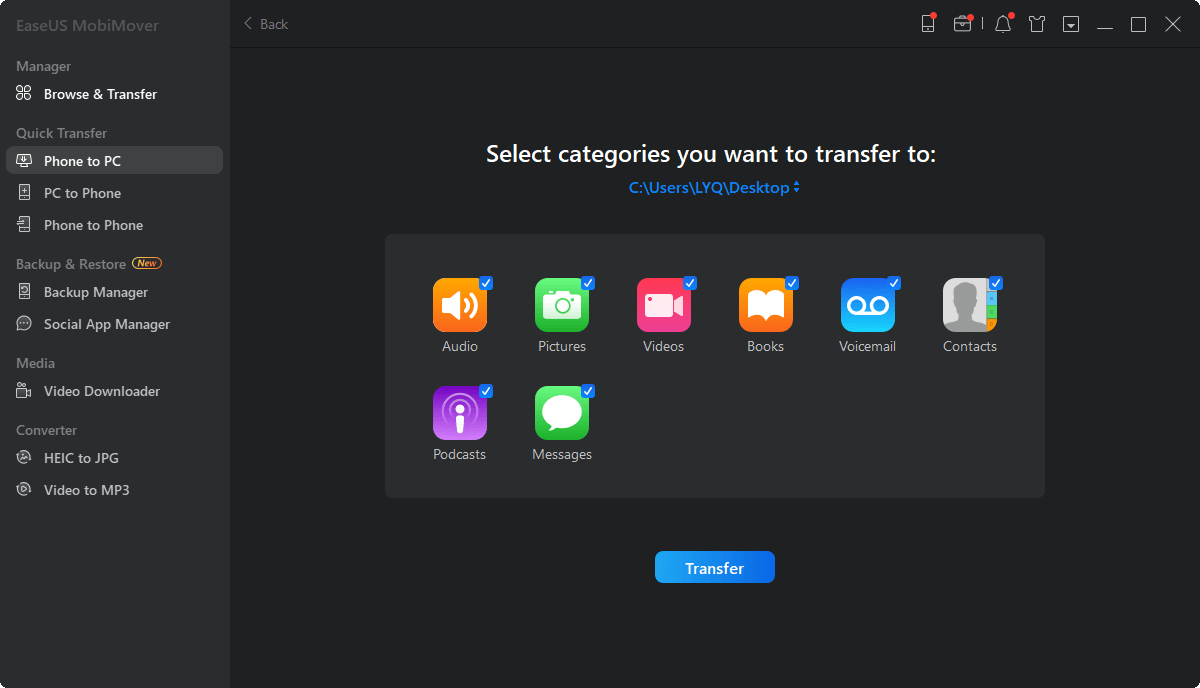
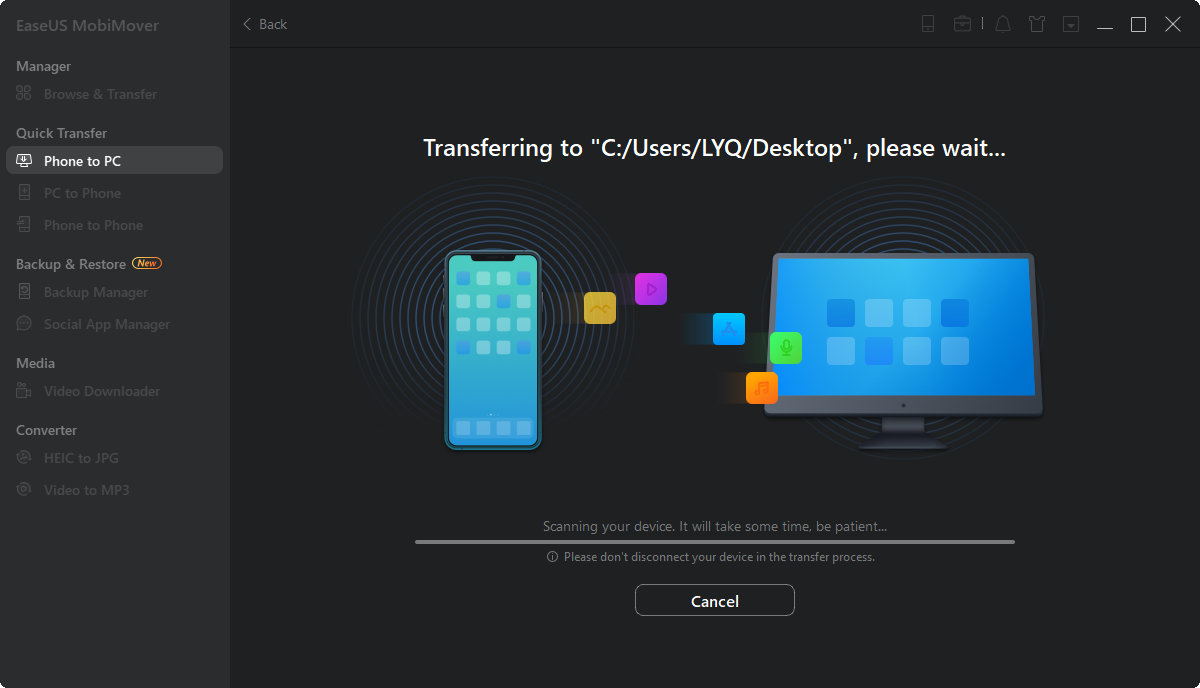
Step 1. Connect your iPhone to your computer and tap "Trust" on your iPhone screen to continue. Run EaseUS MobiMover and choose "Phone to PC" > "Next".
Step 2. Select "Videos" among the options and click the default path to set a custom storage path if you need to. Afterward, click "Transfer".
Step 3. When the transfer process has finished, you can go to view the videos on your computer.
You may also want to convert iPhone video to MP4 so that you can use the video in various programs or projects.
How to Import Videos from iPhone to PC in Windows 10/11 via File Explorer
File Explorer is no doubt the simplest way to copy videos from an iPhone to Windows 10 or Windows 11. As the file browser on Windows, it enables you to access your iPhone photos and videos. By doing so, you will be able to copy your iPhone videos to your PC as you want to. The only flaw is that when you want to transfer videos selectively, it may take you much time since you need select these items one by one.
To copy videos from an iPhone to Windows 10 or Windows 11:
Step 1. Connect the iPhone to Windows and make sure it is recognized.
Step 2. Go to "File Explorer" > "This PC" > "Apple iPhone" > "Internal Storage" > "DCIM."
Step 3. Now you can see all your iPhone folders in which there are your photos and videos.
Step 4. Select the videos you want to transfer and then copy and paste them to a folder on your PC.
![How to transfer videos from iPhone to PC in Windows 10 via File Explorer]()
How to Transfer Videos from iPhone to Windows 10 Using Photos
The pre-installed Photos app available on Windows 8 and later is another easy way to get your iPhone videos to a PC. Photos not only works to manage the photos and videos on your computer but also performs well to import photos and videos from an external device, including your iPhone.
To import videos from your iPhone to Windows 10/11:
Step 1. Connect your iPhone to Windows and make sure it shows up on your computer.
Step 2. Launch Photos, click "Import" in the top right corner, and then choose "From a USB device" or "From a connected device."
Step 3. Wait for Photos to load the photos and videos from your iPhone.
Step 4. Select the videos you want to copy and click "Import [number] items" to start transferring videos from your iPhone to Windows 10 or Windows 11.
![How to download videos from iPhone to WIndows 10 using Photos]()
Some users have encountered the issue "Photos not working on Windows 10." If you come across the same problem, refer to the troubleshooting guide to solve it.
How to Download Videos from iPhone to Windows 10 via iCloud
Cloud-based services have a growing popularity. They also help to solve the problems of data transfer by syncing. By turning on iCloud Photos, you can download videos from your iPhone to Windows 10 automatically over Wi-Fi. No USB cable needed, you will be able to transfer videos from your iPhone to a PC in any Windows version wirelessly using iCloud.
Further reading: See How to Transfer Videos from PC to iPhone for details on video transfers from Windows PC to iOS device.
The preparations you need to make include:
- Make sure you are using the same Apple ID on your iOS device and the PC.
- Make sure there is enough iCloud storage to save your iPhone photos.
- Make sure there is a stable and fast network connection on both of your devices.
Afterward, follow the steps below to download videos from your iPhone to Windows 10 or Windows 11 wirelessly:
Step 1. Download and install iCloud for Windows on your PC.
Step 2. Turn on iCloud Photos on your iPhone in Settings.
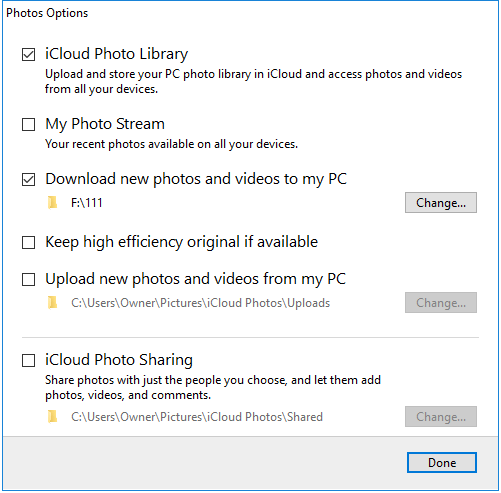
Step 3. On the PC, sign in to iCloud with the Apple ID used on your iPhone and then turn on "iCloud Photo Library" and "Download new photos and videos to my PC."
Step 4. When the syncing process is over, you can go to the folder shown under "Donwload new photos and videos to my PC" to check your iPhone videos.
![How to download videos from iPhone to Windows 10 with iCloud]()
The Bottom Line
With the help of File Explorer or Photos, you may find there is no need to apply a third-party data transfer tool. Personally, that is not completely right. No one will deny their convenience. But you should know that they only help to transfer photos and videos from your iPhone to the PC. That means you can't transfer videos from a PC to an iPhone or share other types of files between these devices using File Explorer or Photos.
Given that, if you only want to copy iPhone videos to Windows 10, using either of them is advisable. While if you want to do more, using a tool like EaseUS MobiMover will fulfill your needs better. As for iCloud, feel free to choose it according to your situation.
 NEW
NEW HOT
HOT