Can You Delete Photos from iPhone But Not iCloud
With iCloud Photos enabled on your iPhone, all your photos from your iPhone will be synced to iCloud, and photos that existing in iCloud will also be synced to your iPhone. When you make changes to your iPhone photos, they will also be updated in iCloud, too. Thus, if you delete photos from your iPhone with iCloud Photos on, these items will also be removed from iCloud, too. That could be disastrous for you who want to keep a backup of photos in iCloud.
Is there any solution to delete photos from iPhone but not iCloud? Actually, there is. By disabling iCloud Photos on the iOS device, you can delete photos from iPhone without deleting them from iCloud. In addition, there are other practical ways for you to apply.
How to Delete Photos from iPhone But Not iCloud
Some of the tips below will help you to delete photos from your iPhone but not in iCloud, while others show you alternative ways to back up your iPhone photos. Read on to get the details.
Option 1. Turn off iCloud Photos
It's quite simple to turn off iCloud Photos on an iPhone. Here are the details:
Step 1. Go to the Settings app on your iPhone.
Step 2. Tap your name and choose "iCloud."
Step 3. Tap "Photos," toggle off "iCloud Photos," and choose what to do with items in iCloud Photos.
Step 4. Now go to delete photos from iPhone as you want to.
![How to disable iCloud Photos on iPhone]()
Option 2. Use Another iCloud Account
The primary condition for photos to sync between your iPhone and iCloud is that you are using the same account. Thus, if you switch to another iCloud account on your iPhone and then delete photos, these changes won't be mirrored to iCloud that uses another account.
To change iCloud account on iPhone:
Step 1. Go to the Settings app.
Step 2. Tap your name and scroll down to click "Sign Out."
Step 3. Choose the copy you'd like to keep, tap "Sign Out" and click "Sign Out" again to confirm.
Step 4. In Settings, tap "Sign in to your iPhone" and enter your Apple ID.
Step 5. Enter the passcode and tap "Next."
Step 6. Enter the Apple ID verification code if necessary. Then enter your lock screen passcode.
Step 7. Choose whether to merge your iPhone data with iCloud.
Step 8. Go to the Photos app to delete photos from your iPhone but not iCloud.
Option 3. Try iCloud Alternatives
Actually, not all cloud-based storage services work like iCloud. If you back up your iPhone photos using Google Photos or Google Drive, the photos that have been synced to the cloud storage won't be removed even if you delete the photos from your iOS device. Therefore, if you want to delete photos from your iPhone without removing them from cloud storage, just switch to other cloud storage services like Dropbox, Google Drive, and Google Photos for help.
Option 4. Back up iPhone Photos to Computer
If you choose to back up iPhone photos to a computer, you won't have such worries since the changes you make on your iOS device will not be synced to the computer. To back up iPhone photos all at once or selectively, you can use the iPhone transfer software - EaseUS MobiMover. It works to:
- Transfer files between an iPhone/iPad/iPod and a computer
- Transfer data from one iDevice to another
- Back up and restore photos, videos, music, ringtones, contacts...
- Back up and restore WhatsApp data
Thus, you can either transfer photos from iPhone to computer or make a backup of your iPhone photos to computer. Both allow you to keep a copy of your precious pictures.
To back up iPhone photos without iCloud:
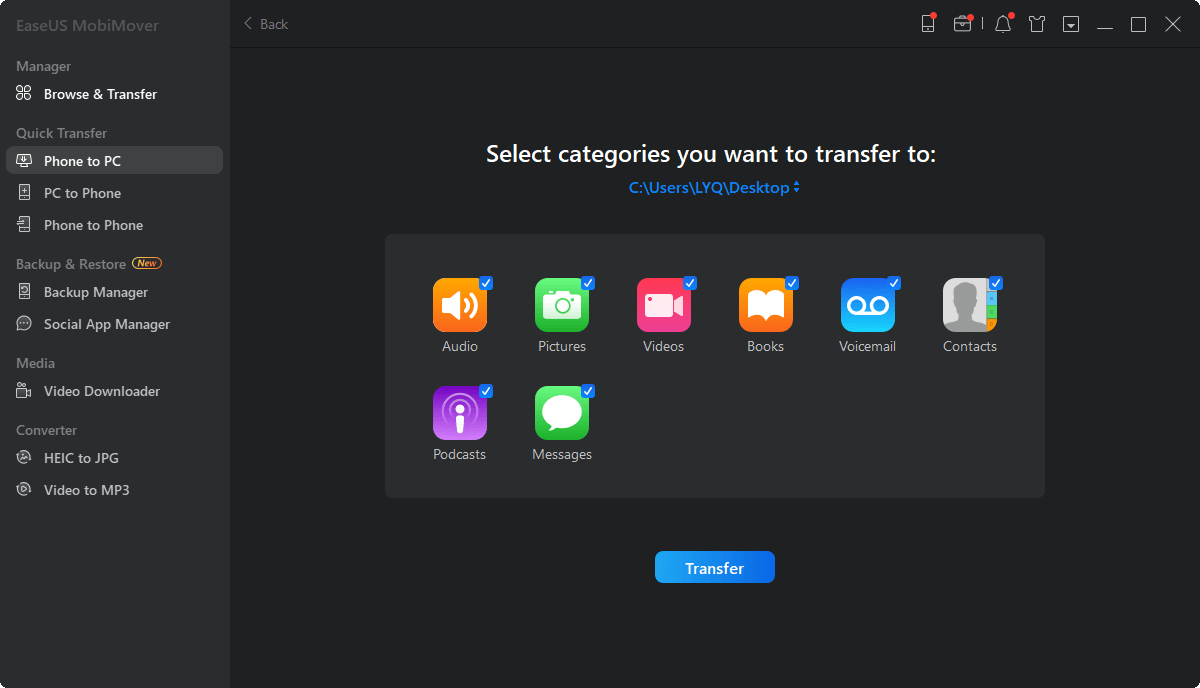
Step 1. Connect your iPhone to your computer (Mac or PC) with a USB cable and run EaseUS MobiMover. In MobiMover, choose "Phone to PC" to back up all your iPhone photos to the computer at once. Then, click the "Next" button to go on.
Step 2. Select the category/categories you'd like to back up. It's an excellent choice to make a copy of all the supported file types on your iPhone using the data transfer feature. You can see from the screenshot below, MobiMover enables you to back up iPhone data on your desktop or customize the storage path by yourself.
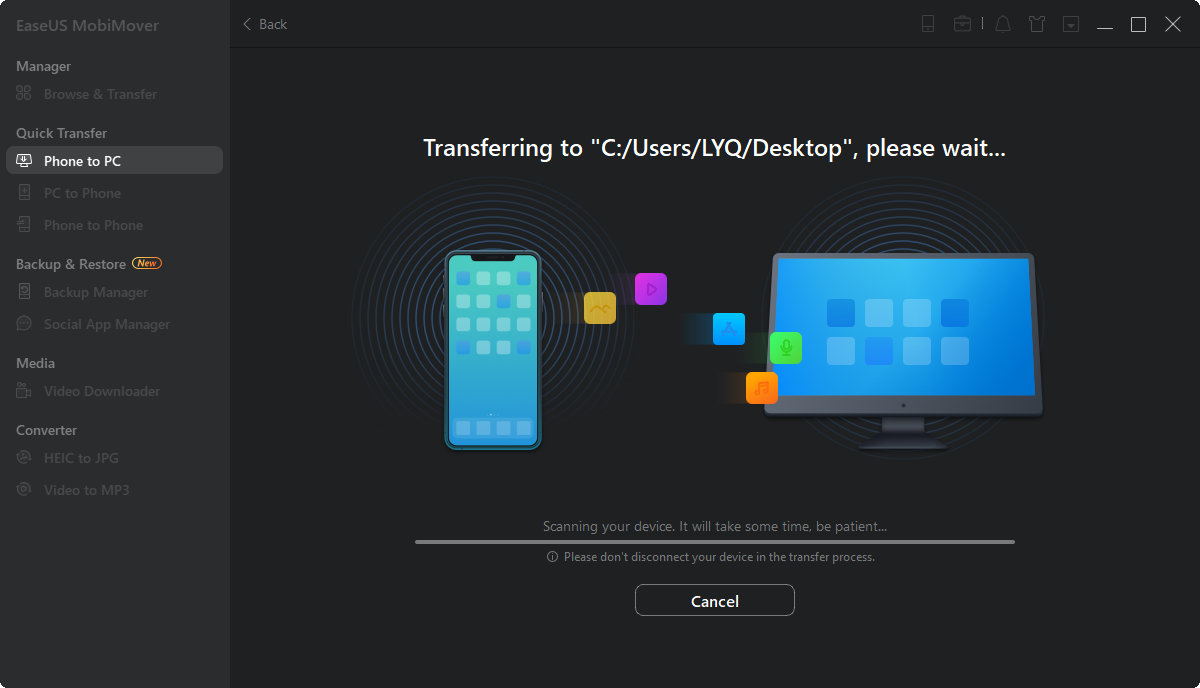
Step 3. Now, click the "Transfer" button to start backing up your iPhone photos to computer without iCloud. The transmission is high-speed, and you don't have to wait too long.
Option 5. Download iCloud Photos to Computer
Another indirect way to keep a copy of the photos you want to delete is to download photos from iCloud to your computer. Even if you delete photos from your iPhone and iCloud, you still have a backup of these items on your computer.
To download iCloud photos to PC:
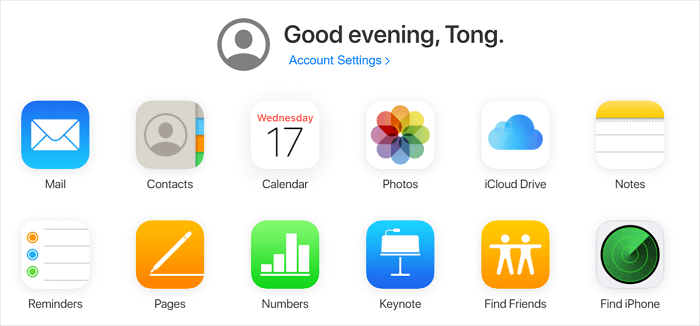
Step 1. Go to visit iCloud.com and sign in with your account.
Step 2. Choose "Photos" and you will see all your iCloud photos.
Step 3. Select the items you want to download and click the "Download" icon.
Step 4. Go to the "Downloads" folder to check the iCloud photos.
![How to download iCloud photos to PC]()
You can check the related guide to learn more ways to download iCloud Photos to PC.
The Bottom Line
To delete photos from your iPhone but not iCloud, there are just some indirect solutions for you. But you can choose other ways to back up your iPhone photos so that you can delete pictures from the iOS device without worrying about losing the backup.
FAQs on How to Delete Photos from iPhone but Not iCloud
For more information about how to delete photos from iPhone but not iCloud, review the following questions that people also ask.
1. How do I delete photos from my iPhone but keep them in iCloud?
Here we share with you three solutions:
- By turning off iCloud photo sharing, you can erase photos from your iPhone while keeping them in iCloud.
- You can also use another iCloud account to keep the iCloud photos from the prior account safe.
- Another alternative is to back up photos on a different cloud service before deleting them from your iPhone.
2. Why is my iPhone storage full when I have iCloud?
If your iPhone storage still remains full after you enable iCloud, it's most likely because it's configured to keep your original photos on your phone rather than uploading them to iCloud.
3. What happens if I turn off iCloud photos?
When you turn off iCloud Photos, fortunately, the photos captured on your device will not be deleted. Each photo or screenshot captured on the smartphone will be saved locally on the phone. But you will not have the access to photos recorded on other devices.
 NEW
NEW HOT
HOT