
Content
Page Table of Contents
About the Author
Hot Topics
Did you upgrade your PC's storage from HDD to SSD, but it's not booting after installing the SSD? You're not alone; in fact, here's what a few of the users said after experiencing the same issue on public forums:
And another user experienced this problem. "So I recently bought a Crucial P3 SSD M.3 NVMe (1TB) to play Baldur's Gate 3. I tried to install it yesterday, but when I try to start the PC, it gets stuck on a black screen, with only one white static line in the upper left corner. The problem is that I can't even enter the BIOS when it is installed (I tried without the M.2 and had no problem). I have no idea about what's happening."
This issue is not as uncommon as you think, and if you're also experiencing the same issue, which is Windows not booting after installing a new SSD.
Continue reading this article, as we'll show you how to fix this issue!
One-click Fix Windows Not Booting After Installing a New SSD
If you've tried all of our above solutions and you weren't able to fix the problem, in that case, we highly recommend you use EaseUS Partition Master and its "boot repair" feature. This feature is highly capable of fixing all the boot issues on an SSD or an HDD and will make it boot Windows successfully.
Step 1. Start EaseUS Partition Master after connecting the external drive/USB to your computer, go to "Bootable Media," and click "Create bootable media."

Step 2. Select an available USB Drive or CD/DVD and click "Create." You can also burn the Windows ISO file to the storage media.

Step 3. Connect the created bootable drive to the new computer and reboot the computer by pressing and holding F2/Del to enter the BIOS. Then, set the WinPE bootable drive as the boot disk and press F10 to exit.
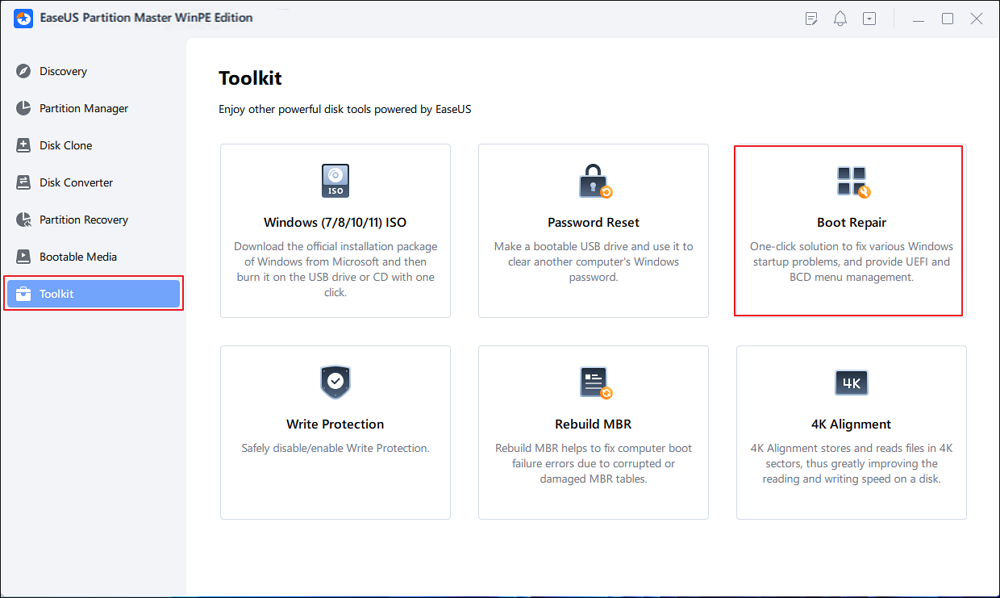
Step 4. Boot the computer again and enter the WinPE interface. Then, open EaseUS Partition Master and click "Boot Repair" under the "Toolkit" option.
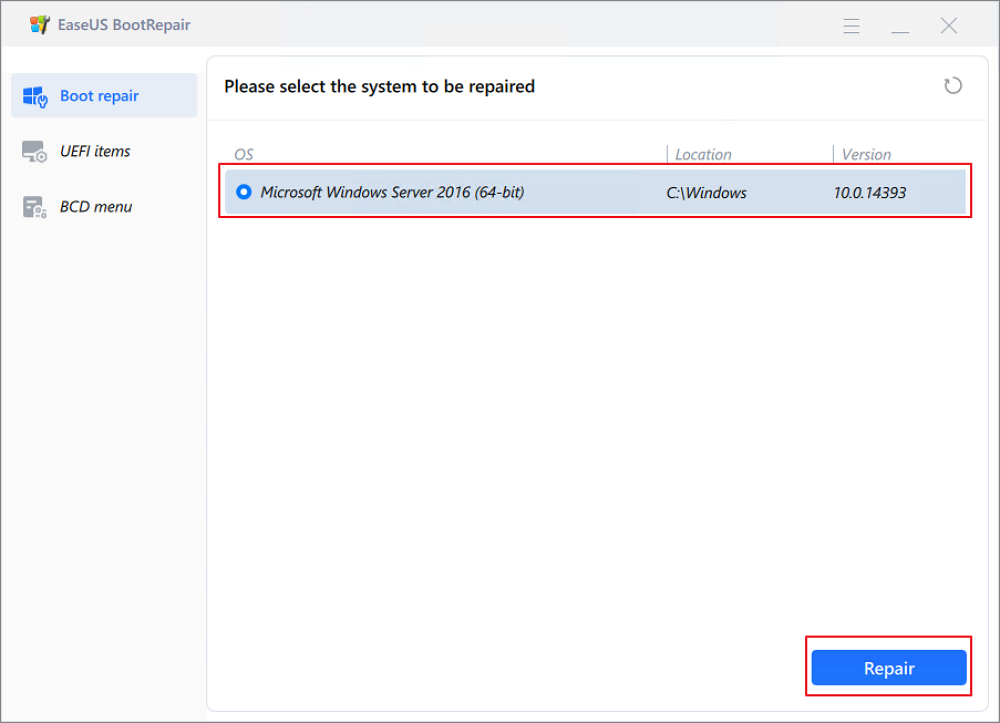
Step 5: Select the system you want to repair and click "Repair."
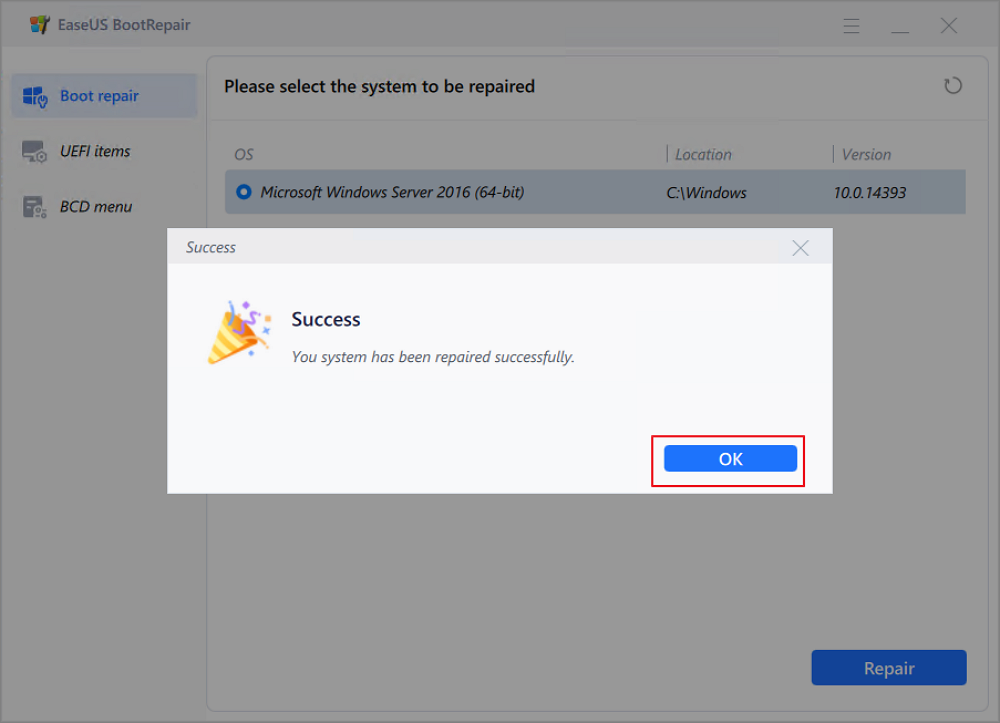
Step 6. Wait a moment, and you will receive an alert that the system has been successfully repaired. Click "OK" to complete the boot repair process.
EaseUS Partition Master uses an enhanced algorithm that locates multiple types of boot issues and fixes all of them in a matter of minutes. Allowing users like you to easily fix the problem and boot Windows successfully.
Fixes - Windows Not Booting After Installing New SSD
We have six solutions for our readers that they can try to fix the SSD that Windows fails to boot after installing.
Fix 1. Check the Compatibility Between the Motherboard and SSD
The motherboard is one of the most important hardware components of a PC. It is where all other PC components like the CPU, GPU, and RAM are installed to make a PC function normally and optimally. However, not all components can be compatible with your PC's motherboard, and your SSD could be the same. Perhaps your SSD isn't compatible with your motherboard.
However, you can confirm if it is compatible or not. Here's how:
Step 1. Remove the motherboard from your computer.
Step 2. Locate the name, model number, and serial number of the motherboard.
Step 3. Open the manufacturer's website and locate your motherboard.

Step 4. In the tech specs, confirm if it supports your SSD type.
Step 5. We have an M.2 SSD, and my motherboard supports it.
Share these methods to help more users facing the same boot errors.
Fix 2. Change Boot Order
One of the reasons why Windows is not booting after you've installed a new SSD is that you would not have changed the boot order and made your SSD the primary boot device.
Here's how to do that:
Step 1. Restart your PC.
Step 2. Press the BIOS key before you click the Windows icon. Your PC should show which key to press to open the BIOS when starting up.
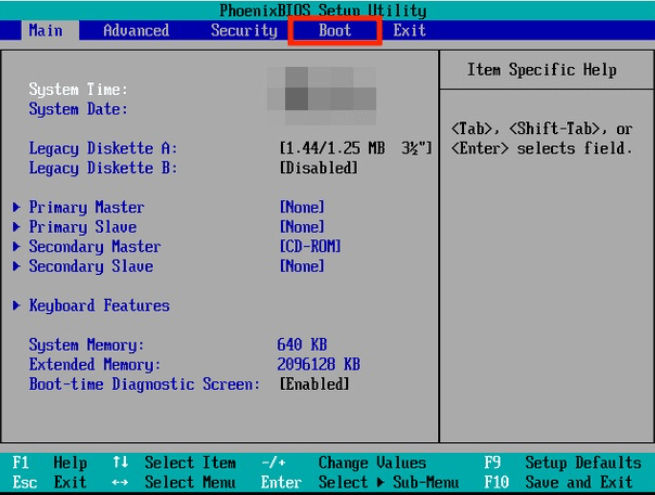
Step 3. Navigate to "Boot" and select "Hard Drive."

Step 4. Now select your SSD as the primary boot device.
Step 5. Save the settings and close the BIOS window by pressing the F10 key or other boot menu keys.

Your Windows PC should now boot Windows off of your new SSD successfully!
You May Also Like:
Fix 3. Update BIOS
The BIOS is an important part of the computer's operating system. It ensures that the computer starts up properly and that Windows can be loaded without issues. If the BIOS is outdated or corrupted, there is a high possibility that this is what is preventing Windows from booting from your SSD.
Here's how to update the BIOS:
Step 1. On a secondary computer, go to the motherboard manufacturer's website and download the latest BIOS update.

Step 2. Extract the ZIP file.
Step 3. Copy the extracted file to a USB drive.
Step 4. Plug the USB drive into a computer on which you can't boot Windows off of your new SSD.
Step 5. Restart your PC and press the BIOS key to open the BIOS menu.
Step 6. Select the USB drive as the primary boot device in the "Boot" menu.
Step 7. Save and exit the BIOS settings.
Step 8. Run the BIOS file on the USB to begin the updating process.
How to Fix PC Won't Boot After Installing M2 SSD - Full Guide
How do we fix the PC that won't boot after installing the M2 SSD? Why won't the PC boot after installing a new SSD? All these details you want are covered in this article.
Fix 4. Reinstall the New SSD Properly
It is likely that you didn't install the SSD properly in the first place. Depending on the type of SSD, such as M.2 SATA, M.2 NVMe, PCIe SSD, and several other types, If you got yourself an SSD that you have no prior experience installing, it is likely that you've installed it incorrectly. The instructions are as follows:
Check the connection - Make sure the new SSD is properly connected to your laptop. If it's an internal SSD, double-check that it's placed properly and the cables are correctly connected. If it's an external SSD, make sure the USB cable or other cables are plugged in correctly.
Reinstall the SSD properly by looking at the manufacturer's installation guide to fix the SSD you're trying to boot Windows from and boot it successfully.
How to Install a Second SSD[Comprehensive Guide]
Do you want to install a second SSD on your computer to enhance its performance? Discover the complete guide on how to install a second SSD in this article.
Fix 5. Test the New SSD on Another Laptop or PC
If you've tried all of our above steps and you still weren't able to successfully boot Windows off of your new SSD, in that case, install it on another PC and test if the problem is with the SSD.
If the problem is with the SSD, return the damaged product and get a replacement, or you can also use the warranty if it is under warranty and get it fixed.
Kindly share these fixes on your social media to help more people. To achieve that, click the following buttons.
Conclusion
If you're getting an SSD for your PC, first verify if your motherboard is compatible with it and then change the boot order. Windows should successfully boot from your new SSD after you install it on your PC.
However, if it doesn't work in that case, try the same on a different computer and see if it works on that PC; if it doesn't, there is a high probability that the SSD is damaged. Get a replacement, or if it is under warranty, visit the nearest service center of the manufacturer and get it fixed.
If this article helped you boot Windows successfully after installing the new SSD, share this article with your friends who are in the same boat as you when Windows is not booting after installing a new SSD in their PC, and help them out!
Windows Booting Erro After Installing New SSDFAQs
Do you have any other questions about why Windows is not booting your new SSD after installing it? Here, we answer a few questions about it.
1. Why is Windows not booting after installing a new SSD?
There are several reasons why you could be facing the issue; however, here are a few of them:
- The SSD may not be properly connected to the motherboard.
- Incorrect boot order in the BIOS.
- The SSD may be damaged or faulty.
- Data corruption.
- Wrong SATA mode.
- The computer's BIOS may not be compatible with the new SSD.
- And more!
2. How do I boot my computer after installing a new SSD?
After you install a new SSD on your computer, change the boot order in your PC's BIOS. Here's how to do that:
- Restart your PC and open the BIOS menu.
- Open the "Boot" section.
- In the "Primary Boot Order" section, select your new SSD as the primary boot device.
- Save and exit the settings.
3. Why won't Windows 10 install on a new SSD?
Usually, Windows 10 should seamlessly install on an SSD. However, if you aren't able to install it on your new SSD, here are a few possible reasons behind it:
- The SSD is not formatted correctly.
- There is a problem with the SSD.
- There is a problem with the BIOS.
- The SSD is not compatible with your computer.
- The Windows 10 installation media is corrupt.
How Can We Help You
About the Author
Sherly joined EaseUS in 2022 and she has always loved writing articles and enjoys the fun they bring. She receives professional training here, focusing on product performance and other relative knowledge. She has written over 200 articles to help people overcome computing issues.
Product Reviews
-
I love that the changes you make with EaseUS Partition Master Free aren't immediately applied to the disks. It makes it way easier to play out what will happen after you've made all the changes. I also think the overall look and feel of EaseUS Partition Master Free makes whatever you're doing with your computer's partitions easy.
Read More -
Partition Master Free can Resize, Move, Merge, Migrate, and Copy disks or partitions; convert to local, change label, defragment, check and explore partition; and much more. A premium upgrade adds free tech support and the ability to resize dynamic volumes.
Read More -
It won't hot image your drives or align them, but since it's coupled with a partition manager, it allows you do perform many tasks at once, instead of just cloning drives. You can move partitions around, resize them, defragment, and more, along with the other tools you'd expect from a cloning tool.
Read More
Related Articles
-
Nintendo Switch Not Reading SD Card? 10 Fixes Here!
![author icon]() Sherly/2024/04/22
Sherly/2024/04/22 -
Guide to Clone All Partitions to SSD [Detailed Steps]
![author icon]() Oliver/2024/04/22
Oliver/2024/04/22 -
Partition Magic Free Download for Windows Disk Management
![author icon]() Tracy King/2024/04/22
Tracy King/2024/04/22 -
Getting Bootrec /Fixboot Access Is Denied Error? Roundup Solutions
![author icon]() Jean/2024/04/22
Jean/2024/04/22
Hot Topics in 2024


EaseUS Partition Master

Manage partitions and optimize disks efficiently