
Content
Page Table of Contents
About the Author
Hot Topics
Cloning all your computer's HDD partitions to an SSD offers several significant advantages. SSDs provide faster speed, improved reliability, and enhanced power efficiency. They are also highly durable, operate silently, and are space-efficient. Cloning all your HDD partitions to SSD can also protect and save your entire data, files, folders, and even programs/apps.

In this guide from EaseUS, we'll walk you through the process of cloning all partitions to an SSD, allowing you to enjoy these benefits without the need for a full system upgrade. So, follow this and learn how to clone all partitions to SSD.
How to Clone All Partitions to SSD
So, let's learn how to clone all the partitions from your existing HDD to the new SSD. The process of cloning all the partitions from your old HDD to the new SSD will transfer all the data and operating system to the new drive.
Guide 1. Preparations
First, you have to prepare SSD before cloning all partitions to SSD. It's crucial to install SSDs on your computer physically. It depends on whether you're using an external SSD or an internal SSD.
We'll show you how to install an internal SSD on your computer. Although an external SSD doesn't require too long process to install, you need an appropriate USB cable to connect it. After installing the SSD, you need to check the total size of the disk and ensure the Disk Partition style of the SSD is the same as the HDD.
Part 1. Check the SSD capacity
Verify that the SSD's capacity is similar to or larger than your HDD's. This ensures that all your data and partitions can be accommodated on the new drive without any issues. For example, if your HDD's capacity is 500GB, the SSD you will clone with should be the same or above that capacity.
Part 2. Install SSD on your computer
The steps of this operation depend from machine to machine, manufacturer, SSD types such as M.2 SSD, etc. Kindly note that this method is for desktop PC users. Also, you'd better confirm the user manual to locate the correct places for components and check the SSD compatibility with your motherboard.
First, you need to prepare a screwdriver and your new SSD. Then, follow the steps to install an M.2 SSD (as example) on your computer:
Step 1. Disconnect your computer from any electric power source and open the case. Unscrew the side of your case.
Step 2. Locate M.2 slot. (It may be behind your GPU.)
Step 3. If the motherboard has integrated heatsinks, remove one before installing an M.2 SSD. Unscrew it and set it aside temporarily.

Step 4. Find your M.2 SSD slot, remove the screw, and insert the SSD diagonally.
Step 5. Put the screw back and use it to secure the M.2 SSD in place.
Step 6. Once physical installation is done, reassemble hardware parts. Follow the same steps in reverse order.
Part 3. Ensure the Disk Partition Style of SSD is the same as HDD
It's essential to make sure the disk partition style of your SSD matches your HDD. You can check and modify this configuration through your PC's BIOS or disk management settings. Now, you need to initialize the new SSD to enable it for usage.
Follow the steps to initialize the new SSD:
Step 1. Right-click the "Start" icon and open "Disk Management".
Step 2. If the disk you want to initialize is "Offline", right-click on it and select "Online".
Step 3. Right-click the disk you want to initialize and then click the "Initialize Disk" option.

Step 4. Pick the specific SSD disk you wish to initialize and determine your preferred partition style.
Step 5. Click "OK" to start the process. After this, right-click on your SSD and choose "New Simple Volume."
Step 6. Complete the "New Simple Volume Wizard" to allocate volume to your SSD.
Do remember to share this informative article with your friends who also want to perform disk cloning.
Guide 2. Clone All Partitions to SSD
For the cloning process, we recommend using EaseUS Partition Master Professional, a reliable and powerful disk cloning software. This tool offers various features, a user-friendly interface, and a robust disk clone function, making the cloning process straightforward and convenient.
Follow the steps:
Step 1. Select the source disk.
- Click the "Clone" from the left menu. Select the "Clone OS Disk" or "Clone Data Disk" and click "Next".
- Choose the source disk and click "Next".
Step 2. Select the target disk.
- Choose the wanted HDD/SSD as your destination and click "Next" to continue.
- Read Warning message and confirm "Yes" button.
Step 3. View the disk layout and edit the target disk partition size.
Then click "Continue" when the program warns it will wipe out all data on the target disk. (If you have valuable data on the target disk, back up it in advance.)
You can select "Autofit the disk", "Clone as the source" or "Edit disk layout" to customize your disk layout. (Select the last one if you want to leave more space for C drive.)
Step 4. Click "Start" to start the disk cloning process.
Some useful features and benefits of EaseUS Partition Master:
- User-Friendly Interface
- Disk Cloning/Sector-by-Sector Clone
- Partition Resizing
- Boot Repair
- Password Reset
You can download the software from the official EaseUS website and use our step-by-step instructions to copy the data and clone the OS to the SSD easily and quickly.
How to Set SSD as Boot Drive
It's good to know that if it is a simple data disk clone, you can simply connect the SSD to the computer without modifying the boot order; if you are cloning all system disk partitions to SSD, you need to set SSD as the boot drive.
Here are the steps to make this adjustment:
Step 1. Restart your PC and instantly press "F12", "F2", "F8", "Esc", or "Del" to enter BIOS.
Step 2. Access the boot menu and modify the boot order to set the cloned SSD as the boot device. Use the arrow keys to move up/down the boot options.
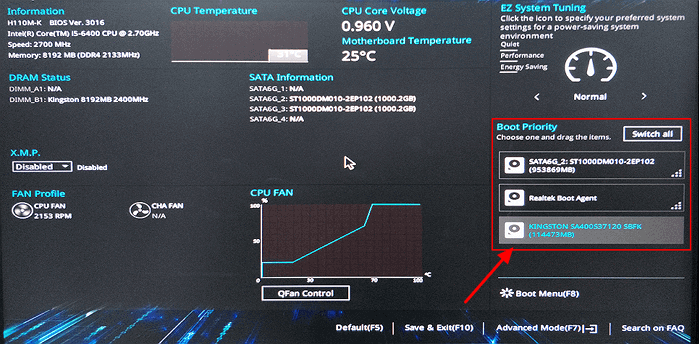
Step 3. Exit BIOS after saving the modifications and restart your PC.
If you find the post helpful and practical, share it on your social media and let more people know!
Possible Issues After Disk Cloning
While disk cloning sometimes becomes essential if you're upgrading your hard drive, it's important to be aware of potential issues that might arise after cloning.
Some common issues can arise:
- Incompatible File Systems: One of the potential issues you may encounter after disk cloning is incompatible file systems. If the file system on the source drive (HDD) differs from the one on the destination drive (SSD), it can lead to problems with data access and drive recognition.
- Insufficient Space: Insufficient space on the target drive, such as an SSD, is another common issue. If the SSD's capacity is smaller than the source drive's, you may encounter problems during cloning or find that some data can't be transferred.
- Bad Sectors: Cloning a drive may copy over bad sectors from the source drive to the destination drive. Bad sectors can cause data corruption and drive instability.
- Hardware Issues: Hardware issues can sometimes surface after disk cloning. These may include compatibility problems with the new drive or unforeseen incompatibilities between the cloned data and the new hardware.
If you are trying to clone data from a larger HDD to a smaller SSD, you may need help from this article.

Clone Larger HDD to Smaller SSD (Windows 11 Support)
Many stand-alone cloners don't support cloning HDD to smaller SSD, and cloning software asks for the destination disk at least the same size as of source disk. Don't worry, here is a possible way to help clone larger HDD to smaller SSD. Read more >>
Conclusion
Cloning all partitions to an SSD offers various benefits, such as faster speed, improved reliability, and enhanced power efficiency. Whether upgrading your hard drive or needing extra storage, cloning partitions to an SSD can be a game-changer for your computing experience.
We strongly recommend using EaseUS Partition Master, a powerful and user-friendly disk cloning software, to simplify this process. Its advanced features, including sector-by-sector cloning, partition resizing, and boot repair, offer a hassle-free way to transfer data and set up your new SSD. So, don't hesitate to enhance your computer's performance with EaseUS Partition Master.
FAQs on Clone All Partitions to SSD
If you have more queries about cloning all partitions to SSD, follow these FAQs. These FAQs will provide you with valuable insights and solutions.
1. Do I need to clone all partitions to SSD?
Whether you need to clone all partitions to your SSD depends on your specific requirements. If you want to copy your entire system, including the operating system and data, cloning all partitions is necessary. However, if you only need to transfer specific data or applications, you can choose to clone selected partitions.
2. Can I clone the C drive to SSD?
Yes, you can absolutely clone the C drive to your SSD. In fact, the C drive typically contains your operating system and important system files. Cloning the C drive ensures that your new SSD functions as the primary boot drive, providing faster system performance.
3. How do I clone a GPT disk to an SSD?
You should convert your SSD to GPT in case your SSD has a different disk partition style, and then you can clone a GPT disk to SSD. Follow the steps outlined in this tutorial to clone all partitions to your new SSD, regardless of whether your source disk uses MBR or GPT. EaseUS Partition Master handles the conversion and cloning seamlessly.
How Can We Help You
About the Author
Sherly joined EaseUS in 2022 and she has always loved writing articles and enjoys the fun they bring. She receives professional training here, focusing on product performance and other relative knowledge. She has written over 200 articles to help people overcome computing issues.
Oliver is an EaseUS professional writer who dares explore new areas. With a passion for solving tech issues with straightforward guides for common users, Oliver keeps honing his writing craft by developing in-depth solutions for disk and partition management, computer boot-up issues, file transfer, etc.
Product Reviews
-
I love that the changes you make with EaseUS Partition Master Free aren't immediately applied to the disks. It makes it way easier to play out what will happen after you've made all the changes. I also think the overall look and feel of EaseUS Partition Master Free makes whatever you're doing with your computer's partitions easy.
Read More -
Partition Master Free can Resize, Move, Merge, Migrate, and Copy disks or partitions; convert to local, change label, defragment, check and explore partition; and much more. A premium upgrade adds free tech support and the ability to resize dynamic volumes.
Read More -
It won't hot image your drives or align them, but since it's coupled with a partition manager, it allows you do perform many tasks at once, instead of just cloning drives. You can move partitions around, resize them, defragment, and more, along with the other tools you'd expect from a cloning tool.
Read More
Related Articles
-
How to Fix ASUS Stuck on Logo | 7 Efficien Solutions💡
![author icon]() Cici/2024/04/19
Cici/2024/04/19 -
Get EaseUS Partition Master Key (v18.2) in 2024 | No Cracking
![author icon]() Tracy King/2024/04/19
Tracy King/2024/04/19 -
How to Factory Reset Dell Laptop Without Password | 3 Ways
![author icon]() Roxanne/2024/04/19
Roxanne/2024/04/19 -
[Fixed] Can't Save Files to USB Flash Drive - 100% Working Guides
![author icon]() Jean/2024/04/22
Jean/2024/04/22
Hot Topics in 2024


EaseUS Partition Master

Manage partitions and optimize disks efficiently