
Content
Page Table of Contents
About the Author
Hot Topics
The demand for devices that are compact, efficient, and excel in performance has experienced a remarkable upswing. As traditional hard disk drives (HDDs) gradually make way for solid-state storage solutions, embedded MultiMediaCards (eMMC) have emerged as a popular choice. These technologies provide unmatched speed and reliability across a diverse array of devices.
However, harnessing the full power of this cutting-edge storage medium often requires installing an operating system that complements its capabilities. In this comprehensive guide, EaseUS will delve into installing Windows 10 to eMMC.
| ⏱️Duration | About half an hour |
| ⛏️Required Tools | ISO burner - EaseUS Partition Master |
| 🧑💻Suitable Users | For all Windows users, even if they are beginners |
| 👣Steps |
1️⃣Stage 1. Ensure the eMMC Driver Is Installed on Windows |
For other solutions to install Windows without product key, please check the following article:
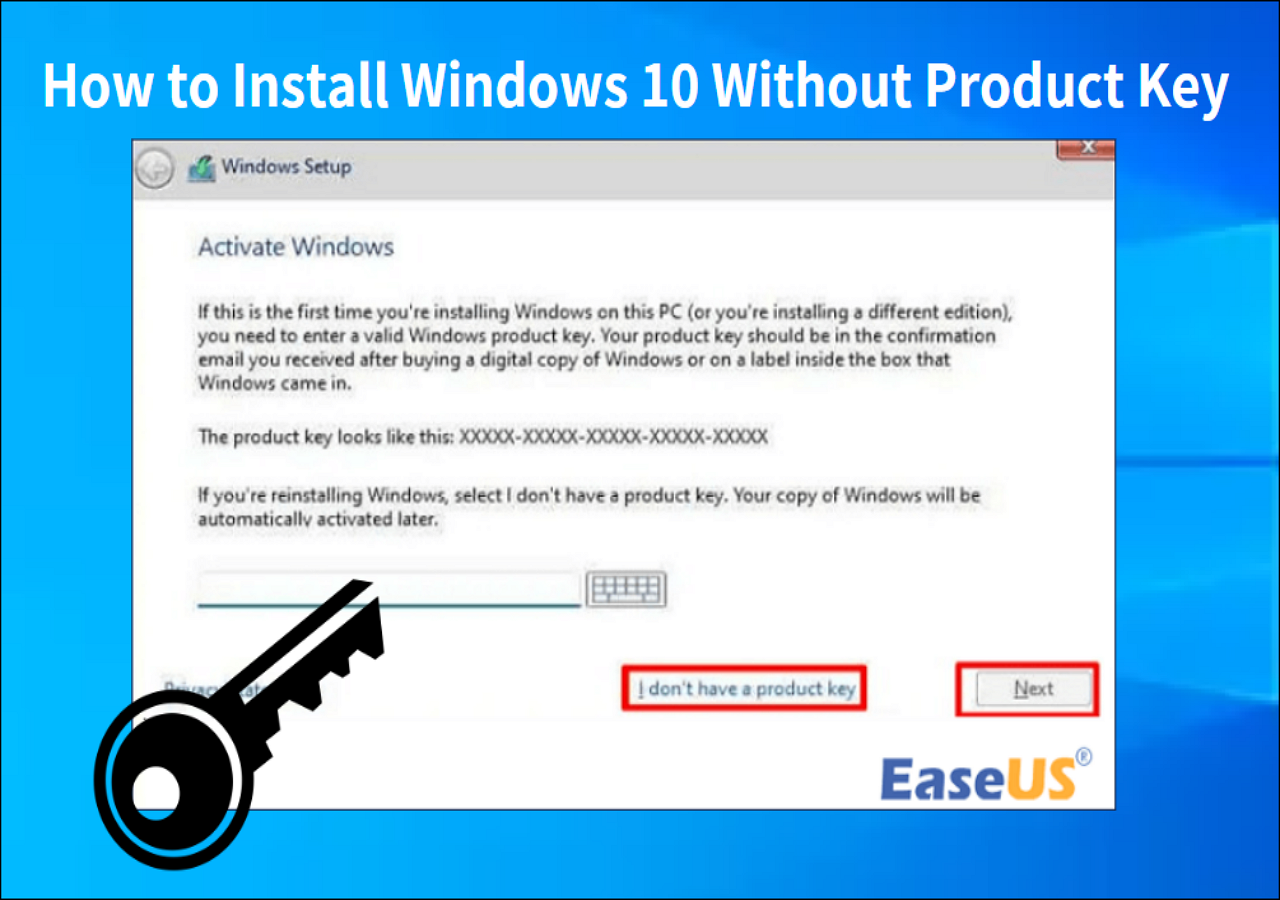
How to Install Windows 10 Without Product Key
You can install Windows 10 without product key by downloading the Windows 10 ISO from Microsoft. This page will offer a comprehensive solution on how to do it.
How to Install Windows 10 to eMMC?
Ensuring you have all the essential tools and prerequisites readily available is vital before commencing the installation process. By diligently following these steps, you will soon unlock the complete potential of your Windows 10-equipped device with eMMC.
Stage 1. Ensure the eMMC Driver Is Installed on Windows
Ensuring the suitable eMMC driver is installed on your device is important. Only then is it worth moving forward to install Windows 10 to eMMC. The eMMC driver facilitates efficient communication between the operating system and the eMMC storage, enabling optimal performance and stability. Without the correct driver, your Windows installation may encounter compatibility issues or fail to recognize the eMMC as a valid storage option. Here are the steps to ensure the eMMC Driver is installed:
Step 1: To check if the eMMC driver is installed, right-click the "Start" button and select "Device Manager" from the context menu. You must expand the "Disk drives" section from the Device Manager window. Here, you should find your eMMC storage listed. If it's correctly recognized, the driver is likely already installed.

Step 2: Double-click on the eMMC storage device to open its Properties window. Navigate to the "Driver" tab to verify the driver's current status. Look for the "Driver Provider" and "Driver Date" fields to ensure it is up-to-date.
Step 3: If you discover that the eMMC driver is missing or outdated, you'll need to update it to ensure a smooth Windows 10 installation. Right-click on the eMMC storage device and select "Update Driver." Now go through the on-screen instructions to update the eMMC driver.
Read Also: Install Windows 10 on Second Hard Drive
Stage 2. Create Windows 10 Bootable Media
With the eMMC drive now recognized as the installation disk, the next crucial step is to create a bootable media containing the Windows 10 ISO file. To accomplish this, we'll rely on the versatile EaseUS Partition Master, which simplifies the process and offers a range of useful features to manage your storage efficiently.
Guide 1. Download Windows 10 ISO File
To begin the installation process, it is necessary to obtain the official Windows 10 ISO file. It is crucial to download the correct version corresponding to your device's architecture (32-bit or 64-bit).
Download link: windowstan.com/win/download-windows-10-iso/
Guide 2. Burn Windows 10 ISO File to eMMC Drive
To burn the Windows 10 ISO file to your eMMC drive, we'll utilize the versatile and user-friendly EaseUS Partition Master. This powerful tool enables you to craft bootable USB drives and provides an array of other cutting-edge functionalities for the seamless management of your storage devices. The tool ensures reliable and secure operations, reducing the risk of data loss during the partitioning or bootable media creation process.
With EaseUS Partition Master, burning Windows 10 ISO files to an eMMC drive becomes much easier. Here are the detailed steps to install Windows 10 to eMMC:
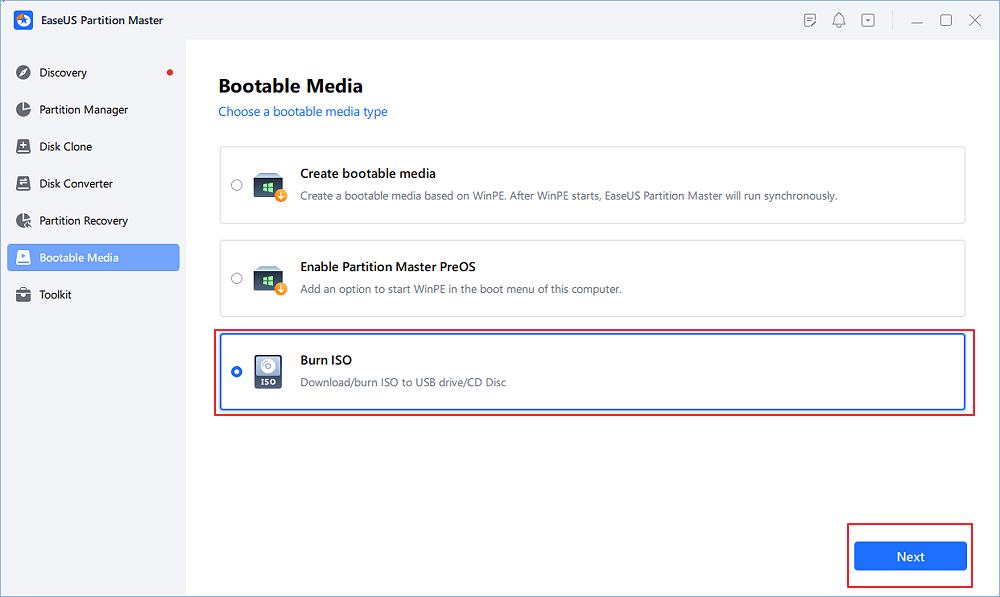
Step 1. Launch EaseUS Partition Master and go to the Bootable Media section. Click "Burn ISO" and click "Next".
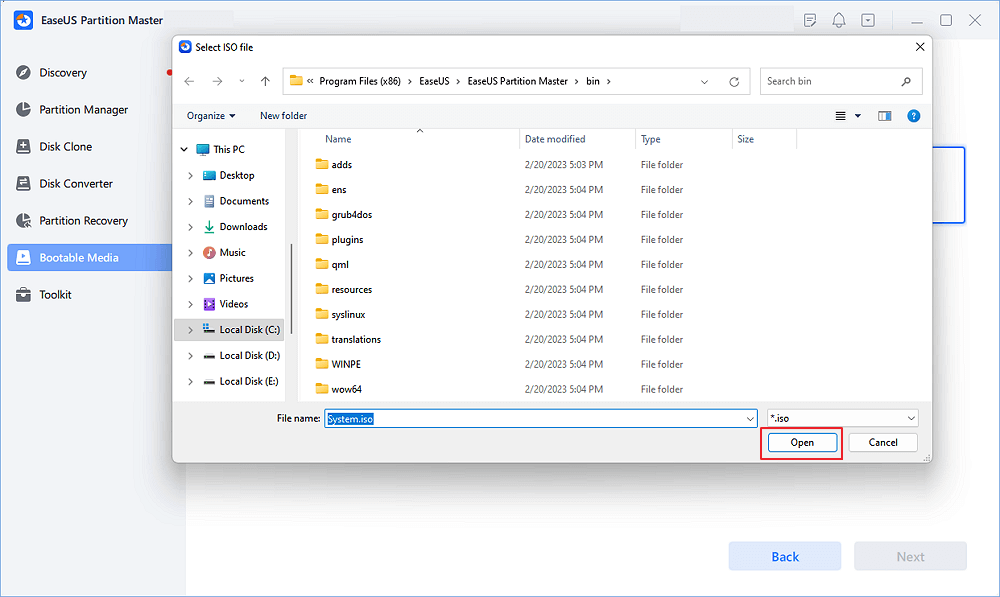
Step 2. Select the ISO image that you have downloaded on your PC, and click "Open".
Step 3. Click "Next" and select the target USB as destination and click "Burn" to execute the operation.
Once you successfully burn Windows 10 to an external drive using EaseUS Partition Master, the eMMC will serve as the installation disk. To proceed with the Windows 10 installation, follow these steps diligently.
If you want to learn more functions of the burning tool, click the buttons for detailed information:
Stage 3. Install Windows 10 to eMMC
With a bootable Windows 10 media prepared on your eMMC drive, it's time to begin the installation process. Follow these steps attentively, and you'll have Windows 10 running smoothly on your eMMC-equipped device:
Guide 1. Boot from eMMC Drive
Before installing, ensure to set your eMMC drive as the primary bootable device in the BIOS or UEFI settings. This will ensure your device boots from the eMMC drive containing the Windows 10 installation files. Here are the steps which you can use to give eMMC drive the highest boot priority:
Step 1: Power on your device and quickly access the BIOS or UEFI settings by pressing the appropriate key during the boot process. The key to access these settings varies depending on your device's manufacturer (common keys include F2, F10, Del, or Esc).
Step 2: Once in the BIOS or UEFI settings, navigate to the "Boot" or "Boot Order" menu using the arrow keys on your keyboard. Look for the list of available boot devices, which may be labeled as "Boot Priority," "Boot Sequence," or something similar.
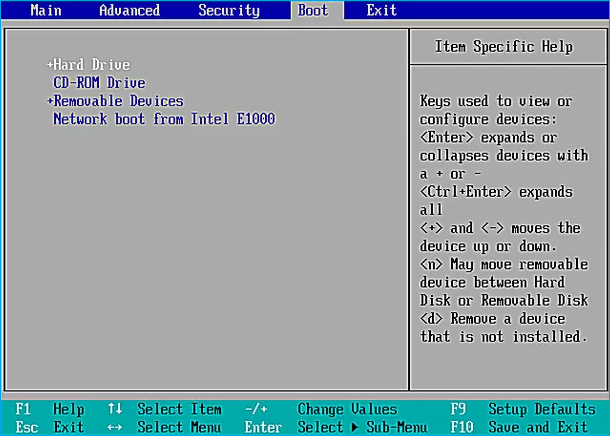
Step 3: Using the appropriate keys (usually +/- ), rearrange the boot order to set the eMMC drive as the first bootable device. Move the eMMC drive to the top of the list to prioritize it over other storage devices. Then, save your applied changes and exit the BIOS or UEFI settings.
Further Reading:
How to Install Windows on Steam Deck in 2024? Complete Guide
In the post, you will learn how to install Windows OS on Steam Deck in detail, along with a step-by-step tutorial and some troubleshooting alternatives.

Guide 2. Install Windows 10
With the eMMC drive selected as the primary boot device, you can now begin installing Windows 10 to eMMC. The installation wizard will guide you through the necessary steps.
It will allow you to customize your preferences and settings along the way. Follow these steps to complete the Windows 10 installation and embark on a seamless computing journey with your eMMC-powered device:
Step 1: After granting Windows 10 media (eMMC drive) the highest boot priority, restart your device. The system should boot from the eMMC drive, initiating the Windows 10 installation process.
Step 2: On the initial Windows Setup screen, select your preferred language, time format, keyboard layout, and other regional preferences. Click "Next" to continue, and tap "Install Now" to start the installation process.

Step 3: When prompted, enter the product key for your Windows 10 edition. If you don't have a product key, you can choose "I don't have a product key" (if you're planning to activate Windows later) or "Skip" to continue without entering a key for now.
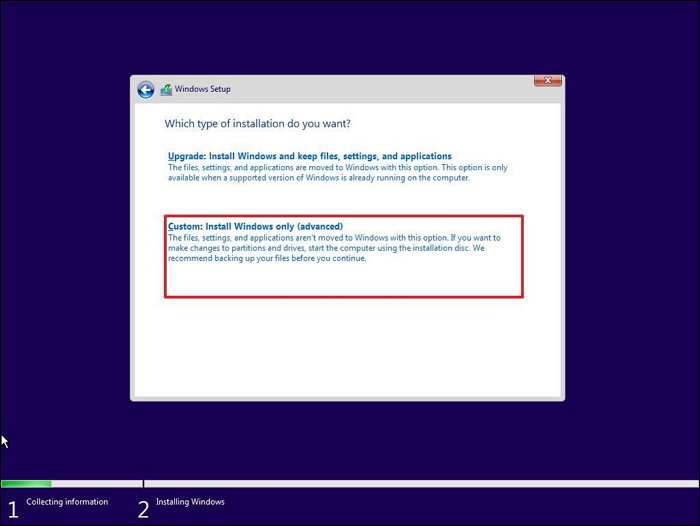
Step 4: Accept the Windows license terms and click "Next." Now choose the installation type. Select "Custom: Install Windows only (advanced) for a clean installation." Next, you will see a list of available storage drives. Select your eMMC drive and click "Next."
Step 5: Windows will begin the installation process on the eMMC drive. The Windows 10 installation will take some time, and your device may restart multiple times during this process.
Once the installation is finished, your device will reboot, and you'll be guided through the initial setup of Windows 10. Follow the on-screen instructions to personalize your settings.
- Notice:
- The methods in this article come from the professional Vam community. And this guide provides a more detailed program. If you have any questions, you can also contact our support center.
If this guide solved your problem, click the link and share to help more people.
Bonus Tip to Fix Cannot Install Windows 10 on eMMC Drive
While installing Windows 10 on eMMC is usually straightforward, some users may encounter challenges that prevent a successful installation. In this bonus tip, we'll address common issues that may arise while installing Windows 10 to eMMC. It will also provide practical solutions to overcome them. Let's explore how to fix the "Cannot Install Windows 10 on eMMC Drive" error and ensure a smooth installation experience.
Cases of Cannot Install Windows 10 on eMMC:
Here is a typical case that users cannot install Windows 10 on eMMC. Let's take a look. And then, we will check the reasons and solutions to fix the error:
Reasons and Solutions to Fix "Cannot Install Windows 10 on eMMC"
| Reasons | Solutions | Get it |
| Incorrect Format: the format or partition style may not be compatible with Windows 10 installation. | You can format the eMMC drive to the necessary format, and ensure it is configured with the GPT partition style. | Format eMMC Drive |
| Not Enough eMMC Memory: Insufficient available space on the eMMC drive may cause it. | You can create more space on the eMMC drive by removing unnecessary files and applications. Or upgrading to an eMMC drive with a larger capacity. | Upgrade EMMC to SSD |
| Windows ISO File Error: ISO file may be incorrect or damaged. | Download the official Windows 10 ISO file directly from a reliable website. Before installing, verify the file's integrity and compatibility with your device. | Unable to Download Windows 11 ISO File |
| eMMC Not Detected: Due to connection or adapter compatibility | Connect the eMMC drive using a different microSD or USB adapter. Specific adapters may resolve detection issues. | Hard Drive Not Detected |
Conclusion
In conclusion, installing Windows 10 on eMMC brings forth many benefits, from lightning-fast performance to enhanced reliability, making it an ideal choice for various devices. Throughout this guide, we have explored the essential steps to successfully install Windows 10 to eMMC, ensuring an optimized computing experience. However, we understand that the installation process may present some user challenges.
These include incompatible formats, insufficient storage, or ISO file errors. To overcome these hurdles easily, we recommend using EaseUS Partition Master as the best choice. With its intuitive interface, reliable performance, and versatile functionality, EaseUS Partition Master is a powerful storage management solution. The tool's ability to clone, resize, and optimize your storage devices further enhances its appeal as an all-in-one solution.
FAQs About How to Install Windows 10 to eMMC
As we conclude our comprehensive guide on installing Windows 10 to eMMC, you may still have some lingering questions. Fear not, for we have compiled a list of FAQs to address any remaining uncertainties. If you seek further answers about the process of installing Windows 10 to eMMC, look no further than the following FAQs:
1. Is 32GB eMMC enough for Windows 10?
While installing Windows 10 on a 32GB eMMC is possible, it may not provide the most optimal experience. Windows 10 requires a significant portion of the storage space for updates, system files, and essential applications, which could quickly fill up a 32GB eMMC. Consequently, having a higher capacity eMMC or using an external storage device with a larger capacity is recommended for a smoother and more efficient Windows 10 experience.
2. How to install Windows 10 on a portable drive?
You can follow a similar process to installing Windows 10 on a portable drive on eMMC. First, use the official Microsoft Media Creation Tool to create a bootable Windows 10 media (USB drive or external SSD).
Then, set the portable drive as the first bootable device in the BIOS or UEFI settings. Finally, proceed with the Windows 10 installation process, choosing the portable drive as the installation location.
3. How to install Windows 11 on 32GB eMMC?
Installing Windows 11 on a 32GB eMMC may pose some challenges due to the increased system requirements of Windows 11 compared to Windows 10. Windows 11 requires a minimum of 64GB of storage, which exceeds the capacity of a 32GB eMMC.
As a result, installing Windows 11 on such a small eMMC may be impossible. It is advisable to consider upgrading to a higher-capacity storage device or using an external storage solution with sufficient space to accommodate Windows 11.
How Can We Help You
About the Author
Updated by Tracy King
Tracy became a member of the EaseUS content team in 2013. Being a technical writer for over 10 years, she is enthusiastic about sharing tips to assist readers in resolving complex issues in disk management, file transfer, PC & Mac performance optimization, etc., like an expert.
Cici is the junior editor of the writing team of EaseUS. She accepted the systematic training on computers at EaseUS for over one year. Now, she wrote a lot of professional articles to help people resolve the issues of hard drive corruption, computer boot errors, and disk partition problems.
Product Reviews
-
I love that the changes you make with EaseUS Partition Master Free aren't immediately applied to the disks. It makes it way easier to play out what will happen after you've made all the changes. I also think the overall look and feel of EaseUS Partition Master Free makes whatever you're doing with your computer's partitions easy.
Read More -
Partition Master Free can Resize, Move, Merge, Migrate, and Copy disks or partitions; convert to local, change label, defragment, check and explore partition; and much more. A premium upgrade adds free tech support and the ability to resize dynamic volumes.
Read More -
It won't hot image your drives or align them, but since it's coupled with a partition manager, it allows you do perform many tasks at once, instead of just cloning drives. You can move partitions around, resize them, defragment, and more, along with the other tools you'd expect from a cloning tool.
Read More
Related Articles
-
How to Access EXT4 Partition and Data on Windows 11/10 in 2024
![author icon]() Tracy King/2024/04/19
Tracy King/2024/04/19 -
Fixed: Disk Already Contains the Maximum Number of Partitions
![author icon]() Sherly/2024/04/22
Sherly/2024/04/22 -
SATA vs SSD: Which One to Choose [Indepth Comparison]
![author icon]() Jean/2024/04/19
Jean/2024/04/19 -
How to Transfer OEM Windows 10 to A New PC [Easy & Quick]
![author icon]() Cici/2024/04/19
Cici/2024/04/19
Hot Topics in 2024


EaseUS Partition Master

Manage partitions and optimize disks efficiently