
Content
Page Table of Contents
About the Author
Hot Topics
Performance and storage optimization is crucial in a world where Raspberry Pi is being developed rapidly. Another capability enhancement is the ability of Raspberry Pi to boot from SSD instead of conventional SD cards. This article from EaseUS will walk you through how to boot Raspberry Pi from SSD in an easy and trustworthy way.
| ⚙️Complex Level | Medium |
| 🛠️What Do You Need |
|
| 🚩Stages |
What Do You Need
Below are some essentials you will need to boot your Raspberry Pi from an SSD. Before we begin, make sure you have all the necessary components at hand, including:
- Raspberry Pi 4 or Raspberry Pi 400
- MicroSD card (1GB minimum, 64GB maximum)
- MicroSD card reader
- An external SSD (M.2, SATA, or NVMe/PCIe)
- A SATA to USB cable
Stage 1. Update System and Firmware
Before booting your Raspberry Pi from an SSD, you should ensure that the operating system and firmware are running at the most recent versions. Follow the given steps to check their versions and learn how to update them.
Step 1. Launch a terminal window on your Raspberry Pi.

Step 2. To update the package list, use the sudo apt update command.
Step 3. Follow up with sudo apt full-upgrade to install the latest updates. Confirm with "Y" when prompted.
Step 4. Execute the command sudo rpi eeprom-update to ensure your firmware is up to date.
Step 5. If updates are available, run sudo rpi-eeprom-update -a to apply them.

Step 6. After updating the system and firmware, reboot your Raspberry Pi using sudo reboot.
Keeping your system and firmware current ensures compatibility with the SSD booting process.
Stage 2. Set up SSD for Raspberry Pi
Update all the SSD's system and firmware now because you will need them when you boot up the system. So, we have two methods to address it, and we will recommend each one with clear instructions.
Option 1: Install Raspberry Pi OS on Your SSD
If you prefer a fresh installation on your USB SSD, follow these steps:
Step 1. Using the SATA to USB cable, link up your SSD drive to the Raspberry Pi.
Step 2. Open Raspberry Pi Imager on the computer.

Step 3. Run the Raspberry Pi Imager to boot the software selection process.
Step 4. From the list of existing operating systems, choose the Raspberry Pi operating system.
Step 5. Pick your SSD connected as the storage choice for the installation.
Step 6. Go and click on the "Write" button and approve it. This installer will save the Raspberry Pi OS to the SSD.
Option 2: Clone SD Card to SSD
For those who want to get a setup similar to what they currently have, reliable and professional disk cloning software can be of great help.
EaseUS Partition Master Professional is a user interface tool that helps perform SD card cloning more easily. This feature allows users to clone the operating system along with all the data on the disk to another one, making the whole implementation process faster and easier.
- Notice:
- To clone SD/USB/external hard drive with data to a new device, connect the external storage device that you want to clone and a new removable device (SD/USB/external hard drive) with bigger capacity to your PC in advance.
Step 1. Clone external storage device (SD/USB/external hard drive)
- 1. Click "Clone" tab. Choose "Clone Data Disk" option and click "Next" to continue.
- 2. Choose a source disk and select a new device (SD/USB/external hard drive/hard drive) as target disk, click "Next".
- 3. Click "Yes" to confirm the warning message.
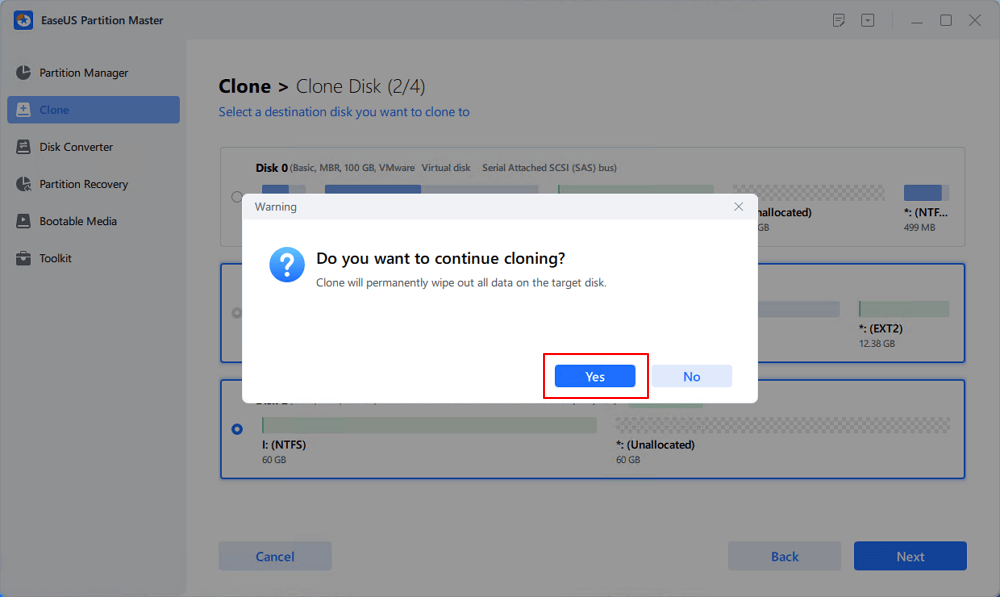
Step 2. Keep all changes
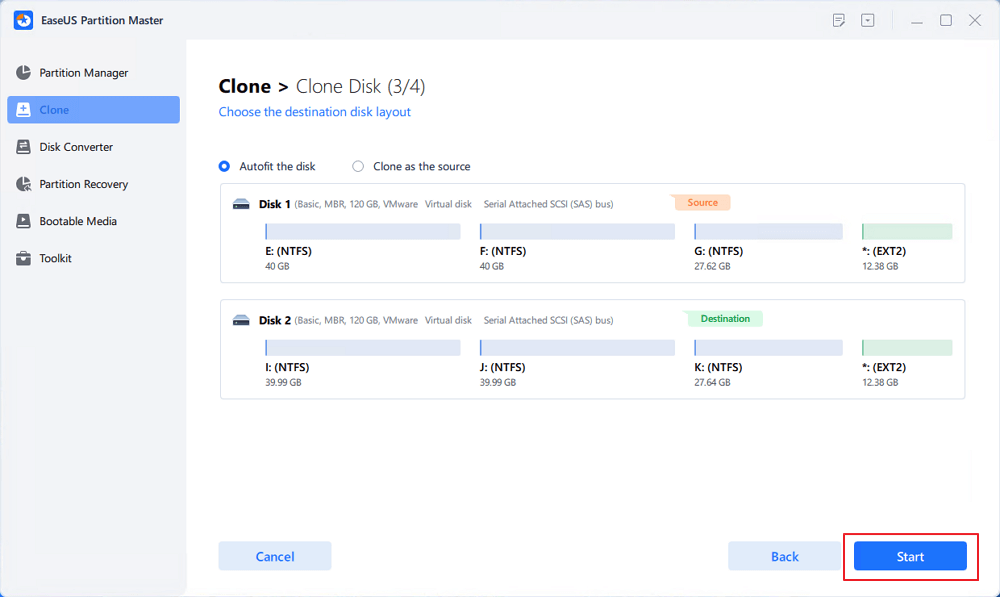
- 1. Check the source disk layout (you can edit the disk by clicking "Autofit the disk", "Clone as the source").
- 2. Click the "Start" to start cloning.
- 3. Wait for the cloning process complete.
You can perform a new installation or clone your current system. Regardless of your choice, the next steps will guide you through the boot order configuration and make the final tweaks for a smooth transition to the SSD booting. Keep on reading as we work to attain the best Raspberry experience, including integrated storage options.
See also:
Stage 3. Boot Raspberry Pi from SSD
Let's proceed with the final steps to get the Raspberry Pi booted from the solid-state drive. The transition will lead to faster speeds and reliability for your Raspberry Pi projects.
Step 1. Cut the power supply of your Raspberry Pi before starting the process.
Step 2. Shut down your Raspberry Pi and remove the SD card. It guarantees that the entire boot process would only use the SSD.
Step 3. Use SATA to USB cable to ensure the SSD is correctly secured to the Raspberry Pi.
Step 4. Plug your SSD and turn on the Raspberry Pi. The system boots up and completes the initialization process.
Step 5. When starting Raspberry Pi, open the terminal interface and run the command lsblk to ensure the SSD is correctly detected.

Raspberry Pi should now be running again from SSD, giving more speed and reliability. In case of any issue, first, you will need to check electric connections and then refer to the previous chapters to ensure a smooth transition. The best you can get with faster data access and robust storage for your Raspberry Pi projects is the improved user experience.
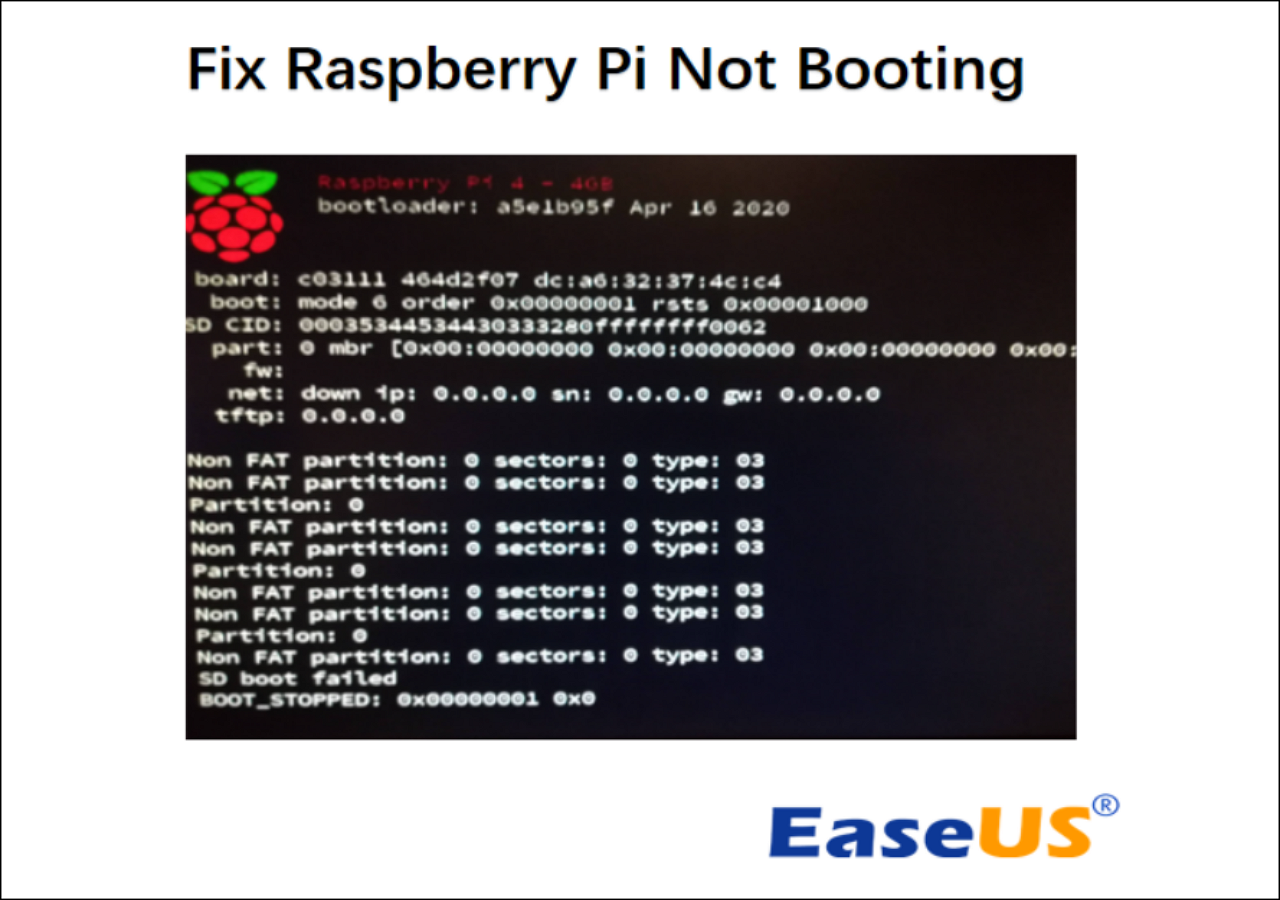
Some users may encounter Raspberry Pi won't boot after the operation. If you are facing the same problem, the following page offers solutions to the issue.
How to Fix Raspberry Pi Not Booting [Causes & Solutions]
Is your Raspberry Pi unbootable? Is the green light on the device not flashing? If so, here are quick and easy troubleshooting tips and fixes that can help you fix Raspberry Pi not booting issue.
Advantages of SSD compared to SD card
After learning about how to boot Raspberry Pi from SSD, you may want to know why adding an SSD to your Raspberry Pi can be beneficial. Here are some primary advantages of SSD compared to a SD card:
- Speed and Performance: SSDs are usually the main storage unit for many modern electronic devices due to their faster read and write speeds, ensuring quicker data access and, hence, improved overall performance.
- Durability: SD cards are much more prone to failure than SSDs when read/write cycles happen often, while SSDs have better lasting capability. This promotes their integrity, making them more suitable for consistent usage in your Raspberry Pi project.
- Reliability: SSDs are less prone to corruption and wear, so data loss is less likely to occur, and a more stable environment is ensured.
- Capacity: SSDs have larger storage capacities than SD cards. Therefore, you can perform even larger and more complex projects on Raspberry Pi without being limited by the storage limits posed by SD cards.
If you have successfully booted Raspberry Pi from your SSD, don't forget to share this page on your social media to help more users.
Final Words
In conclusion, switching your Raspberry Pi to boot from an SSD gives it a high speed, reliability, and storage space lift. Using the newest technology, you can ensure that your projects run more smoothly and efficiently and enjoy a better Raspberry Pi experience with faster access to files and more storage space.
If you want to install something from scratch or make a copy of a current setup, this step-by-step guide will show you how to add SSD booting easily. With assistance from EaseUS Partition Master, you can skip the fresh installation of OS and continue using your original system on Raspberry Pi.
Boot Raspberry Pi from SSD FAQs
Have you had trouble with your Raspberry Pi 4 not booting up from a USB SSD? Let's talk about the primary concerns and look for solutions to ensure SSD starts smoothly.
1. Why is my Raspberry Pi 4 not booting from USB SSD?
This problem might have more than one cause. Firstly, ensure that your Raspberry Pi 4 is running the latest firmware. To check if the software needs to be updated, type sudo rpi-eeprom-update. Make sure the USB SSD is formatted properly and that the Raspberry Pi is set to boot from USB in the boot order configuration. Before trying a different USB port or cable, ensure your links are still correct.
2. Can I run Raspberry Pi without SD card?
Powering Raspberry models with an external storage device such as an SSD instead of an SD card is also possible. While the SD card could still be required at the beginning of the configuration, it will work perfectly in the absence of the SD card after the initial setup.
3. Does Raspberry Pi run faster with SSD?
Yes, Raspberry Pi works faster when the system is booted from the SSD than from the SD card. Using SSDs, you can benefit from faster read and write operations, hence better data access and performance improvement. This explains why they are the most sought-after type of storage device for the drives of Raspberry Pi projects designed for better performance and speed.
How Can We Help You
About the Author
Oliver is an EaseUS professional writer who dares explore new areas. With a passion for solving tech issues with straightforward guides for common users, Oliver keeps honing his writing craft by developing in-depth solutions for disk and partition management, computer boot-up issues, file transfer, etc.
Product Reviews
-
I love that the changes you make with EaseUS Partition Master Free aren't immediately applied to the disks. It makes it way easier to play out what will happen after you've made all the changes. I also think the overall look and feel of EaseUS Partition Master Free makes whatever you're doing with your computer's partitions easy.
Read More -
Partition Master Free can Resize, Move, Merge, Migrate, and Copy disks or partitions; convert to local, change label, defragment, check and explore partition; and much more. A premium upgrade adds free tech support and the ability to resize dynamic volumes.
Read More -
It won't hot image your drives or align them, but since it's coupled with a partition manager, it allows you do perform many tasks at once, instead of just cloning drives. You can move partitions around, resize them, defragment, and more, along with the other tools you'd expect from a cloning tool.
Read More
Related Articles
-
Failed to Open Device Getlasterror()=32: Fix Guiformat Error [100% Working Guide]
![author icon]() Cici/2024/04/22
Cici/2024/04/22 -
HP USB Disk Storage Format Tool Review 2024 [Benefits and Drawbacks]
![author icon]() Tracy King/2024/04/22
Tracy King/2024/04/22 -
Top 5 Best Kingston USB Format Utility and Software Recommend [Pros and Cons]
![author icon]() Tracy King/2024/04/22
Tracy King/2024/04/22 -
How to Fix Dell Stuck on Dell Logo in 7 Ways | Step-by-Step
![author icon]() Cici/2024/04/19
Cici/2024/04/19
Hot Topics in 2024


EaseUS Partition Master

Manage partitions and optimize disks efficiently