
Content
Page Table of Contents
About the Author
Hot Topics
A more thorough method of erasing data is to wipe the hard drive from BIOS (Basic Input/Output System). It is beneficial for individuals or organizations looking to dispose of a computer or a hard drive as it securely wipes the drive so the sensitive data cannot be recovered. Also, the operating system gets erased, making the deletion process more effective and secure.
- Method 1. Use EaseUS Partition Master - Easier for Beginners
- Method 2. Use the Installation CD - Difficult with Commands
- Method 3. Format a Hard Drive From Boot
- Method 4. Wipe a Hard Drive During Windows Installation
How to Wipe Hard Drive from BIOS – 4 Ways
This section will cover the four most effective and result-oriented ways to wipe a hard drive from BIOS. The first method is through EaseUS Partition Master, which will ensure easy and time-saving steps to implement your task. Let's get into the methods in more detail, elaborating on the steps to use.
Method 1. Use EaseUS Partition Master - Easier for Beginners
EaseUS Partition Master is a one-stop solution that allows you to wipe a hard drive and create bootable media. This tool can help you wipe a hard drive from BIOS safely and easily. During the whole process, you don't need to type any commands, making it easy to use for beginners. After wiping the hard drive, this tool can boot your PC from the bootable USB. Its nice compatibility makes it stable to wipe the hard drive in BIOS and boot your PC from the bootable USB after the wiping. Download this tool and follow the steps to begin.
Here is how to create a bootable USB and wipe a hard drive from BIOS:
Step 1. Correctly connect a USB drive, flash drive, or a CD/DVD disc to your computer. Then, launch EaseUS Partition Master, go to the "Bootable Media" and click "Create bootable media", click "Next".

Step 2. You can choose the USB or CD/DVD when the drive is available. Once made the option, click "Proceed".
If you do not have a storage device at hand, you can also save the ISO file to a local drive, and later burn it to a storage media.

Step 3. Connect the WinPE bootable disk to the computer. Restart your computer and press F2/Del at the same time to enter BIOS. Set to boot the PC from "Removable Devices" (bootable USB disk) or "CD-ROM Drive" (bootable CD/DVD) beyond Hard Drive. Press "F10" to save and exit.
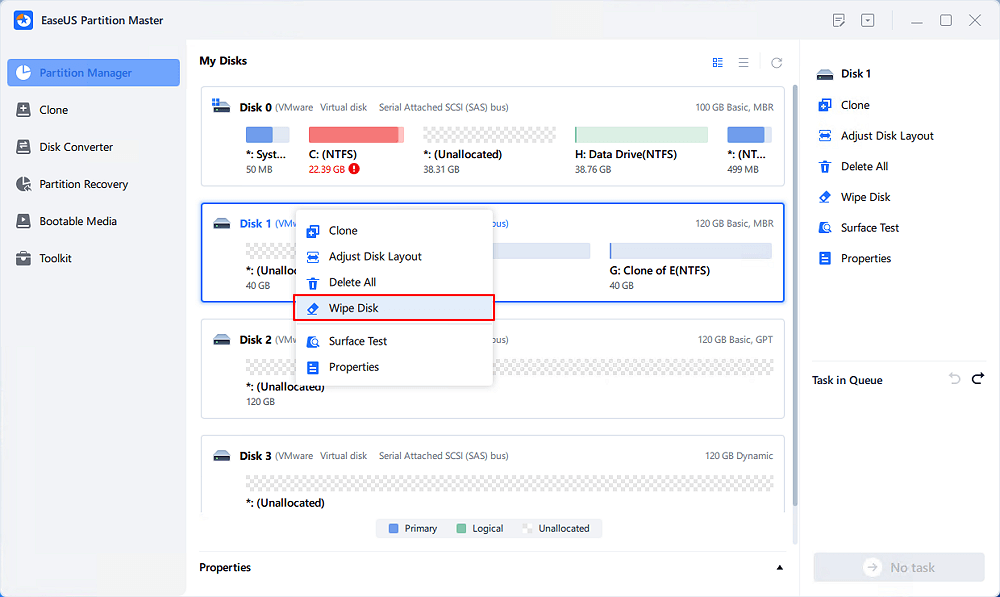
Step 4. Install and launch EaseUS Partition Master. Select the HDD or SSD which you want to wipe. And right-click to choose "Wipe Disk".
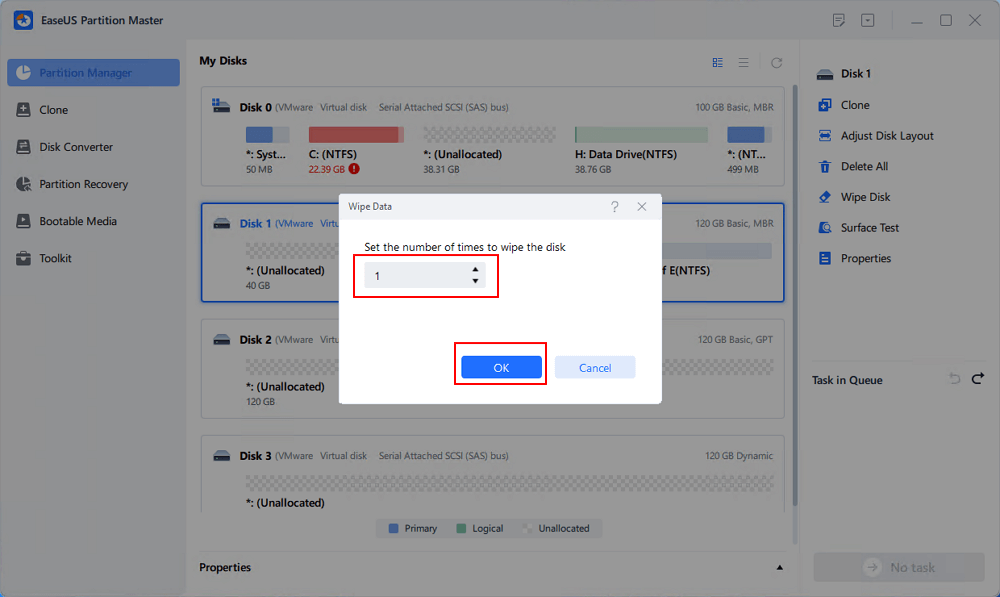
Step 5. Set the number of times to wipe data. You can set to 10 at most. Then, click "OK".
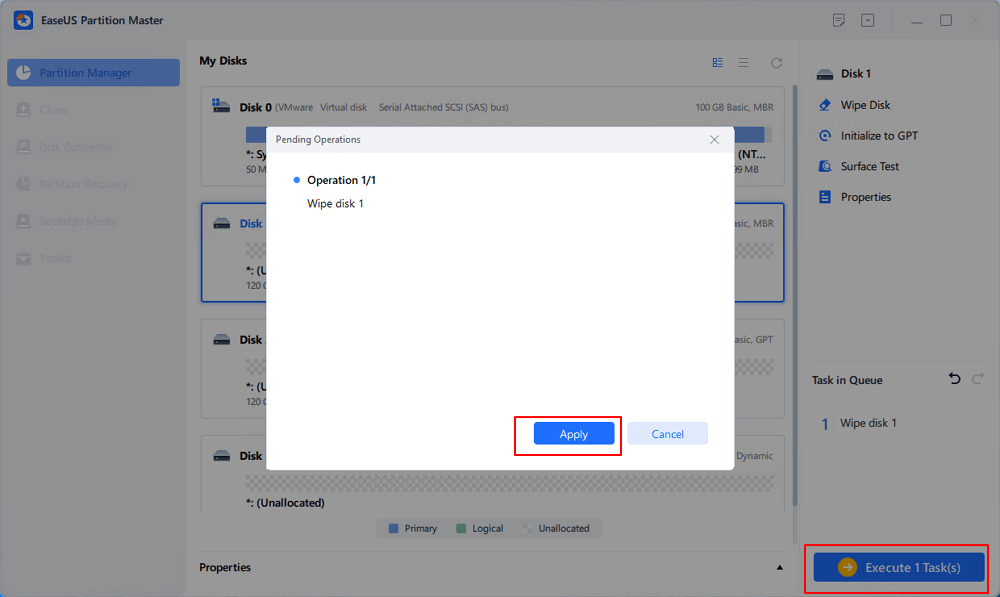
Step 6. Click "Execute 1 Task(s)" and then click "Apply" to start wiping data.
That was the simplified process of wiping the hard drive from BIOS using this user-friendly tool. So, quickly decide and download EaseUS Partition Master to make things easier for yourself.
Download this tool to get its further features, such as:
- Format a hard drive from BIOS
- Boot PC from bootable USB
- Completely wipe a hard drive including OS
- Wipe hard drive from BIOS for HP/Dell/Lenovo/ASUS/MSI laptops
Method 2. Use the Installation CD - Difficult with Diskpart Commands
This method of using an installation CD is effective for a comprehensive data deletion from the BIOS on Windows 10 or Windows 11. However, it's necessary to ensure you have an installation disk available for your operating system before moving forward. Once you have the installation disk, you can proceed by following these step-by-step instructions to reset a hard drive from BIOS:
Step 1. To initiate the process, you need to insert the installation disc, such as CD or USB, into your computer and turn off the system.
Step 2. Afterward, access the BIOS setup by switching it back on and pressing the designated BIOS key like F2, F2, F12, DEL, or ESC. You have to do it repeatedly during startup until the BIOS screen appears. Now, within the BIOS setup, navigate to the "Boot" tab using the arrow keys and move the "CD-ROM Drive" to the top of the boot list. Save changes by pressing the "Enter" or "F10" key and select "Yes."
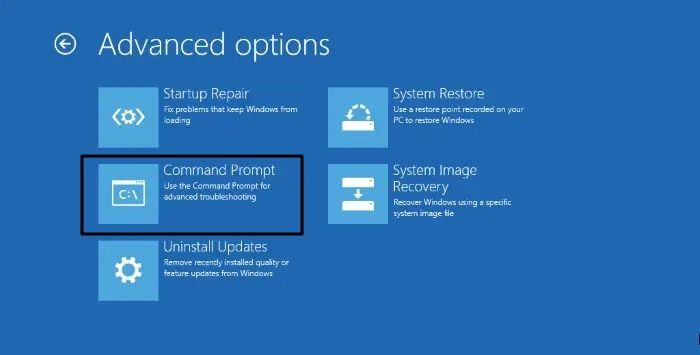
Step 3. Subsequently, proceed to the installation screen by clicking "Next" and choosing the "Repair your computer" option from below. Then, select the "Troubleshoot" section, followed by "Command Prompt."
Step 4. Here, you have to type and execute the following commands one by one in the Command Prompt window that opens and hit the "Enter" key after each command.
- diskpart
- list disk (display a list of all existing volumes on the selected disk)
- select disk 0 (you have to replace "0" with the appropriate disk number)
- clean
Furthermore, wiping the hard drive using the installation CD needs proper attention to be implemented. That's why EaseUS Partition Master is the easier option among them. This tool requires only a few clicks to wipe data from your hard drive.
Method 3. Format a Hard Drive From Boot
The prerequisite for using this method is that you already have an installation media. You can format or erase the hard drive during startup. You can then reinstall Windows 10 or a previous version of Windows, sell it, or use it as a second-hand storage device.
Step 1. Completely shut down the computer and connect the installation media. Restart the computer, press the Prompt key on the splash screen to enter the BIOS, and set the media as the first boot option.
Step 2. Subsequently, restart your computer, and you will be asked if you want to boot from disk; please select your installation media option.
Step 3. In the pop-up window, you will see a set of commands. Select the drive you want to wipe and delete all partitions on it.
Step 4. Select the unallocated space and create a new partition with it. If you are asked for your desired target format, select NTFS or FAT.
Step 5. Wait for the formatting process to complete.
Method 4. Wipe a Hard Drive During Windows Installation
Do you want to erase the hard drive in BIOS? If so, you can follow this step to format or erase your hard drive during system installation.
Step 1. Connect the installation media to the target computer and set its boot priority in the BIOS.
Step 2. Restart your computer and enter the Windows installation screen. Keep the default settings and click Next.
Step 3. Click Install Now to continue.
Step 4. Here, you need to type the product key of your operating system or skip it. If you install the same version of Windows, it will automatically activate when your computer is connected to the network.
Step 5. Select Custom: Install Windows Only (Advanced) installation.

Step 6. Then, you will see several options, including formatting. You need to select the system partition and click on Format.
Step 7. Click "OK" to confirm that you want to wipe the system partition and wait for the final result.
Why Erase or Wipe a Hard Drive from the BIOS
When it comes to why you need to wipe your hard drive from the BIOS, reinstalling Windows or doing a clean install of Windows is probably one of the most common reasons. This operation requires formatting the system partition (usually the C: drive), but it cannot be performed in Windows.
Generally, users can erase data by formatting or erasing the hard drive while the computer is running. However, if you try to erase the system drive (say C partition), you need to erase it from the BIOS because we cannot erase the system while the system drive is in use.
When you are reinstalling Windows on a device or doing a clean install of Windows, you will also need to wipe or wipe the hard drive from the BIOS. To do this, you need to format the system partition, but this cannot be done in Windows. We need to erase the hard drive in the BIOS.
However, before starting this process, you'd better back up your important data (if you have any).
Let's increase the reach of this helpful source and share this article with your friends or colleagues who can benefit from this guide.
Conclusion
To conclude, the process of wiping a hard drive from BIOS requires complicated and technical steps to be implemented effectively. A slight mistake can render the process to be problematic. However, using EaseUS Partition Master provides its users with a much easier and quicker method to erase the content on their drive.
Besides, the tool offers a wide range of functions to manage the partitions in their system. These reasons make it the best tool to wipe the hard drive from BIOS. We recommend you try this user-friendly tool, EaseUS Partition Master, to complete the task effectively within a few clicks.
You May Also Like:
Erase Hard Drives from BIOS Securely FAQs
We have gone through each method in an elaborate way. Still, if you are confused, these FAQs can help you understand the concept better. Go through these commonly asked queries to make the task easier for yourself.
1. Can you erase the hard drive from BIOS?
From BIOS:
- Restart your computer.
- Enter your BISO.
- Find the storage drive that you want to wipe.
- Find a Secure Erase option.
- Use Secure Erase to wipe your drive.
2. How do I wipe my operating system from BIOS?
You have to create an installation media before wiping the operating system from BIOS; then, follow the steps below to implement the task.
Step 1. First, restart your computer and enter the BIOS setup by pressing the designated key during boot-up, such as F2, F12, DEL, Esc, etc.
Step 2. Afterward, you need to navigate to the "Boot" or "Boot Order" section and set the bootable media USB or CD as the first boot option.
Step 3. You can save the changes made to the BIOS settings and exit. Your computer will restart and boot from the bootable media you've inserted.
Step 4. Subsequently, proceed with the prompts to reinstall the OS. You'll have options to format or delete existing partitions during the installation process, which will effectively wipe the OS.
3. Does BIOS data wipe remove Windows?
No, wiping data from BIOS does not directly remove Windows from your system. You have to insert a bootable disk or an installation media to wipe the partition in which Windows is present. That way, you can remove Windows from your system.
How Can We Help You
About the Author
Oliver is an EaseUS professional writer who dares explore new areas. With a passion for solving tech issues with straightforward guides for common users, Oliver keeps honing his writing craft by developing in-depth solutions for disk and partition management, computer boot-up issues, file transfer, etc.
Sherly joined EaseUS in 2022 and she has always loved writing articles and enjoys the fun they bring. She receives professional training here, focusing on product performance and other relative knowledge. She has written over 200 articles to help people overcome computing issues.
Product Reviews
-
I love that the changes you make with EaseUS Partition Master Free aren't immediately applied to the disks. It makes it way easier to play out what will happen after you've made all the changes. I also think the overall look and feel of EaseUS Partition Master Free makes whatever you're doing with your computer's partitions easy.
Read More -
Partition Master Free can Resize, Move, Merge, Migrate, and Copy disks or partitions; convert to local, change label, defragment, check and explore partition; and much more. A premium upgrade adds free tech support and the ability to resize dynamic volumes.
Read More -
It won't hot image your drives or align them, but since it's coupled with a partition manager, it allows you do perform many tasks at once, instead of just cloning drives. You can move partitions around, resize them, defragment, and more, along with the other tools you'd expect from a cloning tool.
Read More
Related Articles
-
Disk Read Only Fix: How to Change Drive from Read Only to Read Write (5 Ways)
![author icon]() Daisy/2024/04/19
Daisy/2024/04/19 -
How to Perform SD Card Lifespan Test
![author icon]() Roxanne/2024/04/19
Roxanne/2024/04/19 -
How to Fix System Partition is Not Allowed to Be Formatted
![author icon]() Tracy King/2024/04/19
Tracy King/2024/04/19 -
Do I need EFI System Partition? Can I Delete the EFI Partition?
![author icon]() Tracy King/2024/04/19
Tracy King/2024/04/19
Hot Topics in 2024


EaseUS Partition Master

Manage partitions and optimize disks efficiently