
Content
Page Table of Contents
About the Author
Hot Topics
The demand for migrating the operating system to an SSD on Windows 8.1/8/10/11 has significantly risen since the introduction of Solid State Drives (SSD). It offers high performance, faster boot times, and enhanced responsiveness. SSD makes the user experience smoother and helps execute multiple tasks. With a straightforward SSD upgrade, users can restore the performance of their older systems.
Unlike the simple data transfer from one drive to another, the process of migrating the operating system to SSD is slightly complicated. This article is dedicated to helping users migrate OS to SSD using the step guide.
Here's a quick overview of this tutorial for migrating OS to SSD:
| ⌛Duration: | 20 - 25 minutes |
| 💻Supported Systems: | Windows 8.1/8 |
| ✅Preparations: | Windows PC, SSD, SATA cable, Screwdriver, and migration software. |
| 🧰Recommended Tool: | EaseUS Partition Master |
| 🔢Steps: |
Migrating the operating system to a new hard drive in Windows 8.1 follows similar techniques to other Windows versions. This guide focuses on the simplest approach, which involves using a cloning tool. To begin the migration process, let's first collect the necessary elements in place.

#1. Preparing for the OS Migration
The migration of the Windows operating system requires some preparations. This section introduces three preparation steps you must follow before migrating OS to SSD for Windows 8.1.
A. Gathering Necessary Tools and Materials
To ensure easy SSD upgradation, gather all the necessary tools and materials, such as a screwdriver, SATA cable, and an SSD. While choosing an SSD, consider ensuring its compatibility and performance. We recommend you purchase an SSD from a trusted brand, such as Samsung or Seagate.

Please note that we do not promote any brand. We want to make sure that you have spent your time and efforts to get everything right.
B. Backing Up Important Data
Migrating the OS from one drive to another could cause potential data loss. To avoid the inconvenience, you must create a backup of all your existing data and save it in an external drive.
C. Install and Initialize SSD
If your backup part is done, let's physically remove the old HHD and install the SSD. Here are the quick steps to install and initialise SSD.
#1. Install SSD
Note* The steps may differ slightly according to the model of your computer.
Step 1: Turn off the laptop and remove all the cables.
Step 2: Hold the laptop upside down and remove the base cover.
Step 3: Detech the battery and hold the power button for 20 seconds. It will drain all the electric charges.
Step 4: Find the HDD and unscrew it from the motherboard. Avoid applying unnecessary force.
Step 5: Gently remove the hard drive and insert the new SSD.

Step 6: Plug the drive directly and screw it on the system board.
Note* You may need to attach the SSD with a SATA cable if you are using an older laptop.
Step 7: Attach the battery and base panel.
#2. Initialize SSD
Once the physical installation is completed, initialize the SSD to the same partition style as the OS disk using disk management. Here are the quick steps:
Step 1: Hit the power button to reboot your computer.
Step 2: Press "Win + X" and select "Disk Management" from the list.
Step 3: You will encounter the list of all the connected drives. Navigate the SSD and right-click on it.
Step 4: Select "Initialize Disk" choose from MBR or GPT partition styles and click "OK."
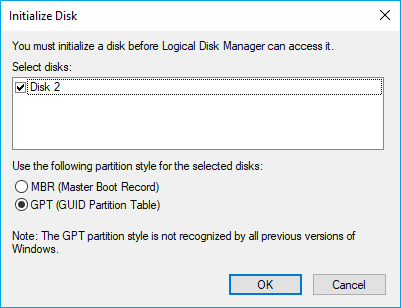
Note* You must choose the same style as your OS disk.
Step 5: Choose "New Simple Volume < Format" to create a new partition on the SSD. Assign a drive letter and "Save."
#2. Migrate OS to SSD with Windows 8.1
To migrate the OS to the new SSD, you will need to go through the given process.
1. Choosing OS Migration Software
After all the essential preparations, the key phase of the migration process is selecting reliable system migration software for Windows 8.1. We recommend downloading and using an easy OS migrating tool - EaseUS Partition Master Professional.
Its OS migration feature allows Windows users to shift the operating system in a few clicks. Beginners and experts can operate its friendly interface to migrate the Windows operating system to an SSD without reinstallation.
Here's why it beats other OS migrating options on the market:
- Compatibility: It is compatible with all types of SSDs and HDDs from various manufacturers, ensuring the flexibility of OS migration.
- Windows Supports: The cloning tool supports all Windows operating systems, including Windows 11, 10, 8.1, 8, and 7.
- Interface: Its intuitive and user-friendly interface enhances its accessibility. Users with limited technical expertise can navigate it with ease.
- File System: It supports all commonly used file systems. It can also clone an MBR system disk to a GPT SSD without requiring manual disk-style conversion.
- Optimized SSD Performance: The software automatically enhances SSD performance through 4k alignment during the cloning process, maximizing the benefits of your new SSD.
2. Initializing OS Migration to SSD with Windows 8.1
To achieve a hassle-free transition, a number of steps must be taken while initializing OS migration to an SSD in Windows 8.1. It includes completing the migration, optimizing system settings, and cloning the OS. Use the best cloning software - EaseUS Partition Master.
Download EaseUS Partition Master for free and follow the given steps to move forward.
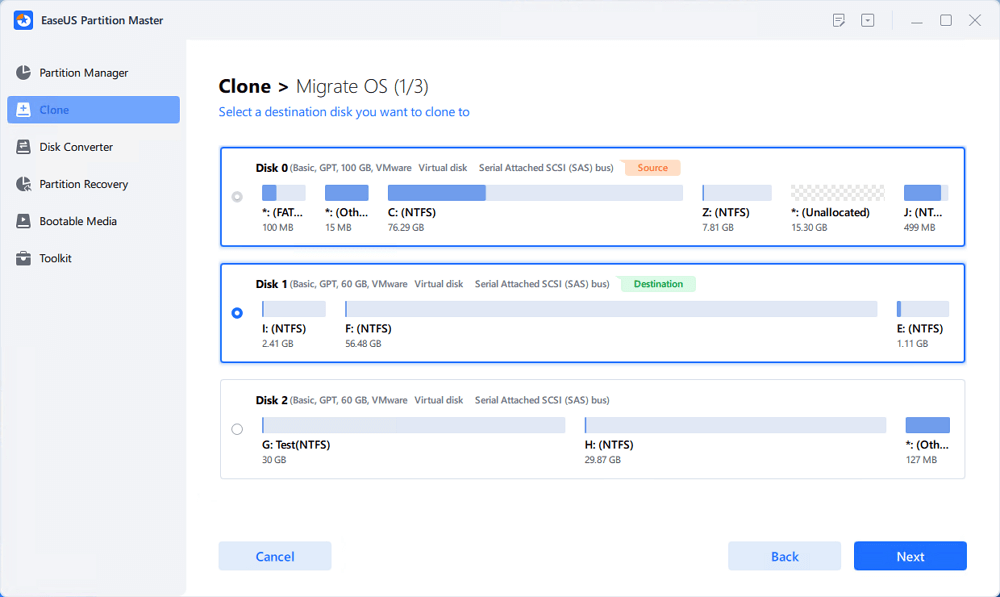
1. Launch EaseUS Partition Master, go to the Clone section, click "Migrate OS" and click "Next" to continue.

2. Select the target SSD you want to migrate Windows OS to, and click "Next".
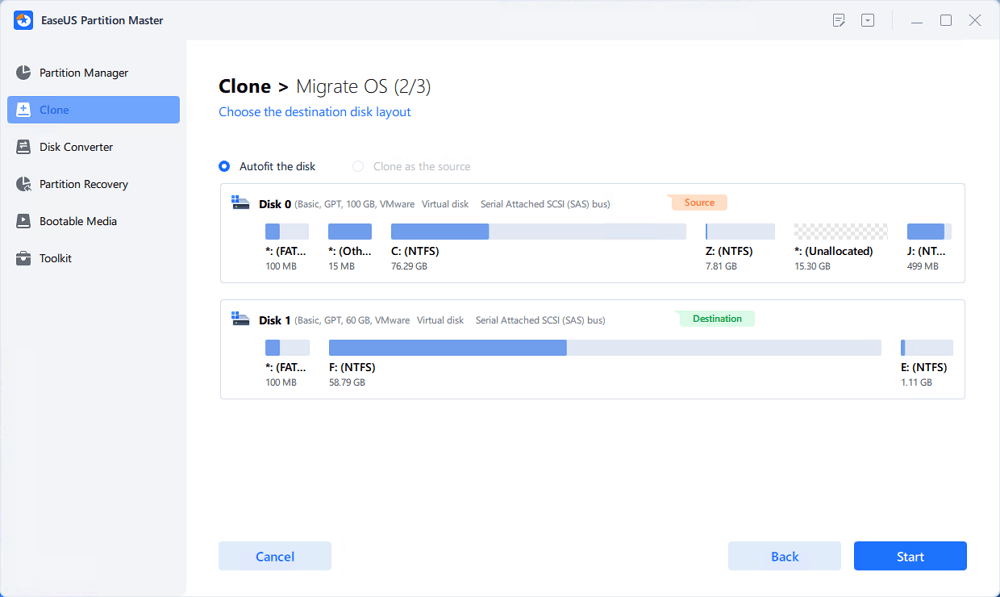
3. Click "Yes" to confirm the you want to exceute the operation.
4. Click "Start" to start migrating your OS to the new SSD.
5. When the process completes, you'll see a confirming message, asking "if you want to start up computer from the clone target disk".
Tick "Adjust the order to boot from the clone target disk" and click the respective button through your demands.
- Reboot Now means to reboot your PC and configure the computer to boot OS from the new disk immediately.
- Done means you want to make the changes later.

After this, you should be able to run your computer OS from the new SSD with success. Feel free to share this tutorial to help more of your friends online:
#3. Setting the SSD as the Boot Drive
This section describes the detailed process of changing the boot order and setting the new SSD as the boot drive. We will change the existing boot order from BIOS settings and prioritise the SSD as the first boot. Here are the steps:
Step 1: Restart your Windows system and press the correct key to access the BIOS settings.
Pro Tip* Generally, Delete, F2, F8, or F10 are commonly used BIOS keys. If you are not sure, search the internet using the model number of your device or check the manufacturer's website.
Step 2: When configuring the BIOS interface, use the right/left arrow keys to navigate the "Boot Order" or "Boot" option.
Step 3: Select the SSD from the list using the down key.
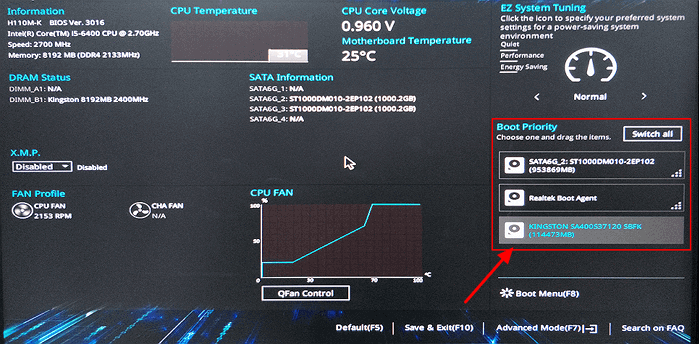
Step 4: Move the SSD to the top of the list using + or - keys.
Step 5: Press "F10" to save changes or choose the "Save and Exit" option.
It will automatically perform a restart with the changed boot order.
Conclusion
We hope the guide helped you learn the detailed process of migrating OS to SSD for Windows 8.1. Make sure to prepare each essential element before starting the migrating process. After the successful OS migration to SSD, you can take many benefits. This upgrade is beneficial to enhance your Windows computer's overall performance and responsiveness. EaseUS partition master is a convenient tool with an advanced Migrate OS feature for help. Later, this tool will assist you in managing partitions and optimizing disk performance.
Feel free to drop your feedback and suggestions in the comment box below. We are eager to hear from you.
FAQs in Migrating OS to SSD in Windows 8.1
Please follow this FAQ section to find detailed answers related to migrate OS to SSD in Windows 8.1/8.
1. Should I migrate OS to SSD with Windows 10?
Any Windows version, including Windows 10, can transfer its operating system to an SSD. However, it depends on the specific needs you have. If you want to improve system performance, an SSD upgrade is an option, and HHD is the best option if you need more storage.
2. Can Windows 8.1 run on an SSD?
Yes, Windows 8.1 can run on an SSD, and doing so can greatly enhance the performance of your SSDs and have quicker read and write rates than conventional hard drives.
3. How do I transfer Windows 8.1 to a new hard drive?
You can use a free cloning software - EaseUS Partition Master, to move Windows 8.1 to a new SSD or hard drive. This software can clone the OS without uninstalling it. However, experienced Windows users can consider new OS installation and then migrate their data and settings.
How Can We Help You
About the Author
Oliver is an EaseUS professional writer who dares explore new areas. With a passion for solving tech issues with straightforward guides for common users, Oliver keeps honing his writing craft by developing in-depth solutions for disk and partition management, computer boot-up issues, file transfer, etc.
Written by Tracy King
Tracy became a member of the EaseUS content team in 2013. Being a technical writer for over 10 years, she is enthusiastic about sharing tips to assist readers in resolving complex issues in disk management, file transfer, PC & Mac performance optimization, etc., like an expert.
Product Reviews
-
I love that the changes you make with EaseUS Partition Master Free aren't immediately applied to the disks. It makes it way easier to play out what will happen after you've made all the changes. I also think the overall look and feel of EaseUS Partition Master Free makes whatever you're doing with your computer's partitions easy.
Read More -
Partition Master Free can Resize, Move, Merge, Migrate, and Copy disks or partitions; convert to local, change label, defragment, check and explore partition; and much more. A premium upgrade adds free tech support and the ability to resize dynamic volumes.
Read More -
It won't hot image your drives or align them, but since it's coupled with a partition manager, it allows you do perform many tasks at once, instead of just cloning drives. You can move partitions around, resize them, defragment, and more, along with the other tools you'd expect from a cloning tool.
Read More
Related Articles
-
Best Bootable USB Hard Disk Format Tool Free Download [2024 How-To Tutorial]
![author icon]() Brithny/2024/04/19
Brithny/2024/04/19 -
How to Fix Windows 11 Update Stuck at 100% | Full Guide🚩
![author icon]() Cici/2024/04/19
Cici/2024/04/19 -
Diskpart Delete Server Partition: Get Solutions to Delete Recovery Partition
![author icon]() Tracy King/2024/04/19
Tracy King/2024/04/19 -
How Do I Upgrade to Larger Hard Drive [Safe & Efficient]
![author icon]() Tracy King/2024/04/19
Tracy King/2024/04/19
Hot Topics in 2024


EaseUS Partition Master

Manage partitions and optimize disks efficiently