
Content
Page Table of Contents
About the Author
Hot Topics
In this article, you'll learn:
- Clone Windows from HDD to SSD Checklist 2024
- 1. Set Up SSD on PC
- 2. Download Windows Cloning Software
- 3. Clone Windows from HDD to SSD
- 4. Set SSD as Boot Drive
There is no easy and quick solution to significantly improve your system’s performance than upgrading your HDD to SSD. Solid-State Drives, or SSD, have much faster read and write speeds than hard disk drives or HDD. There are also less prone to damage, consume less power, are more durable, and have longer lifespans. You also don’t need to reinstall Windows OS when upgrading from HDD to SSD.
How do I clone Windows from HHD to SSD without losing anything? This article will help you. It will list down the complete process from installing SSD to cloning Windows to set it up as the boot drive.
Clone Windows from HDD to SSD Checklist 2024
While it may seem like a mammoth task, cloning Windows from HDD to SSD when upgrading to SSD isn't difficult. With the right guidance, it will take you less than half an hour to complete the process. To answer your "how do I clone Windows from HDD to SSD" question, we have divided the process into these 4 simple parts:
- 1. Set Up SSD on PC
- 2. Download Windows Cloning Software
- 3. Clone Windows from HDD to SSD
- 4. Set SSD as Boot Drive

#1. Set Up SSD on PC
Before setting up the SSD on your computer, ensure that the SSD you buy has the same or larger storage size than the HDD. It is necessary to clone the complete hard disk drive to the new SSD. You also need to buy the SSD type suited for your system and try buying a recognized brand’s SSD.
First, Install SSD to Target PC
Now that you have your SSD, you will need a small screwdriver and your computer’s manual. Check the manual to figure out which type of screwdriver is required. Touch any unpainted metal to discharge static electricity, as it can damage disks and components. When ready, follow these steps to install SSD on your PC:
Step 1: Shut down your computer properly to avoid data corruption or loss, and unplug the power cable. Now press the power button on your computer for 5 seconds to ensure there is no residual electricity.
Step 2: Go through your system's manual and open the computer case with the screwdriver. After making sure that you are grounded, find the hard drive location. Now insert your SSD into the storage slot.
Step 3: On a desktop computer, you will need to use a SATA cable to attach the SSD to the motherboard. Consult the system’s manual to do it properly. For the laptop, you will need to locate the storage slot and plug your SSD into it.
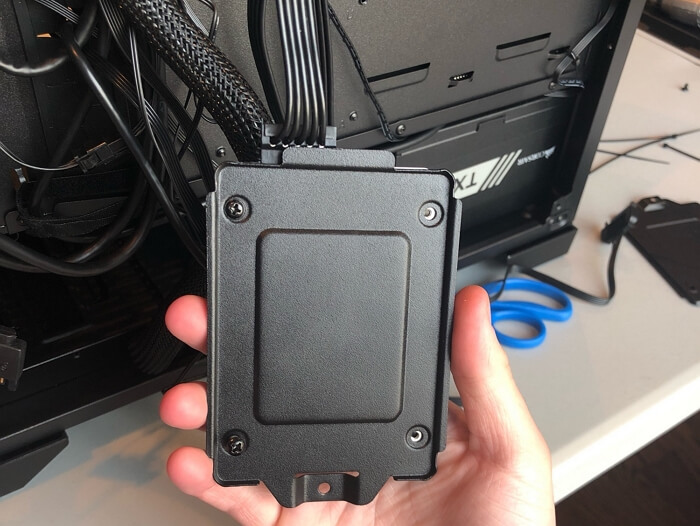
Step 4: Once the SSD has been properly plugged in, reassemble your computer carefully. When done, turn the computer to check the newly installed SSD.
Second, Initialize SSD to the Same Disk Partition Style as HDD
Your computer should be able to initialize the newly added SSD after restarting the computer. However, if it doesn't, use these steps to initialize your SSD to the same disk partition style as your HDD:
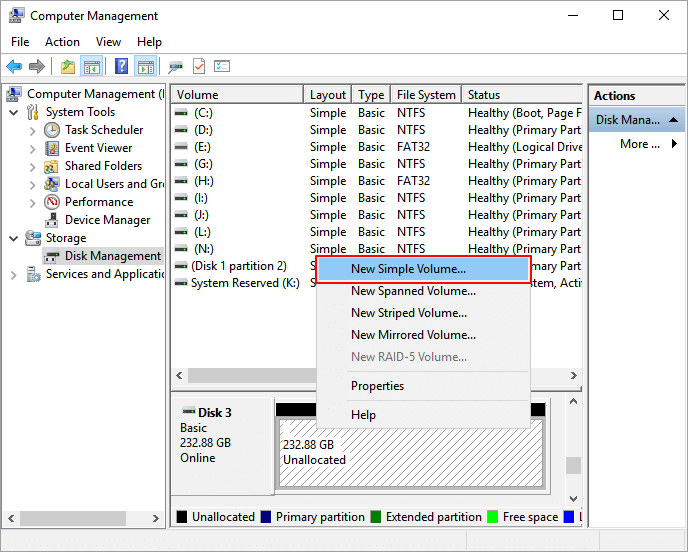
Step 1: Use the "Win + X" key on your system and select "Disk Management." Now select the newly added SSD and right-click on it. If the disk is "Offline," first make it "Online."
Step 2: Now select "Initialize Disk", and a new dialogue box will open. Here, select your SSD, provide the same partition style as your HDD, and press "OK" to start the process.
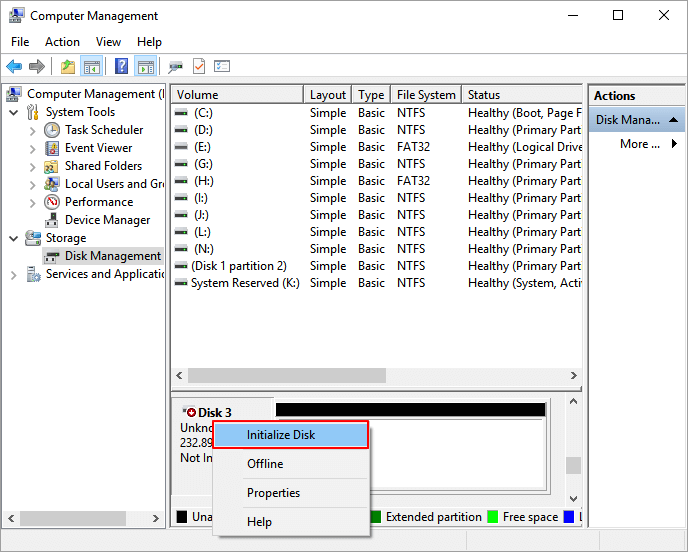
Step 3: Once the initialization process is complete, right-click the SSD drive and choose "New Simple Volume" to allocate a volume to your SSD.
Third, Create 1 or 2 Partitions on the SSD
Do you keep your system and boot volumes on two separate partitions in your hard disk? If yes, then you need to create two partitions on your SSD to ensure smooth cloning of Windows. Here is how you can create partitions on the new SSD:
Step 1: Type "Disk Management" in the search bar of your Windows and select "Create and format hard disk partitions" to open it. Now right-click on your SSD and select "Shrink Volume" to create some unallocated space.
Step 2: When enough unallocated space is created, right-click on it and select "New Simple Volume". Use the on-screen instruction to create a small partition of 100 to 500MB and select NTFS as the format.
Step 3: Now, provide a drive letter to both of your partitions on the SSD. Afterward, right-click the boot partition and tap “Mark Partition as Active” to allow your computer to boot from it.

#2. Download Windows Cloning Software
You will need to install Windows cloning software if you want to clone your Windows from HDD to SSD. When selecting a cloning tool, ensure that it has a quick, comprehensive, and simple process to clone Windows. The best tool to clone Windows is EaseUS Partition Master, as it provides a straightforward method to clone Windows from HDD to SSD to switch the OS disk.
Need to create or delete partitions on your SSD? This tool is your answer. It also allows you to resize or extend the existing partitions. If you want to throw away your old HDD, use this tool to permanently wipe the data on the drive. It also supports recovering deleted partitions and resolving other partition issues. You can download and use this amazing tool for free.
#3. Clone Windows from HDD to SSD
EaseUS Partition Master has a simple and helpful user interface that allows even new or non-tech users to clone Windows from HDD to SSD. It has an easy-to-follow and quick process for cloning Windows that is explained below:
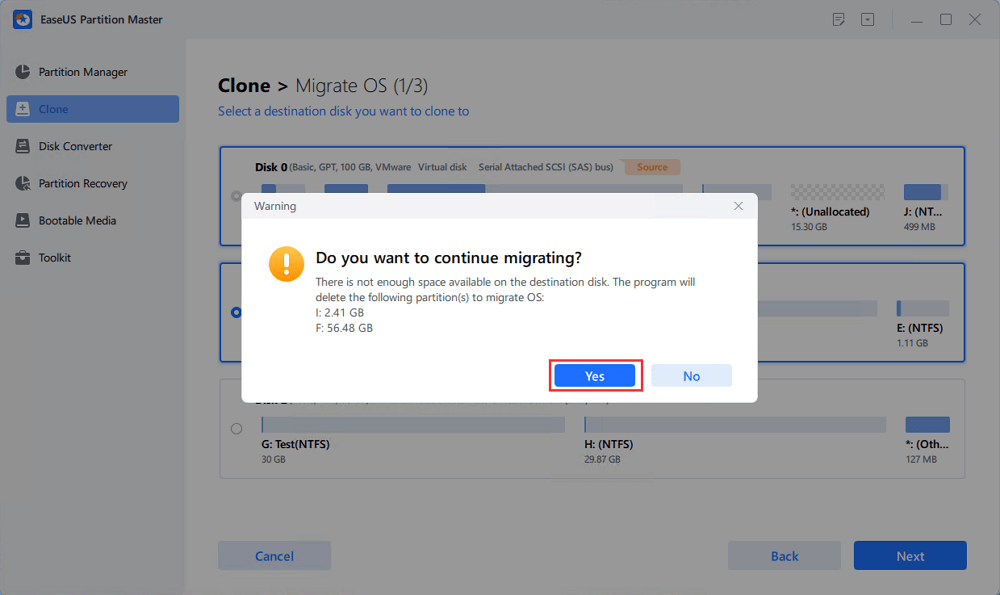
Note: The operation of migrating OS to SSD or HDD will delete and remove existing partitions and data on your target disk when there is not enough unallocated space on the target disk. If you saved important data there, back up them to an external hard drive in advance.
Step 1. Select "Clone" from the left menu. Select the "Migrate OS" and click "Next" to continue..
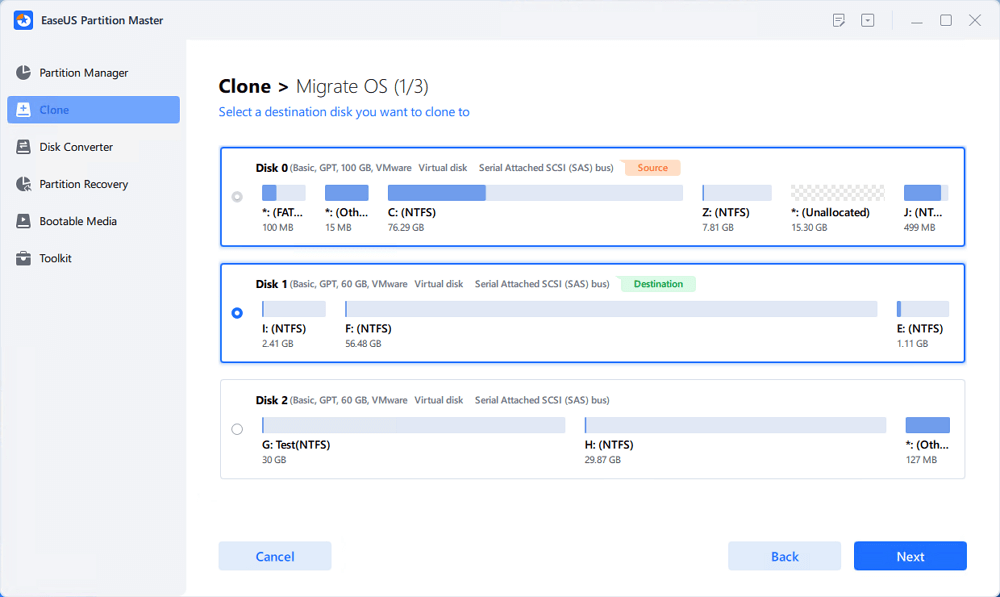
Step 2. Select the target disk you want to clone. Click "Next".
Step 3. Click "Yes" after checking the warning message. The data and partitions on the target disk will be deleted. Make sure that you've backed up important data in advance. If not, do it now.
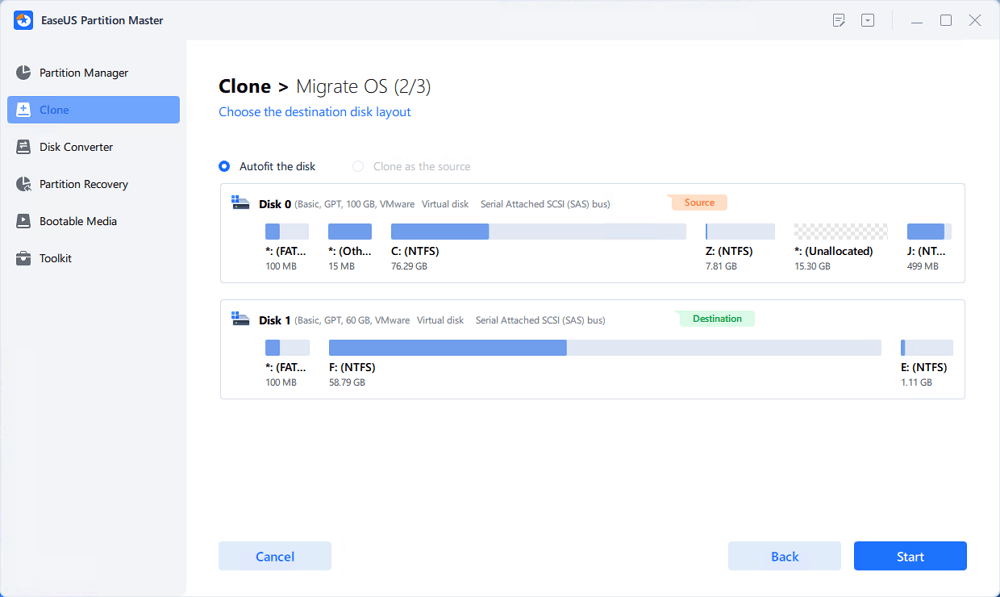
Step 4. Preview the layout of your target disk. You can also click the disk layout options to customize the layout of your target disk as you want. Then click "Start" to start migrating your OS to a new disk
Step 5. When you see a confirming message, asking "If you want to start up computer from the clone target disk", tick "Adjust the order to boot from the clone target disk" and click the respective button through your demands.
- Reboot Now: it means to reboot the PC and boot OS from the new disk immediately.
- Done: it means to make the changes later.

This tool can also help transfer OS to new SSD. Don't miss this tool if you are going to manage the OS.
#4. Set SSD as Boot Drive
Finally, you need to ensure that your computer uses the newly installed SSD to boot up. It can be done using the BIOS settings of your system. Following are the steps you should follow to set the SSD as the boot drive in BIOS:
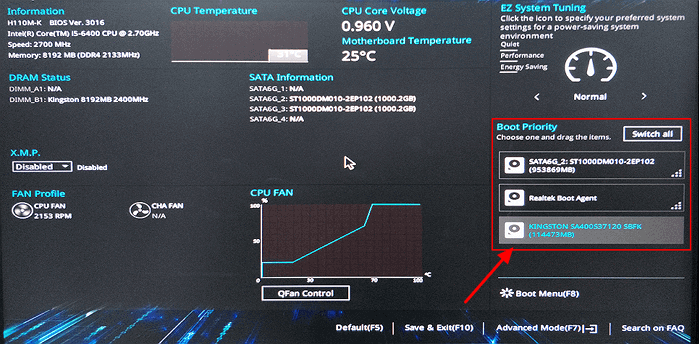
Step 1: Restart your computer and press the BIOS key (F2, F8, F11, or DEL) to enter the BIOS settings. Now navigate to “Boot” settings using the arrow keys.
Step 2: Once there, open it and locate the “Boot Device Priority” option. There, give your SSD drive the highest priority.
Step 3: It can be done using the "+" or "-" keys or the assigned keys in your system. Press “F10” to save and exit the BIOS and restart your computer.
Final Verdict
Upgrading your system's hard disks to SSD is important to increase the computer's performance. You should not postpone this due to the hassle of installing SSD or reinstalling the Windows OS. EaseUS Partition Master is a tool that can make this whole process a breeze.
Through this, you can easily clone Windows to SSD, and use tools like 4K alignment, change cluster size, DiskMark, etc., to increase SSD speed.
FAQs About Clone Windows from HDD to SSD
Here are some FAQs and their answers about cloning Windows from HDD to SSD to help answer your "how do I clone Windows from HDD to SSD" question:
1. How to clone HDD to SSD for free?
Free cloning of your HDD drive to an SSD drive is possible with the help of EaseUS Partition Master. You can download and use the tool for free to clone your partitions from one drive to another. It provides a no-data loss process of cloning HDD to SSD.
2. Is there free HDD to SSD cloning software?
EaseUS Partition Master is the best free HDD to SSD cloning software. It has an easy and quick method for cloning HDD to SDD. This tool allows you to create new partitions on the SSD if your HDD has multiple partitions.
3. Can I transfer just Windows from HDD to SSD?
Yes, you can transfer just Windows OS from HDD to SSD. To do this, you only need to clone the system partition to the SSD. EaseUS Partition Master can help you transfer Windows OS from HDD to SDD on your computer. You can also use the tool to set the new SSD disk as the OS disk when rebooting the computer.
How Can We Help You
About the Author
Oliver is an EaseUS professional writer who dares explore new areas. With a passion for solving tech issues with straightforward guides for common users, Oliver keeps honing his writing craft by developing in-depth solutions for disk and partition management, computer boot-up issues, file transfer, etc.
Written by Tracy King
Tracy became a member of the EaseUS content team in 2013. Being a technical writer for over 10 years, she is enthusiastic about sharing tips to assist readers in resolving complex issues in disk management, file transfer, PC & Mac performance optimization, etc., like an expert.
Product Reviews
-
I love that the changes you make with EaseUS Partition Master Free aren't immediately applied to the disks. It makes it way easier to play out what will happen after you've made all the changes. I also think the overall look and feel of EaseUS Partition Master Free makes whatever you're doing with your computer's partitions easy.
Read More -
Partition Master Free can Resize, Move, Merge, Migrate, and Copy disks or partitions; convert to local, change label, defragment, check and explore partition; and much more. A premium upgrade adds free tech support and the ability to resize dynamic volumes.
Read More -
It won't hot image your drives or align them, but since it's coupled with a partition manager, it allows you do perform many tasks at once, instead of just cloning drives. You can move partitions around, resize them, defragment, and more, along with the other tools you'd expect from a cloning tool.
Read More
Related Articles
-
How Big Is Cyberpunk 2077? Newest Guide Here 2024
![author icon]() Sherly/2024/04/19
Sherly/2024/04/19 -
4 Ways to Factory Reset Windows 7 Without Password
![author icon]() Sherly/2024/04/19
Sherly/2024/04/19 -
[2024] Three Ways to Convert MBR to GPT Disk on Windows 11/10
![author icon]() Jean/2024/04/19
Jean/2024/04/19 -
External SSD Slow Write Speed? Here are 4 Efficient Fixes
![author icon]() Sherly/2024/04/19
Sherly/2024/04/19
Hot Topics in 2024


EaseUS Partition Master

Manage partitions and optimize disks efficiently