
Content
Page Table of Contents
About the Author
Hot Topics
SMART stands for Self-Monitoring, Analysis, and Reporting Technology. Hard drives are designed with this feature to monitor performance and health-related elements. It's crucial to get notifications of possible hard disk failure and enable them to take preventative action. If you are encountering a bypass SMART failure in Windows, EaseUS releases this guide to help you comprehend the potential causes and solutions to fix it. Let's dive into the topic.

Whatever the cause of your bypass SMART failure, you can fix it using the techniques described in the next section. Let's determine what will work best for you.
Troubleshoot and Bypass SMART Failure Issues on Hard Drives [4 Methods]
Here is the list of solutions to troubleshoot and bypass SMART failure errors instantly:
| Methods | Duration | Who Will Need It |
| 1️⃣Disable SMART in BIOS | 5-10 minutes | Advanced users |
| 2️⃣Use SMART Test Software | Less than five minutes | All users |
| 3️⃣Check and Fix File System Error | 5-10 minutes | Beginners |
| 4️⃣Defrag Hard Drive | 3-5 minutes | Beginners |
Regardless of your level of computer expertise, each option offers a viable fix for the SMART failure problem. We have provided complete instructions to assist you in every way possible. Additionally, we advise you to create a prior backup to prevent data loss.
1. Disable SMART in BIOS
When SMART is enabled in BIOS settings, the system automatically detects and warns you with an error message when it finds a potential hard drive failure. It could be a real error or, just as mentioned, a potential issue. So you can first disable it from BIOS before moving on.
| Pros | Cons |
|---|---|
|
|
Step 1: Restart your system, and when the Windows logo appears, continuously press a specific key to access BIOS settings. Usually, it is F2, F8, F12, and DEL keys to enter BIOS.
Additionally, If you're unsure, you can find the key online by entering the modal number of your laptop or computer.
Step 2: Once you enter the BIOS interface, use arrow keys to navigate the Hardware, Hard disk, or something related to storage.
Step 3: You will encounter the "S.M.A.R.T" option.
Step 4: Expand SMART and select "Disable".

Step 5: Select "Save and Exit" and press "Y" to confirm changes.
2. Use SMART Test Software - EaseUS Partition Master
If you encounter bypass SMART failure in your Windows computer, disabling or resetting the SMART may not be helpful. You will need efficient SMART test software to fix the issue. EaseUS Partition Master is a one-stop solution that works perfectly on all Windows versions. All you need to do is, simply install the free version of this test tool and follow the given steps for good indication.
| Pros | Cons |
|---|---|
|
|
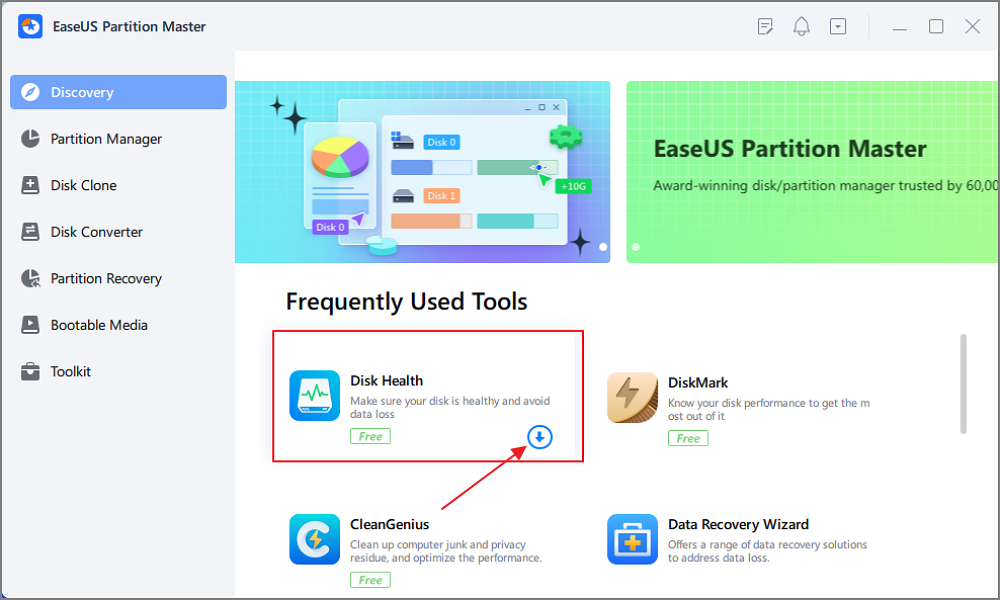
Step 1. Launch EaseUS Partition Master and click the blue arrow to activate the "Disk Health" feature under the "Discovery" section.
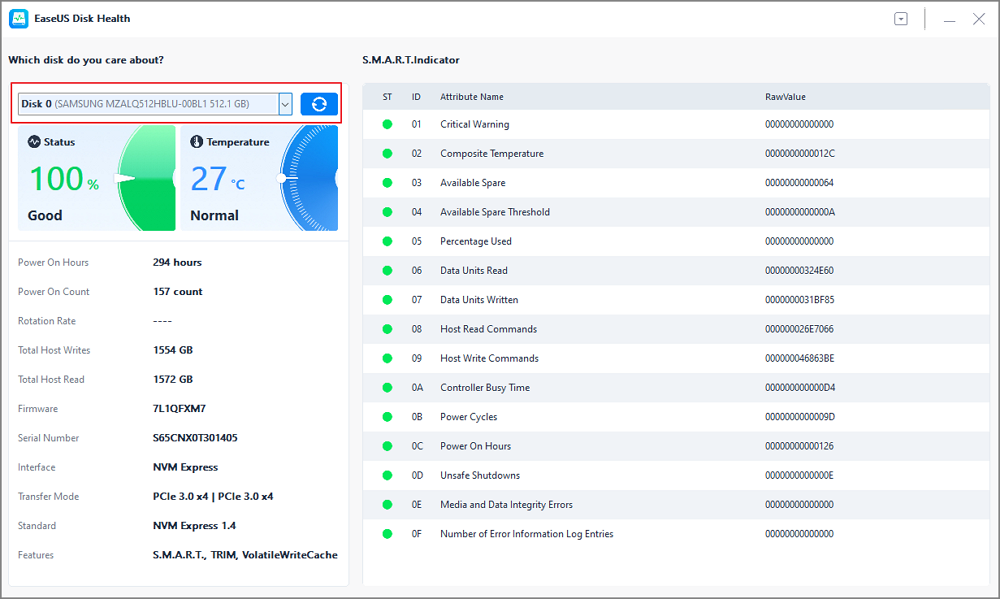
Step 2. Select the target disk and click the "Refresh" button. Then, you can see the health condition of your disk.
Video Tutorial on Testing SSD S.M.A.R.T State
Here, we also created a detailed video tutorial for you to follow and test the S.M.A.R.T state of your SSD.
3. Check and Fix File System Error
Another way to fix bypass SMART Failure is by checking the file system integrity of your disk and fixing errors. We will introduce you to Windows's built-in check file system feature.
| Pros | Cons |
|---|---|
|
The check and fix process can be time-consuming. |
It efficiently performs a scan on the drive and enables users to take proper action on any potential file system error. Here are the steps:
Step 1: Open "File Explorer" and double-click "This PC".
Step 2: Select your system drive (C-drive) and right-click on it.
Step 3: Click on "Properties" to explore more options.
Step 4: Select the "Tools" tab from the top menu and click the "Check" button under the "Error Checking" button.

Step 5: Select the "Scan Drive" option under the pop-up "You don't need to scan this drive".

Now the scan will start to look for any file system issues. You can fix any errors found after scanning the drive
4. Defrag Hard Drive
Sometimes, disk fragmentation can be the reason for SMART failure. Hence, you are required to defrag the hard drive.
| Pros | Cons |
|---|---|
|
Possibility of file corruption and data loss |
Quickly perform disk defragmentation by following these steps:
Step 1: Go to Windows "Search bar" and type "Disk Defragmenter".
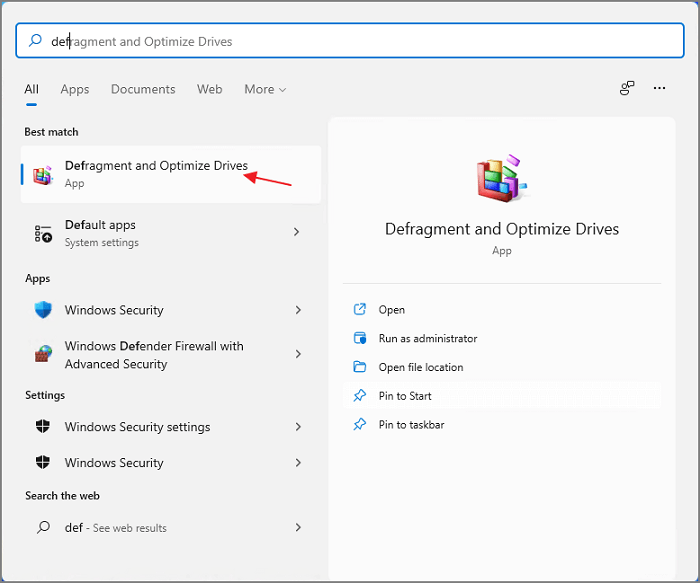
Step 2: Select the first option from the results.
Step 3: Choose the drive and click the ''Defragment Disk'' option.
Bypass SMART Failure: What You Should Know
SMART is a self-diagnostic tool designed to monitor drive conditions based on error rates and performance. A SMART failure occurs when the Self-Monitoring, Analysis, and Reporting Technology (SMART) system in a computer's hard drive notices potential issues or warning signals of impending failure. There can be some common symptoms of SMART failure, such as slow performance, high temperature, frequent crashes, virus attacks, and error messages.
The early warning system by SMART technology enables users to take preventive action before a catastrophic breakdown. If you encounter a bypass SMART failure in your Windows computer, the first step you should do is to create a backup of your data to avoid any unexpected data loss.
Whatever the cause of your bypass SMART failure, you can fix it using the techniques described above.
Conclusion
This guide covers the possible solution to fix the SMART failure error. Moreover, we also introduced some measures to indicate the problem. Users can easily and quickly deal with the issue by using the measures and any solution mentioned above. We recommend you use EaseUS Partition Master as it is the most efficient and easiest way to rectify the bypass SMART failure problem in Windows.
Share this article with anybody you believe will benefit from it, and please leave your valuable comments below to share your experiences dealing with SMART failure.
FAQs About Bypassing SMART Failure
If you have additional queries on this issue, please follow and find answers in this FAQs section.
1. Why is SMART failure predicted on the hard disk
SMART failure is predicted on a hard disk when it detects potential hardware issues or deteriorating conditions. Based on evaluating these factors, including read/write error rates, spin-up time, temperature, reallocated sectors, and several other metrics, SMART failure prediction on a hard disk is based. Users can take valid actions to stop data loss or drive failure altogether.
2. How do I skip SMART failure in BIOS
You can skip SMART failure in BIOS using the F1 key. However, skipping SMART failure in BIOS is not advisable because it can be a sign of problems with your hard disk. To avoid losing data, you should replace the failed hard disk.
3. What is the best SMART software for benchmark hard drive
EaseUS Partition Master is the best SMART software for benchmark hard drives. It is easy to use and supports all internal and external hard drives.
How Can We Help You
About the Author
Oliver is an EaseUS professional writer who dares explore new areas. With a passion for solving tech issues with straightforward guides for common users, Oliver keeps honing his writing craft by developing in-depth solutions for disk and partition management, computer boot-up issues, file transfer, etc.
Written by Tracy King
Tracy became a member of the EaseUS content team in 2013. Being a technical writer for over 10 years, she is enthusiastic about sharing tips to assist readers in resolving complex issues in disk management, file transfer, PC & Mac performance optimization, etc., like an expert.
Product Reviews
-
I love that the changes you make with EaseUS Partition Master Free aren't immediately applied to the disks. It makes it way easier to play out what will happen after you've made all the changes. I also think the overall look and feel of EaseUS Partition Master Free makes whatever you're doing with your computer's partitions easy.
Read More -
Partition Master Free can Resize, Move, Merge, Migrate, and Copy disks or partitions; convert to local, change label, defragment, check and explore partition; and much more. A premium upgrade adds free tech support and the ability to resize dynamic volumes.
Read More -
It won't hot image your drives or align them, but since it's coupled with a partition manager, it allows you do perform many tasks at once, instead of just cloning drives. You can move partitions around, resize them, defragment, and more, along with the other tools you'd expect from a cloning tool.
Read More
Related Articles
-
How Do I Format SD Card for Raspberry Pi? Your Step-by-Step Guide Here
![author icon]() Tracy King/2024/04/22
Tracy King/2024/04/22 -
![author icon]() Daisy/2024/04/22
Daisy/2024/04/22 -
Diskpart Delete Server Partition: Get Solutions to Delete Recovery Partition
![author icon]() Tracy King/2024/04/19
Tracy King/2024/04/19 -
Change File Extension One-by-One or in Bulk [2024 Tutorial]
![author icon]() Tracy King/2024/04/22
Tracy King/2024/04/22
Hot Topics in 2024


EaseUS Partition Master

Manage partitions and optimize disks efficiently