
Content
Page Table of Contents
About the Author
Hot Topics
The moment you try to set up your computer's storage with Diskpart, an unexpected message appears: "There are no fixed disks to show." This can be a frustrating error that leaves you wondering what to do next.
You might be eager to know about the significant culprit behind it. This error has a few potential causes:
- Lose hard drive (HDD) connections. Check the proper connectivity.
- Make sure you are using the latest disk drivers.
- Corrupted Boot Configuration Data (BCD) could be the problem.
If this frustrating error is troubling you, EaseUS will help you fix it.
How to Fix There Are No Fixed Disks To Show Error
The "There aren't any fixed disks to expose" error in Diskpart represents your PC not being able to access your difficult drives. This is a primary inconvenience, but do not be despairing! There are methods you can apply to deal with this trouble.
Before diving into more complex answers, let's start simple. Try reconnecting your hard disk. Here's how:
- Turn off your laptop and unplug all the cables.
- Open your laptop's back panel and navigate the hard drive.
- Carefully disconnect it and reconnect the cables on your hard drive.
- Reassemble the panel, plug it in again, and turn it on.
If reconnecting your hard drive doesn't paintings, here are four extra fixes to strive for:
Fix 1. Rebuild MBR
The Master Boot Record (MBR) is an important data type on your hard drive that helps start up your laptop. If MBR gets damaged, your computer might not understand your onerous force, leading to this irritating error.
To rebuild MBR, you can use a professional disk management tool - EaseUS Partition Master Professional. It's known to fix hard drive issues easily. Its "Rebuild MBR" feature tackles problems with your Master Boot Record (MBR) and lets you easily create a bootable disk for repairs. Even if you need to be more tech-savvy, its user-friendly interface makes it a breeze to use.
Download EaseUS Partition Master and follow these easy steps to rebuild MBR with ease.
Step 1. Create a WinPE bootable disk
- Launch EaseUS Partition Master, and click "Bootable Media" on the toolbar. Select "Create bootable media".
- Click "Next" to finish the process.

Step 2. Boot EaseUS Partition Master Bootable USB
- Connect the bootable USB or CD/DVD to your PC.
- Press F2 or Del when you restart the computer to enter the BIOS screen. Set and boot your computer from "Removable Devices" or "CD-ROM Drive". And then EaseUS Partition Master will run automatically.
Step 3. Rebuild MBR
- Click "Toolkit" and choose "Rebuild MBR".

- Select the disk and the type of MBR. Then, click "Rebuild".

- After that, you can see "MBR has been successfully rebuilt on Disk X".

Here's what it offers:
- MBR Troubleshooting: Addresses numerous issues associated with corrupted or damaged MBR, and restores your computer's potential to recognize your hard power.
- Bootable Media: MBR may be configured even if your PC doesn't boot normally. You can create a separate USB or disk to easily gain access to EaseUS Partition Master.
- Disk Health Check: Allows you to assess the overall fitness of your hard drive, permitting you to look for any capability problems.
- Easy-to-use interface: EaseUS Partition Master is designed simply, making it an on-hand tool for even the least experienced.
To make it easy to rebuild MBR and fix "There Are No Fixed Disks to Show" when using Diskpart, download EaseUS Partition Master to help.
Fix 2. Install the Missing VMware Driver (If Applicable)
This repair is for the mistake generated by a missing VMware motive force. Sometimes, crucial drivers for VMware to interact with your digital difficult disks must be included. Here's how to set up it:
Step 1: Launch VMware Workstation.
Step 2: In your virtual machine's settings, go to "VM"> "Install VMware Tools"> "Mount."
Step 3: Press "Windows + R" to open the Run dialog.
Step 4: Type "cmd" and press "Ctrl + Shift + Enter."
Step 5: Click "Yes" on the User Account Control (UAC) prompt.
Step 6: Then, type the following command. Replace "X" with your VMware drive letter, then hit the "Enter" key.
drvload "X:\Program Files\VMware\VMware Tools\Drivers\pvscsi\Win8\amd64\pvscsi.inf"
Once you run the previous command efficiently, go with the following command and hit Enter. To check if Diskpart works:
X:\windows\system32>diskpart
Please don't forget to replace "X" with your VMware drive letter)
If you can use it usually, the issue should be solved. If so, share the article to help others facing the same problem.
Fix 3. Rebuild BCD
Your computer won't start? This could mean your BCD data is damaged. Here's how to fix it. Since you can't boot your computer normally, we'll need to use a Windows installation disk or USB drive (you can create this on another working computer). Once done, follow the steps to rebuild BCD.
Step 1: Insert it into your computer and change your computer's settings to boot from this drive instead of your hard drive.
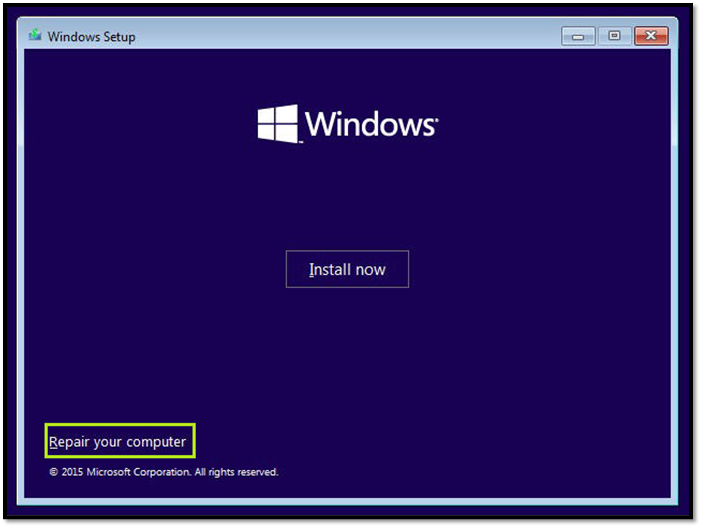
Step 2: When you see the "Install Now" screen, look for a "Repair your computer" option and click it.
Step 3: Choose "Troubleshoot"> "Command Prompt."
Step 4: Type the following commands, pressing "Enter" after each one:
- Bootrec /scanos
- Bootrec /fixMBR
- Bootrec /fixBoot
- Bootrec /rebuildBCD
Step 5: Remove the disk or USB and restart your computer. Hopefully, it now boots normally.
🚩Important: If you're uncomfortable with these steps, it's best to get help from EaseUS Partition Master. This tool also comes with a "Rebuild BCD" feature.
Fix 4. Using Windows Startup Repair
Windows Startup Repair is a built-in tool that can robotically experiment and try to restore troubles preventing your computer from booting nicely.
The "no fixed disks" errors can, on occasion, be a result of these startup problems. To use this tool, you may want the bootable Windows installation disk or USB that you created in Fix 3.
Step 1: Boot your computer from the Windows installation disk or USB drive. If prompted, press a key to boot from it. (If it doesn't prompt you, you may need to change your computer's boot order settings).
Step 2: Click "Repair your computer" on the installation screen.
Step 3: Choose "Troubleshoot"> "Advanced Options"> "Startup Repair" (or "Automatic Repair" depending on your Windows version).

Step 4: Let Windows scan your system for problems and attempt to fix them.
Step 5: After the repair, restart your computer and see if it boots normally.
During the whole process, click the link to fix if the Windows Startup Repair is not working. Besides, the following are some issues related to No Disks Present in Diskpart error. Check them below if you are facing the same error.
What Cause There Are No Fixed Disks to Show
Now that you know some potential solutions for the "There are no fixed disks to show" error, let's dive into what might be causing the problem in the first place. Understanding the root cause can help you choose the most effective fix.
Here are some common culprits:
- Improper connection: If your hard drive's cables aren't connected securely, your computer might not recognize it.
- The VMware driver is missing: When running Diskpart within a VMware virtual machine, a missing driver can prevent the virtual hard disks from being detected.
- The BCD data is corrupted: The Boot Configuration Data (BCD) is critical for your computer's startup process. Damage to this data can lead to boot issues and disk errors.
- Hardware Issues: If the hard drive is damaged or fails, you might encounter this error.
- Initialization error: Sometimes, issues with how the hard disk is initialized can prevent Diskpart from recognizing it.
Was this article helpful? If so, please consider sharing it to help others facing similar issues!
Conclusion
The "There are not any fixed disks to expose" mistakes in Diskpart may be a first-rate headache; however, they are not insurmountable. Whether the difficulty stems from easy connection troubles, lacking drivers, corrupted machine documents, or even hardware failure, the fixes outlined in this text offer a roadmap to getting your disk management back on track.
Remember, if you're uncomfortable with technical troubleshooting, looking for help from a certified PC technician is always a great concept.
No Fixed Disks Present Error FAQs
Are you frustrated with disk errors? If the following questions sound familiar, you'll find some helpful answers below!
1. How do I fix there are no fixed disks to show in Diskpart error?
- Check your HDD for a loose connection. If you recently made hardware modifications to your computer, you may need to check if the HDD connections are properly connected.
- Rebuild MBR. Get a working Windows PC and rebuild the MBR for the current one.
- Check for corrupt Boot Configuration Data. Boot the current PC from a bootable flash drive or a Windows installation media to check for corrupt boot configuration data.
- Perform Windows Startup Repair. This option also requires you to boot the current PC from a USB or installation media.
2. Why do I get "there are no fixed disks to show" errors?
This error message usually indicates a problem with your computer's ability to detect the hard drive. Hardware issues, missing drivers, or corruption of important startup files may cause this.
3. How do I make a disk visible in Diskpart?
If the disk is physically connected and working but does not show up in Diskpart, try reconnecting it, rebuilding the master boot record (MBR), or checking for missing drivers.
How Can We Help You
About the Author
Sherly joined EaseUS in 2022 and she has always loved writing articles and enjoys the fun they bring. She receives professional training here, focusing on product performance and other relative knowledge. She has written over 200 articles to help people overcome computing issues.
Product Reviews
-
I love that the changes you make with EaseUS Partition Master Free aren't immediately applied to the disks. It makes it way easier to play out what will happen after you've made all the changes. I also think the overall look and feel of EaseUS Partition Master Free makes whatever you're doing with your computer's partitions easy.
Read More -
Partition Master Free can Resize, Move, Merge, Migrate, and Copy disks or partitions; convert to local, change label, defragment, check and explore partition; and much more. A premium upgrade adds free tech support and the ability to resize dynamic volumes.
Read More -
It won't hot image your drives or align them, but since it's coupled with a partition manager, it allows you do perform many tasks at once, instead of just cloning drives. You can move partitions around, resize them, defragment, and more, along with the other tools you'd expect from a cloning tool.
Read More
Related Articles
-
How to Fix DBAN Not Booting From USB in Windows
![author icon]() Roxanne/2024/04/19
Roxanne/2024/04/19 -
How to Partition Western Digital Hard Drive on Windows 11/10/8/7
![author icon]() Cici/2024/04/19
Cici/2024/04/19 -
How Do I Convert Bootable Disk or Bootable USB to Normal in Windows 11
![author icon]() Tracy King/2024/04/19
Tracy King/2024/04/19 -
Windows 11 Home VS Pro, Which Is Better? Your Tips Are Here
![author icon]() Tracy King/2024/04/19
Tracy King/2024/04/19
Hot Topics in 2024


EaseUS Partition Master

Manage partitions and optimize disks efficiently