
Content
Page Table of Contents
About the Author
Hot Topics
The baffling write protection issue restricts your ability to modify the contents of your storage device, rendering it read-only. But worry not, for you've stumbled upon the ultimate guide to reclaiming control over your external hard drive. In the following sections, we will delve into various effective methods to remove the write protection from external hard drives, allowing you to manage your data as you see fit.
These comprehensive instructions provided by EaseUS are your go-to resource for tackling the challenges posed by write protection. Not only will you learn the underlying reasons behind this issue, but you'll also be equipped with multiple strategies to overcome it. So, let's learn how to remove write protection from an external hard drive by below six effective methods.
How to Remove Write Protection From External Hard Drive?
In this section, we'll learn five methods about how to remove write protection from an external hard drive. Before venturing into these fixes/solutions, ensure you clearly understand your device's specifications and a backup of your essential data to prevent any unexpected data loss. Read the overall information of these six methods carefully to turn off write protection from your external hard drive in the below table:
| 💻Methods | ⏰Duration | 🔒Difficulty | 🚀Effectiveness |
|---|---|---|---|
| 🥇EaseUS Partition Master | 3 Minutes | Easy | High |
| 🥈Physical Switch | 1 Minute | Easy | Medium |
| 🥉Diskpart | 5 Minutes | Complex | Medium |
| 4️⃣Windows Registry | 5 Minutes | Complex | Medium |
| 5️⃣Antivirus Software | 7 Minutes | Moderate | Medium |
Way 1. Remove Write Protection via EaseUS Partition Master
EaseUS Partition Master stands out as an efficient and user-friendly solution. This method involves utilizing the tool's advanced features to overcome write protection. Not only does EaseUS Partition Master help you remove the write protection, and it offers other valuable features for managing your storage devices.
This software has some shining parts: high effectiveness in removing write protection, a user-friendly interface, and additional storage management features.
Follow the steps to turn off write protection from an external hard drive:
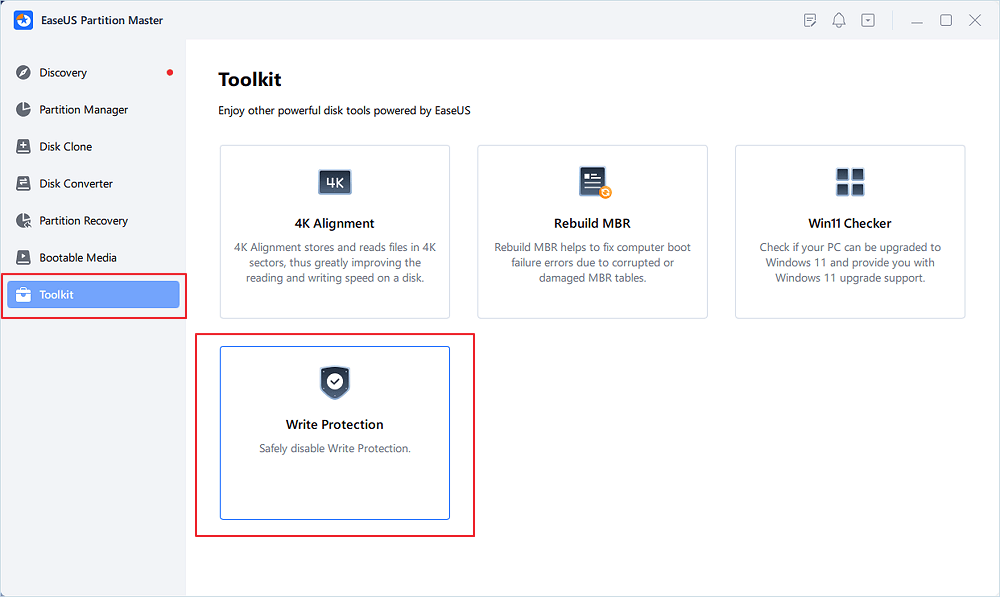
Step 1. Download and install EaseUS Partition Master, go to the Toolkit section, and click "Write Protection".
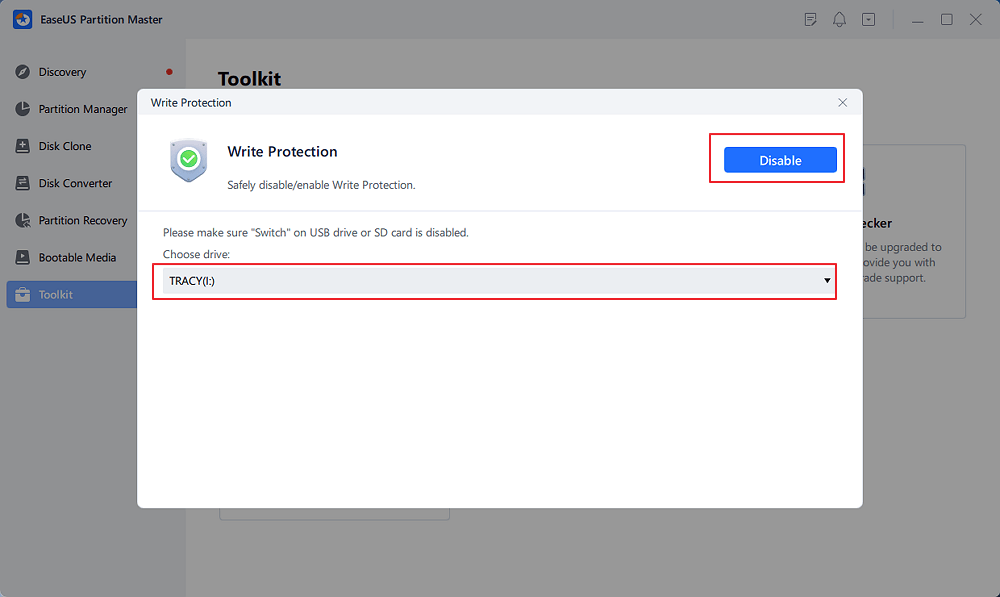
Step 2. Select your write protected USB, USB external disk or SD card, and click "Disable".
Additional Features of EaseUS Partition Master:
- Format a write-protected USB flash drive.
- Format a write-protected SD card.
- Fix a pen drive that is write-protected.
- Solve the disk is write-protected in Windows 11.
So, why are you waiting for? Just give it a try to get rid of write protection from your external drive quickly.
Way 2. Turn Off the Physical Switch
You have to check if your external drive has a physical switch and if it's on your drive is locked. Most external hard drives come with a physical button to lock and unlock. Follow the below simple steps:
Step 1. Just slide that physical switch to remove the lock.

Step 2. After turning off the physical switch, connect it to your PC to check whether the write protection has been removed.
Way 3. Disable Write Protection via Diskpart
The Diskpart utility can override the read-only status on your external hard drive. If your external hard drive is set as read-only, you can use Diskpart to clear read-only attributes. By following the steps below, you can learn how to remove protection:
Step 1. Search the "Diskpart" in the Windows search box at the taskbar. When it appears in the search result, click on it to open it.
Step 2. Write the below-given commands by pressing "Enter" after writing each order.
- list disk
- select disk P( where "P" is the disk number of your hard drive.)
- attributes disk clear readonly

Step 3. Wait a few moments, and let it remove read-only attributes. Once done, type exit and press "Enter."
Way 4. Disable Write Protection with Windows Registry
You can utilize the Windows registry to disable write protection from an external hard drive. However, tampering with the registry without following the proper methods can lead to severe issues with your Windows system. So, learn and follow these steps carefully:
Step 1. Write "regedit" in the "Run" box and hit "Enter."

Step 2. When a popup appears, choose "Yes."
Step 3. Expand the list of "HKEY_LOCAL_MACHINE" by clicking > greater than sign.
Step 4. Similarly, expand the "System" list and then "Current Control Set."

Step 5. Click "Control" and select "Storage Drive Policies."
Step 6. Assign the digit within the DWORD box a value of 0, then click "OK."

Step 7. Close the Windows Registry and restart the system to implement the modifications.
Way 5. Use Antivirus Software
Occasionally viruses and malware attack your external hard drive, leading to write protection. Using trustworthy anti-virus software to terminate the write protection viruses, you can crush this. As for a reliable antivirus software, you can try TotalAV which offers you a real-time protection from virus infection, malware and online threats:
TotalAV is an Award Winning Antivirus and Security Software. It Provides Real-Time Protection from Viruses, Malware & Online Threats.
Antivirus Protection Enabled
You can follow the steps to try the fifth method of write protection removal:
Step 1. First, download and install trustworthy anti-virus software, such as TotalAV, Norton Anti-virus, McAfee, ESET NOD32, Avira, Avast, AVG, etc.
Step 2. Connect the target external hard drive to your laptop or PC.
Step 3. Scan the external hard drive using an anti-virus to clean up and remove the write protection virus.
I hope this post will help you successfully remove the write protection from the external hard drive. If so, you can share it with people in need on social media platforms:
What causes Write Protection on External Hard Drive?
Do you know why the write protection issue is on the external hard drive? Why is this so frustrating? It's frustrating because it restricts our ability and prevents us from managing our external hard drives. Don't worry. We're going to reveal some common reasons so you have to take measures to avoid this intimidating issue in the future. For a better understanding, here are some common causes/reasons:
Infected by Unknown Viruses or Malware
External hard drives are susceptible to the infiltration of viruses or malware, resulting in unexpected write protection. These malicious elements embed themselves within the drive's files, initiating unauthorized access and inhibiting write functionality.
Incompatible Disk Format
Write protection can arise when the external hard drive's format doesn't meet the system's requirements. This often occurs due to disparities between different operating systems or errors in the formatting process.
Accidentally Turned On Physical Switch
Many external hard drives feature a physical switch to prevent accidental data overwriting. However, unintentionally activating this switch can inadvertently enable write protection.
Limited Write Times
Some external hard drives, particularly Solid State Drives (SSDs), possess a finite number of write cycles. Once this limit is reached, the drive engages write protection to extend its lifespan.
Conclusion
Navigating the complexities of external hard drive write protection might seem like a puzzle, but worry not – use the above effective methods to erase write protection from the user-friendly prowess of EaseUS Partition Master, the simplicity of switching off the physical lock, the prowess of Diskpart's command-line magic, or the vigilance of antivirus software.
So, whether it's a lurking virus, an accidental hardware switch, or a compatibility problem, this guide arms you with the knowledge to conquer each obstacle. Don't let write protection hold your data hostage any longer.
Among these solutions, one tool stands tall – EaseUS Partition Master. Its simplicity and effectiveness have proved itself as a go-to option. This powerful software removes write protection and extends its hand to offer various storage management features. Why not let EaseUS Partition Master be your first defense against the write protection problem? Give it a try!
FAQs About How to Remove Write Protection From External Hard Drive
If you have any queries about removing write protection from an external hard drive, please find answers here:
1. How to enable write protection on a USB?
There are multiple ways to enable write protection on a USB. We'll guide you through DiskPart. Follow these steps to enable write protection on your USB:
Step 1. Launch DiskPart, type list disk, and hit Enter.
Step 2. Use the "select disk" command to select your USB flash drive; if it's disk 1, type "select disk 1".
Step 3. Use the command "attributes disk" to display the disk's attributes.
Step 4. Use the command "attributes disk set readonly" to enable the read-only attribute and make a USB write-protected. Once done, type "exit" to close the DiskPart.
2. How to make the external hard drive write-protected?
If you want to make your external hard drive write-protected, the steps are similarly covered above in the first question. Insert your external hard drive into the computer, then use DiskPart. For detailed steps, please refer to the first question.
3. How to format a write-protected external hard drive?
If your external hard drive is write-protected, you must disable the write protection, whether Registry Editor or Command Prompt. We mentioned five different ways step-by-step. Whatever method suits you better, you can remove write protection first. Without turning off the write protection, you can't format it. Follow the steps to format a write-protected external hard drive:
Step 1. After removing the write protection by following the above ways, you must open File Explorer.
Step 2. Find the external hard drive, right-click on it, and click "Format" from the dropdown options.
How Can We Help You
About the Author
Sherly joined EaseUS in 2022 and she has always loved writing articles and enjoys the fun they bring. She receives professional training here, focusing on product performance and other relative knowledge. She has written over 200 articles to help people overcome computing issues.
Roxanne is one of the main contributors to EaseUS and has created over 200 posts that help users solve multiple issues and failures on digital devices like PCs, Mobile phones, tablets, and Macs. She loves to share ideas with people of the same interests.
Product Reviews
-
I love that the changes you make with EaseUS Partition Master Free aren't immediately applied to the disks. It makes it way easier to play out what will happen after you've made all the changes. I also think the overall look and feel of EaseUS Partition Master Free makes whatever you're doing with your computer's partitions easy.
Read More -
Partition Master Free can Resize, Move, Merge, Migrate, and Copy disks or partitions; convert to local, change label, defragment, check and explore partition; and much more. A premium upgrade adds free tech support and the ability to resize dynamic volumes.
Read More -
It won't hot image your drives or align them, but since it's coupled with a partition manager, it allows you do perform many tasks at once, instead of just cloning drives. You can move partitions around, resize them, defragment, and more, along with the other tools you'd expect from a cloning tool.
Read More
Related Articles
-
Does Deleting a Partition Erase All the Data? | Solid Way to Recover
![author icon]() Roxanne/2024/04/19
Roxanne/2024/04/19 -
5 Ways to Reset Windows 7 Password | Quick & Easy
![author icon]() Cici/2024/04/19
Cici/2024/04/19 -
How to Burn Windows 7 ISO to USB [Step-by-Step Tutorial]
![author icon]() Sherly/2024/04/19
Sherly/2024/04/19 -
How to Create EaseUS Partition Master Bootable USB
![author icon]() Daisy/2024/04/19
Daisy/2024/04/19
Hot Topics in 2024


EaseUS Partition Master

Manage partitions and optimize disks efficiently