How much do you know about data recovery? To begin with, let me share some statistics in the data recovery industry - Nearly one of the two (46%) users will lose data each year. Asking for the leading causes of data loss? Why not take a close look at the graph?
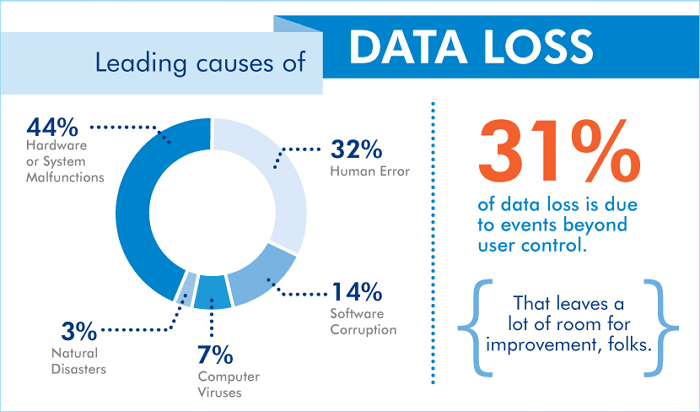
Yes, you didn't see it wrong. Among the collected data, the statistics distribution is:
You know what? 50% of hard drives die within 5 years. It's no doubt that hardware failure/corruption becomes the main cause of losing computer data.
You won't be unfamiliar with human error because you're a human! Human error can be avoided in most situations, but it just happened beyond your expectation. File deletion, 60% of the human error, is a long-lasting topic that is associated with every type of device: a computer, Mac, SSD, an external hard drive, a USB flash drive, camera, an SD card, and many innovative storage devices in modern society: CCTV, dashcam, flying drone...
From the graph, you can see that software corruption also leads to data loss, and it's still happening to us every year. The lost files can be your Word documents, Keynote presentations, Excel worksheets, graduation papers, working contracts, and hardworking designs on Photoshop, Adobe, or Indesign. Won't you feel heartbroken if any of the files were unsaved and deleted by software problems? Besides, the annual statistics of households experiencing theft are 15%, and ransomware has now become the king of the viruses group that deletes files!
Ⅰ. Why Do We Focus on Mac Deleted File Recovery
Based on the unbiased data loss statistics, Windows victims are undoubtedly larger than Mac users due to the dominant Windows operating system's market share. Nevertheless, the Mac devices market share has kept growing in recent years, and it's still the mainstream device with a unique design and uncomparable user experience, particularly for designers from all walks of life.

In addition, it's because the Apple system security rule is tougher than ever for most data recovery software for accessing the system drive since the introduction of the M1 chip and the recently released MacBook Pro 13 and MacBook Air supercharged by the M2 chip. Unless they rely on Trash, it becomes more and more difficult for Mac M1 & M2 users to retrieve their valuable files. That's why we want to help in this post.
Ⅱ. How to Understand "Delete" on Mac
There are defacto solutions to solve a Mac losing files problem, but the best way to retrieve files should be the most suitable one for you, with the least cost and effort to make it. First of all, let's figure out how you deleted a file. Here, the "File" is a general term that can refer to all types of files with various extensions on your Macbook or iMac: Documents (DOC, DOCX, PPT, PPTX, TTF, XLS, XLSX...); Images (AI, BMP, C4D, CR2, DJVU, ICO, JP2, JPG, NEF, PNG, PSD, SVG, TIFF, WMF); Video (3G2, AVI, CRM, FLV, M4V, MKV, MOV, MP4, MPG, OGM, RM, WebM, WMV); Archives and Audio...
Know [Trash] or [Bin]
Formerly called Trash and later Bin, this is the Windows Recycle Bin feature on Mac. It's a place to store a temporarily removed file item on either a Mac internal hard drive or an external flash drive, HDD, or camera SD card. Here, the "temporarily" is opposite to "permanently", which we'll compare the two manners of deletion in the next paragraph.

By which means of deletion will send files to Trash, or Bin
- Drag items to the Trash in the Dock
- Select items and then press Command+Delete
By which means of deletion will bypass Trash Bin, i.e. permanently delete a file
- Select the file and press Option+Command+Delete on your keyboard, and click Delete on the prompt that appears
- Apply the Delete Immediately option
- Click the Empty Trash button
- Enable the option "Remove items from the Trash after 30 days" in Finder Preferences

Ⅲ. Where Do Deleted Files Go on Mac
A not concise explanation: When you delete a file on your Mac, it doesn't immediately disappear from your machine. Instead, it's moved to the Trash, where it will stay 30 days until you empty the Trash. This is why you may sometimes see files that you've deleted reappear in the Trash when you open it.
But that's not all the truth. As mentioned above, permanently deleted files will bypass the Trash folder and completely vanish from your sight.
Nonetheless, such a permanent deletion doesn't have to be a "real" once for all behavior. Removed files don't go anywhere. When you permanently delete a file, the pointer or the link to access the file is lost. So what we lost at the first step is the file pointer on its location. The file content is still intact on the storage media. But this area will be marked as "vacant", which allows us to write new data to overwrite the "removed" data. Thus technically speaking, deleted files that have not been overwritten yet have a chance of full recovery, only with the right tools and right methods.
Knowing the file deletion basics is quite important for Mac users who are now experiencing a heartbreaking moment of losing a priceless file. Now you can step further with confidence and get ready to recover deleted files on Mac!
Ⅳ. Mac Trash Recovery: Recover Deleted Files from Trash (Not Emptied)
From Part Ⅲ, you know that Mac deleted files will only stay in Trash for 30 days. So, if the files you want to recover are deleted within 30 days, and you have not emptied the Trash yet, you just need to put the wanted files out of it. Here are the methods you can use.
#1. Drag and Drop
(Recover files anywhere you like.)
Step 1. Open Trash from the Dock.
Step 2. Search if the files you want to recover are in the Trash. If they are, locate and select them.
Step 3. Drag the selected items and drop them out of the Trash, such as on the desktop, you're recovering those files successfully.
#2. Recover with Put Back Option
(Recover files to the original location)
Another common method you could try is using the "Put Back" option in Trash. This feature is designed for users to regret.
Step 1. Open Trash from the Desktop or Dock.
Step 2. Locate the file you want to recover, right-click it, and select "Put Back".

Step 3. The chosen file will be restored to its original destination.
When we talk about recovering deleted Mac files from Trash, it usually means recovering content in internal drives. Mac has created a hidden Trash folder called ".Trashes" for external devices. Set your Mac to show the hidden files and folders, then open the ".Trashes" folder and use the same procedure outlined above for your Mac's main Trash to recover external device deleted content.
LEARN MORE
It's easy to put a file into Mac Trash and recover it by using the "Put Back" option. What other do you know about Mac Trash? Do you know that you could use the shortcut to move a file to the Trash? For more information about Trash, click here to learn to recover emptied Trash on Mac.
Ⅴ. How to Recover Permanently Deleted Files from Mac (with Software)
As mentioned above, once the files in Mac Trash are expired or emptied the Trash, you permanently lose the deleted files. Other delete methods such as deleting using Terminal or keyboard shortcuts will also lead to permanent data loss. macOS doesn't take this data loss scenario into data recovery consideration. If you need to recover something that seems to be gone forever, you can only rely on third-party recovery tools.
EaseUS Data Recovery Wizard for Mac is the tool we use in this part. Don't worry if you're a novice or you have never tried to recover files by yourself. Here we will show you how to use this tool to perform a deleted data recovery step by step.
Note: You can create a backup of your Mac by clicking the "Disk Backup" on the left first. The software will recover the deleted files from the backup image. It can prevent further damage to your disk and data, making it safer and more reliable.
Step 1. Select the location and scan
Launch EaseUS Data Recovery Wizard for Mac and choose the disk where you lost data. Then, click "Search for lost files" to start scanning.

Step 2. Filter and preview lost files
After the scan, use the file format filter on the left or upper right corner to find the deleted files you need.

Step 3. Recover lost data or files
You can double-click a file to preview its content, or choose multiple files to recover them at once. Click "Recover" to restore the lost data to a local or cloud drive.

Congratulations! Now you have successfully saved your permanently deleted files! This method also works when you want to recover deleted files on Mac without Time Machine.
LEARN MORE
With EaseUS Data Recovery Wizard for Mac, you are able to recover permanently deleted files. We have provided you with further free and paid solutions in this recommended article. Click here to learn about how to recover permanently deleted files on Mac.
Since macOS X 10.10.4, Apple added a command called trimforce, allowing Mac users to enable TRIM on SSDs. Once allowed, whenever you delete a file on your SSD drive (Mac system drive), the TRIM command tells the SSD that specific areas contain no longer used data.
Normally, when data is deleted from a hard drive, the data is not accessible, but it remains on the physical drive. Only once the space needs to be used for other information will the data block be wiped, then rewritten. Via TRIM, the data block is wiped immediately upon deletion. This means it will be more difficult to recover accidentally deleted files from a TRIM SSD.
Now, most Mac computers are TRIM-enabled by default. For much third-party data recovery software, how to maintain the data recovery rate on a Mac with TRIM turned on is a severe test. Luckily, most of the software performs great when recovering files from an external device. If you're interested in how to recover lost data on a TRIM-enabled SSD, click here to learn about SSD TRIM data recovery.
Ⅵ. Recover Deleted Files from Mac Without Software
With a third-party data recovery tool, you are more likely to recover the data that you lost by accident. To explain further, in the absence of backup, the data itself or the disk storing the data was accidentally damaged. For example, your Mac drive is formatted or erased by mistake, or your drive is damaged, all of which are called "accidental data loss".
You can use the following alternative methods to recover permanently deleted files from Mac without software.
Method 1. Recover Deleted Files Using Terminal
(Only recover files from Mac Trash)
The Mac Terminal is a command-line interface for the macOS. Mac Terminal is typically used by network administrators and advanced technical users who want to initiate an action that is not supported by the operating system's graphical user interface.
You can recover permanently deleted files in Mac Terminal, but this method can only use to recover deleted files from Mac Trash. Follow the steps below one by one, and you can't go wrong.
Step 1. Go to "Applications" > "Utilities" > double-click on "Terminal" to open the application.
Step 2. Type in the following Terminal command: cd Trash, then hit "Return".
Step 3. Type mv xxx ../. Replace the "xxx" part with the full name of the file you deleted. Hit the "Return" key.
* This step is very important! You have to type the full name of your deleted file!
Step 4. Type Quit in the Terminal window.

Step 5. Launch the "Finder" window. Enter the deleted files' names in the search bar at the top right of the window to find the restored files.
Method 2. Recover Deleted Files from Time Machine
(Only if the deleted files were backed up before)
When you have the habit of regularly creating backup files, using third-party software is not the only way that you can get your data back. On macOS, the built-in backup utility is Time Machine. Apple suggests users prepare a spare external hard drive as the backup drive. You could back up both the files and the OS with Time Machine. If your lost files are backed up before, restoring the backup file can also save you from the dilemma. In the following content, we will show you how to restore files from Time Machine.
Step 1. Connect your Time Machine backup disk to your Mac.
Step 2. On your Mac, open a window for the item you want to restore.
For example, open the Document window if the deleted file was in the Document folder. If the deleted file was on the desktop, then you don't need to open any window.
Step 3. Click the Time Machine icon on your menu bar. If there is no icon, choose Apple menu > System Preferences, click Time Machine, then select "Show Time Machine in menu bar".
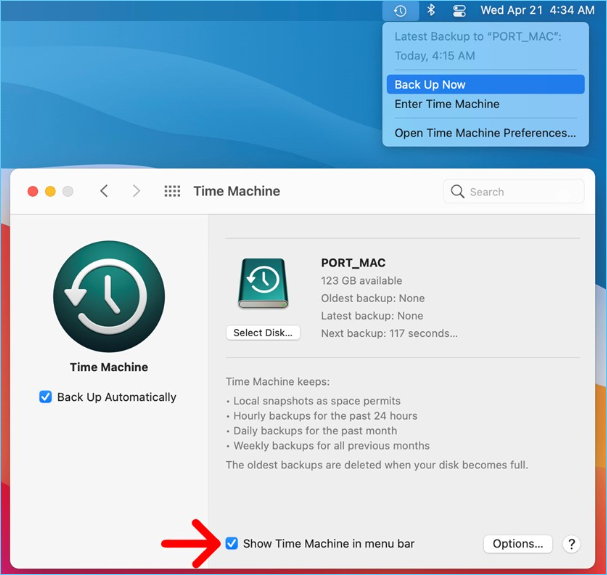
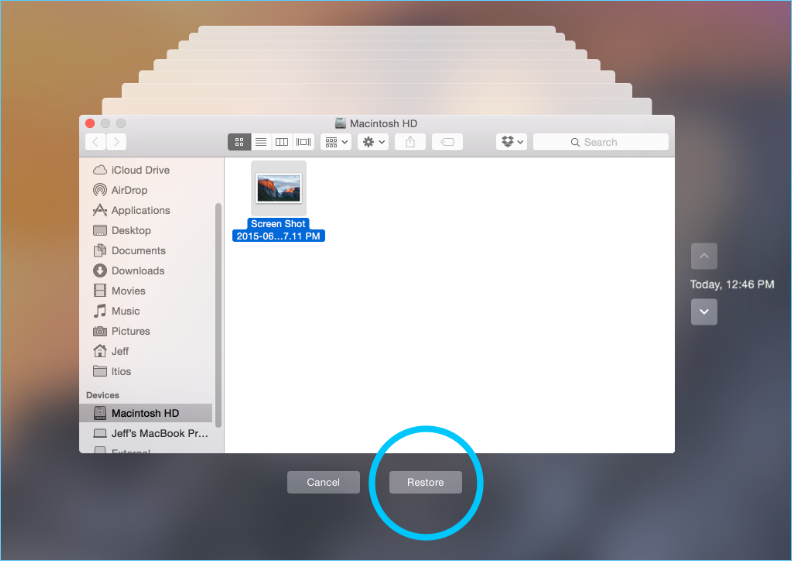
Step 4. Use the arrows and timeline to browse the local snapshots and backups, and select the one that contains your deleted files.
Step 5. You could select one or more items you want to restore (these can include folders or your entire disk), then click Restore. The restored file will go back to its original location.
LEARN MORE
In this part, we only introduce how to restore files with Time Machine. If you want to restore other backup content, such as the OS, click here to learn about the Time Machine data recovery guide.
Ⅶ. Recover Deleted Files with Data Recovery Service
When seeing this title, you may ask why I need a data recovery service? What can I get from a data recovery service? In general, manual data recovery services are designed to help users with more severe data loss issues such as reformatted drives, RAW disks, lost partitions, failed repartitions, system startup errors, and corrupted virtual disks. With this cost-efficient one-on-one manual recovery service, you can consult with experts and get a customized data recovery plan.
EaseUS manual data recovery service is one of the fastest and safest options to enjoy complete data recovery anytime, anywhere. Since 2004, it has been committed to providing users with high-end expert data recovery services. The platform has a team of highly qualified and experienced professionals who have summed up their experience in the form of the perfect tool.

Consult with EaseUS data recovery experts for one-on-one manual recovery service. We could offer the following services after FREE diagnosis
- Repair corrupted external drive, unbootable macOS, and corrupted files
- Recover/repair lost partition and re-partitioned drive
- Unformat hard drive and repair raw drive
- Fix disks that are unmountable
Ⅷ. Data Recovery Comparison: Which Way is Better?
As you can see, there are various solutions for users to perform a Mac data recovery. But what is the best way and which one is better? Here we have made a table comparing some of the common recovery methods. Check to learn more about data recovery choices.
| Comparison | Recovery Content | Cost | Time | Success Rate | Difficulty |
|---|---|---|---|---|---|
| Recover from Trash | Only files in Trash | Free |
30s |
★★★☆☆ |
★☆☆☆☆ |
| Recover with Terminal | Only files in Trash & Emptied Files |
Free |
2-3mins |
★★☆☆☆ |
★★★☆☆ |
| Recover from Time Machine | Only backed-up files |
Free |
15mins+ |
★★☆☆☆ |
★★★☆☆ |
| Recover with Data Recovery Software |
Everything scanned |
Within $100 |
15mins+ |
★★★★☆ |
★★☆☆☆ |
| Data Recovery Service |
Everything examed |
Charge by hour |
1 hour+ |
★★★★☆ |
★★★★★ |
The comparison chart shows that although the Mac built-in recovery utilities are easy to operate and free to use, they have too many limitations and can't help you recover all deleted files. While the manual data recovery service is too expensive and only works if the data is severely corrupted. For common personal users who want to recover lost data, the best choice is the data recovery software.
Have no idea about the features, pros, and cons of so many data recovery software on the market? Click here to learn about the best free Mac data recovery software in 2022.
Frequently Ask Questions
1. How can I recover permanently deleted files from Mac without software?
You can use two ways to recover permanently deleted files: one is to recover with the command line in Terminal, and the other is to restore from Time Machine backup. With Mac Terminal, you can only recover the Mac internal drive deleted files and the files emptied from Trash. While the Time Machine only contains the files you choose to back up.
2. Are files permanently deleted from Mac?
When deleting files on Mac, those files will be first removed and stored in the Trash for 30 days. So within the 30-day limitation, those files are not permanently deleted. You can recover deleted files from Trash. But if you empty the Trash, now the deleted files are permanently lost. However, permanently deleted files do not mean they are permanently lost. You can recover them with data recovery software like EaseUS Data Recovery Wizard for Mac.
3. What is the best data recovery program for Mac?
Here we list the five most common free Mac data recovery software:
1. EaseUS Data Recovery Wizard for Mac Free
2. Disk Drill
3. PhotoRec
4. TestDisk
5. Exif Untrasher
4. Where can I find deleted files on Mac?
On your Mac's desktop, you can see there's a Trash icon on the dock. Double-click it to open the Trash, and you can see all the deleted files on Mac.
5. How do I recover recently deleted files on Mac?
- 1. Open Trash on the Mac desktop.
- 2. Search the file name of your recently deleted content in Trash.
- 3. Right-click the file you want to recover, and click the "Put Back" option.
- 4. The file you delete will be restored to its original place.
6. Is there a way to recover emptied Trash on macOS?
Yes! Once emptied Mac Trash, stop using your Mac right away. Then download and install a data recovery software such as EaseUS Data Recovery Wizard for Mac, scan your Mac system drive and see if the emptied files are in the scanning result.
7. Does Apple have data recovery software?
No. You can only recover deleted files from Trash, Time Machine (only if the deleted files were backed up before), or use the third-party data recovery software.
8. How do I undo a delete in Terminal Mac?
- 1. Go to "Applications" > "Utilities" > double-click on "Terminal" to open the application.
- 2. Type in the following Terminal command: cd .Trash then hit the "Return".
- 3. Type: mv xxx ../. Replace the "xxx" part with the full name of the file you deleted. Hit the "Return" key.
- 4. Type Quit in the Terminal window.
- 5. Launch the "Finder" window. Enter the deleted files' names in the search bar at the top right of the window to find the restored files.
Was This Page Helpful?
Cedric Grantham is a senior editor and data recovery specialist of EaseUS. He mainly writes articles and how-to tips about data recovery on PC and Mac. He has handled 10,000+ data recovery cases and is good at data recovery of NTFS, FAT (FAT32 and ExFAT) file systems, and RAID structure reorganization.
Jean is recognized as one of the most professional writers in EaseUS. She has kept improving her writing skills over the past 10 years and helped millions of her readers solve their tech problems on PC, Mac, and iOS devices.
Related Articles
-
The Best Photo Recovery App/Software for Any Device
![author icon]() Brithny/Jul 20, 2023
Brithny/Jul 20, 2023 -
Word Recovery for Unsaved, Deleted, and Corrupted Word Documents [Professional Guide]
![author icon]() Cedric/Jan 09, 2024
Cedric/Jan 09, 2024 -
Chrome History: How to View, Delete, and Recover
![author icon]() Brithny/Feb 21, 2024
Brithny/Feb 21, 2024 -
Fix Hard Disk Not Detected/Recognized on Windows 10
![author icon]() Brithny/Nov 29, 2023
Brithny/Nov 29, 2023