Featured Articles
- 01 Forgot to Save Word Document
- 02 Recover Unsaved Word Document in Windows 10
- 03 Recover Unsaved Word on Mac
- 04 Turn Off Autosave
- 05 Recover Delete Word Documents
- 06 Word Found Unreadable Content
- 07 Microsoft Office Has Stopped Working, Crashing, or Freezing
- 08 Word Text Recovery Converter
- 09 Repair Corrupted Word Online
- 10 Best Word Repair Tool
How to recover unsaved Word documents on Mac
First, launch the Microsoft Word Mac version. Next, select the "File" tab and select "Manage Document" from the drop-down menu, then click "Recover Unsaved Documents". A window will show up and display a list of documents that have not been saved yet.
Accidentally close a Word document (.doc or .docx) without saving it on Mac? This post will discuss the unsaved Word document recovery on a Mac. Check out 5 proven methods about how to recover unsaved Word documents on a Mac:
| Word document loss scenario | Ways to recover |
| ✅Word shut down without saving on Mac. I need to recover the unsaved Word document on Mac without AutoRecovery. | Unsaved Word document recovery on Mac with file recovery software |
| 🔃My Mac shut down and restarted. Word didn't save my changes, and I lost my Word document. | Recover unsaved Word files on Mac with AutoRecovery |
| 👊Word crashed and didn't autosave on Mac. | Unsaved Word document recovery on Mac in Mac Terminal |
| 📗Accidentally closed Word without saving it on Mac. | Recover unsaved Word documents on Mac from Recovered Item |
| 🚩I deleted Microsoft Word documents by mistake and emptied the Trash later. How to get back my lost Word files | Recover deleted Word on Mac with the EaseUS file recovery tool |
If the built-in features of Microsoft Office can't recover unsaved documents on a Mac, don't be discouraged; you can still use the EaseUS document recovery tool to restore unsaved Word documents efficiently.
Unsaved Word Document Recovery on a Mac with Software🔥
Reliable Mac data recovery software - EaseUS Data Recovery Wizard for Mac upgraded with an unsaved document recovery feature that supports recovery of unsaved Word documents on a Mac with only a few clicks:
You Can Trust EaseUS Data Recovery Software
EaseUS Data Recovery Wizard has acquired an extensive technical base in data recovery and trusted by billions of users since 2005. Check out reviews on Trustpilot.
Download the trusted EaseUS file recovery tool and follow these steps to recover Word documents that are unsaved or lost from your Mac.
- Step 1. Launch EaseUS Data Recovery Wizard for Mac. Choose the disk where you lost an unsaved Word document, and click "Search for lost files".
- Step 2. On the left side of the scan results window, click "Type > Unsaved Documents". Use filters to choose Word doc files, and you can recover unsaved Word documents or other files on your Mac.
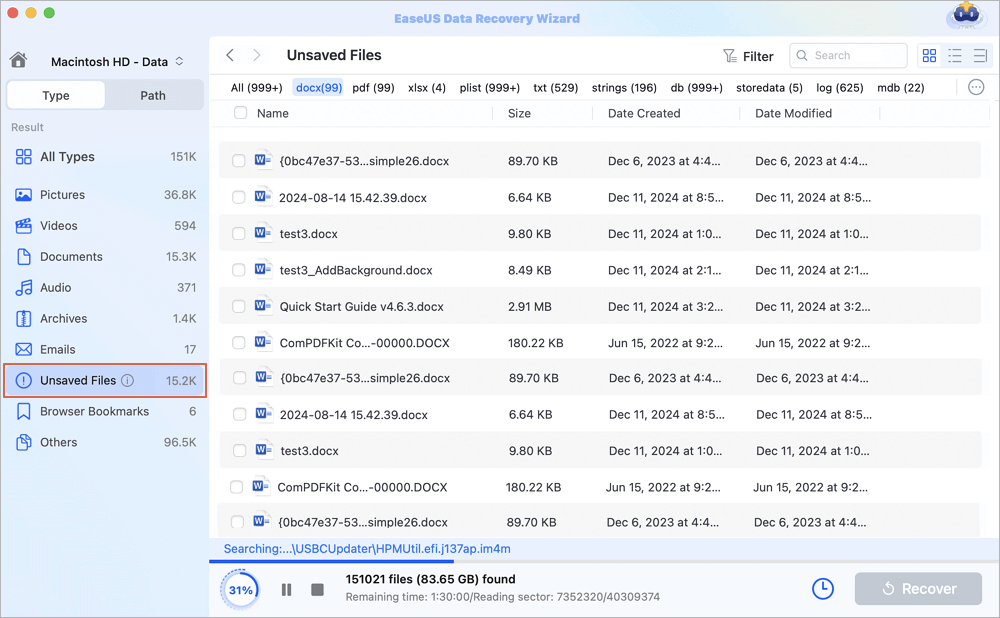
- Step 3. Double-click to preview the selected lost Word files. Then, click "Recover" to recover unsaved Word documents on Mac without auto recovery.
Note: Be careful not to revert to the original location, as this may overwrite the file being recovered.
If this Mac data recovery program helps you restore the original Word document on Mac, don't forget to share it with your SNS.
Video Tutorial to Recover Unsaved Word on a Mac
Embedded with more useful features in certain collaborative situations than recovering pages of documents, Microsoft Word has become increasingly popular among Mac computers. Office 365 even allows users to create Word files on their Mac. Based on this, more and more Mac users are searching for ways to perform unsaved Word document recovery on a Mac.
We provide you with a video tutorial on Mac unsaved Word document recovery.
- 00:37 - AutoRecovery file location on Mac in Word
- 02:04 - Recover Doc from TMP Folder
- 03:06 - Recover Doc from Mac Trash
- 03:39 - Mac Recovery Software

Suppose you don't like to use a file recovery program; the three ways below allow you to recover Word on a Mac without software. Based on the features of Microsoft Word for Mac, there are three potential ways to recover unsaved Word documents after accidentally clicking Don't Save in Word.
Microsoft Word offers standard DOC or DOCX file formats that are compatible with almost every OS platform. Word 2022, 2020, 2019, 2018...2011 featured auto-saving, which enables us to recover a Word document before we could hit Save. In this article, you will learn four ways to recover Word documents that are not saved when Word is not saving on a Mac.
Unsaved Word Document Recovery with AutoRecovery
Word for Mac includes an AutoSave option, which is turned on by default. The app automatically saves a copy of an open Word file every minute. Suppose Word freezes while you're working on a document or the computer crashes, so you lose the Word document on your Mac.
In that case, you can use the AutoRecovery copy to recover an unsaved Word document with the changes or additions you made in your last Word:
How to recover unsaved Word docs with AutoRecovery
- Step 1. Open Finder on your Mac.
- Step 2. Select Go from the top Finder menu. Then, go to Folder.
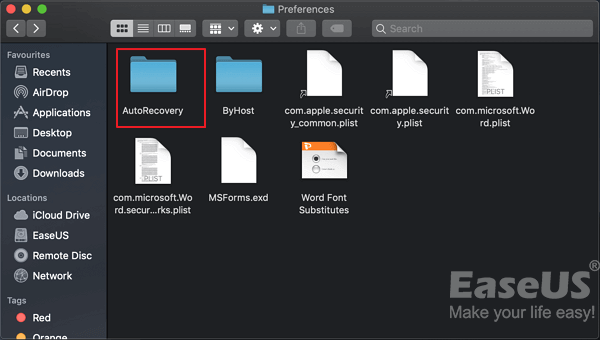
- Step 3. Type: ~/Library/Containers/com.microsoft.Word/Data/Library/Preferences/AutoRecovery and hit Enter.
- Step 4. Open the AutoRecovery folder, and locate the files that start with the words "AutoRecovery save of". Find the one you want to recover.
- Step 4. Double-click the file. The document now opens in Word for Mac. Click the File menu and select "Save As".
Recover Unsaved Word Documents on a Mac from the TMP Folder
According to the unique features of Microsoft Word for Mac, you may find the unsaved item in the AutoRecovery or Word Temporary files folder, which saves a copy of the unsaved document named Word Work File. Your Mac also temporarily keeps files in this temporary folder. However, it's not easy for many Mac users to find it.
Steps to recover lost Word documents on Mac by finding Word temporary files on Mac with Terminal:
- Step 1. Go to "Applications > Utilities" and double-click "Terminal".
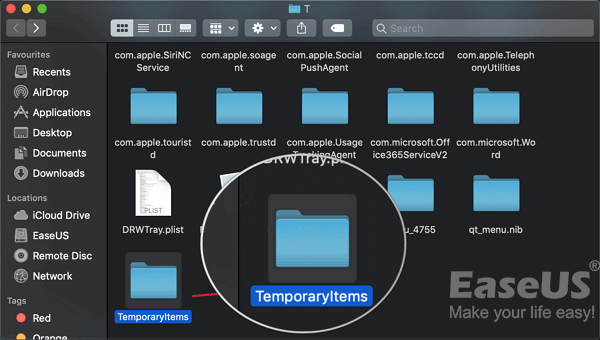
- Step 2. In Terminal, enter open $TMPDIR, and you will be directed to the TMP folder, which keeps files temporarily.
- Step 3. In the TMP folder, find and open the "TemporaryItems" folder. Right-click the desired Word files in it and "Open with..." Microsoft Word.
- Step 4. Save the Word file by clicking on "File > Save As" and save it to another location.
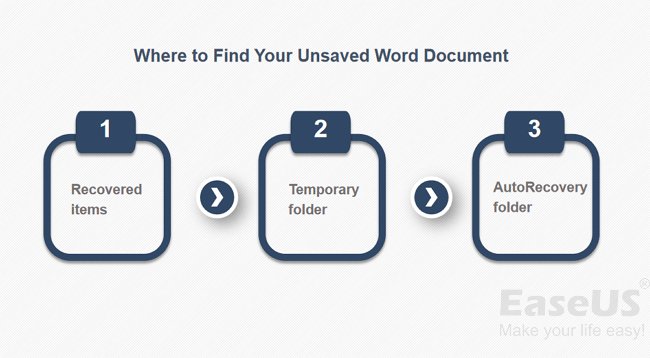
Find an Unsaved Word Document on a Mac from Recovered Items
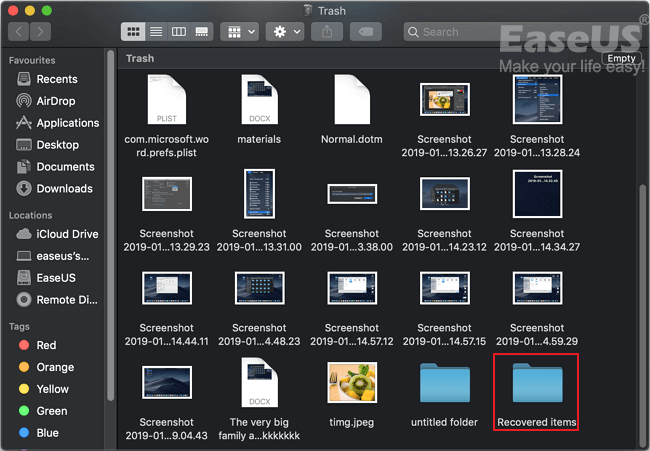
The Word for Mac temporarily saves documents that the user has not yet saved themselves in a folder named "Recovered items" in the Trash. If there are no recovered files, this folder will not appear.
Steps on how to find unsaved documents on Mac:
- Step 1. Open "Trash" by clicking its icon on the dock.
- Step 2. Look for a folder labeled "Recovered items" and click into it to look for your Word file. If you cannot find it, try the next solution.
How to Recover Deleted Word Documents with Software
If you lost a Word document that already existed by deletion, disk formatting, or lost documents because the documents folder is missing on a Mac, you must turn to the EaseUS document recovery tool to recover the original Word document on a Mac.
EaseUS Data Recovery Wizard for Mac is a specialized Mac data recovery software that can recover emptied trash on a Mac, including your deleted Word documents. In addition, it can help you recover previous versions of Word documents on a Mac, so you never worry about deleting your Word documents by mistake!
Here are the steps to recover deleted Word documents on your Mac:
Note: You can create a backup by clicking the "Disk Backup" on the left first. The software will recover the document from the backup image. It can prevent further damage to your disk and data, making it safer and more reliable.
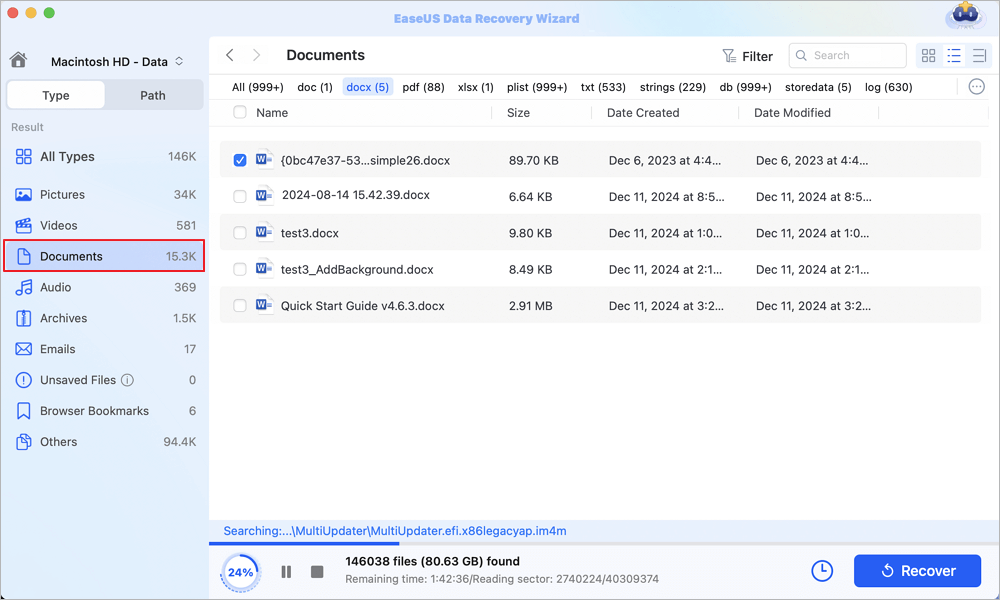
Step 1. Scan for lost documents
Select the location where your important Word/Excel/PPT/Numbers/Pages documents were lost and click "Search for lost files".

Step 2. Find lost documents on Mac
EaseUS Data Recovery Wizard for Mac will immediately start a scan on your selected disk volume. Meanwhile, the scanning results will be presented in the left pane. Select "Documents" and you can quickly filter the DOC/PDF/PPT/XLS files you've lost earlier.
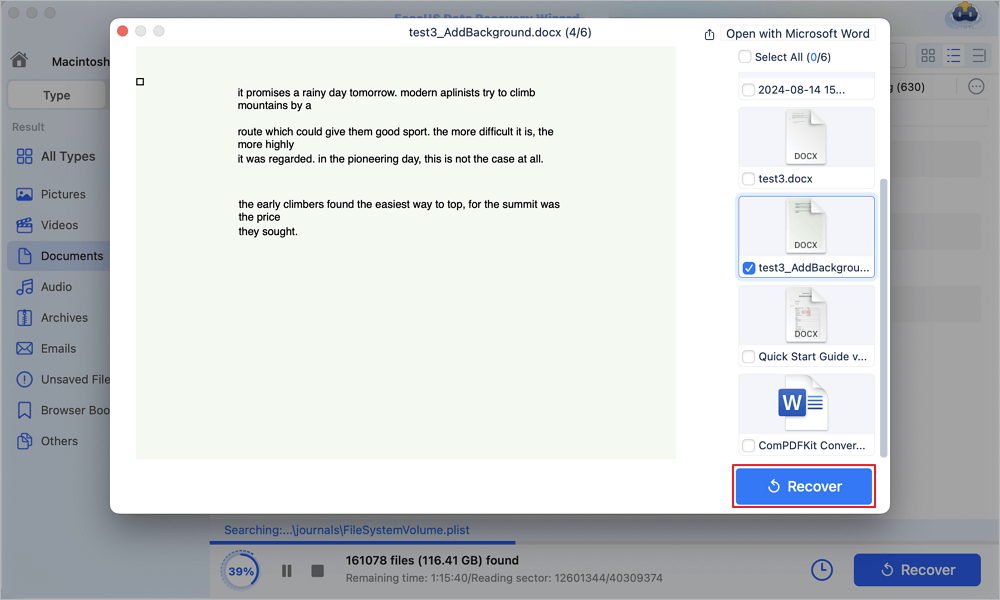
Step 3. Recover lost/deleted documents
Select the target files and preview them by double-clicking them. Then, click "Recover" to get lost documents back at once.
If you found this method helpful enough to recover accidentally deleted Word documents, share it with your friends on Twitter, Facebook, or Instagram!
How to Increase the Chance of Unsaved Word Document Recovery
After suffering from the fear of losing your Word documents, you must not want to experience this kind of situation again. Thus, it's necessary for you to know how to avoid losing Word files. To avoid completely losing your files, you can:
Tip 1. Save the Word Document Whenever You Create a New One
An ever-unsaved Word document exists in the computer's RAM, not on the hard disk. Thus, the chances of saving a Word Document that has never been saved before are slim. Knowing this should give you a hint that you should save the Word document at least once whenever you create a new one.
Tip 2. Change the AutoSave Interval
After you save your Word document, the AutoSave feature will work. To minimize the loss of progress on the file you are working on, you can change the frequency of AutoSave:
Step 1. Open Microsoft Word on your Mac.
Step 2. Go to "Word > Preferences" and click "Save" under Output and Sharing.
Step 3. Check all the items under Save Options (Recommended) and change the interval of AutoSave, for example, from every 10 minutes to every 5 minutes.
Following the two tips above will substantially decrease the risk of losing your Word documents. What if you carelessly deleted your important Word files on your Mac? No worry. Try the free method to retrieve permanently deleted Word documents with EaseUS Data Recovery Wizard for Mac.
Recover Unsaved Word Docs on a Mac FAQs
Don't worry if you still have problems on how to recover deleted Word documents or unsaved Word pages on macOS. Read the questions and answers below to get additional help.
1. How to recover unsaved Word documents on Mac without Autorecovery?
There are at least two ways to recover unsaved Word files on a Mac. You can use data recovery software to restore unsaved documents or use Time Machine backup. To restore unsaved documents on Mac with Time Machine:
- Connect the drive containing your Time Machine backup to your Mac.
- Click the Time Machine icon and choose Enter Time Machine.
- Open the folder where the document should be located.
- Use the arrows on the right side to choose the needed backup version and search for the lost file.
- Click the needed Word document and click Restore.
2. Can I recover a Word document I didn't save on Mac?
Yes, you can recover an unsaved document as long as other files don't overwrite the Word.
Open its current version and then click Version History to find the earlier version. Try Time Machine or EaseUS Data Recovery Wizard for Mac if this operation fails.
3. Where do I find Autorecover files in Word for Mac?
The AutoRecovery files are in a hidden folder on your Mac. Thus, it is impossible to find such files by simply navigating through Finder. To find the Word documents on your Mac, head to Go > Go to Folder and enter this folder path (replace username with your username):
Users > username > Library > Containers > com.Microsoft > Data > Library > Preferences > AutoRecovery
4. Can I recover an overwritten Word document on a Mac?
Yes, there are multiple ways to recover replaced Word documents on Mac:
- Use Time Machine backup
- Turn to iCloud backup
- Run data recovery software
Was This Page Helpful?
Brithny is a technology enthusiast, aiming to make readers' tech lives easy and enjoyable. She loves exploring new technologies and writing technical how-to tips. In her spare time, she loves sharing things about her game experience on Facebook or Twitter.
Written by Tracy King
Tracy became a member of the EaseUS content team in 2013. Being a technical writer for over 10 years, she is enthusiastic about sharing tips to assist readers in resolving complex issues in disk management, file transfer, PC & Mac performance optimization, etc., like an expert.
Related Articles
-
How to Recover Deleted Messages on MacBook Air [with 3 Proven Methods]
![author icon]() Brithny/Feb 26, 2024
Brithny/Feb 26, 2024 -
Recover Files from M1 Mac [Apple Silicon M1 Mac Data Recovery]
![author icon]() Dany/Feb 26, 2024
Dany/Feb 26, 2024 -
Mac Won't Boot into Recovery Mode Fixes | Mac Command R Not Working Solutions
![author icon]() Jean/Feb 23, 2024
Jean/Feb 23, 2024 -
External Hard Drive Not Showing Files Though They Still Exist Mac [4 Fixes]
![author icon]() Jean/Feb 26, 2024
Jean/Feb 26, 2024