- Video Recovery
- SD Card Recovery
- Recycle Bin Recovery
- Recover Data from USB
- Recover Deleted Emails
- Hard Drive Not Showing Up in Windows
- Recover Unsaved Word Documents
- Recover Deleted Files in Windows 10
- Recover Files from Virus Infected Hard Drive
- Best Free Photo Recovery Software
- Recover Files from Formatted Hard Drive
Why Your Internal Hard Drive Not Showing Up on Mac
Every Mac comes with a hard drive that stores all the user data, media content, and programs on your computer. Usually, your hard drive is the startup disk which contains the macOS base system data. However, you can tweak your Mac to start from a network disk or external drive. If you encounter the internal hard drive not showing up on Mac issue, you will be unable to access or use the information stored on the device. Even worse, your computer may not even start up as it should.
You will experience either of two main reasons when your hard drive does not show up on your Mac computer. In the first case, it will not show up on starting up (Mac no startup disk error). As for the second, the hard drive will not display in the Finder/Desktop window.
There are a few possible reasons behind this. For instance, it could arise from physical damage to your hard drive. Power surges can cause this, with more power than the disk can withstand frying it. On the other hand, you may encounter your Macintosh HD not showing in the Finder window if you don't configure the correct settings.
How to Rescue Data from Internal Hard Drive on Mac with Software
The internal hard drive not showing up on the Mac issue can leave you distraught and paranoid. Nobody wants to lose valuable data, but you may be forced to face that possibility if the potential fixes don't work. Your Mac may not boot when you encounter internal hard drive issues.
Thankfully, there is a way out in the form of professional recovery software for Mac computers - EaseUS Data Recovery Wizard for Mac. From partition losses to formatting, system crashes, virus attacks, unmounted drives, and even data lost to hard drive damage, the all-in-one tool is versatile enough to ease your frustrations.
This tool will help you recover lost data when trying to fix corrupted hard drive on Mac or after formatting the hard drive. You can recover deleted files on Mac with ease by using this powerful recovery tool.
An array of advanced features, including Scan Mode, File Preview, and Recover to Cloud, combine to power data recovery. Moreover, if you are a paid user, you get remote IT support with specialists on standby to help you retrieve your data. Here are the steps to recover data from your internal hard drive when your Mac cannot boot:
Step 1. Launch EaseUS Software in Recovery Mode
Select "Utilities > Terminal" from the top menu, and enter the command sh <(curl https://d3.easeus.com/mac/boot.sh). Hit "Return". Wait for the application to open, and it will take several minutes.

Note: If the Terminal displays either "No such file or directory" or "Could not resolve host," you should verify that the command line you entered is correctly spelled, ensure your Mac has a stable internet connection, and confirm that your macOS version is not lower than macOS 10.15.
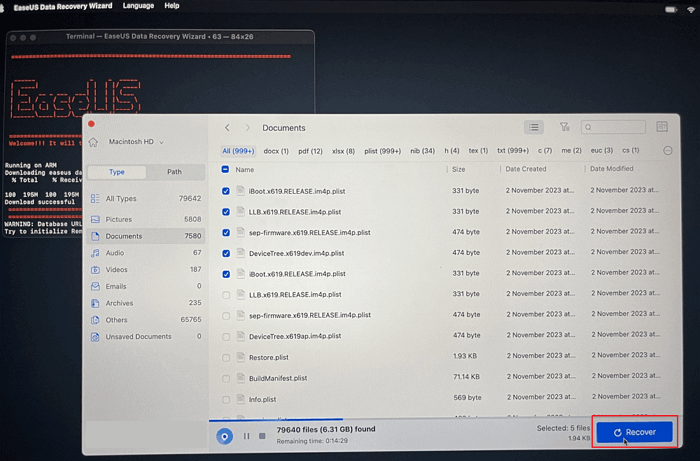
Step 2. Select the Volume on Your Mac Hard Drive
Select the volume where your lost data is stored, and click "Search for lost files". The EaseUS software will quickly locate all the recoverable data on the selected volume.

Step 3. Choose the Lost Data You Want
EaseUS software categorizes the scanned recoverable data by file type and storage path. Find the data you want by clicking "Type" or "Path" in the left panel. Then, check the boxes in front of the data you want to recover.

Step 4. Recover and Save Data on an External Disk
Click the "Recover" button, and a pop-up window will show up saying, "Please select a target location to save". Choose the external disk as the new storage location of your recovered data.
How to Fix Internal Hard Drive Not Showing Up on Mac [7 Ways]
Now that we know the potential reasons for your internal hard drive not showing up on Mac, let's work on fixing it. Here are the seven ways to solve this problem and the steps to take.
Fix 1. Adjust General Setting on Mac to Show Internal Hard Drive on Mac
Remember the symptoms we highlighted earlier? It's either one or the other. If the hard drive does not show up on your Mac, but it boots, it will not display on Finder. To correct that, you can tweak the General settings.
Step 1. Launch the Finder on your Mac and open the Finder menu at the top of the screen. Select "Preferences" and click the "General" tab.

Step 2. Click the check box beside "Hard disks". The option falls under the "Show these items on the desktop" category.

Step 3. Click the "Sidebar" tab and check "Hard disks" again. This time, the option falls under "Locations".
This tweak should lead to your hard drive showing up in Finder. You can now access your files and applications.
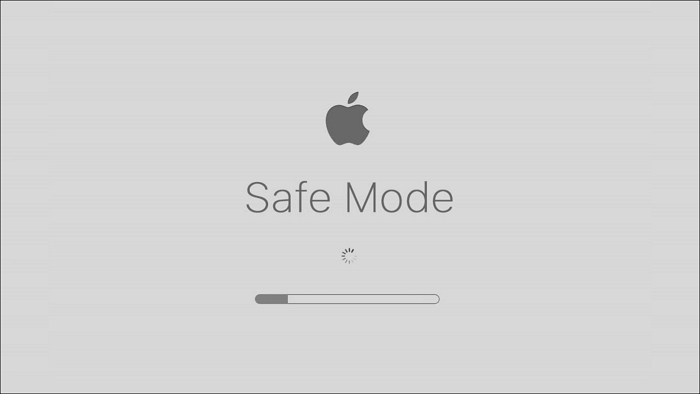
Fix 2. How to Check the Internal Hard Drive in Safe Mode on Mac
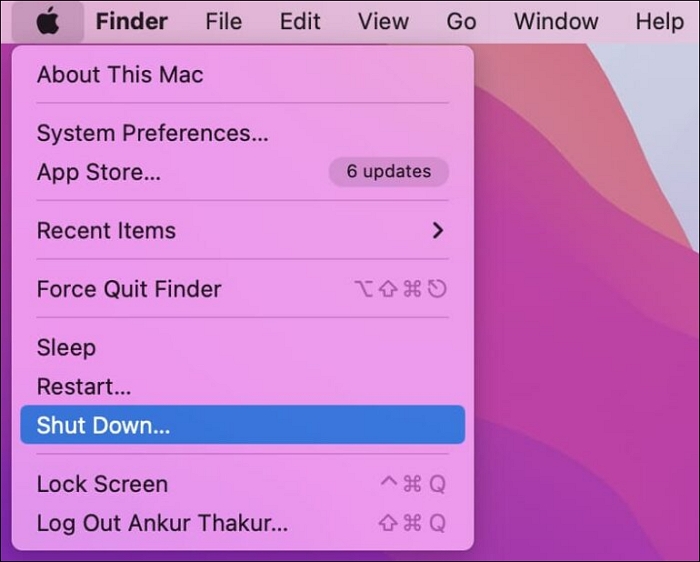
An effective way to locate and resolve many Mac issues is to boot your computer into Mac Safe Mode. It is useful for finding and isolating problems that are not clearly associated with a particular app or setting. Shut down your Mac if it is running, click the Apple logo at the top-left corner and select "Shut Down". Wait for about ten seconds.
On an Apple silicon Mac:
Step 1. Press the Power button until "Loading startup options" displays on the screen.
Step 2. Select the hard disk.
Step 3. Press and hold the Shift button and click "Continue in Safe Mode".
On an Intel-based Mac:
Step 1. Press the Power button. At the same time, press and hold the Shift key.
Step 2. Release the Shift key when the login window displays.
Step 3. Log into your computer.
Fix 3. Repair the Internal Hard Drive in the Recovery Mode
Another possible fix is to repair the hard drive in Recovery Mode. Follow the steps below, depending on whether your Mac is Intel or Silicon-based.
On an Apple Silicon Mac:
Step 1. Shut down your Mac if it is running.
Step 2. Click the Apple logo at the top-left corner. Select "Shut Down".
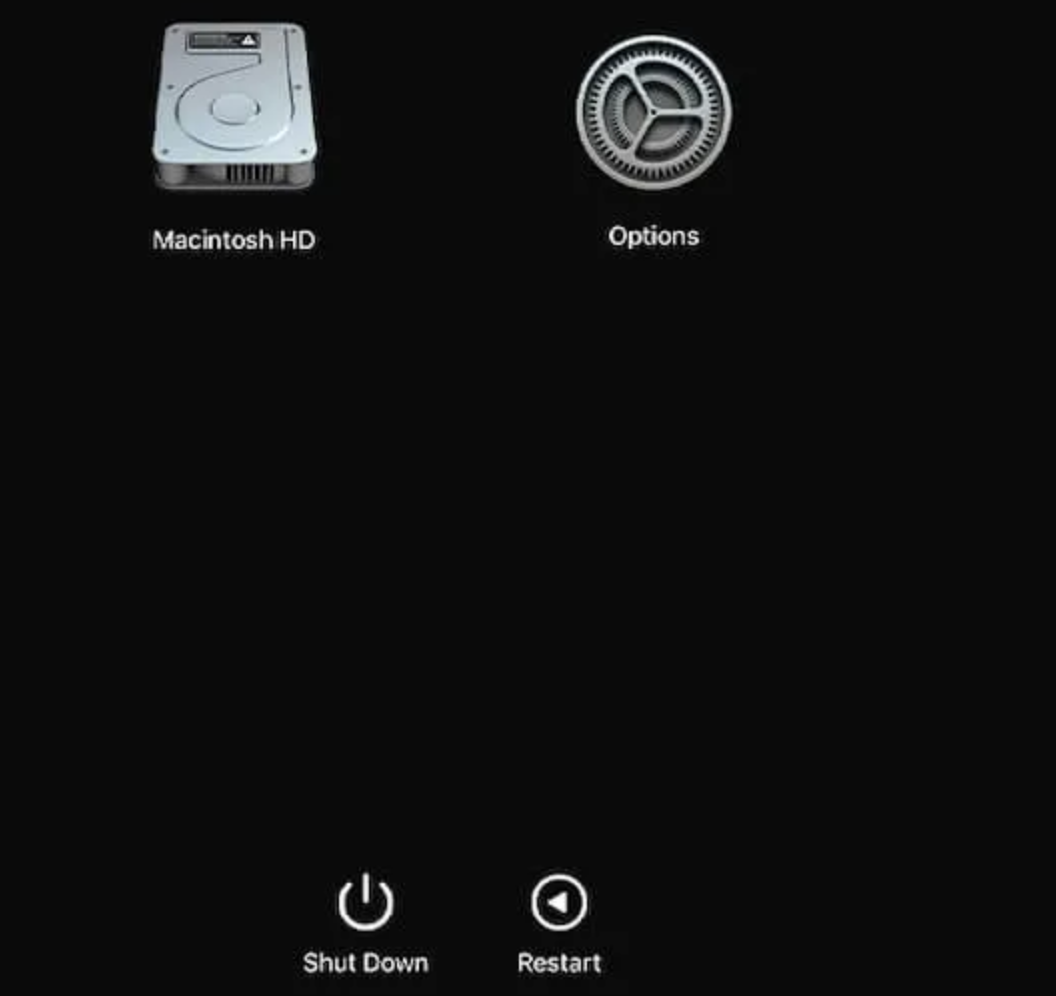
Step 3. Press the Power button and hold until it displays "Loading Startup Options".
Step 4. Click "Options".
Step 5. Click "Continue".
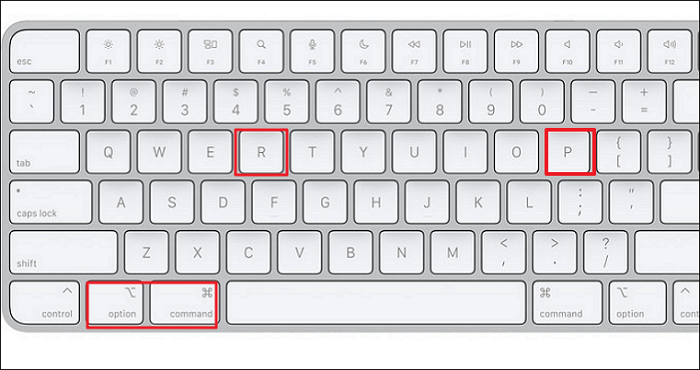
On an Intel-based Mac:
Step 1. Press and hold one of the following combinations until the startup screen displays.
- Command + R
- Command + Option + R
- Command + Shift + Option + R
Step 2. Enter your Mac password if applicable.
Then, in the macOS Recovery utility window:
Step 1. select Disk Utility and click Continue.
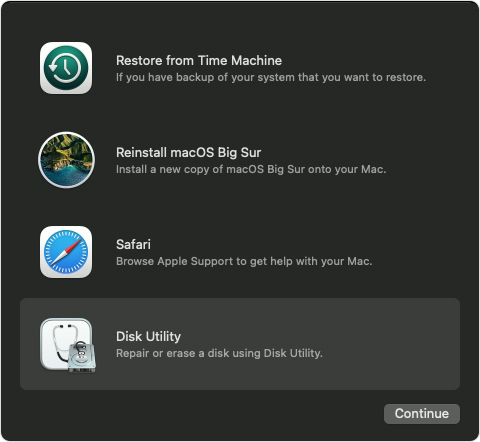
Step 2. Select your hard drive in the left-hand sidebar.
Step 3. Select volumes in the disk. Click the First Aid button and click Run to repair a Mac disk with Disk Utility.

Disk Utility will now run through the volume and repair any errors that may have led to your internal hard drive not showing up on Mac. Repeat for each volume.
Fix 4. Use Disk Utility to Format Your Internal Hard Drive
If the previous steps have not worked so far and your Mac hard drive is still not showing, formatting it may just do the trick. This method picks up where we left off. Note that formatting your hard drive will erase all the content and settings on Mac.
Step 1. Boot Mac into Disk Utility, click "View", and select "Show All Devices".

Step 2. In the left-hand sidebar, select the hard drive. Click the Erase button.
Step 3. Click the pop-up menu. Select "GUID Partition Map".
Step 4. A Format pop-up window will display. Click it and select a file system format from the options.
Step 5. In the space provided, enter a name.
Step 6. Click "Erase". Disk Utility will begin to format your hard drive.
Fix 5. Troubleshoot Your Internal Hard Drive with Terminal
An alternative fix is to use Terminal. Here's how to do that:
Step 1. Open Terminal. Click the Launchpad icon on the Dock, type in "Terminal", and click Terminal. Or you can use Siri to open it.

Step 2. Type in diskutil list and tap Return.
Step 3. Locate the header line "/dev/disk*(external, physical)".
Step 4. Type in diskutil info disk* below. Replace the asterisk with your disk's identifying number.
Fix 6. Reset NVRAM/PRAM to Fix the Internal Hard Drive Issue
Resetting the NVRAM (or PRAM) is a procedure that can fix persistent Mac issues. However, it only applies to Intel-based Mac computers.
Step 1. Shut down your Mac.
Step 2. Press the Power button. Press and hold Command + Option + P + R as soon as it begins to boot.
Step 3. Hold for about 20 seconds while the computer powers on normally, and then release the keys. Check your hard drive to see if it now shows up.
Fix 7. Replace Your Internal Hard Drive If You Encounter Physical Damage
Your internal hard drive may be inside your computer, but it can sustain physical damage with disastrous consequences. The Mac hard drive comes with platters for reading/writing data. Your computer dropping may be enough to damage those platters.
If you hear a clicking noise coming from the position of your hard drive, it may have sustained physical damage. If that's the case, you will have to replace it. To do so, take your Mac to an Apple store or a certified professional.
Summary
The internal hard drive not showing up on Mac can be pretty disconcerting. Thankfully, there are several potential fixes to handle the issue. In this article, we made a rundown of seven ways you can solve the problem. Hopefully, one of them worked for you.
If you formatted your hard drive in the course of solving the issue or are faced with data loss from several other causes, you can recover your data with the help of a convenient tool. EaseUS Data Recovery Wizard for Mac handles scans your hard drive for deleted files and will retrieve them for you.
Internal Hard Drive Not Showing Up on Mac FAQs
Here are the four frequently asked questions about the internal hard drives not showing up on Mac:
How to fix the SSD not showing up on Mac?
In this article, we explored several ways to fix the problem of internal hard drives not showing up on Mac. These solutions will also work for you to fix SSD not showing up on Mac, too.
- 1. Adjust General settings on Mac.
- 2. Check SSD in Safe Mode.
- 3. Repair SSD in Recovery Mode.
- 4. Formate your SSD with Disk Utility.
- 5. Troubleshoot the SSD with the Terminal.
- 6. Reset NVRAM or PRAM to fix SSD.
- 7. Replace your old SSD with a new one.
Why is my internal hard drive not showing up on Mac?
A damaged drive can lead to your Mac not displaying the internal hard drive. Wrong settings can also result in the issue. You should be careful while using your hard drive on Mac to avoid these kinds of issues.
How can my internal hard drive show up on my Mac?
The fixes to help your internal hard drive show up on Mac include tweaking general settings, booting into safe mode, repairing the hard drive in Disk Utility, and formatting the drive. If you cannot fix the issue, your internal hard drive may have suffered physical damage, and you need to send it to a local store for repair. Or you can buy a new one to replace it.
How do I recover a dead hard drive on a Mac?
If your hard drive is dead, you can retrieve valuable information on it with a professional data recovery tool. EaseUS Data Recovery Wizard for Mac is the recommended option for risk-free recoveries. You can create a bootable installer with your USB drive and rescue data from your dead hard drive with this portable recovery software.
Was This Page Helpful?
Brithny is a technology enthusiast, aiming to make readers' tech lives easy and enjoyable. She loves exploring new technologies and writing technical how-to tips. In her spare time, she loves sharing things about her game experience on Facebook or Twitter.
Dany is an editor of EaseUS who lives and works in Chengdu, China. She focuses on writing articles about data recovery on Mac devices and PCs. She is devoted to improving her writing skills and enriching her professional knowledge. Dany also enjoys reading detective novels in her spare time.
-
EaseUS Data Recovery Wizard is a powerful system recovery software, designed to enable you to recover files you’ve deleted accidentally, potentially lost to malware or an entire hard drive partition.
Read More -
EaseUS Data Recovery Wizard is the best we have seen. It's far from perfect, partly because today's advanced disk technology makes data-recovery more difficult than it was with the simpler technology of the past.
Read More -
EaseUS Data Recovery Wizard Pro has a reputation as one of the best data recovery software programs on the market. It comes with a selection of advanced features, including partition recovery, formatted drive restoration, and corrupted file repair.
Read More
Related Articles
-
Top 11 Tools to Recover Deleted Partitions on Mac
![author icon]() Daisy/Mar 18, 2024
Daisy/Mar 18, 2024 -
How to Recover Data from Macintosh HD Data
![author icon]() Daisy/Feb 26, 2024
Daisy/Feb 26, 2024 -
2 Best Ways to Recover Deleted Ring Videos [Solved]
![author icon]() Jean/Mar 18, 2024
Jean/Mar 18, 2024 -
How to Recover a Replaced File on Mac
![author icon]() Tracy King/Feb 26, 2024
Tracy King/Feb 26, 2024