- Video Recovery
- SD Card Recovery
- Recycle Bin Recovery
- Recover Data from USB
- Recover Deleted Emails
- Hard Drive Not Showing Up in Windows
- Recover Unsaved Word Documents
- Recover Deleted Files in Windows 10
- Recover Files from Virus Infected Hard Drive
- Best Free Photo Recovery Software
- Recover Files from Formatted Hard Drive
Choosing a startup disk Mac empty would undoubtedly make your Mac machine unbootable. And if it's happening while updating a recent macOS like Sonoma or Ventura, the update won't move on without selecting a startup disk.
"Hello, I have a MacBook Retina from early 2016. I tried reinstalling the OS, but it told me there was no starting disk. How can I get one or install one? This MacBook has a soldered SSD, RAM, and no disk slot, so I'm guessing it's something I have to install. Thank you for your help." - from iFixit
Mac Startup Disk Not Showing on macOS Ventura/Monterey/Big Sur
Mac startup disk is usually an internal hard drive inside your Mac, which installs the operating system and applications. No startup disk on a Mac surely prevents you from upgrading, downgrading, or accessing your computer.
Though the symptoms are similar when a startup disk cannot be found, the situations for getting the error are distinct. You can check the table for various scenarios in which you may encounter no startup disk issue and directly jump to the corresponding solutions.
| Workable Solutions | Step-by-step Troubleshooting |
|---|---|
| #1. Repair Startup Disk in macOS Recovery | Turn on your Mac and continue to press and hold the power button...Full steps |
| #2. Make Startup Disk Appear in Disk Utility | Shut down your Mac and disconnect all peripherals from your Mac...Full steps |
| #3. Reset NVRAM on Your Mac | Shut down your Mac, turn it on, and immediately press and hold...Full steps |
| #4. Change Another Startup Disk | Turn off your Mac, and press and hold the power button to start up your...Full steps |
Before proceeding, ensure you have a current backup of your essential files and purchased programs (the activation key/code is quite crucial for reinstalling and activating the second time). Otherwise, you can only rely on third-party Mac data recovery software - EaseUS Data Recovery Wizard for Mac to recover missing files.
This professional and trusted data recovery software can help you transfer files in macOS Recovery mode when your Mac startup disk has disappeared.
- It can recover permanently deleted files, documents, photos, audio, music, and emails effectively on Mac startup disk
- It repairs the Mac disk, and restores saved data on the inaccessible disk in a few clicks
You'll boot your Mac from its bootable version and perform the steps below to recover the desired data and transfer it to a safe location.
Step 1. Launch EaseUS Software in Recovery Mode
Select "Utilities > Terminal" from the top menu, and enter the command sh <(curl https://d3.easeus.com/mac/boot.sh). Hit "Return". Wait for the application to open, and it will take several minutes.

Note: If the Terminal displays either "No such file or directory" or "Could not resolve host," you should verify that the command line you entered is correctly spelled, ensure your Mac has a stable internet connection, and confirm that your macOS version is not lower than macOS 10.15.
Step 2. Select the Volume on Your Mac Hard Drive
Select the volume where your lost data is stored, and click "Search for lost files". The EaseUS software will quickly locate all the recoverable data on the selected volume.

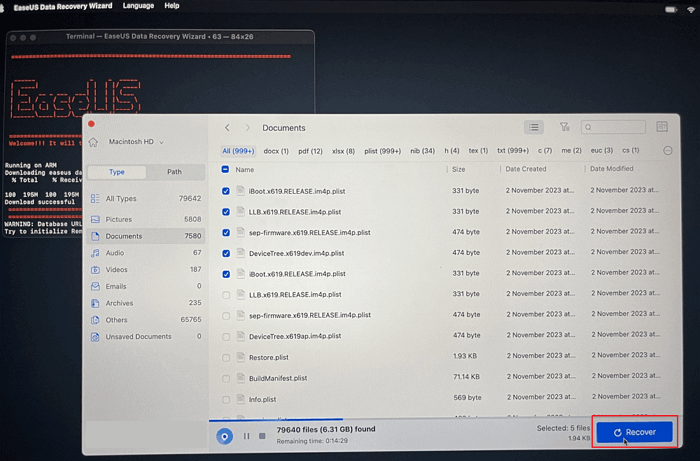
Step 3. Choose the Lost Data You Want
EaseUS software categorizes the scanned recoverable data by file type and storage path. Find the data you want by clicking "Type" or "Path" in the left panel. Then, check the boxes in front of the data you want to recover.

Step 4. Recover and Save Data on an External Disk
Click the "Recover" button, and a pop-up window will show up saying, "Please select a target location to save". Choose the external disk as the new storage location of your recovered data.
After saving your essential data, you can refer to the 4 proven solutions to fix no startup disk on a Mac or Macintosh HS not showing in Disk Utility issues.
Solution 1. Repair Startup Disk in macOS Recovery Mode
Since your startup disk is not showing now, you cannot use the regular way to open Disk Utility by just launching the Applications folder and selecting the Utility folder. You'll enter Disk Utility from macOS Recovery mode this time.
Step 1. Depending on whether you're using a Mac with Apple silicon or an Intel processor, you'll use different keys/entries to enter this mode.
- Apple silicon: Turn on your Mac and continue to press and hold the power button until you see the startup options window. Click the gear icon labeled Options, then click Continue.
- Intel processor: Turn on your Mac, then immediately press and hold the Command (⌘) and R keys until you see an Apple logo or other image.
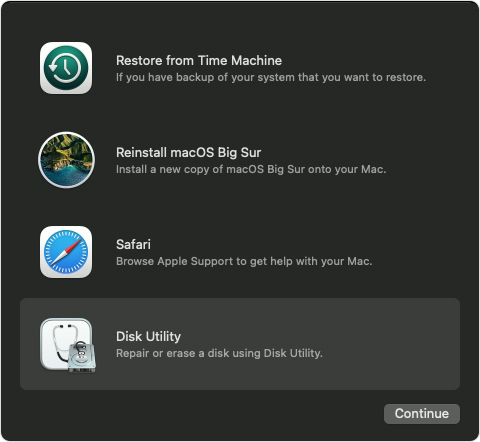
Step 2. Select a user; later, you'll be asked to enter a password to continue. Next, you'll be invited to the macOS Recovery mode. Choose Disk Utility on the window, and click "Continue".
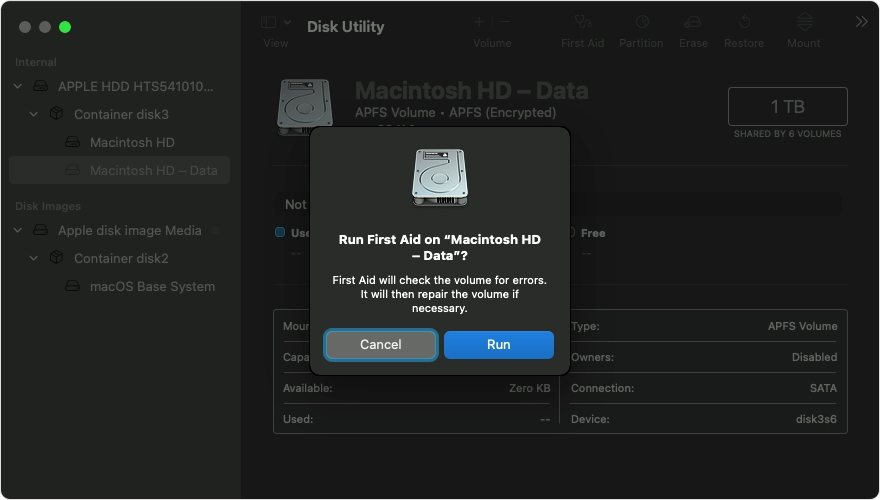
Step 3. In the Disk Utility window, navigate to View > Show All Devices. (None disks are showing? Jump to #solution 2#.)

Step 4. If you're lucky and the startup disk appears here, select it, click the First Aid button, and then click Run. First Aid will check the selected volume for errors and try to repair it if issues are found.
If this method helps you, share this post on social media to help others whose Mac startup disk is not showing normally so that the error can be fixed.
Solution 2. Make the Startup Disk Appear in Disk Utility
Disk Utility can check any connected disk and repair problems once it detects them. How to repair a startup disk if it's not showing up in Disk Utility? For those who didn't see a whole disk or any containers or volumes on that disk, try to use the below steps to make it detected.
Step 1. Shut down your Mac and disconnect all peripherals that are connected to your Mac.
Step 2. If you installed macOS on an external hard drive, make sure that its connection cable is alright, and the connection is solid. Turn off the drive and back on.
Step 3. Follow the #Solution 1# guide to entering Disk Utility in macOS Recovery and repair the startup disk. If you still can't see any drive in the available devices, the most time-efficient way is to get support from Apple Support.com and start with the Mac entry.
Solution 3. Reset NVRAM to Fix the Startup Disk Not Showing
When you try to boot your Mac from the startup disk, but it finally starts up with a flashing question mark like this, it means that your startup disk is no longer available or doesn't contain a working Mac operating system. If an issue persists each time you try to boot your Mac, you'll need to repair the startup disk with Disk Utility in macOS Recovery, which #Solution 1# has demonstrated the steps.

For the case the question mark appears only momentarily before your Mac starts up typically, perhaps resetting NVRAM (nonvolatile random-access memory) will help resolve the problem. As you know, the NVRAM can store the settings of the startup disk selection.
Step 1. Shut down your Mac, turn it on, and immediately press and hold the keys together: Option, Command, P, and R.
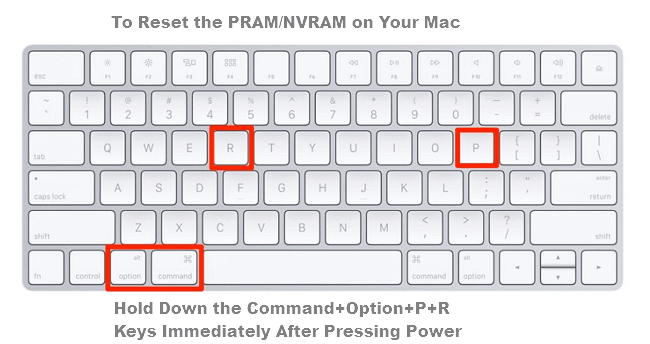
Step 2. When your Mac boots up, check that your preferred startup disk is selected in Startup Disk preferences.
Solution 4. Change Another Startup Disk
We cannot exclude the chance that your current startup disk has failed somehow. The macOS can longer recognize it. If these options are available to you, like a CD/DVD, a network volume, or a different physical disk, you can try to change your startup disk with a working one.
Change a Startup Disk at One Time
Step 1. Turn off your Mac
Step 2. Press and hold the power button to start your Mac if you're using Apple silicon, and press and hold the power button until the "Loading startup options" appear.
Step 3. Click the Up arrow on Mac or the Continue button on Mac with Apple silicon to select the new startup disk when you see all the available startup disks showing up.
Change a Startup Disk for Every Startup
Step 1. Open your Mac and navigate to the Apple menu and then System Preferences. Click "Startup Disk".
Step 2. Choose the wanted disk by clicking the icon of it and clicking "Restart".
Conclusion
If you still can't fix the startup disk error, you can try to run a factory reset on macOS Ventura/Monterey/Big Sur or MacBook to fix the error. During the process, run EaseUS Mac data recovery software to recover data from any device.
Mac Startup Disk Not Showing FAQs
To get further help, read the frequently asked questions below.
1. How do you fix and choose startup disk Mac, not Loading?
Solutions to fix choose startup disk mac empty:
- Repair Startup Disk in macOS Recovery
- Make Startup Disk Appear in Disk Utility
- Reset NVRAM on Your Mac
- Change Another Startup Disk
2. How can the Mac stuck on the Apple logo be fixed?
To fix the Mac stuck on the Apple logo:
- Wait longer
- Force restart Mac
- Boot in Safe Mode
- Reset PRAM/NVRAM
- Reset SMC
- Repair startup disk with First Aid
- Run Apple Diagnostics
- Clean install macOS from USB...
3. How do I reinstall macOS without losing data?
To reinstall macOS without losing data:
- Format the external drive
- Download the macOS installer
- Create a bootable USB disk
- Boot your Mac from a USB drive
Was This Page Helpful?
Brithny is a technology enthusiast, aiming to make readers' tech lives easy and enjoyable. She loves exploring new technologies and writing technical how-to tips. In her spare time, she loves sharing things about her game experience on Facebook or Twitter.
Jean is recognized as one of the most professional writers in EaseUS. She has kept improving her writing skills over the past 10 years and helped millions of her readers solve their tech problems on PC, Mac, and iOS devices.
-
EaseUS Data Recovery Wizard is a powerful system recovery software, designed to enable you to recover files you’ve deleted accidentally, potentially lost to malware or an entire hard drive partition.
Read More -
EaseUS Data Recovery Wizard is the best we have seen. It's far from perfect, partly because today's advanced disk technology makes data-recovery more difficult than it was with the simpler technology of the past.
Read More -
EaseUS Data Recovery Wizard Pro has a reputation as one of the best data recovery software programs on the market. It comes with a selection of advanced features, including partition recovery, formatted drive restoration, and corrupted file repair.
Read More
Related Articles
-
How to Restore Mac from Time Machine [Full Guide]
![author icon]() Brithny/Feb 26, 2024
Brithny/Feb 26, 2024 -
Word Found Unreadable Content on Mac, Can I Recover the Word Document
![author icon]() Brithny/Feb 26, 2024
Brithny/Feb 26, 2024 -
What Is Delete Immediately on Mac & How to Use [Shortcut Tip]
![author icon]() Brithny/Feb 26, 2024
Brithny/Feb 26, 2024 -
Accidentally Erased Hard Drive in Disk Utility
![author icon]() Jean/Feb 23, 2024
Jean/Feb 23, 2024