
PAGE CONTENT:
- Why We Backup Windows Server to Network Share
- How to Backup Windows Server to Network Share with EaseUS Todo Backup
- Alternative Solution: Windows Server Backup Tool
Why We Backup Windows Server to Network Share
Efficiently preserving critical data on a Windows Server is crucial for the smooth operation and continuity of any business. To ensure the safety and accessibility of your valuable information, opting for a reliable backup solution is imperative. Backing up your Windows Server data to a network share offers several advantages over local backups. By storing your backups on a network, you safeguard your data from potential hardware failures, theft, or disasters that may affect your physical server and on-site backups. Moreover, network shares allow convenient access to backups from multiple locations, enabling quick recovery when needed.

Start a live chat with an EaseUS Expert to tailor an enterprise backup solution specific to your requirements. We are here to assist you with the following as well:
- Commence a free trial
- Obtain a quotation
- Arrange a free demonstration
How to Backup Windows Server to Network Share with EaseUS Todo Backup
EaseUS Todo Backup is a comprehensive and user-friendly backup software designed specifically for Windows Servers. With its intuitive interface and robust features, EaseUS Todo Backup simplifies the backup and recovery process, ensuring the safety of your critical data. You can find more information about its functionality below, explained in a few simple steps.
Step 1. Download and install EaseUS Todo Backup Server from the official website.

Step 2. Launch the software and click on "New Task" on the left-hand side of the main interface.

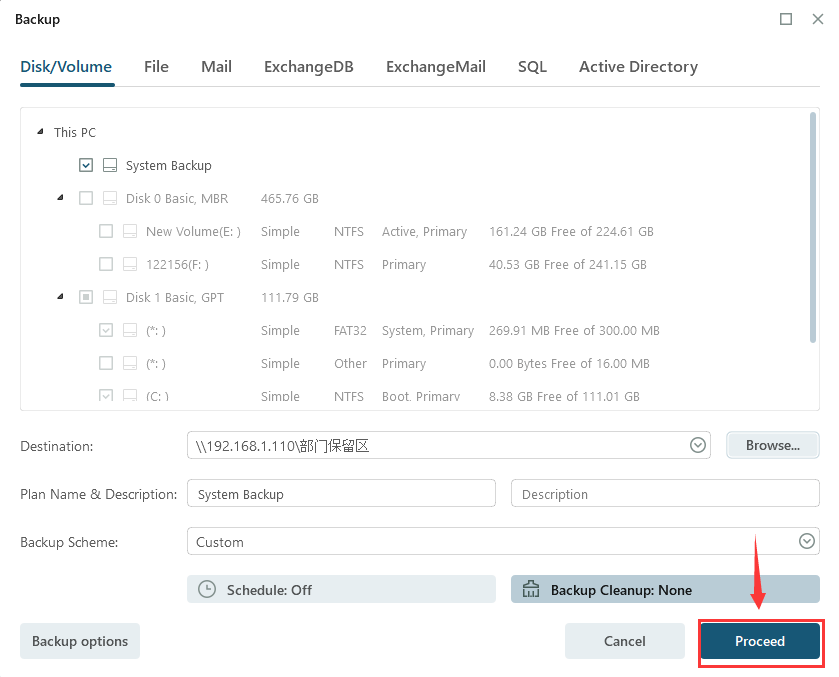
Step 3. Select the type of backup you would like to perform. You can choose from System Backup, Disk/Partition Backup, File Backup, Mail Backup, Exchange, SQL, and Active Directory. Select the appropriate option based on your requirements.

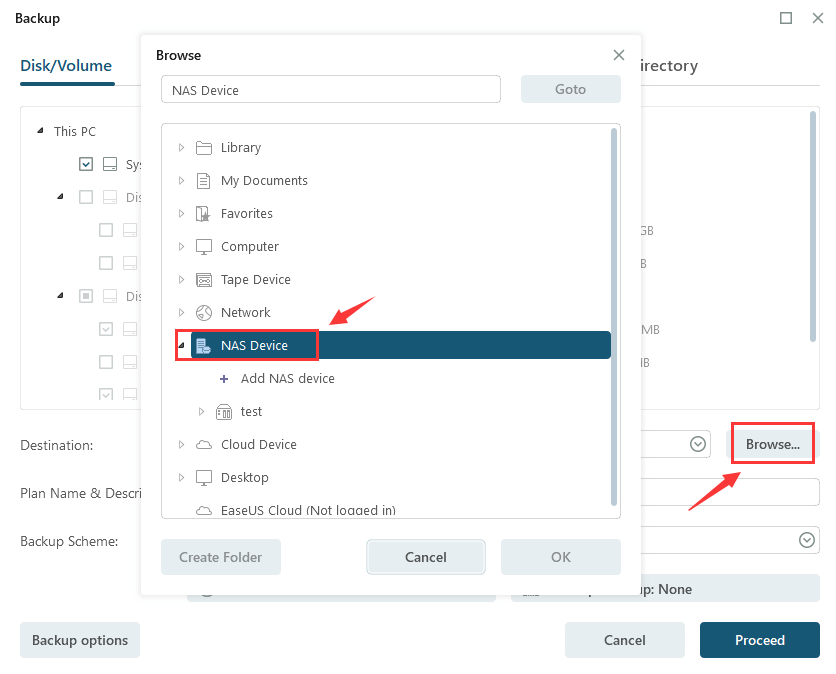
Step 4. Select the destination location where you want to store the backup. You can choose an external hard drive, network location, or any other storage device. Ensure that you have enough space on the destination location to store the backup. In this article, we take the NAS device as an example.

Step 5. Customize the backup options if necessary. You can set encryption, compression, and splitting options for the backup file. You can also schedule automatic backups by clicking on the "Schedule" option.
Step 6. Click on "Proceed" to start the backup process. The software will start creating a backup of your Windows server based on the selected options.
Step 7. Wait for the backup process to complete. The time taken will depend on the size of the data being backed up and the speed of your computer and storage devices. Once the backup is finished, you will be presented with a summary of the backup details. You can also verify the backup by exploring the destination location and checking if the backup file is present.
Alternative Solution: Windows Server Backup Tool
Windows Server offers a built-in backup tool that provides basic backup functionality. The Windows Server Backup tool allows you to perform full server backups, schedule automatic backups, and restore data when needed. While it may be suitable for some basic backup requirements, it lacks several advanced features available in dedicated backup solutions like EaseUS Todo Backup.
Compared to the Windows Server Backup tool, EaseUS Todo Backup provides a more comprehensive and efficient backup and recovery experience. Its user-friendly interface, extensive feature set, and network share backup capability make it an ideal choice for businesses seeking enhanced data protection and convenience.
Conclusion
Investing in a reliable backup solution is vital for ensuring the continuity and security of your Windows Server data. With EaseUS Todo Backup, you can easily perform network share backups, benefiting from secure storage, easy accessibility, and simplified recovery options. While Windows Server Backup tool provides basic functionality, EaseUS Todo Backup offers a comprehensive set of features, making it a highly recommended solution for businesses of all sizes. Safeguard your critical information today and enjoy peace of mind knowing your data is protected.
How to Backup Windows Server to Network Share FAQs
1. What is a NAS backup for a Windows Server?
A NAS backup refers to backing up the data from a Windows Server directly to a Network Attached Storage (NAS) device. It provides a convenient and centralized storage solution for your server backups.
2. How can I connect my Windows Server to a NAS device?
You can connect your Windows Server to a NAS device by configuring the network settings on both the server and the NAS device. This typically involves assigning IP addresses, setting up shared folders and permissions, and ensuring both devices are on the same network.
3. What software do I need to backup my Windows Server to a NAS?
There are various backup software options available for backing up Windows Servers to NAS devices, such as Acronis Backup, EaseUS Todo Backup, or Windows Server Backup (built-in feature). Choose the one that best suits your needs and budget.
4. Can I schedule automatic backups to my NAS device?
Yes, most backup software solutions allow you to schedule automatic backups to your NAS device. You can set the frequency (daily, weekly, monthly), specific times, and even configure incremental or differential backups to optimize storage space.
5. How do I ensure the security of my backups on the NAS device?
To ensure the security of your backups on the NAS device, you can enable encryption features provided by the backup software. Additionally, you should set strong and unique access credentials for the NAS device, disable any unnecessary services, and restrict access to authorized users only.
Was This Page Helpful?
Updated by Gap
Gap has been working as an experienced data backup and security engineer at EaseUS for over 10 years, focusing on working with clients to assess needs and implemented procedures and tasks for appropriate backup solutions.
-
Taking everything into consideration, we can say that EaseUS Todo Backup Home can offer you a little extra sense of security with a set of advanced tools. The interface provides quick adaptation, every process guiding you all the way through so you don't get stuck or further damage your system rather than keeping it safe.
Read More -
EaseUS Todo Backup Free lets you create backups of your important files or your entire computer through its streamlined interface. Just choose the backup type you'd like to get started, and let the program do the reset.
Read More -
EaseUS includes all the features I expect from backup software like versioning, incremental backups, and scheduling. For more advanced users, EaseUS allows you to install a pre-boot environment onto your hard drive so you can use it to restore files without burning a CD or putting it on an external USB drive.
Read More
Related Articles
-
![author icon]() Gap/2023/12/19
Gap/2023/12/19 -
[2024 Featured Pick] 5 Best Backup Software for Small Business
![author icon]() Larissa/2024/02/22
Larissa/2024/02/22 -
How to Back Up Windows Server 2016 [Step by Step]
![author icon]() Brithny/2023/12/15
Brithny/2023/12/15 -
How to Create EaseUS Bootable USB, CD/DVD, and ISO Image with EaseUS Todo Backup
![author icon]() Jean/2023/11/30
Jean/2023/11/30
![]()
EaseUS Todo Backup
Smart backup tool for your files and entire computer in Windows 10/8/7.
Install Windows on Multiple Computers at Once? No Problem!
Learn how to install Windows 11/10/7 and special programs/software on a batch of computers. Use 10 minutes to do the 10 hours work without making a single mistake!
Get Free Solution!