Are you trying to back up Windows 10 to USB so that you can perform a system restore, data recovery or even factory reset Windows 10 to a previous healthy state? On this page, you'll get 3 methods to back up your computer to a USB drive.
| Workable Solutions | Step-by-step Troubleshooting |
|---|---|
| 1. Backup with EaseUS Software |
1. Backup Windows 10 to USB...Full steps 2. Backup Windows 10 data to USB...Full steps 3. Restore Windows 10 system from...Full steps |
| 2. Backup System Image to USB | Connect the USB drive (bigger than the...Full steps |
| 3. Create Recovery Drive to USB | Try every USB port available; Determine...Full steps |
3 Ways to Back Up Windows 10 to USB External Drive
Here, we collected and listed the reasons that can explain why do Windows users want to back up their computer to an external USB drive:
- 1. Back up OS and restore to a previous state from virus, hard drive failure, or human error.
- 2. Back up computer data to prevent file loss.
- 3. Create a system image to perform a factory reset anytime.
So how to back up Windows 10 or the entire computer to a USB drive? Here, we collected 3 ways to help you out. Pick the right method based on your need and follow to back up Windows 10 on your own now:
SO how do I back up my Windows 10 computer to an external USB drive? Follow the desired guide and start backing up your Windows 10 now.
Method 1. Backup Windows 10 to USB with EaseUS Software
It's a smart choice that you turn to reliable backup software to create a backup of your Windows 10 data. Here, we would recommend you try EaseUS file backup software which is designed for System Backup and File backup on Windows 7, 8, 8.1, 10, Vista, and Windows XP.
Secure Download
You can apply it to fully back up Windows 10, including the OS and data, to your external USB drive on your own:
Step 1. Launch EaseUS Todo Backup on your computer, and click Create Backup on the home screen and then hit the big question mark to select backup contents.

Step 2. To back up your Windows operating system, click "OS" to begin the backup task.

Step 3. Your Windows operating system information and all system related files and partitions will be automatically selected so you don't need to do any manual selection at this step. Next, you'll need to choose a location to save the system image backup by clicking the illustrated area.

Step 4. The backup location can be another local drive on your computer, an external hard drive, network, cloud or NAS. Generally, we recommend you use an external physical drive or cloud to preserve the system backup files.

Step 5. Customiztion settings like enabling an automatic backup schedule in daily, weekly, monthly, or upon an event, and making a differential and incremental backup are available in the Options button if you're interested. Click "Backup Now", and the Windows system backup process will begin. The completed backup task will display on the left side in a card style.

#2. Backup Windows 10 Data to USB
Step 1. For the first time you use EaseUS Todo Backup to back up files, click Create backup on the home screen and then mouse click the big question mark to select backup contents.
Step 2. Since you're going to back up files and folders on your computer, go on with the "File" backup mode, where you can select pictures, videos, documents and all other types of files to back up.
Step 3. Follow the paths to locate the files, folders or directories you want to back up, select them all and click "OK".

Step 4. Now you need to select a backup location to save and retain the backup.

Step 5. EaseUS Todo Backup allows users to save the backup files to every device that is handy for you, like a local hard drive, external USB drive, SD card, network drive, or a NAS drive, plus a cloud drive of the EaseUS brand. We personally recommend users to choose the cloud drive prior to a physical drive to save important backups due to the greater accessibility, flexibility and safety.
To be able to access to EaseUS cloud, all you need is an email registration and login.

Step 6. If you're interested in an automatic and intelligent backup schedule for the next file backup task, go on with the "Options" setting. There you can encrypt a confidential file backup, compress the backup image size, or customize a backup scheme to tell the software in what time to start the next backup.
Customize an advanced and automatic backup task here:

Step 7. Click "Backup Now" to start the file backup process. Your completed backup files are visible on the left area in a card style.

Note that EaseUS Todo Backup also contains a schedule backup feature so that you can automatically backup files to an external usb.
#3. Restore Windows 10 System from USB Backup
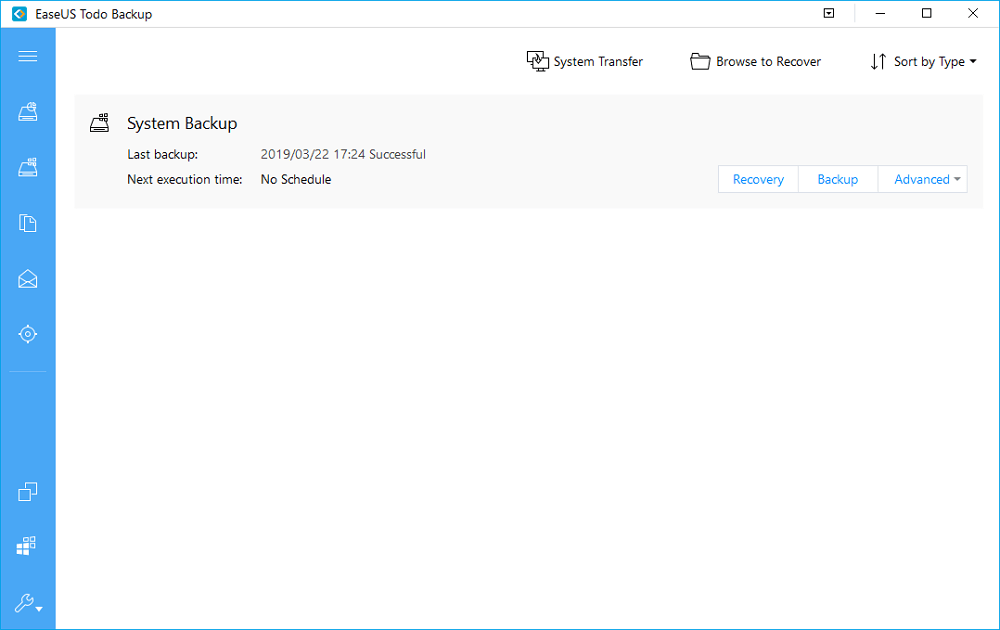
After a successful backup, you may also need to know how to restore Windows 10 backup from the USB drive. If you can boot into Windows, open EaseUS Todo Backup and jump to Step 2 below to restore the system image.
Secure Download
If Windows won't boot, follow the details below:
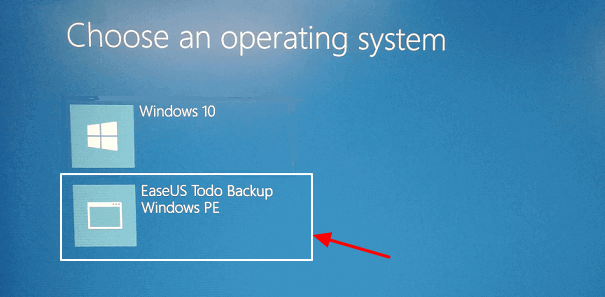
Step 1. Connect USB with Windows 10 OS backup to PC and restart it.
When you see a Windows boot menu, select EaseUS Todo Backup.
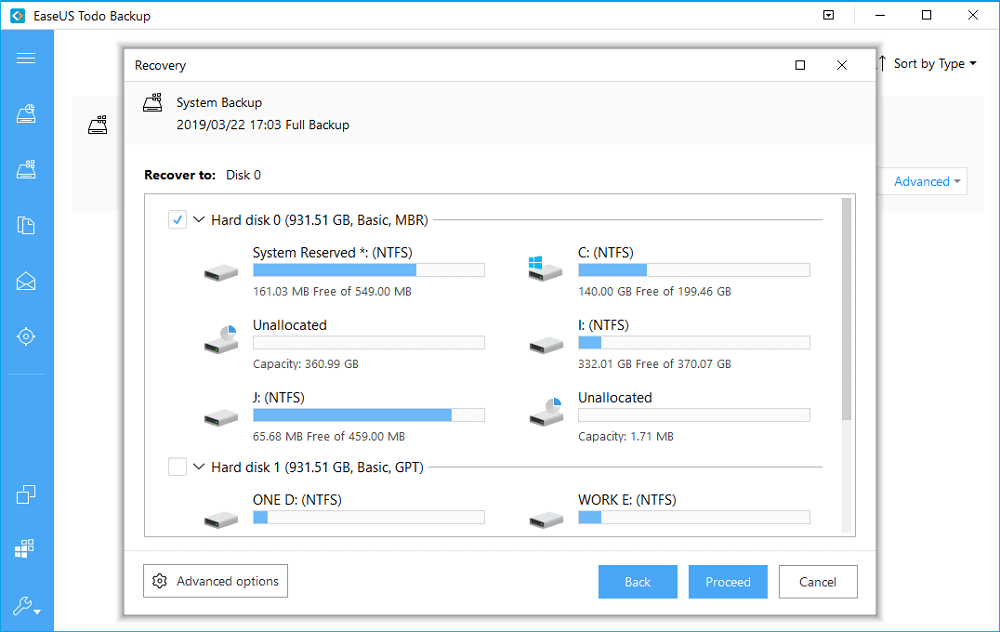
Step 2. Select the image file you want to recover and click "Recovery".
Step 3. Select the destination location which you will recover the system and save it. Then click Proceed to restore Windows 10 backup.
Method 2. Backup Windows 10 System Image to USB
The other efficient way of backing up Windows 10 is to create a system image to USB. If you don't want to use software creating system image backup, you may try this method (source from Microsoft).
It's based on Windows built-in Backup and Restore tool. Let's see how to back up Windows 10 system to a USB drive:
Step 1. Connect the USB drive (bigger than the C drive) to your PC and format it to NTFS.
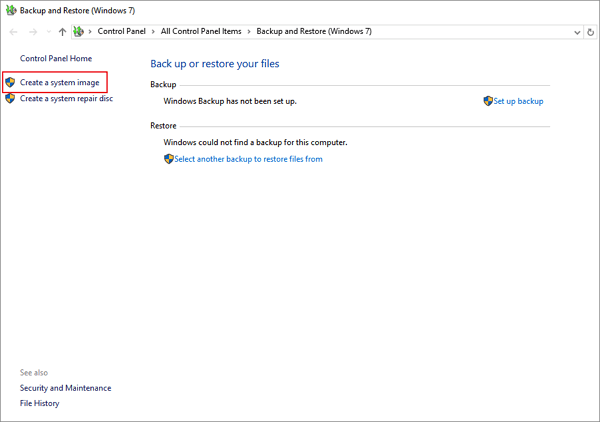
Step 2. Right-click on the Windows icon, select "Search" and type: Control Panel. Open it and click "Backup and Restore (Windows 7).
Step 3. Click "Create a system image".
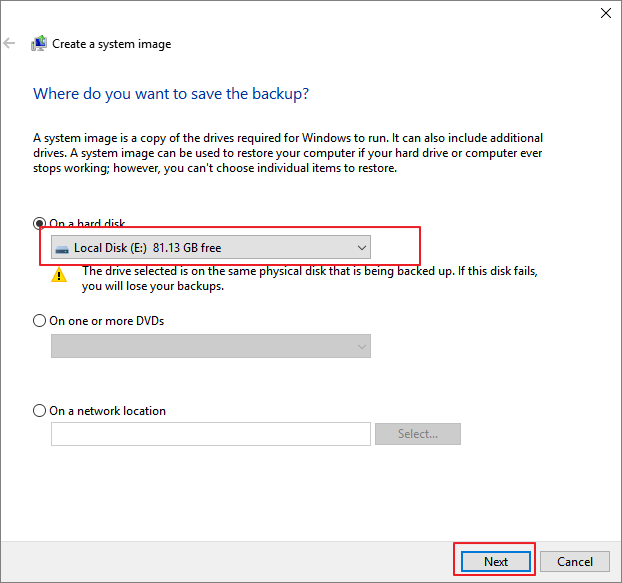
Step 4. Under the On a hard disk section, select the external USB drive as destination, and click "Next" to continue.
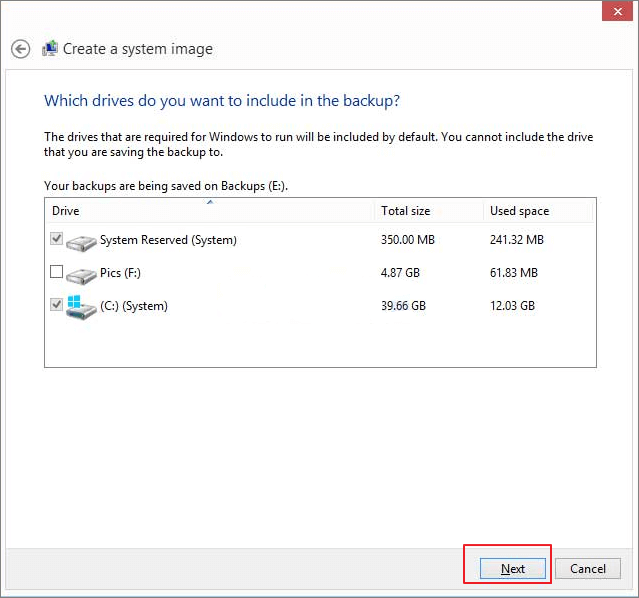
Step 5. Check the System and System Reserved partitions, click "Next" to continue.
Step 6. Click "Start backup" to begin creating your current system image to the USB drive.
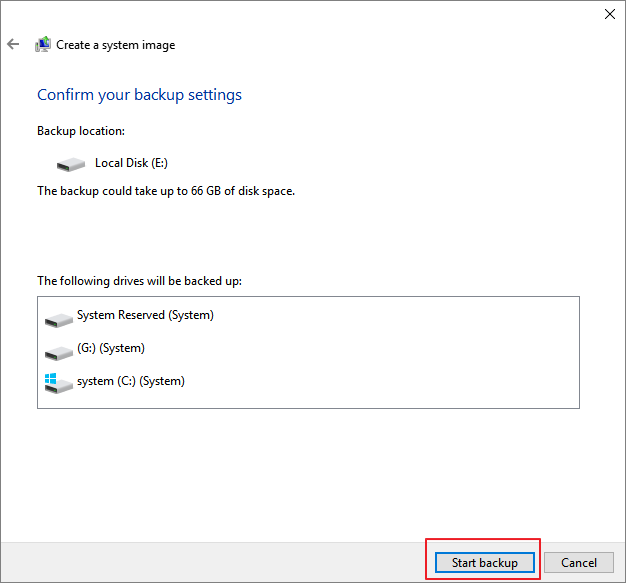
Wait for the process to complete, you've successfully created the system image of Windows 10 to your USB drive.
When you have an OS boot issue or system failure error, you can restore a system image backup of Windows 10 on your USB anytime.
Method 3. Create a Windows 10 Recovery Drive to USB
The last way that you can try is to create a Windows 10 recovery drive to USB. With it, you can restore Windows 10 by performing a factory reset on your computer anytime when the computer or OS goes wrong.
The Windows built-in tool also supports creating a Windows 10 recovery drive. But it will take much time. Let's see.
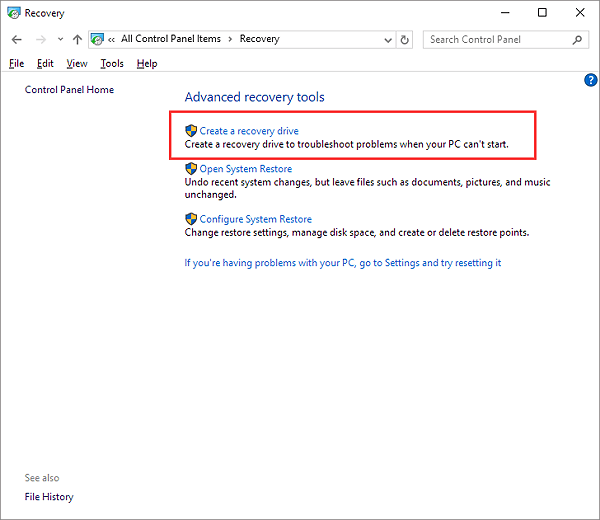
Step 1. Insert the USB drive into your computer. In Windows 10 Control Panel, click "Recovery".
Step 2. Click "Create a recovery drive".
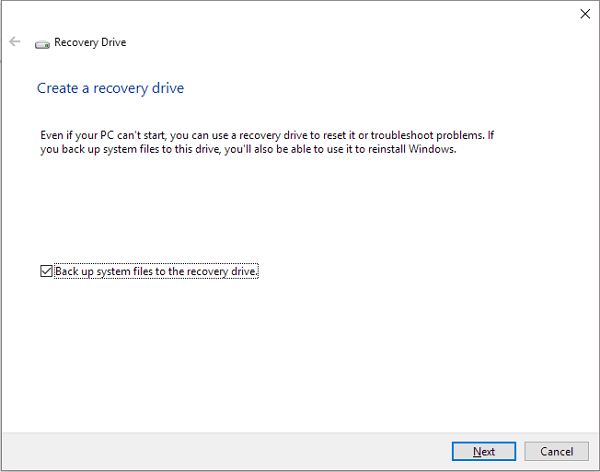
Step 3. Check "Back up system files to the recovery drive" to use the drive to reinstall or restore a previous version of Windows. Click "Next".
Wait until the wizard prepares to copy files to your flash drive.
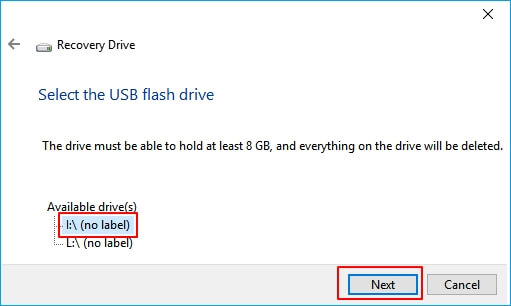
Step 4. Select your USB flash drive as the recovery drive and click "Next".
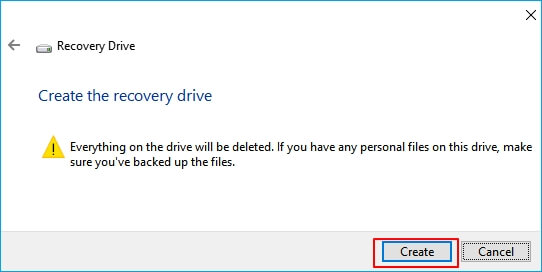
Step 6. Confirm the warning message that "everything on the drive will be deleted. If you have any personal files on this drive, make sure you've backed up the files" and click "Create".
Step 7. When the message "The recovery drive is ready" appears, click "Finish".
The backup may take a few hours, wait patiently. After this, you can use the Windows 10 recovery drive to troubleshoot OS failure or PC boot issues on your computer. For more details, follow this link and check out: Download Windows 10 Recovery Tool for 32/64 Bit.
Pick a Right Way and Backup Your Windows 10 to USB Now
This page covers 3 different but effective Windows 10 backup to USB solutions to help you fully protect Windows 10 and data from any unexpected OS issues.
Among these, you can pick EaseUS backup software - Todo Backup to back up your entire computer, including Windows 10 and the data in an easy and handy way.
Secure Download
If you only want to back up Windows 10 OS to USB, either Method 2 or Method 3 can help. Though a bit complex, but still worth a try. It's not too late, take action to go and backup your Windows 10 and data now.
FAQ on Back Up Windows 10 to USB Drive
What is the best way to back up a Windows 10 computer?
Using a third-party tool, EaseUS Todo Backup is one of the best and easiest ways to back up a Windows 10 computer. This software provides users with complete and effective solutions to backup systems, disks, partitions, files & folders, and emails. With its user-friendly interface, even the most novice user can easily perform the backup operation with just a few clicks.
How big of a flash drive do I need to back up Windows 10?
The size of the flash drive you need depends on the amount of data you want to back up. For example, if you want to back up your entire hard drive, you will need a flash drive that is at least as big as your hard drive. If you only want to back up specific files or folders, you will need a flash drive that is big enough to hold those files.
Was This Page Helpful?
Updated by Melissa Lee
Melissa is a sophisticated editor for EaseUS in tech blog writing. She is proficient in writing articles related to screen recording, voice changing, and PDF file editing. She also wrote blogs about data recovery, disk partitioning, and data backup, etc.
Written by Tracy King
Tracy became a member of the EaseUS content team in 2013. Being a technical writer for over 10 years, she is enthusiastic about sharing tips to assist readers in resolving complex issues in disk management, file transfer, PC & Mac performance optimization, etc., like an expert.
Related Articles
-
Disk Clone vs. Entire Machine Backup: Every Detail You Want to Know
![author icon]() Jean/Feb 26, 2024
Jean/Feb 26, 2024 -
How to Clone C Drive to SSD in Windows 10 [Step-by-Step]
![author icon]() Tracy King/Feb 06, 2024
Tracy King/Feb 06, 2024 -
(Solved!) How to Reset Seagate External Hard Drive to Factory Settings Safely
![author icon]() Jerry/Feb 26, 2024
Jerry/Feb 26, 2024 -
Change Backup Location Windows 7: Manage Backup File & Space Saving
![author icon]() Jean/Feb 26, 2024
Jean/Feb 26, 2024