- Video Recovery
- SD Card Recovery
- Recycle Bin Recovery
- Recover Data from USB
- Recover Deleted Emails
- Hard Drive Not Showing Up in Windows
- Recover Unsaved Word Documents
- Recover Deleted Files in Windows 10
- Recover Files from Virus Infected Hard Drive
- Best Free Photo Recovery Software
- Recover Files from Formatted Hard Drive
Flash drives are common portable storage devices that are widely used by Mac users for work and study, especially when conducting meetings or presentations. However, many users have found that the files disappeared from the flash drive on a Mac after opening it.
If this problem occurs on your flash drive, don't worry! Read on to learn the detailed steps on how to recover files that disappeared from the flash drive on a Mac.
4 Methods to Fix Files Disappeared from a Flash Drive Mac
We will introduce 4 effective methods to fix the Files that disappeared from a flash drive on your Mac under different conditions, such as files copied to a USB drive disappearing. Take a look!
Method 1. Recover Files Disappeared from Flash Drive Using Software
Using a professional Mac USB recovery tool can be the best solution to fix the flash drive file disappearance problem. EaseUS Data Recovery Wizard for Mac Pro is the best flash drive data recovery software that can recover disappeared, deleted, and formatted files on a flash drive.
Even if the USB does not show up on a Mac, with the EaseUS software, you can recover it. If you're worried about the difficulty of the operation, you don't have to worry about that at all. This program takes into account the needs of novice Mac users and makes the data recovery process as simple as possible! Check out the following steps:
Step 1. Connect your USB drive to your Mac
Correctly connect your USB flash drive to your Mac. Launch EaseUS Data Recovery Wizard for Mac. Start selecting the flash drive and click "Search for lost files" to let the software scan for lost files on it.
Note: Before data recovery, you'd better click "Disk Backup" from the left sidebar to create a backup of your USB drive to avoid further data loss. After backing up the USB drive, the software can recover data from your USB drive backup, and you can remove the USB flash drive and use it again.

Step 2. Find lost data on the USB drive
After the scan, all files will be presented in the left panel in the scan results.

Step 3. Recover data from flash drive
Select the files you want to recover and click the "Recover" button. Don't save the recoverable files to the USB drive itself in case of data overwriting.

Worried about unsafe downloads? Don't worry! Check out the real user reviews.

Is EaseUS Safe | Is EaseUS Data Recovery Safe [True Review on EaseUS]
This article discusses the professional data recovery software - EaseUS Data Recovery Wizard. Read more >>
Method 2. Recover Files Disappeared from Flash Drive with Mac Trash
Your files have disappeared from the flash drive, and there is a strong possibility that you have accidentally deleted them. In this case, you should restore them from the Mac Trash bin.
Follow the steps below to recover deleted files on a Mac:
Step 1. Open the Trash bin on your desktop or from the Finder.
Step 2. Search for the deleted flash drive files in the Trash bin.
Step 3. Select the deleted flash drive files you want, and right-click them to display the option menu.
Step 4. Click "Put Back" to restore them. Then, you can find the recovered files in their original storage location.

Suppose your Trash bin is emptied. Install and launch the EaseUS data recovery software to recover emptied Trash on a Mac.
Share this article on social media if it's informative, and help others learn how to fix the files that disappeared from a flash drive on a Mac.
Method 3. Show Disappeared Files from Flash Drive
Can't access files on an external hard drive or a flash drive? Maybe the files on the flash drive are hidden! Here are two ways to unhide the hidden files; take a look:
Use a Keyboard Shortcut to Unhide Files
Connect your flash drive to your Mac, and follow the steps here:
Step 1. Open "Finder" and select the flash drive folder from the Finder window.
Step 2. Press "Command + Shift + Dot(.)" on your keyboard to unhide the hidden files on the flash drive.

Run a Terminal Command to Unhide Files
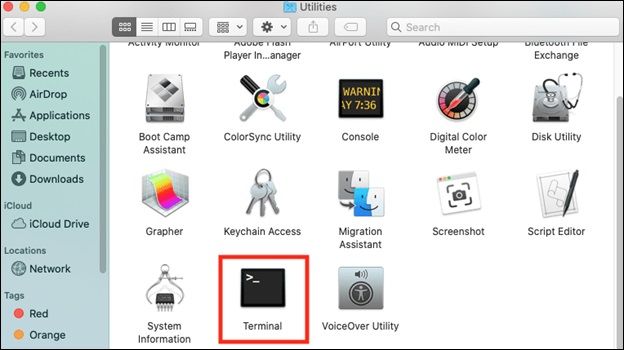
The built-in program Terminal on your Mac can also unhide hidden files on a flash drive. Here are the steps:
Step 1. Open Terminal from "Applications > Utilities > Terminal".
Step 2. Type the following command and hit "Enter".
| defaults write com.apple.finder AppleShowAllFiles TRUE |
Step 3. Type the second command and hit "Enter" again, and all the hidden files on the flash drive will display in the folder.
| killall Finder |
After you've eagerly updated to the latest OS version, macOS Sonoma, you may be dismayed to find that all your Sonoma download files are hidden. In this case, this passage can help you solve this problem.

How to See All Files on Mac Hard Drive [Hidden Files/Folders Included]
This article discusses how to see all files on a Mac hard drive, including hidden files and folders. Read more >>
Method 4. Repair the Flash Drive on Mac Using Disk Utility
When the flash drive fails, the files stored on it will disappear. In this case, you can use the Mac's own function to check if the flash drive is faulty. Or you can reformat it to be compatible with macOS.
Run First Aid to Repair the Flash Drive
The First Aid in Disk Utility can help users check disk health and repair disk errors. Here are the steps to run First Aid on the flash drive:
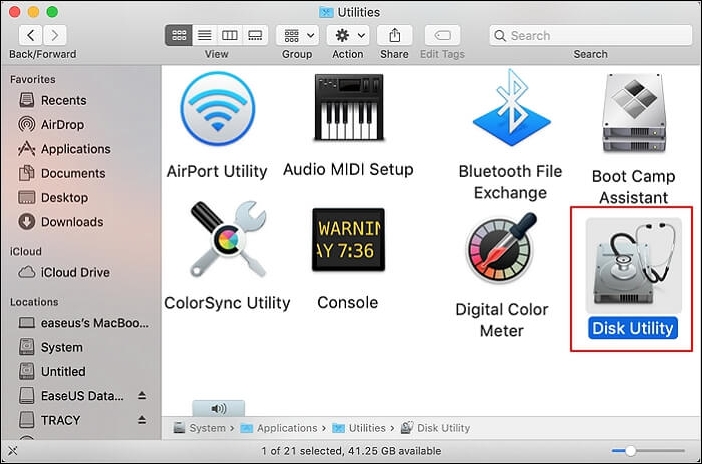
Step 1. Open Disk Utility from "Applications > Utilities > Disk Utility".
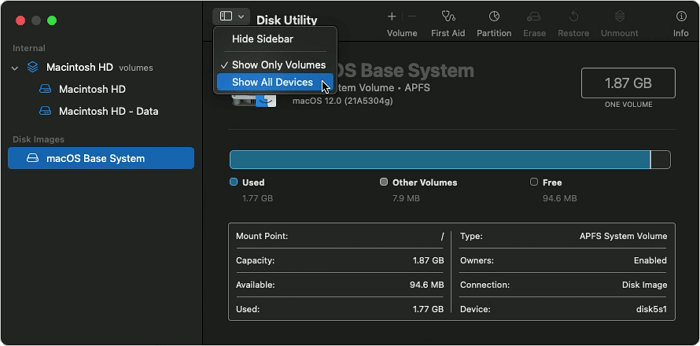
Step 2. Choose the flash drive in the Disk Utility windows, and click "First Aid" at the top menu. If you don't see the flash drive, select the "Show All Devices" option.
Wait for the repair process to complete, and open the flash drive folder to check if the disappeared files show up.
Reformat the Flash Drive
In addition, an incompatible file system format also leads to the error that files disappear from a flash drive. So, consider backing up essential files on the flash drive and then reformat it.
Step 1. Open Disk Utility from "Applications > Utilities > Disk Utility".
Step 2. Choose the flash drive in the Disk Utility windows, and click "Erase" at the top menu. If you don't see the flash drive, select the "Show All Devices" option.
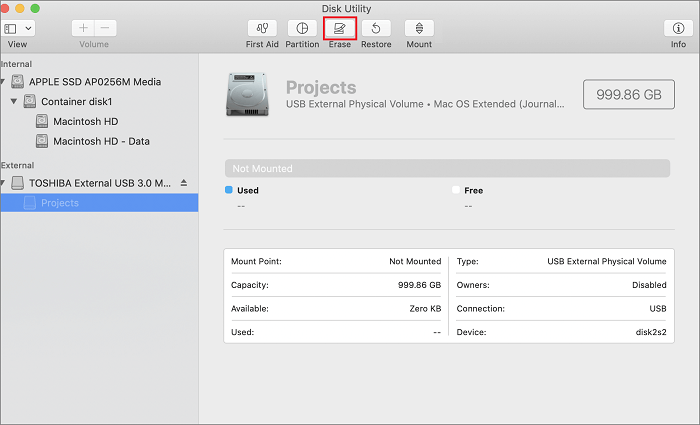
Step 3. Choose a new file system format for your flash drive (ExFAT vs Mac OS Extended), and reset a new name if you want. Then, click "Erase" again to confirm the reformat process.
Tips to Avoid Files Disappeared from a Flash Drive
To avoid files disappearing from your flash drive, take a look at the following tips:
- When plugging in a flash drive to your Mac, do not pull it out without unmounting it.
- Download third-party software from safe and reliable sources to avoid installing virus-carrying software, which may cause the data to be unreadable.
- Always back up important files in multiple storage locations on different devices to avoid data loss.
- Installing reliable data recovery software like EaseUS Data Recovery Wizard for Mac Pro maximizes the probability of returning your data.
Conclusion
This article introduces 4 effective methods to fix the files disappearing from a flash drive problem. We recommend a professional and safe download data recovery tool - EaseUS Data Recovery Wizard for Mac Pro, to recover the disappeared files from the flash drive.
Recover Files Disappeared from Flash Drive on Mac FAQs
Read the following questions to learn more about the files that disappeared from a flash drive on Mac issue:
1. Why did files disappear from my flash drive?
Partition corruption on the flash drive, the flash drive's file format incompatibility with macOS, and file deletion by mistake are some of the main reasons for the sudden disappearance of files on the flash drive.
2. How do I find missing files on my Mac flash drive?
Here are four effective methods, as we mentioned, to find the missing files on your Mac flash drive:
- Method 1. Recover missing files using EaseUS Data Recovery Wizard for Mac Pro
- Method 2. Recover missing files from the Trash bin
- Method 3. Unhide missing files from the Mac flash drive
- Method 4. Repair the Mac flash drive using Disk Utility
3. Can you recover lost files from a USB Mac?
You can recover lost files from a USB flash drive on your Mac by following the steps below:
Step 1. Download and install EaseUS Data Recovery Wizard for Mac Pro.
Step 2. Open the EaseUS software on your Mac and select the USB flash drive in the software window.
Step 3. Click "Search for lost files" to view all the lost files from the USB flash drive.
Step 4. Select the lost files you want, and click "Recover" to get them back.
Was This Page Helpful?
Brithny is a technology enthusiast, aiming to make readers' tech lives easy and enjoyable. She loves exploring new technologies and writing technical how-to tips. In her spare time, she loves sharing things about her game experience on Facebook or Twitter.
-
EaseUS Data Recovery Wizard is a powerful system recovery software, designed to enable you to recover files you’ve deleted accidentally, potentially lost to malware or an entire hard drive partition.
Read More -
EaseUS Data Recovery Wizard is the best we have seen. It's far from perfect, partly because today's advanced disk technology makes data-recovery more difficult than it was with the simpler technology of the past.
Read More -
EaseUS Data Recovery Wizard Pro has a reputation as one of the best data recovery software programs on the market. It comes with a selection of advanced features, including partition recovery, formatted drive restoration, and corrupted file repair.
Read More
Related Articles
-
How to Recover a Replaced File on Mac
![author icon]() Tracy King/Feb 23, 2024
Tracy King/Feb 23, 2024 -
Backup Mac to iCloud: How to Use iCloud to Back Up MacBook Air/Pro
![author icon]() Jaden/Feb 23, 2024
Jaden/Feb 23, 2024 -
How to Recover Data from a Mac with a Broken Screen [2024 Solutions]
![author icon]() Dany/Feb 23, 2024
Dany/Feb 23, 2024 -
How to View Pictures from SD Card on Macbook
![author icon]() Jean/Feb 23, 2024
Jean/Feb 23, 2024