Is your Mac easily accessible? Do you take it along often to the cafe or office? If yes, anyone can access your data, especially if you lose it or someone steals it! Such situations are avoidable, yet not always. Sometimes, mishappenings do occur. Therefore, it's essential to turn on FileVault on Mac to secure your data.
Being a Mac user, you benefit from applying Apple's advanced security features. So, if you want to turn on FileVault on Mac, we have covered you all!
What is FileVault on Mac
FileVault is a robust and vital security feature Apple provides its Mac users. The feature protects your data against unauthorized access and potential breaches. It encrypts your entire Mac start-up disk, ensuring that all data remains protected and confidential, even if you lose your device.
You may be familiar with lock Mac screens to keep your data safe but not with FileVault. As soon as you enable FileVault, it encrypts the data into an unreadable format, owing to advanced encryption algorithms.
This process converts the files into a code that can only be deciphered with a decryption key. Further, the key is connected to your account's credentials, creating a solid barrier between the threat and your data.
When you start your Mac, FileVault asks for a password (Click here if you forget your MacBook password). This is the first step towards accessing the system and unlocking the decryption key.
After that, you can use your data as you usually would. When you turn off or log out, FileVault automatically re-encrypts the data, safeguarding your valuable data.
Should I Turn on FileVault Disk Encryption
Enabling FileVault is crucial for protecting hard disk data and maintaining data security. Unlike hiding files on Mac, this in-built feature employs robust encryption to protect your MacBook, which includes files, applications, and other sensitive information, from unauthorized access.
If someone tries to access the data on your Mac, they won't be able to do so due to robust encryption techniques. It requires the correct passcode or recovery key.
Turning on FileVault also ensures compliance with data protection regulations and protects you from any breaches. The software operates seamlessly in the background with minimal performance impact. This makes it an effective and convenient security measure. FileVault is a vital layer of defense that ensures peace of mind.
In addition, turning on FileVault on Mac can help you unlock your MacBook Pro without a password! So, let's learn how to turn it on!
How to Turn on FileVault on Mac [with Video]
Here is a video explaining how to enable FileVault on macOS. This tutorial will apply to MacBook Pro, Air, and Mini's running the macOS operating system.
- 00:00 - Intro to FileVault and Situations
- 01:13 - Turn on FileVault from System Preferences
- 03:03 - Create a Recovery Key and associate it with iCloud
Enabling FileVault is relatively straightforward, and we will guide you through the process step by step:
Step 1. Click the Apple icon from the top-left of the screen
Step 2. Select "System Preferences" from the drop-down menu and navigate to "Security & Privacy".

Step 3. In it, navigate to the FileVault tab, and at the bottom, click the padlock icon.
Step 4. Now, input your Apple passcode and click "Turn on FileVault".
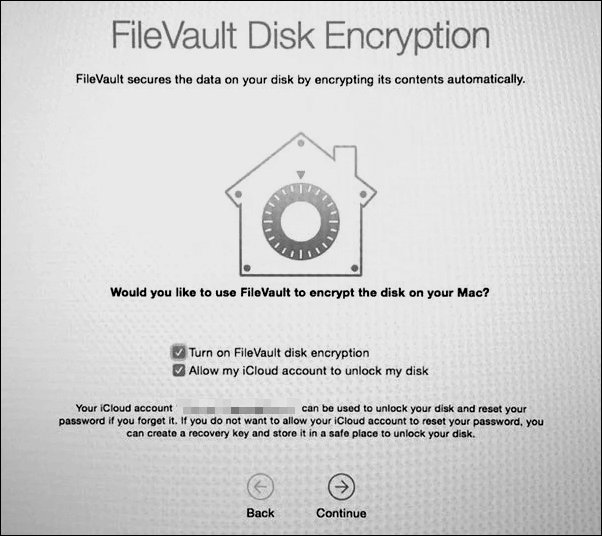
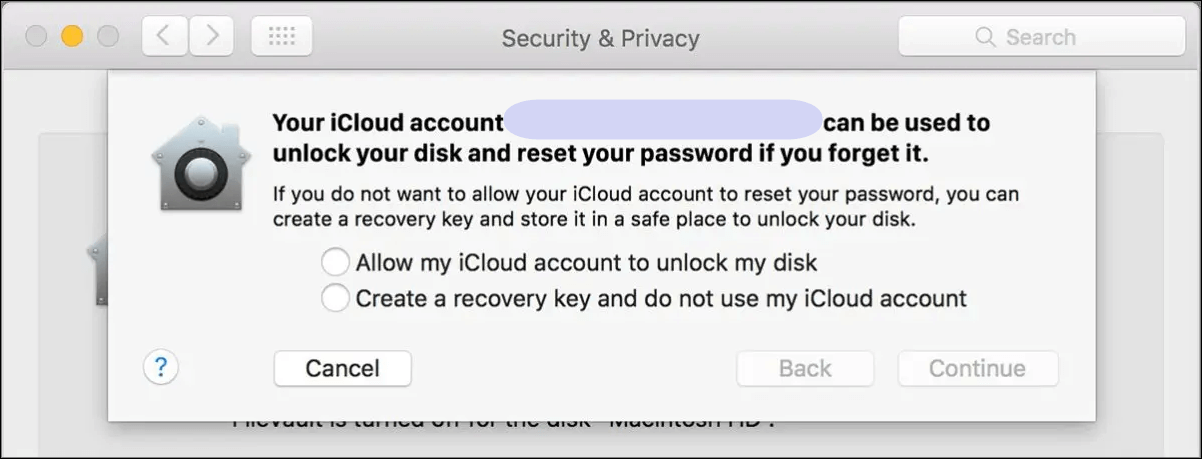
Step 5. When you enable "FileVault", you must select how to unlock the startup disk if you forget the password. There are the following options:
- iCloud account and password: This is a more convenient option if you already have one.
- Recovery Key: It generates a key you must write somewhere and keep safe. If you forget your password, you can recover your startup disk through the Mac recovery key.
Step 6. Plug in the charging cable to start the encryption process.
The entire process takes a couple of hours and sometimes even a day, depending on the kind of data and amount you have.
Share this article on social media to help others learn how to turn on FileVault on Mac.
Recover FileVault Encrypted Data on Mac
Imagine you forgot your iCloud credentials and recovery key, and now there is no way you can recover your encrypted data from the computer. What will you do?
A great thing about the technological revolution is that a solution to any problem is just around the corner. Let us introduce you to EaseUS Data Recovery Wizard for Mac, which is dedicated to helping Mac Users. With this APFS recovery tool, you can recover APFS SSD with an encrypted partition on your Mac.
Irrespective of how you lost your Mac data, this software can recover permanently deleted files on Mac most safely. This versatile software is not limited to MacBook; you can recover your lost files from multiple devices, such as decrypting an SD card without the original device, hard drive recovery on Mac, etc.
Check out the following 3 steps to recover your data on FileVault encrypted Mac:
Step 1. Select the drive to be scanned
In the main EaseUS Data Recovery Wizard window, there will be a list of the drives connected to your Mac. Select the drive you need to recover lost/deleted files from, and click the "Search for lost files" button.
Note: Before data recovery, you'd better click "Disk Backup" from the left sidebar to create a backup of your Mac to avoid further data loss. After backing up, the software can recover data from the Mac backup, and your computer can wirte new data again.

Step 2. Select your lost data/files
EaseUS Data Recovery Wizard for Mac will immediately scan your selected disk volume and display the scanning results on the left pane. You can sort the results to find the wanted files if you are looking for certain files.

Step 3. Recover lost/deleted data
Once you have found the desired files, preview the files and then click "Recover" to begin the recovery of your deleted/lost Mac files.

Conclusion
Enabling FileVault encryption on your Mac is a crucial step towards reinforcing the privacy and security of your data. Our comprehensive guide helps easily enable FileVault and protect sensitive files from unauthorized access.
Additionally, it is wiser to take that extra step to protect your data by installing recovery software like EaseUS Data Recovery Wizard for Mac. There can be instances where you may need access to iCloud or a recovery key. In such anxious situations, you can always rely on recovery data software to do your job.
How to Turn on FileVault on Mac FAQs
Now that you know how valuable FileVault is for macOS users, let's check out some FAQs and learn more.
1. How to disable FileVault on Mac?
To disable FileVault on Mac, go to "System Preferences > Security & Privacy > FileVault". Unlock with the admin password, click "Turn Off FileVault", and follow the prompts. Encryption will be removed, and data will be decrypted. Ensure to restart the computer.
2. How is FileVault enabled on my Mac?
To check if FileVault is enabled, go to "Apple Menu > System Preferences > Security & Privacy > FileVault". If "FileVault is On for [username]" is displayed, it's enabled. The disk icon indicates encryption status. The lock icon means encrypted; the unlocked icon means decrypted.
3. How do I use the FileVault recovery key on my Mac?
To use the FileVault recovery key on your Mac, start your Mac, enter your username at the login screen, click "Forgot all passwords", enter the recovery key, reset your password, and log in with the new password to unlock your encrypted disk and access your data.
4. What can I do when I forget my FileVault password?
When you forget your FileVault password, you can use the recovery key you generated during setup. Restart your Mac, enter your username, click "Forgot all passwords" on the login screen, input the recovery key, reset your password, and log in. You can use data recovery software such as EaseUS if you lose your password and recovery keys.
Was This Page Helpful?
Brithny is a technology enthusiast, aiming to make readers' tech lives easy and enjoyable. She loves exploring new technologies and writing technical how-to tips. In her spare time, she loves sharing things about her game experience on Facebook or Twitter.
Related Articles
-
[Solved] How to Fix Windows Update Error Code 0x8024402c
![author icon]() Jaden/2024-01-11
Jaden/2024-01-11 -
Right-click Not Working on Mac [6 Methods]
![author icon]() Brithny/2024-01-11
Brithny/2024-01-11 -
How to Fix User Profile Cannot Be Loaded in Windows?
![author icon]() Daisy/2024-01-11
Daisy/2024-01-11 -
What Is Allocation Unit Size For SD Card? Everything You Should Know
![author icon]() Cici/2024-02-18
Cici/2024-02-18

EaseUS Data Recovery Services
EaseUS data recovery experts have uneaqualed expertise to repair disks/systems and salvage data from all devices like RAID, HDD, SSD, USB, etc.