When you launch Windows Update, it makes an effort to connect to the internet to update your PC, and this problem can show up: 0x8024402c. How to fix the error? Here is the quick navigation.
| Workable Solutions | Step-by-step Troubleshooting |
|---|---|
| Fix 1. Enable Automatic Network | In the first method, we shall enable automatic network detection settings via Windows Settings...Full steps |
| Fix 2. Disable Windows Firewall | By temporarily disabling Windows Defender Firewall, check whether the error code 0x8024402c...Full steps |
| Fix 3. Delete Distribution | In this method, you should delete software distribution to eliminate the error...Full steps |
| Fix 4. Restart to Clean the Boot | We will perform a Clean Boot via System Configuration to eliminate the error...Full steps |
| More Fixes | The other 2 fixes are available here for you to fix Windows update error 0x8024402c...Full steps |
What Is Windows Error Code 0x8024402c
This occurs when the PC cannot correctly connect to the Windows Update Server, which then confuses the system and ultimately causes it to crash and display the blue screen of death. An incorrect network setting, LAN setting, or update setting that does not comply with the update requirements could cause this issue. By approving the Automatically detected connection settings, it can be stopped.
The connection between the PC and the Windows Updates servers may break down if the firewall or proxy settings are misconfigured, another possible reason for this issue. Given below are more causes on why the Windows update error 0x8024402c occurs:
- ⏳Pending updates
- ⚙️Incorrect time setting on your PC
- 📃Damaged files
- 🚮Junk files that contain active threats
- 🧱Incorrect firewall configuration preventing critical computer updates
So, these are the possible causes of the error 0x8024402c Windows 10 or 11 error. Now, let us move on to the solutions to solve the error.
How to Fix Windows Update Error Code 0x8024402c
There are several methods to fix the Windows 11/10 error 0x8024402c. Check out the solutions below for the error code and a detailed video.
- 00: 22 - Disable Proxy Settings
- 00: 57 - Reset Proxy
- 01: 46 - Install Windows Updates
- 02: 18 - Automatically detect LAN Settings
So, I hope this video helped you understand more about Windows 11/10 error 0x8024402c. Now, let us move on to the detailed solutions for this error.
- Fix 1. Enabling Automatic Network Detection Settings
- Fix 2. Temporarily Disable Windows Defender Firewall
- Fix 3. Delete Software Distribution
- Fix 4. Restart to Access Clean Boot
- Fix 5. Removing the Invalid Characters in the Proxy Exception List
- Fix 6. Changing the DNS Servers
Fix 1. Enabling Automatic Network Detection Settings
In the first method, we shall allow automatic network detection settings via Windows Settings. Here is how to go about it:
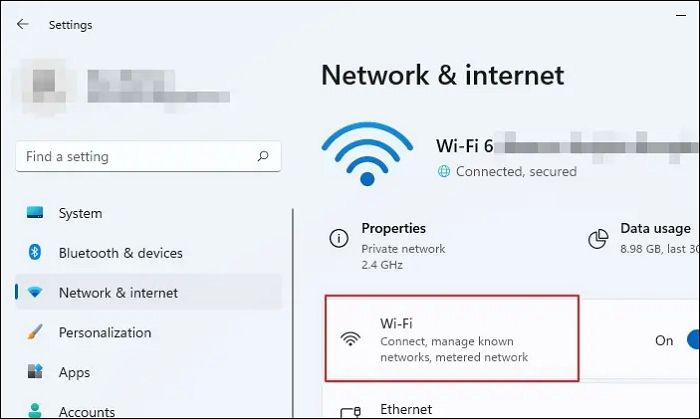
Step 1. Press the Windows key + I to open Settings.
Step 2. Choose Network & Internet from the left pane.
Step 3. Click on Wi-Fi. Next, click on the Wi-Fi properties you are connected to.
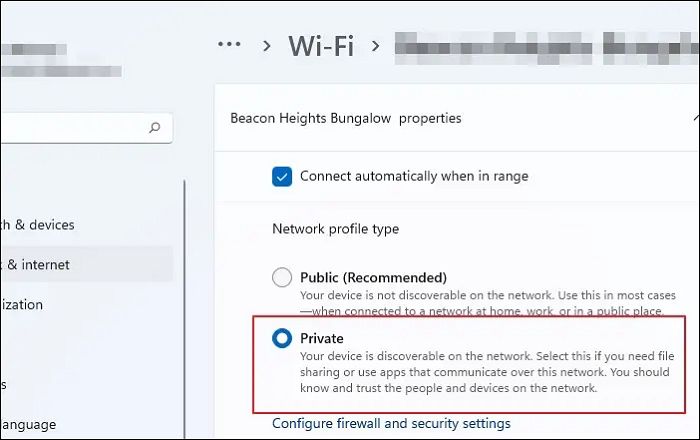
Step 4. Under the Network profile type, click the "radio" button next to the Private option to enable automatic network detection. This will make your PC discoverable and may help eliminate the Windows error code 0x8024402c.
Fix 2. Temporarily Disable Windows Defender Firewall
By temporarily disabling Windows Defender Firewall, check whether the error code 0x8024402c gets eliminated. This is how you go about it:
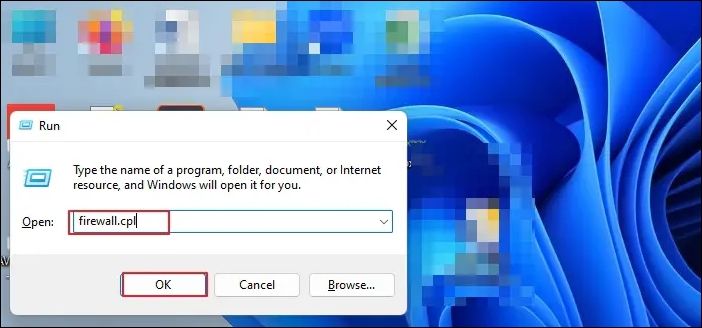
Step 1. Type firewall.cpl into the Windows search bar and press Enter.
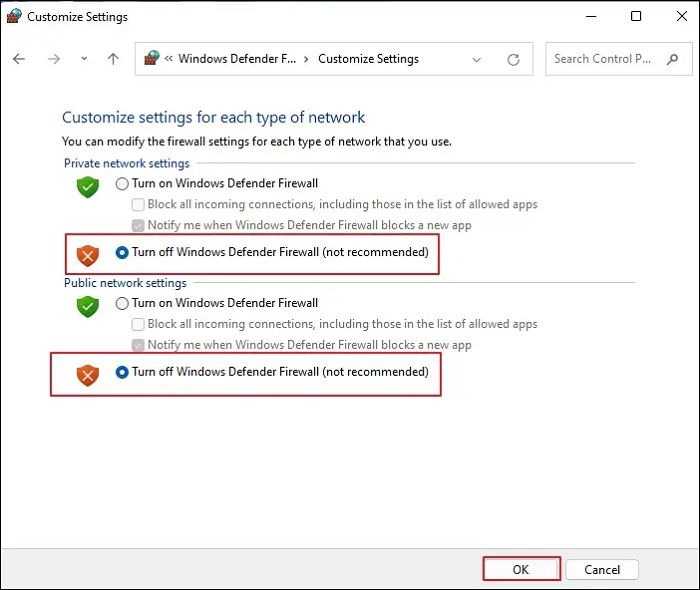
Step 2. On the left side of the windows, click the "Turn Windows Defender Firewall" on or off option.
Step 3. Under Private Network Settings, click the "radio" button next to Turn off "Windows Defender Firewall". Do the same for Public Network Settings and click "OK" to save the changes.
You should now check the Windows updates and see whether the issue is fixed.
Fix 3. Delete Software Distribution
In this method, you should delete software distribution to eliminate the error. This is how you go about it:
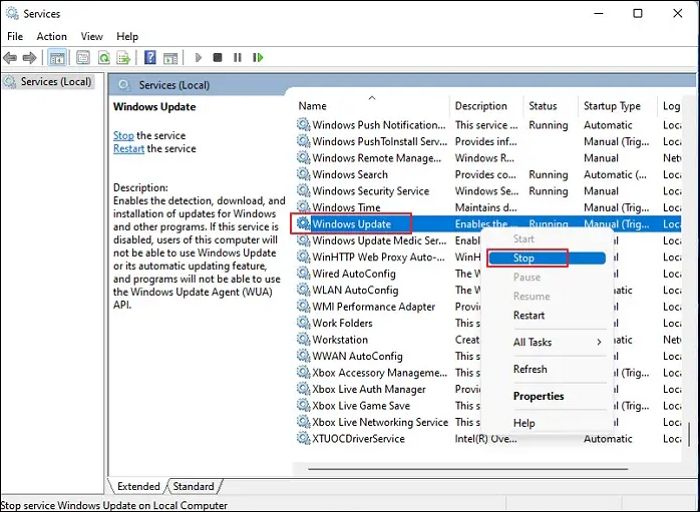
Step 1. Type Services into the Windows search bar, right-click on the result and choose the Run as administrator option.
Step 2. In the Services window, please scroll down and locate the Windows Update option, right-click on it, and choose the "Stop" option from the context menu.
Step 3. After it stops, click on File Explorer and choose Local Disk (C:).
Step 4. Click on the "Windows folder". Next, please scroll down and locate the SoftwareDistribution folder, right-click on it, and choose the Delete option from the context menu.
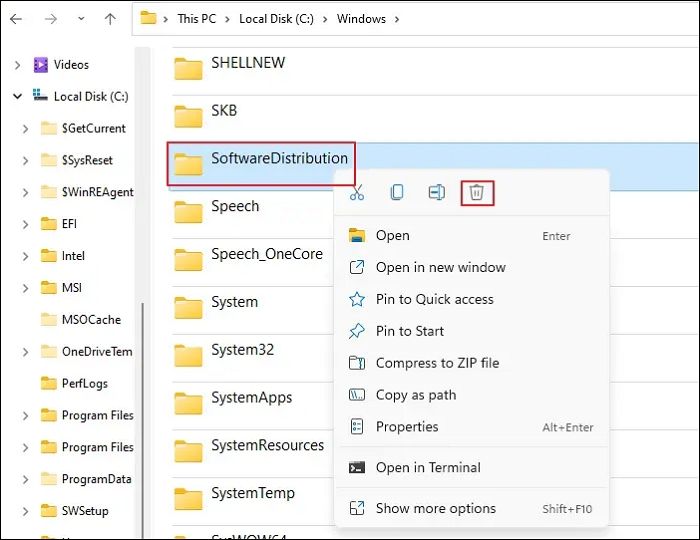
After removing the contents from the SoftwareDistribution folder, check whether the Windows 11/10 error 0x8024402c disappears.
Fix 4. Restart to Access Clean Boot
We will perform a Clean Boot via System Configuration to eliminate the error. Let us see how to go about it:
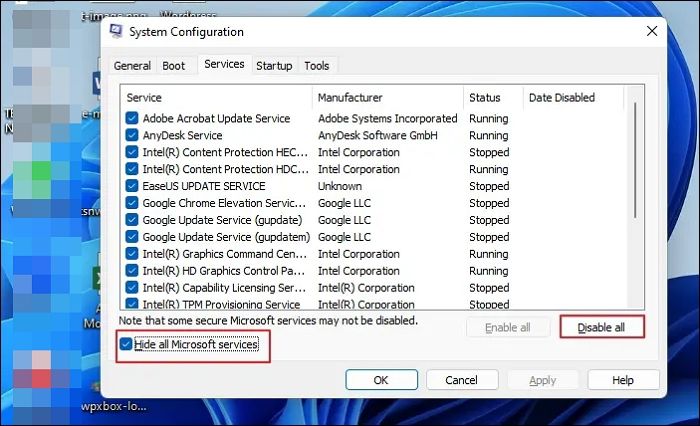
Step 1. Press Windows key + R to open the Run dialogue box. Type msconfig into the text box and press OK. This will open the System Configuration window.
Step 2. Click the "Services" tab and the check box next to "Hide all Microsoft services" to enable it. Next, click the "Disable al"l button and "Apply".
Step 3. Click on the Startup tab and click on "Open Task Manager". Next, please find all the application that has the Enabled status, right-click on them, and choose the Disabled option.
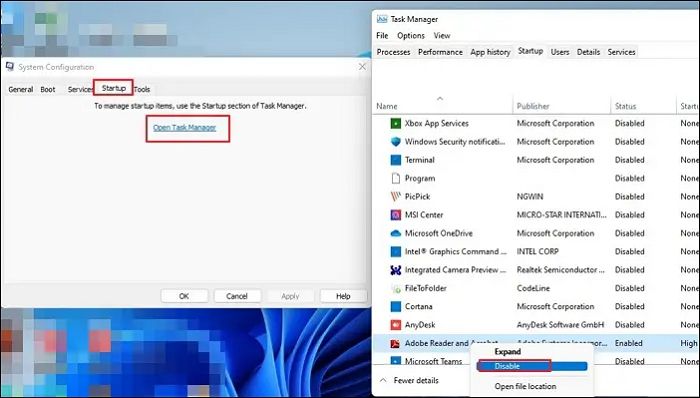
Step 4. Close the window and click OK. Click the Restart button to apply the changes in the System Configuration prompt.
Fix 5. Removing the Invalid Characters in the Proxy Exception List
In the proxy exception list, remove all the invalid characters. This is how you go about it:
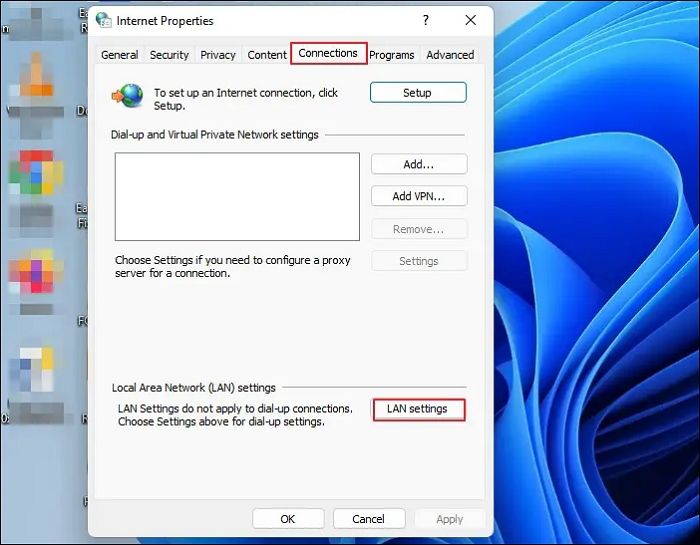
Step 1. Type internet options into the Windows search bar and click on the result to open the Internet Properties window.
Step 2. Click on the "Connections" tab and the LAN settings button.
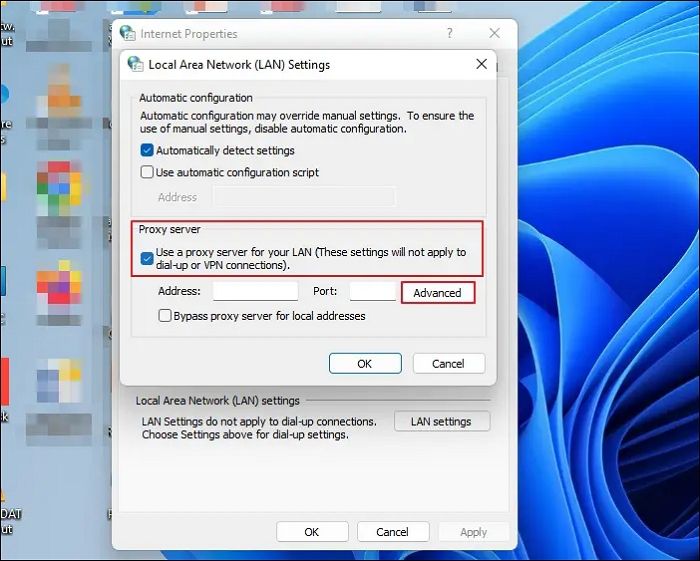
Step 3. In the next window, click on the radio button next to Use a proxy server for your LAN and click on the Advanced button to open Proxy Settings.
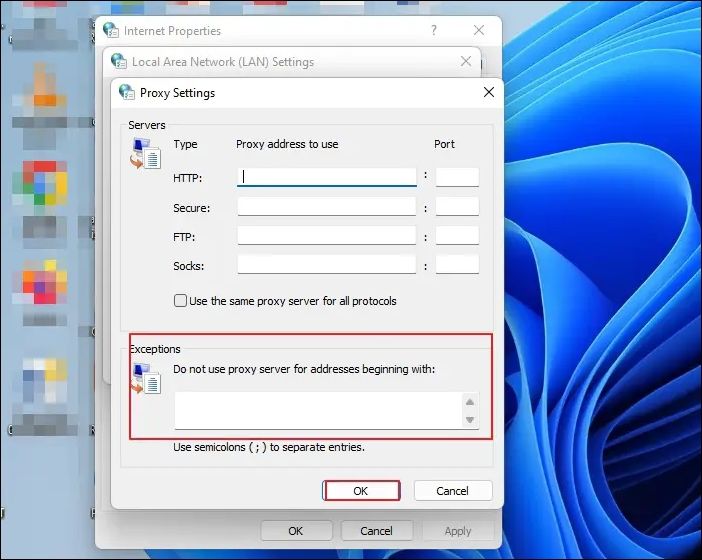
Step 4. Delete everything in the Do not use a proxy server for addresses beginning with the field, press OK in the prompt window, and OK again to close the LAN settings window.
The next step is to clear the proxy cache. Here is how to go about it:
Step 1. Right-click on the Windows logo and click on Windows Terminal (Admin).
Step 2. Press Enter after typing each command line one by one:
netsh winhttp reset proxy net stop wuauserv net start wuauserv
The error code 0x8024402c should be resolved after it is finished.
Fix 6. Changing the DNS Servers
In this method, change DNS servers to fix the 0x8024402c error. Let us see how to go about it:
Step 1. Press the Windows key + R to open the Run command box and type ncpa.cpl into the text box and press Enter to open the Wi-Fi-Status window.
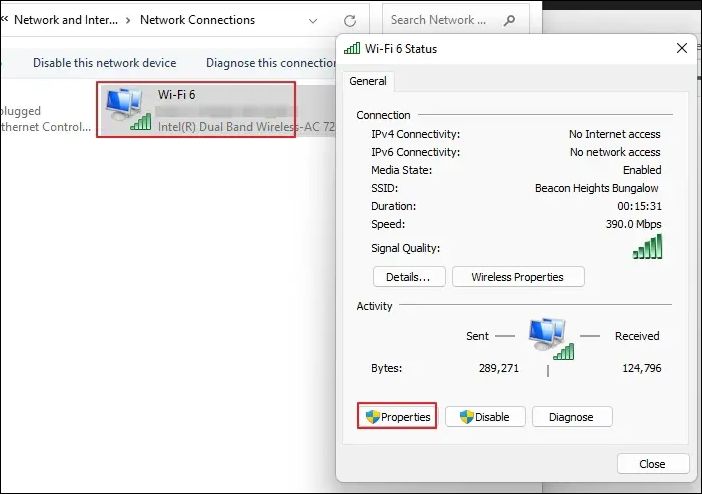
Step 2. Click on the Properties button. Next, locate the Internet Protocol Version 4 option and double-click on t to open its properties.
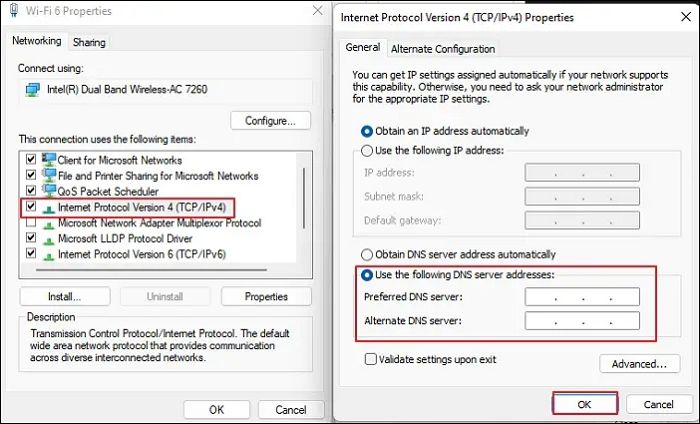
Step 3. Click on the radio button next to Use the following DNS server addresses and type in the following addresses:
- Preferred DNS server: 8.8.8.8
- Alternate DNS server: 8.8.4.4
Step 4. Click OK to update the changes and check whether the Windows error code 0x8024402c has disappeared.
Windows users have proved the efficacy of these fixes. If one of the methods helps fix the Windows update error 0x8024402c, share it on Facebook, Twitter, Instagram, and other social media platforms!
How to Recover Data When Fixing Error 0x8024402c
Windows users may lose data after fixing error code 0x8024402c. So, to recover deleted files from Windows 11/10/8/7, I recommend using EaseUS Data Recovery Wizard. It was created to aid in the recovery of data lost as a result of a file system malfunction, system crashes, and unintended file deletion. Even novice users can recover files quickly because of the software's user-friendly interface.
EaseUS Data Recovery Wizard
- It can recover lost photos, videos, music files, documents, and other files with simple clicks.
- This software recovers data from external hard drives, SSD, USB flash drive, and pen drive.
- It makes restoring a partition's data simple, even if it has been completely lost or the system cannot recognize it.
Download it now and follow the guide below to restore data from your PC quickly.
Note: To guarantee a high data recovery chance, install EaseUS data recovery software on another disk instead of the original disk where you lost files.
Step 1. Launch EaseUS Data Recovery Wizard on your Windows 11, Windows 10, Windows 8, or Windows 7 computer. Select the disk partition or storage location where you lost data and click "Scan".

Step 2. This recovery software will start scanning the disk to find all lost and deleted files. When the scan process completes, click "Filter" > "Type" to specify lost file types.

Step 3. Preview and restore lost Windows files. You can double-click to preview the scanned files. Then, select the target data and click the "Recover" button to save them to another safe spot in the PC or an external storage device.

Conclusion
The abovementioned techniques can resolve the Windows Update error code 0x8024402c.
You can also consider setting up a time sync between your PC and the internet, then restarting Windows Updates. When updates stop working due to malware, you can run security software. You should also be aware that Windows Updates is a compassionate application; if it has problems, the system will be adversely affected and may start to run slowly or improperly. So, follow the solutions given in this article carefully for a smooth and successful completion of the Windows update without any errors.
Also, note that after fixing the error code 0x8024402c, you may lose some data on your PC. So, download and use the data recovery tool EaseUS Data Recovery Wizard to save all your lost files. So that is it! I hope this article helped you resolve the error code issue!
Windows Update Error Code 0x8024402c FAQs
Do you have more questions on the Windows update error code 0x8024402c? Check out the frequently asked questions and their answers given below:
1. What does 0x8024401c mean?
You might encounter various issues when connecting to Microsoft's Windows Update servers. It usually happens when you attempt to install updates, but the proxy, firewall, or other network settings are incorrect. 0x8024402C is one of these error codes. The error code is displayed on the screen when a user checks for updates.
2. How do I get rid of the error-checking drive?
On your Windows PC. Right-click on the Windows logo and choose Windows Terminal (Admin). Click Yes on User Account Control prompt and type chkdsk into the Windows Terminal window. Press Enter. CHKDSK will scan for drive errors and let you know if it finds any issues that need repair. Remember that it will not fix the errors without a command.
3. What does the Windows Update client fail to detect with error 0x8024402c?
An incorrect network setting, LAN setting, or update setting that does not comply with the update requirements could cause this issue. By approving the Automatically detected connection settings, it can be stopped.
4. What is error 0x8024402c for feature installation?
Not sure what this is feature installation. Kindly send me a message about it.
Was This Page Helpful?
Jaden is one of the editors of EaseUS who lives and works in Chengdu, China. She focuses on topics concerning PCs and Mac data recovery. Jaden is committed to enhancing professional IT knowledge and writing abilities. She is always keen on new and intelligent products.
Related Articles
-
Windows 10 Thinks My Hard Drive is Removable
![author icon]() Jean/2024-03-15
Jean/2024-03-15 -
MacBook Won't Turn on After macOS Ventura [SOLVED]
![author icon]() Jaden/2024-01-11
Jaden/2024-01-11 -
Fixed Solutions: Can't Erase USB Drive on Mac [10 Ways]
![author icon]() Cici/2024-03-18
Cici/2024-03-18 -
5 Best Free Adobe CC alternatives You Don't Want to Miss
![author icon]() Daisy/2024-01-11
Daisy/2024-01-11

EaseUS Data Recovery Services
EaseUS data recovery experts have uneaqualed expertise to repair disks/systems and salvage data from all devices like RAID, HDD, SSD, USB, etc.