Erase and Reinstall Mac:
Select Apple menu > Shut Down, then hold down the power button until the message "Loading startup options" appears. Next, choose choices, click Proceed, and then adhere to the prompts on the screen. Choose Reinstall for your macOS release from the Recovery app window, click Proceed, and then stick to the onscreen directions.
Do you want to sell your MacBook away or throw it out for personal reasons? Before doing that, it's crucial to erase your Mac as it may contain plenty of personal data. You can't overlook data elimination as it's essential. There are several ways to erase and reinstall macOS. But before proceeding with the steps below, these are the top 4 reasons to erase and reinstall Mac.
| 💻Migrate the old data into the new Mac. | It's crucial to wipe your old Mac clean if you shift your older files & folders to your new Mac. |
| 🗑️Selling your old Mac | If so, you would wipe your files and details for safety. |
| ⚡Speed up your Mac | Erasing older files and reinstalling it helps increase the speed of your system. |
| ⛑️Mac encounters a severe problem | If error messages emerge constantly, the Mac has usability issues, and the software won't function appropriately, you must reinstall macOS. |

Step 1. Backup Mac to External Hard Drive in Advance
Erasing and reinstalling your Mac needs a backup of your files first. So, there are two ways to back up your Mac.
Option 1. Backup Mac to External Hard Disk with Software
The stunning look and excellent operating system of the Mac have attracted millions of buyers. Nevertheless, the information on the laptop is significantly more important than the hardware. To protect your personal data in the terrible event that your laptop crashes or collapses, you should know how to back up your Mac without Time Machine.
Several handy tools are there to help backup Mac to external hard disks. One of the most efficient tools is EaseUS Data Recovery Wizard for Mac Pro. Expert backup and restore software capable of backing up files for users. With this backup software, you don't have to worry about further data loss. It will keep the disk image for you, and you can recover data from the backup later.
Back Up Your Mac and Never Lose Data
Back up and restore your MacBook/iMac without Time Machine, iCloud, or external hard drives.
You can follow the tutorial below to back up your Mac with this professional data recovery tool now!
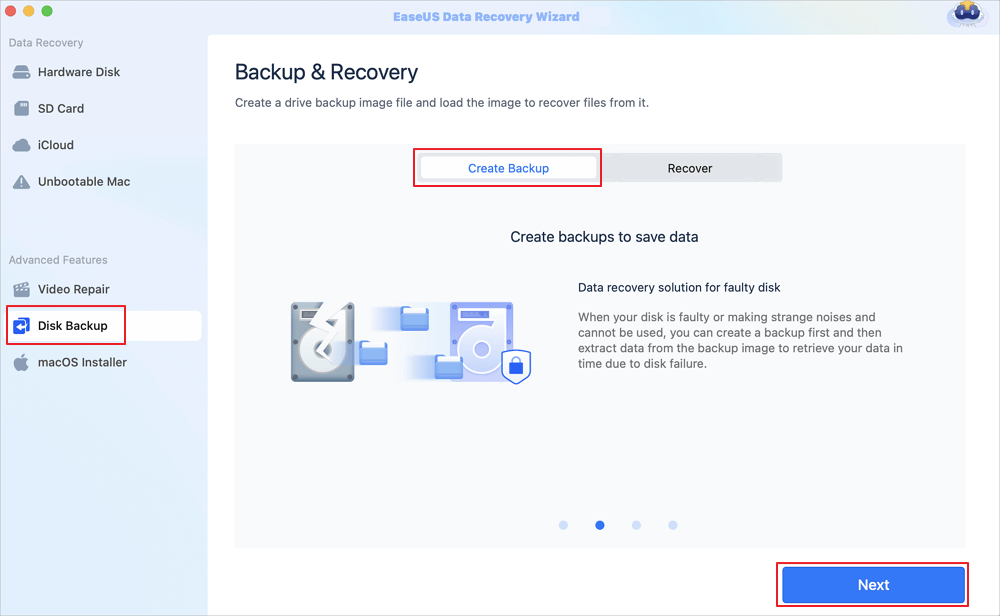
Step 1. Click "Disk Backup" > "Create Backup" > "Next" in EaseUS Data Recovery Wizard for Mac's main interface. You can create a drive backup image file in case the data is overwritten.
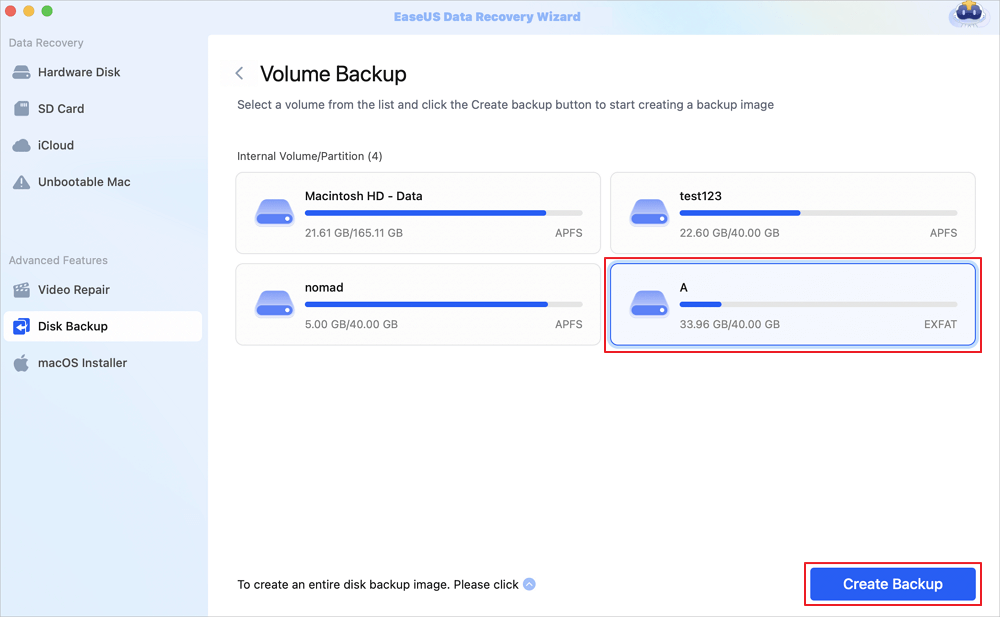
Step 2. Select an internal volume to back up, and click "Create Backup". If you want to create backups and recover data from an external hard drive, USB flash drive, or SD card, remember to connect the storage device to your Mac in advance.
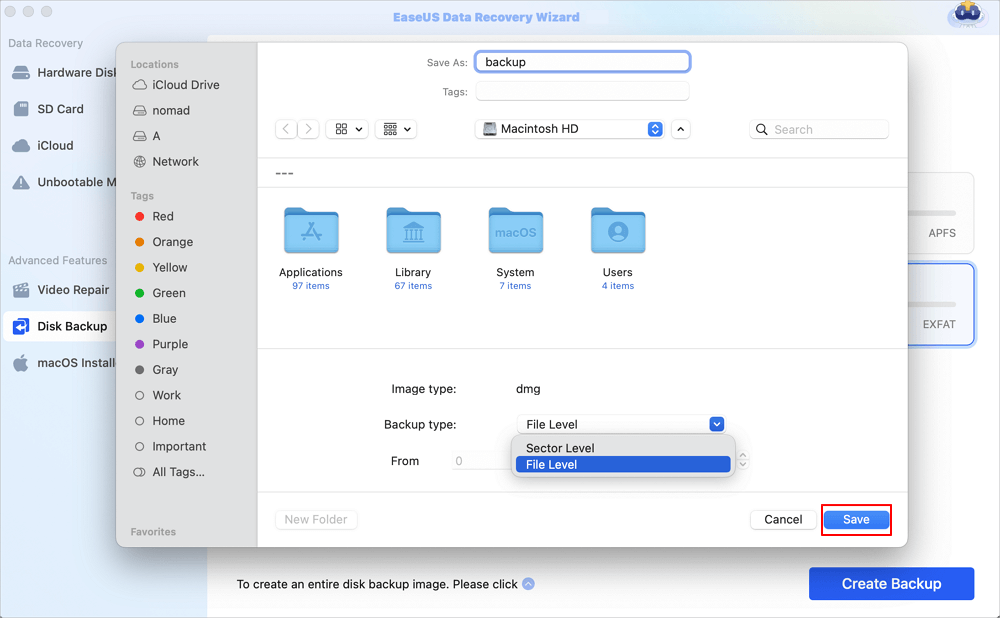
Step 3. Choose a place to save your backup files, and change the name of your backup file, then click "Save". It is not wise to save backups in the same storage device that you want to recover data from.
Also, if you like this page, don't forget to share it with your friends on social media.
Option 2. Backup Your Mac with Time Machine
The data will be deleted if you decide to restart macOS or reboot your computer. Thus, prior to wiping and reinstalling your Mac, you ought to keep a backup of each file. The most straightforward way to backup your Mac is with Time Machine. Follow the steps below to backup your Mac:
Step 1. Merge an external hard drive to your MacBook.
Step 2. Select the "Apple" icon in the menu bar that resides in the upper-left corner of the display.
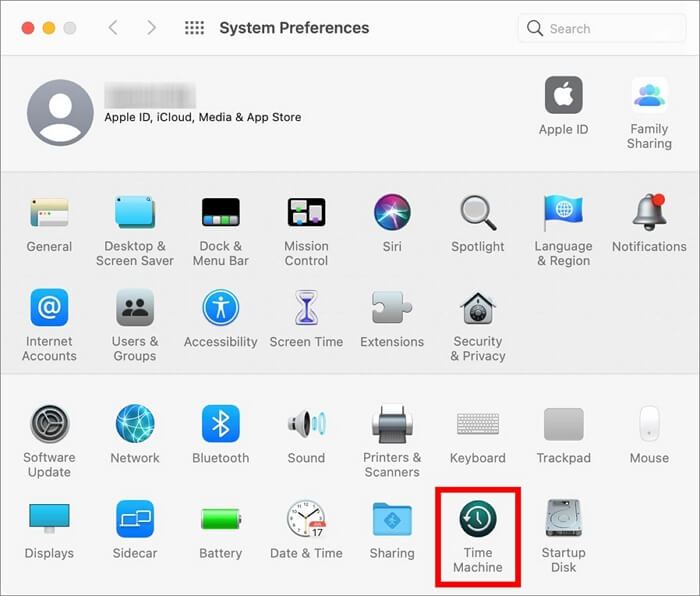
Step 3. Opt for "System Preferences".

Step 4. Select "Time Machine".
Step 5. Hit the "Select Backup Disk" option.

Step 6. Opt for a drive, and hit "Use Disk".

Step 7. Tick the box adjacent to "Backup Automatically." It should initiate the backing-up process on your Mac instantly.

You can also choose to back up all the important files to iCloud. Read the following passage to find a detailed tutorial on backing up Mac to iCloud:

Backup Mac to iCloud | Backup and Restore Mac from iCloud
macOS features a unique backup software to ensure you don't lose crucial files. Continue reading to find out how to back up Mac to iCloud to avoid data loss. Read more >>
Step 2. How to Erase Your Mac with 2 Methods
I was wondering how to erase your MacBook. There are two leading ways to do that: one is using Erase Assistant, and another is Disk Utility.
Option 1. Erase a Mac with Erase Assistant
If you would like to start from scratch with your Mac or think of selling it away, after erasing it using an Erase Assistant, your Mac will demonstrate the Setup Assistant and be ready to be established like a new one. Follow the steps below:
Step 1. Hit the "Apple" icon in the menu bar.
Step 2. Opt for "System Preferences".
Step 3. In case you own macOS Ventura or later, opt for "General" in the sidebar, select "Transfer" or "reset"> "Erase All Content and Settings".

Step 4. Provide your admin password in the "Erase Assistant dialog prompt", and hit OK.
Step 5. Follow the steps above if you haven't backed up your crucial data.
Step 6. If the data has backed up, hit the "Continue" button.
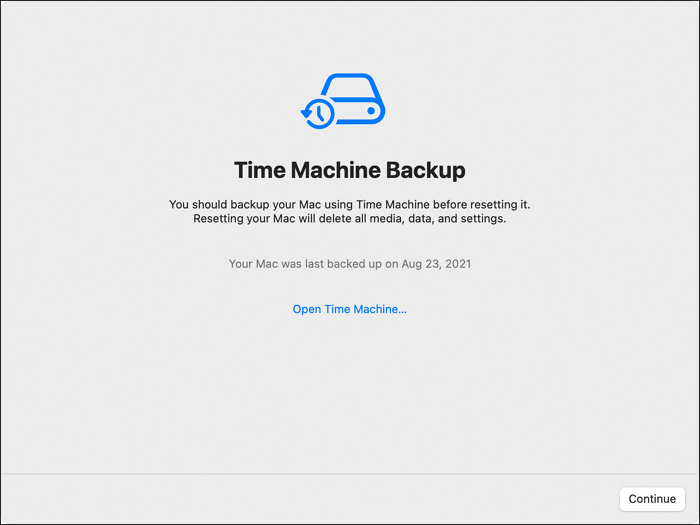
Step 7. Hitting the "Continue" button will eliminate all data and media.
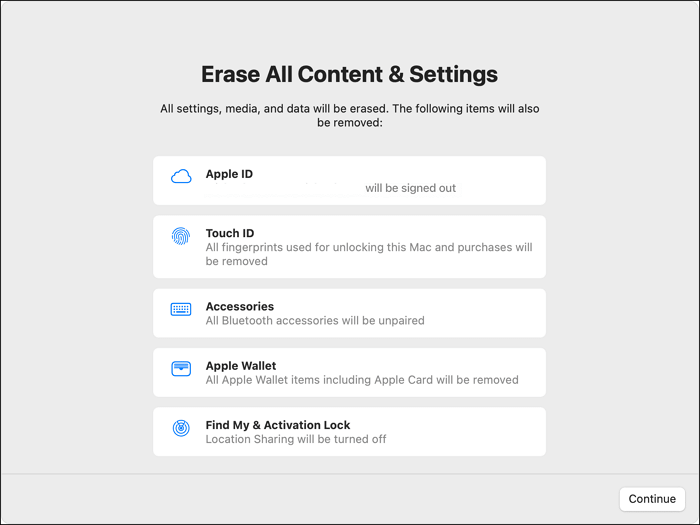
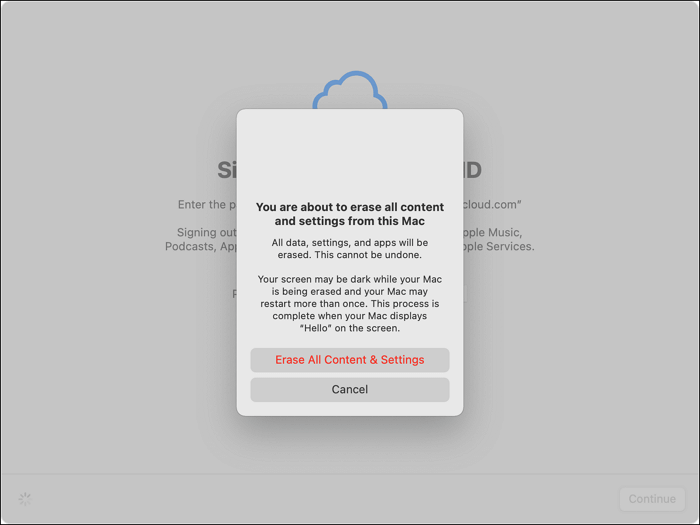
Step 8. Opt for "Sign out of your Apple ID," and hit "Erase All Content & Settings" to confirm.
Option 2. Erase Macs in Disk Utility
If the Erase Assistant is not supported on your Mac, go through the steps below to erase Macs in Disk Utility:
Step 1. Hit the "Apple" icon located in the top left side of your Mac's screen, and opt for the "Restart" button.
Step 2. Press the "Command + R" keys together as you hear the Mac chime specifying a reboot.
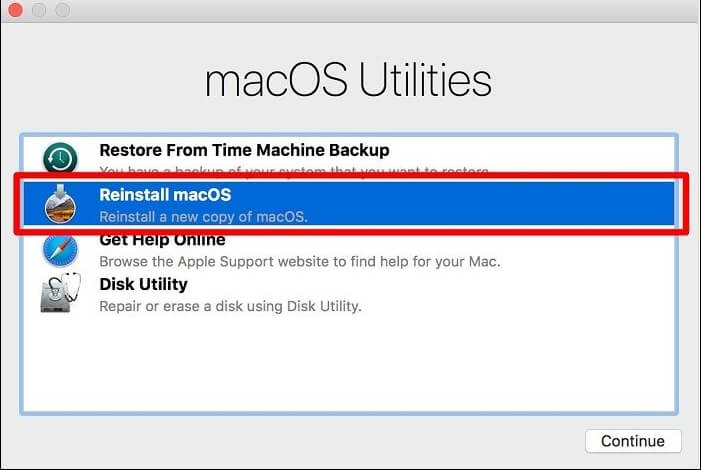
Step 3. Wait for a while until the macOS utilities screen pops up. After that, select "Disk Utility."

Step 4. Opt for your Mac's system drive, named "Macintosh HD," and then hit the "Erase" option.
Step 5. Choose the "Format" option "Mac Extended" or "APFS".

Step 6. Hit the "Erase" button, confirm the action, and wait until the formatting is over.
Step 7. Then, you can reinstall macOS
Keep reading to find the tutorial on reinstalling your Mac!
Step 3. Reinstall macOS with 2 Methods
If you would like to reinstall macOS, two genuine methods are there. One is to reinstall macOS in the macOS Recovery Mode, and another is to clean install macOS with a bootable installer.
Option 1. Reinstall macOS in Recovery Mode
Using the recovery mode is a hassle-free way to reinstall the macOS. The steps to reinstall Apple Silicon Mac are the following:
Step 1. "Restart" your Mac.
Step 2. Press down the "Command + R" keys as your MacBook restarts. Press them until you notice the "Apple" logo on the screen. Release those keys after that.

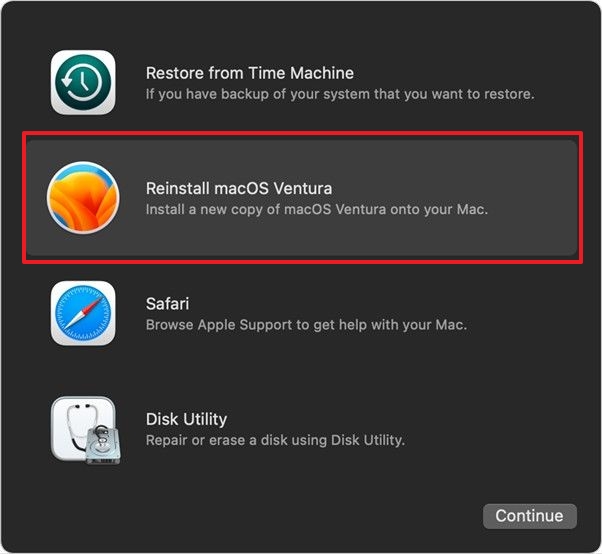
Step 3. Hit the "Reinstall macOS" when you're in recovery mode, and after that, hit the "Continue" button.
Step 4. Hit the "Continue" button when the installer window appears.
Step 5. Hit the "Agree" button, and select the HDD in the subsequent window.
Step 6. Opt for "Install" to commence the process.
The steps to reinstall an Intel-based Mac are the following:
Step 1. Erase your Mac utilizing "Erase Assistant" or Disk Utility.
Step 2. Hit the "Restart" button on your Mac.
Step 3. Opt for the "Apple" menu > "restart," then press and hold the keys: "Option + Shift + Command + R."
Step 4. Reinstall the latest version of macOS using "Command + R".
Step 5. Opt for "Reinstall" in the Recovery app window > Choose "Reinstall" for your macOS release > hit "continue"> go through the onscreen prompts.
Option 2. Reinstall macOS with Bootable Installer
If you want to reinstall the latest macOS Sonoma, you can also create a bootable USB to clean install macOS Sonoma. The bootable USB drive claims that Macs equipped with Intel or Apple Silicon chips load up differently.
On a computer with an Intel processor, follow these steps to reinstall macOS:
Step 1. Press down the "Option" key quickly after restarting your Mac.
Step 2. Release the key instantly when you notice a dark screen demonstrating your bootable volumes.
Step 3. Opt for the volume to have the bootable installer.
Step 4. Hit the "up arrow," or you may hit the "return" option.
Step 5. Opt for the "language".
Step 6. Opt for "reinstall macOS" from the "Disk Utility" Window.
Step 7. Hit the "Continue" button, and go through the onscreen instructions.
Steps to reinstall macOS on an Apple Silicon-based Mac are the following:
Step 1. Switch on your Mac, and hold the "Power" button until you notice the startup options window.
Step 2. Opt for the "volume" having the bootable installer, and hit the "Continue" button.
Step 3. Follow the onscreen prompts when the macOS installer initiates.
You may learn more information on creating macOS Sonoma bootable USB in the following passage:

How to Create macOS Sonoma Bootable USB ✨
If you have macOS Sonoma installed, then it's essential to create a bootable USB in case of an issue with the OS. Read more >>
If you like this passage, please share this with your mates on social media.
Step 4. Restore Data After Erasing and Reinstalling a Mac
By using dependable Mac data recovery programs, you may put an end to your concerns when you lose files after factory resetting your Mac or reinstalling an earlier version of macOS. Therefore, we suggest using EaseUS Data Recovery Wizard for Mac out of all the available Mac data recovery programs. EaseUS Data Recovery Wizard for Mac guarantees that your data will be restored to file restoration following a macOS reinstallation. The significant features of the EaseUS data recovery software are the following:
- ✅Recover files after factory resetting Mac. You can recover lost files after using the Erase Assistant on your Mac.
- ✅Recover formatted hard drive on Mac. You can restore important files even after erasing the Mac disk in Disk Utility.
- ✅Losing data after reinstalling macOS is common. You can recover files after reinstalling macOS with the EaseUS recovery tool.
It helps recover files through raw recovery, offline disk recovery, formatted recovery, inaccessible disk recovery, and more. If you have created a backup with EaseUS earlier, you can follow the steps below to restore from the backup.
Step 1. Launch EaseUS Data Recovery Wizard for Mac when you are ready to extract data from a disk image. Choose "Disk Backup" in the sidebar, and click "Recover" > "Next".

Step 2. Find the DMG file you have created before, and click "Open". If you save the disk image on an external hard drive, you need to connect the backup disk to your iMac/MacBook.

Step 3. EaseUS data recovery software will start scanning immediately and you can filter the lost files on the left side of the window. Choose all the photos/documents/videos/emails you want to recover, and click "Recover". You are allowed to save your files to local/cloud, and you even restore files to iCloud by clicking the "Save" button.

Conclusion
Regardless of your approach, your Mac ought to be spotless by now. If you'd like, you can begin Time Machine file restoration or put your Mac up for sale. Have you lost your file while performing the reinstallation process of macOS? Download EaseUS Data Recovery Wizard for Mac Pro now!
Erase and Reinstall macOS FAQs
Consider the FAQs below to erase and reinstall macOS effectively:
1. Will reinstall macOS erase everything?
Does reinstalling macOS delete data? One easy and rapid way to replace the malfunctioning OS with an updated version is to reinstall macOS with macOS Recovery. Theoretically, you can't remove files or wipe your disk by reinstalling macOS.
2. How to erase and reinstall macOS Sonoma?
All you need to do is boot into "recovery mode,"> opt for your "startup disk,"> hit the "erase" button > opt for "reinstall macOS Sonoma,"> hit the "Continue" button.
3. How to reinstall an Intel-based Mac?
With Command-R, you may launch the macOS Recovery System from the built-in menu. You may employ the other programs in macOS Recovery or reinstall the most recent version of macOS on your machine by using this key combination. With Option-Command-R, you may launch the online-based macOS Recovery.
4. Can I recover data from an erased Mac?
Macs come with a built-in backup feature called Time Machine that lets you restore deleted data from a backup. Otherwise, you may use EaseUS Data Recovery Wizard for Mac to retrieve data from an erased Mac.
Was This Page Helpful?
Dany is an editor of EaseUS who lives and works in Chengdu, China. She focuses on writing articles about data recovery on Mac devices and PCs. She is devoted to improving her writing skills and enriching her professional knowledge. Dany also enjoys reading detective novels in her spare time.
Related Articles
-
How to Fix the Recovery Server Could Not Be Contacted on macOS Sonoma/Ventura
![author icon]() Brithny/2024-01-11
Brithny/2024-01-11 -
Guide on Recovery Partition Not Showing in My Computer | Find Missing Recovery Partition Easily
![author icon]() Cici/2024-01-11
Cici/2024-01-11 -
How to Activate Windows 10 for Free Permanently in 2024
![author icon]() Jean/2024-03-15
Jean/2024-03-15 -
Fix macOS Monterey Issues on Mac/MacBook [Top 8 Problems and Solutions]
![author icon]() Dany/2024-01-11
Dany/2024-01-11

EaseUS Data Recovery Services
EaseUS data recovery experts have uneaqualed expertise to repair disks/systems and salvage data from all devices like RAID, HDD, SSD, USB, etc.