Have you encountered macOS Monterey issues on Mac? We have organized eight issues and possible solutions to help users solve Monterey's issues.
| macOS Monterey Issues | Step-by-step Troubleshooting |
|---|---|
| 1. Cannot Install macOS Monterey on Mac/MacBook | Multiple reasons explain why users are unable to install macOS Monterey on Mac/MacBook. These...Full steps |
| 2. Stuck on Checking Null when Installing macOS Monterey | Go to the Applications folder. Move the 'Install macOS Monterey' app to Trash. Go to the App Store...Full steps |
| 3. How to Fix macOS Monterey Could Not be Verified | Go to the Apple menu. Choose System Settings from the drop-down menu. Click on General on the right...Full steps |
| 4. How to Fix Copy of macOS Monterey Is Damaged | Go to the Apple menu. Choose System Settings from the drop-down. Click on General followed...Full steps |
| More Issues on Monterey | Go to the Apple menu. Choose System Settings. Click on General and choose Storage. Now, you...Full steps |
macOS Monterey Issues Overview
Released in October 2021, macOS Monterey enjoyed a grand reception, and the introduction of new features created a wave of excitement. Some macOS Monterey features include Universal Control, AirPlay, Focus, Live Text, etc. However, like on all other OS, you may encounter macOS Monterey issues.
Several users have reported different macOS Monterey problems. While some faced Monterey upgrade issues, others had to find solutions to macOS Monterey installation issues, even the macOS Monterey boot problems. The wide range of problems encountered by Apple users led to the search for potential solutions.
Before we move ahead to the list of solutions, it is vital to ensure that your system is compatible with the upgrade to Monterey. Take a look at these models compatible with macOS Monterey:
- MacBook Pro (2017 or above)
- MacBook (2017 or above)
- iMac (2017 or above)
- MacBook Air (2018 or above)
- Mac Mini (2018 or above)
- Mac Pro (2019 or above)
- Mac Studio
- iMac Pro
Read the sections below to know how to fix macOS Monterey issues on Mac/MacBook.
macOS Monterey Issues 1. Cannot Install macOS Monterey on Mac/MacBook
Multiple reasons explain why users are unable to install macOS Monterey on Mac/MacBook. These include poor internet connection, lack of space, software incompatibility, firewall restrictions, etc.
There are several solutions one can use to fix these problems. For instance, you can check the internet connectivity to see if it works properly. Change the service provider if the issue persists. If that doesn't resolve the issue, check the storage space on the system.
For that, you need to go to the Apple menu. Now, choose System Settings and press General. On the right, you will see Storage. Click on it and select All Volumes. Now, you can view a bar color-coded and see what is using how much space. After that, you can uninstall apps and delete data accordingly.
LEARN MORE
If you cannot install macOS Monterey 12 on your MacBook Air/Pro, iMac, or other Mac devices, you'd better find a detailed tutorial to guide you. Still curious? Click here to learn about how to fix macOS Monterey won't Install.
macOS Monterey Issues 2. Stuck on Checking Null When Installing macOS Monterey
Is your Mac stuck on checking null when installing macOS Monterey? It generally happens due to incorrect naming of the drive, and it is also a commonly reported problem when upgrading to Monterey from Mojave.
There are multiple solutions to fix this error. Take a look:
Solution 1. Delete the 'Install macOS Monterey' app:
Step 1. Go to the Applications folder.
Step 2. Move the 'Install macOS Monterey' app to Trash.
Step 3. Go to the App Store and download Monterey again for installation.
Solution 2. Rename the hard disk and then install macOS Monterey
Step 1. Turn off the system and boot Mac into Disk Utility.

Step 2. Select the Mac hard disk you want and choose Erase.
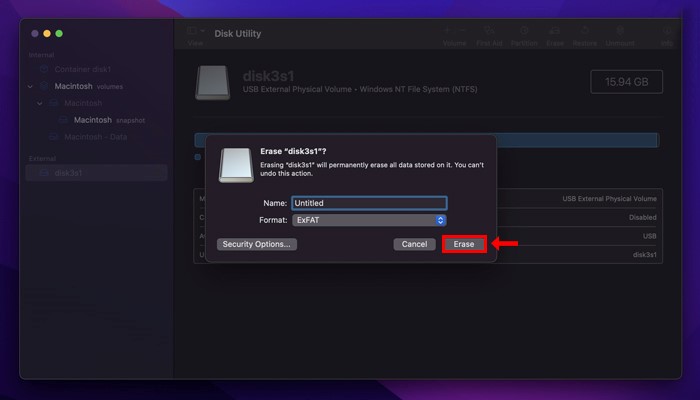
Step 3. Rename the drive. Make sure the format is APFS, and erase it.
Step 4. Install macOS Monterey again.
macOS Monterey Issues 3. macOS Monterey Could Not be Verified
Sometimes, users report "macOS Monterey Could Not be Verified" problems. The primary reasons include issues with the date and time settings and cached data with the user account. There are two solutions you can adopt to fix this problem. Let's take a look:
Solution 1. Download macOS Update
Step 1. Go to the Apple menu.
Step 2. Choose System Settings from the drop-down menu.

Step 3. Click on General on the right side and select Sharing from the left menu.

Step 4. Choose Content Caching. Please turn it off.
Step 5. Restart the system and download macOS Monterey.
Solution 2. Correct Time Sync
Step 1. Go to the Apple menu. Choose System Settings.
Step 3. Click on General. Select Date & Time from the right-side menu.
Step 4: Turn on "Set date and time automatically." Restart the system and give it a try once again.

macOS Monterey Issues 4. Copy of macOS Monterey Is Damaged
Have you witnessed the "This copy of the install macOS Monterey application is damaged and can't be used to install macOS" error? One of the main reasons causing this error might be the date.
To fix this error, take a look at the steps you can follow:
Step 1. Go to the Apple menu.
Step 2. Choose System Settings from the drop-down.
Step 3. Click on General followed by Date & Time.

Step 4. Uncheck "Set date and time automatically."
Step 5. Set the time to a date after the release of macOS Monterey.
Step 6. Rerun to the macOS Monterey installer.
Remember to share this passage with your friends and help them fix macOS Monterey issues!
macOS Monterey Issues 5. Not Enough Space for macOS Monterey Installation
One of the primary reasons for macOS Monterrey installation issues is the lack of space. If upgrading from macOS Sierra or later, you must have at least 26 GB of storage space, and if it is an older version, you will need more space. The recommended amount is 44 GB.
To check how much space you have, follow these steps:
Step 1. Go to the Apple menu. Choose System Settings.
Step 2. Click on General and choose Storage.
Step 3. Now, you can check the amount of space you have.
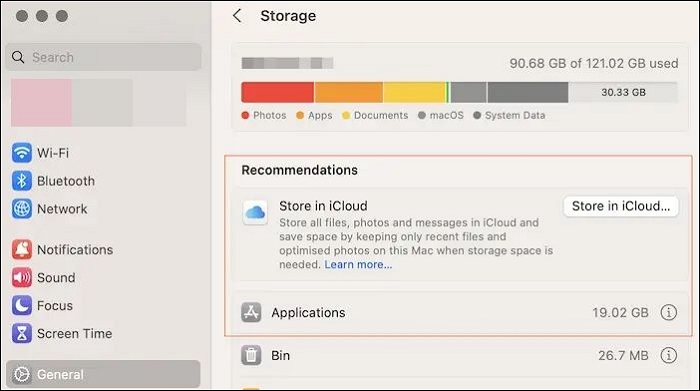
You can also press Manage and see the recommended options to free up space on the disk. Another thing that needs consideration is that the internet connection must be stable. If that doesn't work, delete the partially downloaded OS files. After that, start the download and installation process again.
Here is a passage mainly about not enough space for the macOS Ventura update. You can check detailed tutorials to fix this problem on macOS Monterey, too:
Not Enough Free Space for macOS Ventura Update/Installing/Downloading macOS 13
Here are some possible solutions to free up space on Mac/MacBook to complete the macOS Ventura update. The methods are workable for macOS 12 as well.
macOS Monterey Issues 6. Mac Runs Slow After macOS Monterey Update
Multiple causes can lead to the Mac running slow after the update. It can be due to cluttering the desktop or running multiple background applications. Besides, it can also be due to a lack of disk space or apps that are no longer compatible.
Sometimes, auto-startup applications might affect the functioning of the app. Here are the steps to follow:
Step 1. Go to the Apple menu. Select "System Settings" followed by Login Items on the right side.

Step 2. Go to login items. Choose the item you want to exclude and turn off the button next to it to stop it from auto-starting.
Other solutions include quitting background applications, checking storage space, and ensuring you have enough space.
- Tip
- If you have encountered this issue on your macOS Ventura Mac as well, you can get full solutions to fix this problem by reading this page: How to Fix Mac Runs Slow After macOS Ventura Upgrade [8 Ways to Speed Up].
macOS Monterey Issues 7. Mac Cannot Boot After macOS Monterey Installation
Multiple reasons can lead to booting problems after macOS Monterey installation. For instance, it could be a lack of power or issues with external devices. It can also be due to problems with NVRAM/PRAM.
To reset NVRAM, restart the system, and when it turns on, press and hold Command, Option, P, and R keys. As the system restarts, wait for the second startup sound. When you hear that, release the keys. The NVRAM/PRAM is reset.
macOS Monterey Issues 8. macOS Monterey Is Stuck on 'Setting Up Your Mac'
Sometimes, updating the system to the recent version can lead to the "Setting Up Your Mac" error. It can also happen while booting up the system for the first time. There are several solutions to fix this problem. Let's take a look
Solution 1. Restart the system to fix the error
Step 1. Go to the Apple icon.
Step 2. Select Restart.
Step 3. Wait for the system to shut down and turn on.
If that's not possible, you need to hard restart Mac. For that, press the power button and hold it for a few seconds. After it turns off, please wait and press the power button to turn it on again.
Solution 2. Try installing macOS Monterey in Safe Mode
Check out these steps:
Step 1. Turn off the system.
Step 2. Press and hold the Power button till the startup options appear.
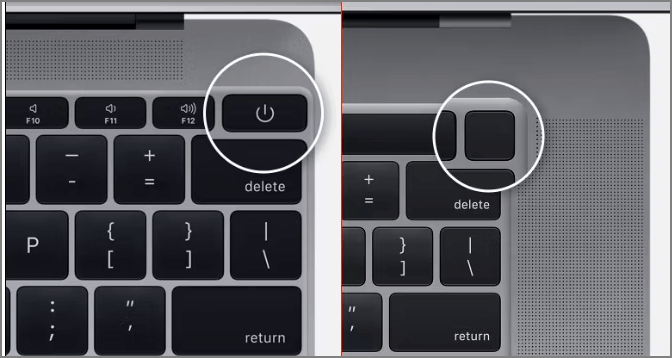
Step 3. Release the key.
Sep 4. Choose the startup disk.
Step 5. Press the Shift key and hold it.
Step 6. Select "Continue" in Safe Mode.
Step 7. Let go of the Shift key.
Step 8. Now install macOS Monterey.
- Notice:
- These steps of booting Mac into Safe Mode are for Macs with Apple Silicon chips. The steps will be different on Intel-based Macs.
Recover Data Lost on macOS Monterey with Software
Did you lose data while trying to boot after the macOS Monterey installation? You may encounter that Mac or MacBook won't turn on after macOS Monterey update. Are you anxious about data loss while trying to fix the system running slowly after the update? The various macOS Monterey issues can lead to the loss of critical data. You must opt for professional data recovery software if you don't have a data backup.
The EaseUS Data Recovery Wizard for Mac is a reliable yet user-friendly data recovery software. With this tool, you can restore lost data no matter the situation that led to its loss. Be it formatting or system crash, it is easy to restore data. Besides, the program has a simple user interface, making it easy for beginners to use.
To help you know more about EaseUS Data Recovery Wizard for Mac, we have listed the highlights:
- 📈Easy to recover lost files after macOS Monterey update. Retrieval of different data types such as music files, videos, photos, documents, etc.
- 💽Restoration of Mac-based devices like SSD, HDD, fusion drive, and more. EaseUS also supports SD card recovery on Mac.
- 🔖Use the filter feature to locate lost data quickly and the preview feature to ensure you recover the files you want.
Are you excited to use EaseUS Data Recovery Wizard for Mac? In that case, check out these simple steps:
Note: You can create a backup by clicking the "Disk Backup" on the left first. When the disk is damaged or the data on the disk is accidentally deleted or lost, you can get the data back from the backup image.
Step 1. Select the location
Select the disk where you lost data after updating to macOS Sonoma/Ventura/Monterey/Big Sur. Then, click "Search for lost files".

Step 2. Find lost data after the scan
EaseUS Data Recovery Wizard for Mac will immediately scan your selected disk volume and display the scanning results on the left pane. Use the file type and file path to find wanted data on Mac.

Step 3. Recover data after macOS update
Select the target files that were unknowingly lost during or after the update and click the "Recover" button to get them all back.

Summary
It is without a doubt that macOS Monterey comes with a wide range of new features. However, with new features, users have also reported various issues. For instance, Mac users encounter installation problems or setting up their Mac issues. Luckily, there are several solutions one can apply to fix the problem.
If you encounter data loss during these situations, you need to opt for the assistance of reliable data recovery software. Use the EaseUS Data Recovery Wizard for Mac to easily restore lost data. You can recover various types of data following easy and simple steps. Check out The EaseUS Data Recovery Wizard for Mac today!
macOS Monterey Issues FAQs
There are multiple solutions users can adopt to fix various macOS Monterey Issues. To know more, take a look at these questions and answers listed below:
1. How to fix the macOS Monterey update stuck at X minutes?
To fix the macOS Monterey update stuck at X minutes, you can cancel the ongoing macOS download. After that, ensure nothing is left of the OS within the Applications folder. Now, boot your system into Safe Mode. Follow the on-screen instructions to download macOS Monterey.
2. How to downgrade from macOS Monterey?
Firstly, restart your system and then go to the Recovery Mode. From there, select Disk Utility and choose the drive where Monterey is installed. Next, select Erase and wait for the data to be deleted. Once completed, select Restore from Time Machine from the macOS Utilities menu.
Choose the Time Machine drive connected to your system and select Continue. From the Select a Backup screen, opt for the latest backup and choose Restore. These steps will successfully downgrade from Monterey to Big Sur or other versions. It is worth noting that downgrading may result in data loss, so it is essential to back up your files before proceeding.
3. Should I update from macOS Big Sur to macOS Monterey?
If you want the new features of macOS Monterey, you can update from macOS Big Sur to macOS Monterey. You can try out these exciting features, which include Universe Control, FaceTime Upgrade, Live Text, Focus Mode, etc.
4. What are the issues with macOS Monterey?
There are multiple issues with macOS Monterey. These include problems with Wi-Fi, installation problems, serious battery drain, crashes, UI lag, problems with third-party apps, etc. Luckily, all of these problems have multiple solutions.
Was This Page Helpful?
Dany is an editor of EaseUS who lives and works in Chengdu, China. She focuses on writing articles about data recovery on Mac devices and PCs. She is devoted to improving her writing skills and enriching her professional knowledge. Dany also enjoys reading detective novels in her spare time.
Related Articles
-
Desktop Not Refreshing Automatically on Windows 10/11 [FIXED]
![author icon]() Larissa/2024-03-15
Larissa/2024-03-15 -
Computer Restarts When Playing Games | 10 Fixes🔥
![author icon]() Jerry/2024-01-22
Jerry/2024-01-22 -
Screen Flickering on Windows 11/10 (Causes & Fixes)
![author icon]() Larissa/2024-03-15
Larissa/2024-03-15 -
How to Format Seagate Hard Drive for Mac [Fast & Full Guide]
![author icon]() Sherly/2024-01-16
Sherly/2024-01-16

EaseUS Data Recovery Services
EaseUS data recovery experts have uneaqualed expertise to repair disks/systems and salvage data from all devices like RAID, HDD, SSD, USB, etc.