
As organizations expand and diversify their IT infrastructure, they may find themselves using multiple virtualization platforms, such as Microsoft's Hyper-V and VMware. While both platforms offer robust features, there are instances where businesses may need to migrate from Hyper-V to VMware to optimize their virtual environment. This article provides you with an easy and safe way on converting a Hyper-V virtual machine to a VMware.

To ensure a safe conversion without data loss, it is recommended to back up your Hyper-V first and transfer it to your VMware. EaseUS Todo Backup is a reliable and safe tool to help you with this process. And the System Transfer function in it will help you achieve this objective. The following article will guide you through the conversion process step by step with the mentioned backup tool.
Preparation before the Conversion
Before beginning the conversion process, please ensure proper preparation as outlined below.
First, Install Tools
Please ensure that VMware is installed on your server. Additionally, a comprehensive backup of the Hyper-V system is essential for the conversion. Therefore, kindly install the EaseUS Todo Backup tool on your Hyper-V virtual machine.

Second, Back up the Hyper-V
Log in to your Hyper-V virtual machine and launch the backup tool. Click New Task to create System Backup, which will be transferred to VMware later.

Please be aware that VMware cannot detect the local disks. Therefore, we highly recommend saving the backup data to a network, NAS, or cloud storage such as EaseUS cloud.

Third, Create a WinPE disk
A WinPE bootable disk assists in installing a system on a computer, and EaseUS Todo Backup offers this functionality. To create an ISO image, click Create Emergency Disk and select a path to save the image file.

Procedures for the Conversion
Once the preparation is complete, you can proceed to convert your Hyper-V virtual machine to VMware by following several steps.
Step 1, Create a New Virtual Machine
Launch the VMware, click Create a New Virtual Machine option and choose the configuration as Typical to create a new virtual machine.

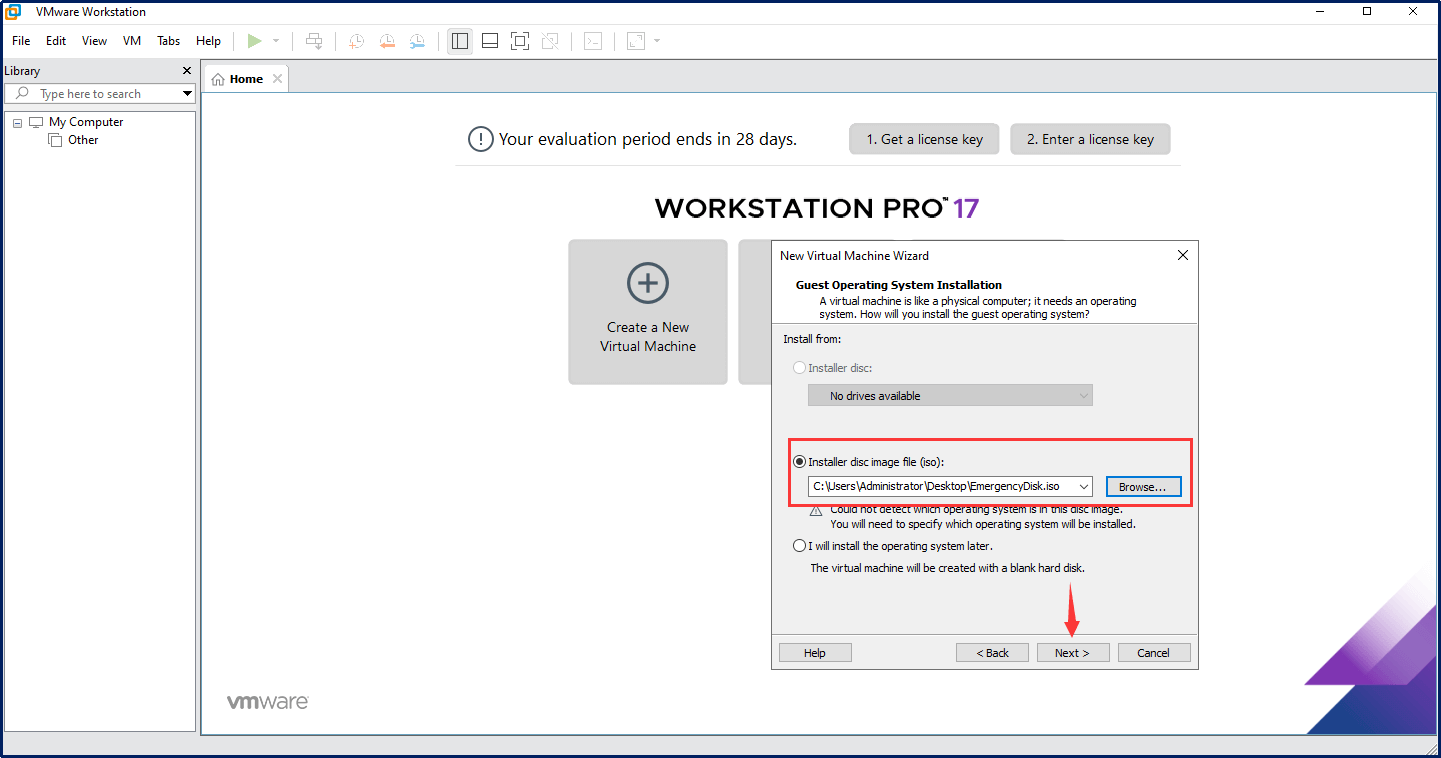
Step 2, Install Disc Image File
Click Browse button to locate and load the prepared ISO image created by EaseUS Todo Backup. After selecting the ISO image, click Next.
Step 3, Choose Guest Operating System
Since we are transferring the system from Hyper-V virtual machine to VMware, please guest the operating system as Microsoft Windows and choose the appropriate system version. For example, we choose the system as Windows Server 2022, where our Hyper-V virtual machine is on.

Step 4, Name the Virtual Machine
Customize the name of the virtual machine and choose a path for installation. Afterward, click Next to proceed.

Step 5, Specify Disk Capacity
You are permitted to set the maximum disk size according to your requirements. It is recommended to use the suggested size for optimal operating performance.

Step 6, Get Ready to Create
At this stage, VMware will display a summary of the selections you have made. If you don't want to change your choices, click on Finish to proceed.

Step 7, Power on the Virtual Machine
Click Power on this virtual machine in the top-left corner and prepare to transfer the system from your Hyper-V virtual machine to this VMware.

Step 8, Boot Manager
After completing the above process, you will be logged into the Boot Manager. Please navigate the cursor up and down, select the CD drive, set it as the first boot order, and then proceed to boot from it.

Step 9, Log into the EaseUS Todo Backup WinPE
After completing the above processes, you will log into EaseUS Todo Backup. Next, select System Transfer to restore your Hyper-V system backup data to VMware.

Step 10, Load the Hyper-V System Image
Please click the Browse option to locate the path where you saved the system image.

Step 11, Restore the System
The last step is to select the target drive and click Proceed to restore your system on VMware.

Conclusion
Converting a Hyper-V VM to a VMware VM can be a straightforward process with the help of EaseUS Todo Backup. Follow the steps outlined in this article to successfully migrate your VMs from Hyper-V to VMware, ensuring a smooth transition and minimizing downtime.
Convert Hyper-V to VMware FAQs
You may have some concerns about the virtual machine after the conversion. Here are some other issues that may help you understand better. Please check them below.
1. How do I move a file from the Hyper-V host to the VM?
You can use a backup tool, such as EaseUS Todo Backup, to back up the file and restore it to your VMware without data loss.
2. Which one is better, Hyper V or VMware?
VMware is more efficient with memory usage due to its support for memory duplication. This feature allows more applications and services to run simultaneously without running out of memory. While Hyper-V supports more memory in the host server, VMware supports a higher maximum memory allotment per VM.
3. Does Hyper-V work with VMware?
Hyper-V and VMware are two different virtualization platforms and are not compatible with each other. Hyper-V is a Microsoft virtualization platform, while VMware is a product of VMware Inc. To use both platforms, you would need to run them separately on different servers or create a virtual machine with one platform and install the other platform as a guest OS.
4. How do I add an ISO file to Hyper-V?
•Open Hyper-V Manager.
•Select the virtual machine to which you want to add the ISO file.
•Click on the Settings option in the right-hand panel.
• Select DVD Drive from the left-hand panel.
• In the right-hand panel, select Image File and click on the Browse button.
• Browse to the location of the ISO file you want to add and select it.
• Click Apply and then OK to save the changes.
Was This Page Helpful?
Updated by Gap
Gap has been working as an experienced data backup and security engineer at EaseUS for over 10 years, focusing on working with clients to assess needs and implemented procedures and tasks for appropriate backup solutions.
-
Taking everything into consideration, we can say that EaseUS Todo Backup Home can offer you a little extra sense of security with a set of advanced tools. The interface provides quick adaptation, every process guiding you all the way through so you don't get stuck or further damage your system rather than keeping it safe.
Read More -
EaseUS Todo Backup Free lets you create backups of your important files or your entire computer through its streamlined interface. Just choose the backup type you'd like to get started, and let the program do the reset.
Read More -
EaseUS includes all the features I expect from backup software like versioning, incremental backups, and scheduling. For more advanced users, EaseUS allows you to install a pre-boot environment onto your hard drive so you can use it to restore files without burning a CD or putting it on an external USB drive.
Read More
Related Articles
-
How to Backup with WinPE Bootable Disk
![author icon]() Gap/2023/12/19
Gap/2023/12/19 -
Endpoint Backup Solutions for Enterprise
![author icon]() Gap/2023/12/19
Gap/2023/12/19 -
SQL Server Backup Best Practice
![author icon]() Gap/2024/01/03
Gap/2024/01/03 -
VMware Image Backup: A Tutorials for EaseUS Todo Backup
![author icon]() Gap/2023/12/19
Gap/2023/12/19
![]()
EaseUS Todo Backup
Smart backup tool for your files and entire computer in Windows 10/8/7.
Install Windows on Multiple Computers at Once? No Problem!
Learn how to install Windows 11/10/7 and special programs/software on a batch of computers. Use 10 minutes to do the 10 hours work without making a single mistake!
Get Free Solution!