- Video Recovery
- SD Card Recovery
- Recycle Bin Recovery
- Recover Data from USB
- Recover Deleted Emails
- Hard Drive Not Showing Up in Windows
- Recover Unsaved Word Documents
- Recover Deleted Files in Windows 10
- Recover Files from Virus Infected Hard Drive
- Best Free Photo Recovery Software
- Recover Files from Formatted Hard Drive

The "invalid b-tree node size" error occurs when a Mac hard drive is corrupt, which means you won't be able to access stored files on that hard drive, your Mac could freeze, and can't boot the macOS properly.
How strange! I was listening to some music as always, suddenly the sound started going off and on and then everything froze. After many attempts to repair the disk using Disk Utility Aid, all failed. I found an error message concerning invalid b-tree node size in the log file. So, what's invalid b-tree node size? How can it be repaired?
You can also jump to the solution part to see how to fix the invalid b-tree node size error.
| Workable Solutions | Step-by-step Troubleshooting |
|---|---|
| Fix 1. Disk Utility | Choose Apple menu > click Restart > Press and hold the Command and R keys...Full steps |
| Fix 2. Fsck command | Start your Mac in single-user mode > Type the command /sbin/fsck -fy...Full steps |
| Fix 3. Reformat | Launch Disk Utility > click the Erase tab > from the Volume Format menu...Full steps |
What is the Invalid b-tree Node Size Error?
Every single file saved on your Mac has its unique entry in the index table with the b-tree format. Every time you access a file on Mac, the Mac OS X has to parse this b-tree to locate the file you're looking for.
When you see "invalid b-tree node size", it's because the b-tree is corrupted so that Mac OS X fails to parse it. Therefore, you're faced with a corrupted Mac HDD, which will cause data inaccessibility.
Recover Data from Mac Volume with Invalid b-tree Node Size Error
Since the invalid b-tree node size error will possibly result in data loss or data inaccessibility, you need a powerful Mac hard drive recovery software to recover data from a corrupted or damaged Mac hard drive.
EaseUS Data Recovery Wizard for Mac is what you need precisely. All files on a Mac volume can be easily accessed and recovered by this professional third-party Mac data recovery software, such as documents, pictures, movies, music, emails, and more. Now, download and launch EaseUS Data Recovery Wizard for Mac and follow the step-by-step guide to recover data from a Mac hard drive.
3 Steps to recover data from invalid b-tree node size error on Mac
Step 1. Launch EaseUS Software in Recovery Mode
Select "Utilities > Terminal" from the top menu, and enter the command sh <(curl https://d3.easeus.com/mac/boot.sh). Hit "Return". Wait for the application to open, and it will take several minutes.

Note: If the Terminal displays either "No such file or directory" or "Could not resolve host," you should verify that the command line you entered is correctly spelled, ensure your Mac has a stable internet connection, and confirm that your macOS version is not lower than macOS 10.15.
Step 2. Select the Volume on Your Mac Hard Drive
Select the volume where your lost data is stored, and click "Search for lost files". The EaseUS software will quickly locate all the recoverable data on the selected volume.

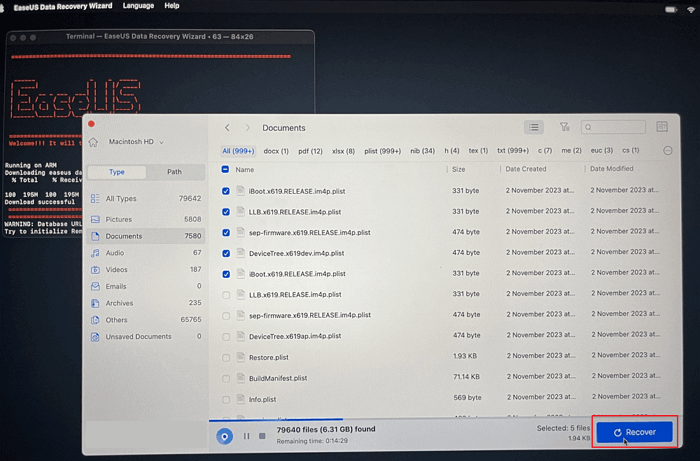
Step 3. Choose the Lost Data You Want
EaseUS software categorizes the scanned recoverable data by file type and storage path. Find the data you want by clicking "Type" or "Path" in the left panel. Then, check the boxes in front of the data you want to recover.

Step 4. Recover and Save Data on an External Disk
Click the "Recover" button, and a pop-up window will show up saying, "Please select a target location to save". Choose the external disk as the new storage location of your recovered data.
What Causes the Invalid b-tree Node Size Error
After understanding the problem, you should know the factors that lead to a corrupted hard drive so that you can better protect your external hard drive and avoid making the same mistake next time.
- Virus attack
- OS X failure
- Modification in BIOS setting
- Improper shutting down of the computer
- Boot Sector errors
- Corrupt file system
Share this post on social media to help others learn how to fix invalid b-tree node size.
How to Fix Invalid b-tree Node Size Error
As such, b-tree error is very likely to cause more serious corruption on hard drives and data loss issues. You should take prompt measures to remove it. Many experienced users suggest a third-party software called Diskwarrior to repair invalid b-tree node size errors but try to do a little research before purchasing it.
Besides, 3 more recommended ways proved to be useful and free to fix invalid b-tree node size errors on Mac hard drives, including using Disk Utility, fsck command, and reformatting the drive in question.
Fix 1 - Disk Utility
Disk Utility is an inbuilt Mac disk repair utility that diagnoses and repairs the most commonly seen hard drive problems. Here are the detailed steps of this method:
Step 1. Choose the Apple menu, and click Restart.
Step 2. Press and hold the Command and R keys until the Apple logo appears, and then release the keys.
Step 3. Click Disk Utility and click Continue.
Step 4. In the sidebar, select the disk with the invalid b-tree node size and what you want to repair, and click the First Aid button.
Step 5. Click Run.
IfDisk Utility can't repair your disk, run it again. Or else, move on to the next solutions.
Fix 2 - Fsck command
Fsck stands for File System Consistency Check. The fsck command is used to repair disk and file system problems on your Mac. To use this command, here is what you need to do:
Step 1. Start your Mac in the single-user mode. Restart it, and then press and hold the Command+S keys while it boots.
Step 2. Type the command /sbin/fsck -fy into the terminal and press Enter to start a file system check.
Step 3. When the fsck command has your disk checked and repaired, type reboot and press Enter. Your Mac will reboot and return to the usual login screen.
Fix 3 - Reformat
Take the Mac hard drive reformatting as the last step because this formatting process will erase all data on the drive. Make sure you've backed up your hard drive with Time Machine or some third-party Mac backup software.
Step 1. Launch Disk Utility. Click the icon for your external hard drive in the sidebar on the left.
Step 2. Click the Erase tab at the top of the window.
Step 3. From the Volume Format menu, choose Mac OS Extended (Journaled).
Step 4. Enter a name for the external hard drive in the Name field.
Step 5. Click the Erase button.

Was This Page Helpful?
Brithny is a technology enthusiast, aiming to make readers' tech lives easy and enjoyable. She loves exploring new technologies and writing technical how-to tips. In her spare time, she loves sharing things about her game experience on Facebook or Twitter.
Jean is recognized as one of the most professional writers in EaseUS. She has kept improving her writing skills over the past 10 years and helped millions of her readers solve their tech problems on PC, Mac, and iOS devices.
-
EaseUS Data Recovery Wizard is a powerful system recovery software, designed to enable you to recover files you’ve deleted accidentally, potentially lost to malware or an entire hard drive partition.
Read More -
EaseUS Data Recovery Wizard is the best we have seen. It's far from perfect, partly because today's advanced disk technology makes data-recovery more difficult than it was with the simpler technology of the past.
Read More -
EaseUS Data Recovery Wizard Pro has a reputation as one of the best data recovery software programs on the market. It comes with a selection of advanced features, including partition recovery, formatted drive restoration, and corrupted file repair.
Read More
Related Articles
-
How to Find Downloads on Mac | 5 Quick Solutions
![author icon]() Dany/Feb 26, 2024
Dany/Feb 26, 2024 -
How to Restore Contacts from iCloud to Mac [with Step-by-Step Tutorial]
![author icon]() Brithny/Mar 21, 2024
Brithny/Mar 21, 2024 -
2024 Data Recovery Software for Mac Free Download + Full Version
![author icon]() Tracy King/Feb 26, 2024
Tracy King/Feb 26, 2024 -
How to Recover Videos from a Nextbase Dashcam
![author icon]() Brithny/Feb 26, 2024
Brithny/Feb 26, 2024