- Video Recovery
- SD Card Recovery
- Recycle Bin Recovery
- Recover Data from USB
- Recover Deleted Emails
- Hard Drive Not Showing Up in Windows
- Recover Unsaved Word Documents
- Recover Deleted Files in Windows 10
- Recover Files from Virus Infected Hard Drive
- Best Free Photo Recovery Software
- Recover Files from Formatted Hard Drive
Did you format your USB using the ExFAT file system? That isn't an issue as multiple users opt for the ExFAT filing system. However, when Mac stops recognizing the ExFAT drive, that is when problems arise. It is natural to think about the essential data you have on the drive and the scenario of potential data loss.
Tensions arise when you come across a situation where irreplaceable data loss is a possibility. It is unfathomable to lose critical data. In this article, we will discuss what ExFAT USB is, why Mac doesn't recognize it, and potential solutions. Keep reading!
*** 79% of Mac users are interested in ExFAT vs. Mac OS Extended
What Is Exactly ExFAT USB?
ExFAT stands for "Extended File Allocation Table". It is a file system specifically designed for SD cards, USB flash drives, etc. Microsoft introduced the ExFAT filing system in 2006.
ExFAT is the successor of the FAT32 filing system. The optimization of ExFAT is mainly for flash drives. Numerous features make ExFAT the perfect file system for flash drives, such as USBs.
For starters, ExFAT is an exceptionally lightweight system that doesn't need many hardware resources for its maintenance. It is compatible with different operating systems and devices. With this file system, you can get partition support of up to 128 pebibytes. It also supports a large file size limit (the same as the partition limit).
The compatibility of the ExFAT file system with Mac and Windows makes it even more appealing. That makes transferring data between the different operations systems and devices more accessible. That is why using ExFAT to format the USB is an excellent idea.
Why My ExFAT USB Is Not Detected on Mac?
Various reasons explain why the ExFAT USB is not detected on Mac. Here are some of these causes listed. Take a look.
- Corruption issues: In some cases, the ExFAT USB might not mount on the Mac operating system due to corruption. That prevents mounting. You will need to rebuild the directory or run the repair on the USB.
- Missing driver software: Another reason could be the lack of essential driver software for reading the ExFAT USB.
- Faulty cable: Sometimes, the USB cable might be facing some issues. In that case, the best solution is to try with a different cable.
- Plugging issues: When you plug in the USB drive, it is vital to ensure that the plugging is snug. Lack of power supply can cause problems in mounting the drive.
- Operating system concern: In some situations, the operating system and the USB might not be compatible. It will lead to the failure of the system to recognize the drive.
Solved: USB Flash Drive Not Showing Up on Mac
The reasons behind the problem of a USB device not showing up are various, including the USB port is not working, USB drive corruption, virus infection, macOS faulty, etc. So, to figure out the effective solutions for your own case, you need to...

5 Methods to get your ExFAT USB recognized by Mac
Did you check the power supply? Is the USB properly plugged into the system? Despite checking these pointers, you need to opt for other solutions if you still have trouble.
Fortunately, there are numerous solutions that you can use to solve the problem of your ExFAT USB not getting recognized by Mac. Take a look at the different methods listed below.
- Method 1. Turn Mac Off and On Again
- Method 2. Check Finder Preferences
- Method 3. Update Your Mac's OS and Firmware
- Method 4. Use First Aid to Repair the USB Corruption Error
- Method 5. Change System Configuration
Method 1. Turn Mac Off and On Again
You might be surprised, but the simple method of turning off and on the system can resolve the issue. It won't take much time and can be done easily. Here are the steps.
Step 1. Go to the Apple icon present on the corner of the screen and press the Restart option.

Step 2. Make sure to uncheck the Reopen windows option while logging in again. Then select the "Restart" option again.

Now, the Mac will restart. You need to wait. After the system starts, try using the USB flash drive once again. If this doesn't work, move on to the other methods.
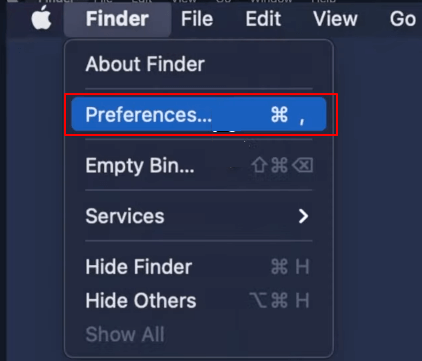
Method 2. Check Finder Preferences
A Finder is an excellent tool that Mac users can use to check if a particular drive can be mounted on the system. Here are the steps.
Step 1. Launch Finder. Select the "Finder" menu at the top of the screen. Go to "Preferences".
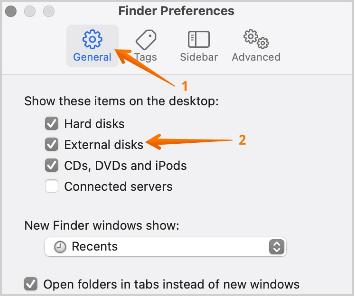
Step 2. Click on the "General" tab. Tick the options "External disks".
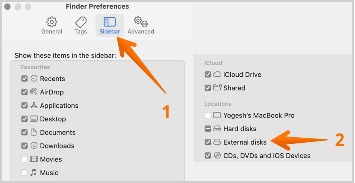
Step 3. Now, select the "Sidebar" tab. Here also, you need to tick the "External disks" option.
Step 4. Close the window. Plug the USB and see the shows on the Mac screen.
Method 3. Update Your Mac's OS and Firmware
One of the easiest ways to open USB drives on the Mac is to check out updates.
Take a look:
Step 1. Go to the "Apple" icon on the screen and click the System Preferences option. Then go to "Software Update".
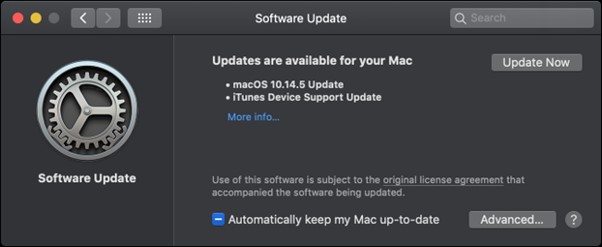
If you find any update, click on it immediately.
Note: You can also checkmark the box saying "Automatically keep my Mac up to date". That way, you don't have to look out for updates constantly. Keep in mind that updating OS and firmware is a smart idea. It improves the performance of the system.
Method 4. Use First Aid to Repair the USB Corruption Error
Another exceptional repair feature that Mac has is the First Aid. It is an excellent storage device repair tool. It is accessible from the Disk Utility option. You can follow the steps listed below.
Step 1. Click anywhere on the desktop until you see the "Finder" menu on the top.
Step 2. Click on the "Go" option and select "Applications" from the drop-down menu.
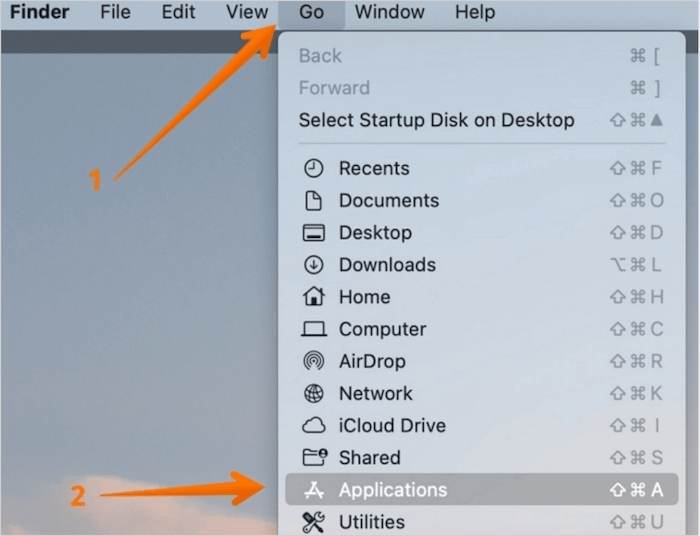
Step 3. Click on the "Utilities" folder option and open "Disk Utility".
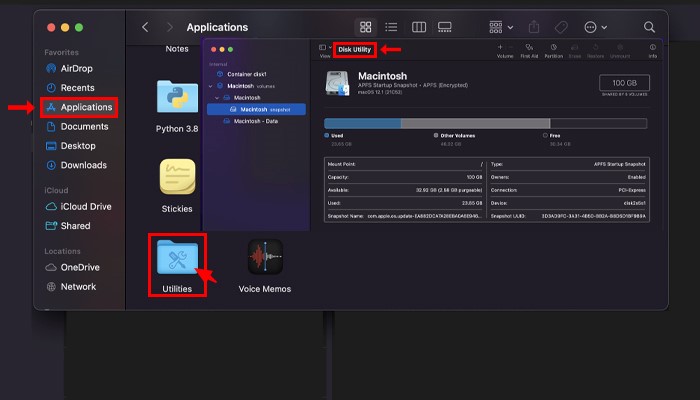
Step 4. On the list of storage devices, choose your USB flash drive. Select the "First Aid" option in the toolbar.
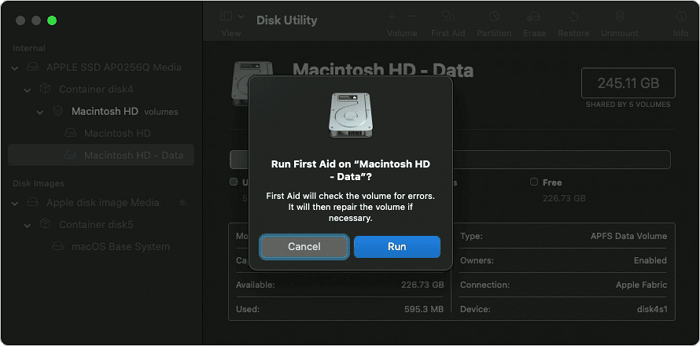
Step 5. Choose the "Run" option. It will check the USB for errors. First Aid will assess the USB flash drive and repair the errors (if found).
Method 5. Change System Configuration
To resolve the USB drive issues, resetting the system configuration is an excellent idea. You need to reset or change two system components to fix the problem.
Resetting the SMC or System Management Controller
Step 1. Shut down the system and take out the power supply cord.
Step 2. Press the power button and hold it down for five seconds. Then reconnect the power supply.
Step 3. Turn on the system.
Resetting the PRAM/NVRAM (The Parameter RAM and the Non-volatile RAM has information related to the USB ports that you use on the Mac)
Step 1. Shut down the system and then press "Command", "Option", "P", and "R" keys together while restarting the Mac.
Step 2. Hold them down until there is a flash and sound. Wait for the chime.
Now, wait as the system boots.
The Ultimate Trick: Format Your ExFAT USB
Have you tried the methods mentioned earlier and still facing the same issue? In that case, the only approach is to format the ExFAT USB. However, it is necessary to understand that formatting the USB drive can be particularly dangerous. Here, the best option is to backup the essential data.
To backup data, mac users can opt for the Time Machine Backup. Alternatively, users can also choose third-party apps such as EaseUS Todo Backup for Mac.
However, in some cases, formatting the ExFAT USB can lead to data loss. The rising tension and panic that occurs due to data loss are natural. Here, the ideal solution is to use data recovery software. You can opt for the EaseUS Data Recovery Wizard for Mac.
The EaseUS Data Recovery Wizard for Mac is an excellent data recovery software. It aids in the retrieval of lost data due to various reasons. No matter the cause of the data loss, you can get it back. With the data recovery software, you can get back photos, music files, videos, emails, documents, etc.
If you are worried about the size of the deleted file, you can relax. EaseUS Data Recovery Wizard for Mac helps you regardless of the cause of the data loss or the size of the file. It has a wide array of features that make it the perfect choice for mac users.
Are you wondering how to use EaseUS Data Recovery Wizard for Mac? Take a look at these steps:
Step 1. Search for lost files
Correctly connect your external hard drive to your Mac. Launch EaseUS Data Recovery Wizard for Mac, and select the external hard drive. Then, click "Search for lost files" to find lost/deleted files on your external devices.
Note: Before data recovery, you'd better click "Disk Backup" from the left sidebar to create a backup of your external hard drive to avoid further data loss. After backing up the external hard drive, the software can recover data from your external hard drive's backup, and you can remove the external hard drive and use it again.

Step 2. Filter and find lost files
After the scan, all file types will be presented in the left panel. Select the file type to find wanted files on your external devices.

Step 3. Preview and recover
Click the file and preview it. Then, select the files you want to recover and click the "Recover" button. You can save your data to local and cloud drives.

Was This Page Helpful?
Brithny is a technology enthusiast, aiming to make readers' tech lives easy and enjoyable. She loves exploring new technologies and writing technical how-to tips. In her spare time, she loves sharing things about her game experience on Facebook or Twitter.
Jean is recognized as one of the most professional writers in EaseUS. She has kept improving her writing skills over the past 10 years and helped millions of her readers solve their tech problems on PC, Mac, and iOS devices.
-
EaseUS Data Recovery Wizard is a powerful system recovery software, designed to enable you to recover files you’ve deleted accidentally, potentially lost to malware or an entire hard drive partition.
Read More -
EaseUS Data Recovery Wizard is the best we have seen. It's far from perfect, partly because today's advanced disk technology makes data-recovery more difficult than it was with the simpler technology of the past.
Read More -
EaseUS Data Recovery Wizard Pro has a reputation as one of the best data recovery software programs on the market. It comes with a selection of advanced features, including partition recovery, formatted drive restoration, and corrupted file repair.
Read More
Related Articles
-
2024 Data Recovery Software for Mac Free Download + Full Version
![author icon]() Tracy King/Feb 23, 2024
Tracy King/Feb 23, 2024 -
How to Repair Corrupted Video Files on Mac [macOS Ventura applicable]
![author icon]() Jaden/Feb 23, 2024
Jaden/Feb 23, 2024 -
2024 Tips| How to Recover Unsaved Photoshop (PSD) Files on Mac
![author icon]() Tracy King/Feb 23, 2024
Tracy King/Feb 23, 2024 -
Snow Leopard Recovery Mode | How to Recover Data from Mac OS X
![author icon]() Daisy/Feb 23, 2024
Daisy/Feb 23, 2024