What Is a Disk Image on Mac?
A disk image is an exact copy of a disk or a partition. It can be used for backup purposes or to save space by storing only one copy of large files that are used infrequently. Disk images come in many formats, so they can be used on different kinds of computers, including Windows, macOS, and Linux. On macOS, the format of the disk image is .dmg.
How to Create a Disk Image on Mac?
On a Mac computer, there is a tool called Disk Utility. It is used for Mac users to erase, format, and mount disk. As a disk management tool for Mac, you can also use it to create a disk image for Mac.
#To Create A Disk Image on Mac
Step 1. Open and launch Disk Utility. Choose File > New Image > Blank Image.
Step 2. Enter a file name for the disk image, add tags if necessary, then choose where to save it. This is the name that appears in the Finder, where you save the disk image file before opening it.

Step 3. In the Name field, enter the name for the disk image. This is the name that appears on your desktop and in the Finder sidebar after you open the disk image.
Step 4. In the Size field, enter a size for the disk image.
Step 5. Click the Format pop-up menu, then choose the format for the disk:
- If the disk will be used with Macs, choose Mac OS Extended (Journaled) or Mac OS Extended (Case-sensitive, Journaled).
- If the disk will be used with Windows or Mac computers and is 32 GB or less, choose MS-DOS (FAT).
- If the disk will be used with Windows or Mac computers and is over 32 GB, choose ExFAT.
- To encrypt the disk image, click the Encryption pop-up menu, then choose an encryption option.
#To Partition and Format the Disk Image
Step 1. Click the Partitions pop-up menu, then choose a partition layout.
Step 2. Click the Image Format pop-up menu, then choose an option:
- Sparse bundle: Same as a sparse image, but the directory data for the image is stored differently. Uses the .sparsebundle file extension.
- Sparse disk image: Creates an expandable file that shrinks and grows as needed. No additional space is used. Uses the .sparseimage file extension.
- Read/write: Allows you to add files to the disk image after it’s created. Uses the .dmg file extension.
- DVD/CD master: Changes the size of the image to 177 MB (CD 8 cm). Uses the .cdr file extension.

Step 3. Click Save, then click Done.
When you need to use the disk image, double-click it to open it. If the disk image is encrypted, enter the password when prompted. After the disk image is mounted, you can access its contents in the Finder like any other disk. When you're done, eject the disk image by dragging it to the Trash or by choosing Disk Utility > Eject from the menu bar.
The Benefits of Creating Disk Image
No matter whether you want to create a disk image for Mac or Windows, the functions and advantages of a disk image are the same. There are many benefits of disk images. For example, you can use disk images to:
- Install the software on multiple computers without having to download it each time.
- Copy files to a disk or partition that can't be copied using the Finder.
- Create a bootable disk or partition.
- Restore a disk or partition to its original state.
Bonus Tip: How to Backup Mac without Time Machine
Apart from Disk Utility, Mac has another built-in tool called Time Machine. Unlike Disk Utility, Time Machine only has one function, which is to backup Mac data. Here we recommend a third-party Mac backup tool - EaseUS Todo Backup for Mac. It supports you to simply backup Mac to external hard drive or other storage devices with just 3 simple steps.
You can directly Google "EaseUS Todo Backup for Mac" or directly download it and install this software for free to back up your Mac data under all Mac OS X without Time Machine now:
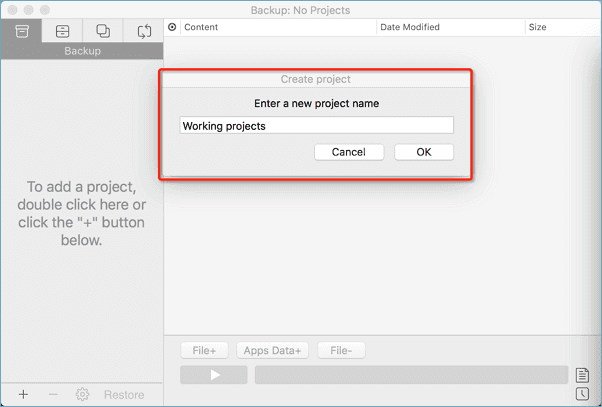
Step 1. Launch and run EaseUS Todo Backup for Mac.
Click the first Backup tab or simply click the + button in the bottom-left corner to create a backup project - name the backup project and click OK.
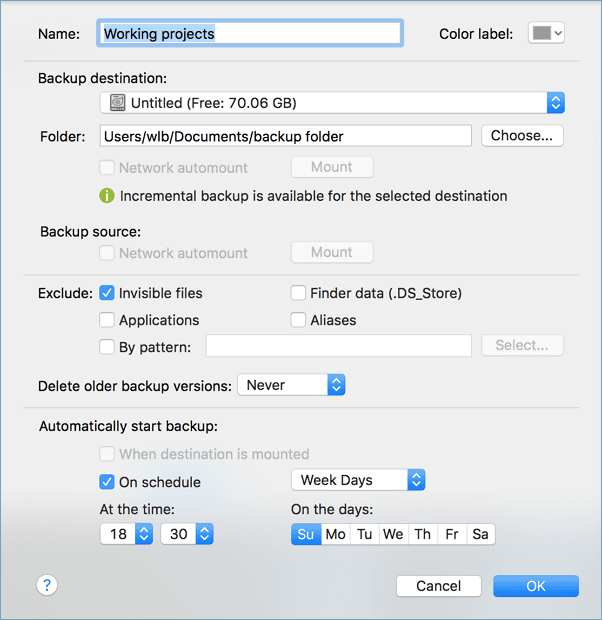
Step 2. Set up the backup destination where you want to store Mac files as backups, automatic backup frequency, etc and click OK.
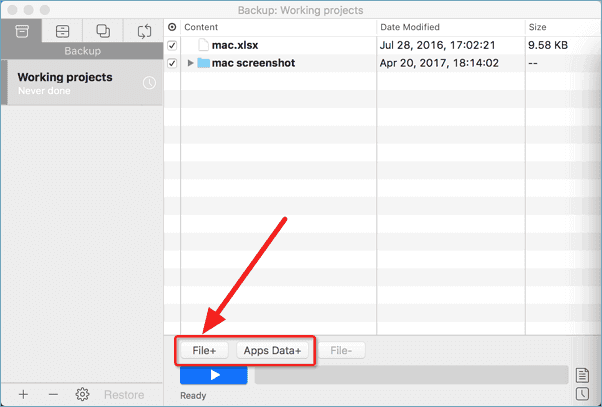
Step 3. Add files and folders to the backup project.
Click File+ to selectively choose files and folders to add to the backup and click the blue start button to back up your Mac to another drive or external device.
How to Clone a Hard Drive on Mac
Download the most popular Mac cloning software to clone Mac hard drive to SSD without reinstalling operating system and applications.

The Bottom Line
Now you know how to create a disk image on Mac and the benefits of disk images. Just follow the steps above to make your own disk images. If you have any other questions, feel free to leave a comment below. Thanks for reading!
Was This Page Helpful?
Jean is recognized as one of the most professional writers in EaseUS. She has kept improving her writing skills over the past 10 years and helped millions of her readers solve their tech problems on PC, Mac, and iOS devices.
Related Articles
-
Transfer Files and Applications to New Mac without Migration Assistant
![author icon]() Tracy King/Jul 20, 2023
Tracy King/Jul 20, 2023 -
How to Fix Mac Migration Assistant Stuck or Frozen
![author icon]() Tracy King/Oct 26, 2023
Tracy King/Oct 26, 2023 -
How to Backup Photos on Mac to External Drive [3 Detailed Guides]
![author icon]() Sherly/Jul 20, 2023
Sherly/Jul 20, 2023 -
How to Backup Mac without Time Machine?
![author icon]() Tracy King/Jul 20, 2023
Tracy King/Jul 20, 2023